LouDiamond 1 #1 March 21, 2004 What are your favorite filter(s) that you use with Photoshop or other programs? I found one that is pretty damn impressive. It's called focus fixer They offer other filters that look promising. I'm curious to what everyone else is using."It's just skydiving..additional drama is not required" Some people dream about flying, I live my dream SKYMONKEY PUBLISHING Quote Share this post Link to post Share on other sites
skysurfcam 0 #2 March 22, 2004 clicky no workie Brother Wayward's rule of the day... "Never ever ever go skydiving without going parachuting immediately afterwards." 100% PURE ADRENALENS Quote Share this post Link to post Share on other sites
LouDiamond 1 #3 March 22, 2004 HMMM. lets try it again focus fixer"It's just skydiving..additional drama is not required" Some people dream about flying, I live my dream SKYMONKEY PUBLISHING Quote Share this post Link to post Share on other sites
indyz 1 #4 March 22, 2004 Auto-levels. My most used filter by far. Quote Share this post Link to post Share on other sites
jdhill 0 #5 March 22, 2004 not really a filter, but levels, auto color, and the new shadow/highlight adjustment in CS... The unsharpen mask is also useful for minor focus issues. JAll that is necessary for the triumph of evil is that good men do nothing. - Edmund Burke Quote Share this post Link to post Share on other sites
quade 3 #6 March 22, 2004 Auto-level and auto-color are -evil-. What they do is look at the overall scene and try to determine, in the case of auto-level, what is the high and low points of each channel and then stretch that over the 0-255 range on each channel. Auto-color works in a similar but slightly different manner attempting to find the "whit epoint" of the photo. Both of these with -totally- screw up a good photo and only offer small benefits to photos that have already been badly mangled by photo finishers, age, or poor photography and color balance. Buy a book on using PhotoShop and learn to do level adjustments and color corrections using anyone of a number of other methods. You'll get FAR better results than any of the "auto" tools - which as I said before - are EVIL! My favorite filter in PhotoShop is "Unsharp Mask" which is a bit of a confusing term to most people as it's actually a sharpening tool. On a full sized D60 or 10D photo, try 50% and 2 pixels as a start. Crispens images well without making them look fake or harsh.quade - The World's Most Boring Skydiver Quote Share this post Link to post Share on other sites
AlvaroCarvalho 0 #7 March 22, 2004 Eye Candy and Xenofex mostly... About Focus Fixer..."Designed for use on selected sections of a picture instead of the whole" is the one thing I think it worth to try. Cheers. Hey...ho...let's go! Quote Share this post Link to post Share on other sites
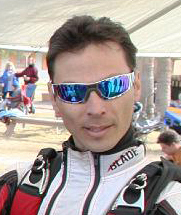
quade 3 #8 March 22, 2004 Examples of what Auto-crap does to your images. The one marked "Orig" is right out of the D60 with NO correction whatsoever other than cropping, sizing and resaving for use here. AutoColor isn't the worst example of AutoColor, but as you can see, it really doesn't add much to the photo. AutoLevels is pure 100% crapulance. If you use AutoAnything be -very- aware that it's probably just going to make your good images look a LOT worse.quade - The World's Most Boring Skydiver Quote Share this post Link to post Share on other sites
LouDiamond 1 #9 March 22, 2004 I agree with you to a degree, the "autos" aren't a perfect click and forget solution to a picture that might already be pretty close to ideal. They do however provide a noticable difference to pictures that were either under/over exposed or had poor lighting in some instances. The thing about PS that makes it amazing is as sson as you think you've seen it all someone else shows you something that makes you go WOW. I don't know what you were going for in the photos above Quade but here is something for everyone to try next time. 1. Open your source photo 2. Choose image>Duplicate and when the dialog appears, name the new image "auto levels" repeat this step until you have a "auto Contrast" and a "auto color". You should have 4 image windows open. 3. You want to be able to see all 4 images so choose Window>Arrange>Tile so each window takes up a quarter of the screen. Zoom and scroll as necessary. 4. Click in the "auto Levels" image window and make it active, then choose Image>Adjustments>Auto Levels. Repeat this step for the remaining windows using "Auto Contrast" and "auto Color" You can now see the effects of all the "autos" against the original. More than likely you will find that you like something midway between two of the "autos". You can combine the two to get a finial image thats to your liking very easily. Lets say you like the way the "auto color" image came out but want something midway between it and "auto Levels" 5. With the "auto color" window active, choose Image>Apply Image. In the Apply image dialog,set the source option to Auto levels. Next,skip down to the blending option and set it to normal, and then adjust the opacity value to taste. The higher the opacity number in this case would mean more emphasis would be on the Auto levels than auto color. 6. After blending the 2 choose File> save and name it, place it and your done. Quade, as an example,I took your original photo and applied the steps above. I choose the auto contrast image and applied auto levels to it at 60% opacity. took me less than 5 mins and there is a noticable difference. Again, you can blend to individual tastes."It's just skydiving..additional drama is not required" Some people dream about flying, I live my dream SKYMONKEY PUBLISHING Quote Share this post Link to post Share on other sites
hoym 0 #10 March 23, 2004 A couple weeks ago, I started playing with Neat Image to reduce the noise from my high iso images. The images seem to come out a bit soft but nonetheless, I've been happy with the results so far. They have a free version for home non-commercial use. It was rated #2 out of 18 similar products in some review I read somewhere. http://www.neatimage.com Quote Share this post Link to post Share on other sites
quade 3 #11 March 23, 2004 I dunno, if I wanted to have multiple images up at the same time and see picked parts I liked, yada yada . . . then Image/Adjustments/Variations might be a better choice. I should also point out that if you decide to do any sort of color corrections to your images, its really important to: 1. Always work on a copy -- never the original. 2. Always have a calibrated monitor and some sort of color sync workflow. Additionally, the magazines (Parachutist, Skydiving, et. al) usually don't appreciate any color corrections. They usually want UNcolor corrected images since obviously you'd have to resave the corrected images and they usually would have to redo the color corrections anyway.quade - The World's Most Boring Skydiver Quote Share this post Link to post Share on other sites
indyz 1 #12 March 23, 2004 Quotecolor sync workflow. Off topic, but the workflow comment reminded me of something I read this afternoon. How do you handle over 1 million digital stills a year, with over 16,000 in one seven hour stretch? Sports Illustrated's digital workflow. Quote Share this post Link to post Share on other sites
nacmacfeegle 0 #13 March 23, 2004 I do something similar to Lou, but I prefer to work on layers. File sizes get pretty big pretty quickly (PSD format), but you can play with gradients switching on and off layers, etc and flatten the image once you are happy with the end result. This is mostly for my own fun, normally for incorporation into a video. As someone else said, just about any publication will want 'virgin' images. It goes without saying that you work on a copy, but the original is always available as an untouched base layer if it all goes horribly awry.-------------------- He who receives an idea from me, receives instruction himself without lessening mine; as he who lights his taper at mine, receives light without darkening me. Thomas Jefferson Quote Share this post Link to post Share on other sites
chachi 0 #14 March 23, 2004 I agree with Quade, use Curves to fix levels. ~Chachi Quote Share this post Link to post Share on other sites
LouDiamond 1 #15 March 23, 2004 QuoteI dunno, if I wanted to have multiple images up at the same time and see picked parts I liked, yada yada . . . then Image/Adjustments/Variations might be a better choice. Again, I guess it depends on what you want to do to the photo. I am thinking this would be ideal for selling pictures to people at the DZ/boogies and saving yourself time and ink. In variations you can see the differences but you can't combine two of the possible ones you like together. The alternative is always curves and or refering to the histogram to see where it's lacking and tweak from there. That SI workflow article almost sounds like an ad for the products they use. I am glad to see the only thing they use ACDsee for is quickly viewing photos. I did like the filter they used to remove grain from photos. The example used was pretty impressive."It's just skydiving..additional drama is not required" Some people dream about flying, I live my dream SKYMONKEY PUBLISHING Quote Share this post Link to post Share on other sites