1 1

Safety

    Swooping is Not a Crime

    A large sector of the skydiving population is currently in danger of extinction. This is because of the widespread proliferation of new DZ rules that prohibit 270 turns for landing or ban high speed approaches entirely. Consequently, many jumpers now find themselves homeless and considering alternate sports - not a good thing for skydiving.
    These new restrictions come in the name of safety. We have lost many
    friends this year due to canopy collisions, and the management at
    several dropzones has responded by adding new rules in an effort to
    prevent such accidents from happening in the future. There are several
    aspects within this direction of policy that concern me.
    Remember 9-11? We felt unsafe after the tragedy, and so we willingly
    gave up many of our rights as free citizens. Now they are taking
    nail-clippers away from little old ladies. It is getting ridiculous, as
    is the policy banning advanced approaches. It is a knee-jerk reaction to
    fear, and I think we all know where that slippery slope leads.
    "My rights end where your rights begin."
    This is the fundamental idea that forms civilization. In other words, if I fly my parachute into you in the pattern, I am in the wrong. I think everyone agrees with this and it therefore can and should be asserted that if my behavior does not have an effect on anyone else, I should be allowed to continue to do what I am doing, provided I am doing it in a safe manner.
    We all need to challenge ourselves. This is what keeps us showing up at the dropzone every weekend. Thousands of people enjoy the challenge of high speed approaches and define the swoop landing as an essential part of their experience. They wait all week to get a few jumps in over the weekend, and now many of them are unable to get what they came for. To take that away is to cut many people off from the very reason why they skydive in the first place. Is that really where we want to go with this?
    We cannot afford to alienate anyone. There are precious few experienced skydivers in the world and I would argue that we are the reason for the dropzone in the first place. I understand that there are a few DZOs that are doing very well running purely tandem operations, but this is the exception, rather than the rule. Most dropzones are a business of passion, rather than a pragmatic financial pursuit. If we wanted to make a million dollars, we would have done something else with our time. We do this because we love it.
    The atmosphere created by having fun jumpers around is essential to the success of a dropzone, even if the profit is significantly less. Sport jumpers give the tandem students a reason to come back and learn how to skydive. They come back for the jumping, true, but they also come back for the connection to other people. They want to be part of a community, as do we all. We must therefore allow all aspects of the sport to continue to proliferate so that our numbers may grow.
    It is that simple.
    We can create sustainable solutions.
    It is possible. We simply need to think things through and adapt to the changing needs of a growing sport. I remember the debate on my dropzone as to whether or not we wanted to let the students jump ram air canopies. Many were concerned that the "squares" were too much responsibility and that students could not be trusted. Are we saying the same thing about ourselves now?
    We need to trust each other. True, we need to create a structured environment in which we can create a degree of predictability in the air over our DZs. Otherwise none of us would be able to manage all the variables in our heads. But as soon as we start back-peddling away from danger, we are becoming more similar to the groundlings we pass on the road on the way to the dropzone.
    We must have specific runways where the high speed pilots can land safely, out of the way of everyone else. We must communicate our intentions in the loading area. We must create sustainable vertical separation before reaching pattern altitude. Most importantly, we must increase our level of awareness under canopy so that no matter what the circumstances, we can fly in traffic without risk of running into each other. We do this by remaining calm and keeping our eyes open.
    We need to stop pointing fingers and making over-protective rules, and simply do what we need to do in order to be safe and still have fun. Let's work together and unite as a whole to make the dropzone a welcoming place for everyone.
    Brian Germain

    www.TranscendingFear.com


    By admin, in Safety,

    The Stall

    The stall is one of the least explored and most feared aspects of flying. Avoidance of this flight mode causes many canopy pilots to be uncomfortable with flying slowly, and unpracticed in this important art. This article will discuss the governing variables relating to the stall, in hopes that this knowledge will help parachute pilots to become less afraid of this essential aspect of the flying experience.
    First we must explore what a stall is. The assumption made by most canopy pilots is that the stall is caused by slow speed flight. This is not true. It is correlated with low speed flight, but a wing can stall at high speed too. A stall is caused by an excessive angle of attack. When the relative wind flows over an airfoil, it is bent in the general direction of down. This causes an opposite force called "Lift". When the orientation of the airfoil is changed to a higher angle with respect to the relative wind, it is said to have an increased angle of attack.
    Air is quite cooperative. It is willing to be redirected and still flow in a fairly organized manner…up to a point. At a specific angle, all airfoils fail to bend the air into submission. This discrete angle of attack is referred to as a stall. It is coupled with a sudden drop in lift, and thus a significant increase in decent rate. Whether you are flying an F-16 or a Lotus 190, recovery from a stall is always the same: the pilot must reduce the angle of attack. On an airplane this requires forward pressure on the yolk or stick. On a parachute, we are simply required to let off the downward pressure on the toggles or rear risers that has increased the angle of attack in the first place.
    Each parachute stalls and recovers differently. Depending on several governing variables, some parachutes will recovery nicely from a stalled configuration no matter what the recovery technique, while others will require very careful execution. Let's take a look at these issues one by one.
    The characteristics of a stall on any ram air canopy are based on two main variables, and several lower order variables. The most significant governing variable is the flight mode when the stall is reached. If the canopy is in a sink, rather than level flight (zero decent surf), it will tend to stall in a more forgiving and docile manner. The second primary variable is the attitude about the roll axis when the stall is reached. In other words, if there is any bank angle when the stall precipitates, it will cause the lower wing to stall first, resulting in significant yaw energy, which can result in line twists.
    There are several other things to consider when testing the stall of a canopy, including: canopy design, density altitude, wing-loading, aggressiveness of the control input, and most importantly, recovery technique. This will be discussed next.
    If the wing is allowed back into forward flight quickly, it will dive aggressively toward the ground, causing a drop in the angle of attack, as well as the lift and therefore the overall line tension. This may allow the wing to surge below the suspended weight (you), and possibly cause a jumper/canopy entanglement. Further, if the release of the brakes is asymmetrical, the lack of line tension can allow the wing to surge unevenly about the yaw axis, causing line-twists.
    The key to stalling any wing is to enter the stalled configuration in a sink, with the wing level and static about the roll axis. As soon as the stall is reached, the toggles (or rear risers) should be released only a few inches to allow for only a slight drop in the angle of attack. As soon as the brakes are released, the jumper should be prepared for a sudden increase in toggle pressure, as the tail of the parachute is about to get hit with a pulse of relative wind. If the pilot is unprepared for this, the toggles will usually be pulled upward and possibly in an uneven manner, often resulting in an aggressive stall recovery that may result in line twists.
    When the brakes are released quickly to the full flight position, the wing doesn't have much drag. This means that there is very little to prevent it from surging forward in the window. When the brakes are released slowly, and then held down just above the stall point, the wing has a great deal of drag. You have two big barn doors at the back of the wing helping to prevent and aggressive surge.
    Further, as you become more familiar with the stall and recovery characteristics of your wing, you may begin to fly "actively" with respect to the recovery process. In other words, as soon as the wing begins to fly forward in the window, the pilot jerks on the brakes to dampen the forward surge. It is important to do this minimally enough to prevent re-stalling the wing. A well-timed reapplication of the brakes during the recovery process will significantly reduce the amount of altitude lost in the stall. This can be very useful in the event of a low altitude stall. This maneuver can be practiced in relative proximity to another canopy in deep brakes. Be sure to keep your distance when you do this. By definition, a stall is a loss of control of the wing.
    Rear riser stalls tend to be sharper at the onset, but quicker on the recovery. Therefore it is advisable to stall the parachute on the rear risers first before attempting to stall it on the brakes. Further, such maneuvers should always be performed at an altitude that will allow for a safe cutaway.
    Given all of these concerns, one must ask "Why should I stall my parachute in the first place". There are several valid reasons why each jumper should rehearse stalls at altitude.

    In high angle of attack approaches, such as may be necessary in a tight landing area, stalls can happen inadvertently while maneuvering. This is why it is also important to practice slow flight maneuvering by lifting the toggle on the outside of the turn, rather than depressing the one on the inside of the turn.
    In order to reach a (near) zero ground-speed on a no-wind day, the pilot must have full "Toggle Authority". In other words, if the toggles are set too long, the pilot will be unable to access the slowest possible airspeed, and therefore will be forced to land with more ground-speed without the advantage of a headwind. Being able to finish the flare completely and then let up after landing to prevent the stall from pulling you onto your heels in an essential part of any no wind landing.
    When you decide to practice stalls, I suggest taking the process step by step. Simply honking your brakes down with your eyes squinting in negative expectation usually results in a wild ride, and sometimes a cutaway. Try hanging out in slow flight for a while. Bring your toggles down to a bit more than half brakes and leave them there. If you are above the stall point, it isn't going to just stall all by itself. Watching people fly in deep brakes is usually similar to watching them light a firecracker. Your parachute isn't going to explode…promise.
    When you get your canopy into the deep brake mode, take a deep breath in and let it out slowly. Relax your muscles. Let your legs hang limp. I find that nervous pilots can't connect with their parachute because it isn't touching their bones. If you soften your muscles, your will allow the leg straps to sink into you so that you can feel what is happening with the newest addition to your body: your wing. By truly relaxing under canopy, we begin to sober up from the adrenalin that is blurring our vision and skewing our perspective toward the negative.
    Stalls are an essential part of flight. If you are to be fully in control over the wing, you must explore all aspects of your parachute's performance envelope. Ultimately, flying slowly is the most important aspect of flight because we land in slow flight. The more comfortable you are with your slow flight skills, the better your touchdown will be. Remember, the definition of a good flight is one that ends well.
    BSG
    www.BrianGermain.com
    BIGAIR SPORTZ

    By BrianSGermain, in Safety,

    Body Language: Helping Your Canopy Open Better

    Many factors determine the way your canopy opens. The design of the canopy and the way it is packed are two important factors, but body position also plays a major role.
    We learn to deploy our canopies in a basic, stable position as students, and many of us don't give this skill much more thought after that. Unfortunately, we sometimes develop a few bad habits that have a negative effect on our openings.
    Even after making thousands of jumps, people have been surprised to find that a few small adjustments to their body position during deployment can significantly improve their openings.
    This article is about deploying a parachute, one of the most important things you do on every skydive. It might be a good idea to practice these techniques on the ground before trying them in the air. You might even want to make a solo jump and try some practice pulls using these techniques before it's actually time to deploy.
    If you are not a licensed skydiver yet, or have just recently earned your license, you should discuss this article with your instructor before trying anything you read here. He or she may want you to focus on more important skills, like altitude awareness and basic stability, rather than adding anything new to your pull sequence.
    No Need for Speed
    The speed at which you are falling when you deploy your canopy can have a large effect on the forces generated during the opening. As your airspeed increases, these forces also increase.
    Many of today's canopies are designed for relatively slow openings, and some will not be affected greatly by a little extra speed at deployment time. Some jumpers even find that their canopies open better when they are falling a bit faster. This is not something you should take for granted, though.
    Higher airspeeds might not cause a canopy to open hard as long as everything else is just right, but small variables tend to have greater effects at higher airspeeds. If you rush your pack job one time and let things get a little sloppy, or if your canopy is starting to go out of trim, extra airspeed could make the difference between an opening that is slightly abrupt and one that really hurts.
    Slowing down before you deploy can provide a greater "margin of error" and reduce the effects that other variables have on your openings. Slowing down can be especially helpful if your openings are frequently or even just occasionally faster than you like them to be.
    Vertical or "freefly" body positions like head-down or sit-flying allow you to reach much higher airspeeds than "flat" body positions. This extra speed makes flattening out and slowing down before you pull particularly important. Both beginners and experienced freeflyers should keep this in mind when planning their dives. Even if you don't freefly, simply tracking at the end of a belly-to-earth jump can significantly increase your airspeed, and you may still find it helpful to "flare out" of the track and slow down before you deploy.
    To flare out of a track, spread your arms and legs and de-arch slightly for a second as shown in. This will help bleed off any excess speed. Keep your arms and legs spread out and maintain a slight de-arch while you wave off, remembering to look around for other jumpers. As you finish your wave-off and start to pull, relax back into a normal arch. If done correctly this doesn't take a significant amount of time and becomes a natural part of your wave off.
    What Are You Looking At?
    Take a moment to notice where you are looking while you reach for your pilot chute. If you jump with a video camera, look at some of your openings on tape. What do you see in the video as you pull? Are you looking up at the horizon, or down at the ground below you? Do you look back toward your pilot chute handle as you reach for it? Do you look over your shoulder after you pull?
    Older skydiving rigs used spring-loaded main pilot chutes activated by a ripcord. Even in the late 1990's this type of system was still used on most student rigs. Those of us who were trained using this type of system were taught to look for the ripcord handle before grabbing it. We were also taught to look over one shoulder and "check" after pulling the ripcord. Looking over your shoulder changes the airflow over your back and helps clear pilot chute hesitations, which are common when using a spring-loaded main pilot chute.
    Most licensed jumpers use hand-deployed main pilot chutes, and these are becoming the standard for student training as well. Even if years have passed since they transitioned to a hand-deployed pilot chute, many experienced jumpers still have the habit of looking for their pilot chutes as they reach for them and checking over one shoulder after they throw them. Unfortunately, it's almost impossible to look over your shoulder and keep your shoulders level at the same time. Looking over your shoulder also tilts your container to one side.
    Although large, docile student canopies may not get offended if your shoulders and container are uneven, more responsive sport canopies will be much happier if you keep your shoulders level. Having your shoulders and container tilted as the canopy deploys can cause off-heading openings, line twists, and can even cause a hard opening.
    Most of us have our pilot chutes mounted on the bottom of the container, so trying to look for the handle is really useless. Even if you still use a legstrap-mounted pilot chute, you probably can't see the handle very easily in freefall. Since hand-deployed pilot chutes are thrown into the clean air next to your body, pilot chute hesitations rarely occur and checking over your shoulder every time isn't necessary.
    Some people have a habit of looking straight down as they deploy. This tends to put you in a slightly head-low attitude, which can increase your airspeed slightly. It can also amplify the opening force your body feels, since this force will mainly be transmitted to your shoulders when the canopy reaches the end of the lines. Also, your legs may swing through a wider arc as the canopy sits you up in the harness, making the opening feel more abrupt.
    Instead of looking for your handle or looking down at the ground, try lifting your head up and looking out at the horizon as you reach for your main deployment handle. This puts you in a more head-high attitude. The opening forces will be transmitted farther down through the harness instead of being concentrated at your shoulders.Looking at the horizon also helps keep your shoulders and container level as you pull.
    After throwing the pilot chute, bring your arms back into a neutral freefall position and think about keeping your shoulders level as the deployment bag lifts off of your back. You can also push your hips down slightly and bend your knees just a bit, as if you were in a very slow backslide. This keeps your head and upper body high.

    In the past, some jumpers have recommended "sitting up" during the deployment. This can actually work well as long as it is done correctly, but if you sit up too much or too soon there is a risk of increasing your airspeed or even becoming unstable. Simply lifting your chin, looking at the horizon, arching a bit more, and relaxing your legs slightly has a similar effect to consciously sitting up, and you're less likely to overdo it.
    Some people who jump with side-mounted cameras believe it's necessary to keep their heads down when they deploy, to prevent a riser from hitting the camera. This might be an issue if you have narrow shoulders or wear your chest strap very tight, leaving less room between your risers. It also might be a problem if your camera sticks out from the side of your helmet quite a bit. It's best to minimize this problem by keeping side-mounted cameras as small, streamlined, and snag-free as possible. If you're convinced it's necessary to keep your chin down, at least keep a good arch and relax your lower legs to keep your shoulders higher than your hips, and also focus on keeping your arms and shoulders level in the relative wind.
    Back in the Saddle

    As soon as the canopy sits you upright in the harness, try putting your feet and knees together for the rest of the opening . Putting your legs together helps keep your weight even in the harness and reduces the chances of an off-heading opening. This is especially effective if you are jumping an elliptical-type canopy. Just the weight of your legs swinging around or a small weight shift in the harness can cause some of these canopies to start turning.
    If you grab your risers as the canopy is opening it's best to hold the lower part of the risers, just above the 3-Ring system. If you grab the risers up near the toggles you might make the canopy turn by unintentionally pulling one riser or releasing one brake. If you hold on to the bottom of the risers, you can still slide your hands up quickly to steer with the risers or release the brakes if necessary.
    Some jumpers try to keep their openings on heading by actively steering with their rear risers while the slider is still up against the canopy. This works with some canopies, but other canopies don't like it at all. You may get better results if you just relax, sit still, focus on keeping your weight even, and wait until the slider starts to come down before making any corrections with the risers.
    Watch Where You're Going
    In a first jump course we are taught to check our canopies to make sure they open correctly. Although this is important, it can also create a very bad habit. Many jumpers look up at their canopies as soon as they start to open, and continue watching the canopy through the entire opening sequence. Some people continue looking up for several more seconds while they collapse their sliders and release their brakes.
    If another person opens close to you, you may only have a second or two to react in order to avoid a collision. Staring up at your canopy for five or ten seconds after you deploy is like driving down the highway while staring up at the roof of your car.
    Fortunately, a few techniques can help you avoid this problem.
    Many students are taught to count out loud while their canopy deploys, saying "arch, reach, pull, one thousand, two thousand, three thousand…" If you don't do this already it's a good habit to create, and can help you keep track of time during the deployment sequence.
    You will hear and feel different things during each stage of the deployment. A second or less after you throw your pilot chute, you should feel the snatch force pull you upright in the harness. This is the force of the canopy fabric hitting the relative wind as it comes out of the deployment bag.
    The canopy will then snivel. The snivel is the portion of the opening where the slider stays against the bottom of the canopy, reducing your airspeed before the canopy starts to inflate. There will still be a lot of wind noise during the snivel, and you will still have a sensation of falling. This may last for a second or two, or even for several seconds.
    The inflation occurs as the slider moves down the lines and the cells fill with air. Things become quieter once the canopy inflates. Even under a canopy that inflates very slowly and smoothly, you will still feel the transition from falling to gliding. You may also hear the slider flapping above your head once it comes down.
    Once you become more aware of these sensations you will find that your other senses can tell you as much about your opening, if not more, than your eyes do. Soon you will feel comfortable looking out in front of you during the entire opening, rather than watching the canopy itself. This allows you to watch for other jumpers, and many people find this reduces off-heading openings as well.
    "But," you may ask, "if I don't watch my canopy open, how will I know if I'm having a malfunction?" Take the advice of someone who has cut away a number of misbehaving canopies: you will probably know right away if you are having a malfunction. They tend to feel very different from a normal opening, and you will probably know something is wrong before you ever look up.
    If you start to count after throwing your pilot chute, and reach "two thousand" or "three thousand" without feeling the snatch force, there is obviously a problem. This would be an acceptable time to look back over your shoulder and check for a pilot chute hesitation or pilot chute in tow.
    Once you know how many seconds the snivel usually lasts on your canopy, you will also know if that part of the opening is taking longer than normal. You can usually feel line twists right away, and if you start spinning wildly you'll surely want to look up at your canopy and see what's bothering it.
    What if the opening feels perfectly normal? Unless you need to avoid another jumper right away, you should still look up and check your canopy right after it inflates. You might not notice a tear, broken line, or similar problem until you look up. Even in these situations, if the opening felt normal then the canopy is probably flying well enough to give you a low rate of descent. Assuming you deployed at a reasonable altitude, you should have enough time to do a control check and execute emergency procedures if necessary.
    If you've been watching your canopy open every time then you might not feel ready to stop doing this during your very next jump, but you should start developing better habits as soon as possible. Start counting when you throw your pilot chute, and notice how long each stage of the deployment sequence takes. Pay attention to what you are hearing and feeling during the opening. Soon you won't need to watch the whole deployment, and will be able to pay more attention to your body and your surroundings.
    Improving your body position and increasing your awareness when you deploy your canopy can produce great results. You might not remember everything in this article during your next jump, but at least think about trying these suggestions one at a time, at your own pace. You might be amazed by the difference a few small changes can make.
    About the author: Scott Miller runs the Freedom of Flight Canopy School at Skydive DeLand in Florida (www.freedomofflight.tv) and holds canopy skills camps at other DZ's throughout the year. He has worked at several drop zones as an AFF instructor, tandem instructor, and freefall photographer, and also worked as a test jumper for Performance Designs.
    This article first appeared in Skydiving Magazine, Volume 25, Number 7, Issue #295, February 2006. Printed here by permission of the author.

    By admin, in Safety,

    Belly Fly 101

    You just graduated AFF or you got your A license. You can execute all the skills required of you in the sky. Now it is time to take it to the next level. Tunnel flight can help you hone your skills that you have already, and most definitely help you learn some new skills. The wind tunnel can give you confidence, awareness and much needed experience at a time when it is hard to come by any of those things.
    The wind tunnel is perfect for anybody. Wind tunnel coaching through the whole AFF and A-license experience is standard issue for all Central Florida drop zones. Coordinating the circle of awareness, motion, fall rate, turns, docking and practice pulls are all possible in the wind tunnel.
    The first thing that you should learn is the relative work position. The position is the root for all movement. The reason is every time you want to move; you always start and stop in the learned belly position. Your chin should be up. Your eyes should be focused in front of you, not looking down. Your arms should be relaxed so they do not cup air or carry stiffness. You should have pressure on your shins so you do not back slide. You should be bent slightly at the knees so you do not constantly move forward. Your body should be symmetrical. Asymmetry causes turning. Your hip should be in its most arched position. Sometimes it takes a bit of moving down to actually get a good arch.
    After the neutral position is learned then the 6 points of motion are taught down, forward, backward, up, and sidle siding left and right.
    The first thing I teach after the standard position is to move down. The reason is the worst thing that can happen to a newbie in the wind tunnel is to catch air and ascend high up; so the instructor cannot reach you easily. Anything above 8ft high off the net makes it challenging for your instructor and dangerous for you at first. To move down, simply arch more. If that does not do the trick, take up less surface area by getting smaller. You should move right down to the net. Some times I keep first time students on the net for a rotation or two so they do not bounce around. In the lower wind speed it is easier to make mistakes and not fly up against the wall. Once general body awareness is attained, the controller can turn up the speed a little more. The first time student can fly off the net with a little more speed after they can go down. I also teach going down first, so if the student does get up a little higher than they like, they can easily come back down.
    The next thing to learn is motion forward and backward. Most people come into the wind tunnel with built in movement in their technique. In order to stay perfectly still you must learn to go forward and backward first. Forward motion is accomplished by putting both feet back at the same time and then relaxing back into the neutral position and coasting to a stop. Moving backwards is done by putting both arms forward in front of you while you relax your legs towards your butt and coast back in to a neutral position for a stop.
    I do not teach "braking" until the student can do the first 4 points of motion. The reason is for most students early on braking is too much to think about. Initiating subtle movements and coasting to a stop slowly is more effective in the beginning.
    Flying in the sky is like flying on a football field, plenty of room to roam. Flying in the wind tunnel is like flying in a bottle, close proximal flying. Small movements are a necessity. Deep diaphragmatic breathing will lessen the tension carried in the body and relax your mind.
    After a student can go down, forward and backward; I teach them how to go up. The two easiest ways to teach a student how to go up is by them taking up more surface area or de-arching with their hip. The easiest way to move up is to get longer with your arms and legs and flatten your torso. This cups air and pushes your body up like a board. The second way to move up is to de-arch at your hip. This will catch air in the pocket your hips and torso make and accelerate you upward.
    Each method for going up works in different scenarios. If a person you were jumping with slowed up very quickly de-arching at the hip would be a good way to slow down in the sky. Keep eye contact with the person! If that same jump partner ascended relative to you very slowly then getting longer and flatter would be optimal.
    Side sliding would be your next skill to learn. Side sliding is moving sideways while facing forward. It is very important to do this with a straight torso. Bending at the torso is inefficient and usually causes a turn. To keep your torso straight and move side ways, use your arm and leg at the same time to push you across the tunnel. The most popular rookie mistake is to push with just your hand. If you push with just your hand you will turn instead of side slide. You should push both your foot and your hand at the same time. Initiate the movement and then cost to a stop. This will create a seamless side slide.
    Make sure to arch when you side slide to keep on the same level or plane that you initiated the motion on. Once you can go back and forth seamlessly both ways with out changing levels at all; then learning more advance side slide techniques would be warranted.
    Turning is also a very important skill that can be learned in the wind tunnel. I start to teach turning usually right after the first 4 points of motion are learned. I progressively perfect my student's turn as side sliding is attained. The most important turning skill is to turn slowly in the wind tunnel. More often then not students like to "crank" turns out when they start. In the sky that might be all well and good, but most students are moving when they turn. If you turn with precision at first, then the progression will come easy.
    Keep your head up and maintain a huge arch when you turn. Most students look down and de-arch when they turn. The sheer act of spinning creates lift. Coupled with de-arching spinning can send you up to the huge fans that power the wind tunnel. It is important to arch even harder when you turn to maintain your levels throughout.
    Another popular mistake is to relax your legs on your butt when you turn. This makes for interesting times. Relaxing your legs will make you back slide while you are turning. Keep the shin pressure you have when you turn. Some students need to think of putting their feet out when they turn, just to keep the legs in the same place through out the completion of the turn.
    The Mantis position is popular in more advanced relative work. We will cover it in the scope of this article because the vast majority of new fliers want to learn it. My opinion is that it should be learned after 6 points of motion, 90 degree turns and 360 degree turns. Early on in the progression, I believe that most students are too stiff to learn the Mantis properly.
    Once a student can move their arms freely without causing instability or motion, then it is time to refine the basic relative work position into the Mantis. The student should try to bring their hands closer to their ears first to reduce drag on the arms. Remember the whole idea of the Mantis is to fly a more aero-dynamic position not to learn it because it looks cool. Most students press their elbows down at first. This usually causes tension. After a student can fly with hands closer to their ears instead of the basic relative work position, all the time, perfecting the Mantis position should be tackled. The hands should come closer together like you are hugging a small volley ball while laying your body on a flat surface. Dropping your elbows down into the standard Mantis position should be the last step to learning it.
    It is very important to fly in the wind tunnel. The wind tunnel is the most revolutionary tool to be introduced to the sport of skydiving since the three ring system and tandem jumping. Now that wind tunnels are popping up all over the world, they will subject more and more people to our sport. Our numbers will grow in a prolific fashion and we will finally get the market penetration that our sport has long yearned for.
    If you get frustrated in the tunnel keep trying. In all likelihood your frustration stems from only a few places. A bad instructor, people looking at you when you fly, the constant presence of glass or chicken wire and the inability to just go "buck wild" like you can in the air can lead to frustration. The wind tunnel is so much fun. With the right training regimen, repetition and a good instructor the sky is truly the limit to your skills.
    Steven Blincoe is the founder and head coach of the New School Flight University in Orlando, Florida. He has 4,000 skydives and 500 hours of wind tunnel time. He specializes in wind tunnel camps and will scower the globe in the next few years to spread the art of tunnel coaching. Please feel free to contact him at www.blincoe.org or 530-412-2078.

    By admin, in Safety,

    Exit Separation Revisited

    Exit separation has become a point of contention at many DZ's lately. Years ago, when belly flying was the rule and the Cessna 182 was the aircraft at most DZ's, exit separation wasn't too much of a big deal - you gave the other group (if there was another group) some time and then you went. With the aircraft in popular use 15-20 years ago, it was hard to exit very quickly to begin with, and so the issue never came up very often.


    Bill von Novak started skydiving in 1991 at a small DZ in New York. Since then he has become an S+TA, an AFF, tandem and static line instructor, and has set two world records in large formation skydiving. He lives with his wife Amy in San Diego.


    Since then, several factors have conspired to make exit separation more of an issue. First off, there are more people freeflying. Freeflyers, especially head down groups, drift differently than belly flyers, and thus need different considerations when planning for exit separation. Faster canopies mean that people who open facing each other need more distance to deal with a potential collision. Large aircraft with big doors can hold several larger groups, and those groups can get out those big doors more quickly. Finally, GPS spotting has removed some of the delay between groups. It's rare to see people even check the spot before beginning their jam-up.
    I first became aware of this issue in 1994, when I started jumping at Brown Field in San Diego. We went through a series of aircraft as we grew, from Cessna 206's to King Airs to Beech-99's, none of which had GPS. In addition, we were less than a mile from the US-Mexico border, which meant our jump runs had to be east-west and our spots had to be dead on. Several instructors were "designated spotters" and we would argue over 100 yard differences in jump run offset and exit location. After a while we got pretty good at spotting.
    As our aircraft became larger, exit separation became more of an issue. We had a few close calls, and so we agreed to start allowing more space between groups. At first it was essentially trial and error - we would leave some amount of time (10 seconds or so) between groups and increase that time whenever someone felt they were too close to someone else. After a while, we began to get a feel for how much time was required. We knew that if the upper winds were strong and the plane was just creeping along the ground, we had to leave more time. We also knew that if we let the freeflyers get out first, we had a problem almost every time. We ended up with a system that worked for us, and had essentially no problems with collisions or close calls after that.
    During this time I was also traveling in the summers to different boogies and I noticed a wide variety of exit separation techniques. By far the most common technique was some amount of fixed time - the next group would pause, then climb out and go, without knowing what the upper winds were doing or what the spot was. The next most common technique was similar but they added a "leave more time if it's windy" clause to their delay. There was also a class of jumpers who looked out the door to tell how much separation to leave; these jumpers either looked at angle of the departing group or the ground to tell how much space to leave.
    This got me thinking. What really works and what doesn't? I tried a few methods on my own, from the "45 degree" method to a purely ground-based method. After some experiments, a group of skydivers collaborated via email and internet and came up with the actual math behind separation, the physics that determines how far the center of group A will be from the center of group B after they open. But before diving into the math, there are a few basic concepts to cover.
    What we care about. When we're talking about separation at opening time, we don't really care about where we are in relationship to the plane or even the ground - what we care about is how far we will be in the air horizontally from the next group that opens. So for our purposes, the airplane and the ground don't really matter, and someone watching from either of those places may not get the same "picture" of things that we get. (Of course, we do care about our relationship to the ground when it comes to spotting and landing on the DZ, but that's a separate issue.)

    How we fall. In most freefall (tracking dives and wingsuits excepted) we fall essentially straight down with respect to the air. If there's wind, the wind blows us at whatever speed it's blowing. If the wind is doing 30kts at altitude, a group of skydivers will be doing 30kts as they drift with the wind. It's also important to realize how your trajectory changes after you open. At a freefall speed of 100kts, a 30kt wind will slightly deflect your trajectory, because it's a small fraction of your total speed. Once under canopy and descending at 10kts, it will deflect your trajectory a tremendous amount, since it is now a very large part of your speed. Of course, under canopy you have much more control over your own horizontal speed, and the winds may add or subtract from your canopy's groundspeed depending on the direction you are facing.

    Speeds. When discussing speeds, it's important to define units. There is feet per second, which is very useful for people who are trying to figure out how far they want to be from another group. At 100 feet per second, 10 seconds gives you 1000 feet, which is about as easy as it gets. You may also hear the terms indicated airspeed, true airspeed, and groundspeed, in both knots and miles an hour. These can all be converted back and forth as needed . Now that all that's out of the way, the math is pretty simple. The distance you will get between group centers is the speed of the aircraft plus the speed of the winds at opening altitude, multiplied by the time you leave between groups. That's it. So if the aircraft is flying into the wind doing 80 knots per its GPS, and the winds at opening altitude are 10 knots from the same direction, and you are waiting 10 seconds between groups, you are going to get (80+10 = 90 kts, which is 153 feet per second) 1530 feet between groups.
    It gets a little more complicated when the winds are not from the same directions. If the winds at opening altitude are opposite jump run, you have to subtract them rather than add them. If the winds at opening altitude are from the side, it's the same as zero winds at opening altitude when it comes to separation.
    If you put these equations into a spreadsheet and play with the numbers, some basic patterns emerge. If the headwinds at altitude are strong you have to leave more time. If the plane is slow (i.e. it's indicated airspeed on jump run is low) you have to leave more time. If the winds at opening altitude are strong as well, and from the same direction, you can safely leave less time. (Or, preferably, just leave the same amount of time and you'll end up with even more separation.) If the winds at opening altitude are opposite from jump run, that's the worst case, and you have to leave even more time.
    Some people have a problem visualizing how winds at opening altitude can possibly cause them trouble if they leave enough distance on exit. The question is usually phrased as "don't all jumpers follow the same path out of the plane?" And they definitely do. To visualize why this can still cause you problems, take a look at the separation diagram shown below.


    Drawing showing exit separations
    In the first drawing, there is no wind after exit, and the first group breaks off, tracks, opens, and flies their canopies away from the center for the first few seconds, which is what they should be doing on most formation skydives. (After that, it's a good idea to turn away from line of flight once you're sure you are clear of others in your group.) The second group arrives 10-15 seconds later, shortly after the first group has opened their parachutes, with some room to spare.
    The second drawing shows what happens when there are winds are the same all the way down. Notice that the "cone" caused by the breakoff and the canopy flight has shifted strongly to the right. This is because (as mentioned before) once their parachutes are open, the wind affects their trajectory more strongly. As with the first example, it is assumed that everyone flies away from the center for the first few moments. That means the jumper flying into the wind makes no progress and comes straight down, while the jumper flying downwind gets a boost in groundspeed..
    The third drawing shows where you can run in to problems. In this drawing, the winds after exit are from the opposite direction. You get the same skewing of the cone, but now the edge of the cone is getting dangerously close to the trajectory of the next group. This is a case where the same separation at exit led to trouble because of opposite winds at opening altitude.
    This leads naturally to the question "how much separation do you really need?" That depends on the group. 1000 feet should probably be an absolute minimum for any belly formation skydiving. That means that two four-ways can exit, fall straight down the pipe, track 300 feet from center on breakoff, and then still have 300 feet to deal with avoiding a potential collision after opening. With the speeds of today's canopies, that's a bare minimum. If the group size grows to two 10-ways, 2000 feet might be a wiser separation. If a low-time RW group backslides a bit, again, 1500 feet might be needed to be clear of them at opening time.
    So how does a jumper who doesn't want to carry around a calculator figure out how much time to leave between groups? One very simple way is to just look out of the plane and wait until it has covered 1000 feet, then go. This method, originally suggested by Skratch Garrison, takes much of the figuring out of exit separation. It can be hard to determine how far 1000 feet is on the ground, but fortunately most DZ's come with a handy ruler - a runway. A 3000 foot runway allows you to put 3 groups out along its length with a bit of margin thrown in. This method also has the tremendous advantage that it requires people to look out the door, and that means they are more likely to see traffic, high canopies or clouds that could pose a hazard to their skydive.
    Another simple way is time-based. There are several tricks you can use to determine how long to wait. One common one is to always leave at least 7 seconds, then if the upper winds are strong divide them by 2 and wait that number of seconds. (Faster aircraft sometimes use divide by 3.) So if the winds are 30kts you wait 15 seconds between groups. This technique uses some math but isn't too bad.
    A third technique that seems to be popular for some reason is the 45 degree method. In this method, jumpers wait until the previous group passes through an imaginary 45 degree line before they exit. The problem with this method is that the jumpers never pass through that 45 degree angle, or pass through it so quickly (under 1 second) that it's not useful for determining separation. The numbers confirm this. What you see out the door depends purely on speed of the aircraft, fallrate of the jumpers and type of exit. If the plane is going slower than freefall speed, the group may start out above the 45 degree line, but will drop below the line in less than a second and never rise above it again. If the plane is going faster than freefall speed (which is rare) the jumpers stay above the line and never cross it at all. A good head-down exit will tend to move jumpers lower in the picture. Winds will not affect the picture; an exit in 5kt uppers looks the same as an exit in 50kt uppers.
    There has been some friction over this issue. The 45 degree method has a lot of supporters because it's so simple and makes a sort of intuitive sense. Beyond that, it actually seems to work for some people - although it's likely that the extra time it takes to locate and stare at the previous group has something to do with the reason the next group usually leaves enough time. To show that this doesn't work, two cameras were fixed at a 45 degree angle and mounted on a boom outside an Otter's door (see pictures below.) Pictures and video of several jump runs both into the wind and downwind were taken and magnified to determine how close each group was to the imaginary 45 degree line, which was essentially the center of the images. The pictures confirmed the basic problems of the 45 degree rule. RW groups, falling a little faster than the aircraft, never quite passed behind the 45 degree line. Freeflyers, going much faster than the aircraft, stayed well below the 45 degree line for as long as they were visible in the stills (about 30 seconds.)


    Some version of the 45 degree method may work for some people. It may be that the simple act of looking out the door delays them enough, or their subconscious may see the group moving slowly along the ground (because the aircraft's groundspeed is low) and send a warning message to the rest of their brain - "hey, hold up a minute." But waiting for a true 45 degree angle simply does not work.
    Another issue that has become more important lately is exit order. Some places still put freeflyers out first, and that doesn't make much sense. In 30kt uppers, a belly flyer who leaves 10 seconds and gets out after freeflyer will open 100 feet from him, but if the belly flyer goes first and the freeflyer leaves the same time he will open 2200 feet from the freeflyer. RW groups, since they are in freefall longer, drift farther downwind before opening. It seems like a no-brainer to choose an exit order that used this to your advantage and increased, rather than decreased, separation distances. You can certainly wait 20 seconds after the freefly groups before the belly groups exit if there is some other reason why the freeflyers have to exit first, but at most DZ's it's hard to ensure that 20 seconds, especially since waiting so long almost guarantees long spots or a goaround.
    Below are two diagrams that show how exit order can affect separation.

    Belly out first diagram

    Freefly out first diagram
    One reason given at DZ's to explain a backwards exit order is that freeflyers open sooner and therefore are beginning to descend before the next group gets there. Bryan Burke of Skydive Arizona has pointed out that you simply cannot trust vertical separation - one premature deployment or malfunction and all that vertical separation is gone. Even during a normal skydive, when you add up altimeter error, pull timing and snivel distance, you can easily get a jumper opening 1000 feet from where he expected to be open. In fact, Bryan points out that at Skydive Arizona, the primary reason high pullers get out last is not for separation but rather because they are the ones that can make it back from a bad spot.
    Every drop zone is going to have a different set of rules and a different approach to exit order. Some work well, some don't work as well. Jumpers have to understand the factors that can reduce group separation so they can make informed decisions about when they want to exit and what kind of exit orders they are comfortable with.

    By admin, in Safety,

    Collapses and Turbulence

    There are many variables to consider when looking into a canopy collapse:
    What was the pilot doing?
    How fast was the canopy flying when it collapsed?
    Where was the pilot flying?
    What is the canopy design?
    What is the wing-loading?
    Was there any re-active solution employed? These are the principle considerations, but not the only ones. I will take each one separately.
    1) The way in which a parachute is flown can increase or decrease the "G" loading on the lines. A rapid release of one or both brakes significantly increases the chances that the canopy will collapse. This allows the parachute to surge forward to a lower angle of attack, decreasing the lift of the parachute. This reduces the amount of energy exerted by the parachute away from the suspended load, allowing the "negative" portion of the lift to take over and allow the wing to fly towards the jumper.
    2) Airspeed is what creates lift. Lift is what causes the wing to strive to fly up and away from the jumper. This is the formula for line tension and therefore stability. The slower you are flying, the more likely your parachute will collapse due to low internal pressure and low line tension.
    3) Was the wing flying in clean air when the collapse occurred? This is an important part of the question. All parachutes can collapse in "bad" air. We must always fly considering the invisible dangers that the sky presents us. If you wouldn't fly a kite there, don't fly or land your parachute there.
    4) Certain parachute designs do better in turbulence than others. I must avoid pointing fingers here, as this is a volatile industry that can be taken down by non-skydiving lawyers. Nevertheless, certain wings have an increased propensity to go "negative" when presented with adverse condition, while others bump around a bit and keep on flying. This is a complex issue, and the best way to decide which parachute to buy and fly is to listen to the actual statistics, and to your own experience when flying a particular design. I have not experienced any kind of collapse on the parachutes I fly, ever.* If you have on yours, you may want to reconsider what is over your head.
    *(This does not include nasty, ill-conceived prototypes that seemed like a good idea at the time. I am talking about production-model canopies here)
    5) Parachutes perform differently at different wing loadings. The lighter the wing loading, the slower it will fly. This means that the internal pressurization of the wing will be less on larger canopies. In general, lightly loaded parachutes experience more small collapses than heavily loaded ones. Not only is there less internal pressure in the wing, but the dynamic forces area also less with decreased airspeed. This means that the average line tension tends to be less on a lightly loaded wing, and the wing tends to have a increased propensity to surge forward in the window when flying at low air speeds. This is why very small, highly loaded parachutes tend to experience fewer distortions, especially when flown at high speed. Flying at high speed increases the drag of the canopy itself, relative to the jumper, so the relative wind holds the parachute back in the window and at a higher angle of attack. This is why I make carving, high "G", high speed turns to final approach heading, especially in turbulence. The speed actually reduced the chances of a collapse by increasing the forces that keep the parachute at the end of the lines. I am literally increasing my wing loading by flying fast and at high "G's", and the increases velocity reduces the amount of time that I fly in bad air. I am not saying that you should downsize just to increase your stability. I am saying that until your skills and knowledge are ready to fly smaller, faster parachutes, you should stay out of the sky until the winds come down. I still haven't been hurt by a jump I didn't do.
    6) This is all about "Pitch Control". If you are flying a good design with lots of airspeed and significant line tension, and in a reasonable location that has no obvious precursors for collapse, you can only deal with a collapse in a re-active manner, as you have addressed all of the relevant variables up to this point. If your wing tries to aggressively surge forward in the window, you must notice it and quickly stab the brakes to bring it to the back of the window. A collapse always begins by a surge to a low angle of attack, but there is very little time to deal with the problem before I folds under. Here are the signs:
    The first sign is a change in Pitch. The wing moves forward in the window. This is the limited flying space over your head. Too far forward and it collapses. Too far back and it stalls.
    The "G" loading drops dramatically and almost instantly. In other words, your apparent weight in the harness drops because the wing is producing less lift. This is the time to jerk on your brakes: quickly, sharply, but not more than about 50% of the total control stroke. This action is to pull the wing back in the window, not to stall the parachute. By putting the wing further back in the window, we are increasing the angle of attack. This increases the lift, and forces the wing to fly away from the suspended load and thereby increase the line tension. This can prevent a collapse entirely, or cause the wing to recover to stable flight before things get really out of control.
    If the wing is allowed to collapse, it may recover quickly on its own. This is why the more modern airfoils have the fat point (Center of Lift) so far forward. It causes the wing to pitch nose-up when it begins to fly again, bringing it back to the end of the lines. Nevertheless, parachutes can still collapse fully, which often involves significant loss of altitude and possibly a loss of heading. If your wing goes into a spin because of a collapse, your job is to stop the turn first, as you increase the angle of attack. If it is spinning, there is less chance of recovery until the flight path is coordinated and the heading stable.
    Conclusions:

    Don't fly an unstable parachute. If it is prone to collapse, ground the parachute. Do not sell it to an unsuspecting jumper at another drop zone. These people are your brothers and sisters.
    Don't fly in crappy air. Land in wide open spaces, in light winds, and never directly behind another canopy.
    Practice stabbing your brakes in response to forward surges on the pitch axis. This must become a "learned instinct" that requires no thought at all. Like pulling emergency handles, pulling the wing to the back of the window when the lines get slack is essential for safe skydiving.
    Keep flying the parachute. If your parachute does something funny near the ground, don't give up. If you keep your eyes on YOUR ORIGINAL HEADING, you will unconsciously do things that will aid your stability and keep you from getting hurt. Looking toward what you don't want is how you make it occur. I hope this little article helps you understand the phenomenon of collapses a bit better. I know as well as anyone how painful a collapse can be. I do not want to go back to that wheelchair, and I don't want anyone else to have to experience that either. You morons are my family, and if information can help protect you, I will give it until my lungs are out of air.
    Blue Skies, Sky People.

    Bri
    Article Discussion

    BIGAIR SPORTZ

    By BrianSGermain, in Safety,

    Five Quality Canopy Skills Every Beginner Should Have

    So you whipped through your student program, graduated AFF, moving towards or already got your A license, eyeing a rig to buy and well on your way to your first 100 jumps. Canopy or parachuting skills are an integral part of every training program, but are also the most important skills these days. There are five quality canopy skills every student should know: awareness of your rig and canopy, awareness of your self and others in the pattern, awareness of target and setup, good depth perception, and a proper two stage flare.
    A Few Parachuting Tips That Are Very Important

    1. Awareness Of Your Rig And Canopy
    Developing awareness of your rig comes with time. Unfortunately, when you're a student, time is not a comfort you always have. You need to be comfortable and confident with your rig on every jump. If it is a new rig you're jumping, wear it around the house, while your cooking dinner, sitting on the couch or doing chores so that you can get used to it.
    If you rent rigs, get suited up extra early like on the twenty minute call, so you can go through all your emergency procedures. This comfort and confidence is paramount when you are up in the air. If you are not confident in your parachuting equipment, you will have "gear fear" and this can affect your judgment.
    If you have a new rig and there are things you don't like about the rig, change them. You would be surprized the little things a rigger can do to make a rig fit better. I recommend buying a custom rig when you have reached a size you will be on for a while 190-170 sq feet on average. Even with a new rig, small alterations can be made. The easiest fixes that I see students can do is a bungee cord to connect your leg straps, padded reserve handle, shortening the closing loop, and modifying the laterals to make the rig fit tighter. All these modifications are freefly specific but a tighter rig is a safer rig.
    Know your canopy when parachuting. Know each stage of deployment and the equipment on your canopy which is responsible for each stage. Learn how to pack! Packing your parachute is an intimate way to get to know your equipment. If you can pack your rig well, you will more likely have a greater understanding of your equipment and confidence with it. Packing comes with experience. Pack at home over and over again, watch people pack, and ask lots of questions. If a packing course is offered, take it.
    I know when I was starting out, I wasn't that interested in my canopy. It was a docile vehicle to get me from 3,000 feet to the ground, which I had to pack every time to go up. I definitely feel different about my canopy now. When you are under canopy and not in the pattern above 1000 feet, play with your canopy, practice your landings over and over again. Experiment with front risers, rear risers and toggles.
    Two intricate tips with your equipment can improve the performance of your canopy immensely. The first is simple, stow your slider and bring it down behind your head. Keep weary of where you are located relative to the drop zone, and other jumpers. Don't mess with the slider as you might end up in another county. Stowing your slider helps reduce drag and can increase your glide. It also gets rid of that annoying flapping noise.
    The second tip is for a student who can land on his target consistently. After your slider is stowed elongate your chest strap all the way out, without undoing it. Practice on the ground. You want your chest strap to be as wide as possible for three reasons: the canopy is designed to fly like this as it increases the glide of your canopy, second it gives you another control surface to fly, that being your hips, and lastly it allows you to lean forward in your harness which gives you more control. All three of these points can be seen on a good canopy pilot and a moderate student can start practicing these skills early on in his career, even though it will play a bigger part later.
    When your chest strap is elongated your hips are now hooked directly to your canopy instead of your shoulders through the harness. It will be hard to turn the canopy with your hips at first especially with large canopies, but it can be done. Simply scissor your legs and throw the leading leg over the trailing leg and lean in to it. Then try it the other way. This will become more important when you get to sizes like 150 sq feet and below.
    A word of caution, don't spend too much time elongating your chest strap under the canopy while you are parachuting, you definitely will end up in a different county. Opening shock makes it more difficult to elongate the chest strap then on the ground. The buckles cinch up with opening shock to make sure you don't fall out. Do not undo your chest strap! If you elongate the chest strap properly you will not fall out of the harness. The canopy will feel slightly wilier but nothing dangerous. Stow your slider and elongate your chest strap before you unstow the brakes. This will make it infinitely easier. If you unstowed your brakes already, let the alterations go and remember to do these things on the next jump. You must have a certified instructor watch over you when you practice on the ground and in the air. Make sure these alterations are done before 1000-1500 ft. Be careful, use common sense.
    2. Awareness Of Your Self And Others While Parachuting
    I have briefly touched on this subject already, but since canopy collisions and landing off are a reality, awareness of yourself and others is a Quality Skill unto it self. Always know where you are relative to the drop zone. Are you up wind or downwind? Can't tell, figure it out! Watch the wind on the trees, or a nearby lake. Watch other skydivers, are they landing in the same direction your facing, or the opposite.
    I tell my students to watch the drop zone in the plane and where you are relative to it and the wind. This serves multiple purposes: you gain an awareness of where the pilot is in his jump run and his tendencies, you have a better understanding of the area you are jumping and potential outs and hazards, and on jump run you will be able to anticipate where you will be if you look out the window while other people are getting out.
    Look out for other people under canopy, especially during and right after opening. Check your canopy then look for others immediately. Look up and down the jump run for the people who got out before you and right after you. Get a visual then go through your checklists of things to do. If you are playing with your canopy up high always look before you turn or yank on a control surface. Find the pattern; be mindful of people out side the pattern. Do not spiral in the pattern. The best way to have clear space around you is to go last and deploy high.
    One easy thing that you can do especially when you are traveling to a different drop zone is find how they operate their pattern. You would be surprised how many experienced jumpers do not ask about or forget the pattern. I think this is the biggest problem at destination DZs where people are visiting. Follow the rules laid out; the rules are there for you as skydiver's safety and the safety of others.
    3. Awareness Of Your Target And Setup
    You should be aware of where your landing target is in freefall. I have left countless jumps early because the spot was off, people took to long in the door and spread the spot to thin, or the wind was stronger when we exited then when we took off. The point is, develop an awareness of where your target is in freefall by doing solos. Don't be afraid to deploy a little early if you see you are entirely too long to get back.
    After you are open and you have made sure the canopy is safe, you have made your control checks and alterations, size up the distance and altitude you have from your target. Execute the pattern your instructor and you have gone over. Try to stay up wind of your target before you start to execute your pattern. Go over in your head, how you are going to execute, see the legs of your pattern, check for others, and then go!
    Hitting your target is not done in the last 150 feet, that is how people get hurt. Hitting your target comes from proper briefing of the landing area before the jump, your spot, and how you set up for your pattern at 1000 feet. Good target acquisition comes from practice but also preparation.
    4. Good Depth Perception
    Depth perception is a key element of being a good canopy pilot. It is a learned skill but can be greatly improved through various techniques. If you wear glasses please tell your instructor. Do not be ashamed of your sight. Your sight will put you at a great disadvantage if you do not use your glasses or contacts while parachuting. With proper use of glasses and contacts you can enjoy the sport with no problems. If your goggles don't fit your glasses buy ones that do. If you do not like glasses and your contacts dry up, change your goggles to a snugger fit, or possibly look into laser surgery. I know many people in the sport who swear by laser surgery. The bottom line is that when you skydive, use what you use to drive your car. Skydiving is as critical as getting behind the wheel with your eye sight.
    If your sight isn't a problem or you use one of the corrective measures above, you can dramatically increase your depth perception of the drop zone and the ground. Look at the drop zone while you are in the plane and gage it with your altimeter so you get an idea of how high you are. Get a highly visible altimeter and don't forget it on the ground! When you get within the last 150 feet do a quick check for people around you, then lock in on your target. When you get 50 feet from your target, shift your eye sight from looking down to looking in front of you. Open your vision so you still include the ground but try to look forward. Begin your two stage flare at about 10-15 feet depending on the winds. Keep your vision open and wide; do not fixate on the target. Consult your instructor.
    5. A Proper Two Stage Flare
    I know some drop zones do not condone a two stage flare. Do not buck the trend on this one. If your drop zone doesn't allow it, come to me I will teach you. Ask your instructor about the two stage flare. I know from my experience some students have a tough enough time doing a symmetrical flare at the proper altitude. So maybe the two stage flare is not right for you, right now. I do believe it is an important part of being a good canopy pilot, and mixed with all the alterations mentioned above can give you your first swoops coming straight in with no riser input. In fact I have seen students who collapse and stow their slider, elongate their chest strap, and use a proper two stage flare swoop 50-60 feet with no wind.
    The two stage flare is quite simple.10-15 feet above the ground quarter flare your canopy. This action planes out your canopy and translates your vertical motion forward. Make sure that the flare is quartered not a half flare. There is a dramatic difference. A quarter flare will plane the canopy out and accelerate you forward; a half flare will distort your canopy and make you sink. When you are five feet above the ground, full flare to come to a complete stop. I see many people just leave the canopy in a quarter or half flare. This action makes you hit the ground moving forward and a little hard, you might have to run it out.
    Make sure you have a consistent symmetrical flare on target before you practice a two stage flare. The two stage flare is difficult without video to show you what you are doing. So, get coaching with video, people just telling you what to do will not get it done. You must have feedback and video is the best for this. Also if your instructor uses radio this is a plus, but not essential.
    I have commented on many things in this article. Do not try to do them all at once. Concentrate on one thing per jump. Focus on one thing for 20 jumps if you get flustered easily, till you get it right and it becomes habit.
    If you incorporate all these things with the over site of a quality coach, you can swoop coming straight in with no riser input on target safely negotiating others and the physical hazards around you. Be very careful under canopy while you are parachuting. Nothing replaces common sense, good judgment and asking lots of questions. You too can be an excellent canopy pilot with these five quality skills.

    Steven Blincoe has 4,000 jumps and 300 Skyventure hours in the wind tunnel. He is the founder of the New School Flight University in Orlando, Florida. He also has 10 years of experience in the sport coaching, competing, and filming. Steven Blincoe can be reached by phone 530-412-2078 USA, or by email [email protected]. You can also go to www.blincoe.org.

    By admin, in Safety,

    Canopy Skills Drills

    Learning to fly our parachutes is absolutely necessary for long-term survival in this sport. The philosophy that the canopy is simply a means to get down from a skydive is gradually becoming a thing of the past. This may be as a result of individuals with such an attitude dropping out of the sport due to canopy-related injuries, or from the insurmountable fear that comes as a result of a lack of control over their experience. Regardless, many jumpers have been taking an increased interest in flying their parachutes better.
    Reading and talking about canopies is the beginning of this process. We must understand the principles that allow our canopies to fly. To make a real difference in our capabilities, however, we need to physically experiment with our parachutes in flight. We must practice in the real world.
    Here are a few exercises that will increase your abilities to save your own life, and enhance your feeling of control while under canopy:
    Pitch Control Exercises

    Manipulate the canopy on the pitch axis using the brakes.
    Look at canopy to notice the amount of pitch axis change.
    Notice the difference between "soft" and "sharp" inputs: slow application vs. quick. Why?
    Controlling the pitch angle is how we manipulate the angle of attack of the wing. Without a dynamic change to the angle of attack, we will be unable to increase the lift of the parachute enough to change the direction of flight from its normal full flight glide to level flight. This maneuver is essential for safe landings.
    Pitch Control With Bank Angle

    Begin a turn using a single steering toggle.
    Apply the opposite toggle while still in the turn.
    Experiment with soft versus sharp inputs to negate decent.
    Look at canopy to notice pitch changes. Why?
    Having the ability to control the pitch axis while in a bank is what gives the pilot the ability to control the decent rate while in a turn. The natural tendency is to loose altitude in a turn, but this is not necessarily the result of turning with bank angle. By increasing the angle of attack while in a bank, we can increase the amount of lift that the parachute is producing, and even alter the flight path to level flight despite significant bank angle.
    Dive Arrest: Toggle Turns

    Place the canopy in a spiral dive using a single steering toggle.
    Arrest the dive as quickly as possible by sharply applying the opposite toggle as well as the inside toggle; the inside toggle is not applied until the two are matched in the degree of input. When the toggles are matched, a short stab of collective brake pressure is usually all that is needed to achieve level flight.
    Exercise both banked recovery and wings level recovery. Why?
    Turning too low is the preliminary cause of many injuries in our sport. Unfortunately, most canopy pilots assume that bank angle must be eradicated before arresting the dive. This leads many to waste valuable altitude in the process of leveling the wing. In situations with very little altitude remaining, this may delay the collective brake application until it is too late. By rehearsing a transition to zero decent while still in a bank, the pilot becomes accustomed to applying the toggle on the outside of the turn as a learned instinct, reducing the chances of a turn leading to serious injury.
    Dive Arrest: Front Riser Dive

    Place the canopy in a dive using the front risers.
    Rehearse dropping the front risers and quickly stabbing the brakes.
    Rehearse both straight front riser dive recovery as well as turning dives. Why?
    While acceleration on final approach can be great fun and usually leads to longer swoops, the acquisition of speed is not really the hard part. What keeps us alive is the judgment and skills necessary to save us when we dive the canopy too close to the ground. If we rehearse the solutions to the dangers, the likelihood of a dive resulting in serious injury is reduced. Letting the front risers up slowly may be the best way to get a long swoop when the dive is rounded up slowly and with ample altitude. Unfortunately, this muscle memory may not serve us when we are really low. In the time it takes to smoothly let up on the front risers we may find ourselves planted in the ground like a shrubbery. Dropping the front risers allows the pilot to keep their hands down, ready to stab the brakes aggressively to arrest a mortal dive. A short, sharp, shock on the brakes may be all that is necessary to place the jumper back under the wing, and to the higher angle of attack that saves their life.
    Slow-Flight Practice

    Place the canopy in 90% brakes and hold for 60-90 seconds.
    Make controlled heading changes of 45-90 degrees.
    Notice the difference in responsiveness as compared to full flight turns.
    Notice that lifting a toggle on the outside of the turn reduces the risk of stalling the wing on the inside of the turn. Why?
    Most pilots spend the majority of their canopy ride in full flight. This means that the feeling of the canopy in this mode is most comfortable to most people. It also means that flying in deep brakes places many out of their comfort zone. This means that most people are feeling somewhat uncomfortable just prior to putting their feet on the ground every single jump. In fact, this anxiety often causes people to hold their breath, and then offset their steering toggles toward the end of the landing in order to get to the ground sooner. They simply want this part to be over. In order to land with great consistency, we must become intimately aware of the flight performance of our parachutes in very deep brakes. The more time we spend in this flight mode, the more comfortable we will be. If we are to land well, we must be as comfortable with deep brakes as we are with full flight.
    Brian Germain is the author of The Parachute and its Pilot, a canopy flight educational text. Brian is also the President of Big Air Sportz parachute manufacturing company, and teaches canopy flight courses all over the world. To learn more about parachutes, or to order the book, go to: www.BrianGermain.com .

    By BrianSGermain, in Safety,

    Landing Challenges

    Most of your landings will be normal and in the center of the drop zone, but unusual things do happen like landing in water, in sudden high winds, descending through power lines or trees.
    Turbulence
    As mentioned earlier, bumpy air may be encountered at any altitude and it has been known to close end cells and upset canopies. Jumpers have been robbed of their wings to be left back in freefall at 75 feet. Bumpy air may occur on windy days and on hot, no-wind days. Keep your canopy inflated during turbulence by flying at one-quarter to one-half brakes and make gentle turns. If turbulence causes a partial canopy collapse of your canopy, bring the steering lines down to half to
    three-quarters brakes to help the canopy to reinflate.
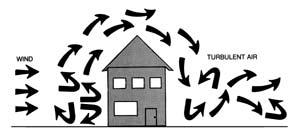
    Turbulence near the ground may be caused when wind flows over obstacles such as buildings and tree lines. Avoid landing on the downwind side of any obstacle. The air may be bumpy or descending. The stronger the wind, the farther downwind the turbulence will exist and the taller the object, the higher the turbulence will be. Turbulence can be significant downwind as far as twenty times the object’s height. For a fifty-foot tree line, that could mean 1,000 feet downwind turbulence.
    Turbulence also occurs behind other ram-air canopies. Stay away from the area directly behind another canopy about 45 degrees up from the trailing edge.
    Dust Devils
    Dust devils are very dangerous. They can rob you of your canopy when you need it most — near the ground. Look for the spinning dust clouds. Unfortunately they can’t be seen over grass.
    One jumper landed, his canopy deflated and then it was reinflated by a dust devil. The swirling wind picked him up and then threw him back on the ground. He died from the impact. In windy conditions, pick up your deflated canopy immediately. In bad conditions, stand on it.
    High winds. If you find yourself in high winds, look behind you as you back up. Many jumpers back into power lines and fences. When landing in high winds, let go of one toggle as soon as your toes touch the ground. Keep the other toggle at the flare position and quickly pivot 180 degrees in the direction of the depressed toggle. Steer the canopy into the ground. Run toward and around it to collapse it. If necessary, continue pulling on that toggle and reel in its line to pull the canopy out from under itself.
    Once you are on your feet, stand on the canopy and remove your harness. Don’t let it reinflate and start dragging you all over again.
    Thunderstorms
    Thunderstorms are violent vertical lifting of air masses, a phenomenon which can build cumulonimbus clouds from near the ground to anywhere from 50,000 to 75,000 feet. Thunderstorms possess violent updrafts and downdrafts along with lightning. While the West Coast of the U.S. has only around five thunderstorms each year, the northeast has 20, and Florida 80 to 90. Jumpers have been caught in cumulonimbus clouds for some pretty scary and wet rides. When the storm clouds appear, put the gear away.
    The Tree Landing
    The tree landing is rarely hazardous if you “center” the tree. Your canopy will lower you gently into and through the trees as you slow further, breaking the thinner branches. You will probably go all the way through to the ground and make a normal parachute-landing fall on
    the other hand, if you clip a tree with a wing tip, your canopy may collasp, dropping you to the ground.
    If you can’t avoid the trees, face into the wind to minimize your ground speed, pull half brakes, and place your feet and knees tightly together so you won’t straddle a branch. Do not attempt to brake your descent by grasping limbs; you are better off going all the way through to the ground slowly than ending up sitting in the top of the tree. Prepare for a PLF. If you come to rest short of the ground, check your position. Students should wait for DZ personnel to come to their aid.
    If your feet are within three feet (1m) of the ground, unfasten your chest strap and then your (solid saddle) leg straps and drop to the ground. If you do not undo the chest strap first, you could injure your neck as you fall away.
    If you are up quite a way, relax and wait for help. If help does not arrive, you may have to climb down. Perhaps you are way off the DZ and dusk is approaching. It’s hard to shout continually, and it is nice to have a whistle in times like these. You may deploy the reserve canopy without activating the cut away mechanism (for S.O.S. type equipment, pull the metal cable out of its housing without disturbing the plastic-coated breakaway cables), let down the canopy and lines and then climb down hand over hand. If you let the narrow lines slip through your fingers and aren’t wearing gloves, you will receive painful friction
    burns, so go hand over hand.
    Keep your helmet on until you have both feet firmly on the ground. Its purpose is to protect your head from takeoff to touchdown, and you aren’t down yet.
    Power Lines
    You must avoid power lines at all cost; the danger is just too great. Look for the high-tension wires. If you are at an unfamiliar DZ or land off target, look for poles; wires run between them invisibly. Keep power lines continually in mind from the time you open so you can avoid them. High-tension lines don’t look dangerous, but they strike with the speed and power of lightning. They may electrocute you in an instant or put you in the hospital with severe burns; it isn’t at all pleasant. If there is any question about clearing the lines, turn and run with the wind until you are past them and make the decision high enough. It will be better to land downwind than to land in power lines.
    If landing in the wires is inevitable, it is essential that you avoid touching more than one wire at a time. Any bird will tell you that it takes touching two wires to get zapped. If you are going into the wires, face your canopy into the wind to minimize horizontal drift, pull half brakes to make your final descent as close to vertical as possible. Drop your ripcord or anything else in your hands. Place your feet and knees firmly together with the toes pointed to avoid straddling a wire. Look for wires and wriggle and squirm as necessary trying to avoid touching more than one at a time. If you come to rest near the ground, check below to see what is underneath you. If there is no hazard below you and it is less than five feet to the ground — and assuming it is the main canopy that is hanging you from the wires you might decide to execute a breakaway and get away from the danger area as quickly as possible, but it would be better to wait for calmer heads to give you guidance in this matter. If there is a hazard below you or if it is your reserve parachute that is hanging you from the wires, you must wait calmly for competent, professional help. Any movement on your part may force an electrical contact. If a local resident walks up desiring to help you, ask them to call the power company and the DZ in that order. Warn would-be rescuers not to touch you or your gear until the power has been turned off. They could complete a circuit between you and the ground with fatal results.
    Once you get to the ground, be alert for broken power lines, they are like snakes hidden in the grass and they not only strike, they sometimes start fires. Never pull on a canopy attempting to remove it from the wires, it may be your very last good deed. Let the power company do it; it is their kind of work.
    Water Landings
    There are two types of water jumps — those you plan and those you don’t. An intentional water jump is an exciting, rewarding combination of aviation and water sports. But being unexpectedly blown out over a body of water is cause for great concern. In fact, while few jumpers have perished in a planned water jump, 48 perished in unexpected water landings between 1967 and 1984. These figures have dramatically decreased now that the use of ram-air canopies has become universal and floatation devices for operations within one mile of water are mandated by the BSRs.
    The procedures for these two very different types of landings are not the same.
    In an intentional water landing you will slide back in the saddle, undo the chest strap, the bellyband (if there is one), and loosen both leg straps slightly (unless you have a full saddle harness, in which case you can release one leg strap up high, then the last leg snap upon splashing down). This procedure is also recommended if you find yourself being blown unexpectedly out over the ocean or other immense body of water. When there is absolutely no question that you are going for a dunking, you should inflate your floatation device. Don’t get out of your gear until you get wet. Don’t break away when you think you are about to get wet. Depth perception over water is deceptive. You may think you’re at 20-feet, but you’re probably much higher. Without knowing how deep the water is, you almost guarantee yourself a landing injury if you don’t steer the canopy all the way to the surface. For landing purposes, assume the water is just a few inches deep. Take a deep breath and prepare to do a PLF. Line up your landing into the ground winds (you may have to use the sun’s position for a reference) and once you are wet, swim or work your way forward out of your gear. Don’t try to save the gear at first. Remember that it is replaceable, you aren’t. Worry about the gear later, when you are safely away from it. Better yet, let someone else (such as your water landing crew) worry about it.
    When making an intentional water jump, conditions are good, the jump is planned and the necessary flotation equipment is worn. The ingredients for tragedy, on the other hand, are born by being unprepared for the unexpected.
    The Basic Safety Requirements insist on carrying flotation gear when parachuting within one mile of any water deep enough to take a life, but there are times when one mile is not enough. A bad spot on a big load with high upper winds, sudden radical wind changes, or a popped round reserve as you exit at twelve grand, for examples, may carry you far from the friendly DZ. Some water requires more protection than just flotation gear, such as when a jumper punches through the ice in the wintertime.
    Most unintentional water landings are also unexpected. They take place in narrow rivers and small ponds; so small that you don’t know you are going into them until just a short distance from splashdown. There is no time to do much water-landing preparation, particularly if you are trying to avoid trees. As a result, you are going into the water in all your gear and your chances are poor.
    On the other hand, if you go through the intentional water landing procedure just in case and then miss the water only to land in the trees because you couldn’t spend enough time steering, you may subject yourself to other dangers.
    The greatest danger in water landings is becoming entangled in the net-like canopy and lines. In fact, we should think of: panic-canopy-entanglement-drowning. All are challenges, very much related, and either of the first two can lead to the others. If there is little wind in the small tree-protected pond, the canopy will deflate and fall straight down on you in a huge mess of tangled nylon fabric and lines. If you panic, you are sure to become caught in the trap. It seems logical, then, to try to avoid the canopy, or better yet, avoid the water landing.
    The procedure recommended for unintentional water landings is as follows: You are at 1,000 feet and the wind is backing you toward a water hazard. If you continue to face the wind, you may land short of it and if you turn to run, you may land on the other side of it, but one thing is for sure: you will land in the vicinity of it. So, take the action outlined below and then at double to triple the height of the trees, face into the wind to minimize your ground speed, pull your
    toggles to half brakes, and place your feet and knees firmly together in preparation for a PLF.
    Two Action System (TAS)
    Continue to steer, activate your flotation gear if you have it, undo your chest strap and your belly band if there is one. Loosen your leg straps so that you can slide the saddle forward a bit. Disconnect the RSL. Then, just before touchdown, reach for the canopy release handle. At the moment your feet get wet, not one moment sooner, activate the releases. The tensioned canopy will recoil upwards and even a mild wind will carry it away. Altitude is very difficult to judge, especially over flat ground or a large body of water. One is always tempted to drop out of the harness just before touching down, but what appears to be just a leg length may really be building height, so don’t break away until your feet are in the water.This procedure will leave you floating with your harness and reserve on but with the dangerous unpacked main canopy gone. Roll over on your back and take off the harness. Actually, the harness won’t hurt or restrict you and the packed reserve will even provide positive flotation. In fact, the reserve won’t become negatively buoyant for about three minutes. So, you can use it for temporary flotation.
    Single Operation System (S.O.S.). With the S.O.S. system, if you jettison the main canopy, the Stevens lanyard will activate the reserve. Allow yourself to get wet, bend forward and then swim or work your way forwards out of the loosened leg straps as quickly as possible. Get clear of the canopy.
    If the canopy does land on top of you anyway, grab it and follow/walk a seam to the edge of the canopy. There is no reason to panic as you can always lift the porous fabric to form a space to breathe. Once clear of the canopy, swim away using mostly your hands until you are clear of the lines. Keep kicking to a minimum, as pumping legs tend to draw lines and fabric toward them.
    If you should land in a river, even a slow moving one, you want to jettison your main as soon as possible. If it catches in the current it will drag you under and/or downstream away from your rescuers.
    Besides your reserve, certain other pieces of your gear may provide some flotation. Pneumatic soled jump boots, full shell helmets, knotted jumpsuits, etc.; they are all there for those who think to use them.
    You must undergo (dry) unintentional water-landing training for your USPA A license and (wet) live water training with full gear for the B license. These requirements have probably saved hundreds of lives so far.
    Buildings

    Landing on a building presents two distinct hazards. First, you might go through the roof of the building, which may lead to a broken or cut extremity. Second, if it is windy, you might find yourself being dragged off of the building and going for a second extremely hazardous landing. If you feel your life is in danger (such as being dragged off a high building), break away from the main as quickly as possible. Don’t worry about the reserve inflating — it won’t have enough of a
    chance to do so. If it is your reserve that put you on the building, try to collapse it as quickly as possible. If that doesn’t work, you’re going off the building in the wrong position for a second landing and there probably won’t be much of a chance to get into a PLF mode, but try to anyway.
    Other Obstacles
    There are many other landing obstacles that are potentially hazardous to parachutists such as ditches, fences, hard roads and even some unique ones like hot water geysers. These hazards at your DZ will be pointed out to you in your first jump course, probably with a marked aerial photograph. When visiting a new drop zone, be sure to check in with an instructor or the Safety & Training Advisor for a briefing on their local hazards and recommended alternate landing areas.
    When you are in the air, look for the danger areas. Invisible
    barbed wire runs between visible fence posts, power lines run between power poles, isolated buildings are served by electricity. Power lines, ditches, and fences often border roads, airplanes land on runways, etc. This should all be obvious, but sometimes it’s not. It is all new to you and the view is different: you are looking down at the terrain now, not horizontally.
    If an obstacle presents itself, steer your canopy to avoid it. Turn your canopy to run and land beyond it, if necessary. If you are going to strike an object, hit it feet-first. Successful landings under a parachute are like those in an airplane: the ones you walk away from are good. It is far better to land outside the target area and walk back than land on a fence and be carried back. Don’t let get home-itis get you. If you pass over the obstacle very low, you may not have sufficient altitude to turn into the wind for landing. It is then preferable to crab the canopy slightly and try to do your best forward PLF. But, obviously, the best solution is to think and plan ahead to avoid the obstacle in the first place. The most important rule about landing hazards is: Continually make efforts to avoid them. The second rule is: It is better to land flying downwind than to hit an obstacle.

    By admin, in Safety,

    Freefall Emergencies

    Accelerated FreeFall (AFF) Emergencies
    As you get ready to leave the aircraft, you are supposed to do a pre-exit check to make sure that your jumpmasters are ready to exit too. If you make an error in your exit count, you can fool your jumpmasters (JMs) into thinking that you are about to leave and they may end up pulling you off the aircraft before you are truly ready to go. If you leave at the wrong time in the count, you could be taking your jumpmasters in tow. This could lead to some awkward flying if you are not arched. You may be positioned in a reverse arch (like a cat standing on top of a toilet bowl) which will attempt to send your butt to earth. The exit timing depends upon you doing the exit count right so that your jumpmasters can exit with you, not before or after you. If you find yourself looking up at the sky or tumbling, arch hard for stability. Your jumpmasters will be doing their best to assist you in getting back to the proper belly-to-earth position.
    AFF:Loss Of One Jumpmaster
    If you sheared off one jumpmaster during the exit or one let go because he was not contributing to the stabilization of the formation, arch for stability and check with the remaining jumpmaster during your circle of awareness. If you get a headshake of “NO,” it may mean that the jumpmaster holding onto you is not quite comfortable with your stability at that time. On the other hand, it may mean that he doesn’t want you to go to the next portion of your tasks because the other jumpmaster is just about to re-dock on the formation and he wants that jumpmaster in the correct position before you continue with your tasks. You may or may not feel the other jumpmaster re-dock. Whenever you get a “NO,” simply arch a bit more, wait a few seconds, then do another circle of awareness. If you get a nod of “YES,” you may continue on with your skydiving tasks regardless of whether or not you have just one of both jumpmasters firmly holding onto you.
    AFF: Loss Of Both Jumpmasters
    You are in an extremely hazardous environment if you don’t have a jumpmaster holding onto you. The moment you realize this, arch and pull immediately.
    The following emergencies apply to either AFF or S/L program freefalls. Of course, in the S/L program, a jumpmaster might not be in the air with you during your freefall.
    Five-Second Rule For Loss Of Stability
    Here’s a good rule for AFF or freefall. It is called the Five-Second Rule. If you are out of control, attempt to regain control by arching hard for five seconds. If you don’t recover stability by the end of that five-second period, pull your ripcord immediately (which one depends upon your altitude). This rule is normally taught to AFF students when they start their Level III training and it is applicable to all freefall students.
    Loss Of Altitude Awareness
    If you can’t determine what your altitude is because you can’t see your altimeter and you can’t see either of your jumpmasters’ altimeters, arch and pull immediately. The worst of all situations is to go into the ground at a high rate of speed simply because you didn’t know where you were.
    Goggles
    If your goggles weren’t tight, they may come up off of your eyes and cause sight problems. You could simulate a practice pull position and try to hold them in their proper place, but it is probably better to end the freefall once the situation occurs. There is nothing worse than a distraction to disorient you and cause you to lose track of time and altitude. When in doubt, whip it out.

    By admin, in Safety,

1 1