Search the Community
Showing results for tags 'safety'.
Found 179 results
-
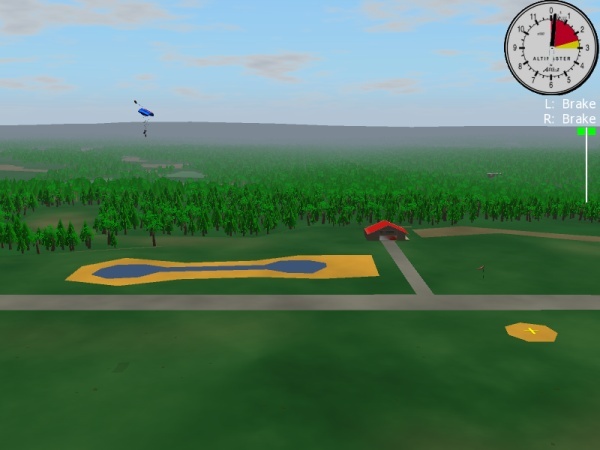
 Landing Pattern is an interactive computer simulation program for ram-air parachutes. It is similar to flight simulators, such as Microsoft Flight Simulator. One can fly a landing approach of a parachute in different wind conditions. Currently only Skydive New England is available in the simulation as a virtual drop zone, but more will be added in the future. Usually the landing pattern is shown to the students on top of an aerial picture or a satellite image. The pattern has an entry point around 1000ft, then the turn to the base leg around 500ft, and then the turn to the final around 300ft. The altitudes for these points are kept constant, while the position of the canopy relative to the landing target changes depending on the wind conditions and canopy parameters. Static Line Interactive released a free online service Landing Pattern Estimator that shows you the landing pattern above the satellite image from google maps. Landing Pattern allows you to fly a landing approach. Landing Pattern comes with tutorials that explain each leg of the landing approach. You can pick the wind direction, wind strength, starting altitude, position for the jumper, and the type of the altimeter to use (digital or analog). You control the left toggle by pressing the left mouse button and moving the mouse up and down, and holding down the right mouse button allows you to control the right toggle. If you hold both mouse buttons together you control both toggles at the same time to flare the canopy. You can experiment with normal and flat turns. It is possible to switch between top view, side view, first person view, and free camera. You can show or hide the landing approach guides. Top view allows you to see the the movement of the jumper from above, which is useful to see the general shape of the pattern that you are flying. It is easy to see when to turn to the base leg or to the final leg. Side view allows to see the difference in altitude between the jumper position and the proposed landing approach. It is also useful to see the changes in the canopy pitch as the flare is performed. After understanding how to fly the approach using the top and side camera views you can use the first person view. This is how you would fly a canopy in real life. You can look at the analog or digital altimeter mounted on your chest. You can also see the proposed landing approach to follow. Use the mouse to look around and locate the target. Free camera allows you to fly the camera around so you can find the perspective that helps you the best. At the end of the jump you can flare the canopy for landing. After touchdown, you will see the speed of your landing as well as other statistics about your jump. You can review the trajectory of the jump and compare the current trajectory with trajectories from previous jumps. Author Information: Alexander Shyrokov is the founder of Static Line Interactive, Inc.
 -
I have spent much of my life studying parachute stability. It has become an obsession of sorts, spurred by a fairly sizable stint in a wheel chair- funny how that works. I have designed and built many, many canopies with the goal of creating collapse-proof canopy. I have failed. It is impossible. This is the case because, despite the best efforts of the designer to increase internal pressurization and dynamic stability, the canopy can still be flown badly and become unstable. This will always be so. The job then, falls on the educators, and on the pilots themselves to learn and rehearse the essential survival skills that increase the chances that the correct action will be taken in the spur of the moment. I stated in my original article on turbulence, entitled “Collapses and Turbulence”, that the key is to maintain lots and lots of airspeed and line tension. I still hold that this is generally the truth. However, upon re-examining the situation, I have realized that my perspective on the situation is based on my frame of reference. I fly sub-100 square foot cross-braced speed machine that falls out of the sky like a homesick bowling ball. I do not really represent the whole. The average-size parachute is 150-170 square feet in the civilian world, and much larger for students and military jumpers. In further exploring the issue from the perspective of lighter wing loading and larger parachutes, I have discovered that this is not necessarily best way to fly a larger canopy in chaotic air. Here is why this is so: If the parachute has a great deal of drag, i.e. a light wing-loading, thick airfoil or is a large parachute in general, the rules change. Such canopies are less capable of maintaining high speeds unless flown very aggressively. Due to the high drag variable at the canopy end of the drag equation (“Rag Drag”, as I call it) the excess airspeed makes the canopy itself want to retreat behind the jumper far enough to reduce the airspeed far below the unadulterated full flight speed. This momentarily increases the likelihood of a collapse. The parachute levels off in mid air, slows down, and for a brief moment, becomes vulnerable to collapse. Therefore, when flying a canopy with a short, powerful recover arc, aiming to increase the speed beyond full flight becomes a double-edged sword. If the timing is wrong, such as when leveling out high (prematurely), the situation can become very dangerous. The truth is, leveling off well above the ground is dangerous for any wing-loading, and can happen with any parachute due to an incomplete plan or an imperfect execution. Parachutes flown below one G, at speeds less than full flight speed tend to be more susceptible to collapse. So, if the pilot is quick with their "Surge-Prevention Input", (what paraglider pilots call "flying actively", the risk of collapse is significantly reduced as the negative pitch oscillations will be minimized, thereby diminishing the likelihood that the wing will reach a low enough angle of attack to actually achieve negative lift and dive toward the jumper (i.e. collapse and scare the daylights out of you). Given the fact that the only preventative or corrective response to a collapse is to stab the brakes as quickly as possible, the sooner the pilot responds to the forward surge, the less the input necessary to avoid or correct a collapse. Therefore, a canopy with a great deal of slack in the brake lines will require more motion on the part of the pilot to create any appreciable effect. This means that a canopy that is in full glide, with the toggles all the way up in the keepers and three inches of excess brake line trailing behind will take longer to see an increase in the angle of attack due to the control input than one with no slack in the brakes at all. So then the question is posed: “Do we shorten the brake lines on larger canopies to help the pilot prevent collapses?” The answer to this is no, we cannot. This will result in serious bucking during front riser input. It will also mean that following a few hundred jumps, the canopy will be in significant brakes when they think they are in full flight, due to their “lazy arms” pulling the tail down when they should be flying arms up. This will result in lower average airspeeds that will reduce the parachute’s flare power, as well as it’s penetration into the wind. This will also result in more oscillation and distortion in turbulence. The answer comes to us from our sisters and brothers in the paragliding world. They teach their students to hold a touch of tension on the brakes when flying through turbulence. The goal here is not to put on the brakes and deform the tail, but to simply take up the slack on the brake lines, in preparation for a 12-24 inch strike on the toggles to prevent a collapse. Some teach their students to hold about 5 lbs of pressure on the brakes, while others teach that we should hold no more than two inches below the “Feel Point”. Either way, taking the slack out of the brakes is like standing ready in the door, even when you can't see the count. So, on larger canopies, it appears that a light touch on the brakes may help prevent collapses. However, it is not because the canopy is more stable in this configuration, but simply that the pilot is more prepared to prevent the wing from surging forward in the pitch window. Once the wing has passed through that parcel of turbulent air, however, the job remains to regain the full flight airspeed, while maintaining positive G's. Letting the wing surge back into full flight too quickly can send the wing out of the frying pan and into the fire. Get it back to speed gently, but get back there as quickly as possible. These are opposing goals, so the actions of the pilot once again become pivotal, calling upon trained skills and acute attention to sensation. Ultimately, the best way to handle turbulence is to deny it battle. Despite what your ego is telling you, you already have enough jumps. I know you want more, but sometimes the best way to go is to sit on the ground and watch the inexperienced jumpers get experienced. Live to fly another day. Brian Germain Big Air Sportz www.bigairsportz.com
-
When I started skydiving more than 25 years ago, the leading cause of skydiving deaths was the failure to pull on time, or at all. Skydivers just failed to do the one thing every one of us knew we _must_ do: pull. Education, regulation specifically addressing this issue, and not least the development by Helmut Cloth of the first AAD widely accepted by experienced skydivers in the 90's helped to control this problem… only to show the emergence of another, more insidious: skydivers were dying in increasing numbers under perfectly good parachutes, hitting the ground at unsurvivable speeds sometimes after colliding at low altitude with other perfectly good parachutes. And this happened not only to hot shots under handkerchief-sized canopies, it also affected jumpers flying conservatively under big canopies. Once more, the response adopted by the skydiving community has been to put an increased emphasis on the education of skydivers, their instructors, safety officers and DZ operators. It is here where “Canopy Control: Core Essentials” fits right in. Produced by VASST.com and authored by Chris Gay and Chris Warnock, it is aimed primarily to new skydivers. To them, it will be an invaluable tool to complement and clarify what they are learning in the first jump course. But while reviewing it I found it is also extremely useful for experienced skydivers as a refresher of basic concepts that may or may not have been adequately acquired, and sometimes forgotten, years ago. The DVD is divided in several sections totaling 55 minutes, with another 12 minutes of bonus material plus a couple of printable charts. In the beginning the host Chris Gay introduces a key concept: “the person most responsible for your safety, is you”, and it is with this in mind that one should view this DVD, regardless of experience level. Throughout the DVD the importance of different aspect of flying our canopies in relation to others is constantly reminded and related to, as a way to increase our awareness of other canopies in the air and to reduce the chances of a collision. It is also constantly reminded to seek advice from an instructor or canopy pilot coach. In the “Terminology” section, Chris Gay introduces and proceeds to explain basic terminology and concepts related to canopy flying. As through DVD, well conceived and executed graphics, both static and animated, are used to clarify the point being made. This, in addition to the even more prevalent footage of canopy pilots executing the maneuvers being discussed or explained. In “Planning and Landing Pattern”, this process is thoroughly explained. While more experienced skydivers jumping at their local DZ may not be conscious of doing it, it is a skill that must be acquired and developed. And when we are on a new DZ… well, then we all are “new” skydivers. In this regard, great importance is given to acquiring local knowledge on the peculiarities of any given DZ we may be visiting regarding local regulation, obstacles, landing areas, not to land zones (a.k.a. Farmer McNasty’s fields), wind indicators, etc. Also, it is explained how to explore the landing area and what to watch out for. The section “Flying the Pattern” follows, in which great emphasis is given to adapting the landing pattern to changing conditions. There is an extensive treatment on how to modify the landing pattern according to different wind conditions, and what to do if they change after take off. Similar treatment is given to the effect canopy traffic on the landing pattern and how to adjust accordingly, or what to do is you find yourself in the landing pattern at altitudes different than planned. And what to do if, in spite of all our planning and best efforts, we find we are not going to land where intended? That is also explained in this section. “Canopy Controls” is the most technical of the sections, in which a in-depth explanation of the diverse methods of controlling the parachute is given, as well as in what situation every kind of input is appropriate, always relating it to the aerodynamic forces involved. “Getting Back From Long Spots” deals with how to recognize the probably landing site and how to adjust the flight of our canopy to correct it in order to land in the intended site in different wind situations. It also explains the ever important how to plan and what to watch out for if we end up having to land out. “Flaring” advices on how to improve our landings. Explains how the canopy reacts while flaring for landing, different flaring techniques, and how to learn more efficiently this aspect of canopy control. The main section of the DVD finalizes with a “How to Learn More” section, in which different training aids and techniques are advised. In the Bonus section a variety of complementary topics are discussed: wing loading, technical aspects of canopies (7 vs. 9 cells, elliptical vs. “square”, cross braced vs. standard, flight characteristics of small vs. large canopies), on heading openings, packing for better openings, when to learn swooping, and finally a safety review Q & A. As a bonus of the bonus, if I may call it that, there is footage of the Canopy Formation 4-way world champion team Clean Air demonstrating what it is meant for “canopy control”. In summary, as stated by Chris Gay, “Our goal to make this DVD is to help to make you a safer skydiver”. I believe that reviewing and following the advice in this DVD, both by beginners and experienced skydivers, will certainly be a big step in that direction.
-
CANOPY FORMATION PARACHUTING - CF (Part 2)Part 1 may be read here Packing the Canopy You will want to pack your canopy for a CF jump in a way which will ensure that: it opens fast and reliably it opens on heading all canopies involved open with identical timingA good way to achieve this is to pack the main similar to a reserve canopy, as the requirements for a reserve opening are about the same. Indeed, many CF teams do so. Since there are different methods of reserve packing, it is recommended that all jumpers involved in a team or group should use the same packing method for safety reasons. Doing so reduces the probability of collisions and unintended different opening levels to make sure that each team member has an optimal set up for his way to the formation. Type of Exit and Exit OrderA good exit speed is 70 to 80 knots with little prop blast. Newcomers to CF will enjoy greater success if the jumpers exit one after another in the same way students perform “hop and pops” and remain stable. It is essential to remain in a symmetrical body position until the canopy is completely inflated to assure that the canopy opens on heading and continues flying straight until you want to fly your pattern towards the docking position. With experience comes a tighter exit timing, and this practice becomes even more important. If your canopy does not open on heading you can easily end up in a dangerous collision or at least in a bad position during the approach to the formation. Also, other jumpers can be disturbed as they try to avoid the errant canopy. In general you will exit in the order of your position in the formation. Competition teams might use different techniques to speed up the build of their first formation. TimingTeams with more experience will eventually develop an exit with two or three jumpers standing in the door, jumping with only very little delay, and pulling in sequence to create a perfect set up for the build of their first point. In this type of exit, the last jumper leaving the plane (front person in the door) deploys first. The next jumper deploys when he can see the beginning deployment of the jumper above. This leads to a set up with the lower canopy slightly in front, which creates a perfect set up for a final approach. Set-Up for Building the FormationIn most cases it makes sense if the person flying the Base sets up on heading, flying with a little brakes and slightly lower than the jumpers that will dock next. That gives the next jumpers the potential to fly to their docking position because altitude is our fuel. A good position for the final approach of a single canopy is slightly higher and to the side (perhaps slightly behind) of the canopy to dock, onflying parallel with it. The optimum setup of course depends on the flight characteristics of the formation to dock on. For docking on a fast sinking formation, it’s probable that the setup will be lower than for docking on a floaty formation. The necessary experience to estimate the perfect set up will only come with the jumper and quality of your jumps Body Position Fig2.1 To keep your canopy flying straight with even controls, body position must be symmetrical. Shoulders should be square and arms in a “box position” with legs slightly spread and bent as shown in the sketch of a stack. If you lift one leg from that position while stretching the other one your canopy will start to turn towards the stretched leg. If done with intention, this can be a useful tool. For example, a stair step formation might benefit from stretched-leg control. Bent legs also provide the potential to compensate for tension in a formation and to dampen oscillations. Reducing AltitudeWhen getting into the setup position for your final approach to the formation you may find yourself higher than desired (if your are too low or far behind you won’t be able to get into the formation). There are different ways to lose extra altitude without using much space. It always makes sense to stay in a small area because long distance movements take much more time. Additionally you may interfere with the waiting position of another jumper. Furthermore, you might have difficulties estimating your exact position. Below, you’ll find methods of losing altitude. Cross ControlsIf it is important to use very little space, you can easily lose altitude by using cross controls. That means you’ll pull down one front riser, then compensate the move your canopy would now make by applying the toggle on the opposite side. Because the canopy is being distorted it sinks and will pick up speed to the distorted side. The toggle action evens out this momentum so that the canopy ends up sinking in place, assuming that the right balance is applied. Doing so you can get into the desired set up position for your final approach without disturbing another jumper in his set up position close to the formation. Rear Riser StallA similar result can be achieved by performing a rear riser stall. To do so, you grab the connector links on your rear risers and pull them down carefully. This is not very hard to do. Because the main part of the lift is being created in the first third of the profile where the A- and B-lines are attached to the front risers, this is a fairly light pull.. At first, the canopy will begin glide flatter without losing much speed. This range can be useful if you find yourself far away from the drop zone on a down wind flight pattern and want to get as close to the DZ as possible. If l the risers are pulled down a little further, the canopy will smoothly begin to stall and sink very fast. This technique can help to lose a lot of altitude. However, it should be practiced with only two jumpers involved before being used in a big way jump. It is not recommended in a tight echelon as the canopy may come out of the stall bailing out to the side, and interfering with others in the lineup. Rear RiserIf you are too low and need to gain altitude on the way to your waiting position, or if you’ve gotten behind the formation, you can use very light pressure on both rear risers to fly a fatter path without losing much forward speed. This has to be done very carefully because it you pull them down too much you will lose speed and only millimeters further, end up in the rear riser stall previously mentioned. About the oldest technique to lose altitude is the “sashay.” The sashay begins with a radical toggle turn away from the formation and then a reverse movement as soon as the canopy has tilted to the side; this movement is stopped out with both toggles. It is not very efficient, utilizing a lot of area and you may lose track of your position relative to the formation. It takes a lot of practice to get good results with this radical maneuver. Over the TopAlso from rotations comes the “rotation over the top“. The move begins with going to deep brakes quickly. As soon as the canopy rocks back grab both front risers and quickly pull them down without letting go of your toggles. It takes less force than you might expect because if done at the right moment, the front riser pull will coincide with the canopy having almost no lift and no tension on the lines. Next, you riser down little further than your final destination, release the risers, and swoop into your docking position by using the toggles. Today some successful teams are using a combination of the two techniques mentioned above. However, these should be considered advanced skills, to be discussed in another article. Techniques for ApproachesThe most challenging part of a CF jump is the build of the initial two-way formation or the dock on a single canopy. Remember, a formation will usually not perform as well as a single parachute. Docking on a larger formation always gives you a little extra performance relative to the formation since you have a single canopy with all of its lift potential. Good technique(s) is/are required to dock with a single parachute of similar performance. That means you’ll need to gain some momentum when attempting to dock on a canopy flying by itself. The only way to do so is by setting up higher and not too far behind the canopy you’ll be docking with. The canopy to be docked upon should slightly hold brakes to make things easier. The docking jumper begins his approach setting from a position with his feet approximately at the level of the canopy he’s docking on; slightly behind or a little to the side. The approach is initiated by using front risers to pick up speed and controlling the direction of flight. Now pilot the canopy to a position slightly lower and slightly behind the final docking point. The final move is performed via toggles (reducing speed), swooping up to the desired level, and aiming the docking cell to the desired position (center cell for a stack or end cell for a stair step). It is essential not to have too much energy left when docking and also not to end up too low. If you end up too low the dock will fail. If you find yourself having too much left-over energy, you should abort the dock for safety reasons and use the potential energy to fly to a good position for a new setup and another attempt. Building the FormationsIn principle, there are only two or three ways of making approaches. Building a StackTo build a stack, the jumper who is docking sets up slightly behind and above the canopy he’s docking on while the jumper to be docked upon flies straight holding a little brakes. The lower canopy stays in brakes until the docking center cell has touched his back. If the dock is perfect and he has some experience, he can take foot grips hooking his feet behind the center lines. If not, he can release his toggles and grab the docking canopies nose get it into the right position and then take the foot grips. Having done so, the lower canopy pilot gets back on the toggles to control the formation. Never release the toggles before the docking canopy has actually touched you because if you do, your own canopy picks up speed and flies away from the canopy trying to dock. In any case it is important that he releases both toggles evenly to prevent the formation from spiraling. It is also very important that the docking pilot can see at least the lower legs of the jumper he’s docking on. Should the legs become shorter and shorter you need to add more brakes. It an absolute NO to pass under a jumper you intended to dock on. If you have the impression that this is about to happen you must abort the attempted approach by either stalling radically or turn away with one front riser pulled down. It can be extremely dangerous to fly underneath and in front of a formation because your burbles can cause canopies in the formation to collapse. Also you could lift up with the middle of your canopy under the jumper you wanted to dock on ending up in a wrap. That means if you perform any kind of dock on a formation you have to be in full control of your canopy at all times and able to abort if not. Otherwise you are not qualified to do CF jumps. Fig 2.2 If the docking canopy ends up higher than wanted, it’s not necessarily a problem. The docking jumper can park his canopy with his nose in the center against the lines of the top canopy and slide it down by moderately using his front risers until the top jumper is able to reach for his grips. Approaches to lower positions in a stack or plane will need a lower set up than for high positions because the formation begins to sink more with its size - especially the “plane” formation. Speed teams may still want to dock positions three and four from a higher position and perform a riser dock by aiming their slider to the jumpers feet instead of the center cell. Building a PlaneA plane formation begins with a stack. Next, the top jumper climbs down the center A-lines and once the slider has been reached, he now hooks his feet behind the front risers of the lower jumper. The lower jumper helps by putting on some brakes to increase the lift of his canopy. If the top jumper needs to pull himself down on the A-lines, it must be done with uniformity to prevent the formation from oscillating sideways. Building a StairstepThe Stairstep is the second basic type of formation. The technique for building a stairstep dock is similar to the techniques explained previously but because the Stairstep is far less solid than a stack or plane, everything has to be done with lighter input and greater precision. The set up for the final approach is slightly to the side of the formation. To make a clean straight and precise dock you’ll want to keep it relatively short with not too much potential. You may start with one canopy width to the side of your target canopy and your canopy slightly lower than the canopy to dock. The approach should be from the side rather than from behind so that the jumper to be docked upon has a good view of the line he wants to catch as well as remaining in the clean air to the side of the docking canopy. Also in this type of dock you should never get too low or lose sight of the target. The docking end cell should end up at the hip to the shoulder of the docked body. The docked jumper can now hook his outside foot behind the outside A-line of the docking canopy with his body staying outside the docking cell. If the grip taker should need to use a hand grip to guide the docking canopy to a good position for taking ther foot grip he has to be well aware to maintain his body position in the harness to prevent unwanted influence on the flight of his own canopy. The docking pilot puts on some outside front riser trim as soon as the top jumper has taken his grip to prevent his canopy from coming up on the opposite side. After having set his canopy by doing so he may release some of that trim or maybe even all of it. Sometimes it gives you enough trim to stretch the outside leg to keep the bottom canopy flying nicely. Sometimes no further trim is needed any more but still you should keep your hand on the outside front riser ready to apply trim again if needed. The set up for stairstep docks in lower positions may be somewhat lower. None-the-less be aware that a stairstep formation flies fast and flat compared to other formation types. If your setup is too low your docking time may become very long. The build of the stairstep, stack, or plane can of course also be done in reverse order with the lower canopy flying in little brakes and being the target and the top canopy flying the approach. The technique is referred to as the Top-Dock and will be explained with techniques of sequential CF later on. Flying in the FormationAs in free fall skydiving you have to keep on flying after you docked. In a stack for instance, especially in the bottom position, you need to make sure that your canopy does not get too light and floats up. All canopies should have slight tension on the center A-line to make the formation healthy. In a plane it is important that all cells of all canopies are inflated. If not the jumper in question can reinflate his closed cells by putting on some brakes. Perhaps he will also have to maintain some toggle trim to keep his canopy’s nose open. Also a jumper next to a closed cell can help by pulling the nose open. Good awareness is needed in formations with stairstep grips like stairsteps, diamonds or boxes. Especially jumpers in lower positions need to always keep their canopies from coming up or around. Possible techniques are: outside front riser trim asymmetrical leg position and inside toggle. Signals within the FormationTo signal information to other jumpers in the formation there are two ways. You can either shout a command by addressing the jumper with his name or use certain signs. In bigger formations it is more convenient in most cases to use signals instead of vocal communication to avoid noise and confusion. The signs and commands to use must be known well to everybody. In case of vocal information you must never use negative commands. If for instance you shout “don’t cut away!” and the other jumper misunderstands he will cut away. In this case you should have said “hold on!” for example. In large formations there are two very useful signals to the jumper below you: Twisting your foot sideways means the jumper whose canopy is on that foot needs to get lighter for example by putting on some brakes or easing the front riser pressure if possible. Shaking the foot vertically means get heavy which means put on some front riser pressure or signal further down if the jumper(s) below is (are) light on you as well. Piloting a FormationStack and plane formations always follow the top canopy and are controlled by the top jumper also called the pilot. The stair step needs more caution than the stack because it is connected less stable. Diamond formations act similar but in bigger formations the pilot might need some assistance by all the out side wing people to help keep the formation flying straight or to help turn the formation. Bigger diamonds are fairly inert. It takes some time to make a big diamond turn. The most attention is needed in stair steps. In a turning stair step the bottom jumper always needs to compensate the change in the flight characteristic of the turning stair step versus the straight flying one. If the formation is turning away from him he needs to release some of his outside front riser trim and if the formation turns towards him he needs to increase the trim on his outside riser. Because the links in a stairstep formation are similar to pivot points these formations need to be turned very carefully. Separating a FormationSeparating a formation needs at least as much attention as building one, especially for safety reasons. Also should it be done high enough. Bigger formations should be separated at 1.500m (5.000ft) and smaller ones at 900m (3.000ft). Small formations can be split in reverse order of building letting go one jumper after another. The jumper whose turn it is to go shouts the names of the ones holding him and they drop him. Then he clears the proximity of the formation immediately to give room for the next jumper to leave it. Larger formations in the shape of a diamond of up to 36 jumpers can be split by using a technique called STARBURST. The starburst is being started by the designated person calling “starburst! - starburst!” which is to be echoed through the formation. Then one person starts a count down calling “ok – ten, nine…..two, one, break!“ Everybody else joins the count loudly to make sure that everybody is able to hear it. On “one” everybody get his hands on the controls and on break lets go of the grips to fly out of the formation radially away from the center. Peter A. Pfalzgraf Rheingaustr. 24 12161 Berlin [email protected]
-
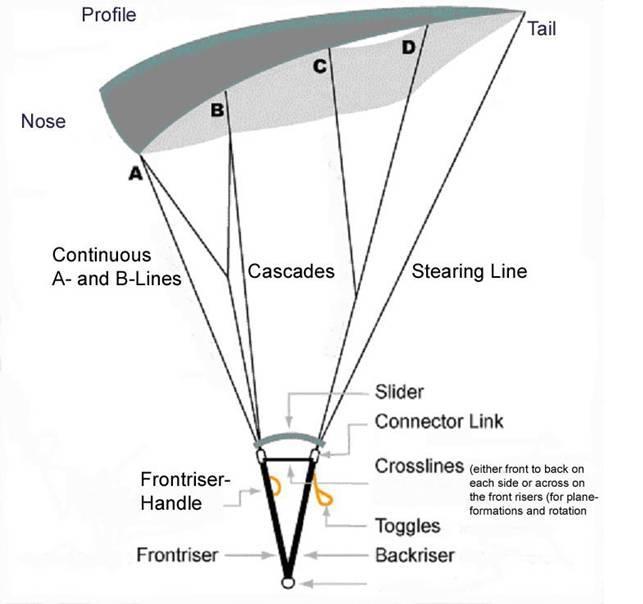 By Peter Pfalzgraf In the early days of CReW (as canopy formation skydiving used to be called) I wrote and published a little booklet for those who were interested in learning the new sport. Things have changed a lot since then. So, I found it necessary to publish something new to make general information on our sport available to everybody interested. This essay combines techniques and hints from Europe and America. The latest input came from the training camps for the new canopy formation world record attempts aiming for a 100-way formation. Canopy and Harness (Figure 1) The times are gone where they had all-around canopies that could be used fairly well for any kind of skydive. Such canopies as the Cruisair, ¬U¬nit, Pegasus, Cruislite and Fury were once very common. Today, the best parachutes for canopy formation parachuting (briefly known as “CF”, in the old days) are 7-cell canopies. These parachutes are the safest concerning deployment and stability in flight, especially in turbulent conditions. It is no coincidence that reserve parachutes and canopies for BASE jumping are mostly 7-cell canopies. Triathlons and Spectres with Dacron lines can be used for casual CF jumps, although Lightnings are the CF canopies of choice. If you intend to do a CF jump today you are well advised to use a canopy that has been designed for this kind of activity. As a compromise for your first attempts, you may use a 7-cell canopy with a thick profile (for instance a student or accuracy canopy). Never attempt CF jumps with elliptical canopies, canopies with wide wing spans (in comparison with the depth of the profile/length in direction of flight) and/or a low profile. Today’s CF canopies are available in different sizes for different weight classes. It is important that people intending to join a CF jump use the same type of canopy with the same line length and trim. Furthermore, the wing loading (weight under canopy per square foot) should be reasonably identical to guarantee similar flight characteristics. The container of your harness should be big enough for the packing volume of the canopy to make sure it can be closed properly (safety!). There should be no handles, container flaps, pop-top pilot chutes or anything else sticking out that could get caught in another jumper’s lines. Those things could result in unintentional reserve openings or problems on separation. The bridle should be short or even better, self retracting to prevent your pilot chute from being caught in the other jumper’s lines while you are in a formation. You can imagine that separating a plane formation with one jumper’s pilot chute entangled in the other jumper’s lines will most certainly result in serious problems. Additional Equipment The altimeter should be worn in a way that makes sure it does not get snagged and can always be seen while you have your hands in the toggles. The helmet should provide not only head protection but also allow good hearing. It should not cause wind noise that might affect your hearing. Every CF jumper should carry a hook knife that can be used in case of an entanglement or wrap. Sometimes it only takes one line to be cut to get free and save a reserve ride. The hook knife of course should also be worn in a way that prevents it from being caught or ripped away. Your shoes must not have any hooks. They should fit loose enough that you can get rid of them if need be in order to get free. It is very useful to wear long socks to protect your legs against bruises and line burns. Aerodynamics of the Airfoil Lift is the force that keeps a canopy in the air. Opposite to a round canopy that only creates a big air resistance to slow down your descent using a large area of fabric, the square parachute, or airfoil, really produces lift like the wing of a glider for instance. The square footage of an airfoil is approximately one-sixth to one-quarter of a round canopy, and yet has a far lower rate of descent. The lift of the airfoil consists of 1/3 high pressure under the profile (similar to the round canopy) and 2/3 low pressure on the top surface created by the undisturbed airflow. This effect is the important matter for us. The physical reasons for this effect aren’t pertinent to this particular discussion. What is most important is to know that the main part of the lift depends on the undisturbed airflow on the top surface of the square canopy, forward speed and the shape of the profile. The lift increases with forward speed and grows with the thickness of the profile. The air resistance of the canopy slows the forward speed down. Due to the different pressure at the upper and lower surface of the profile air will flow around the sides of the canopy from the bottom to the top following the pressure difference. This effect reduces the lift and is called induced resistance. As a consequence of this, the maximum lift is in the centre of the airfoil. The stabilizers on either side of the profile are designed to reduce the loss of lift by hindering the airflow from the bottom to the top surface. Another way to reduce the loss of lift is to make the airfoil very wide so that the percentage of wing area being affected becomes comparably small. A good sample for this solution is the paraglider. This shape of airfoil is, of course, not good for CF activities. Because of the airflow around the sides and also around the tail, a parachute gliding through the air leaves a track of turbulence. The side turbulence creates a zone of turbulent air on either side beginning at the trailing corners of the airfoil. The turbulence of the tail creates a turbulent zone rising from the trailing edge of the canopy. It is clear that a parachute or canopy formation flying into such a turbulent zone will be affected by losing lift. Even aircraft flying through the turbulence of a canopy formation will lose considerable altitude. Figures 2 and 3 show the shape and position of the zones of turbulence. In a formation these phenomenon cause effects that can be noticed clearly. Just the top canopy in a formation gets only undisturbed airflow and has the maximum possible lift. All canopies having a body in front or on a front corner will lose lift due to the turbulence caused by the body out in front. Aerodynamics of the basic Formation Types Knowing the things mentioned above, we can predict that any type of formation cannot perform as well as a single canopy. That is useful for building formations as it gives the single canopy the potential to approach and dock on a formation due to its extra lift and forward speed. In principle all formations consist of a few basic types. Let’s look at the conditions in these. The Stack The stack (Figure 4) is the most basic formation. To build a stack one jumper sits on top the other jumper’s center cell and hooks his feet behind the center A-lines of the lower canopy similar to sitting on a chair. There will be some tension on the lines because the lower canopy in this type of formation will have a little less lift. In a stack the body of the top jumper is in front of the center cell of the lower canopy. The turbulence of that body meets the airflow of the lower canopy exactly at the point where the main lift is created and leads to a considerable loss of lift. This means that a stack will sink far more than a single canopy. The Plane The plane (Figure 5) is created out of the stack. The top jumper climbs down the center A-lines and hooks his feet behind the front risers of the lower jumper underneath the slider. The lower jumper supports him by putting on some brakes to increase the lift of his canopy. For this formation type one or two cross connectors are required, which either connect the front connector links (one line) or two lines that connect the front and rear connector link on either side. Otherwise the top jumper might slide back up due to his plus of lift and pull up the slider, which would result in a collapsed lower canopy. In a plane formation, the turbulence/loss of lift effect is not as strong. As the top jumper’s body is beneath the two canopies, one might think there is no loss of lift at all, yet the line contact causes deformation in the lower canopy and additionally forces both canopies into a new aspect ratio. This leads to a loss of performance. A single canopy will perform better than a biplane. If a plane becomes bigger there will of course, be canopies with bodies in front of them. Planes with more than four canopies will sink faster as the plane formation grows larger. The Stairstep In a stairstep formation (Figure 6) the top jumper is positioned outside of the lower canopies end cell. He takes a foot grip on the outside A-line. Flying the stair step requires much more experience than flying a stack or plane formation because the link is not as stable. It is more of a pivot point than a stable connection. The lower jumper has to compensate for the influence of the upper jumper’s body to the flight of his canopy. To prevent the lower canopy from coming up and around you can put some tension on the outside front riser of the lower canopy or the lower jumper can stretch the outside leg while lifting the inside leg. The stair-step is far less turbulent than the stack and plane. The body of the top jumper only causes turbulence on the outside corner of the lower canopy and that is a part of the airfoil that contributes only a minor amount of lift. That means that a stair step formation is only slightly less efficient than a single canopy. Because only one side of the lower canopy is affected, the other side will perform better and cause the canopy to rise and drive forward. If the lower jumper does not compensate for this, his canopy might come up and around, leading to a wrap. To prevent that the lower jumper will start to compensate for the difference as soon as the top jumper has taken his grip. Possible ways to compensate include putting tension on the outside front riser and stretching the outside leg while lifting the inside leg. One might also apply some slight inside brake. You can determine how much trim is needed by easing up on the risers or brakes after the canopy is set. Sometimes the formation will fly well with only slight trim or none at all. Nevertheless, the lower jumper should keep a watchful eye on his canopy to immediately compensate, if necessary. That wraps up part one. Join Peter in a week or so for Part 2, when we'll dive deep into building and controlling these formations.
 -
 ByNadene Beyerbach Want to improve your skydiving skills, but don’t have thousands of dollars to blow in the wind tunnel? Try yoga! Yoga has been around for thousands of years. What is commonly considered yoga in Western society is actually Hatha Yoga, focusing mainly on physical yoga postures. However, yoga is not just a series of postures or poses. Yoga is meant to integrate the mind, body and spirit, and to achieve a state of enlightenment. For skydiving, this means developing your insight, awareness and focus, as well as balance, flexibility and stability. Not just an effective exercise for improving skydiving skills, yoga is also extremely convenient to practice at the dropzone. The simplicity of yoga means that you can do it virtually anywhere and need very little to get started. The most important thing you can do is wear comfortable, loose fitting clothing that you’re able to move easily in. A yoga mat is ideal, since it will allow you to grip with your feet and go deeper into the poses. However, poses can be done on grass, a towel or a blanket, if necessary. You can experiment with different yoga postures, breathing, meditation and relaxation exercises to see how they affect your skydiving. Try the following to get started: Complete Breath: A complete, “three part” breath consists of deep, continuous breathing through the nose. It is referred to as “three part” breath because you breathe first into the throat, expanding through the ribs, then deep into the belly. Slowly exhale, drawing the belly back in. Slow, deep breathing both energizes the body and calms the mind. Try using complete breathing when you’re concentrating on flying a body position that requires a lot of effort. For a relaxed and stable exit, you can also try exhaling completely as you leave the aircraft. Meditation/Relaxation: Simply close your eyes and focus on your breathing. Let your mind go blank. As thoughts enter your mind, just return your attention to your breath and let the thoughts float away. Meditation reduces stress and tension and improves concentration. Try meditating for a few moments on the ride to altitude before you begin any mental rehearsal. This will allow you to visualize your intention for the jump from a calm and centered place. Physical Postures: There are many different types of yoga postures to explore. Standing poses, seated poses, forward bends, back bends, twists, inversions (upside down poses), balance poses and relaxation poses are just some of the different types of postures. Let’s take a more in-depth look at sun salutations, twists, inversions and balance poses. Sun Salutations are an ideal warm-up for skydiving. Sun salutations are made up of a series of poses, flowing continuously from one move to the next. As you move through the poses be sure to hold each one for a few deep breathes. Begin by standing with your shoulders back and body properly aligned (Mountain Pose). Taking a deep breath, stretch your arms overhead, then fold forward at the hips and let your head hang toward the ground (Forward Fold). Step back with your left foot into a lunge. Follow with your right foot, pushing into your hands and feet to create an inverted V shape (Downward Dog). Lower your body toward the ground (Plank), then straighten your arms, looking up and lifting your chest toward the sky (Upward Dog). Now return to your starting position: Push back into Downward Dog, lunge on the right leg, fold forward, and finish by inhaling deeply in Mountain Pose. Try this sun salutation before gearing up for your next jump. You’ll instantly increase circulation, mobility, and flexibility. Twists offer back relief for skydivers who do a lot of bellyflying. If you spend a great deal of time arching, try a Half Spinal Twist to release tension in your back. Sitting down, bend your right leg to bring your foot toward you. Lift your left foot and place it on the outside of your right knee. Looking over your left shoulder, place your left arm behind you and your right arm around your knee. Breathe deeply and twist through your spine. Along with relieving tension, spinal twists will increase flexibility in your back and neck to help you further improve your RW skills. Inversions are poses performed upside down (with your feet above your head). They improve circulation and increase the flow of oxygen throughout the body. Inversions allow you to become comfortable in an upside down position and to work on balance with your center of gravity above your head. To try the Half Shoulder Stand, lie on your back and pull your knees to your chest. Support your back with your hands and straighten your legs above your body. Your weight should be on your shoulders, not your neck. Breathe deeply and remain strong through your core to help you balance. The Half Shoulder Stand is an excellent inversion to work on if you’re learning to fly head down. Balance Poses deserve special attention when it comes to skydiving. There is no better way to develop balance, strengthen stabilizer muscles, and increase mind-body awareness. Warrior 3 (also known as Airplane) is a good pose to begin working on your balance. Start by standing tall and lifting your arms to shoulder-height. Place your weight on one leg, lifting the opposite leg and leaning forward until you form a straight line. Hold for a few deep breathes, then repeat on the opposite side. Holding a balance pose will quickly make you aware of your alignment and body position. If you do any freeflying, adding balance work to your routine could give you the edge you’re looking for. Enjoy your adventures in yoga! Test out the suggestions in this article and continue to experiment with different postures to find what works best for you. Always work at your own pace and stop if you experience any pain or discomfort. Remember, it’s about the journey, not the destination, so don’t worry if you’re not an expert right away. To learn more, consider attending a yoga class or inviting an instructor to teach at your dropzone. With practice you’ll start to notice improvement in your skydiving skills through increased mind-body awareness, balance, focus and control. Keeping your body strong and flexible will also help to protect you from hard openings and not-so-perfect landings. Blue skies, or as we say in yoga, Namaste. Nadene Beyerbach is a skydiver and yoga instructor. She is certified by Body Training Systems as a Group Centergy instructor and is a member of the Canadian Yoga Association. Learn more about skydiving specific yoga at Flex Fly.
 -
 Skydiving requires an action to survive. Freeze, fight or flight are natural reactions to stress but they do not work for skydivers. There is very little time to think about what to do next when the ground is approaching fast. Hence, our response must be quick. We can separate a human reaction into three process: perception, assessment, and execution. These processes happen consecutively. The faster we complete them, the quicker our response is to the changing environment. Let's examine how education and training affects these processes. Perception is the process during which we become aware of information: we look at the altimeter to know the altitude, we look around to see if no other canopies are moving to collide with us, etc. Education and past experiences play a major role in a person's perception. We are not necessarily aware of what we look at. Education trains us to look for the right information in the right places. For example, if we do not look around after our canopy opens to see where the drop zone is, we will not turn to fly toward it. On the other hand, even if we see where the landing area is, we may not know how to detect if we can reach it. As a result, we may not make a turn to fly toward the landing area in time. Books and instructors tell students where to look and what to see, while videos show us examples. However, once students are in the air, they must make a conscious effort to look in the correct direction and focus on the right information: "It's landing time. The ground is moving very quickly. It should not move so quickly. Ohh... I must look at the horizon, I must not look directly underneath." The goal is to make proper perception a habit, because conscious effort is slow. Habits develop with practice, and practice takes time. A student has not yet developed habits and may forget to think about what to pay attention to, but help comes from the instructor over the radio: "Prepare for landing flare. Eyes on the horizon..." One does not develop a habit by taking a class, reading a book or watching a video. Instead, these sources supply knowledge that can be used during practice, which eventually leads to habit. Simulation of a situation, on the other hand, does help to develop a habit, in a safe environment. The emergency procedures that every jumper practices before every jump (you do, right?) is the example of a "simulation". In such "simulation" we create situations and responses ourselves. Another example of a "simulation" is hanging in a harness during a safety day. In this circumstance, an instructor creates an emergency situation for us. Dirt-dive is an example of a non-emergency "simulation". Airplane pilots take the concept of "simulation" further by using flight simulators (http://en.wikipedia.org/wiki/Flight_simulation). The military have used skydiving computer simulators (these are similar to flight simulators) for some time. Nowadays, computer parachute simulation software is available for everyone. The second process in our reaction sequence is assessment - making a decision about what the acquired facts mean. We look at the altimeter and it's 2000 feet. Nothing to be done just yet, or maybe we still have a problem with the canopy, or maybe we see that we are not making it to the landing area, etc. Education has the largest impact on the process of assessment. We are taught what actions are required in different situations. At the very beginning, all we need to do is to pick the right action from the proffered set of actions. Speed of the recall is important. Repetition is key for a quick recall. Taking a class, reading a book, or watching a video are good ways to refresh our memory (safety days help us do exactly that). The disadvantage of these methods is that they cover very limited number of situations and conditions. For example, we are told that to get back from a long spot we can use rear riser input, but that's only true for a certain ratio of your canopy forward speed and the speed of the wind. In some situations, we may have to use front risers or brakes. Now instead of a simple memory retrieval task, we have to do some reasoning. We may have all the knowledge to do the reasoning properly, but it's slow and error prone (time pressure and adrenalin rush do not help rational reasoning). Simulations offer an efficient way to condition memory by repetition. A computer simulation also allows for an infinite amount of situations with different conditions. It's easier to make a decision when we have already seen such a situation before. Execution is the process of acting on the chosen response. Muscle memory allows us to speed up this process. Instructors, books, or videos can not help this process. Muscle memory is developed by repeating an action... but we already know that simulation is good for that! Pulling the cut away and reserve handles while hanging in a training harness or before your reserve is due for a repack are good examples of muscle memory training: we feel how hard we need to pull the handles, what the proper motion of the hands are, etc. Computer simulation can help as well, but it is most effective with a special hardware, which is not yet available at a reasonable price. We have covered three processes that contribute to our reaction: perception, assessment, and execution. We repeat them over and over again. Every time we do something, a new set of conditions manifests itself. There is a dynamic and complex relationship between the situation and our responses to it. Instructors, books, and videos can only mention a very small set of examples. Traditional simulation methods (use of the imaginations or/and an instructor) are also quite limited. A computer simulation, however, provides real time feedback for all possible actions that we can exercise in the simulation. We can judge the correctness of our actions based on what happens next. Simulation has always been an essential part of skydiving education and training. Computer simulation takes this concept further and allows for even better results. We have seen how it can help us when other means of education and training are less efficient or can not help at all. One may ask: "How good must a "computer simulation" be to be used for training?". A similar question would be "How good must a picture be in a text book?" The answer is "As long as it (simulation or picture) reasonably illustrates the required concepts." No educational tool can or should be used by itself. The purpose of the tools is to make a student think, ask the right questions, and develop the correct responses. Given our limited attention span, it's always a compromise between focus on safety and focus on other things, especially for novice jumpers. The faster we get our habits and muscle memory developed, the safer our jumps become. This is why it's important to understand what tools are available to us, and what their limitations, advantages, and disadvantages are. In his book "The Parachute and its Pilot" Brian Germain phrased it this way "When we can acquire the right information, and access this data at the right time, we have a pretty good chance of walking away from sketchy situations." Our goal is "to acquire the right information." We can do this most efficiently when we understand what educational and training tools we have in our disposal: classes, book, videos, simulations, etc. The newest tool in the skydiver's toolbox is computer simulation software. This software greatly complements the other means of education and training. Which, in turn, will result in a safer and more enjoyable sport. Author Information: Alexander Shyrokov is the founder of Static Line Interactive, Inc.
 -
"Turn coordination" is a topic that, until recently, has been mostly unapplied to ram-air parachute aerodynamics. In simplest terms, this refers to the degree to which a flight vehicle is aligned to the relative wind during a turn. Another way to look at this is the degree to which a turning aircraft is pointed at the relative wind with regards to the yaw axis. A "clean turn", from an aerodynamic perspective, is one that keeps the nose of the aircraft pointed at the relative wind throughout the turn. When flying airplanes, this prevents the passengers from spilling their drinks, as well as saving fuel and preserving airspeed. In parachutes however, this aspect of turning has mostly been ignored. As parachutes become faster and faster, the time has come to begin thinking about this aspect of our canopy flight for several very important reasons. The first has to do with the ability of the pilot to level off at any point during the turn. Lets face it, sometimes the ground creeps up on us. Flying an aerodynamically sound turn increases the likelihood that you will be able to convert your airspeed into lift in a timely manner. If you are sliding sideways through the sky because you are simply jamming a toggle down, you are not prepared to interface with the planet. The relative wind is jumping across the bumps on your parachute, creating turbulent flow, while the suspension line load is getting shifted to one side of your canopy. When you attempt to stab out of an uncoordinated turn, there is a hesitation before the parachute begins to change direction and level off. If the ground gets to you before this happens you may find yourself watching Oprah in your hospital bed for a while (not that I have anything against Oprah). The second reason for flying a coordinated turn has to do with overall parachute stability. In an uncoordinated turn, the nose of your parachute is not pointed at the oncoming relative wind. It is sliding sideways. This means that the pressure in your wing is being compromised, in addition to the wingtip on the outside of the turn being presented to the relative wind. If you hit turbulence during this kind of "sloppy" turn, you are much more likely to experience a collapse of this side of the parachute. In other words, if you are turning right, your left wing more likely to fold under. Interestingly, when an aggressive, uncoordinated toggle turn is released, the opposite tends to happen. When the right toggle is released, the right wing surges forward as the drag is released and it is presented to the relative wind, opening the door for a collapse on right side of the parachute. Either way, this can result in way too much daytime TV. A fundamental problem...There is a fundamental problem with the way in which most of us were taught how to turn our parachutes. They said: "if you want to turn right, pull down the right toggle." Simply pulling on a toggle increases the drag on the right side of the parachute, retreating that wing tip. At the beginning of the turn, it is purely "yaw" energy. It is like the pilot of an airplane stepping on the rudder pedal. As a discrete action, steering toggles are an incomplete input. We need some "roll" energy. The harness is more than a way to attach the jumper to the parachute. It is also a way to manipulate the canopy itself. If the right leg reaches for the earth as the left hip reaches for the sky, the parachute will turn to the right. It is true that smaller parachutes will respond quicker to such inputs than larger ones, with elliptical canopies responding the quickest, but harness input will have an affect all parachutes. Most importantly, when used at the initiation of a turn, harness steering converts a toggle turn into a coordinated maneuver. This is true if you are under a Lotus 190 or a Samurai 95. When flying an airplane, all turns begin by initiating roll energy with the ailerons, (rotating the yolk), followed by an application of the rudder to coordinate the turn. The old airplanes had a string on the cowling (hood) to show the direction of the wind-flow, while newer ones have slip indicators on the instrument panel. If only we had such information while we were flying our canopies. Ah, but we do… Trailing behind your wing is all the yaw axis coordination data you will ever need. It is called your pilot-chute. If you are flying a coordinated turn, your bridle will remain parallel to the ribs of your canopy throughout the turn. If at any point it goes slack, whips around like a snake or drifts off to one side, you are not flying a clean turn. You are not carving your wing through the sky; you are skidding out of control. The relative wind is not following the valleys of your ribs; it is hopping over the bumps, tumbling into chaos. Try this on your next jump. Look up at your canopy while you are flying straight and simply yank a steering toggle down to the ½ brake position. You will immediately see what I am talking about as your pilot-chute swings off to one side. Next, lean in your harness, lifting one leg-strap to yield direct roll axis input. It may turn and it may not, depending on the wing. This is not important. Then, while holding the harness input, pull the steering toggle to turn toward the direction of your harness input. You will notice that the pilot-chute is trailing straight back, even in a sharp turn. Once you have experienced your first real coordinated parachute turn, it is time to develop new habits. This takes time. I find that when learning a new skill like this, it is best to have a simple way to remember the process. In this case, try using the following sequence for every turn you make: 1) LOOK, 2) LEAN and 3) TURN. This is mnemonic was taught to me by a great paragliding instructor and skydiver, J.C. Brown. Rather than thoughtlessly jamming a toggle down, look where you are about to go, lean in the harness to establish the roll, and finally, pull the toggle down to flow deeper into the maneuver. When you play with this kind of turn, you will find that the parachute simply feels better; that you feel more in control over the wing. You will also find that you can better bump both brakes down during the turn in order to reduce your decent rate, or even level off completely. While practice is necessary to perfect the technique, all parachute have the ability to transition from a descending turn into a level flight turn, into a soft beautiful landing. If you know how to carve your way out of a low turn, there will never be a reason to hook into the ground, ever. Although many skydivers still think of their parachute simply as a means to get back down to the ground after a skydive, learning how to use the system the way it was meant to be used will increase the chances that you will get back down to the ground safely. Gravity pulls equally on those who love canopy flight as those who abhor it. From twenty years of teaching parachute flight I have learned this: you can only become great at something that you love. The more you understand, the more you will explore. The more you explore, the more you will feel control. The more in control you feel, the more you will love it. And that, ladies and gentlemen, is what it is all about. BSG Brian Germain is a parachute designer, test pilot, advanced canopy flight instructor and author. Brian's book The Parachute and its Pilot has become the worldwide source for canopy flight information and is available at a gear store near you, or through Brian's website: www.BigAirSportZ.com
-
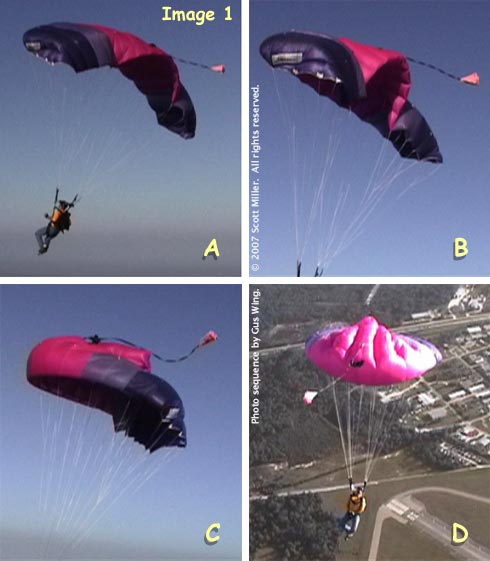 The advice Brian Germain provides in his article titled "Surviving the No Wind Landing" might help you achieve consistent, comfortable landings on days when the winds are calm. Unfortunately, other jumpers might not be as successful when trying to follow that same advice. Some of the techniques described in "Surviving the No Wind Landing" are slightly advanced, and jumpers who are just trying to perfect basic flaring skills might find those techniques difficult to use. Other information in that article might be helpful to people flying certain specific sizes and types of canopies, but we might discover that this information does not actually apply to a significant number of canopies in common use. The first piece of advice Brian offers is to "make sure you level off within touching distance from the ground." This can certainly lead to softer landings, particularly in calm winds. There is only one problem: if many jumpers fear no-wind landings, there are probably even more who are afraid of flaring too high. For some people the game is over at the instant they realize they have made that mistake: they expect the worst, stop flying, and start panicking. In an effort to always level off within touching distance from the ground some jumpers develop a habit of consistently flaring too low. Another common problem occurs when people reach for the ground with their feet, believing they are within touching distance when they are actually a few feet high. People who suffer from these habits are often pleasantly surprised, and see a remarkable improvement in their landings, when they learn that it is not actually necessary to level off with your feet right at ground level. Many modern canopies are actually very forgiving of a high flare. Understanding the StallA very common concern is that a canopy will stall if it is flared too high. Brian reinforces this concern when he mentions the importance of arriving at the ground "before the stall breaks." To understand why flaring slightly high is not necessarily a problem we need to take a closer look at the concept of a stall. "Stall" has a very specific meaning in aviation. It is a significant decrease in lift caused by a separation of airflow that occurs when a wing reaches its critical angle of attack. Understand? No? Okay, then imagine a car driving down the highway, heading toward a curve in the road. Most highways have gentle curves, for good reason, because cars tend to fly off the road if a curve is too sharp. Now think about the relative wind blowing in your face under canopy. Your canopy bends that relative wind to create lift. Pulling down on both toggles pulls the tail of the canopy down and bends the relative wind even more, creating even more lift. The further you pull the toggles down the more lift is created, up to a certain point. The "critical angle of attack" is the point where the curve becomes too sharp and the relative wind separates from the canopy like a car flying off of the road. This separation results in a sudden and dramatic loss of lift. The term "stall" refers specifically to the sudden loss of lift that occurs in this particular situation. Image 1 shows a canopy being intentionally stalled. In frame "A" the brave and handsome test jumper is putting the canopy into brakes, pulling the tail down and increasing the curve that the relative wind must follow. In frame "B" we see the canopy in very deep brakes, but not yet in a stall. The canopy is curving the relative wind sharply and creating a lot of lift. In this flight mode it is flying slowly through the air with a very low rate of descent. In frame "C" the canopy has reached the critical angle of attack. The lift is rapidly decreasing as the canopy begins to stall. In frame "D" the canopy has entered a full stall. When flaring it is obviously important to have your feet on the ground before your canopy stalls. But let's think about a student canopy. Student canopies are traditionally not supposed to stall when the toggles are held all the way down in a full flare. They are either specifically designed that way or are rigged with extra slack in the brake lines. What about a slightly smaller canopy, such as one that might be used by a novice or intermediate jumper? If the brake lines are set to the correct length specified by the manufacturer, many canopies in this category also will not stall when the toggles are held all the way down in a full flare. They will simply maintain a slow forward speed and low rate of descent, just like frame "B" in image 1. Even if they do stall it might not occur until the toggles have been held all the way down for a number of seconds: sometimes five or six seconds, maybe even more. Jumpers who fly these types of canopies don't really need to be too concerned about an accidental stall. You may be surprised to learn that some small, "high-performance elliptical" canopies also will not stall with the toggles held all the way down, or at least not until they've been held there for a few seconds. Whether or not a particular canopy will stall when it is held in a full flare depends on several factors, including the model and size of the canopy, the length of the brake lines, the length of the risers, and length of the jumper's arms. When held in a full flare a significant number of canopies will simply maintain a relatively low airspeed and rate of descent, at least for several seconds. This knowledge can be very helpful when we talk about flaring high. Look at image 2. In frame "A" we see a jumper reaching level flight with his toes about six feet above the ground. Tragedy? Not really. There are only three things he needs to do: 1) wait wait wait; 2) keep it straight; and 3) FINISH! "Wait" means stop pulling the toggles down as soon as you realize you've started flaring too high. Save the rest of the flare for later. "Keep it straight" is important, too. You want to look at a point on the ground out in front of you and keep the canopy flying straight toward that point, just like driving your car down a straight road. And when the canopy starts to drop you back toward the ground, just before your feet touch down, push the toggles down and FINISH your flare, as we see in frame "B." In most cases doing this will result in a reasonably soft, stand-up landing as we see from the last two frames. Even if you don't land softly, look at frames "B" and "C" again. What body position are you in when you finish your flare properly? Looks like you're ready for a PLF, doesn't it? Granted, you will achieve softer landings on calm-wind days if you level off right above the ground, but that is a skill that needs to be developed through practice. An important step in that process is learning to relax and stay focused if you do flare high. This will allow you to keep flying the canopy and finish the flare properly, which will improve your landings in all conditions. Practice at AltitudeWe can see the importance of knowing whether or not your canopy will stall when held in a full flare. How can you find this out? Yep, you guessed it. Under canopy, in your holding area, above 2000', after checking thoroughly for other canopies, push those toggles all the way down and see if that baby stalls. If you've never stalled a canopy before you may want to get some advice from an instructor or coach before trying it. So try it. Did your canopy stall? No? Makes flaring seem a bit less intimidating, doesn't it? Or was the canopy easier to stall than you expected? If so, you may want to have it checked out by a rigger. Some canopies are relatively easy to stall, even with the brake lines set to the correct length. If you are jumping one of these canopies then hopefully you've already perfected your landing technique under something more forgiving. If you can't stall your canopy just by holding the toggles down, does that mean you won't be able to get enough stopping power at the end of your flare? Some people believe so, and Brian touches on this point in his article when he stresses the importance of making sure your brake lines are "short enough:" Brake Line Settings "Most manufacturers set the brake lines to allow for a certain amount of slack so that when the front risers are applied with the toggles in the hands, there is no tail input. This, coupled with shorter risers... will prevent you from reaching your parachute's slowest flying speed." In reality, many popular canopies do not come from the factory with this much slack in the brake lines. For example, people who jump a Sabre2 from Performance Designs or a Triathlon from Aerodyne Research might prefer to have the brake lines lengthened a few inches beyond the factory setting if they use their front risers a lot. Even then, they might not lengthen them to the point where there will be no tail input all when the front risers are used. Even canopies specifically designed for swooping won't necessarily have the brake lines set that long. Is there really anything wrong if your canopy does have a bit of extra slack in the brake lines? Usually not. Even with the brake lines "detuned" on a student canopy, we still expect students to learn how to stand up their landings. In fact, many popular canopies used by experienced jumpers will also slow down enough for a comfortable landing even if you cannot reach the canopy's absolute slowest flying speed: plenty of people achieve soft stand-up landings in calm winds under canopies that will not stall when the toggles are held in a full flare. Even jumpers who have intentionally lengthened their brake lines for swooping can still achieve comfortable landings in calm winds. Is there anything wrong with shortening your brake lines? In some cases, yes! Especially if they are shortened so much that they pull the tail down when your toggles are in the full glide position. As an example, look closely at the tail of the canopy in image 3. It seems like the jumper is pulling the toggles down slightly, but a closer inspection reveals that his hands are all the way up. Having a canopy's brake lines set too short like this can significantly reduce the flare power on some canopies and make them noticeably more difficult to land, particularly on calm-wind days. Excessively short brake lines are more common than many people realize and frequently go unnoticed. It is a common mistake for someone to shorten a canopy's brake lines because it appears that the canopy "doesn't have enough flare at the bottom end," when the real problem is that the brake lines are already too short! If you're really convinced that your brake lines are too long there are a few steps you should take before having them shortened. On your next jump, after you've released your brakes, put your toggles all the way up against the guide rings and look up at the tail of your canopy. Don't forget to watch where you're going and look out for other canopies. If your canopy looks like the one in image 3 then forget about having the brake lines shortened. They probably need to be lengthened instead. If your canopy seems difficult to land you can also have a rigger measure the suspension lines and compare them to the manufacturer's specifications. It's possible that your canopy has simply gone out of trim and is due for a reline. Once these steps have been completed then get some of your landings videotaped and see if you are finishing your flare properly. Look at the jumper in image 4, just as he is touching down. Does he need shorter brake lines to get a better flare? No, he needs to push his toggles all the way down and FINISH flaring before he touches down. Most jumpers finish their flares at least slightly better than the jumper in image 4, but not finishing completely is one of the most common flaring problems. Brian makes a very good point about this: "the brake lines can only work if they are pulled." If you are still absolutely convinced that you need shorter brake lines then follow another good piece of advice Brian gives and only shorten them an inch at a time. Make several jumps, preferably in different wind conditions, before shortening them any more. And remember that you can significantly reduce a canopy's flare power by shortening the brake lines too much. There is usually some excess brake line left over when the toggles are tied onto a canopy, and there are front row seats in purgatory for people who cut this excess brake line off. That excess line should be finger-trapped back into the brake line or secured in a similar fashion in case the brake lines need to be lengthened later on. A qualified rigger should know how to do this correctly. What else might affect your landing on a calm-wind day? Brian discusses the importance of keeping the canopy flying straight during the flare, and not allowing it to bank or turn. He emphasizes this by stating that "any tilt in the roll axis will result in a premature stall of the parachute…. due to an effect known as 'load factor.'" Load FactorIf we are going to introduce "load factor" into our discussion then let's do the math. At a bank angle of 30 degrees load factor will increase stall speed by approximately 8%. A bank angle of 45 degrees will increase stall speed by 20%. The exact stall speed of a ram-air canopy will depend on several factors, but let's use 5 mph (8 km/h) as an example. In that case, a 30-degree bank angle while flaring will only increase your stall speed by 0.4 mph (0.64 km/h). To increase stall speed by 1 mph (1.6 km/h) you will need a bank angle of 45 degrees while flaring, which is a pretty sporty maneuver by most people's standards. While load factor might sound important, is a 0.4 mph increase in stall speed a significant consideration when landing your canopy? Probably not. Nonetheless, is it important to keep the canopy flying straight while you flare? Absolutely. Even without a stall occurring, banking or turning while you flare can cause you to touch down at a higher speed. You will probably also land with your body off balance, and fall over sideways. A bank or turn during the flare is most commonly caused by reaching for the ground with one foot. You can usually see yourself doing this on video, and might even feel yourself doing it while it's happening. This problem can easily be avoided if you focus on looking straight ahead, keeping your body straight, and flaring evenly. What should your feet be doing? Do you need one foot below you and one out in front as you prepare to touch down? That probably will happen naturally just as you stand up at the end of your flare without putting any extra effort into making it happen. And putting extra effort into making it happen could cause you to reach for the ground with one foot. If you need to think about anything while you're flaring, think about keeping your feet together as you get into level flight, and continue keeping them together while you fly the canopy in a straight line across the ground as far as possible. If everything is going smoothly then as the canopy sets you down you can just stand up as if you were getting out of a chair. Your feet know what to do. Look at image 5 below. We see a jumper flaring his canopy with his feet and knees together, knees slightly bent. Looks like he's simply maintaining a good PLF position, doesn't it? As he finishes his flare and the canopy sets him down, his feet come apart slightly to accept his weight. Harness Body PositionWhat about leaning forward in the harness? Is "freeing your body from the pitch of the system" a crucial part of flaring? Look at image 5 again. A pitch change does occur when the nose of your canopy tilts up at the beginning of the flare. This pitch change is what puts the canopy into level flight, and the pitch change is actually created by the movement of your body under the canopy. In fact, it can be extremely helpful to view your body as an integral part of the parachute system instead of separating yourself from it. Feeling your body swing in conjunction with the canopy's movement is an important part of doing effective practice flares. If you like to lean forward in the harness and it seems to help your landings, that's fantastic. It feels nice and looks cool. But it's also not a problem if you simply sit still in the harness and let your feet swing out slightly in front of you as you flare. Your body will rock up onto your feet as your feet touch down and accept your weight. You can either "lean forward into the experience," as Brian suggests, or maintain a more laid-back pose if you prefer. Whichever one feels more comfortable is the best one for you. The technique Brian calls the "Seagull Landing," where you dip down below standing height then rise up again at the end of the flare, also feels good and looks cool if you do it correctly. You'll do it correctly if you develop the technique naturally while you practice good basic flaring skills. Putting too much conscious effort into achieving a "Seagull Landing" is similar to the belief that you must level off right at ground level every time: it can result in the same problems and bad habits. Most canopies will slow down just fine if you level off a comfortable distance above the ground and simply maintain level flight through the remainder of the flare. In general, it might help to stop thinking about a "no-wind landing" as being significantly different from a "normal" landing. The basic skills that you use to land in stronger winds will also help you land softly in calm winds. Any bad habits you develop might not hurt your landings too much when there is some wind to slow you down, but those habits are usually still present and affecting your flare to some degree, and can be eliminated by practicing proper techniques. Eliminating those bad habits by keeping things simple, letting yourself relax, and focusing on good basic flaring techniques will go a long way to improving your landings in all conditions. Soon you'll be just as confident landing on calm day as you are on windier ones, and you may even start to prefer calm-wind landings. Experienced skydiving instructors and coaches, like those in any other sport, develop their own opinions, philosophies, and teaching methods. The advice you get from one person may be quite different from what someone else tells you. This can actually be a good thing sometimes, because the advice that helps one person may not be equally helpful to others. The most basic, fundamental principles of aerodynamics can be used to describe the flight of any wing, so some of the things you learn about one canopy will certainly apply to others. However, specific performance characteristics can vary greatly from one aircraft to another: a 210 sq. ft. canopy does not perform exactly the same way as a 107, and a Triathlon does not perform exactly like a Sabre2. A Sabre2 does not perform exactly like a Lotus, and a Lotus does not perform exactly like a Twin Otter. When discussing canopy performance and flying techniques the most important piece of advice I give my students is this: don't passively accept anything anyone says, including anything that I tell you. Think about it, and if it doesn't make sense keep asking questions until it does. More importantly, experiment in the air and see for yourself if it's really true. Also, remember to breathe. Scott Miller References: Direction of Commander, Naval Air Systems Command, United States Navy. Aerodynamics for Naval Aviators. Washington: Naval Air Systems Command, 1960. Revised 1965. Germain, Brian. "Surviving the No Wind Landing." Dropzone.com. Sep 05 2007. (accessed October 13, 2007)
 -
One of the most dreaded conditions of all is the no wind scenario. This fear is so profound that many jumpers in fact avoid jumping in no wind conditions. Although landing with the benefit of a headwind is unarguably easier, there are specific methods that markedly improve the chances of standing up your landing. Here are a few tips that will help you to land softer and safer when the wind goes away: 1) Make sure you level off within touching distance from the ground. If you finish the flight with some space between you and the earth, you will have more than just forward speed to deal with at the end of the landing. All parachutes stall above zero airspeed, which means that as soon as the extreme slow flight capability of your parachute is attained, it will drop you into the ground with both forward and vertical movement. The best way to deal with this is to be sure that you have already arrived at standing height when the stall breaks. That way, the only remaining kinetic energy is forward movement, which can be diminished by taking a few controlled steps. 2) Make sure your brakes are short enough. Most manufacturers set the brake lines to allow for a certain amount of slack so that when the front risers are applied with the toggles in the hands, there is no tail input. This, coupled with shorter risers (most parachutes are set up for 21 inch risers), will prevent you from reaching your parachute's slowest flying speed. With the help of your rigger, shortening the brake lines is an easy task. Take out not more than one inch at a time and give it a few jumps before taking more out. 3) Keep the parachute over your head. Any tilt in the roll axis will result in a premature stall of the parachute, which will drop you into the ground while you still have ground speed. This is due to an effect known as "load factor". When a wing is in a bank, it requires a bit of increased angle of attack to keep it flying at the same height or descent rate. This results in an increased relative weight, which in turn increases the stall speed. Keep your eyes looking down the "runway" and you will be able to notice variance in your bank angle easier. Making smooth corrections to the bank angle all the way to the end of the landing will result in a softer touch-down and less forward velocity at the end of the ride. 4) Be sure that you are finishing the flare. Keep smoothly adding brakes until you run out of arms, or ground-speed, whichever comes first. In other words, if you are flying into a significant head-wind, flaring all the way down will make you go backwards, as the speed of your parachute will be less than the speed of the wind. Flaring straight down is the only way to accomplish a complete flare, as stylish outward sweeping of the arms out to the sides or to the back will only result in a stylishly ineffective flare. The brake lines can only work if they are pulled. 5) Assuming that a PLF is not necessary, put one foot under your spine, as the "main landing gear", and the other out in front as the "nose gear". That way you will not plant both feet at the same time and pivot onto your face. Slide your main gear along the ground as long as you can, and then when the friction finally grabs your foot, take that first step onto the front foot. 6) Loosen your chest strap and lean forward in the harness. This will allow you to get your weight over your "landing gear", rather than back on your heels. The parachute will increase its pitch angle as you progress through the landing, but your body doesn't have to tilt in accordance. Freeing your body from the pitch of the system will allow you to feel more comfortable finishing the flare, as you will not feel the urge to let up on the toggles as you put your feet down to get to a more balanced pitch angle. 7) Let the wing sink down below standing height during the second half of the swoop, and then use the canopy's lift to bring you back up to standing height. Referred to as the "Seagull Landing", this allows you to arrest any excess forward speed, as you will be in a climb at the last part of the landing. Be sure not to climb above standing height as you do this, as that will result in a drop at the end that will put you on your face. 8) Practice slow flight up high. The more comfortable you are with the low-end range of your canopy's performance envelope, the longer you will be willing too keep your toggles down at the end. Fear of the stall results in incomplete flares, as well as letting up the toggles at the end of the landing. Keep the canopy in brakes for at least 30 seconds (up high), and perform smooth turns right and left. This will help you fly your way out of any bank angle created by an asymmetrical level off during the flare. 9) Believe it is possible to land perfectly. It is. Only when a pilot thinks: "I am going to crash" is the crash inevitable. 10) Get video! There is no greater tool than actually seeing yourself land. The best way to get filmed, I have found, is to film other people. Landing in no wind can be great fun. Ultimately, this is how we counter the fear of landing our parachutes. If you lean forward into the experience, your positive body language results in more fluid, appropriate actions that actually improve your situation. When you are comfortable with landing in no winds, you begin to actually look forward to those zero-wind sunset loads. Scooting across the ground with maximum forward speed can be incredibly enjoyable when you know you have the skills to handle the situation. In the end, the only way to achieve this is to jump on a regular basis, and enjoying the learning process is how this is reinforced. Find something about every landing that you can smile about, even your crashes. Everything that is not the path shows us where the path is not. Happy Landings! Bryan Germain www.CanopyFlightInstructor.com Editors Note: Also see - Another Look at No-Wind Landings by Scott Miller
-
 A large sector of the skydiving population is currently in danger of extinction. This is because of the widespread proliferation of new DZ rules that prohibit 270 turns for landing or ban high speed approaches entirely. Consequently, many jumpers now find themselves homeless and considering alternate sports - not a good thing for skydiving. These new restrictions come in the name of safety. We have lost many friends this year due to canopy collisions, and the management at several dropzones has responded by adding new rules in an effort to prevent such accidents from happening in the future. There are several aspects within this direction of policy that concern me. Remember 9-11? We felt unsafe after the tragedy, and so we willingly gave up many of our rights as free citizens. Now they are taking nail-clippers away from little old ladies. It is getting ridiculous, as is the policy banning advanced approaches. It is a knee-jerk reaction to fear, and I think we all know where that slippery slope leads. "My rights end where your rights begin."This is the fundamental idea that forms civilization. In other words, if I fly my parachute into you in the pattern, I am in the wrong. I think everyone agrees with this and it therefore can and should be asserted that if my behavior does not have an effect on anyone else, I should be allowed to continue to do what I am doing, provided I am doing it in a safe manner. We all need to challenge ourselves. This is what keeps us showing up at the dropzone every weekend. Thousands of people enjoy the challenge of high speed approaches and define the swoop landing as an essential part of their experience. They wait all week to get a few jumps in over the weekend, and now many of them are unable to get what they came for. To take that away is to cut many people off from the very reason why they skydive in the first place. Is that really where we want to go with this? We cannot afford to alienate anyone. There are precious few experienced skydivers in the world and I would argue that we are the reason for the dropzone in the first place. I understand that there are a few DZOs that are doing very well running purely tandem operations, but this is the exception, rather than the rule. Most dropzones are a business of passion, rather than a pragmatic financial pursuit. If we wanted to make a million dollars, we would have done something else with our time. We do this because we love it. The atmosphere created by having fun jumpers around is essential to the success of a dropzone, even if the profit is significantly less. Sport jumpers give the tandem students a reason to come back and learn how to skydive. They come back for the jumping, true, but they also come back for the connection to other people. They want to be part of a community, as do we all. We must therefore allow all aspects of the sport to continue to proliferate so that our numbers may grow. It is that simple. We can create sustainable solutions.It is possible. We simply need to think things through and adapt to the changing needs of a growing sport. I remember the debate on my dropzone as to whether or not we wanted to let the students jump ram air canopies. Many were concerned that the "squares" were too much responsibility and that students could not be trusted. Are we saying the same thing about ourselves now? We need to trust each other. True, we need to create a structured environment in which we can create a degree of predictability in the air over our DZs. Otherwise none of us would be able to manage all the variables in our heads. But as soon as we start back-peddling away from danger, we are becoming more similar to the groundlings we pass on the road on the way to the dropzone. We must have specific runways where the high speed pilots can land safely, out of the way of everyone else. We must communicate our intentions in the loading area. We must create sustainable vertical separation before reaching pattern altitude. Most importantly, we must increase our level of awareness under canopy so that no matter what the circumstances, we can fly in traffic without risk of running into each other. We do this by remaining calm and keeping our eyes open. We need to stop pointing fingers and making over-protective rules, and simply do what we need to do in order to be safe and still have fun. Let's work together and unite as a whole to make the dropzone a welcoming place for everyone. Brian Germain www.TranscendingFear.com
 -
The stall is one of the least explored and most feared aspects of flying. Avoidance of this flight mode causes many canopy pilots to be uncomfortable with flying slowly, and unpracticed in this important art. This article will discuss the governing variables relating to the stall, in hopes that this knowledge will help parachute pilots to become less afraid of this essential aspect of the flying experience. First we must explore what a stall is. The assumption made by most canopy pilots is that the stall is caused by slow speed flight. This is not true. It is correlated with low speed flight, but a wing can stall at high speed too. A stall is caused by an excessive angle of attack. When the relative wind flows over an airfoil, it is bent in the general direction of down. This causes an opposite force called "Lift". When the orientation of the airfoil is changed to a higher angle with respect to the relative wind, it is said to have an increased angle of attack. Air is quite cooperative. It is willing to be redirected and still flow in a fairly organized manner…up to a point. At a specific angle, all airfoils fail to bend the air into submission. This discrete angle of attack is referred to as a stall. It is coupled with a sudden drop in lift, and thus a significant increase in decent rate. Whether you are flying an F-16 or a Lotus 190, recovery from a stall is always the same: the pilot must reduce the angle of attack. On an airplane this requires forward pressure on the yolk or stick. On a parachute, we are simply required to let off the downward pressure on the toggles or rear risers that has increased the angle of attack in the first place. Each parachute stalls and recovers differently. Depending on several governing variables, some parachutes will recovery nicely from a stalled configuration no matter what the recovery technique, while others will require very careful execution. Let's take a look at these issues one by one. The characteristics of a stall on any ram air canopy are based on two main variables, and several lower order variables. The most significant governing variable is the flight mode when the stall is reached. If the canopy is in a sink, rather than level flight (zero decent surf), it will tend to stall in a more forgiving and docile manner. The second primary variable is the attitude about the roll axis when the stall is reached. In other words, if there is any bank angle when the stall precipitates, it will cause the lower wing to stall first, resulting in significant yaw energy, which can result in line twists. There are several other things to consider when testing the stall of a canopy, including: canopy design, density altitude, wing-loading, aggressiveness of the control input, and most importantly, recovery technique. This will be discussed next. If the wing is allowed back into forward flight quickly, it will dive aggressively toward the ground, causing a drop in the angle of attack, as well as the lift and therefore the overall line tension. This may allow the wing to surge below the suspended weight (you), and possibly cause a jumper/canopy entanglement. Further, if the release of the brakes is asymmetrical, the lack of line tension can allow the wing to surge unevenly about the yaw axis, causing line-twists. The key to stalling any wing is to enter the stalled configuration in a sink, with the wing level and static about the roll axis. As soon as the stall is reached, the toggles (or rear risers) should be released only a few inches to allow for only a slight drop in the angle of attack. As soon as the brakes are released, the jumper should be prepared for a sudden increase in toggle pressure, as the tail of the parachute is about to get hit with a pulse of relative wind. If the pilot is unprepared for this, the toggles will usually be pulled upward and possibly in an uneven manner, often resulting in an aggressive stall recovery that may result in line twists. When the brakes are released quickly to the full flight position, the wing doesn't have much drag. This means that there is very little to prevent it from surging forward in the window. When the brakes are released slowly, and then held down just above the stall point, the wing has a great deal of drag. You have two big barn doors at the back of the wing helping to prevent and aggressive surge. Further, as you become more familiar with the stall and recovery characteristics of your wing, you may begin to fly "actively" with respect to the recovery process. In other words, as soon as the wing begins to fly forward in the window, the pilot jerks on the brakes to dampen the forward surge. It is important to do this minimally enough to prevent re-stalling the wing. A well-timed reapplication of the brakes during the recovery process will significantly reduce the amount of altitude lost in the stall. This can be very useful in the event of a low altitude stall. This maneuver can be practiced in relative proximity to another canopy in deep brakes. Be sure to keep your distance when you do this. By definition, a stall is a loss of control of the wing. Rear riser stalls tend to be sharper at the onset, but quicker on the recovery. Therefore it is advisable to stall the parachute on the rear risers first before attempting to stall it on the brakes. Further, such maneuvers should always be performed at an altitude that will allow for a safe cutaway. Given all of these concerns, one must ask "Why should I stall my parachute in the first place". There are several valid reasons why each jumper should rehearse stalls at altitude. In high angle of attack approaches, such as may be necessary in a tight landing area, stalls can happen inadvertently while maneuvering. This is why it is also important to practice slow flight maneuvering by lifting the toggle on the outside of the turn, rather than depressing the one on the inside of the turn. In order to reach a (near) zero ground-speed on a no-wind day, the pilot must have full "Toggle Authority". In other words, if the toggles are set too long, the pilot will be unable to access the slowest possible airspeed, and therefore will be forced to land with more ground-speed without the advantage of a headwind. Being able to finish the flare completely and then let up after landing to prevent the stall from pulling you onto your heels in an essential part of any no wind landing. When you decide to practice stalls, I suggest taking the process step by step. Simply honking your brakes down with your eyes squinting in negative expectation usually results in a wild ride, and sometimes a cutaway. Try hanging out in slow flight for a while. Bring your toggles down to a bit more than half brakes and leave them there. If you are above the stall point, it isn't going to just stall all by itself. Watching people fly in deep brakes is usually similar to watching them light a firecracker. Your parachute isn't going to explode…promise. When you get your canopy into the deep brake mode, take a deep breath in and let it out slowly. Relax your muscles. Let your legs hang limp. I find that nervous pilots can't connect with their parachute because it isn't touching their bones. If you soften your muscles, your will allow the leg straps to sink into you so that you can feel what is happening with the newest addition to your body: your wing. By truly relaxing under canopy, we begin to sober up from the adrenalin that is blurring our vision and skewing our perspective toward the negative. Stalls are an essential part of flight. If you are to be fully in control over the wing, you must explore all aspects of your parachute's performance envelope. Ultimately, flying slowly is the most important aspect of flight because we land in slow flight. The more comfortable you are with your slow flight skills, the better your touchdown will be. Remember, the definition of a good flight is one that ends well. BSG www.BrianGermain.com BIGAIR SPORTZ
-
 Many factors determine the way your canopy opens. The design of the canopy and the way it is packed are two important factors, but body position also plays a major role. We learn to deploy our canopies in a basic, stable position as students, and many of us don't give this skill much more thought after that. Unfortunately, we sometimes develop a few bad habits that have a negative effect on our openings. Even after making thousands of jumps, people have been surprised to find that a few small adjustments to their body position during deployment can significantly improve their openings. This article is about deploying a parachute, one of the most important things you do on every skydive. It might be a good idea to practice these techniques on the ground before trying them in the air. You might even want to make a solo jump and try some practice pulls using these techniques before it's actually time to deploy. If you are not a licensed skydiver yet, or have just recently earned your license, you should discuss this article with your instructor before trying anything you read here. He or she may want you to focus on more important skills, like altitude awareness and basic stability, rather than adding anything new to your pull sequence. No Need for SpeedThe speed at which you are falling when you deploy your canopy can have a large effect on the forces generated during the opening. As your airspeed increases, these forces also increase. Many of today's canopies are designed for relatively slow openings, and some will not be affected greatly by a little extra speed at deployment time. Some jumpers even find that their canopies open better when they are falling a bit faster. This is not something you should take for granted, though. Higher airspeeds might not cause a canopy to open hard as long as everything else is just right, but small variables tend to have greater effects at higher airspeeds. If you rush your pack job one time and let things get a little sloppy, or if your canopy is starting to go out of trim, extra airspeed could make the difference between an opening that is slightly abrupt and one that really hurts. Slowing down before you deploy can provide a greater "margin of error" and reduce the effects that other variables have on your openings. Slowing down can be especially helpful if your openings are frequently or even just occasionally faster than you like them to be. Vertical or "freefly" body positions like head-down or sit-flying allow you to reach much higher airspeeds than "flat" body positions. This extra speed makes flattening out and slowing down before you pull particularly important. Both beginners and experienced freeflyers should keep this in mind when planning their dives. Even if you don't freefly, simply tracking at the end of a belly-to-earth jump can significantly increase your airspeed, and you may still find it helpful to "flare out" of the track and slow down before you deploy. To flare out of a track, spread your arms and legs and de-arch slightly for a second as shown in. This will help bleed off any excess speed. Keep your arms and legs spread out and maintain a slight de-arch while you wave off, remembering to look around for other jumpers. As you finish your wave-off and start to pull, relax back into a normal arch. If done correctly this doesn't take a significant amount of time and becomes a natural part of your wave off. What Are You Looking At?Take a moment to notice where you are looking while you reach for your pilot chute. If you jump with a video camera, look at some of your openings on tape. What do you see in the video as you pull? Are you looking up at the horizon, or down at the ground below you? Do you look back toward your pilot chute handle as you reach for it? Do you look over your shoulder after you pull? Older skydiving rigs used spring-loaded main pilot chutes activated by a ripcord. Even in the late 1990's this type of system was still used on most student rigs. Those of us who were trained using this type of system were taught to look for the ripcord handle before grabbing it. We were also taught to look over one shoulder and "check" after pulling the ripcord. Looking over your shoulder changes the airflow over your back and helps clear pilot chute hesitations, which are common when using a spring-loaded main pilot chute. Most licensed jumpers use hand-deployed main pilot chutes, and these are becoming the standard for student training as well. Even if years have passed since they transitioned to a hand-deployed pilot chute, many experienced jumpers still have the habit of looking for their pilot chutes as they reach for them and checking over one shoulder after they throw them. Unfortunately, it's almost impossible to look over your shoulder and keep your shoulders level at the same time. Looking over your shoulder also tilts your container to one side. Although large, docile student canopies may not get offended if your shoulders and container are uneven, more responsive sport canopies will be much happier if you keep your shoulders level. Having your shoulders and container tilted as the canopy deploys can cause off-heading openings, line twists, and can even cause a hard opening. Most of us have our pilot chutes mounted on the bottom of the container, so trying to look for the handle is really useless. Even if you still use a legstrap-mounted pilot chute, you probably can't see the handle very easily in freefall. Since hand-deployed pilot chutes are thrown into the clean air next to your body, pilot chute hesitations rarely occur and checking over your shoulder every time isn't necessary. Some people have a habit of looking straight down as they deploy. This tends to put you in a slightly head-low attitude, which can increase your airspeed slightly. It can also amplify the opening force your body feels, since this force will mainly be transmitted to your shoulders when the canopy reaches the end of the lines. Also, your legs may swing through a wider arc as the canopy sits you up in the harness, making the opening feel more abrupt. Instead of looking for your handle or looking down at the ground, try lifting your head up and looking out at the horizon as you reach for your main deployment handle. This puts you in a more head-high attitude. The opening forces will be transmitted farther down through the harness instead of being concentrated at your shoulders.Looking at the horizon also helps keep your shoulders and container level as you pull. After throwing the pilot chute, bring your arms back into a neutral freefall position and think about keeping your shoulders level as the deployment bag lifts off of your back. You can also push your hips down slightly and bend your knees just a bit, as if you were in a very slow backslide. This keeps your head and upper body high. In the past, some jumpers have recommended "sitting up" during the deployment. This can actually work well as long as it is done correctly, but if you sit up too much or too soon there is a risk of increasing your airspeed or even becoming unstable. Simply lifting your chin, looking at the horizon, arching a bit more, and relaxing your legs slightly has a similar effect to consciously sitting up, and you're less likely to overdo it. Some people who jump with side-mounted cameras believe it's necessary to keep their heads down when they deploy, to prevent a riser from hitting the camera. This might be an issue if you have narrow shoulders or wear your chest strap very tight, leaving less room between your risers. It also might be a problem if your camera sticks out from the side of your helmet quite a bit. It's best to minimize this problem by keeping side-mounted cameras as small, streamlined, and snag-free as possible. If you're convinced it's necessary to keep your chin down, at least keep a good arch and relax your lower legs to keep your shoulders higher than your hips, and also focus on keeping your arms and shoulders level in the relative wind. Back in the Saddle As soon as the canopy sits you upright in the harness, try putting your feet and knees together for the rest of the opening . Putting your legs together helps keep your weight even in the harness and reduces the chances of an off-heading opening. This is especially effective if you are jumping an elliptical-type canopy. Just the weight of your legs swinging around or a small weight shift in the harness can cause some of these canopies to start turning. If you grab your risers as the canopy is opening it's best to hold the lower part of the risers, just above the 3-Ring system. If you grab the risers up near the toggles you might make the canopy turn by unintentionally pulling one riser or releasing one brake. If you hold on to the bottom of the risers, you can still slide your hands up quickly to steer with the risers or release the brakes if necessary. Some jumpers try to keep their openings on heading by actively steering with their rear risers while the slider is still up against the canopy. This works with some canopies, but other canopies don't like it at all. You may get better results if you just relax, sit still, focus on keeping your weight even, and wait until the slider starts to come down before making any corrections with the risers. Watch Where You're GoingIn a first jump course we are taught to check our canopies to make sure they open correctly. Although this is important, it can also create a very bad habit. Many jumpers look up at their canopies as soon as they start to open, and continue watching the canopy through the entire opening sequence. Some people continue looking up for several more seconds while they collapse their sliders and release their brakes. If another person opens close to you, you may only have a second or two to react in order to avoid a collision. Staring up at your canopy for five or ten seconds after you deploy is like driving down the highway while staring up at the roof of your car. Fortunately, a few techniques can help you avoid this problem. Many students are taught to count out loud while their canopy deploys, saying "arch, reach, pull, one thousand, two thousand, three thousand…" If you don't do this already it's a good habit to create, and can help you keep track of time during the deployment sequence. You will hear and feel different things during each stage of the deployment. A second or less after you throw your pilot chute, you should feel the snatch force pull you upright in the harness. This is the force of the canopy fabric hitting the relative wind as it comes out of the deployment bag. The canopy will then snivel. The snivel is the portion of the opening where the slider stays against the bottom of the canopy, reducing your airspeed before the canopy starts to inflate. There will still be a lot of wind noise during the snivel, and you will still have a sensation of falling. This may last for a second or two, or even for several seconds. The inflation occurs as the slider moves down the lines and the cells fill with air. Things become quieter once the canopy inflates. Even under a canopy that inflates very slowly and smoothly, you will still feel the transition from falling to gliding. You may also hear the slider flapping above your head once it comes down. Once you become more aware of these sensations you will find that your other senses can tell you as much about your opening, if not more, than your eyes do. Soon you will feel comfortable looking out in front of you during the entire opening, rather than watching the canopy itself. This allows you to watch for other jumpers, and many people find this reduces off-heading openings as well. "But," you may ask, "if I don't watch my canopy open, how will I know if I'm having a malfunction?" Take the advice of someone who has cut away a number of misbehaving canopies: you will probably know right away if you are having a malfunction. They tend to feel very different from a normal opening, and you will probably know something is wrong before you ever look up. If you start to count after throwing your pilot chute, and reach "two thousand" or "three thousand" without feeling the snatch force, there is obviously a problem. This would be an acceptable time to look back over your shoulder and check for a pilot chute hesitation or pilot chute in tow. Once you know how many seconds the snivel usually lasts on your canopy, you will also know if that part of the opening is taking longer than normal. You can usually feel line twists right away, and if you start spinning wildly you'll surely want to look up at your canopy and see what's bothering it. What if the opening feels perfectly normal? Unless you need to avoid another jumper right away, you should still look up and check your canopy right after it inflates. You might not notice a tear, broken line, or similar problem until you look up. Even in these situations, if the opening felt normal then the canopy is probably flying well enough to give you a low rate of descent. Assuming you deployed at a reasonable altitude, you should have enough time to do a control check and execute emergency procedures if necessary. If you've been watching your canopy open every time then you might not feel ready to stop doing this during your very next jump, but you should start developing better habits as soon as possible. Start counting when you throw your pilot chute, and notice how long each stage of the deployment sequence takes. Pay attention to what you are hearing and feeling during the opening. Soon you won't need to watch the whole deployment, and will be able to pay more attention to your body and your surroundings. Improving your body position and increasing your awareness when you deploy your canopy can produce great results. You might not remember everything in this article during your next jump, but at least think about trying these suggestions one at a time, at your own pace. You might be amazed by the difference a few small changes can make. About the author: Scott Miller runs the Freedom of Flight Canopy School at Skydive DeLand in Florida (www.freedomofflight.tv) and holds canopy skills camps at other DZ's throughout the year. He has worked at several drop zones as an AFF instructor, tandem instructor, and freefall photographer, and also worked as a test jumper for Performance Designs. This article first appeared in Skydiving Magazine, Volume 25, Number 7, Issue #295, February 2006. Printed here by permission of the author.
 -
 You just graduated AFF or you got your A license. You can execute all the skills required of you in the sky. Now it is time to take it to the next level. Tunnel flight can help you hone your skills that you have already, and most definitely help you learn some new skills. The wind tunnel can give you confidence, awareness and much needed experience at a time when it is hard to come by any of those things. The wind tunnel is perfect for anybody. Wind tunnel coaching through the whole AFF and A-license experience is standard issue for all Central Florida drop zones. Coordinating the circle of awareness, motion, fall rate, turns, docking and practice pulls are all possible in the wind tunnel. The first thing that you should learn is the relative work position. The position is the root for all movement. The reason is every time you want to move; you always start and stop in the learned belly position. Your chin should be up. Your eyes should be focused in front of you, not looking down. Your arms should be relaxed so they do not cup air or carry stiffness. You should have pressure on your shins so you do not back slide. You should be bent slightly at the knees so you do not constantly move forward. Your body should be symmetrical. Asymmetry causes turning. Your hip should be in its most arched position. Sometimes it takes a bit of moving down to actually get a good arch. After the neutral position is learned then the 6 points of motion are taught down, forward, backward, up, and sidle siding left and right. The first thing I teach after the standard position is to move down. The reason is the worst thing that can happen to a newbie in the wind tunnel is to catch air and ascend high up; so the instructor cannot reach you easily. Anything above 8ft high off the net makes it challenging for your instructor and dangerous for you at first. To move down, simply arch more. If that does not do the trick, take up less surface area by getting smaller. You should move right down to the net. Some times I keep first time students on the net for a rotation or two so they do not bounce around. In the lower wind speed it is easier to make mistakes and not fly up against the wall. Once general body awareness is attained, the controller can turn up the speed a little more. The first time student can fly off the net with a little more speed after they can go down. I also teach going down first, so if the student does get up a little higher than they like, they can easily come back down. The next thing to learn is motion forward and backward. Most people come into the wind tunnel with built in movement in their technique. In order to stay perfectly still you must learn to go forward and backward first. Forward motion is accomplished by putting both feet back at the same time and then relaxing back into the neutral position and coasting to a stop. Moving backwards is done by putting both arms forward in front of you while you relax your legs towards your butt and coast back in to a neutral position for a stop. I do not teach "braking" until the student can do the first 4 points of motion. The reason is for most students early on braking is too much to think about. Initiating subtle movements and coasting to a stop slowly is more effective in the beginning. Flying in the sky is like flying on a football field, plenty of room to roam. Flying in the wind tunnel is like flying in a bottle, close proximal flying. Small movements are a necessity. Deep diaphragmatic breathing will lessen the tension carried in the body and relax your mind. After a student can go down, forward and backward; I teach them how to go up. The two easiest ways to teach a student how to go up is by them taking up more surface area or de-arching with their hip. The easiest way to move up is to get longer with your arms and legs and flatten your torso. This cups air and pushes your body up like a board. The second way to move up is to de-arch at your hip. This will catch air in the pocket your hips and torso make and accelerate you upward. Each method for going up works in different scenarios. If a person you were jumping with slowed up very quickly de-arching at the hip would be a good way to slow down in the sky. Keep eye contact with the person! If that same jump partner ascended relative to you very slowly then getting longer and flatter would be optimal. Side sliding would be your next skill to learn. Side sliding is moving sideways while facing forward. It is very important to do this with a straight torso. Bending at the torso is inefficient and usually causes a turn. To keep your torso straight and move side ways, use your arm and leg at the same time to push you across the tunnel. The most popular rookie mistake is to push with just your hand. If you push with just your hand you will turn instead of side slide. You should push both your foot and your hand at the same time. Initiate the movement and then cost to a stop. This will create a seamless side slide. Make sure to arch when you side slide to keep on the same level or plane that you initiated the motion on. Once you can go back and forth seamlessly both ways with out changing levels at all; then learning more advance side slide techniques would be warranted. Turning is also a very important skill that can be learned in the wind tunnel. I start to teach turning usually right after the first 4 points of motion are learned. I progressively perfect my student's turn as side sliding is attained. The most important turning skill is to turn slowly in the wind tunnel. More often then not students like to "crank" turns out when they start. In the sky that might be all well and good, but most students are moving when they turn. If you turn with precision at first, then the progression will come easy. Keep your head up and maintain a huge arch when you turn. Most students look down and de-arch when they turn. The sheer act of spinning creates lift. Coupled with de-arching spinning can send you up to the huge fans that power the wind tunnel. It is important to arch even harder when you turn to maintain your levels throughout. Another popular mistake is to relax your legs on your butt when you turn. This makes for interesting times. Relaxing your legs will make you back slide while you are turning. Keep the shin pressure you have when you turn. Some students need to think of putting their feet out when they turn, just to keep the legs in the same place through out the completion of the turn. The Mantis position is popular in more advanced relative work. We will cover it in the scope of this article because the vast majority of new fliers want to learn it. My opinion is that it should be learned after 6 points of motion, 90 degree turns and 360 degree turns. Early on in the progression, I believe that most students are too stiff to learn the Mantis properly. Once a student can move their arms freely without causing instability or motion, then it is time to refine the basic relative work position into the Mantis. The student should try to bring their hands closer to their ears first to reduce drag on the arms. Remember the whole idea of the Mantis is to fly a more aero-dynamic position not to learn it because it looks cool. Most students press their elbows down at first. This usually causes tension. After a student can fly with hands closer to their ears instead of the basic relative work position, all the time, perfecting the Mantis position should be tackled. The hands should come closer together like you are hugging a small volley ball while laying your body on a flat surface. Dropping your elbows down into the standard Mantis position should be the last step to learning it. It is very important to fly in the wind tunnel. The wind tunnel is the most revolutionary tool to be introduced to the sport of skydiving since the three ring system and tandem jumping. Now that wind tunnels are popping up all over the world, they will subject more and more people to our sport. Our numbers will grow in a prolific fashion and we will finally get the market penetration that our sport has long yearned for. If you get frustrated in the tunnel keep trying. In all likelihood your frustration stems from only a few places. A bad instructor, people looking at you when you fly, the constant presence of glass or chicken wire and the inability to just go "buck wild" like you can in the air can lead to frustration. The wind tunnel is so much fun. With the right training regimen, repetition and a good instructor the sky is truly the limit to your skills. Steven Blincoe is the founder and head coach of the New School Flight University in Orlando, Florida. He has 4,000 skydives and 500 hours of wind tunnel time. He specializes in wind tunnel camps and will scower the globe in the next few years to spread the art of tunnel coaching. Please feel free to contact him at www.blincoe.org or 530-412-2078.
 -
Exit separation has become a point of contention at many DZ's lately. Years ago, when belly flying was the rule and the Cessna 182 was the aircraft at most DZ's, exit separation wasn't too much of a big deal - you gave the other group (if there was another group) some time and then you went. With the aircraft in popular use 15-20 years ago, it was hard to exit very quickly to begin with, and so the issue never came up very often. Bill von Novak started skydiving in 1991 at a small DZ in New York. Since then he has become an S+TA, an AFF, tandem and static line instructor, and has set two world records in large formation skydiving. He lives with his wife Amy in San Diego. Since then, several factors have conspired to make exit separation more of an issue. First off, there are more people freeflying. Freeflyers, especially head down groups, drift differently than belly flyers, and thus need different considerations when planning for exit separation. Faster canopies mean that people who open facing each other need more distance to deal with a potential collision. Large aircraft with big doors can hold several larger groups, and those groups can get out those big doors more quickly. Finally, GPS spotting has removed some of the delay between groups. It's rare to see people even check the spot before beginning their jam-up. I first became aware of this issue in 1994, when I started jumping at Brown Field in San Diego. We went through a series of aircraft as we grew, from Cessna 206's to King Airs to Beech-99's, none of which had GPS. In addition, we were less than a mile from the US-Mexico border, which meant our jump runs had to be east-west and our spots had to be dead on. Several instructors were "designated spotters" and we would argue over 100 yard differences in jump run offset and exit location. After a while we got pretty good at spotting. As our aircraft became larger, exit separation became more of an issue. We had a few close calls, and so we agreed to start allowing more space between groups. At first it was essentially trial and error - we would leave some amount of time (10 seconds or so) between groups and increase that time whenever someone felt they were too close to someone else. After a while, we began to get a feel for how much time was required. We knew that if the upper winds were strong and the plane was just creeping along the ground, we had to leave more time. We also knew that if we let the freeflyers get out first, we had a problem almost every time. We ended up with a system that worked for us, and had essentially no problems with collisions or close calls after that. During this time I was also traveling in the summers to different boogies and I noticed a wide variety of exit separation techniques. By far the most common technique was some amount of fixed time - the next group would pause, then climb out and go, without knowing what the upper winds were doing or what the spot was. The next most common technique was similar but they added a "leave more time if it's windy" clause to their delay. There was also a class of jumpers who looked out the door to tell how much separation to leave; these jumpers either looked at angle of the departing group or the ground to tell how much space to leave. This got me thinking. What really works and what doesn't? I tried a few methods on my own, from the "45 degree" method to a purely ground-based method. After some experiments, a group of skydivers collaborated via email and internet and came up with the actual math behind separation, the physics that determines how far the center of group A will be from the center of group B after they open. But before diving into the math, there are a few basic concepts to cover. What we care about. When we're talking about separation at opening time, we don't really care about where we are in relationship to the plane or even the ground - what we care about is how far we will be in the air horizontally from the next group that opens. So for our purposes, the airplane and the ground don't really matter, and someone watching from either of those places may not get the same "picture" of things that we get. (Of course, we do care about our relationship to the ground when it comes to spotting and landing on the DZ, but that's a separate issue.) How we fall. In most freefall (tracking dives and wingsuits excepted) we fall essentially straight down with respect to the air. If there's wind, the wind blows us at whatever speed it's blowing. If the wind is doing 30kts at altitude, a group of skydivers will be doing 30kts as they drift with the wind. It's also important to realize how your trajectory changes after you open. At a freefall speed of 100kts, a 30kt wind will slightly deflect your trajectory, because it's a small fraction of your total speed. Once under canopy and descending at 10kts, it will deflect your trajectory a tremendous amount, since it is now a very large part of your speed. Of course, under canopy you have much more control over your own horizontal speed, and the winds may add or subtract from your canopy's groundspeed depending on the direction you are facing. Speeds. When discussing speeds, it's important to define units. There is feet per second, which is very useful for people who are trying to figure out how far they want to be from another group. At 100 feet per second, 10 seconds gives you 1000 feet, which is about as easy as it gets. You may also hear the terms indicated airspeed, true airspeed, and groundspeed, in both knots and miles an hour. These can all be converted back and forth as needed .Now that all that's out of the way, the math is pretty simple. The distance you will get between group centers is the speed of the aircraft plus the speed of the winds at opening altitude, multiplied by the time you leave between groups. That's it. So if the aircraft is flying into the wind doing 80 knots per its GPS, and the winds at opening altitude are 10 knots from the same direction, and you are waiting 10 seconds between groups, you are going to get (80+10 = 90 kts, which is 153 feet per second) 1530 feet between groups. It gets a little more complicated when the winds are not from the same directions. If the winds at opening altitude are opposite jump run, you have to subtract them rather than add them. If the winds at opening altitude are from the side, it's the same as zero winds at opening altitude when it comes to separation. If you put these equations into a spreadsheet and play with the numbers, some basic patterns emerge. If the headwinds at altitude are strong you have to leave more time. If the plane is slow (i.e. it's indicated airspeed on jump run is low) you have to leave more time. If the winds at opening altitude are strong as well, and from the same direction, you can safely leave less time. (Or, preferably, just leave the same amount of time and you'll end up with even more separation.) If the winds at opening altitude are opposite from jump run, that's the worst case, and you have to leave even more time. Some people have a problem visualizing how winds at opening altitude can possibly cause them trouble if they leave enough distance on exit. The question is usually phrased as "don't all jumpers follow the same path out of the plane?" And they definitely do. To visualize why this can still cause you problems, take a look at the separation diagram shown below. Drawing showing exit separations In the first drawing, there is no wind after exit, and the first group breaks off, tracks, opens, and flies their canopies away from the center for the first few seconds, which is what they should be doing on most formation skydives. (After that, it's a good idea to turn away from line of flight once you're sure you are clear of others in your group.) The second group arrives 10-15 seconds later, shortly after the first group has opened their parachutes, with some room to spare. The second drawing shows what happens when there are winds are the same all the way down. Notice that the "cone" caused by the breakoff and the canopy flight has shifted strongly to the right. This is because (as mentioned before) once their parachutes are open, the wind affects their trajectory more strongly. As with the first example, it is assumed that everyone flies away from the center for the first few moments. That means the jumper flying into the wind makes no progress and comes straight down, while the jumper flying downwind gets a boost in groundspeed.. The third drawing shows where you can run in to problems. In this drawing, the winds after exit are from the opposite direction. You get the same skewing of the cone, but now the edge of the cone is getting dangerously close to the trajectory of the next group. This is a case where the same separation at exit led to trouble because of opposite winds at opening altitude. This leads naturally to the question "how much separation do you really need?" That depends on the group. 1000 feet should probably be an absolute minimum for any belly formation skydiving. That means that two four-ways can exit, fall straight down the pipe, track 300 feet from center on breakoff, and then still have 300 feet to deal with avoiding a potential collision after opening. With the speeds of today's canopies, that's a bare minimum. If the group size grows to two 10-ways, 2000 feet might be a wiser separation. If a low-time RW group backslides a bit, again, 1500 feet might be needed to be clear of them at opening time. So how does a jumper who doesn't want to carry around a calculator figure out how much time to leave between groups? One very simple way is to just look out of the plane and wait until it has covered 1000 feet, then go. This method, originally suggested by Skratch Garrison, takes much of the figuring out of exit separation. It can be hard to determine how far 1000 feet is on the ground, but fortunately most DZ's come with a handy ruler - a runway. A 3000 foot runway allows you to put 3 groups out along its length with a bit of margin thrown in. This method also has the tremendous advantage that it requires people to look out the door, and that means they are more likely to see traffic, high canopies or clouds that could pose a hazard to their skydive. Another simple way is time-based. There are several tricks you can use to determine how long to wait. One common one is to always leave at least 7 seconds, then if the upper winds are strong divide them by 2 and wait that number of seconds. (Faster aircraft sometimes use divide by 3.) So if the winds are 30kts you wait 15 seconds between groups. This technique uses some math but isn't too bad. A third technique that seems to be popular for some reason is the 45 degree method. In this method, jumpers wait until the previous group passes through an imaginary 45 degree line before they exit. The problem with this method is that the jumpers never pass through that 45 degree angle, or pass through it so quickly (under 1 second) that it's not useful for determining separation. The numbers confirm this. What you see out the door depends purely on speed of the aircraft, fallrate of the jumpers and type of exit. If the plane is going slower than freefall speed, the group may start out above the 45 degree line, but will drop below the line in less than a second and never rise above it again. If the plane is going faster than freefall speed (which is rare) the jumpers stay above the line and never cross it at all. A good head-down exit will tend to move jumpers lower in the picture. Winds will not affect the picture; an exit in 5kt uppers looks the same as an exit in 50kt uppers. There has been some friction over this issue. The 45 degree method has a lot of supporters because it's so simple and makes a sort of intuitive sense. Beyond that, it actually seems to work for some people - although it's likely that the extra time it takes to locate and stare at the previous group has something to do with the reason the next group usually leaves enough time. To show that this doesn't work, two cameras were fixed at a 45 degree angle and mounted on a boom outside an Otter's door (see pictures below.) Pictures and video of several jump runs both into the wind and downwind were taken and magnified to determine how close each group was to the imaginary 45 degree line, which was essentially the center of the images. The pictures confirmed the basic problems of the 45 degree rule. RW groups, falling a little faster than the aircraft, never quite passed behind the 45 degree line. Freeflyers, going much faster than the aircraft, stayed well below the 45 degree line for as long as they were visible in the stills (about 30 seconds.) Some version of the 45 degree method may work for some people. It may be that the simple act of looking out the door delays them enough, or their subconscious may see the group moving slowly along the ground (because the aircraft's groundspeed is low) and send a warning message to the rest of their brain - "hey, hold up a minute." But waiting for a true 45 degree angle simply does not work. Another issue that has become more important lately is exit order. Some places still put freeflyers out first, and that doesn't make much sense. In 30kt uppers, a belly flyer who leaves 10 seconds and gets out after freeflyer will open 100 feet from him, but if the belly flyer goes first and the freeflyer leaves the same time he will open 2200 feet from the freeflyer. RW groups, since they are in freefall longer, drift farther downwind before opening. It seems like a no-brainer to choose an exit order that used this to your advantage and increased, rather than decreased, separation distances. You can certainly wait 20 seconds after the freefly groups before the belly groups exit if there is some other reason why the freeflyers have to exit first, but at most DZ's it's hard to ensure that 20 seconds, especially since waiting so long almost guarantees long spots or a goaround. Below are two diagrams that show how exit order can affect separation. Belly out first diagram Freefly out first diagram One reason given at DZ's to explain a backwards exit order is that freeflyers open sooner and therefore are beginning to descend before the next group gets there. Bryan Burke of Skydive Arizona has pointed out that you simply cannot trust vertical separation - one premature deployment or malfunction and all that vertical separation is gone. Even during a normal skydive, when you add up altimeter error, pull timing and snivel distance, you can easily get a jumper opening 1000 feet from where he expected to be open. In fact, Bryan points out that at Skydive Arizona, the primary reason high pullers get out last is not for separation but rather because they are the ones that can make it back from a bad spot. Every drop zone is going to have a different set of rules and a different approach to exit order. Some work well, some don't work as well. Jumpers have to understand the factors that can reduce group separation so they can make informed decisions about when they want to exit and what kind of exit orders they are comfortable with.
-
 There are many variables to consider when looking into a canopy collapse: What was the pilot doing? How fast was the canopy flying when it collapsed? Where was the pilot flying? What is the canopy design? What is the wing-loading? Was there any re-active solution employed?These are the principle considerations, but not the only ones. I will take each one separately. 1) The way in which a parachute is flown can increase or decrease the "G" loading on the lines. A rapid release of one or both brakes significantly increases the chances that the canopy will collapse. This allows the parachute to surge forward to a lower angle of attack, decreasing the lift of the parachute. This reduces the amount of energy exerted by the parachute away from the suspended load, allowing the "negative" portion of the lift to take over and allow the wing to fly towards the jumper. 2) Airspeed is what creates lift. Lift is what causes the wing to strive to fly up and away from the jumper. This is the formula for line tension and therefore stability. The slower you are flying, the more likely your parachute will collapse due to low internal pressure and low line tension. 3) Was the wing flying in clean air when the collapse occurred? This is an important part of the question. All parachutes can collapse in "bad" air. We must always fly considering the invisible dangers that the sky presents us. If you wouldn't fly a kite there, don't fly or land your parachute there. 4) Certain parachute designs do better in turbulence than others. I must avoid pointing fingers here, as this is a volatile industry that can be taken down by non-skydiving lawyers. Nevertheless, certain wings have an increased propensity to go "negative" when presented with adverse condition, while others bump around a bit and keep on flying. This is a complex issue, and the best way to decide which parachute to buy and fly is to listen to the actual statistics, and to your own experience when flying a particular design. I have not experienced any kind of collapse on the parachutes I fly, ever.* If you have on yours, you may want to reconsider what is over your head. *(This does not include nasty, ill-conceived prototypes that seemed like a good idea at the time. I am talking about production-model canopies here) 5) Parachutes perform differently at different wing loadings. The lighter the wing loading, the slower it will fly. This means that the internal pressurization of the wing will be less on larger canopies. In general, lightly loaded parachutes experience more small collapses than heavily loaded ones. Not only is there less internal pressure in the wing, but the dynamic forces area also less with decreased airspeed. This means that the average line tension tends to be less on a lightly loaded wing, and the wing tends to have a increased propensity to surge forward in the window when flying at low air speeds. This is why very small, highly loaded parachutes tend to experience fewer distortions, especially when flown at high speed. Flying at high speed increases the drag of the canopy itself, relative to the jumper, so the relative wind holds the parachute back in the window and at a higher angle of attack. This is why I make carving, high "G", high speed turns to final approach heading, especially in turbulence. The speed actually reduced the chances of a collapse by increasing the forces that keep the parachute at the end of the lines. I am literally increasing my wing loading by flying fast and at high "G's", and the increases velocity reduces the amount of time that I fly in bad air. I am not saying that you should downsize just to increase your stability. I am saying that until your skills and knowledge are ready to fly smaller, faster parachutes, you should stay out of the sky until the winds come down. I still haven't been hurt by a jump I didn't do. 6) This is all about "Pitch Control". If you are flying a good design with lots of airspeed and significant line tension, and in a reasonable location that has no obvious precursors for collapse, you can only deal with a collapse in a re-active manner, as you have addressed all of the relevant variables up to this point. If your wing tries to aggressively surge forward in the window, you must notice it and quickly stab the brakes to bring it to the back of the window. A collapse always begins by a surge to a low angle of attack, but there is very little time to deal with the problem before I folds under. Here are the signs: The first sign is a change in Pitch. The wing moves forward in the window. This is the limited flying space over your head. Too far forward and it collapses. Too far back and it stalls. The "G" loading drops dramatically and almost instantly. In other words, your apparent weight in the harness drops because the wing is producing less lift. This is the time to jerk on your brakes: quickly, sharply, but not more than about 50% of the total control stroke. This action is to pull the wing back in the window, not to stall the parachute. By putting the wing further back in the window, we are increasing the angle of attack. This increases the lift, and forces the wing to fly away from the suspended load and thereby increase the line tension. This can prevent a collapse entirely, or cause the wing to recover to stable flight before things get really out of control. If the wing is allowed to collapse, it may recover quickly on its own. This is why the more modern airfoils have the fat point (Center of Lift) so far forward. It causes the wing to pitch nose-up when it begins to fly again, bringing it back to the end of the lines. Nevertheless, parachutes can still collapse fully, which often involves significant loss of altitude and possibly a loss of heading. If your wing goes into a spin because of a collapse, your job is to stop the turn first, as you increase the angle of attack. If it is spinning, there is less chance of recovery until the flight path is coordinated and the heading stable. Conclusions: Don't fly an unstable parachute. If it is prone to collapse, ground the parachute. Do not sell it to an unsuspecting jumper at another drop zone. These people are your brothers and sisters. Don't fly in crappy air. Land in wide open spaces, in light winds, and never directly behind another canopy. Practice stabbing your brakes in response to forward surges on the pitch axis. This must become a "learned instinct" that requires no thought at all. Like pulling emergency handles, pulling the wing to the back of the window when the lines get slack is essential for safe skydiving. Keep flying the parachute. If your parachute does something funny near the ground, don't give up. If you keep your eyes on YOUR ORIGINAL HEADING, you will unconsciously do things that will aid your stability and keep you from getting hurt. Looking toward what you don't want is how you make it occur. I hope this little article helps you understand the phenomenon of collapses a bit better. I know as well as anyone how painful a collapse can be. I do not want to go back to that wheelchair, and I don't want anyone else to have to experience that either. You morons are my family, and if information can help protect you, I will give it until my lungs are out of air. Blue Skies, Sky People. Bri Article Discussion BIGAIR SPORTZ
- 3 comments
- 4
-
- 1
-

-
- canopy control
- safety
- See more
-
 So you whipped through your student program, graduated AFF, moving towards or already got your A license, eyeing a rig to buy and well on your way to your first 100 jumps. Canopy or parachuting skills are an integral part of every training program, but are also the most important skills these days. There are five quality canopy skills every student should know: awareness of your rig and canopy, awareness of your self and others in the pattern, awareness of target and setup, good depth perception, and a proper two stage flare. A Few Parachuting Tips That Are Very Important 1. Awareness Of Your Rig And CanopyDeveloping awareness of your rig comes with time. Unfortunately, when you're a student, time is not a comfort you always have. You need to be comfortable and confident with your rig on every jump. If it is a new rig you're jumping, wear it around the house, while your cooking dinner, sitting on the couch or doing chores so that you can get used to it. If you rent rigs, get suited up extra early like on the twenty minute call, so you can go through all your emergency procedures. This comfort and confidence is paramount when you are up in the air. If you are not confident in your parachuting equipment, you will have "gear fear" and this can affect your judgment. If you have a new rig and there are things you don't like about the rig, change them. You would be surprized the little things a rigger can do to make a rig fit better. I recommend buying a custom rig when you have reached a size you will be on for a while 190-170 sq feet on average. Even with a new rig, small alterations can be made. The easiest fixes that I see students can do is a bungee cord to connect your leg straps, padded reserve handle, shortening the closing loop, and modifying the laterals to make the rig fit tighter. All these modifications are freefly specific but a tighter rig is a safer rig. Know your canopy when parachuting. Know each stage of deployment and the equipment on your canopy which is responsible for each stage. Learn how to pack! Packing your parachute is an intimate way to get to know your equipment. If you can pack your rig well, you will more likely have a greater understanding of your equipment and confidence with it. Packing comes with experience. Pack at home over and over again, watch people pack, and ask lots of questions. If a packing course is offered, take it. I know when I was starting out, I wasn't that interested in my canopy. It was a docile vehicle to get me from 3,000 feet to the ground, which I had to pack every time to go up. I definitely feel different about my canopy now. When you are under canopy and not in the pattern above 1000 feet, play with your canopy, practice your landings over and over again. Experiment with front risers, rear risers and toggles. Two intricate tips with your equipment can improve the performance of your canopy immensely. The first is simple, stow your slider and bring it down behind your head. Keep weary of where you are located relative to the drop zone, and other jumpers. Don't mess with the slider as you might end up in another county. Stowing your slider helps reduce drag and can increase your glide. It also gets rid of that annoying flapping noise. The second tip is for a student who can land on his target consistently. After your slider is stowed elongate your chest strap all the way out, without undoing it. Practice on the ground. You want your chest strap to be as wide as possible for three reasons: the canopy is designed to fly like this as it increases the glide of your canopy, second it gives you another control surface to fly, that being your hips, and lastly it allows you to lean forward in your harness which gives you more control. All three of these points can be seen on a good canopy pilot and a moderate student can start practicing these skills early on in his career, even though it will play a bigger part later. When your chest strap is elongated your hips are now hooked directly to your canopy instead of your shoulders through the harness. It will be hard to turn the canopy with your hips at first especially with large canopies, but it can be done. Simply scissor your legs and throw the leading leg over the trailing leg and lean in to it. Then try it the other way. This will become more important when you get to sizes like 150 sq feet and below. A word of caution, don't spend too much time elongating your chest strap under the canopy while you are parachuting, you definitely will end up in a different county. Opening shock makes it more difficult to elongate the chest strap then on the ground. The buckles cinch up with opening shock to make sure you don't fall out. Do not undo your chest strap! If you elongate the chest strap properly you will not fall out of the harness. The canopy will feel slightly wilier but nothing dangerous. Stow your slider and elongate your chest strap before you unstow the brakes. This will make it infinitely easier. If you unstowed your brakes already, let the alterations go and remember to do these things on the next jump. You must have a certified instructor watch over you when you practice on the ground and in the air. Make sure these alterations are done before 1000-1500 ft. Be careful, use common sense. 2. Awareness Of Your Self And Others While ParachutingI have briefly touched on this subject already, but since canopy collisions and landing off are a reality, awareness of yourself and others is a Quality Skill unto it self. Always know where you are relative to the drop zone. Are you up wind or downwind? Can't tell, figure it out! Watch the wind on the trees, or a nearby lake. Watch other skydivers, are they landing in the same direction your facing, or the opposite. I tell my students to watch the drop zone in the plane and where you are relative to it and the wind. This serves multiple purposes: you gain an awareness of where the pilot is in his jump run and his tendencies, you have a better understanding of the area you are jumping and potential outs and hazards, and on jump run you will be able to anticipate where you will be if you look out the window while other people are getting out. Look out for other people under canopy, especially during and right after opening. Check your canopy then look for others immediately. Look up and down the jump run for the people who got out before you and right after you. Get a visual then go through your checklists of things to do. If you are playing with your canopy up high always look before you turn or yank on a control surface. Find the pattern; be mindful of people out side the pattern. Do not spiral in the pattern. The best way to have clear space around you is to go last and deploy high. One easy thing that you can do especially when you are traveling to a different drop zone is find how they operate their pattern. You would be surprised how many experienced jumpers do not ask about or forget the pattern. I think this is the biggest problem at destination DZs where people are visiting. Follow the rules laid out; the rules are there for you as skydiver's safety and the safety of others. 3. Awareness Of Your Target And SetupYou should be aware of where your landing target is in freefall. I have left countless jumps early because the spot was off, people took to long in the door and spread the spot to thin, or the wind was stronger when we exited then when we took off. The point is, develop an awareness of where your target is in freefall by doing solos. Don't be afraid to deploy a little early if you see you are entirely too long to get back. After you are open and you have made sure the canopy is safe, you have made your control checks and alterations, size up the distance and altitude you have from your target. Execute the pattern your instructor and you have gone over. Try to stay up wind of your target before you start to execute your pattern. Go over in your head, how you are going to execute, see the legs of your pattern, check for others, and then go! Hitting your target is not done in the last 150 feet, that is how people get hurt. Hitting your target comes from proper briefing of the landing area before the jump, your spot, and how you set up for your pattern at 1000 feet. Good target acquisition comes from practice but also preparation. 4. Good Depth PerceptionDepth perception is a key element of being a good canopy pilot. It is a learned skill but can be greatly improved through various techniques. If you wear glasses please tell your instructor. Do not be ashamed of your sight. Your sight will put you at a great disadvantage if you do not use your glasses or contacts while parachuting. With proper use of glasses and contacts you can enjoy the sport with no problems. If your goggles don't fit your glasses buy ones that do. If you do not like glasses and your contacts dry up, change your goggles to a snugger fit, or possibly look into laser surgery. I know many people in the sport who swear by laser surgery. The bottom line is that when you skydive, use what you use to drive your car. Skydiving is as critical as getting behind the wheel with your eye sight. If your sight isn't a problem or you use one of the corrective measures above, you can dramatically increase your depth perception of the drop zone and the ground. Look at the drop zone while you are in the plane and gage it with your altimeter so you get an idea of how high you are. Get a highly visible altimeter and don't forget it on the ground! When you get within the last 150 feet do a quick check for people around you, then lock in on your target. When you get 50 feet from your target, shift your eye sight from looking down to looking in front of you. Open your vision so you still include the ground but try to look forward. Begin your two stage flare at about 10-15 feet depending on the winds. Keep your vision open and wide; do not fixate on the target. Consult your instructor. 5. A Proper Two Stage FlareI know some drop zones do not condone a two stage flare. Do not buck the trend on this one. If your drop zone doesn't allow it, come to me I will teach you. Ask your instructor about the two stage flare. I know from my experience some students have a tough enough time doing a symmetrical flare at the proper altitude. So maybe the two stage flare is not right for you, right now. I do believe it is an important part of being a good canopy pilot, and mixed with all the alterations mentioned above can give you your first swoops coming straight in with no riser input. In fact I have seen students who collapse and stow their slider, elongate their chest strap, and use a proper two stage flare swoop 50-60 feet with no wind. The two stage flare is quite simple.10-15 feet above the ground quarter flare your canopy. This action planes out your canopy and translates your vertical motion forward. Make sure that the flare is quartered not a half flare. There is a dramatic difference. A quarter flare will plane the canopy out and accelerate you forward; a half flare will distort your canopy and make you sink. When you are five feet above the ground, full flare to come to a complete stop. I see many people just leave the canopy in a quarter or half flare. This action makes you hit the ground moving forward and a little hard, you might have to run it out. Make sure you have a consistent symmetrical flare on target before you practice a two stage flare. The two stage flare is difficult without video to show you what you are doing. So, get coaching with video, people just telling you what to do will not get it done. You must have feedback and video is the best for this. Also if your instructor uses radio this is a plus, but not essential. I have commented on many things in this article. Do not try to do them all at once. Concentrate on one thing per jump. Focus on one thing for 20 jumps if you get flustered easily, till you get it right and it becomes habit. If you incorporate all these things with the over site of a quality coach, you can swoop coming straight in with no riser input on target safely negotiating others and the physical hazards around you. Be very careful under canopy while you are parachuting. Nothing replaces common sense, good judgment and asking lots of questions. You too can be an excellent canopy pilot with these five quality skills. Steven Blincoe has 4,000 jumps and 300 Skyventure hours in the wind tunnel. He is the founder of the New School Flight University in Orlando, Florida. He also has 10 years of experience in the sport coaching, competing, and filming. Steven Blincoe can be reached by phone 530-412-2078 USA, or by email [email protected]. You can also go to www.blincoe.org.
 -
 Learning to fly our parachutes is absolutely necessary for long-term survival in this sport. The philosophy that the canopy is simply a means to get down from a skydive is gradually becoming a thing of the past. This may be as a result of individuals with such an attitude dropping out of the sport due to canopy-related injuries, or from the insurmountable fear that comes as a result of a lack of control over their experience. Regardless, many jumpers have been taking an increased interest in flying their parachutes better. Reading and talking about canopies is the beginning of this process. We must understand the principles that allow our canopies to fly. To make a real difference in our capabilities, however, we need to physically experiment with our parachutes in flight. We must practice in the real world. Here are a few exercises that will increase your abilities to save your own life, and enhance your feeling of control while under canopy: Pitch Control Exercises Manipulate the canopy on the pitch axis using the brakes. Look at canopy to notice the amount of pitch axis change. Notice the difference between "soft" and "sharp" inputs: slow application vs. quick. Why? Controlling the pitch angle is how we manipulate the angle of attack of the wing. Without a dynamic change to the angle of attack, we will be unable to increase the lift of the parachute enough to change the direction of flight from its normal full flight glide to level flight. This maneuver is essential for safe landings. Pitch Control With Bank Angle Begin a turn using a single steering toggle. Apply the opposite toggle while still in the turn. Experiment with soft versus sharp inputs to negate decent. Look at canopy to notice pitch changes.Why? Having the ability to control the pitch axis while in a bank is what gives the pilot the ability to control the decent rate while in a turn. The natural tendency is to loose altitude in a turn, but this is not necessarily the result of turning with bank angle. By increasing the angle of attack while in a bank, we can increase the amount of lift that the parachute is producing, and even alter the flight path to level flight despite significant bank angle. Dive Arrest: Toggle Turns Place the canopy in a spiral dive using a single steering toggle. Arrest the dive as quickly as possible by sharply applying the opposite toggle as well as the inside toggle; the inside toggle is not applied until the two are matched in the degree of input. When the toggles are matched, a short stab of collective brake pressure is usually all that is needed to achieve level flight. Exercise both banked recovery and wings level recovery. Why? Turning too low is the preliminary cause of many injuries in our sport. Unfortunately, most canopy pilots assume that bank angle must be eradicated before arresting the dive. This leads many to waste valuable altitude in the process of leveling the wing. In situations with very little altitude remaining, this may delay the collective brake application until it is too late. By rehearsing a transition to zero decent while still in a bank, the pilot becomes accustomed to applying the toggle on the outside of the turn as a learned instinct, reducing the chances of a turn leading to serious injury. Dive Arrest: Front Riser Dive Place the canopy in a dive using the front risers. Rehearse dropping the front risers and quickly stabbing the brakes. Rehearse both straight front riser dive recovery as well as turning dives. Why? While acceleration on final approach can be great fun and usually leads to longer swoops, the acquisition of speed is not really the hard part. What keeps us alive is the judgment and skills necessary to save us when we dive the canopy too close to the ground. If we rehearse the solutions to the dangers, the likelihood of a dive resulting in serious injury is reduced. Letting the front risers up slowly may be the best way to get a long swoop when the dive is rounded up slowly and with ample altitude. Unfortunately, this muscle memory may not serve us when we are really low. In the time it takes to smoothly let up on the front risers we may find ourselves planted in the ground like a shrubbery. Dropping the front risers allows the pilot to keep their hands down, ready to stab the brakes aggressively to arrest a mortal dive. A short, sharp, shock on the brakes may be all that is necessary to place the jumper back under the wing, and to the higher angle of attack that saves their life. Slow-Flight Practice Place the canopy in 90% brakes and hold for 60-90 seconds. Make controlled heading changes of 45-90 degrees. Notice the difference in responsiveness as compared to full flight turns. Notice that lifting a toggle on the outside of the turn reduces the risk of stalling the wing on the inside of the turn.Why? Most pilots spend the majority of their canopy ride in full flight. This means that the feeling of the canopy in this mode is most comfortable to most people. It also means that flying in deep brakes places many out of their comfort zone. This means that most people are feeling somewhat uncomfortable just prior to putting their feet on the ground every single jump. In fact, this anxiety often causes people to hold their breath, and then offset their steering toggles toward the end of the landing in order to get to the ground sooner. They simply want this part to be over. In order to land with great consistency, we must become intimately aware of the flight performance of our parachutes in very deep brakes. The more time we spend in this flight mode, the more comfortable we will be. If we are to land well, we must be as comfortable with deep brakes as we are with full flight. Brian Germain is the author of The Parachute and its Pilot, a canopy flight educational text. Brian is also the President of Big Air Sportz parachute manufacturing company, and teaches canopy flight courses all over the world. To learn more about parachutes, or to order the book, go to: www.BrianGermain.com .
 -
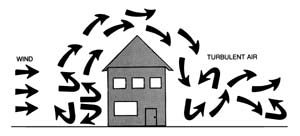 Most of your landings will be normal and in the center of the drop zone, but unusual things do happen like landing in water, in sudden high winds, descending through power lines or trees. TurbulenceAs mentioned earlier, bumpy air may be encountered at any altitude and it has been known to close end cells and upset canopies. Jumpers have been robbed of their wings to be left back in freefall at 75 feet. Bumpy air may occur on windy days and on hot, no-wind days. Keep your canopy inflated during turbulence by flying at one-quarter to one-half brakes and make gentle turns. If turbulence causes a partial canopy collapse of your canopy, bring the steering lines down to half to three-quarters brakes to help the canopy to reinflate. Turbulence near the ground may be caused when wind flows over obstacles such as buildings and tree lines. Avoid landing on the downwind side of any obstacle. The air may be bumpy or descending. The stronger the wind, the farther downwind the turbulence will exist and the taller the object, the higher the turbulence will be. Turbulence can be significant downwind as far as twenty times the object’s height. For a fifty-foot tree line, that could mean 1,000 feet downwind turbulence. Turbulence also occurs behind other ram-air canopies. Stay away from the area directly behind another canopy about 45 degrees up from the trailing edge. Dust DevilsDust devils are very dangerous. They can rob you of your canopy when you need it most — near the ground. Look for the spinning dust clouds. Unfortunately they can’t be seen over grass. One jumper landed, his canopy deflated and then it was reinflated by a dust devil. The swirling wind picked him up and then threw him back on the ground. He died from the impact. In windy conditions, pick up your deflated canopy immediately. In bad conditions, stand on it. High winds. If you find yourself in high winds, look behind you as you back up. Many jumpers back into power lines and fences. When landing in high winds, let go of one toggle as soon as your toes touch the ground. Keep the other toggle at the flare position and quickly pivot 180 degrees in the direction of the depressed toggle. Steer the canopy into the ground. Run toward and around it to collapse it. If necessary, continue pulling on that toggle and reel in its line to pull the canopy out from under itself. Once you are on your feet, stand on the canopy and remove your harness. Don’t let it reinflate and start dragging you all over again. ThunderstormsThunderstorms are violent vertical lifting of air masses, a phenomenon which can build cumulonimbus clouds from near the ground to anywhere from 50,000 to 75,000 feet. Thunderstorms possess violent updrafts and downdrafts along with lightning. While the West Coast of the U.S. has only around five thunderstorms each year, the northeast has 20, and Florida 80 to 90. Jumpers have been caught in cumulonimbus clouds for some pretty scary and wet rides. When the storm clouds appear, put the gear away. The Tree LandingThe tree landing is rarely hazardous if you “center” the tree. Your canopy will lower you gently into and through the trees as you slow further, breaking the thinner branches. You will probably go all the way through to the ground and make a normal parachute-landing fall on the other hand, if you clip a tree with a wing tip, your canopy may collasp, dropping you to the ground. If you can’t avoid the trees, face into the wind to minimize your ground speed, pull half brakes, and place your feet and knees tightly together so you won’t straddle a branch. Do not attempt to brake your descent by grasping limbs; you are better off going all the way through to the ground slowly than ending up sitting in the top of the tree. Prepare for a PLF. If you come to rest short of the ground, check your position. Students should wait for DZ personnel to come to their aid. If your feet are within three feet (1m) of the ground, unfasten your chest strap and then your (solid saddle) leg straps and drop to the ground. If you do not undo the chest strap first, you could injure your neck as you fall away. If you are up quite a way, relax and wait for help. If help does not arrive, you may have to climb down. Perhaps you are way off the DZ and dusk is approaching. It’s hard to shout continually, and it is nice to have a whistle in times like these. You may deploy the reserve canopy without activating the cut away mechanism (for S.O.S. type equipment, pull the metal cable out of its housing without disturbing the plastic-coated breakaway cables), let down the canopy and lines and then climb down hand over hand. If you let the narrow lines slip through your fingers and aren’t wearing gloves, you will receive painful friction burns, so go hand over hand. Keep your helmet on until you have both feet firmly on the ground. Its purpose is to protect your head from takeoff to touchdown, and you aren’t down yet. Power LinesYou must avoid power lines at all cost; the danger is just too great. Look for the high-tension wires. If you are at an unfamiliar DZ or land off target, look for poles; wires run between them invisibly. Keep power lines continually in mind from the time you open so you can avoid them. High-tension lines don’t look dangerous, but they strike with the speed and power of lightning. They may electrocute you in an instant or put you in the hospital with severe burns; it isn’t at all pleasant. If there is any question about clearing the lines, turn and run with the wind until you are past them and make the decision high enough. It will be better to land downwind than to land in power lines. If landing in the wires is inevitable, it is essential that you avoid touching more than one wire at a time. Any bird will tell you that it takes touching two wires to get zapped. If you are going into the wires, face your canopy into the wind to minimize horizontal drift, pull half brakes to make your final descent as close to vertical as possible. Drop your ripcord or anything else in your hands. Place your feet and knees firmly together with the toes pointed to avoid straddling a wire. Look for wires and wriggle and squirm as necessary trying to avoid touching more than one at a time. If you come to rest near the ground, check below to see what is underneath you. If there is no hazard below you and it is less than five feet to the ground — and assuming it is the main canopy that is hanging you from the wires you might decide to execute a breakaway and get away from the danger area as quickly as possible, but it would be better to wait for calmer heads to give you guidance in this matter. If there is a hazard below you or if it is your reserve parachute that is hanging you from the wires, you must wait calmly for competent, professional help. Any movement on your part may force an electrical contact. If a local resident walks up desiring to help you, ask them to call the power company and the DZ in that order. Warn would-be rescuers not to touch you or your gear until the power has been turned off. They could complete a circuit between you and the ground with fatal results. Once you get to the ground, be alert for broken power lines, they are like snakes hidden in the grass and they not only strike, they sometimes start fires. Never pull on a canopy attempting to remove it from the wires, it may be your very last good deed. Let the power company do it; it is their kind of work. Water LandingsThere are two types of water jumps — those you plan and those you don’t. An intentional water jump is an exciting, rewarding combination of aviation and water sports. But being unexpectedly blown out over a body of water is cause for great concern. In fact, while few jumpers have perished in a planned water jump, 48 perished in unexpected water landings between 1967 and 1984. These figures have dramatically decreased now that the use of ram-air canopies has become universal and floatation devices for operations within one mile of water are mandated by the BSRs. The procedures for these two very different types of landings are not the same. In an intentional water landing you will slide back in the saddle, undo the chest strap, the bellyband (if there is one), and loosen both leg straps slightly (unless you have a full saddle harness, in which case you can release one leg strap up high, then the last leg snap upon splashing down). This procedure is also recommended if you find yourself being blown unexpectedly out over the ocean or other immense body of water. When there is absolutely no question that you are going for a dunking, you should inflate your floatation device. Don’t get out of your gear until you get wet. Don’t break away when you think you are about to get wet. Depth perception over water is deceptive. You may think you’re at 20-feet, but you’re probably much higher. Without knowing how deep the water is, you almost guarantee yourself a landing injury if you don’t steer the canopy all the way to the surface. For landing purposes, assume the water is just a few inches deep. Take a deep breath and prepare to do a PLF. Line up your landing into the ground winds (you may have to use the sun’s position for a reference) and once you are wet, swim or work your way forward out of your gear. Don’t try to save the gear at first. Remember that it is replaceable, you aren’t. Worry about the gear later, when you are safely away from it. Better yet, let someone else (such as your water landing crew) worry about it. When making an intentional water jump, conditions are good, the jump is planned and the necessary flotation equipment is worn. The ingredients for tragedy, on the other hand, are born by being unprepared for the unexpected. The Basic Safety Requirements insist on carrying flotation gear when parachuting within one mile of any water deep enough to take a life, but there are times when one mile is not enough. A bad spot on a big load with high upper winds, sudden radical wind changes, or a popped round reserve as you exit at twelve grand, for examples, may carry you far from the friendly DZ. Some water requires more protection than just flotation gear, such as when a jumper punches through the ice in the wintertime. Most unintentional water landings are also unexpected. They take place in narrow rivers and small ponds; so small that you don’t know you are going into them until just a short distance from splashdown. There is no time to do much water-landing preparation, particularly if you are trying to avoid trees. As a result, you are going into the water in all your gear and your chances are poor. On the other hand, if you go through the intentional water landing procedure just in case and then miss the water only to land in the trees because you couldn’t spend enough time steering, you may subject yourself to other dangers. The greatest danger in water landings is becoming entangled in the net-like canopy and lines. In fact, we should think of: panic-canopy-entanglement-drowning. All are challenges, very much related, and either of the first two can lead to the others. If there is little wind in the small tree-protected pond, the canopy will deflate and fall straight down on you in a huge mess of tangled nylon fabric and lines. If you panic, you are sure to become caught in the trap. It seems logical, then, to try to avoid the canopy, or better yet, avoid the water landing. The procedure recommended for unintentional water landings is as follows: You are at 1,000 feet and the wind is backing you toward a water hazard. If you continue to face the wind, you may land short of it and if you turn to run, you may land on the other side of it, but one thing is for sure: you will land in the vicinity of it. So, take the action outlined below and then at double to triple the height of the trees, face into the wind to minimize your ground speed, pull your toggles to half brakes, and place your feet and knees firmly together in preparation for a PLF. Two Action System (TAS) Continue to steer, activate your flotation gear if you have it, undo your chest strap and your belly band if there is one. Loosen your leg straps so that you can slide the saddle forward a bit. Disconnect the RSL. Then, just before touchdown, reach for the canopy release handle. At the moment your feet get wet, not one moment sooner, activate the releases. The tensioned canopy will recoil upwards and even a mild wind will carry it away. Altitude is very difficult to judge, especially over flat ground or a large body of water. One is always tempted to drop out of the harness just before touching down, but what appears to be just a leg length may really be building height, so don’t break away until your feet are in the water.This procedure will leave you floating with your harness and reserve on but with the dangerous unpacked main canopy gone. Roll over on your back and take off the harness. Actually, the harness won’t hurt or restrict you and the packed reserve will even provide positive flotation. In fact, the reserve won’t become negatively buoyant for about three minutes. So, you can use it for temporary flotation. Single Operation System (S.O.S.). With the S.O.S. system, if you jettison the main canopy, the Stevens lanyard will activate the reserve. Allow yourself to get wet, bend forward and then swim or work your way forwards out of the loosened leg straps as quickly as possible. Get clear of the canopy. If the canopy does land on top of you anyway, grab it and follow/walk a seam to the edge of the canopy. There is no reason to panic as you can always lift the porous fabric to form a space to breathe. Once clear of the canopy, swim away using mostly your hands until you are clear of the lines. Keep kicking to a minimum, as pumping legs tend to draw lines and fabric toward them. If you should land in a river, even a slow moving one, you want to jettison your main as soon as possible. If it catches in the current it will drag you under and/or downstream away from your rescuers. Besides your reserve, certain other pieces of your gear may provide some flotation. Pneumatic soled jump boots, full shell helmets, knotted jumpsuits, etc.; they are all there for those who think to use them. You must undergo (dry) unintentional water-landing training for your USPA A license and (wet) live water training with full gear for the B license. These requirements have probably saved hundreds of lives so far. Buildings Landing on a building presents two distinct hazards. First, you might go through the roof of the building, which may lead to a broken or cut extremity. Second, if it is windy, you might find yourself being dragged off of the building and going for a second extremely hazardous landing. If you feel your life is in danger (such as being dragged off a high building), break away from the main as quickly as possible. Don’t worry about the reserve inflating — it won’t have enough of a chance to do so. If it is your reserve that put you on the building, try to collapse it as quickly as possible. If that doesn’t work, you’re going off the building in the wrong position for a second landing and there probably won’t be much of a chance to get into a PLF mode, but try to anyway. Other ObstaclesThere are many other landing obstacles that are potentially hazardous to parachutists such as ditches, fences, hard roads and even some unique ones like hot water geysers. These hazards at your DZ will be pointed out to you in your first jump course, probably with a marked aerial photograph. When visiting a new drop zone, be sure to check in with an instructor or the Safety & Training Advisor for a briefing on their local hazards and recommended alternate landing areas. When you are in the air, look for the danger areas. Invisible barbed wire runs between visible fence posts, power lines run between power poles, isolated buildings are served by electricity. Power lines, ditches, and fences often border roads, airplanes land on runways, etc. This should all be obvious, but sometimes it’s not. It is all new to you and the view is different: you are looking down at the terrain now, not horizontally. If an obstacle presents itself, steer your canopy to avoid it. Turn your canopy to run and land beyond it, if necessary. If you are going to strike an object, hit it feet-first. Successful landings under a parachute are like those in an airplane: the ones you walk away from are good. It is far better to land outside the target area and walk back than land on a fence and be carried back. Don’t let get home-itis get you. If you pass over the obstacle very low, you may not have sufficient altitude to turn into the wind for landing. It is then preferable to crab the canopy slightly and try to do your best forward PLF. But, obviously, the best solution is to think and plan ahead to avoid the obstacle in the first place. The most important rule about landing hazards is: Continually make efforts to avoid them. The second rule is: It is better to land flying downwind than to hit an obstacle.
 -
Accelerated FreeFall (AFF) EmergenciesAs you get ready to leave the aircraft, you are supposed to do a pre-exit check to make sure that your jumpmasters are ready to exit too. If you make an error in your exit count, you can fool your jumpmasters (JMs) into thinking that you are about to leave and they may end up pulling you off the aircraft before you are truly ready to go. If you leave at the wrong time in the count, you could be taking your jumpmasters in tow. This could lead to some awkward flying if you are not arched. You may be positioned in a reverse arch (like a cat standing on top of a toilet bowl) which will attempt to send your butt to earth. The exit timing depends upon you doing the exit count right so that your jumpmasters can exit with you, not before or after you. If you find yourself looking up at the sky or tumbling, arch hard for stability. Your jumpmasters will be doing their best to assist you in getting back to the proper belly-to-earth position. AFF:Loss Of One JumpmasterIf you sheared off one jumpmaster during the exit or one let go because he was not contributing to the stabilization of the formation, arch for stability and check with the remaining jumpmaster during your circle of awareness. If you get a headshake of “NO,” it may mean that the jumpmaster holding onto you is not quite comfortable with your stability at that time. On the other hand, it may mean that he doesn’t want you to go to the next portion of your tasks because the other jumpmaster is just about to re-dock on the formation and he wants that jumpmaster in the correct position before you continue with your tasks. You may or may not feel the other jumpmaster re-dock. Whenever you get a “NO,” simply arch a bit more, wait a few seconds, then do another circle of awareness. If you get a nod of “YES,” you may continue on with your skydiving tasks regardless of whether or not you have just one of both jumpmasters firmly holding onto you. AFF: Loss Of Both JumpmastersYou are in an extremely hazardous environment if you don’t have a jumpmaster holding onto you. The moment you realize this, arch and pull immediately. The following emergencies apply to either AFF or S/L program freefalls. Of course, in the S/L program, a jumpmaster might not be in the air with you during your freefall. Five-Second Rule For Loss Of StabilityHere’s a good rule for AFF or freefall. It is called the Five-Second Rule. If you are out of control, attempt to regain control by arching hard for five seconds. If you don’t recover stability by the end of that five-second period, pull your ripcord immediately (which one depends upon your altitude). This rule is normally taught to AFF students when they start their Level III training and it is applicable to all freefall students. Loss Of Altitude AwarenessIf you can’t determine what your altitude is because you can’t see your altimeter and you can’t see either of your jumpmasters’ altimeters, arch and pull immediately. The worst of all situations is to go into the ground at a high rate of speed simply because you didn’t know where you were. GogglesIf your goggles weren’t tight, they may come up off of your eyes and cause sight problems. You could simulate a practice pull position and try to hold them in their proper place, but it is probably better to end the freefall once the situation occurs. There is nothing worse than a distraction to disorient you and cause you to lose track of time and altitude. When in doubt, whip it out.
-
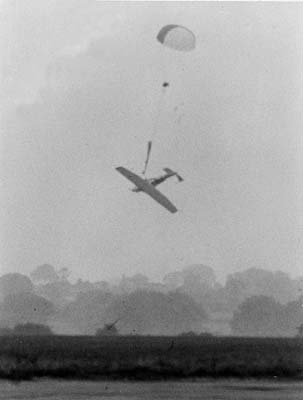 Exit Hazards-static LineWhen climbing out onto a step for a S/L exit, you need to firmly plant your feet on the step so that you don’t trip over yourself and fall off. If you do find yourself prematurely exiting the aircraft, merely arch hard for stability. Don’t grab the pilot chute or parachute as it comes by you. To do so may cost you your life. Exit Hazards-AFFWhen climbing out for an AFF exit, your jumpmasters are supposed to have good control of you. If you start to stumble, they will probably help you into position. If you do prematurely exit, at least one of them should have a hold of you and you will need to arch hard for stability. When climbing out, make sure your hands stay away from the jumpmaster’s ripcord handles. Occasionally a jumpmaster is launched off the step when a student grabs for the jumpmaster and snares a handle by mistake. Dangling Static LineAfter the jumpmaster dispatches each student, he will unhook the static line and stow it in the back of the aircraft or under the pilot’s seat. If he forgets to disconnect the static line, it is one ingredient for another horror story. During the scramble to exit, jumpers have managed to get those long pieces of webbing half-hitched around their ankle. The result is a surprising and abrupt halt just a short distance out the door. Due to the weight of the gear and the wind, it is impossible for the jumper to climb back up. There should be a knife in the plane to cut you loose and, of course, every experienced jumper in the plane should be carrying one. If there aren’t any knives handy, you will hope the pilot is sharp enough to think of breaking some glass out of one of the instruments in the panel because your alternatives are not terribly pleasant. Either you can pull your ripcord and risk jerking your leg off, or you can wait it out and suffer severe runway rash when the plane lands. One jumper caught in this situation lucked out, he was jumping a helicopter. The pilot set him down gently and red faced in front of everyone on the DZ. Student In TowOne of the more dramatic problems is the static line hang-up or student in tow. It occurs when you or some part of your equipment entangles with the static line preventing separation. You wind up suspended about ten feet below the aircraft by the long nylon web. This emergency is extremely rare and if it does occur, it will probably be because the static line is misrouted (perhaps under the harness). Maybe the error was missed in the equipment check, or you and the jumpmaster failed to keep the line high and clear as you moved into the door to jump, or you performed some wild gymnastic maneuver instead of a stable exit and became entangled in the line. Some students, despite all their training, yell arch thousand and then let go with the hands, leaving the feet firmly planted on the step, thus they perform a backloop upon exit. The in-tow/hang-up situation presents all of you with a perplexing situation. The jump ship will be more difficult to fly. In fact, the pilot may be unable to maintain altitude because of all the extra drag. Just as with the dangling static line situation, you do not want to pull the reserve or land with the plane. As with other emergencies, there is an accepted procedure. You, your jumpmaster and pilot must be familiar with it. The pilot will be diverting the aircraft to a safer, open area and will be trying to gain altitude. If you relax, you will probably assume a stable towing position either face or back to earth which is better than twisting in the wind. If you are conscious and your arms have not been injured, signal the jumpmaster by placing both hands on top of your helmet. Your hands will show you understand the situation and are ready to take corrective action. Your jumpmaster will signal he is ready too by holding up a knife. Now, your jumpmaster will cut the static line and you will fall away. Pull the reserve ripcord. Be sure you are cut loose before you pull. If you are unconscious or otherwise incapacitated, you won’t be able to give the OK signal to your jumpmaster. Your static line will still be cut but your jumpmaster (and you) will rely on your automatic activation device to deploy your reserve parachute. Back when reserves were worn in the front, jumpmasters could lower an unconscious student by unhooking their own reserve and attaching it to the static line. The static line had to have an extra ring for attachment to the reserve to make this method of rescue possible. There is also a second type of main canopy in-tow emergency to be considered. Normally, you fall away from the step so quickly that it is virtually impossible to tangle your canopy in the tail, but if one of your parachutes opens when you are on the step, entanglement may occur. If you find yourself in this situation, look up and determine which parachute is fouled on the aircraft. If it is the main parachute (which will be attached to risers that can be disconnected from the harness), look at your reserve ripcord handle, jettison your main and pull your reserve ripcord immediately, per the procedures that you were taught to use. If it is your reserve that is entangled on the aircraft, pulling the reserve/SOS ripcord would not change your situation but it will make your main canopy useless as it would be disconnected at the risers, therefore don’t pull the reserve ripcord handle. The fouled canopy may just self-destruct, putting you back into freefall, in which case you will need to deploy your main parachute to save your life. (If you deployed your main parachute while the reserve is fouled on the aircraft, you can assume that major structural damage will occur to that aircraft and anyone left inside that aircraft will have to perform their own emergency procedures.) Static Line Not Hooked UpOccasionally, despite all procedures, a student exits the jump plane without being attached to it. While hooking up the static line is the jumpmaster’s responsibility, you must verify that it is attached prior to exit. If you forget to check this and find yourself in freefall, follow the procedure for a total: pull your reserve ripcord. Pulling High Is DangerousEveryone else expects you to pull below 3,000 feet. If you pull higher, another freefalling skydiver could hit you. An open canopy descends at about 1,000 feet per minute and jumpruns are usually a minute apart. If you plan on pulling higher announce your decision to all before leaving the ground.
 -
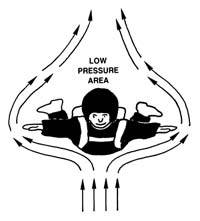 Common ripcord and hand-deployed pilot chute malfunctions are the lost handle and the hard pull. Submitted by plante Lost Handle Lost handle or out-of-sight hand-deployed pilot chute. Some ripcords are held in place by elastic webbing or Velcro® cloures. If the ripcords come out of these places, they may be blown out of your sight. Some puds (knobs or handles for hand-deployed pilot chutes) attach with Velcro closures, and some are stowed in elastic pockets. There are pros and cons to where these pilot chutes and deployment handles should be mounted. Either one may separate from the container and blow up behind you. Search for the ripcord (one time only) by following the harness to the ripcord housing with your hand. Search for a hand deployment device (one time only) with your hand by following the container to the area where it is supposed to be mounted — perhaps even as far as the closing grommet. If you can’t locate the handle immediately, pull your reserve ripcord. Practice this on the ground periodically. Lost handles and hand-deployed pilot chutes can also occur after the pull if you fail to pull far enough. Make sure you pull the ripcord all the way out of the housing, or if using a hand-deployed pilot chute, pull the pud to arm’s length before you release it. Hard Pull The hard pull may be caused by a bent or rough pin, a hand-deployed pilot chute bound up in its pouch, or you may have packed more canopy in the center of the container instead of filling the corners. If you feel resistance to your pull, give it two more quick tries (perhaps even with both hands while maintaining the arched body position) and then if that doesn’t deploy the main parachute, pull your reserve ripcord immediately. After a number of jumps, it is normal to become somewhat complacent about the pull; you may give it a relaxed, half-hearted jerk. The pull may take as much as 10 kg (22 lbs.) of force, so pull again. If continual hard pulls are bothering you, you might choose to spray a non-petroleum-based silicone or Teflon® fluid on your ripcord cable or your closing pin and your closing loop. This will make quite a difference and it will last for many jumps. You may occasionally have to do it again as dirt and grime builds up on your pin or ripcord cable system. Inspect your system for any signs of roughness. If they exist, get a rigger to replace the rough component with a smooth one. Pilot Chute Hesitation A problem you could have with your reserve deployment, or a main with a spring-loaded pilot chute, is the common pilot chute hesitation. Hesitations can happen to hand-deployed mains but they are not as common. Hesitations occur when the pilot chute momentarily flutters in the low-pressure area behind you rather than catching air. The hesitation may be caused by a bent or weak pilot chute spring, but usually the pilot chute is just sitting in the dead air space created behind you when you are in the stable position. Sometimes the pilot chute jumps upon release but fails to travel far enough to get a grip on the air rushing past you. It may drop back down on your back and just bounce around or just lay there. If it was hand-deployed, you may not have given it a good throw. To correct the problem, you may turn on your side during the post exit or pull count, allowing the airflow to inflate the pilot chute and pull it free, you may peek over your shoulder after pulling the ripcord, or you may sit up to dump (deploy your canopy). This last method of pulling, then sitting up (almost the start of a backloop) also reduces the opening forces on your shoulders, but it can lead to other problems such as trapping a tight-fitting deployment bag in its container. Consult with an instructor who is familiar with your system prior to attempting this type of maneuver. Pull-out v. Throw-out The pull-out and throw-out pilot chutes are preferred by experienced jumpers, but students (except IAD students) use the ripcord and coil spring pilot chute combination. For a detailed explanation of these three systems, see the chapter on equipment. Trapped Pilot Chute If the pilot chute is not properly stowed in its pocket, it may bunch up and jam when you try to extract it. The trapped pilot chute results in a hard pull that may or may not be cleared. If you find you have a hard pull, try one more vigorous pull before you go for your reserve. Pilot Chute In Tow Pilot chute in tow may be short or long. It is short when the pilot chute bridle is looped around something such as a harness strap. (A proper gear check could have avoided this problem.) If you have one of the rare bellyband mounted throw out models, make sure that the bellyband is not twisted. If the pilot chute bridle is wrapped around the harness (such as on a twisted bellyband or leg strap), tugging on it will only result in a (short) trailing pilot chute. Check the bridle routing during packing, have it checked in the equipment check prior to boarding the aircraft and check the routing again prior to exit. Twisted bellybands and twisted leg straps are a significant cause of pilot chutes in tow. The pilot chute in tow is long when the pilot chute pulls the bridle to its full extent but does not pull the pin securing the main container. The failure may be due to a damaged pilot chute (producing insufficient drag), a rough pin, a tight main container (canopy stacked too high), or a closing loop which is too short. The long pilot chute in tow is more likely on sub-terminal velocity jumps. Make sure the bridle-pin connection is not worn, that the pin is smooth and curved, not straight (unless it is supposed to be such as in pull-out pilot chute systems), and that the locking loop is not too short. If you are faced with a long pilot chute in tow, never try to clear it. A recent USPA article (Parachutist, June 1997) stated that if you have a pilot chute in tow, deploy the reserve immediately. Therefore, it is treated as a total malfunction. Other experts in the field take the position that if there is anything out behind the container, including a spring-launched or hand-deployed pilot chute, execute a cutaway and reserve deployment immediately. Note: Most student equipment is Single Operation System (SOS) oriented. This means that pulling the reserve handle will execute the cutaway (disconnect the main risers) then deploy the reserve all in one smooth action. A two-handle system requires a separate cutaway handle to be pulled to disconnect the risers, followed by a pull of the reserve ripcord. How to handle a pilot chute in tow has been the subject of great debate and much beer has been consumed discussing it. While there are exceptions and strong feelings about what has been stated above, time is usually too short to consider them. After the reserve starts to deploy, the main container may go slack enough that whatever kept it closed is no longer doing so, therefore the main may start to deploy. If the main was disconnected from the harness by the action of a cutaway, it will probably not be anything more than a temporary nuisance. However, one must always be prepared for possible entanglement of the two canopies whether a “cutaway” has or has not been performed.
 -
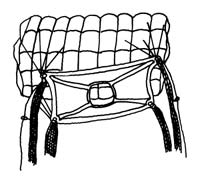 A malfunction is any failure of the system to provide a normal rate of descent and this includes loss of canopy control. Malfunctions are normally caused by one or a combination of the following: bad packing, poor body position during canopy deployment and/or faulty equipment. There are some malfunctions, however, that just happen (Acts of God); parachutes are good but not perfect. Failures of the main parachute can be divided into two areas. Either nothing comes out and you have a total malfunction or the canopy starts to open but something is wrong with it and you have a partial malfunction. Each of these two areas will be broken down still further in this chapter. It is because of the possibility of an equipment malfunction that the USPA’s Basic Safety Requirements list the opening altitude for students at 3,000 feet AGL. (For tandem jumps, it is set at 4,000 feet AGL. For A and B licensed skydivers, it is set at 2500 feet.) The BSRs and the FARs require that a second (reserve) parachute be worn for all sport jumping. It is important that you are drilled in its use. But even with the stated opening altitude safety margin or cushion, you must be aware of the time, speed and distances involved. If you exit the aircraft at 3,000 feet AGL, for example, you will begin to accelerate; you start off at zero vertical speed and then fall faster and faster until you reach terminal velocity (more about that later). If you didn’t have a parachute, it would take you about 22 seconds to reach the ground. In the case of a partial malfunction, you will have a little braking from your canopy and this means even more time. But even if you have a total, allowing for reaction time, you should be open under your reserve at well above 1,500 feet. In fact, while it seemed like an eternity to you, your friends on the ground will tell you that you performed your procedures quickly and efficiently; you will be surprised at how fast you react to a malfunction. Your main parachute takes 3-4 seconds to open and the reserve may be just slightly faster. Even at terminal velocity, which in a face-to-earth,stable position is about 110 mph, (the fastest you can fall in that position), four seconds translates into about 700 feet. If you haven’t been jerked upright by the sixth segment (second) of your exit or pull count, you should already be into the emergency procedure for a total malfunction. Static lines not hooked up, in-tow situations, lost or hard ripcord pull or pilot chute problems have already been discussed and won’t be repeated here. Total Malfunctions Of all the possible equipment malfunctions, the total (pack closure) is the safest to deal with because there is no other garbage over your head to interfere with the deploying reserve. While the total is the easiest malfunction to rectify, remember it also presents you with the least amount of time in which to act. Do not spend time trying to locate a lost handle; you do not have time. Do not waste time breaking away; a loose riser could tangle with a deploying reserve. When in doubt, whip it out. (Pull the reserve ripcord.) Partial Malfunctions A partial malfunction is one in which the canopy comes out of the container but does not properly deploy. The canopy may not inflate (e.g. a streamer that hardly slows your descent at all) or it may take on some air and be spinning violently (e.g. a line over or slider hang-up). You could have an end cell closure that will probably slow you enough for a safe landing. So, partial malfunctions may be major and minor. An additionally important consideration is that they may be stable or spinning. Most partials can usually be attributed to an error in packing or poor body position on opening. Some partials, however, just happen. Some partials are so minor, most instructors do not even classify them as malfunctions; they call them "nuisances." Some of these things that just happen are line twists, end cell closures and a slider that has not fully descended. These are correctable problems which you will be trained to handle. A good canopy is rectangular (square) and flies straight once the slider is down and the brakes are released. It is stable through the flare and turns properly with the correct toggle inputs. (Remember the controllability check?) Major partial malfunctions. Ones that you don’t waste time to correct. Bag lock presents you with trailing lines, bag and pilot chute but the canopy will not come out of the bag. This problem is not likely to clear itself. Breakaway and pull your reserve. Horseshoe. This malfunction can result from bad maintenance, failure to check equipment and incompatible canopy/container systems. It can happen when the locking pin or ripcord is dislodged from the closing loop, allowing the bagged canopy to escape before you have removed the pilot chute from its stowage pocket. The horseshoe can occur if you tumble during the deployment sequence, allowing the pilot chute to catch on your foot, your arm, or some other part of your body, but these are rare occurrences today. Another possibility is a poor launch of a pilot chute from your container, allowing it to fall back into your “burble” (the partial vacuum behind you) where it can dance around and snag on something, preventing it from properly deploying. Improper hand deploy procedures can lead to the pilot chute being caught on your arm. The danger of a horseshoe malfunction is that a pulled reserve may tangle with the horse-shoed main as it tries to deploy. If you experience a horseshoe, and you are using a hand deployment technique, pull the main’s hand deploy pilot chute immediately. Then, and even if you can’t pull the main hand deploy pilot chute, execute a breakaway and deploy the reserve. Chances are that there will be enough drag on the lines and canopy to separate the risers from their attachment points and present only a single line of “garbage” for the reserve to clear (rather than a horseshoed main). Violent spin. Unless you can tell immediately that you have an unstowed brake, breakaway and pull your reserve. If you have plenty of altitude and the problem is not compounded by line twists, push the toggles down to the crotch for two seconds, then let up slowly. If the spin continues, break away and pull your reserve. Line overs can occur when a brake lock releases during the opening sequence allowing one side of the canopy to surge forward over itself, or due to a packing error or an Act of God. If you are on a very high clear and pull, you may try to pull down on the end lines (by the risers) to make the other lines slip off. However, if you deployed at the normal pull altitude, you do not have time for this maneuver on the main. Break away and pull your reserve ripcord. If this happens on a square reserve, pulling down on the side the lines are over is your best hope, along with a great PLF. Partial Malfunctions That May Be Majors Or Minors Partial malfunctions that may be majors or minors. You may have time to make a decision as to how to handle them. Rips and tears are not common on ram-air canopies and may usually be ridden in. Even a rip from leading edge to trailing edge on one surface can probably be controlled. Internal rips may not be visible. See whether the canopy is controllable with toggle pressure no lower than your shoulder. If your controlability check indicates a serious problem, break away and pull your reserve ripcord. If the check does not indicate a serious problem, make slow, shallow turns and flare slowly for landing. The snivel is a slow, mushy opening. The canopy’s fabric weave opens up slightly after a few hundred jumps and becomes more porous. Higher permeability leads to sniveling. Look up after pulling to watch your canopy open. Learn to distinguish a slow-opening snivel from a never-opening streamer. Sometimes replacing the pilot chute will lead to quicker openings. Try packing the nose of the canopy in different positions but check with a rigger before you experiment. Contact the manufacturer about resetting the brakes two inches higher. Then the canopy will take to the air with the tail somewhat higher giving the leading edge a better bite of air. Slider hang-up, at the canopy. The slider may hang up at the top of the lines because it is caught in the lines or caught on the slider stops. Grommets become battered and rough as they slide down and hit the connector links at the risers. The links should be fitted with plastic sleeve buffers. Make sure the grommets are smooth. A slider hang-up at the canopy is a high-speed malfunction and will be hard to clear. You may be upright but you are descending quickly. There is little time to deal with a slider hang-up at the canopy, so jettison your main and pull your reserve ripcord. Slider hang-up, halfway. A slider hang-up halfway down the lines will slow you down but possibly not enough for landing. Check your altitude and if there is time (you are still above the decision altitude for emergency procedures), release the brakes and pull the toggles down to your crotch for two seconds in an effort to stall the canopy and relieve some of the spanwise spreading of the canopy. Repeat if necessary, pump the steering lines up and down. If the slider descends to within 10 or 12 inches of the connector links, that is close enough. Sometimes, the slider is caught higher in a suspension line or steering line. Let both toggles up to determine whether the canopy will fly straight. If you have to pull down the opposite toggle to more than shoulder level to maintain straight flight, the canopy will probably be unstable. If you don’t gain total control of the canopy by the decision altitude (sometimes called the hard deck), break away and pull your reserve ripcord. If the slider comes down the lines halfway and stops, the canopy has probably changed in some way. After you are safely on the ground, measure the line lengths and compare opposite lines. Check the slider grommets for damage. Bring the canopy to the equipment manager (if it is student gear), your rigger, or send it to the manufacturer for inspection. Broken suspension line(s). Most line breaks only put the canopy into a slight turn. Correct the turn with opposite toggle pressure. Occasionally the broken line causes the slider to hang up. Do a controllability check. If there is any internal damage to the canopy, it will not perform as expected. Failing a controllability check will dictate a breakaway and a reserve deployment. Minor Malfunctions Minor malfunctions are more like nuisances that can be dealt with and don’t threaten you unless they get worse or are complicated by other problems. Line twists. Sometimes, the bag rotates a few turns as it lifts off. Now you may find it difficult to get your head back to look up at the canopy. The problem is that the risers are closer together and twisted instead of spread. These twists can happen with or without your help. If you are kicking, rocking or twisting just as the bagged canopy lifts off, you can impart a twist to it. The principle is the same as when you give a Frisbee disc a flip of the wrist on launch. Line twists are more common on static line than freefall jumps. Determine quickly whether the canopy is flying straight, your altitude and which way the lines are twisted. Reach above your head, grab the risers and spread them to accelerate the untwisting. If necessary, throw your legs in the twist direction. Line twists are worse on a ram-air canopy than a round because you cannot pull down on the steering lines to control the canopy until the twists are cleared and this may take up to 30 seconds. If the canopy is spinning in the same direction, you may not be able to untwist faster than it is twisting. Do not release the brakes until untwisted. While you have the risers spread, check your canopy to make sure nothing else is wrong with it. A spinning canopy descends quickly. If you haven’t untwisted the lines by 1,800 feet AGL, break away and pull your reserve. Premature brake release. Ram-air canopies are packed with their brakes set to prevent the canopy from surging on opening. If one brake releases on opening, the canopy is likely to turn rapidly which can escalate into a spin and/or an end cell closure if not corrected immediately. If the canopy doesn't have line twists, grab both toggles and pull them down to your waist. (Grabbing both eliminates having to choose which one to pull.) This maneuver will release the other brake, reduce your forward speed, stop the turn and let you see if any lines are broken. If the premature brake release is compounded with line twists, releasing the other brake may have some or no effect. Be aware of your decision altitude and try to unspin from the line twists. If you are sure that just one steering line is still set in its deployment setting, you might try to release it. Broken steering line. When you find one of your steering lines has snapped or floated out of reach, release the other brake and steer the canopy by pulling down on the rear risers. Do not try to steer with one control line and the opposite riser. The turns will be inconsistent and you may find yourself in a dangerously low turn when you flare for landing. Pulling down on the risers may be hard but it will steer the canopy. The canopy will probably want to turn in the direction of the good control line. If you cannot make the canopy fly straight with the opposite riser, break away and pull your reserve. If the broken line wraps around the slider, do not try to pump the slider down any further. It will only make the turning worse. Reserve some energy to pull down on both risers at about ten feet from the ground to flare the landing. You want to start this flare lower because pulling down on the risers results in a more pronounced flare. Steering line(s) won’t release is similar to dealing with a broken steering line, except that one may release while the other won’t. If neither steering line releases, simply fly the canopy to a safe landing using the rear risers. If only one releases, then you can pull that steering line down to the point at which the canopy will fly straight, then control the direction the canopy flies by either using the rear risers or using the one working steering line. Quite often, you will have time to grab the riser of the steering line that won’t release and work towards getting it released. Be mindful of your altitude as you work on the problem. You don’t want to steer yourself to a hazardous landing while you are distracted with this release challenge. Pilot chute "under/over" problems. The pilot chute may fall over the leading edge of the canopy and re-inflate underneath, usually causing a turn in the distorted canopy. Attempt to stall the canopy slightly so that it backs up, possibly allowing the pilot chute to come back up and over the front of the parachute. If the canopy cannot be controlled with toggles, break away and pull your reserve ripcord. End cell closures occur when the pressure outside the canopy is greater than the pressure inside. They usually happen during canopy surge on opening but they can also be caused by radical turns or turbulent air. Turbulence can occur on hot, no-wind days, on windy days downwind of trees and buildings, and during stormy conditions. Lightweight jumpers under large canopies (called low wing loading) will experience end cell closure more frequently. To avoid end cell closure, fly with one-quarter to one-half brakes. To counteract end cell closure, push the toggles down to your crotch for a few seconds, until the cells inflate, then let the toggles up slowly. Repeat if necessary. End cell closures are not a major concern. Keep the canopy and land it if it is not spinning. If the end cells collapse below 200 feet, do not try to re-inflate them.Pull to half brakes to stabilize the canopy. When you flare for landing, the cells will probably pop open. Combination Malfunctions When confronted with more than one malfunction, correct for line twists first. The canopy will be uncontrollable until the twists are removed. When in doubt, whip it out, especially if you are at or below decision height (1800 feet AGL). Two Canopies Open You may find yourself confronted with two fully open canopies. This can happen in several ways: The automatic activation device on your reserve could fire when you are happily flying your canopy through 1,000 feet; you may have reacted very quickly to a pilot chute hesitation without effecting a breakaway; or the main release system may have failed to separate during an emergency procedure. If the two canopies take off at different times, they may not deploy into each other, but you need to be prepared to handle that possibility. At the Parachute Industry Association Symposium in Houston in 1997, a detailed report was presented on the performance of two ram-air canopies out — a very dangerous situation. First, quickly check the condition and position of the main and reserve canopies, then make your decision based upon the following: If the two canopies are flying side by side, steer yourself to a safe landing area by using gentle control inputs on the larger canopy. Due to the nearly doubled surface area supporting your weight, the effective lift of the parachute system will make flaring the canopies unnecessary. Flaring one could create a hazardous situation, especially close to the ground. If the two canopies are both flying downward towards the ground (called a downplane), jettison the main. Note:Certain reserve static line lanyards may have to be disconnected so as not to foul the reserve parachute when the main is disconnected. Ask your instructor about the specifics concerning your system. If the canopies are flying one behind the other and in the same direction (called a biplane), make gentle steering inputs with the lead canopy (which is usually the main). Do not release the rear canopy’s deployment brakes. Do not flare the landing. If the reserve container has opened but the reserve canopy has not yet, or not completely deployed, make gentle steering inputs with the main and try to haul in the reserve and stick it between your legs. Tandem Jumping Malfunctions Tandem jumping malfunctions may be aggravated because the weight is doubled while the effective drag area of the two falling bodies is not. As long as the drogue pilot chute has been deployed properly, freefall speeds are about the same as a single skydiver. If the drogue is not deployed or fails to work properly, the terminal velocity will be much faster than that of a single skydiver (110 mph); perhaps as much as 160-170 mph. The greater speed places a much greater strain on the parachute system and on the jumpers. Large Ring And Ripcord Handle Older harnesses used a plain round ring for the largest of the rings in the 3-Ring canopy releases. When the main canopy is jettisoned, the largest of the riser-release rings remains on the harness. If the rings flop down on the lift web, the one near the reserve handle may be mistaken for that handle. Both are large silver rings and the reserve handle may have shifted from its normal position. Some jumpers have broken away only to tug on the wrong ring. Some never lived to tell about it. Newer equipment may have a shaped large ring or a smaller (mini) ring that is more difficult to confuse with the reserve handle. If you have older equipment, you should be aware of this potential problem. Change Of Emergency Procedures Anytime you change your equipment or emergency procedures, make sure you are thoroughly trained. Practice in a suspended harness until proficient on the new equipment. Each corrective procedure is different and you must not waste precious seconds in an emergency thinking about what you should do. You must act automatically and quickly. Review your emergency procedures prior to each jump and touch all your handles before you proceed to the door. Breakaway Training Breakaway training is essential to assure that it will be accomplished completely, quickly and well. Training must take place in a suspended harness that is easy to rig up. Simply tie an old set of risers to an overhead beam and attach them to your harness. The drill must be repeated again and again until it becomes mechanical and automatic so that you will perform correctly and without hesitation should the time come. When you take your reserve in to be repacked, ask your rigger if you may practice the breakaway to include the reserve pull. It is a valuable experience and in this controlled environment, it is safe for your gear. Emergency Priorities Think about and review the seven priorities of skydiving: Pull - Open the parachute. Pull by the assigned altitude or higher - whether stable or not. Pull with stability - to improve canopy-opening reliability. Check the canopy - promptly determine if the canopy has properly opened and is controllable. If necessary, activate the reserve - perform the appropriate emergency procedures if there is any doubt that the main canopy is open properly and is controllable. Land in a clear area - a long walk back is better than landing in a hazardous area. Land safely - be prepared to perform a PLF with the feet and knees together to avoid injury. Canopy Collisions Let’s assume that your canopy has just opened properly and you are reaching up for the toggles when suddenly, you look ahead and see another canopy coming directly towards you. What should you do? If the collision is avoidable by steering to the right or left, choose the right. The turn to the right is virtually universal in all forms of navigation. If the collision is unavoidable, spread your arms and legs out to absorb the impact over the most surface area possible. Chances are that spreading out will allow you to bounce up and over the lines and canopy you will be colliding with. You may get a bit hurt, but you will be alive so long as you don’t make full body contact with the other jumper. If you find yourself entangled with another parachute, the general rule of thumb is that the lower person has the right to perform emergency procedures first. Communicate with each other as to what you want to do, what you’re going to do, then do it while you still have enough altitude to do it safely. Most canopy collisions occur during the landing phase of the skydive, when too many people are trying to get into one tiny area all at the same time. Vigilance in canopy control and choosing a less congested area can help avoid this emergency. If you do end up tangled at an altitude too low to break away (less than 500 feet AGL), ride about half brakes and get set to do a fantastic PLF.
 -
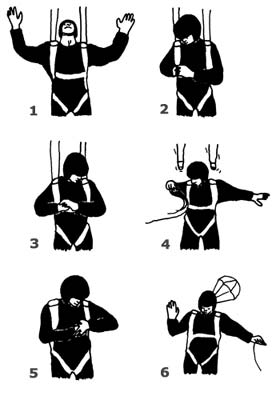 Jettisoning The Main CanopyBefore we talk about the series of problems you may encounter with your main canopy, it is important to discuss the types of cutaway (main canopy disconnection systems) that are in common use and their procedures. The breakaway or cutaway is an emergency procedure that involves jettisoning the main canopy prior to deploying the reserve. Originally, the cutaway was performed with a knife and the lines were cut to separate the canopy from the harness. Today, we use canopy releases to breakaway. The breakaway procedure should be executed immediately under rapidly spinning malfunctions because ever-increasing centrifugal forces will make arm movement difficult, and may cause you to lose consciousness (red-out) due to the blood flow to your eyes. The decision altitude for the breakaway is 1,800 feet. This is your safety margin, above this it is safe to try to clear the malfunction but at this point, all clearing work must stop. Watch your altitude. The breakaway must be commenced above 1,600 feet to assure you plenty of time to get the reserve out. Under high-speed malfunctions, you may be just seven seconds off the deck at this point, and it may be necessary to forget the breakaway and just pull the reserve. To breakaway, spread your legs (for lateral stability and push them back as far as possible while bending your knees about 45 degrees (only). Arch your back and pull your head back but keep your chin resting on your chest and your eyes on the handle(s). On release you will fall into a stable, face- to-earth position. Body position during the breakaway is very important. If you are not falling away correctly, you may become entangled in the canopy and/or lines of your deploying reserve. Even with good body position, breaking away from a violently spinning malfunction may throw you tumbling across the sky. The breakaway procedure is as follows: Two Action System(TAS)The TAS has two handles: Pull the first one (usually a Velcro-attached pillow handle located on the right-hand main lift web), to release both risers (a single point release). Then activate the reserve by pulling the other handle (usually located on the left-hand main lift web). A. Total malfunction (nothing out) Do not waste precious time breaking away; just pull the reserve. LOOK at the reserve ripcord handle and arch. REACH for the reserve ripcord handle with both hands. PULL the reserve ripcord handle with both hands. B. Partial malfunction (canopy out but not working properly) There are two schools of thought on how to perform the breakaway action using this system. The first one presented is in the USPA’s Skydivers Information Manual, “Section 8-3.16.” While it states “Look at the reserve ripcord handle...” (step 3), it says nothing about the choice of one hand or both on the breakaway handle. It is as follows: LOOK at the breakaway handle and arch. The arch should keep you from making a backloop when you jettison the main. REACH for the breakaway handle (presumably with both hands). LOOK at the reserve ripcord handle before breaking away. PULL the breakaway handle and throw it away while continuing to keep your eyes on the reserve handle. REACH for the reserve handle with both hands. PULL the reserve ripcord. CHECK over your shoulder for a pilot chute hesitation. CHECK your reserve canopy, look around and prepare to land. Note: For student equipment, and something that is becoming more popular on experienced jumper equipment, there is a device known as a reserve static line lanyard RSL (sometimes called a Stevens lanyard). This is a piece of webbing attached from the right side riser (or both risers on some systems) to the reserve ripcord cable. It is designed to pull the reserve ripcord out of its locking loop(s) as you fall away from the main parachute after that main canopy is cut away, thus allowing the reserve to deploy. When installed and operating properly, it will usually beat you to the manual deployment of the reserve. However, it should not be relied upon, for after all, along with an automatic activation device (AAD — described in Chapter 7), it is merely a back-up device to your proper execution of emergency procedures. This system can be disconnected (if necessary) by personnel who know what they are doing. It is a possibility that when you perform a breakaway using both hands on the breakaway handle, there is a fraction of a second of disorienting instability as the maneuver is executed. Although you are supposed to be looking at the reserve ripcord handle, you still need to move one or both hands to it from whatever position you are in at the conclusion of the breakaway-handle pull. The ripcord handle may move from where it was (on the harness) under the tension of the partial malfunction to a different position during this moment. It is a possibility that there may be an additional second or more of elapsed time as you reach for the reserve ripcord handle. Therefore, there is a second school of thought about performing the breakaway, which is, if you are about to execute a breakaway and you put your right hand on the breakaway handle and your left hand and thumb through the reserve ripcord handle, there will be no lost time reaching for the reserve ripcord after the breakaway is executed. Here is a typical scenario: LOOK at the breakaway handle and arch. The arch should keep you from making a backloop when you jettison the main. REACH for the breakaway handle with your right hand. REACH for the reserve ripcord handle with your left hand, placing your thumb through the handle to ensure that you have a firm grip on it. PEEL and PULL the breakaway handle to full right arm extension. Throwing it away is optional. Immediately after you’ve pulled the breakaway handle with your right hand, PULL the reserve handle out to full extension with your left hand. CHECK over your shoulder for a pilot chute hesitation. CHECK your reserve canopy, look around and prepare to land. In this scenario, there is no hesitation in looking for a reserve ripcord that may have moved, thus it may save a second or two of precious time. The Single Operation System (S.O.S)The Single Operation System is a one-handle/one-motion system. The S.O.S. has a combined handle, usually on the left main lift web, to release both risers and activate the reserve. The S.O.S. has a reserve static line lanyard (Stevens lanyard) from one riser to the reserve ripcord. The purpose of the S.O.S. is to eliminate one the motions in the breakaway sequence; that of separately pulling the cutaway handle. By pulling the reserve ripcord all the way, you accomplish both the breakaway and the reserve-ripcord pull in one complete action. With a two-action system, half a breakaway is worse than no breakaway at all unless you have an RSL. The S.O.S. usually produces full deployment of the reserve canopy in less than 100 feet. If you find an RSL on your piggyback harness/container assembly, you should leave it on. When you and your instructor develop enough confidence that you will pull the reserve after a breakaway, you can do away with the line if you wish. Total or Partial malfunction In the event of a total or partial malfunction: LOOK at the combination release/ripcord handle and arch. REACH for the combination handle with both hands. PULL the combination handle with both hands to full arm extension. REACH back with one hand, grasp the cables where they come out of the housing. PULL AGAIN to clear the cables and CHECK over shoulder for a pilot chute hesitation. CHECK the reserve canopy, look around and prepare to land. Never depend on the reserve static line device (Stevens lanyard). Always pull your reserve ripcord cable all the way out of the housing immediately after breaking away. Canopy Transfer Canopy transfer is a third type of breakaway procedure sometimes used in Canopy Relative Work by those who believe something is better than nothing. If your main canopy becomes damaged or tangled on a jump and it is still flying forward, you may pull your round reserve and drag it behind you, full of air. Once the reserve canopy is inflated, jettison the main. This maneuver is extremely risky with a square reserve canopy as two squares may fly around and into each other. This type of problem is discussed later on in detail. Harness shiftWhen you jettison the main canopy, your harness will shift downward taking the reserve ripcord location with it. Therefore, it is essential that you keep your eyes on the reserve ripcord handle, if your hand is not already grasping it, when jettisoning the main canopy. Now that we have covered cutaways (breakaways), let’s discuss when and where they are used.
 -
Hazard BriefingsEmergency procedures will vary from drop zone to drop zone to fit local conditions. There may be trees, rivers, power lines, hostile neighbors, prisons, highways or a girls’ school. In fact, those DZ’s lacking certain hazards may touch on the corrective action for every emergency but lightly. Therefore, when visiting a new DZ, it is imperative that you get a briefing on the area. Alcohol And DrugsIn order to achieve the greatest enjoyment from your skydiving experience, you will want to approach it with an unfogged mind. This means going to bed early the night before and going easy on the booze. Even the common cold will trouble you due to the changes in atmospheric pressure. If your mind and body are not operating at 100%, you will react with less efficiency in an emergency and you will enjoy the jumping less. Remember, the lower pressure at altitude amplifies the affects of alcohol and drugs. Health ConcernsJumping with a head cold can lead to ruptured sinuses and ruptured ear drums. The inner ear and the Eustachian tubes do not take kindly to large pressure changes when they are plugged. Infections in these areas can produce debilitating pain under normal jump conditions. In a few words — if you are sick or under the weather, don’t jump. Loading up on antihistamines and decongestants can cause other medical problems. There is always another day to enjoy a jump in good health. Scuba Diving AlertThere is no problem in descending into the water within 24 hours of jumping or flying, however, there is trouble waiting in doing the reverse. Scuba divers know to stay away from air travel for a period of 24 hours after their last descent below 30 feet (one atmosphere’s increase in pressure) so as to avoid the bends (nitrogen bubbles forming in the joints and blood stream). Since skydiving involves air travel, the same rule applies. Some Fear Is Good For YouIt has been said that the difference between fear and respect is knowledge. Most people fear skydiving because they don’t understand it. Fear is the result of ignorance and it is part of nature’s protective mechanism; it warns us to beware when we are on unfamiliar ground. The best way to cope with problems is to prevent them in the first place. The key is education. It is unfortunate when someone is injured while engaging in sport, but it is tragic when a second person is hurt for the same explainable and preventable reason.