0

Gear

    Flight Club - you can hear the difference

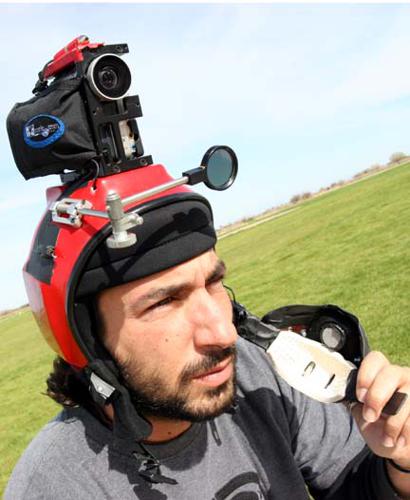
    We have been dreaming about this for a long time and now it is real. In air communication systems, allowing us to talk and communicate in freefall, in the wind tunnel and under canopy. An ideal tool for instruction, but not limited to only just that.
    Flight Club is now using the in air communication systems acquired from RareDynamic.com.
    The in flight systems arrived just in time, on the second to last day of a Freefly skills camp with the Golden Knights Tandem Team. The Golden Knights chose to receive coaching from Flight Club and improve their Freefly skills to become better all around skydivers. They were the
    perfect group to introduce this technology to. The results were incredible. Both Flight Club instructors and The Golden Knights witnessed and experienced a much faster learning curve. The Knights produced positive results including faster reaction time and better understanding of what the instructors wanted from them.
    Other students agreed with the Knights. Diane Oelschlager (1202 jumps) said: "Absolutely kick ass technology! Hearing your instructor's calm soothing voice, instantly relaxes you and lets perform at your best." Cheri Johnson (130 jumps) added: " Not only did I see my instructor but I actually got to hear him. Even on landing! When the winds seriously picked up to he point where my canopy was almost flying backwards, it was comforting to hear a voice confirming my actions and guiding me down safely."
    Instructors agreed that when the student hears the command, there is a faster reaction time compared to making the association and translation of hand signals. The instructor can also give more elaborate instructions. In comparison, hand signals, are somewhat limiting; one could command “legs out”, however, how do you give someone the sign for a more complex message? It is simple, now with the air-to-air communication system you can clearly communicate in detail.

    This helps to avoid miscommunication and decrease anxiety and apprehension with students by helping to manage arousal levels through for example breathing. Instructors can continue to use hand signals as a secondary form of communication.
    "This system is totally off the hook", says Benjamin Forde (520 jumps). "I could not believe how clear it was. Imagine having Omar chatting with you and pointing out the kinks, real time, crystal clear, no more guessing, no more trying to remember the 20 things that happened during the jump once on the ground. I get it! I will get the learning equivalent of 3-5 traditional coach jumps for every one I do with this system and these guys... and under canopy, its awesome, swoop training anyone? You are no longer alone—it's THE absolute revolution in coaching."
    Flight Club offers in flight communication to all students for all disciplines. Visit their web site for more information on their courses.
    Flight Club

    By admin, in Gear,

    Film Closer, Get better footage, Be safer

    The 'Diamond .3' wide-angle video camera lens is now available. The lenses are handmade in Japan. The Diamond .3 wide-angle lens gives a video camera a 110-degree field of view with very little barrel distortion. The lens is NOT a fish-eye.
    The lens has no vignette (black corners in the field of view). The lens is perfect for freeflying, flat flying inside video, relative work and AFF coaching (from the instructor's angle), CRW, canopy swooping, BASE jumping or anything that an inside, wide-angle view is desired. Capture up-close shots with a crystal clear, non-distorted view.
    The size of the lens is very low profile. The diameter is 44mm (1 ¾ inch.) and the length is 8mm (5/16inch). The small size has many benefits. It puts less stress and wear on the camera's frame and standard lens. It minimizes vibrations and camera shake since it is more than ¼ the size of other lenses. The chance of a riser strike on your camera's lens is decreased, as well as contact with any other object.
    It is available in two different thread sizes, 30mm (pc-1, 3, 5, 9, etc.) and 37mm (pc-7, 10, 100, 110, etc). In most Sony camcorders, no adapter ring is needed.
    The retail price of the lens is $200 US. Summer Sale Price of $175 (plus s/h)
    For more information, contact Max Cohn at: [email protected], or at 201.538.4652, or visit http://generationfreefly.com/diamond.3/ for more pictures and information.

    By wlie, in Gear,

    Drift Innovation Release Drift HD Ghost

    Just a mere few weeks after GoPro released the new HD Hero 3, another popular POV camera manufacturer has too released a new product. Drift, which has had quite successful sales with their previous model have announced the release of the "Drift HD Ghost", a new and more powerful product when compared to their award winning and commercially popular model, simply named the "Drift HD".
    It is clear from the start that Drift were putting their focus on the features with the HD Ghost, being quick to highlight their new two-way LED remote control. The selling point for Drift, when it comes to the Ghost HD, is the concept that while many other POV cameras come with accessories included, that these other products will often require a number of aftermarket accessories to achieve the results desired by the consumer. Drift say that the HD Ghost will include 'everything sports enthusiasts need to capture professional quality video immediately".
    The above mentioned LED remote controller is one that is designed to allow the user to understand what current settings his HD Ghost is set to. Where most remote controls work one way, sending information to the camera, but not receiving it, this two way remote controller system is something that is new to the POV camera market, the question as to whether this will be a feature that will be adopted by other manufacturers in future or whether it will be seen primarily as a gimmick is yet to be seen, but if the system works in practice as it does in theory - it will certainly allow for a much easier and comfortable mode switching experience when one is using the remote to control the camera functionality.
    There is a 'Drift Flashback (TM)' function on the HD Ghost which will record video in a loop, and only save the file when the user 'tags' it. This can come in useful in situations where you're looking for 'that' shot and are expecting a number of failed attempts before catching it. I'm sure many of all are all too familiar with running out of recording space just when you need it, a curse that seems to extend to still photography too.
    The Ghost HD comes with a 2-inch LCD screen which allows for video playback and editing. The LCD is also covered in Gorilla Glass(R) which prevents scratching and keeps the camera rugged. A 7 element lens design is said to help increase the vibrancy and clarity of the HD Ghost as opposed to previous models, and brings better image quality to the 1080p, 960p, 720p and WVGA recording modes. The camera is also able to shoot stills while recording video footage.
    Stills are able to be captured in three different formats: 5, 8 or 11 megapixels. Or 2 megapixels when taking a still shot while recording.
    Also of interest is the ability for the Ghost to switch between 170°, 127° and 90° field of view.
    The device comes with wi-fi connectivity and soon Drift are said to be releasing an iOS and Android mobile app which will allow Ghost HD owners to control their camera's recording, settings and playback directly from their mobile devices. This is seem as a way of making it even easier for users to record footage and share it with social networks. In essence, one could record a video, transfer to their smart phone and then upload directly to social networks within mere minutes of the recording.
    The Drift Ghost HD is made with 3 meter water proofing when used without a case, this means that general water sports with the exception of things like scuba diving, don't have to invest in an extra housing case, though there is the option for deep water protection by purchasing one of Drift's special underwater housings, which are water proof until 60 meters.
    Drift claims to boast the longest lasting battery for any POV camera currently on the market, with 3 hours of recording time, using a 1700 mAh lithium-ion battery.
    The current retail price on the Drift HD Ghost puts it in the same market as the GoPro HD Hero 3, meaning that Drift see the HD Ghost as a serious contender in the action camera market. And from early reviews it seems that the Ghost is able to capture some quality footage, whether that footage is as good as the Sony AS15 or the GoPro HD Hero 3 is yet to be seen. But we do think that the Drift HD Ghost is a big step up from their previous Drift HD, which didn't perform too well compared to some of the competition in our action camera comparative review.

    By admin, in Gear,

    Do Skydivers Care About Safety

    Image by Russell M. WebbIf I've learned one thing in my 35 years in the sport, it's that it is very difficult to get most skydivers interested in safety. Years ago, when it became obvious that my hand deploy pilot chute and 3-ring release made it possible to deploy a malfunction, and then breakaway from it, 500 feet faster than the existing internal pilot chutes and Capewell canopy releases allowed, a lot of jumpers simply started deploying their mains 500 feet lower. Utterly negating the increase in safety these systems offered.
    Even today, most jumpers think that because all gear has a TSO tag on it, one piece of gear is as safe as another. Unfortunately, that is not true, and most jumpers will choose "fashion" over safety every time. Here are just a few examples of what I mean, starting in the '60's, right up to the present day.
    The army found out that if you put 2 foot band of fine netting around the skirt of a round parachute, you eliminate the most common deployment malfunction, the partial inversion. The trick worked so well that airborne troop static line malfunctions went from 1 in 250 to 1 in 250,000. WOW! So, a company that made round sport reserves (there were no square reserves yet) came out with an "anti-inversion netted" reserve. NO ONE bought it. You know why, of course...It packed up 10% bigger. Jumpers past up a proven 1,000 times increase in safety for smaller pack volume.
    Believe it or not, there is a similar, thought not nearly as drastic, choice jumpers are making when they buy a square reserve today. Let me explain. The first square canopies came without sliders, so they had to be built tough. This meant, among other things, that there was tape running spanwise (from right to left) between the line attachment points. With the advent of the slider and softer opening canopies, some companies began leaving the spanwise reinforcing tapes out of their square reserves. Why? Because they cost less to build, and (you guessed it) they packed smaller. This proved to be a wise choice, (at least in the marketing department) because although jumpers very often choose their mains for performance and durability, the almost always always choose their reserves base only on price and pack volume. While reserves without spandwise tapes are fine in most situations, as we have seen recently, they tend to fall apart when skydivers push the envelope. (ie. big people on tiny canopies, going head down at high altitudes.) Safety doesn't seem to be any larger a consideration than it was when they passed up anti-inversion netted round reserves in the '60's.
    Standard size (large) 3-ring release systems have never given a solo jumper any problem. They ALWAYS release easily and NEVER break. However, mini 3-rings look neater, so that's all people will buy. No matter all the reports of hard or impossible breakaways or broken risers. Don't get me wrong, Properly made, and maintained, mini 3-ring release systems will handle anything even the newest ZP canopy with microlines can dish out. Unfortunately, because they are now being pushed right to their design limit, they must be made EXACTLY right. And a lot of manufacturers either can't or won't. On the other hand, a large 3-ring system has so much mechanical advantage, that even a poorly made system will still work just fine. But then fashion is much more important than safety, isn't it?
    Spectra (or micro-line) is strong and tiny, so it reduces both pack volume and drag , which means you get a smaller rig and a faster canopy. Unfortunately, It has a couple of "design characteristics" (this is manufacturer talk for "problems") It is very slippery (less friction to slow the slider), and stretches less than stainless steel. This is why it hurt people and broke so many mini risers when it was first introduced. Now, I must say that the canopy manufacturers did a wonderful job handling these "characteristics" by designing new canopies that opened much slower than their predecessors. However, the fact still remains, that if you do have a rare fast opening on a microlined canopy, Spectra (or Vectran) will transmit that force to you (and your rig) much, much faster, resulting in an opening shock up to 300% higher than if you have Dacron lines. (It's sort of like doing a bungee jump with a stainless steel cable. At the bottom of your fall, your body applies the same force to the steel cable as it would to a rubber bungee cord, but because steel doesn't stretch, your legs tears off.)
    So why would I have a fast opening? Well for one thing, you, or your packer might forget to "uncollapse" your collapsible slider. BAM! Or perhaps you're zipping along head down at 160 mph with a rig that wasn't designed for it, and you experience an accidental container opening. BAM again. The point is this: If you want to push the envelope, and get all the enjoyment this sport has to offer, and do it "safely", you need to make careful choices in the gear you jump. If you weigh 200 lbs. and do a lot of head down, perhaps you really shouldn't be using a reserve without spanwise reinforcement, mini 3-rings, or a canopy with micro lines.
    No matter how much you weigh, you should educate yourself about gear, and then only jump gear that is designed for how you jump. So many fatalities occur because of decisions jumpers make BEFORE even getting in the airplane. Don't join that group. Be smarter than that. Fashion, at least in skydiving, can get you killed.
    ~ Bill Booth

    By admin, in Gear,

    Digital or Analog Altimeter

    Altimaster Galaxy We all know there are some hot debates in our sport: RSL or no RSL, AAD dependency, and exit separation are well-known dead horses. Another topic certainly worthy of discussion is the choice between analog and digital altimeter displays. Asking that question will yield a variety of opinions (no surprise there) and will likely be inconclusive.
    First, a clarification: this discussion revolves around the altimeter display, not the underlying hardware. Altimeters with mechanical internal aneroid capsules have analog displays; those with electronic pressure sensors can have either a digital or analog display. Now that we have cleared that up...
    Analog dial faces of all types commonly have numerical graduations and colored segments to indicate the status of what is being measured. Alti-2’s Altimaster Galaxy, for example, is first graduated in thousand foot increments starting at the 12 o’clock position (zero). There are yellow and red caution zones placed at commonly used altitudes to provide a visual warning at a glance. Digital displays, like Alti-2’s N3, provide a numerical altitude reference. N3 provides a three-digit decimal altitude in free fall and four digits under canopy. So – which is better? It really boils down to three things: familiarity, specific application, and personal preference.
    Many skydivers stick to what they learned to use as students. Later in their skydiving career they may choose to “re-train” that familiarity and transition to a digital display. I did so myself when Neptune hit the market nearly ten years ago and have been a huge digital display fan since then.
    Application brings a different frame of reference entirely. Let’s take a look at two commonly used analog dials, starting with the temperature gauge in your automobile. My dear old Dad taught me to look at my gauges periodically like a pilot does cross-checks. A quick glance at the temperature gauge should show the pointer dwelling just slightly left of center, or about 40% of its travel. I have no earthly idea what specific numerical data that conveys – I glance at the gauge, my brain processes the placement of the needle based upon my training, and I know that I am good to go! Now consider the gauge on a fire extinguisher which contains a small green segment and a large red segment. A quick glance reveals the pointer dwelling in the green or the red – good or no good. In both of these cases, an analog display is preferable to the way I do business.


    Altimaster N3 What about skydiving? From day one we are asked to apply specific action to specific performance altitudes. As an AFF Student, we may be taught to recognize 5,500 feet on our altimeter to trigger a critical action: wave off and pull. It can be argued that the direct conveyance of that numerical data from a digital display eliminates the need for the brain to convert the pointer’s indication on an analog dial face into numbers for an action to be triggered. If an AFF Student recognizes 5,500 feet on his digital display, it directly sends him into action.
    Then there is personal preference. Electronic altimeters with a digital display often have other features like logbooks, timers, and the like that take more time to learn. Some skydivers just love the simplicity of turning a knob to zero the pointer and off they go.
    Mechanical/analog altimeters are usually more economical for skydivers on a budget. Electronic devices require power from replaceable or rechargeable batteries; mechanical devices do not. There are several other advantages and disadvantages regarding the mechanism which can also drive personal preference. Factor in accuracy, calibration requirements, form factor, mounting options, ability to read altitude in low-light or darkness, waterproofing, convertibility between visual and audible, and others – the decision becomes more complicated.
    So, if you are in the market for an altimeter, or are thinking about switching from analog to digital, I suggest you try them both. Put your trusty Altimaster II in your helmet bag and borrow an N3 from a friend or even your local gear store. Make a few jumps reading digitally conveyed numerical altitude and see what you think! In the meantime, I will be thinking about what advances in technology might be on the event horizon.
    Arrive safely,

    slotperfect
    John Hawke (slotperfect) is General Manager of Alti-2, Inc. in DeLand, Florida, USA

    By admin, in Gear,

    Derek's Gear Tips


    Image by BoonhuckDerek Vanboeschoten is a Senior Rigger, Tandem Master and AFF instructor with more than 3300 jumps. Derek also moderates the Gear & Rigging forum on Dropzone.com where he first posted this list of Gear Tips. It is republished here for your convenience.
    Use Performance Design's Slinks for the main and reserve canopies instead of Rapide links. Slinks are stronger, lower bulk, easier to install and remove, and won't damage the slider grommets.

    Clean cutaway cables every 30 days with Ace Pure Silicone Lubricant, sold at Ace Hardware stores, to keep cutaway pull forces low.

    Inspect cutaway cables every 30 days and replace nicked or kinked cutaway cables with a new cutaway handle/cables.

    Flex 3-rings every 30 days to prevent them from taking on a "set" and hanging up during a cutaway.

    Inspect Rapide links and bumpers or PD Slinks every 30 days. Always use slider bumpers with Rapide links to prevent damage to the slider grommets, "Lock-Tite" to keep the link from loosening, and nail polish to torque-stripe Rapide links.

    Use metal, capped, and tacked riser inserts for the excess cutaway cables, regardless of main size or type. They prevent difficult or impossible cutaway resulting from the channel "gripping" the cables or from line twists that include the excess cutaway cables.

    Replace the main closing loop early and often. Adjust main closing loop so that the closing pin is snug. Use a stainless steel washer thick enough that it won't bend when closing the container.

    Have Velcro replaced every 100-200 uses.

    Use a kill line pilot chute, regardless of the size/type of main canopy you have. Check the length of your main pilot chute kill line every 30 days. The kill line should have a little slack in it when the pilot chute is "cocked" and the bridle is under tension. If it doesn't, have it fixed.

    Replace a damaged or old kill line pilot chute with a new one.

    "Cock" a kill line PC after laying the cocooned canopy on the ground and just before putting the canopy in the deployment bag.
    Take the twists out of steering lines every jump or, at a minimum, after the last jump of the day.

    When setting the brakes, set them so that the steering line is to the inside (between the risers) and the excess is to the outside. This will put the excess to the bottom of the riser channels, helping to protect the excess steering line.

    Keep gear out of the sun as much as possible.

    Use Velcro-less toggles/risers. Velcro requires replacement every 100-200 uses, and Velcro damages the steering lines, risers and anything else it comes into contact with.

    Replace mini-risers every 500 jumps or less. Inspect them every 30 days for wear.

    While packing, check your line trim every 30 days or less. When new, all the "A" lines are the same length (on 'most' canopies, check with the manufacturer). Spectra shrinks from the heat from friction with the slider grommets, pulling the canopy out of trim. Pay special attention to steering/control lines. Replace line sets that are significantly worn or out of trim.

    Use the proper size rubber bands, 'Sky Bands', or 'Tube Stows' and do not double wrap them.

    Have your rig washed every 500 jumps or so, more if jumping in a sandy or salt-water environment.
    What to do After Landing Your Reserve:
    First, place the toggles back on the Velcro. This will prevent the hook half of the Velcro from damaging the lines. Second, daisy chain the lines. Use the slider to keep the daisy chain from unraveling. This will keep the lines neat and untangled. If you have an RSL, remove it from your main canopy and re-mate the Velcro to keep the hook Velcro from damaging your gear.
    Be very careful with the canopy. Get it out of the sunlight and into a large plastic garbage bag and then into your gear bag. Be careful when zipping the gear bag shut to not get any fabric caught in the zipper. As long as it is clean, put the reserve pilot chute and free-bag in the center of your rolled up reserve. This will protect the spring inside the reserve pilot chute from damage.
    Do not take the main canopy off of the risers to untangle it. It got tangled on the risers, it will come untangled on the risers. Taking the canopy off the risers, or worse, the lines off the links, will only make the job of re-assembling the main more difficult.
    Put the cut away cables and reserve ripcord back into their housings and the handles back in their pockets. This will prevent any dirt on the cables from getting on the reserve or the Velcro from damaging lines, the container, or the reserve. If you lost one, or both handles, order them and have them shipped to your rigger. Also, if the free-bag and reserve pilot chute was lost, order a new one and have it shipped to the rigger. Make sure when ordering handles or free-bag to order the correct size for your harness/container.
    In the gear bag, put a card with your name, address, phone number(s), and any special instructions, such as "install/replace soft links", "wash the container", "remove/install RSL", "I need the rig by this weekend", etc.
    If you have a Cypres, check your reserve packing data card to see when the scheduled maintenance and 2 year battery replacements are due. If the maintenance is due (4 and 8 years +/- 3 months (+/- 6 months for Cypres "2") from DOM), make arrangements with your rigger to ship the unit or have your rigger remove it and ship it yourself (your rigger will need the original Cypres box to ship it). If your batteries are due (two years since installation for the Cypres1), check with your rigger to see if they have new batteries or if they will need to be ordered. The batteries will have to be replaced if there is less than four months remaining in the two-year cycle, for a Cypres "1". Cypres2 batteries are replaced at the 4 and 8 year maintenance by the factory.

    By admin, in Gear,

    Derek's Gear Tips

    Derek Vanboeschoten is a Senior Rigger, Tandem Master and AFF instructor with more than 3300 jumps. Derek also moderates the Gear & Rigging forum on Dropzone.com where he first posted this list of Gear Tips. It is republished here for your convenience.

    Use Performance Design's Slinks for the main and reserve canopies instead of Rapide links. Slinks are stronger, lower bulk, easier to install and remove, and won't damage the slider grommets.
    Clean cutaway cables every 30 days with Ace Pure Silicone Lubricant, sold at Ace Hardware stores, to keep cutaway pull forces low.
    Inspect cutaway cables every 30 days and replace nicked or kinked cutaway cables with a new cutaway handle/cables.
    Flex 3-rings every 30 days to prevent them from taking on a "set" and hanging up during a cutaway.
    Inspect Rapide links and bumpers or PD Slinks every 30 days. Always use slider bumpers with Rapide links to prevent damage to the slider grommets, "Lock-Tite" to keep the link from loosening, and nail polish to torque-stripe Rapide links.
    Use metal, capped, and tacked riser inserts for the excess cutaway cables, regardless of main size or type. They prevent difficult or impossible cutaway resulting from the channel "gripping" the cables or from line twists that include the excess cutaway cables.
    Replace the main closing loop early and often. Adjust main closing loop so that the closing pin is snug. Use a stainless steel washer thick enough that it won't bend when closing the container.
    Have Velcro replaced every 100-200 uses.
    Use a kill line pilot chute, regardless of the size/type of main canopy you have. Check the length of your main pilot chute kill line every 30 days. The kill line should have a little slack in it when the pilot chute is "cocked" and the bridle is under tension. If it doesn't, have it fixed.
    Replace a damaged or old kill line pilot chute with a new one.
    "Cock" a kill line PC after laying the cocooned canopy on the ground and just before putting the canopy in the deployment bag.
    Take the twists out of steering lines every jump or, at a minimum, after the last jump of the day.
    When setting the brakes, set them so that the steering line is to the inside (between the risers) and the excess is to the outside. This will put the excess to the bottom of the riser channels, helping to protect the excess steering line.
    Keep gear out of the sun as much as possible.
    Use Velcro-less toggles/risers. Velcro requires replacement every 100-200 uses, and Velcro damages the steering lines, risers and anything else it comes into contact with.
    Replace mini-risers every 500 jumps or less. Inspect them every 30 days for wear.
    While packing, check your line trim every 30 days or less. When new, all the "A" lines are the same length (on 'most' canopies, check with the manufacturer). Spectra shrinks from the heat from friction with the slider grommets, pulling the canopy out of trim. Pay special attention to steering/control lines. Replace line sets that are significantly worn or out of trim.
    Use the proper size rubber bands, 'Sky Bands', or 'Tube Stows' and do not double wrap them.
    Have your rig washed every 500 jumps or so, more if jumping in a sandy or salt-water environment. What to do After Landing Your Reserve:
    First, place the toggles back on the Velcro. This will prevent the hook half of the Velcro from damaging the lines. Second, daisy chain the lines. Use the slider to keep the daisy chain from unraveling. This will keep the lines neat and untangled. If you have an RSL, remove it from your main canopy and re-mate the Velcro to keep the hook Velcro from damaging your gear.
    Be very careful with the canopy. Get it out of the sunlight and into a large plastic garbage bag and then into your gear bag. Be careful when zipping the gear bag shut to not get any fabric caught in the zipper. As long as it is clean, put the reserve pilot chute and free-bag in the center of your rolled up reserve. This will protect the spring inside the reserve pilot chute from damage.
    Do not take the main canopy off of the risers to untangle it. It got tangled on the risers, it will come untangled on the risers. Taking the canopy off the risers, or worse, the lines off the links, will only make the job of re-assembling the main more difficult.
    Put the cut away cables and reserve ripcord back into their housings and the handles back in their pockets. This will prevent any dirt on the cables from getting on the reserve or the Velcro from damaging lines, the container, or the reserve. If you lost one, or both handles, order them and have them shipped to your rigger. Also, if the free-bag and reserve pilot chute was lost, order a new one and have it shipped to the rigger. Make sure when ordering handles or free-bag to order the correct size for your harness/container.
    In the gear bag, put a card with your name, address, phone number(s), and any special instructions, such as "install/replace soft links", "wash the container", "remove/install RSL", "I need the rig by this weekend", etc.
    If you have a Cypres, check your reserve packing data card to see when the scheduled maintenance and 2 year battery replacements are due. If the maintenance is due (4 and 8 years +/- 3 months (+/- 6 months for Cypres "2") from DOM), make arrangements with your rigger to ship the unit or have your rigger remove it and ship it yourself (your rigger will need the original Cypres box to ship it). If your batteries are due (two years since installation for the Cypres1), check with your rigger to see if they have new batteries or if they will need to be ordered. The batteries will have to be replaced if there is less than four months remaining in the two-year cycle, for a Cypres "1". Cypres2 batteries are replaced at the 4 and 8 year maintenance by the factory.
    Gear & Rigging Forum

    By admin, in Gear,

    Could 6,000 be your new lucky number?

    Performance Designs, Inc., located in Deland, Florida, is having a contest to celebrate the making of its 6000th Sabre2 main canopy which has been one of their most successful lines of main canopies.
    The Sabre2 emerged from over 15 years of ongoing research and development. Named after its predecessor – the original Sabre – its purpose was to fulfill the evolving need for an all-purpose all-around canopy. Starting as a replacement of the original PD 9 cell, the original Sabre was designed to appeal to the needs of an emerging skydiving market in the late 80’s. The President of Performance Designs, Bill Coe, and Vice President, John Leblanc, said they needed a canopy that would appeal to a general market that wanted better openings, landings and performance characteristics than the current models available at the time. The canopy was designed with such vision that continues to endure. The original Sabre established precedence as the benchmark for rectangular zero porosity canopies with over 20,000 of them produced and jumped all over the world since 1989.
    As the needs of our customers evolved, so did our research and development and it was clear that the time had come for the original to spawn the next generation of Sabre. The Sabre2 was introduced to the skies in 2001 - A totally new design from the original, Sabre2 incorporated advances in design accumulated throughout the decade or more that had passed since its predecessor – and it promised to be exciting! The Sabre2 provides a broad range of features to the general skydiving population from weekend jumpers to professional skydivers, such as Max Cohn from Generation Freefly and Arianna de Benedetti from the Italian National Team. Additionally, various drop zones use Sabre2 canopies in their student programs, as well as in transition and rental applications. The Sabre2 boasts the slogan ”Quite possibly the world’s most perfect all around canopy” and since its release has sold nearly 6,000 of them in just 4 years. To celebrate this, Performance Designs is giving one lucky winner the prize of a lifetime!
    FREE canopy—your Sabre2 canopy at no charge
    FREE flight to Deland, Florida to visit Performance Designs’ facilities.
    FREE first jump on your new canopy with John Leblanc, vice-president of Performance Designs and head designer of our products!
    FREE case of beer
    FREE canopy control class with Scott Miller
    And of course, tons of pictures and memories as we feature you on magazines and websites worldwide!
    About the Sabre2
    The Sabre2 is a slightly tapered, zero-porosity nine cell canopy, suitable for intermediate jumpers at light wing loadings and a wide range that makes it attractive to more experienced jumper at higher wing loadings. The Sabre2 is designed to be fun to fly, easy to land, and to be a great all-purpose skydiving canopy. Slow openings, crisp positive response to toggle input, along with its light toggle and riser pressure are some of the characteristics that set this canopy apart. The Sabre2 has an incredible amount of lift available on landing that will give you tremendous ability to slow down when you wish to. Sabre2’s performance envelope is huge – it will feel aggressive at higher wing loadings while maintaining its incredible ease of landing and forgiveness at lower wing loadings. If you are looking for a canopy that represents the evolution of modern, carefree performance, the Sabre2 is it!
    How to participate
    All you need to do to participate is place an order for your Sabre2 canopy through your favorite dealer. And when lucky 6,000 comes up – John Leblanc will contact the winner personally. So what are you waiting for?


    By admin, in Gear,

    Cookie Releases G4 Helmet

    After years of research and design, the Cookie G4 helmet is now available for sale. The full-face helmet is certified to Skydiving and Wind Tunnel Helmet Standard XP S 72-600. To achieve this standard, helmets must pass impact and snag resistance testing.
    New features
    - Ventilation control: The user can now adjust airflow into the helmet using the chin bar actuator (two switches inside the helmet).
    - Additional head coverage: The G4 offers more coverage at the back of the head compared to the G3. This is especially appealing to dynamic tunnel flyers.
    - Quiet: The new design seals the visor to the helmet for a much quieter flying experience.
    - Easy maintenance: The closing mechanism is similar in operation to the G3 but designed to offer little or no maintenance for the life of the helmet.
    - Cool: Two rear ventilation ports allow hot air to leave the helmet and the liner is a breathable material, providing a cooler experience.

    Color and customization options
    The G4 is available for sale in the following matte colors: black, white, dark blue, red, charcoal, tactical green, royal blue, lime green, electric blue, orange, purple, yellow and pink.
    Several side plate color and engraving options are available. The G4 side plate has a slightly larger footprint, ideal for custom engraving. G4 visors are tested and certified for optical qualities. They have an anti-fog inside and anti-scratch outside and are available in clear, tinted, and blue-mirrored colors.
    Sizing
    The G4 is available in sizes x-small through xx-large. Sizing varies slightly from G3,so users should review the sizing chart or try one on before purchase. The G4 retails at $439 USD and is available for purchase at www.flycookie.com or from your favorite Cookie dealer.

    By Administrator, in Gear,

    Cookie G4 Skydiving Helmet Review

    Review by Joel Strickland
    Cookie Composites are quick to admit that there was a fair element of luck involved in their success with the G3. At the time of release in the early teens, the tunnel industry was exploding - and the full face helmet was crossing over from the province of close-in disciplines where you need to be extra careful about catching a knee or an elbow in the face - to pretty much everyone. Flyers were after a greater level of comfort while training for extended periods of time indoors while retaining a level of communication akin to open helmets. People wanted to be able to see each other’s whole face - and with the G3 you could. Skydiving soon followed suit, because you could now wear your cool sunglasses underneath your lid and see all the big grins in the pictures and video.
    While lucky with the timing, Cookie had purposefully pulled off a crucial victory with their product - it occupied a particular sweet spot between form and function that appeals greatly to skydivers. The G3 was desirably fancy - but not too posh or too shiny to the point where it stood out as worthy of mockery. A few scratches and a couple of stickers later, and it had become (in the most positive of terms) part of the furniture of skydiving. While there were functional alternatives available, the G3 became iconic - as much so as the L+B device on your wrist or the Cypres unit in your rig.

    Over the last few seasons there has been a growing grumble in our sport about the level of protection offered by helmets specifically designed for flying. The biggest and most successful company is always going to be the softest target for conversations about the actual value a helmet with no impact protection material has for your brain in an accident, and the G3 has come under fire against new offerings from competing companies that have been through tests and carry a certification. The concerns over safety are certainly valid, yet these conversations would often neglect that for a very long time we were all basically completely fine with what was on offer, and from day one - if we had been genuinely more concerned about safety over comfort and style - everyone single one of us always had the option of wearing a $20 Protec just like we all did when learning to skydive in the first place.
    In the meantime, Cookie Composites have quietly and diligently created the G4 - extensively researching every single material and design element to give us what we have been asking for. Instead of rushing something out, Cookie worked alongside others in the industry to help develop a brand new rating with the specific requirements of both the skydiving and tunnel environments in mind.

    While purposefully retaining the same balance of form and function, up close it is clear that it is a complete redesign - applying many lessons learned from its predecessor. Here are the main differences that you likely care about the most:
    Recessed Visor: High speed flying combined with any looseness in the springs could create a distracting visor vibration on a G3. The new design has the visor recessed to fit flush all-round with the shell to eliminate this effect. It also looks great.
    Audible Pockets: While perfectly fine for a lot of people, many of us with funny shaped faces were squeezed by our audibles despite any amount of wiggling. Cookie have rebuilt the pockets - and now they fit into the shell with zero intrusion into the space where your head is supposed to be. Now I can jump with two sets of beeps, hearing them perfectly yet feeling nothing - unthinkable for me previously with even the largest G3.
    Metal Springs: With the old design, over time the rubber springs would stretch out and require replacing - a process that even the most generous can only describe as a pain in the ass. While Cookie took steps to remedy this with good post-purchase support, they were always going to be searching for a new system. The G4 visor mechanism has done away completely with the rubber and now uses a metal spring arrangement that should eliminate the maintenance routine.
    Rear Protection: While maintaining the same general look, the new shell goes down a little further at the back to offer some more coverage in a sensitive area. This does make the hole where you put your head a wee bit smaller, and changes slightly the familiar back-forward motion of putting on a G3, to something more akin to donning a motorcycle helmet.
    Impact Rated: Now there is deformable material inside. The big design battle Cookie faced was to create a helmet that would pass the crash tests while always remaining something sleek and light that skydivers would embrace as the right thing. The G4 is a little bit bigger and a little bit heavier than the G3 - but comparing them with one in each hand there is really not much in it. With the redesigned interior allowing a bit more space around the ears, it does feel like a bigger helmet when you first wear it - but that is coming from someone who has been wearing a G3 for work since the day it was released.

    The unsolved problem (for now) is that while the Cookie G4 as sold qualifies for this new rating specific to skydiving, the tests are very precise indeed. As soon as you make any modifications at all to the weight or shape you are no longer using the helmet that has been qualified - you are using something else. The truth is that the myriad what and where of how we mount cameras makes practical testing out of reach. Along with impacts, a part of the new rating are thorough snag tests - and adding even the smallest, sleekest camera mounts would fail them.
    The question we now face is that is it safe to assume that a helmet designed from the ground up with impact protection in mind going to provide a greater level of protection in a crash regardless of where you stick a camera on it? I know what I believe.

    The driving force behind Cookie Composites - Jason Cook and Jeremy Hunt - speak passionately about their company and their products. A quick hello turns into two hours of sharing their experiences creating the G4. The lessons from the previous design have been studied, revised and thoroughly applied - along the way investigating and investing in all manner of materials, theories and processes to make it the best it can possibly be. Cookie’s success this decade has given the company the knowledge and the practical means to deliver a new product that should occupy the same place in our sport that its predecessor has done for many years. Their visual presence and the level at which they support our sport can make Cookie Composites can seem like a big company, but at a basic level it is still a handful of skydivers tinkering around in a workshop, putting in a great deal of time and effort to make something that works the best for their friends and their community around the world. Long may it continue.
    Does the G4 live up to the hype? Yes. Yes it does.

    By Meso, in Gear,

0