Search the Community
Showing results for tags 'news'.
Found 523 results
-
Thousands of toys and paratroopers, hundreds of volunteers, and more than a dozen aircraft come together December 10th and 11th at Fort Bragg in order to give back to the surrounding community. WHEN: Friday, December 10, 2010 for Toy Collection and Lottery [ 9:00am – 10:30am ] Saturday, December 11, 2010 for the Airborne Operation [ 7:00am – 3:00pm ] WHERE: Green Ramp, Pope Air Force Base (Friday) Sicily Drop Zone, Fort Bragg (Saturday) What makes this year’s Toy Drop different? The addition of the 437th Air Wing out of Charleston Air Force Base and their unofficial challenge to “out-toy” Fort Bragg and Pope Air Force Base by collecting more toys for underprivileged families throughout the region. This year’s operation will also include double the amount of jump masters from allied militaries – greatly expanding the number of foreign jump wings awarded to U.S. paratroopers who participate. Operation Toy Drop’s goal is to collect more than 6,000 new toys for children and families throughout the region who may not otherwise receive gifts this holiday season. America’s paratroopers don’t hold back – donations last year included numerous high-end game consoles, countless bicycles, and more otherwise unattainable toys for children of underprivileged families. Media opportunities include: hundreds of Paratroopers lined up to donate toys for their chance to join the jump; the jump itself; paratroopers delivering toys, and more. Live interviews via satellite uplink will be available Friday during toy collection and airborne refresher training and Saturday morning from the drop zone during the jump. Dozens of parachute silhouettes raining down against the North Carolina sky are nothing out of the ordinary around Fort Bragg, but each December since 1998, Airborne operations have taken on a different meaning to America's men and women in uniform with the Randy Oler Memorial Operation Toy Drop. An annual opportunity for Fort Bragg's military community to help families in need over the holidays, Operation Toy Drop combines the efforts of Army, Air Force and civilian service organizations in a truly unique event. Operation Toy Drop is a week-long, philanthropic project where Fort Bragg's paratroopers (or visiting paratroopers from across the nation) individually contribute new, unwrapped toys to be distributed to local children's homes and social service agencies. Despite the project's name, these toys are not "dropped" anywhere except into the arms of deserving children throughout Cumberland County and North Carolina. The drop is actually a daytime, non-tactical airborne operation supervised by foreign military jumpmasters – a rare treat for participating Soldiers who relish the opportunity to earn a foreign nation's "jump wings". Masterminded by then-Staff Sgt. Randy Oler in 1998, Operation Toy Drop started as a relatively small-time success backed by some big-time coordination. Oler's dream of incorporating Airborne operations, foreign military jumpmasters and local charities was a tall order, but Oler was never one to shy away from a challenge. He approached his commanding general within the U.S. Army Civil Affairs and Psychological Operations Command with the idea and was given the green light to spearhead the project. That December, after eight months of planning, USACAPOC(A)'s first annual Operation Toy Drop had been completed on a wing, a prayer, and Oler's handshakes across several organizations. It was small, and very few toys had actually been raised - but it was a start, and from that point on Oler had a foundation to build on. Over the following years, Operation Toy Drop expanded to include aircraft support from Pope Air Force Base's 43rd Airlift Wing, and welcomed the participation of Soldiers from Fort Bragg's XVIII Airborne Corps and 82nd Airborne Division. These Soldiers’ enthusiasm to participate in the budding holiday tradition greatly outweighed the number of jump slots available. With limited space on the planes, the project's organizers arranged to draw names of participating Soldiers at random to fill the slots. The name drawing has become one of the main spectacles of Operation Toy Drop, where hundreds of Soldiers crowd together for the chance to hear their ticket number called, no matter how long the wait. Each iteration of Operation Toy Drop has brought in more toys for children in need. Even as USACAPOC(A) Soldiers mobilized with the rest of the military community in support of the Global War on Terrorism, those who remained stateside continued the tradition. In 2001, each child who lost a family member in the Sept. 11 attacks received a toy raised in the following December's Operation Toy Drop. As the war broke out, Oler remained at the helm of the operation. By April of 2004, he'd been promoted to Sgt. 1st Class and was finishing up an assignment at the U.S. Army John F. Kennedy Special Warfare Center and School. Even as the USACAPOC(A) commanding general was fighting Oler's relocation orders, which would take him away from Fort Bragg, Oler was starting to get the ball rolling for Operation Toy Drop, 2004, which was less than eight months away. Oler had warned his colleagues that he might not be around for what would have been his seventh year running Operation Toy Drop. Sadly, he was right, but not due to any relocation orders. On April 20th, 2004, Sgt. 1st Class Randall R. Oler suffered a heart attack while performing jumpmaster duties aboard a C-130 aircraft. At 43 years old, Oler was pronounced dead at Womack Army Medical Center. The Tennessee native had joined the Army in 1979 as an Infantryman, spending time in Ranger and Special Forces battalions throughout his career, and had deployed in support of Operations Desert Storm, Provide Comfort and Joint Endeavor. In 1995, he joined USACAPOC(A) to become a Civil Affairs specialist. Oler's humanitarian spirit built Operation Toy Drop from the ground up, and it's only appropriate that the following December, his dream-turned-reality was dubbed the Randy Oler Memorial Operation Toy Drop by those who had worked so closely with him over the years. The void left by Oler's death was a difficult one to fill – Oler had run the operation from memory for six years. With no written notes to work from, key players scrambled to make the connections that Oler had worked from his head over the previous years. To this date, Operation Toy Drop has collected and distributed over 35,000 toys – from bikes, to dolls, to video game systems – for local families and children in need. In 2007, Operation Toy Drop's 10-year anniversary, over 3,000 participants brought in approximately $55,000 worth of toys. USACAPOC(A), a subordinate of the Army Reserve Command, has had control over Operation Toy Drop since Oler, a USACAPOC(A) Soldier, initiated the event in 1998. Oler's passion for helping those in need is echoed again and again among USACAPOC(A)'s nearly 10,000 Army Reservists, whose civilian experiences play important roles in their units' missions overseas. By conducting civil-military projects and humanitarian assistance efforts, USACAPOC(A) Soldiers are making non-lethal contributions to global peace and stability across the world. Located at Fort Bragg, USACAPOC(A) is headquarters to the 69 Army Reserve Civil Affairs and Psychological Operations units across the nation. Civil Affairs and PSYOP Soldiers account for only five percent of the U.S. Army Reserve force, but comprise 20 percent of Army Reserve deployments.
-
Base jumping is something that I’ve not had a desire to do, so it was understandable that when I was presented with the opportunity to read and review "The Great Book of Base" that I did so with some level of skepticism. You see, I've always had preconceived ideas about BASE jumpers, their discipline, and the personality types involved - ironic when you consider the very notion, a pet peeve of mine, general skydivers have regarding canopy piloting/swooping. "The Great Book of BASE" helped turn that thinking on its head. The Author, along with oftentimes anecdotal experiences with other BASE jumpers, paints a vivid yet methodical view of the world of BASE jumping. The book itself begins with a rather heavy handed push warning readers of the dangers of BASE jumping. Something, that while necessary, wears a little bit on the reader at times. It was the only part of the book I found a little difficult to get through - not because the warnings were invalid, or not to be heeded, but rather it felt like the Author was attempting to offset any potential future litigation. There is something about this book that should be clearly stated: This book will NOT teach you how to BASE jump, nor is it the intention of the Author for it to do so. What the book does do, and in my opinion does very well, is give the reader a solid sense of a path to follow in the BASE world. It's a guide and a reference book, something you read multiple times in your BASE career and refresh the things you need to. For newer (and perhaps even some seasoned jumpers) the book discusses the myriad of things a BASE jumper should consider from etiquette (site burning, etc), mentorship (something the Author is a avid believer in), various types of BASE jumps and locations, detailed explanations on various weather phenomena that can affect the outcome of the BASE jump, and even the types of skydives a future, or current, BASE jumper should spend time working on to give them the greatest chance of having a positive BASE experience. Also noteworthy is how the Author takes some time to dispel myths, largely prevalent in the regular skydiving community, about altitude BASE jumps. All the subjects mentioned above are discussed in depth, but not so much so that they become a chore to read. Quite the opposite in fact, and the Author does a spectacular job of keeping the reader engaged in the topic being discussed - not always an easy task when discussing technical topics. The book is well edited and written. The only real complaint I had about the layout, and it's a minor quibble, is that the Author refers to DBS (Deep Brake Setting) at one point, but doesn’t actually explain the acronym until a later chapter. As a non-BASE jumper, this term had me scratching my head until it was later explained. So what does this mean for you, the reader? Well while I still have the opinion that BASE jumping is not for me I have a newfound respect for participants in the sport. Additionally I can say that if I ever were to reconsider my BASE jumping career, I would certainly have this book on my bookshelf and use it for guidance on the next steps to take. I definitely will be recommending to some of the local BASE jumpers I know. Safe BASE jumps. Overall: Highly recommended
-
Preston, UK – Sep 15, 2010 – Beginning in September, GoWear skydiving t-shirts from the USA will be available in the UK through Go-Wear (Europe) Ltd, a new company formed by UK skydiver Adrian Bond. “This will be good news for skydivers in the UK and Europe,” says Kris Ruff, the American skydiver and designer who started GoWear back in 2000. “There’s always been a lot of interest in our products in Europe, but the high cost of shipping overseas has made it difficult for our customers to get them. Now, t-shirts like our classic Jumps from Perfectly Good Airplanes t-shirt can be ordered from a UK-based website instead of having to come all the way from the U.S.” A Good Partnership Kris is excited to be working with Adrian, who will be the sole distributor of GoWear’s products in Europe. “Adrian brings great business expertise to this new partnership and has lots of great ideas for new products to add to the GoWear brand.” Go-Wear (Europe) will start with 12 of the most popular GoWear t-shirts and widen the range in the coming months. In addition to t-shirts, other products, including personalized products that will be completely new to the market, are in the works. All the Details GoWear skydiving t-shirts and other products will be available in Europe at www.Go-Wear.co.uk during August. Unisex tees will sell for £17.99 and the luxury women’s fitted tees will be £21.99. In addition, some DZ shops will be carrying the range. Go-Wear (Europe) Ltd is also looking for agents in Europe. If you’re interested, contact Adrian Bond at [email protected] or t: 0843 289 1655 or m: 07786 980 984. Author: Adrian Bond has been a skydiver for 7 years and jumps camera for a four way FS team, he is also on the BPA council and has been for 6 years. As well as launching Go Wear is also a management consultant.
-
 Phoenix-fly announces a new Coaching program to replace the Phoenix-fly Instructor Program. Rising up from out of the ashes is the Phoenix and the latest re-start at Phoenix-fly is the dismantling of their “Instructor” program and the birth of a new Coaching program, making room for a gradual move towards a more official training standard. “With the recent rise in wingsuit-related incidents and the tremendous growth in the wingsuit discipline, we felt it was time to re-examine our roster of manufacturer-endorsed instructors and determine a path for instruction that not only provides the best methodologies for training, but also provides an accessible, consistent system that Phoenix-fly can firmly stand behind,” says Jarno Cordia, Global Marketing Manager for Phoenix-Fly. Phoenix-Fly’s history is well known; president and founder Robi Pecnik was one of the first and easily the most innovative wingsuit designer in the early days of wingsuiting. Paired up with Jari Kuosima, they formed Birdman. Pecnik kept the company on the leading edge of suit design while Kuosima sold suits. Together they built a powerhouse product line, and over time they instituted a training program to help skydivers get their wings into the air. The program was primarily authored by Chuck Blue and Henny Wiggers.This was known as the “Birdman Instructor” program. In 2004, Pecnik grew dissatisfied with the direction Birdman was taking, and so left to form Phoenix-fly. Many Birdman Instructors (BMI) automatically received Phoenix-fly instructor ratings when the competitive company was formed, and the Phoenix-fly program moved forward and grew from that base of early instructors. It was later discovered that some of the BMI’s had received their ratings via email. In short, some of the new PFI’s had never received formal training of any kind. “We’ve found over the course of years that instructors were going uncurrent or teaching First Flight Courses to skydivers that didn’t meet the industry-recognized recommendation of 200 skydives in the last 18 months,” said Jarno, “We needed to address this, and with the spate of recent fatalities, we wanted to address it before someone was killed or injured during one of our training jumps. A high percentage of the recent fatalities fall well below the 200 jump minimum required by Phoenix-Fly and now by the new USPA BSR.” With this in mind, the old PFI or “Phoenix-fly Instructor” program has been dismantled and the replacement program being steadily brought online. “We made four Phoenix-Fly Coaches (PFC’S) this past June, with others lined up to obtain their rating in the fall months,” says Douglas Spotted Eagle (DSE) Director of US training. “With the new additions to the SIM that myself and a team of wingsuiters authored, the recent changes in the program Robi and Jarno wanted to make, and the USPA adding a Basic Safety Requirement related to wingsuiting demonstrated that now is the right time to change up the program.” Holders of the Phoenix-fly Instructor’s patch now hold a souvenir of the time they taught beginning wingsuiters. The Phoenix-Fly Instructional rating does not automatically translate to the newly founded Coach rating, and requires some re-training to merge into the new methodology of the PFC program, as well as a USPA Coach rating (USA-only). “The new program parallels the USPA Coaching program and in fact we now require, rather than recommend, that Phoenix-fly Coaches in the USA hold a current USPA Coach instructional rating,” says DSE (who also holds a USPA Coach Examiner rating). According to Cordia, “We’re looking at requiring something similar for our non-USA Coaches. We’re already in the process of training up a Coach/Examiner for South America and he’s a USPA AFFI, TI, and just finishing his Senior Rigging rating. These are the kinds of people we want teaching and evaluating potential coaches.” The newly developed program fundamentals came from the coaching techniques initially developed by Skydive University, discussions with other wingsuit coaches, and weaknesses observed over hundreds of student jumps. Kinesthetics, isometrics, visual imagery, and student repetition are all part of the revamped PF First Flight program. First Flight Courses take slightly more time and provide improved and up-to-date information regarding navigation, deployments, and emergency procedures. Scotty Burns of Z-flock points out, “We’ve been teaching wingsuiting based on methods developed in the early days of wingsuits but the suits of today are much bigger, faster, and potentially more dangerous than they were ten years ago. This new program arms students with the knowledge they’ll need as they undergo the wingsuit journey. I’m really excited about it. I’ve taught dozens of wingsuit students over the years and know what to expect in an average First Flight. Since I’ve started training with this new program, my students somehow have been flying better. This thing works!” “Having watched numerous wingsuit first flight courses, I can say with confidence that the PF coach program takes instruction to a completely new level, using various well thought-out techniques that deliver the best training I could think of,” commented recent PFC graduate Andreea Olea. “It's amazing how well it works with all kinds of students, from the most distracted to the most clumsy to the most cocky ones. Quality wingsuit training at its best - major kudos to Phoenix-Fly for setting such an excellent standard!” Phoenix-fly coach candidates that have obtained their USPA Coach rating should plan on attending a Phoenix-Fly Coach training session at Skydive Elsinore, Skydive Utah, Skydive City/Zephyr Hills, or at Raeford Parachuting School with Douglas Spotted Eagle, Scotty Burns, or Chuck Blue. There is one half day of classwork, some of which will recall training received during the USPA Coach rating process. The second half day is a jump day, in which students must receive two satisfactory scores in three possible jumps. The jumps are scored using criteria very similar to the USPA Coach evaluation form. Candidates are also required to pass a written test before receiving their Phoenix-Fly Coach patches. “Phoenix-fly Coaches must teach a minimum of six First Flight Courses per year and 15 coach jumps in order to remain current,” says DSE. Phoenix-fly Coaches receive special discounts on PF wingsuits, access to the PF training fleet for special events, and other unique discounts and opportunities via PFpartners. “Truly, we’ve changed up our program so it meets a standard consistent with the USPA methodology of training and coaching, and so that the new program is consistent with the new wingsuiting additions to the USPA SIM. We’re looking to insert additional Coach/Examiners so that there are more geographical points in the USA where potential Phoenix-fly Coach candidates can more readily receive training and pass the course,” says Cordia. “We believe we’ve built a new training program worthy of even the most challenging students.” “From the USPA perspective, we’re thrilled to see Phoenix-fly step up their training to prepare skydivers for bigger suits, low-tail aircraft, and overall safety. The fact that the program is consistent with existing USPA standards and training programs is a bonus for all, ‘ says Jay Stokes, President of the USPA. Former Phoenix-Fly instructors wanting to update their Phoenix-Fly rating, or anyone qualified to challenge the PFC course may contact one of the PF Coach Examiners to arrange for a training class. Phoenix-fly Coach Courses are currently available at: ~Skydive Elsinore (Douglas Spotted Eagle) ~Skydive Utah (Douglas Spotted Eagle) ~Raeford Parachuting Center (Chuck Blue) ~Skydive City/Z-Hills (Scotty Burns) -The Parachute Center, Lodi, CA (Ed Pawlowski) Contact Jarno Cordia for other countries/regions Dropzones are encouraged to check Phoenix-fly.com for information regarding the active status of Phoenix-Fly Coaches.
 -
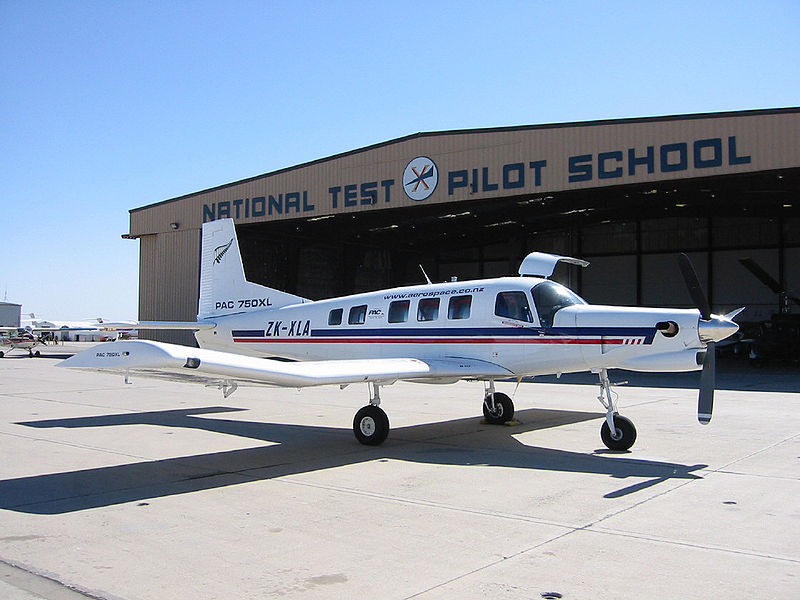
Funneled exits are bound to happen once in a while on recreational RW loads, but they do not have to be the norm. With the leadership of a good load organizer and thorough dirt dives, jumpers with relatively little experience can soon be pulling off stable exits. In recreational RW, the most common type of exit is a Star (or “round” as it often called). In a Star exit, it is easier to control the exit chunk and maintain levels because all jumpers are looking into the center. The number of jumpers in the Star exit depends on factors such as jumper experience and the complexity of the skydive. For recreational loads with mixed experience levels, a 2, 3 or 4-way Star is probably large enough. Any bigger and the chance of a funnel increases. This article focuses on Star exits from left side-door aircraft such as Otters, Cessna Caravans and PAC750s because they are commonly used for formations larger than a 4-way. Also, because many recreational skydivers don’t do a lot of 4-way, terms such as Middle Floater and Rear Floater are used instead of 4-way terminology such as Outside Center and Tail. Deciding Who Will Be In The BaseThe simple solution is to put only experienced jumpers in the base, but that often doesn’t leave enough experienced jumpers further back in the lineup. An alternate solution is to put experienced jumpers outside the plane and lesser-experienced jumpers inside. This mix of experience levels can work quite well if everybody leaves on ‘GO’ and presents to the relative wind. Then, if the exit is less than perfect, the experienced jumpers are in a better position to control the exit chunk. For example, if one of the inside jumpers starts to flip over, it is sometimes possible for one of the outside jumpers to push against his back pack and help him settle back down into his slot. The Importance Of Dirt Diving The ExitThe exit is just as important as remembering the points of the skydive. If the base is not there, no points will be turned anyway. So during the dirt dive, jumpers should pack it up and take grips exactly the way they expect to do it on jump run. This can prevent a lot of fumbling around for grips when they are lining up for real. If a mockup of the aircraft door is available, jumpers should use it. If not, they can make marks on the ground to represent the door. Typically, the organizer is positioned in the middle of the door and facing in so that he can see when everybody is in position before giving the count. Since full face helmets make it very difficult to hear the count, many organizers move their head or leg in time with the count. Some organizers swing their left leg out-in-out to indicate the Ready-Set-Go. (The second swing out represents the ‘Go’). Launching A 2-Way StarThis exit uses a Middle Floater and 1 jumper inside the plane. As mentioned earlier, the most experienced jumper should be outside the plane because he is in a better position to control the inside jumper as the 2-way leaves the plane. Getting Into position1. With both hands holding onto the bar (or the top inside of the door if there is no bar), the Middle Floater rotates his body to the left so that his back pack goes out the middle of the door (so he doesn’t snag anything). His head follows until he is standing outside the plane with his right foot on the edge of the door and his left knee presented to the prop blast. His hands should be approximately shoulder-width apart. 2. As soon as the Middle Floater turns around in the door, the Inside Jumper reaches between the Middle Floater’s arms then right and left for his arm grippers. This leaves both the Middle Floater’s arms free to fly and control the exit. 3. As he takes grips, the Inside Jumper steps forward with his left foot, placing it on the edge of the door and crouching down (not on his knees) while keeping his chest cheated toward the prop blast and his back straight up and down. His right foot should naturally be a foot or two back inside the plane (helps ensure his body is cheated toward the prop blast). The Launch When the Inside Jumper is ready, he looks up at the Middle Floater. The Middle Floater gives the count and launches out, leading with his left knee and presenting his chest and hips to the prop blast. With his free hands he can help control the Inside Jumper if he starts to twist or turn off heading. He can also double grip the Inside Jumper for added stability. The Inside Jumper DOES NOT push but goes with the exit, keeping his head up and rotating his chest and hips toward the prop blast as he helps fly the 2-way on the relative wind. Both jumpers are responsible for keeping the 2-way on heading relative to the aircraft’s line of flight so that other jumpers on the skydive can go directly to their slots for a faster build. The 2-way is also responsible for maintaining a good fall rate. Launching A 3-Way StarThis exit uses 2 floaters (a Rear and a Middle) and 1 jumper inside the plane. Again, the most experienced jumpers should be outside the plane. Getting Into Psition1. The Rear Floater climbs out first (see the photo of the Middle Floater climbing out for the 2-way). 2. On the heels of the Rear Floater, the Middle Floater climbs out the same way, except he rotates his body to the right and stands pretty much in the middle of the door. 3. As the Middle Floater climbs out, the Rear Floater grips the Middle Floater’s right arm gripper with his left hand. 4. Both floaters are now standing outside the door and should be turned slightly toward the front of the aircraft with the inside of their left knees presented to the prop blast. 5. The Inside Jumper gets in position the same way as described for the 2-way Star except he takes a left-hand grip on the Rear Floater’s right arm gripper and a right-hand grip on the Middle Floater’s left arm gripper. (Again, he steps toward the door with his left foot and places it near the edge of the door to ensure he is cheated toward the prop blast.) Launch When the Inside Jumper is ready, he looks up at the Middle Floater. The Middle Floater gives the count and launches out, leading with his left knee and presenting his chest and hips to the prop blast. The Rear Floater should anticipate the count and leave a split second early, hardly noticeable but just enough to place him on the lower end of the 3-way and looking up at it. (In 4-way, the Rear Floater, called the ‘Tail’, is always on the lower end of the formation to help anchor it on the relative wind.) The Inside Jumper DOES NOT push. He simply steps off, keeping his head up and rotating his chest and hips toward the prop blast as he helps fly the 3-way on the relative wind. All jumpers are responsible for keeping the 3-way on heading relative to the aircraft’s line of flight so that other jumpers on the skydive can go directly to their slots for a faster build. The 3-way is also responsible for maintaining a good fall rate. Launching A 4-Way StarThis exit uses 2 floaters (a Rear and a Middle) and 2 jumpers inside the plane. As with the 2 and 3-way Star exits, the most experienced jumpers should be outside the plane. Getting Into Position1. The Rear and Middle floaters climb out the same way as described for the 3-way Star exit. (Note: The Rear Floater should stand a few inches forward of the rear door jamb so that the Inside Rear jumper does not hit his arm on exit.) 2. While the two floaters are climbing out, the 2 inside jumpers (let’s call them Inside Rear and Inside Front to indicate their relative positions in the door) should step forward with their left foot and place it on the edge of the door, keeping their back pack backs straight up and down and their chests cheated toward the prop blast. They should crouch but not be on their knees. Their right foot should naturally be a foot or two back inside the plane. 3. The Inside Rear jumper takes a left-hand grip on the Rear Floater’s right arm gripper and a right-hand grip on the Inside Front jumper’s left arm gripper. 4. The Inside Front jumper takes a right-hand grip on the Middle Floater’s left arm gripper and can either leave his left hand free or reach back and double grip the Inside Rear jumper’s right arm. The Launch When the inside jumpers are ready, they look up at the Middle Floater. The Middle Floater gives the count and launches out, leading with his left knee and presenting his chest and hips to the prop blast. The Rear Floater should anticipate the count and leave a split second early (the same way as described for the 3-way exit). The inside jumpers DO NOT push. They basically step off and go with the Middle Floater, keeping their heads up and rotating their chests and hips toward the prop blast. The Inside Front jumper should also think about launching toward the front of the plane, and the Rear Inside jumper should think about helping to place the Inside Front jumper up and forward. No grip switching is necessary. If the 4-way is the base for a big-way, jumpers can take double grips for added stability. All jumpers are responsible for keeping the 4-way on heading relative to the aircraft’s line of flight so that other jumpers on the skydive can go directly to their slots for a faster build. The 4-way is also responsible for maintaining a good fall rate. Safety Tips Before boarding the plane and before jump run, jumpers should give each other pin checks. During the lineup and the exit, jumpers should always protect their handles. Before planning to launch larger exit chunks, jumpers should know how many jumpers are allowed in the door and at the back of the aircraft (so that the aircraft’s stall point is not jeopardized). If they don’t know, they should ask the pilot!As with other types of exits, methods for launching a Star can vary from one organizer to the next, from one 4-way team to the next, or even from one DZ to the next. The methods described in this article are ones that have worked successfully for this author on both 4-way and recreational loads. But no matter what method is used, success is much more likely if jumpers present as much as possible to the relative wind when lining up in the door and continue this through the launch. Finally, bigger is not always better. Most skydivers would rather swoop on a solid 2-way than chase a funneled 6 or 8-way base. A solid base allows everybody on the load to turn more points and get the most bang for their buck.
-
Landing your canopy in a specific place is a skill that we all must master. If you cannot land where you want to, eventually you will land someplace you don’t want to. Honing this skill is something that we all must pursue, and how we approach this will determine whether or not we survive the learning process. We must first learn how to land on a runway before striving to land on a specific point. When pilots try to skip this step, they often run into significant stumbling blocks, some of them requiring surgery. Once you are proficient at hitting the centerline of a runway with consistency, then you can move on to more specific targets such as entry gates and landing points. One of the most important aspects of any approach is the “entry angle”. Although we can often repair a flawed approach, there are limits to our course corrections. The parachute can only do so much. If you set up too close to the target or entry gate of the swoop course, you may be in for a painful lesson. Too tight is a very dangerous place to be. Even if you are flying a conservative approach, making gentle turns to final, this can still bite you. When a pilot strives to land on a target that is mostly underneath them, they are on what I call “the path of crazy shit”. You can almost hear the banjo music starting like in a chase scene in an old western. There is no graceful way to land on a target that is directly below you. The parachute wants to glide, and turning or diving to get there will always put your life at risk. If you are a swooper, the consequences of being too close to your entry gate are dire. You may have the potential to extend the dive of your canopy to make the entry gate, but all you will do is make a divot between the flags that mark the location of your final act of egoistic stupidity. Let it go, and live to swoop another day. If we are too far away from our entry gate, real or imaginary, our solutions are simple, and generally quite safe. “Shallowing” of the approach can easily be accomplished by letting off the dive early and/or holding a bit of brakes or rear risers. We do not often read incident reports about canopy pilots who died a horrible death as a result of holding two inches of rears to stretch their glide back to the target. Set up deep, and tighten up over several jumps. The hard part comes when you have set yourself up, started your dive, and are not sure if you can make the gate or not. You are tight and steep, and you think that if you make it you are going to be a hero. Hero or zero that is; only time will tell. If you hold your swoop in your hand like a butterfly, hoping it will not fly off, you will live far longer than if you squeeze it tightly and try to force a square peg into a round hole. Either it is there or it is not. You need to train yourself to know when you are too tight by knowing what it looks like when it is just right. Visualize the perfect entry, not too shallow, not too tight, with the target or entry gate out in front of you. Walk through the sequence, setting up tiny gates on the ground, and practice making aborts by lifting your eyes from the entry gate and landing long. If you are looking down at it, just let her fly, land safely, and go up and do it again. There is always the next jump. They key to a good abort procedure is training. Without physical rehearsal for physical activities, our cognitive understanding is useless. We have to practice arresting the dive over and over, and find new ways of putting our parachutes into level flight quickly. The first concept is: “Pitch Before Roll”. This means that the turn itself is less important than the pitch attitude of the canopy. When you are striving to pull up from a diving turn, increase the canopy’s pitch angle before striving to recover the roll. Bank angle does not kill people, descent rate does that. If you nose your parachute up, you will increase the angle of attack of the wing, which will give you the added lift that will reduce the decent rate. This will afford you the time to reduce your roll angle prior to touchdown. You literally create time. The second concept that supports healthy recovery technique is: “Sharp Inputs Create Sharp Results”. Slowly applying the brakes, regardless of the depth of the input, will never create the high rate of pitch change that shorter, sharp inputs can. This is the same reason why slow flares, when started at a very high altitude, will not cause an adequate change of direction of flight so as to create a level-off for a soft landing. Practice giving sharp stabs on the brakes while in a turn, and see what it does for you. If your weight increases dramatically, you know you are creating a change of direction, since inertia is resisting your change of motion. Another relevant concept with regards to saving yourself from a low turn is: “Give Up Some Heading”. If you strive to arrest your dive and stop the yaw too quickly, you are likely to wobble on the roll axis. This is because the increased lift on the low wing is bringing that wing up, beginning an oscillation about the roll axis. This can easily be prevented by allowing the turn to continue a bit following the increase in the angle of attack. Look into the turn, and let the wing follow through with its natural over-steer tendency, perhaps as much as 90 degrees when recovering from a fast turn. This overshoot can be as little as 20 degrees in a slower, carving turn. When you strike the toggles, do it with a short, strong burst-and-hold of 12-18 inches, but do it in an asymmetric manner that continues the current momentum of the turn. This will allow you to smoothly and slowly exit the turn and enter your final landing procedures gracefully. The last idea that seems to make a difference in how quickly you are able to pull up from a low turn is where you are looking: “Look Where You Want To Go”. If you are like most people, you will stare at your impending impact point on the ground, right until landing. By focusing your attention on what you don’t want, you inevitably make it happen. Somehow we are drawn toward whatever is in the center of our focus, so it is a far better plan to look toward where you intend to go, rather than where you are currently going. If you have turned too low, your current destination point is somewhere below you, while your intended flight path is in the general direction of the horizon. Lift your eyes, and make your parachute fly toward where you want to go. Focus is more than the object of attention, it is the shape of things to come. Aborting is a part of life. Humans are not perfect, and sometimes we are incapable of fixing our errors. Targets and entry gates are fun to shoot for, but not at the expense of our bodies. Aim to fly a clean approach every time, and let your gut tell you what to do. If it feels bad, it usually is. Do not let your desire to make the swoop course or the peas keep you from seeing what is right in front of you. Ego distorts our vision, as does passionate desire. The only way to see clearly is to remain calm, breathing slowly and completely throughout the approach, and maintain a positive mood as you set yourself up. If you start to feel scared, it is your cue to breathe more and try less. The perfect approach always feels easy. It flows like water. It is the result of good planning combined with good execution, made possible by positive emotion. Joy is thrust, fear is drag, ego is weight, and knowledge is lift. Maximize lift and thrust, and you will go far. Go Big Live Long BSG Brian Germain is the author or several popular skydiving books including: The Parachute and its Pilot, Transcending Fear, Vertical Journey and Greenlight Your Life. He also has a spot on Skydive Radio called “Safety First with Brian Germain. Brian runs canopy flight courses throughout the world, and does motivational keynote speaking on the topic of transcending fear. His website is: www.BrianGermain.com
-
You have probably seen the previous article on the bonehead composites gear update. Well that was the first of what was almost a complete gear section update. It became evident that much of what is listed in the gear database wasn't entirely fresh and that there were some discontinued items which were still listed and some new gear out there which also hadn't found it's way into the database. Action has been taken in correcting this issue and making sure the gear section is as up to date as possible. I have both sent out e-mails to all involved manufacturers as well as manually gone through the list and updated what I could. The result is over 100 new gear items added to the database including a new category, "Cameras and Camera Equipment". Granted much of what is new on the site isn't new in production, but this now gives you a chance to review gear that was previously not listed. New gear items can be found under the following categories: Altimeters, Audibles and AADS - Alti-2 Inc - Free Fall Accessories - Larsen & Brusgaard - Parasport Italia Cameras and Video Cameras - GoPro - Sony - VholdR - Conceptus - Hypoxic - Ultimate Switch - Sky Tools - Skydance Headwear Harness and Container Systems - Altico - Basik Air Concept - Jump Shack - Para Avis - Para-Phernalia - Rigging Innovations Inc - Sunrise Manufacturing International - Thomas Sports Equipment Helmets, Head Gear and Goggles - 2K Composites - Bonehead Composites - Cookie Composites - Gath Head Gear - Headfirst Headwear - Parasport Italia - RAWA - Sky Systems - TonFly Jumpsuits and Clothing - Bird-Man Suits - Body Sport USA - Firefly Jumpsuits - GoCrazy - Kurupee - Matter Clothing - Phoenix-Fly - Sonic Flywear - Tonfly Main and Reserve Parachutes - Atair - Basik Air Concept - Flight Concepts - Icarus Canopies - ParaAvis - Parachute Systems - Performance Designs A complete list of the new gear items can be found - On the New Listing page. Though even with these updates I am sure there are still manufacturers which have slipped through and aren't listed in the database. And I will be trying my best to fill in these holes and hopefully create a comprehensive up to date gear section. Your assistance would be greatly appreciated too! Anyone who notices a manufacturer or gear item missing in the database can post information in the following thread - Gear Section - and I will add them. If you are also aware of products which have been discontinued, but aren't listed as such you can also alert me to this and I will go ahead and correct the issue.
-
We're happy to announce that we've updated the Bonehead Composite gear page with plenty of new items. We've been somewhat out of date regarding some of the new helmets put out by Bonehead Composite, so there is lots to check out- some of which you may already be aware of or own. Though this gives you the chance to head over to some of the new items and rate them, should you already have experience with them. Here's some of the new items we have added: The ZEUS Helmet"Take a walk on the wildside... Zeus is a new way to look at video helmets. The ZEUS from BoneHead Composites Is designed to be a versatile camera helmet with its flat side and a space provided for a Cam EYE II. One of the first things you'll notice about the ZEUS is the Retro-Roman styling. ZEUS provides more frontal facial coverage and a brim to keep the sun out of your eyes without being aerodynamically obtrusive. The ZEUS comes standard with BH's ingenious Thermal-Fit liner, our new buckle chin-strap closure and the great finish quality that you have come to expect from BoneHead. This helmet does not require a chin-cup and there is not a cutaway system currently available" The FLAT-TOP NARROW Camera Helmet"The other choice of professional camera fliers from around the world… The FLAT-TOP NARROW from Bonehead composites is the trimmed version of our almost famous FLAT-TOP PRO. The FLAT-TOP NARROW is a great all-around camera helmet for any discipline in skydiving. RW, freefly, tandem video or competition freestyle can be captured with your FLAT-TOP NARROW. This camera helmet is a rear-entry system to give the user better camera stability without sacrificing comfort. This NARROW version of the FLAT-TOP PRO has been made to allow the camera flyer less surface mounting availability and air drag but keeps the stability of the rear-entry configuration. The FLAT-TOP NARROW has plenty of space inside to run wiring, camera buttons, etc. to keep as much of the snagable surfaces to a minimum. You have the choice of where you would like a ring sight post placed. The FLAT-TOP NARROW comes standard with BH's ingenious Thermal-Fit liner, still camera adjustable platform, NEW cutaway system, and "Riser Slap" release button protector." Hells Halo Camera Helmet"Hell's Halo is Boneheads latest and greatest camera helmet. There are 3 mounting surfaces for all your camera mounting needs. What makes this helmet stand out is an internal "halo" band that is adjustable using the ratchet clip on the back for last minute size adjustment. The helmet comes in two shell sizes along with our thermo-fit foam and an adjustable chin strap. If you still feel you need a chin cup, that accessory is also available. You can choose from our regular chin cup or our new concealed chin cup which hides the ladder straps!" The MAMBA Helmet"Welcome to BoneHead's latest addition to Full-Face Flip-Up Helmets. The MAMBA from Bonehead Composites is a great choice for RW jumpers with its full face security and the ability to flip open the lens quickly and easily without sacrificing keeping closed in freefall. The new lens closing mechanism requires the jumper to squeeze the lens together to allow the closing pin to be released from it's locking position at the forehead area in order not to make a push-in button on the chin susceptible to knock and unwanted lens openings during the most intense skydives. The MAMBA features dual internal audible pockets on the inside of the helmet, great peripheral vision, a heavy neoprene neck liner to help with fogging lenses and noise, a FASTEX chin strap closure with padded strap, front Chin-Dam wind deflector to keep unwanted wind flow out of the inside of the helmet and a shape that allows full head movement and the ability to see and locate emergency handles. The MAMBA comes standard with BH's ingenious Thermal-Fit liner, chin-strap closure and also comes with the lens coated with anti-fog direct from the factory." The ALL-SPORT Helmet"Refined Sleek Shape For All Types of Skydiving. The ALL-SPORT helmet from Bonehead Composites is now available from your favorite retailer! Customers all over the world wanted a helmet that was simple, sleek and of course had the quality and design that has made BoneHead Composites famous in the skydiving world.. and we delivered! The ALL-SPORT features a very simple shell design that is flatter on the left and the right so that camera mounts can be added easier. We took all the best attributes of the Guner and Mindwarp and combined them to make the ALL-SPORT. Internal audible pockets have been integrated into the helmet so that there is no need to build out the sides of the shell to accommodate audibles and still keep the interior comfortable. The ALL-SPORT comes standard with BH's ingenious Thermal-Fit liner, neoprene padded leather FASTEX chin-strap closure. " These are just 5 of the new 10 helmet and helmet items added today. Head over to the Bonehead Composite gear page to see the rest.
-
A mid-summer skydiving celebration honoring the "first man in space" is the centerpiece for one of the biggest fundraising events yet planned for the National Skydiving Museum. Fifty years ago, Air Force Capt. Joe Kittinger exited at 102,800 feet from a helium balloon over New Mexico, reaching a speed of 614 mph during a four-and-a-half minute free fall. The record still stands today, although there have been several attempts to better it. The "National Skydiving Museum Weekend Honoring Joe Kittinger" will be held in DeLand, Florida the weekend of August 13-15. Kittinger’s jump was on August 16, 1960. Kittinger, who retired as a colonel and is now 81, plans to attend, as well as other skydiving luminaries. There will also be several activities during the weekend benefiting the Boy Scouts of America, another cause Kittinger supports, to commemorate their 100th Anniversary. Joe Kittinger outside the gondola from which he took his historical jump.The Saturday evening dinner will be devoted to honoring the initial class of inductees into the National Skydiving Museum Hall of Fame. A special committee carefully selected eleven honorees, culled from a list of skydivers who made major lifelong contributions in equipment design, free fall techniques, and those who excelled in national and international competitions. This fundraiser is part of the National Skydiving Museum’s $5 million capital program that will raise the necessary funds to build the museum in Fredericksburg, VA. (story contributed by Doug Garr) Show your support and join us! Skydiving Activities and Exhibitions... Here are just a few of the events that will honor Joe Kittinger and celebrate 50+ years of skydiving history including giving special recognition to other pioneers for their contributions to our sport. (schedule subject to change) Jumping for Joe 50-Way Formation Skydiving Exhibition This 50-way formation with some of the best skydivers in the country will celebrate and symbolize 50 years since Joe Kittinger’s record breaking jump. Canopies opening in an almost simultaneous rhythm will have the audience cheering until the last skydiver lands. Swooping Exhibition Swooping truly shows how far parachute equipment has come over the years. Swooping is gliding a high performance parachute across the ground or water for long distances, generally a slalom type course, to show the skill of the canopy pilot. The exhibition will have some of the top swooping demo jumpers in both individual and team exhibitions. Accuracy Competition Accuracy goes way back in our history but didn’t get the recognition it deserved until the Sixth World Parachuting Championships held for the first time in the U.S. at Orange, MA. Accuracy canopies in those days were modified military surplus equipment with very little steerability. Today, high performance accuracy canopies and the skill of jumpers make for exciting and competitive accuracy contests. Skydiving Demonstrations Precision skydiving demos the world famous Army Parachute Team (Golden Knights) and the Air Force Academy Parachute Team. Wingsuit Flying Exhibition Grand finale and tribute to Joe Kittinger wingsuit flying truly exhibits the dream of human flight. Ten to 15 of the premier wingsuit flyers in the world will fly formations across the sky with smoke to add to the effect of this spectacular jump. Source - http://www.skydivingmuseum.org/
-
 It is no secret that skydiving is bad for the environment, it doesn't take rocket science to figure out each load is using fossil fuel which is essentially damaging to the environment. Many companies, people and organizations around the world continue to try become more 'green' in an attempt to slow down emissions, an initiative which has been strongly inspired by the global warming buzz which has been increasingly present over the past decade or so. Skydiving has been put on the list of most environmentally damaging hobbies/sports activities a few times, this because of the fuel used in each load. Though it's certainly not that black and white, and one has to look at little bit deeper, down to that layer of thought called logic. To quote a member of the dropzone forums in an environmental thread. "While skydiving may consume more fuel per participant then, say, soccer. He (the writer of the article that the thread is discussing) ignores the fuel consumed by the millions of fans who drive to soccer stadiums around the world every week. Therefore, the impact of soccer as a whole, makes skydiving look like a drop in the bucket." Let's quickly look at some numbers and see just how 'bad' skydiving is in comparison to other sporting events. In soccer for example, the world’s largest spectator sport- stadiums can hold from 40 000 to in excess of 100 000 spectators, and often these stadiums are full. The FIFA World Cup this year is in South Africa, and the South African chief organizer of the World Cup is suggesting a possible 300 000 foreign visitors. Including flights to the country, local flights between games and transport that's a lot of fossil fuel! This is of course just one example of a sport where the transportation of the spectators seems to outweigh the emissions of skydiving. The fact that skydiving is an activity which is based around aeroplanes often tends to trigger people into thinking that conventional sports are a lot less damaging to the environment. But it is important to take into account the details and nature of each activity and not just look at which one appears at first glance to be damaging. Trying to become more environmentally aware does not mean that one must stop all activities that are harmful to the environment, because with that logic one would likely never leave their room. It's about trying to make a difference, looking for greener ways to continue what you're currently doing. There will be times when you will have to sacrifice comfort should you want to become more environmentally friendly, though this is a personal choice you should make on your own. With that said; There are dropzones who are getting into the green swing of things and attempting to cut their emissions the best they can, while at times positively enhancing the dropzone as well. Skydive Lake Wanaka is just one dropzone who has recently purchased a P-750 X-Stol jumpship. They stated in a press release they have upgraded their current Cresco to the Cresco P-750 in an attempt to cut down on the amount of loads done per day by increasing the size of their aircraft and doubling the amount of possible passengers per load. This is just one case where a small investment allows for progressive environmental support while at the same time increasing the quality of the dropzone. The P-750 is not only larger than the current Cresco, but it is more comfortable, has larger windows and a quieter engine. The current Cresco has an average fuel consumption of 180 litres/h while the P-750 X-Stol has an average fuel consumption of 192 litres/h, an increase of just 12 litres an hour while being able to hold twice the amount of passengers.
 -
When I started skydiving round parachutes were the only parachutes available. The landing under a round canopy had a high straight down component. Although Para Commanders had a noticeable forward speed under no wind conditions, landing in winds over 10 mph were again straight down. Due to straight down landings most injuries were to the ankles because one tended to sit down on the ankles during a less than perfect timing of the landing techniques required by round parachutes. Use of the Parachute Landing Fall (PLF) greatly reduced the extent and severity of landing injuries. Virtually all successful skydivers were experts at PLFs because not every landing was executed perfectly, no matter how many jumps one had, and sooner or later one had to land a round reserve. In the classroom it required a block of at least two hours to teach landing the parachute because so much of the time was devoted to teaching an actual PLF. The complete PLF technique is not a natural, readily apparent procedure. During the actual jump about half of the students would perform a PLF and the other half wouldn’t no matter how much time and practice was spent on PLFs. The injury rate was quite high. About 1 in 20 first jump students would suffer some type of ankle injury. With the advent of square parachutes, and particularly with the advent of placing students under square parachutes, the landing injuries changed. Each experienced person reading this article will realize that the injuries from landings that we see today are not limited to ankles. This is because the parachute is moving the jumper across the ground in almost all circumstances. However, there are cases were a person would be descending straight down even today. A high or rapid or deep flare by a student would be one example. In this case the PLF position for landing would definitely influence the ability of the student to walk away from their mistake. In my opinion there are instances when use of a PLF for a botched landing is NOT beneficial to the jumper. A downwind landing is such an instance. The PLF introduces a roll and a square parachute introduces a large amount of speed. For the sake of this example, assume the wind is blowing at ten mph. The jumper has made a mistake and is landing downwind. He/she has the presence of mind to have the toggles at his/her ribs (half flight) for an air speed of ten mph and a ground speed of 20 mph. Please bear with me for the easy math. 20 mph = 20 mph X 5280 ft/hr = 105,600 ft/hr 105,600 ft/hr = 105,600 ft/hr divided by 60 minutes/hour = 1,760 ft/min 1,760 ft/min = 1,760 ft/min divided by 60 sec/min = 29.33 ft/second At 20 mph ground speed a person is moving 29.33 ft per second across the ground. At half flight the downward speed (3 to 5 mph) would be somewhere between 4.4 ft/sec and 7.33 ft/sec. I believe that in this example the best outcome for the jumper would be to try to absorb as much of the initial downward velocity as possible with their legs (knees bent and pressed tightly together) and then NOT ATTEMPT A PLF. The danger inherent to a high speed roll/tumble is a direct result of the laws of physics. An example using a cylinder will illustrate the principle. I am 52 inches around the shoulders so let’s talk about a perfectly round cylinder, 52 inches in circumference, moving in the air just above the ground and oriented perpendicular to the line of flight. At touchdown the cylinder is going to pick up a rotational (angular) velocity based upon the speed across the ground (linear velocity) divided by the circumference of the cylinder. Excluding friction, which will slow the cylinder by scraping, the cylinder will initially roll across the ground at 29.33 ft/sec divided by 52” (circumference) per rotation. 52 inches divided by 12 inches per foot = 4.33 feet (circumference) 29.33 ft/sec divided by 4.33 ft / rotation = 6.77 ROTATIONS PER SECOND!!! If this seems quite a lot, it is. However, this is why occupants of a rolling vehicle are thrown so far from the vehicle in a rollover car accident (buckle up?). In the rollover case the rotational speed (angular velocity) of the vehicle rolling is translated to the linear velocity of the thrown body. The thrown objects, including unbuckled occupants, are thrown hundreds of feet. Returning to the skydiver, I am not a perfect cylinder. I am more of an imperfect ellipse (oval) seen from above. This is not to my benefit in a rolling landing as the ground (not perfectly smooth) will have a tendency to turn me into a round object by attempting to break off my protrusions (shoulders, arms, knees, etc.) This is complicated by the fact that the PLF was developed using round parachutes which did not have flare capability. As such the arms in a round canopy PLF were above the head, elbows bent and cushioning the head from the sides. This positioning essentially extends the arms along the long axis of the cylinder. With a square parachute our hands are down at our sides (hopefully) controlling the flare. During the rotation of a PLF, and particularly a rotation of 6.77 rpm, the hands and arms are thus exposed to quite a bit of trauma due to impact with the ground, more than once, as the roll proceeds. What one hopes for is the best case scenario where the jumper is rolling from shoulder to shoulder across the ground. The worst case scenario would be tumbling head to toe across the ground. Unless one is a trained gymnast this would expose the head and neck to several impacts with the ground. A real life roll/tumble would probably fall somewhere between these two extremes. At a rotational speed of 6.77 rpm a PLF would risk head and neck injury. At a rotational speed of 6.77 rpm, even a perfect PLF has great risk to shoulders, arms, hips and legs. There is a solution to this downwind landing possibility. It is easy to train and easily understood by newcomers and experienced skydivers alike. The simplest way to prepare for as many landing scenarios as possible is to assume the PLF position, fly the parachute and slide on one hip in the event of a forward motion, high speed landing. I teach our students to envision holding a dollar bill between their knees and squeezing a quarter between their glutes (“feet and knees, dollar and a quarter”). Actually doing so puts one into the PLF position. When the person discovers a downwind mistake has been made, he/she should assume this PLF position. At touch down the jumper should try to absorb as much as possible of the downward impact with their feet but lean back in the harness. Under no circumstances should the person allow themselves to be thrown head first. The jumper wants to stay on their feet as long as possible, tending to sitting down. As the person sits down he/she wants to transition (during the squat) onto a hip. One does not want to impact directly onto the butt. The spine will tolerate torsion (bending) but very little compression. Sitting down directly onto the butt could cause spinal problems on its own (disks and vertebrae). Absorbing the actual butt touchdown with the hip will allow the spine to flex. Hitting a rock with the tailbone while sliding across the ground could be quite painful as a likely result is a cracked tailbone. Hitting a rock with the hip while sliding across the ground might possibly bruise the hip, an easier recovery than any spinal injury. The jumper should perform a baseball slide into second base ensuring that they remain sliding feet first. The person will get dirty. Done properly, one may see damage to the leg strap cover on the hip, but a dirty/torn jumpsuit and/or a dirty/scraped hip cover will be all that one sees. During a proper landing (into the wind) and under reasonable conditions, if a person is in a PLF position (feet and knees, dollar and a quarter) accompanied by a flare anywhere near half–flight, the parachute will lay the student down in the first half of a PLF. This is all that is necessary with a properly sized square canopy. The “lay down” is a result of the fact that most students are not true into the wind at touchdown and thus the square parachute almost always imparts some degree of forward AND sideward motion to the student. The occurrence of downwind landings is relatively rare. However, bear in mind that most of these are done by a jumper off student status (off radio assistance). This person has received very little if any formal instruction since the first solo landing class. So the technique must be simple to learn, retain and execute months after the initial training. Since I began teaching this concept, decades ago, I have not had a single jumper injury related to downwind landings when my advice was put into practice. My motivation for writing this article comes from the words that I hear when traveling to other drop zones and the words that I read in articles such as “Incident Reports”, “…you should have done a PLF”. This is not always the case, particularly with today’s parachutes. A PLF is no longer a panacea for all conditions. I also want to point out that, in my opinion, the instructor showing a first jump student a PLF accomplishes nothing at all. Having each student perform a PLF on the ground is no better. For a person to learn a PLF requires repetitions by the student, MANY repetitions, from an elevated platform. A person or publication telling anyone that he/she should have done a PLF, which the person has never actually learned, is not accomplishing what the student needed and the knowledge that the publication is trying to disseminate.
-
Although there are many ways to improve one’s accuracy in parachuting, I have found no better way than flying a consistent pattern. By connecting a series of invisible points in the sky, “Altitude-Location-Checkpoints” as I call them, we can create a consistent flight path that makes us more predictable in the air, as well as significantly increasing our chances of landing on target. The typical pattern, made up of three distinct turn points, I will now argue is not quite enough to get to the target with the consistency we are looking for. The standard flight pattern for a ram air parachute involves a downwind leg, a cross wind leg, and an into-the wind leg, also know as the final approach. This pattern is defined by three distinct turn points, “A” (Base to Final), “B” (Downwind to Base), and “C” (pattern entry point). It is true that if we are prepared to modify our approach in light of new information along the way, we can hit the target. But wouldn’t it be nice to get there without needing to modify our flight path, to just sail along and turn when the altitude is right? That is exactly what the inclusion of a fourth turn point does. The trouble with the standard pattern is that there is a good deal of guesswork when it comes to the length of the Base leg. Depending on the glide ratio of the parachute, the location of the turn to Base leg will vary widely. The better the relative glide ratio, the farther the turn to Base needs to be from the target. Our ability to adapt to this changing environment is spotty at best, and often requires substantial correction along the way. This creates traffic conflicts, as well as varying airspeed and decent rate, making life far more difficult for us, and for the canopies behind us. In most cases, the length of the Base Leg needs to be longer than we think. This becomes an even more important issue for swoopers setting themselves up for a high speed approach. If the length of the Base Leg is incorrect, the pilot is forced to either float in the brakes or “S-Turn” prior to the initiation of the dive. This has consequences to the approach, even if they manage to reach the Initiation Point at the correct altitude. If they are flying significantly faster than usual when they arrive at the initiation point, they may lose much less altitude in the turn due to the increased front riser pressure upon initiation. If they are flying significantly slower than usual, they may lose a much greater amount of altitude in the turn, and find themselves hooking into the ground. It is my experience that, aside from the altitude of the Initiation, the selection of the “B” point is the most important aspect of a high speed approach. If we simply add another checkpoint prior to the entry into the Downwind Leg, we can take the guessing out of the process. Assuming that the turn points are equidistant in altitude (300, 600 and 900 feet), we can simply add another unit above the original pattern entry to create a fourth, or “D” point, precisely on the wind-line, upwind of the target. What this does is, it creates a Pre-Base Leg, which shows us exactly how long the Base Leg needs to be. In other words, if the altitude between the points is 300 feet, the “D” point is at 1200 feet. The beauty of the data that this “D” point brings us is, we discover the exact length of the base leg without choosing the precise location of the “B” point prior to exit. This means that we can fly this pattern at a new drop zone, or when we are landing off, and learn where the altitude-location-checkpoints are for that specific landing area. It doesn’t help us with the “depth” of the pattern points, but it puts us in the ballpark, assuming that we have a rough idea of our canopy’s glide ratio. When the winds pick up, this method still works perfectly well. The crab angle on the Pre-Base Leg is equivalent to the angle of crab on the Base Leg. Note that the horizontal distance of the offset from the target on the downwind leg on a windy day is exactly the same as it would be on a no wind day (A to B = Anw to Bnw). This is only true if we do not compensate for the side-slip of our ground track due to the crosswind legs. However, even when we do choose to compensate for diagonal crabbing on the base leg and create a “Holding Crab”, if we create the same crab angle on the Pre-Base Leg, we end up on the perfect final approach despite the complex situation. This is easily accomplished by simply making our goal to fly a box pattern on the ground, flying our Pre-Base and Base Legs perpendicular to the wind-line. Also note that the length of the base leg is longer on the No Wind condition than it is on a windy day on which we perform a Holding Crab on the crosswind legs. This is due to the reduced groundspeed when in a Holding Crab, and the diminished glide ratio that comes as a result of it. If you aren’t pointed where you are going, you will not move there quite as quickly. This method assumes something that many canopy pilots do not have: a trustworthy altimeter. A standard dial-type, analog altimeter is not sufficient to give us the kind of accuracy we are looking for. Even the digital dial-type is not usually graded in such a way that we can distinguish units of one hundred feet or less. These are freefall altimeters. For the precise data required by today’s canopy pilots, we need digital altimeters with digital read-outs. Even better, many of us have found, is the heads-up advantage of an audible altimeter designed for canopy flight such as the Optima and Neptune. If you have an audible alert telling you where you are, it is far easier to keep your eyes looking outside the cockpit and on the action that may require your instantaneous reactions. All that being said, your eyes have ultimate veto power. If things do not look right, your instruments must be ignored. Too many skydivers have hit the ground due to complete faith in their instruments that let them down due to mechanical problems, battery issues or some unconsidered technical malfunction. Assuming that you use this accuracy technique the way it was intended, and you notice what is happening as it is happening, you can take a huge step forward in consistently hitting your target runway. It will take a while to dial-in your approach so that you actually hit the target, but the target is always a secondary goal to hitting the centerline of the runway and turning to final at a reasonable altitude. If you plan your pattern well, using four distinct points along the way, you can change what you are capable of handling as a canopy pilot. Not only will you feel better about yourself, you will increase the likelihood that you will live a long, healthy life. That, of course, is the mark of a great skydiver. In addition to being a highly experienced skydiver with over 14,000 jumps, Brian Germain is the author of several books including The Parachute and Its Pilot, Transcending Fear, Vertical Journey, and Green Light. He is currently designing canopies for Aerodyne Research, and offers canopy flight courses worldwide. For more about Brian’s Books, Seminars and Parachutes, visit his websites: www.BigAirSportz.com and www.TranscendingFear.com
-
Yes, I know who you're talking about. It is these crazy guys, who jump out of perfectly good aircraft with the bunch of ropes and fabric in their backpack. The only reason why they are allowed to do this is the fact that the pilot wants to get rid of them. Badly. Having a cabin full of freaks which are laughing, kicking out the jokes only they can understand and giving each other high five from time to time... you know, I can understand the pilot. Some of these guys are so untolerable so the pilot makes them to get out in the middle of the way up (sometimes at 3,500 ft). The crazy bastards call this "hop and pop". Aha. Hop'n'pop. You know. Hop! And pilot turns the red lights. I believe this is because skydivers almost never listen to the pilot so he has to give them a visual cue. Most of them are still allowed to drive a car so the red light still rings the bell. Surprisingly, this bell tells them "the fun is about to begin"! Green light follows. Pop! The guy is popped from the plane. I suspect, sometimes, this happens not without a good kick to the ass from the humble bros and sisters. Why would they call it "pop" otherwise??? Then, there is always somebody who is curious if the pushed out guy got his lesson - you can always see a few heads out of the plane looking at the guy tumbling in the air. No, they had not been such freaks from the very beginning. In the beginning the innocent guys and girls were lured into the small room full of weird stuff: worn out harness containers hanging on the ceiling looking like just taken from a dead body, creepy plane cabin imitation, tables on the wheels with soft tops looking very... very... suspicious. The whole place looks like a mideval torture chamber. Then, during several hours they are asked to do a lot of strange things: hang in the harness and partially disconnect it from the hanging ropes, falling down like been hanged, assume strange poses on the soft table, fall and roll on the floor while other yelling "PLF, PLF!!!", memorize a lot of motions which doesn't make much sense for any decent person who got used mostly to the movement of glass with beer to the mouths. I think, "PLF" must be an abbreviation for Practice Leaning to the Floor. But why jump from the small stair for that??? All this is sometimes interrupted with the videos showing multiple ways how the parachute doesn't work. And such videos for some strange reason are supposed to be encouraging. No way! After a few hours, when the instructor ensured the guy is driven crazy enough already, they get with the student on the plane going up. While it is the beginning, no normal person is going to jump out of plane, but these bastards got a trick for it: one of them holds the poor guy on one side, another - on the other side and then they suggest "just to look at the prop". Yeah, they are trained well so it is easy to push the relaxed guy into the air. During the freefall their favorite joke is to tease the guy in the middle with quite inappropriate gestures. The most popular is the gesture which the Rome Ceasers showed "death to him" to the gladiators at the arena: big thumb down. Some other gesture is the way people in the Europe say "you're an ugly goat" - two fingers apart. When the student screams and kicks legs, they just tip the big thinger to the palm showing "shut up". And when they sick and tied of the guy, they point to him, which will mean "fuck off, pull now so we cannot see your ugly face any more around". Do you know why they give the guy the radio on the first jumps? They always say "it's a one way radio" but actually they enjoy listening to the screams of the student. It is obvious that after such a treatment the guy goes nuts completely and gets an inevitable desire to repeat. However, some of them reasonably try to get rid of instructors on the jump (who wants these freaks around, really???). The most popular ways are: don't give an exit count or exit in the middle of count, tumble like a bitch on the exit, hoping that the instructors will be lost, assuming the unusual positions in the freefall hoping the guys aside will not be able to hold on. Apparently, this almost never works – in the most successful cases the best achieved result could be the one instructor lost only. With the time, guy's craziness goes deeply and it is only one instructor needed to make him out of plane. To check that the process of madness goes well, instructor requires the guy to do weird things on the jump: put the head completely out of plane and look for aircrafts, roll and rotate while falling, try to hit the small piece of land while landing. The advancing on that way is almost completed when the guy decides to jump out of plane alone. However, after a few jumps alone almost all of them got a bit better and prefer to get out with a coach, trying to hang on him during the freefall. Obviously, it is safer to hang on something firm while in the air! They call it "docking". The progressing in that is recorded in the special (I believe, medical) sheet (white or yellow) and then submitted to the organization which tries to keep account of the sick bastards. The organization is named USPA which is apparently the abbreviation for US Psychiatric Advisory. In 25 jumps and when all the symptoms are listed, USPA classifies the guy and assign him a first "A" number in the sad history of sickness. The progressing classifications are: A - Almost Hopeless B - Better Be Avoided C - Completely Crazy D - Dreadfully Mad It took time for USPA to figure out exact symptoms of progressing from one category to another. However the common anomalies were noted and listed (like jumping into the water, jumping in the middle of the night etc.) It is noticed that many guys prefer to exit from aircraft not alone (some prefer to have as many jumpers as possible surrounding them). And this is a natural fear - and it is not a rare to see multiple jumpers hanging on each other in the sky. Sometimes, by chance, their formation looks even nice. However, within a minute they realize that hanging on the other guys don't help them from getting close to the earth and they break off and fly do the different directions, obviously scared. I personally saw 30 such guys at once, flying from each other as fast as they could. Some of them try to pretend nothing unusual happens and flying sitting - like they were at home on a sofa. Some prefer to have some roof over the head and flying head down. Anyway, all of them soon realize that something goes wrong. "Most probably", they think, "it is that heavy backpack drags me down to earth" and the obvious decision is to get rid of it. For some unknown reason all of them start with ripcord or BOC pilot chute... In a few seconds the parachute opens and now they have the desire not to get down to earth somehow satisfied. Poor bastards! They could have simply stayed in the plane instead! Any reasonable man can confirm that having as big umbrella as possible above you is safer under the open sky.Who know, what can fall from it on your head. Especially, when you are flying. So, obviously, the most experienced skydivers land with two parachutes over them. They call their parachute "canopy". "Canopy" must have came from Russian “konoplya” and in Russian it means "cannabis" - something that gets you high, which obviously is associated both with the parachute and the whole process itself. "Get high naturally!" - they say, - "Skydive!” Hmm... I think skydiving should be declared as a controlled substance too. Note, while under canopy these guys are very dangerous and do not hesitate to use their awful knives (designed in the best traditions of Jack the Ripper) if somebody else decided to join them. Even if another guy just wanted to chill out together! The separate branch of the symptoms is the animalizing. Some of these guys (and their number is progressing with the years) decide that they are not humans but the... birds. Yes, birds!!! I suspect birds flu has something to deal with it. They take on the bird-like costumes. Sure thing, somebody is making money on this heavy mania, selling the bird suites to them. Then they jump out of plane. Another proof of the animal-like anomaly is then they get and fly together. They call this "flocking" - what else needs to be said! Sure think, not all of them so unreasonable. There are some guys who recognize their “mental change” and do the best to make it safe. The best of them do not get on the plane to jump on awfully high altitude with heavy backpack stuffed with two parachutes. They know that it is safe to jump from low, unmoving object. They know that two canopies introduce exhaustingly big number of options: which to pull? So they jump from very reliable, unmoving, low bridges, buildings and cliffs. With one canopy only. These ones are obviously less crazy and the other skydivers call them BASE jumpers - they are nuts too, but only basically nuts. Yeah, and, of cause there are some guys who enjoys to see the normal people dropped from the plane. These are very smart and persuade the good citizens to do this, proving on the ground that there is nothing scary in that. "You even don't have to wear this heavy ugly backpack. I can do it for you. But put this harness on so my boss would not suspect anything." While in the plane, they sit behind the poor guy and, unexpectedly, grab his harness and tie up to his one. He get close... very close... to the guy or the girl. And I personally saw how they pushed the poor one to the aircraft exit in front of them, telling them: just cross your hands on your chest, there is nothing else you can do now... Yes, I was the one of the guys dropped out of plane that way. But this... hmm... close relationship doesn't last long - in 6-7 minutes they are on the ground, and giggling, seeing as normal people runs from them, screaming on their way. "They are excited!" they say. Yeah, right! If the guy doesn't run away - here we go, he is another candidate for AFF (see what I wrote about it before). Oh, yeah, AFF is obviously for Awfully Freaked Fella - the student. So, when you are going to marry a skydiver, don't even hope that he or she is going to be around you all the time. Sky and jumping will be the on the top of his/her list of priorities. And if you want to get to that list not far after sky, jumping, boogie, bonefire, beer, new container, try a wingsuit, new reserve, freeflying, freeflying jumpsuit, wind tunnel, night jump, audible alti, jump from balloon, big ways, CRW, hook turns, swooping, go to Florida to jump in winter, spend vacation on drop zone in New Zealand, high-altitude jumps, sleep sometimes, try weight, try that cool new canopy on boggie, jump from the cliff in grand canyon, dogs... then you have to become a skydiver too! Wanna have him or her around more often? It is simple. Do RW with them! Blue skies!
-
Managing Media on the Dropzone Whether for positive or negative reasons, every dropzone in the world should expect a visit from local news media at some point in time or another. This is a short guide to help you best understand how to manage modern media on the dropzone. For starters, understand that the media generally considers skydiving as an "extreme sport" so they're often willing to portray it from a perspective using terms like "dare-devils," "Adrenaline junkies," "thrill-seekers," and so forth. It's not necessary to encourage these labels; they'll exist anyway. Remember always, that any press is good press, but well-managed press is GREAT for the DZ and the sport. INVITING THE MEDIA TO AN EVENT AT THE DROPZONE If you've got an event at the dropzone, such as a celebrity jump, someone's Xthousandth, a war hero, multiple generations of a family, competitions, special guests, etc, you'll likely want to invite the media. It's not quite as easy as it may seem. Here are some rules and practices of etiquette that will enhance your chances of succeeding in bringing the media to the dropzone. -Send a short press release no further than four weeks out. Follow up two weeks out. Follow up one week out, and send a final release the day before the event. Press releases should NEVER be longer than one page. -Make sure the press release contains at least two contact phone numbers. At least one of those numbers should be an after-hours number. It should also CLEARLY state the date and time the event is taking place. -Include some action statements and if you're creative, you might consider generating one or two subtle headlines. "The Family that Jumps Together, Lands Together," "World-Record Skydiver Visits XXXX Dropzone," "Human Birdmen Flock to XXX Dropzone," etc. These headlines will almost assuredly not be used, but will spark the creativity of the reporter or editing staff, and most importantly, the assignments desk. -Have a place for the media at your dropzone. Assign a dropzone liason to stay with the media during the entire event. This person is not only there to answer any questions, but to also guide the media to safe areas during landings, help them to find the best angle with safety in mind (they'll almost always want the sun at the back of the camera operator), and more importantly, act as their friend during what is likely an unusual experience. It's a good idea to have cold bottled water on hand if it's a hot day. They're your guests, treat them as such. The person assigned to act as a media liason should be well-spoken and well-groomed. Articulation is very important. Remember, this person is representing YOUR dropzone and our sport to the masses. He/she may not appear on camera, but if he/she will appear on camera, be sure they're wearing clean, non-wrinkled clothing with neatly groomed hair. They should be able to start and complete a sentence without "ummmmm," or showing a lack of confidence. They should be able to smile and speak with a slowed cadence. If it's an exciting event, great. But fast speech is slurred in most instances, unless they're a trained speaker. They should know the language of "sound bites." Like it or not, the MOST airtime your event will receive is 2.5 minutes and that length of time is fairly rare. Being able to speak in concise, clear sentences will assure that you'll get maximum airtime, and likely increase the chances of the media wanting to return for future events. RULES OF ETIQUETTE -Don't send photos or video via email before the event. Send links to downloadables, links to photos, or make it clear that photos and video will be made available on the day of the event. -Don't ask a reporter if they received your email. -Don't ask for a copy of the story. If you want it badly enough, go get a copy for yourself. The reporter has other things to do. Your event is a big deal to you; to them...it's just another story. -Never provide gifts of any kind to reporters. It's bad form, and could be misconstrued. -Don't expect reporters to do tandems. If they ask, great. If not, don't push. Some reporters have clauses in their contracts that prevent them from doing anything considered to be a "high risk." You don't want to be known as the dropzone that broke the reporters leg or tailbone. -Don't call reporters during deadline hours. It's a good idea to ask a reporter when the best time to reach them might be. Don't repeatedly call; it may be seen as harassment. Don't be "that guy." -Don't spam every reporter at the media source. If you don't have a cultivated contact, send email to the City Desk or assignments editor. DEALING WITH THE MEDIA IN TIMES OF AN INCIDENT "If it bleeds, it leads." Period. That's ALWAYS the axiom of the news media. Deal with it. Death, mayhem, corruption make for more interesting stories that up ratings. Depending on the story, it can quickly go huge. Cases in point, my own incident went nationwide due to my small celebrity stature. Another case in point, the guy that dropped his paraplane into a crowd and injured six people, including small children. Both generally small stories, but mine occurred on a slow news day, and the paraplane story had great footage from an amatuer camera. Understand you can't stop this from occurring, and trying to keep the media away from injuries or fatalities only piques the interest and will make your dropzone look as though you've something to hide. You cannot win against the Fourth Estate. Deal with it. If you have a fatality or unusual incident, you should; -have someone pre-designated to speak to the press. This is critical, and this person hopefully has already rehearsed or has spoken to the press before. As previously mentioned, this person should be capable of articulate, intelligent speech. -NEVER speak off the record. Ever. There is no "Just between you and me" with reporters. Ever. Gossip is the fodder on which they eat. Shut your mouth. -Do not provide details about an incident; it's usually too early to provide details anyway, depending on how quickly the press arrives at your dropzone. This is not the time for some arrogant, ego-driven jackass to be promoting his authority on the subject of skydiving. Merely by appearing on camera will give an air of authority, and a brief sound bite is all that is needed. Later, we'll look at some general methods of speaking. -Do not allow the press to shoot images of any aftermath if possible. There are alternatives to managing this better, such as a Crisis Kit or EPK (Electronic Press Kit). Every dropzone should have one of these. -If you have footage of the incident occurring, the DZO, DZM, or S&TA; should be given a copy, and its usually a good idea to have the videographer turn over the original work so it doesn't show up on YouTube or similar. Bear in mind that any video may be retained by the police or investigators as evidence. Fatalities are treated as a crime scene in most areas. Help, don't hinder.Skydivers are our own worst enemies. Case in point, at the USPA Board of Directors meeting, I was informed that the FAA has watched several wingsuits buzzing tandems. They're watching. They've also watched videos of DZ's busting clouds and I'm aware of at least one DZ that was visited and ramped, simply due to a video of skydivers busting clouds. Keep a tight lid on footage of incidents and have someone worthy of responsibility and sound judgement decide what to do with the footage. This is why one reason I've encouraged my home DZ to institute a "Work for Hire." Tandem footage or hired aerial camera footage belongs to the DZ, not the camera flyer. -Keep statements short and as glib as possible. Here is an actual (shortened) transcript of a Dropzone Operator speaking to the press; "The guy was doing a low turn, he turned low with his toggles, turning too close to the ground. When the parachute turns close to the ground, it loses altitude and his body slammed into the ground. He made a mistake and he's now badly hurt. We'd talked to him about low turns before but he just kept doing them...." The DZ rep was still talking as the press cut back to the news room. In other words, he desperately needed to show his superior intelligence about the sport of skydiving and was reveling in his 15 minutes of fame. And wouldn't shut up. Not good. For anyone involved. Additionally, the end result of this poor presentation is that the skydiver ended up having his insurance company challenge various aspects of their payments, citing that he willfully put himself in a bad situation by turning low, and that he was negligent. Do you really want to put one of your buddies in that situation regardless of what may have occurred? Finally, if you're hot-headed, avoid being near the press. Incidents are emotional, and hot-heads and high emotions don't mix with the media. A recent incident had a skydiver become aggressive with a news camera. The news station gathered unflattering footage that may be trotted out whenever there is a skydiving incident, and the station has a prejudiced view of skydiving in general, simply because of an immature, emotional person that felt they needed to keep the media off the DZ. In the future, do you think the media will present pleasant, happy stories about skydiving? Keep these sorts of people away from the media. A better example (and a paraphrased version of another incident report); "We're not yet exactly certain what happened. All we know at this time is that unfortunately, one of our friends has been injured, and we won't know the cause until we talk to everyone who actually observed what occurred. We will be providing a full report of the incident to the USPA, and that report will be available to you as soon as we have it." Simple, short, and sweet. It doesn't degrade the skydiver, doesn't give the news a "push" to assure it meets the "bleed." And it's all true. Be brief and stay on point. You'll also get more questions. Answer them confidently, briefly, articulately. Don't be afraid to say "It's too early to know that," or "That's a great question, and we hope to have an answer very soon." Additionally, don't be afraid to say that "Skydiving is a high-risk activity, and sometimes accidents occur." If you do want or feel a need to provide details, keep them as factual and simple as possible, and explain that we train for these scenarios, etc. Remember, your dialog with a visual media reporter is a 'performance' as much as it is a dialog. Stay confident, look in one direction, avoid moving your eyes around. Try to avoid "uuhhh,,,, mmmmm,... weeeeellll,...and other verbal distractions. Just because you're the DZO or DZM doesn't mean you're the right person to speak to the media. Find that nice-looking, articulate guy or gal on the dropzone and have them represent you and your DZ. The media serves one purpose and one purpose only. They need to bring a story back to the station. DZO's, S&TA;'s, or media personnel at the DZ can shape the voice of the story, and help direct the flow of the story by being courteous, professional, and helpful. Or, they can create a bad image for the DZ and the sport by reacting badly. Just as you have a job on the DZ, the press has a job too. One way or another, they're going home with a story. Wouldn't you rather have a say in how that story is presented? BUILDING A CRISIS KIT/EPK A Crisis Kit or Electronic Press kit is a great tool for DZ's whether it's used for crisis management or event promotion. This kit is a DVD that contains: -Contact information and a headshot of the DZO, DZM, or other authorities for the DZ that are permitted to speak to the media. -A "fact" sheet of statistics related to skydiving. This is available from the USPA website. -Random video clips, well labeled, that show happy times in skydiving. Hoop jumps, tandems, RW, VRW, wingsuiting, etc are all good to include. These clips should not be more than :30 in length. These provide the media with cutaway shots, and will quell their desire to create more than the "real" story in the event of an incident. It also will help promote your DZ in a positive manner, regardless of what has brought the media to the dropzone. I recommend delivering in a .mxf format, high definition is preferable today. Any news station can open a Material eXchange Format file. DV is next best, preferably widescreen. -Contact information for the USPA, assuming you're a USPA dropzone. The USPA has a PR team there to support and help you. Provide them as a resource. Most savvy DZO's know that any press, good or bad, is good for business. However, if you can work with the media, provide them tools and assistance, make them feel welcome and appreciated regardless of their role on the DZ, they can become a weighty ally for your dropzone whether you're promoting a competition or just sponsoring an Easter Egg hunt. The media can be free advertising and provide a draw to your location. Used wisely, you can dramatically increase traffic around your dropzone. Blue skies and puffies, ~douglas
-
There I was, in the middle of a Utah winter, dreaming about jumping again. I’d recently finished editing a couple of instructional DVDs regarding wingsuiting, and those videos had sparked a new interest for me: I wanted to learn wingsuit flying in the upcoming jump season. My budget was tight, and the cost of a new wingsuit seemed high. “Why not build my own suit?” I wondered. My sewing skills were adequate for patching canopies, but that was the extent of my expertise. I’d been planning to work on sewing projects this winter… projects that would expand my knowledge of sewing. This was a logical step, I ventured. Surely building a wingsuit would help me in the seamster department, provide a suit for me to use in springtime, and keep my budget intact… it all appeared to be a fantastic idea. I went through a list of resources I had available: 1) A great DZO (Jack Guthrie) who would allow me use his sewing machines. 2) A good friend (Douglas Spotted Eagle) who would let me borrow a wingsuit for a while. Note: Neither Douglas nor I expected that “while” to be 4.5 months. 3) My girlfriend’s mother (Jane) works at a fabric store, and has extensive knowledge of available fabrics and parts such as zippers, snaps, etc. 4) A Wingsuit manufacturer (Tony Uragallo, of Tonysuits) Tony Uragallo of Tonysuits who was willing to answer some questions I had about wingsuit design and assembly. Tony’s input was key during a few points in this project. The first thing I did was take the borrowed wingsuit to Jane at Hi-Fashion Fabrics, in Grand Junction, CO. She inspected this Tonysuits Mach1 and helped me create a list of fabrics and parts necessary to build a replica. That day Jane was able to provide me with all the Parapac, Supplex, and Cordura I’d need, for about $225. Some parts, such as zippers, binding tape, snaps, and thread were purchased from other stores. Next step was creation of a pattern. I laid the borrowed Mach1 out flat on the floor and inspected the design. It became apparent that this design could be easily broken down into three main pieces: Right wing, Left wing, and body piece. Jane had donated some white basting material, which she thought would work well for the large pattern pieces I’d need. I started copying the body piece first: tracing the front skin and rear skin onto my pattern material. Much like the top and bottom skins of a ram-air parachute, these front and back skins would have ribs connecting them: providing an airfoil shape when inflated. The two skins were easy to trace and cut, but adding the ribs required some planning. Because these ribs were inside the model suit and therefore out of sight, I decided it was time to reach out to Tony Uragallo, designer of this suit. I explained to Tony that I desired to learn more about sewing, and this was a project for my learning. Tony said if this was the only suit I’d build, and if I’d promise not to begin manufacturing more of his design, he’d help me out. Tony provided key information about size and shapes I should use for ribs in all three wings: Tail wing, right wing, and left wing. I wish I could say that the project was a breeze from this point on, but there were two key points of sewing that I needed to learn. First: Thread tension in the sewing machine. I’d purchased 210 denier Parapac, and when I began sewing two layers of this light fabric together, the stitches would bunch together, causing each of my seams to shorten, thereby slightly changing the size of my pieces. You can see bunching in these seams, more severe in some areas than others. The thread tension needed to be very loose. I was nearing completion of the main body piece before I finally understood how to correct both top and bottom thread tensions in the sewing machine precisely. Second: Patterns must be laid out horizontally or vertically on Parapac material in order to make them hold their shapes symmetrically. I’d been thinking of how to maximize number of pieces that I could get from my pieces of Parapac, and so I’d placed the parts at odd angles on the fabric. Oops. This pattern should have been rotated such that it pointed straight up the What did this mean for my project? As I neared completion of the main body piece, and began attaching zippers from foot to throat, I saw the body was leaning hard to one side. It took me a while to figure out the issue. I knew all my pieces were cut symmetrically because I’d folded the front and back skins in half when cutting them… why were they no longer symmetrical? The body piece warped into an asymmetrical shape Finally it dawned on me that if I pulled one side of the body, it would stretch several inches. Pulling on the other side however wouldn’t yield much at all. This was because the threads of this fabric were not running straight across my pattern. The only way I could deal with this big error: wad up the body piece and start from scratch. At this point I was approx 25 hours into the wingsuit project. With these lessons in mind, my second body piece was built much faster. My patterns were already made, so the parts were quick to cut and mark. Since I was still relatively new to sewing, assembly did take me another 12 hours til completion of the main body piece. Thankfully this body piece was symmetrical after completion, and proper thread tension had been used throughout. Now for the arm wings. Tracing parts for the arm wings wasn’t nearly as simple as it had been for the body piece. There are quite a few curves and angles, which were difficult to duplicate when using a pre-assembled wing as the model. Another difficulty in the arm wings: Each rib shape and size was completely different from the others. You can see that each wing rib is unique. Creating these pieces takes time My leg wing had used identical ribs, because each rib was approximately the same length and height, creating a uniform symmetrical shape. Arm wing shapes for the Mach1 are much more complex than the leg wing, and use of CAD software would be necessary to create truly accurate patterns for this. After much painstaking measurement and pinning of my patterns, I was satisfied that I’d created a suitable set of patterns for my arm wings, close enough I believed to provide a fully functional wingsuit. The wing ribs are first sewn to the bottom skin, then top skin is attached at gripper Assembling of both arm wings took about 25 hours. There are air locks, zippers, inner sleeves, elastic, snaps, and binding tape involved. Next step is sewing top edges of wing ribs to the top skin, essentially “zipping up” from outside in With the right wing, left wing, and body piece assembled, I figured I was very close to completion. Then I learned how difficult it can be to create correctly sized booties, and to attach them in appropriate places on the legs of a suit. My first attempt at booties took 10 hours and failed to fit me. Those booties found their way to the trash can, and the second set took another 5 hours… these fit much better. Booties need to be made wider than the shoe, so that the shoe can slide in easily. After the booties were finally finished, I had only minor trim parts to finish, and final connection of all three pieces. Tony’s Mach1 design made it quick and painless for me to mount the wings: Tops of the wings zipped on (up and over the shoulder), and bottom of the wings required a simple straight seam, one running down the side of each leg. I tried the suit out while wearing a rig, and it fit quite nicely. However, I still needed a bit of training before I’d feel comfortable jumping out of an airplane with these wings attached. The suit fit, but I needed some more instruction before taking it to the skies.Photo by Dru Poma I’d already been through a First Flight Course with Scott Gray, and a refresher course with Scotty Burns, but both those classes had been several months ago. First I sat down in my living room & watched the FlockU DVD that I’d edited, Wingsuits 101, to refresh my memory. Next I called on my WS instructor friend, Douglas Spotted Eagle, and requested that he run me through all the ‘what-ifs’ (ie: what if I go upside down, what if I start spinning, what if I can’t find my handles). Douglas put me through all these scenarios, and finally I felt comfortable that I could handle any of these situations. The following day was gorgeous, with blue skies and warm weather over Skydive Utah. Douglas came along with me for my initial jump in this suit, and took a few photos. Boarding the plane requires some concentration when your feet are inhibited by a leg wing. Photo by Dru Poma Riding up in the plane reminded me of a night jump: all the training had been covered in detail on the ground, yet still I was nervous. A few minutes after takeoff, we were at altitude, with an open door awaiting our exit. I hopped out of the plane and counted “Jump one thousand, Wing one thousand”, then opened my wings. I could feel the positive pressure inside the wings.Holding my arms in place required little effort. Photo by dse All three wings inflated evenly, and the suit felt stable. Photo by dse Photo by dse I didn't keep my tail wing collapsed during deployment, resulting in line twistsPhoto by dse Douglas and I flew a left-hand box pattern, and I deployed at 5,000 ft. My giant grin was evidence to those who met me on the ground that my Mach1 replica had flown well and had provided great enjoyment. I’m looking forward to jumping this wingsuit many more times this summer so that I may learn more about the exciting discipline of wingsuiting. There are quite a few tricks I need to learn through practice, such as keeping my leg wing closed throughout deployment of my canopy. photo by Dru Poma When all was said and done, I’d spent over 100 hours planning, researching, buying parts, and building this wingsuit. Also, I’d spent about $350 on parts and equipment for this suit. A little math made me realize that if I’d worked a minimum wage job and spent 100 hours working it, I’d have been able to buy a new suit from the manufacturer with all options, would’ve received it much quicker, and would’ve spent the same. Would I recommend this project to anyone else? No way. Go buy a suit from a manufacturer and realize what a deal you’re getting! They may seem expensive at first, but once I understood the amount of R&D; that goes into each design, and the amount of customization required for each individual suit, to fit each owner’s body, I realized that the MSRPs for these suits are actually very reasonable compared to parts and labor combined, for building my own suit. Cost and time aside, I’m glad I built this wingsuit. My ability to sew improved exponentially as I worked with this project, and my understanding of how wingsuits function increased drastically. Chris Warnock is a TI, AFFI, Rigger, Canopy Coach, and videographer at Skydive Utah. Chris produced the "Canopy Control" DVD with Chris Gay for VASST. See him fly at the FreeFlock Utah Boogie in July, 2009.
-
I have spent much of my life studying parachute stability. It has become an obsession of sorts, spurred by a fairly sizable stint in a wheel chair- funny how that works. I have designed and built many, many canopies with the goal of creating collapse-proof canopy. I have failed. It is impossible. This is the case because, despite the best efforts of the designer to increase internal pressurization and dynamic stability, the canopy can still be flown badly and become unstable. This will always be so. The job then, falls on the educators, and on the pilots themselves to learn and rehearse the essential survival skills that increase the chances that the correct action will be taken in the spur of the moment. I stated in my original article on turbulence, entitled “Collapses and Turbulence”, that the key is to maintain lots and lots of airspeed and line tension. I still hold that this is generally the truth. However, upon re-examining the situation, I have realized that my perspective on the situation is based on my frame of reference. I fly sub-100 square foot cross-braced speed machine that falls out of the sky like a homesick bowling ball. I do not really represent the whole. The average-size parachute is 150-170 square feet in the civilian world, and much larger for students and military jumpers. In further exploring the issue from the perspective of lighter wing loading and larger parachutes, I have discovered that this is not necessarily best way to fly a larger canopy in chaotic air. Here is why this is so: If the parachute has a great deal of drag, i.e. a light wing-loading, thick airfoil or is a large parachute in general, the rules change. Such canopies are less capable of maintaining high speeds unless flown very aggressively. Due to the high drag variable at the canopy end of the drag equation (“Rag Drag”, as I call it) the excess airspeed makes the canopy itself want to retreat behind the jumper far enough to reduce the airspeed far below the unadulterated full flight speed. This momentarily increases the likelihood of a collapse. The parachute levels off in mid air, slows down, and for a brief moment, becomes vulnerable to collapse. Therefore, when flying a canopy with a short, powerful recover arc, aiming to increase the speed beyond full flight becomes a double-edged sword. If the timing is wrong, such as when leveling out high (prematurely), the situation can become very dangerous. The truth is, leveling off well above the ground is dangerous for any wing-loading, and can happen with any parachute due to an incomplete plan or an imperfect execution. Parachutes flown below one G, at speeds less than full flight speed tend to be more susceptible to collapse. So, if the pilot is quick with their "Surge-Prevention Input", (what paraglider pilots call "flying actively", the risk of collapse is significantly reduced as the negative pitch oscillations will be minimized, thereby diminishing the likelihood that the wing will reach a low enough angle of attack to actually achieve negative lift and dive toward the jumper (i.e. collapse and scare the daylights out of you). Given the fact that the only preventative or corrective response to a collapse is to stab the brakes as quickly as possible, the sooner the pilot responds to the forward surge, the less the input necessary to avoid or correct a collapse. Therefore, a canopy with a great deal of slack in the brake lines will require more motion on the part of the pilot to create any appreciable effect. This means that a canopy that is in full glide, with the toggles all the way up in the keepers and three inches of excess brake line trailing behind will take longer to see an increase in the angle of attack due to the control input than one with no slack in the brakes at all. So then the question is posed: “Do we shorten the brake lines on larger canopies to help the pilot prevent collapses?” The answer to this is no, we cannot. This will result in serious bucking during front riser input. It will also mean that following a few hundred jumps, the canopy will be in significant brakes when they think they are in full flight, due to their “lazy arms” pulling the tail down when they should be flying arms up. This will result in lower average airspeeds that will reduce the parachute’s flare power, as well as it’s penetration into the wind. This will also result in more oscillation and distortion in turbulence. The answer comes to us from our sisters and brothers in the paragliding world. They teach their students to hold a touch of tension on the brakes when flying through turbulence. The goal here is not to put on the brakes and deform the tail, but to simply take up the slack on the brake lines, in preparation for a 12-24 inch strike on the toggles to prevent a collapse. Some teach their students to hold about 5 lbs of pressure on the brakes, while others teach that we should hold no more than two inches below the “Feel Point”. Either way, taking the slack out of the brakes is like standing ready in the door, even when you can't see the count. So, on larger canopies, it appears that a light touch on the brakes may help prevent collapses. However, it is not because the canopy is more stable in this configuration, but simply that the pilot is more prepared to prevent the wing from surging forward in the pitch window. Once the wing has passed through that parcel of turbulent air, however, the job remains to regain the full flight airspeed, while maintaining positive G's. Letting the wing surge back into full flight too quickly can send the wing out of the frying pan and into the fire. Get it back to speed gently, but get back there as quickly as possible. These are opposing goals, so the actions of the pilot once again become pivotal, calling upon trained skills and acute attention to sensation. Ultimately, the best way to handle turbulence is to deny it battle. Despite what your ego is telling you, you already have enough jumps. I know you want more, but sometimes the best way to go is to sit on the ground and watch the inexperienced jumpers get experienced. Live to fly another day. Brian Germain Big Air Sportz www.bigairsportz.com
-
Skydiving has come a long way since the first (recorded) jump was made from a hot air balloon in 1797. Only being practiced as a special stunt on public events, it was far from a public sport at that point. The silk envelope used to safely descend from 3000 ft on that first jump wasn't much to look at in terms of design, but the design and materials used formed the basis for the parachute as we know it today. The military were the first to develop parachuting as an emergency escape procedure for balloon and aircraft pilots, and later as a means of delivering soldiers to the battlefield. In the 1960s, skydiving ventured outside its military use and started to become seen as a sport in its own right. As the sport grew, so did the research and development of the materials used. The harness, cutaway system and parachute itself underwent major changes and upgrades, resulting in the gear that we all now accept as commonplace as we exit the aircraft. Due to these advancements in the materials used and their design, our gear has actually passed the point where it is now safer than its end user. Getting into the sport Skydiving was once a sport which was considered pretty extreme in itself, but as the years went by, and due to the gear and teaching advancements, it became more and more safe, and was marketed as a sport for everyone. In the media, the growing attention for the more extreme disciplines and variations of our sport have led to a large group of people who no longer see the basic sport of skydiving itself as the goal, but rather as an intermediate training, or even an obstacle in the way of what they really want to do. These predetermined goals on what somebody wants to accomplish within the sport often form before or during a skydivers first few jumps. Not being a huge sport with millions of participants worldwide, we tend to enthusiastically take in new people, and sometimes pull them into our sport deeper and faster then they should be. With every year that goes by, people seem to be in more and more of a rush to jump with a video camera, downsize their canopy, learn to fly a wingsuit, freefly in bigger and bigger groups, fly head down straight from AFF and starting BASE jumping with the bare minimum, if indeed any at all, experience. Sadly, the growing trend is to encourage this behavior, and try to facilitate them in getting there as soon as they can, instead of trying to make people understand the potential consequences of the rushed path they have chosen. Photo by Costyn van Dongen Video For many,, the media creates the image that a lot of the extreme variations of our sport are things you can take up as easy as a bungee jump from a local bridge, or a ride in a theme park. When people look at some of the 'big names' in our sport, its easy to forget almost all of them put in many hundreds, if not thousands of jumps to acquire the skills, precision and experience to excel in their field of expertise. The PD factory team didn’t start swooping on sub 100 sq/ft canopies straight from AFF, just as Loic Jean Albert didn’t start flying wingsuits within touching range of cliffs after his first skydive. There are many more examples like this within our sport. Here, I think, lies our biggest responsibility: Trying to help people new to this sport understand the work it takes to reach a certain level. Trying to teach them to respect and honor the effort people put in, and helping them understand that’s what they need to do to reach their goals based on skill, hard work and determination, not do everything as fast as they can and for a large part trusting on luck to come out of it alive. Often thinking their experience or exceptional abilities in other sports set them apart from normal people, allowing them to progress much faster and skip steps. While in truth, they are exactly the people the rules were made for. Photo by Costyn van Dongen Respect the rules As with any developing sport, rules and safety procedures were created over the years based on experience. Some of the rules and safety recommendations where literally written in blood. Learning lessons the hard way. These days many people new to the sport tend to look at these same rules as a means of holding them back. Stopping them from having the same fun as the people on the dropzone who have been jumping many, many years already. We live in a fast society. Everything has to be done quickly and with instant gratification. When we experienced jumpers start talking to young skydivers about certain goals, this can develop frustrated views on the sport for some of them. They get into a mindset where they feel skydiving isn’t fun until they have their A license, or how its isn’t really fun until they are swooping a small canopy, taking up BASE jumping or flying a wingsuit. If we go along with that line of thought, and acknowledge those statements, we then suddenly turn skydiving into a point of frustration for these newer jumpers. Instead of enjoying their first few hundred jumps, and slowly learning more and more about our sport, they start seeing it as a big waiting game where they can’t wait start jumping that same tiny rig and sub 100 sq/ft canopy as the cool guys who have been around a bit longer. Photo by Stefan Smith The road is more important than the destination. Allowing people to cut corners in reaching certain goals, is not only dangerous to them, but also undermining the authority of people teaching. It’s the image more experienced jumpers portray to the newer people in our sport that determines how they in turn, will approach the sport. As an example, being in a rush and boarding a plane without a pin check is not only dangerous to ourselves, it’s also a bad example to the kid fresh off AFF who's on the same load. The same goes for many aspects in our sport. Realize that it’s not just the people who give instruction that are teaching, it’s the way we as individual skydivers approach, talk about, and treat our sport that ultimately sets an example that the new flyers will follow.
-
I have noticed in my travels that many drop zones are a little slow these days. The student numbers are down, and we are blaming it on the economy. We have convinced ourselves that there is no way to get blood from a stone, and if the students feel broke, they will not want to spend the money to jump out of an airplane. I’m not buying it. It is true that the world is caught up in negative thinking. It is true that people are scared. But the question I would ask is this: What do people want more than anything in a time of worry? They want a feeling of release. They need to let go of their mundane perspective, filled with limitations, and do something that shifts them into a state of absolute joy. We have exactly what they need. So, now that we know we have the solution to all the world’s problems, we have a job to do. Unfortunately, just because someone needs something doesn’t necessarily mean they will take it. We need to get the horse to water, but we also need to make them want to drink. In other words, we need to inspire them. In order to do that, we need to tap into our own authentic inspiration. Do you remember what it is about skydiving that you love? If you are like me, there are a great many things. There is the social aspect; the people that skydive are the coolest bunch of weirdoes that I have ever met. If the world was made up of just skydivers, life on this planet would be a lot more fun. Then there is the unbridled euphoria that we experience when we are up there. Let’s face it, there are very few experiences that make a person feel like that. Beyond that, there is the never-ending process of learning that makes us realize that we are not done living. The more you learn, the more you want to learn. It is this kind of passion for more that draws a person out of the depressing feeling of “today is yesterday” into a deep desire to push forward into the exploration of what is possible. Once we reconnect with our true love of skydiving, all we need to do is share that feeling selflessly and fearlessly. There he goes again, droning on about fear. Yes, fear is the only thing that is holding us back from talking about skydiving with everyone we meet. Yes, part of what stops us from bringing it up is because we get a bit tired of the feeling of rejection when a die-hard whuffo gives us that eyes-rolled-back “you are crazy” look. If you think about it though, even that aversion has fear at its root. We are afraid of the feeling of rejection. If you hate being told that you are afraid, as I do, you will get off your ass and talk about skydiving to strangers. You will accept that you are in love with the whole thing, and come out of the closet. You know that this is the source of your joy. The more you talk about it, the happier you will be. Hang posters at work and hold informational meetings, perhaps with a few short videos and a real rig for them to see. Sit in a booth at a fair or university and talk about the experience to those who have not yet been there. You will be deeply glad you did. Then I often get the response: “what’s in it for me?” My DZ doesn’t have a finders-fee for bringing in new students. I’ll tell you what’s in it for you. You will get to be your higher self more often than before. You will get to keep your head in the clouds by talking about your true passion. As a secondary benefit, you will inevitably bring in more students. They will help to pay for the aircraft, the repairs to the hangar, the new bunkhouse at the DZ, the new fire pit, the new creeper-pad and even keep the jump prices reasonable despite rising gas prices. Imagine that. We can alter the worldwide trend toward fear-driven hoarding, at least in our little corner of the world. We have the antidote to fear and unhappiness. All we need to do is remember what we have, and share it. The world is in your hands. Get out there and be yourself! --BSG Transcending Fear Specialist Brian Germain is the author of several books, including Transcending Fear, Green Light Your Life, The Parachute and its Pilot, and Vertical Journey. His psychology background, combined with over 14,000 parachute jumps makes Brian uniquely qualified to discuss the important and pivotal topic that he refers to as “Adrenalin Management”. Learn more about Brian Germain here: www.GermainSeminars.com and here: www.CanopyFlightInstructor.com
-
Receiving an AFF Instructor rating is one of the pinnacle points of a skydiver’s continuing education and experience in the sport skydiving world, and has been a personal goal of mine for approximately two years. I was sure that the moment I had six hours of freefall time and my C license, I'd be able to knock this thing out fast. How wrong I was... This badge is likely the most expensive badge in the skydiving world When I first began skydiving, I was presented with the opportunity to spend some time in the tunnel at Perris, CA, with Ed Dickenson and Jay Stokes. I immediately took Ed up on his very generous offer to help me in my progression towards being a camera flyer. At 27 jumps, I entered the tunnel to learn some of the techniques I’d later use to fly with tandems, four-way, and fun jumpers. The video is hilarious.While I waited for Ed, we hung out at the school in Perris, and I overheard many conversations taking place between students and instructors. It was at that point I decided to become an instructor. Jay Stokes, Ed Dickenson, and Jack Guthrie all encouraged me to look towards that goal, yet six hours of freefall and a C license seemed so far away at that point, it quickly fell off the radar. I was having a hard time waiting for my 200th jump just so I could put on a camera anyway, let alone being an instructor.When I hit 200 jumps, I immediately got my coach rating. Alright! I was prepared to be unleashed on unsuspecting just-off-AFF-students.My first coach jump went great and filled me with a confidence that I had never before experienced. My third coach jump didn’t go so well with me finding myself very low, opening at an altitude that got me grounded for the weekend. Little lessons seemed to constantly present themselves. Although most of my wingsuit coach jumps have gone well, I once took a student with only 160 jumps. Bad decision; he had a cutaway (on a rig he'd borrowed from me) and I'm grateful that's all that occurred. I grounded myself for the weekend, and learned that lesson the hard way.It seems like most of us have stories like that; this one was my moment of enlightenment. Over the next two years opportunity to teach, be taught, sit in on teaching experiences, and grow within the sport continually presented themselves. Like many skydivers, I surely thought I “had it all” in the 500 jump range when in truth, I was merely beginning to understand how much more there was to learn. As one skydiver repeated over and over (and over), “You don’t know what you don’t know.” Well…he’s right. I was discovering how little I knew, how far I had to go, and I was finding myself on the road of discovery.Being part of the qualification process for the 71 Way Wingsuit World Record opened my eyes to what good wingsuit instruction could be. I gained information over the last year that is integral to the first flight process as well, taking instruction from Scott Campos, Scott Callantine, Sean Horton, Justin Shorb, Jeff Nebelkopf, Scotty Burns, and several other very experienced wingsuit coaches. Like most skydivers, I've experienced great coaching and not-so-great coaching in my skydiving progression. Being present when a friend was part of a tragic incident at the start of the year convinced me that I needed to know more about instruction, and I began looking at available AFF course opportunities. At the PIA conference, USPA President Jay Stokes informed me that Certification Unlimited (Jay’s instructional entity) was putting up a Coach and AFF course at Skydive Arizona in the following weeks. Timing was going to be tough, as I had some minor surgery scheduled, but I was excited to take advantage of the closeness of the opportunity, at one of my favorite dropzones, and in warm weather while it was freezing back home. Image Left to Right: Alex Chrouch, Jay Stokes, Craig Girard, Kelly Wolf, Nikos, Eliana Rodrigues, Douglas Spotted Eagle Arriving in Eloy on a Saturday, I was completely pumped to start my education then and there. After all, I have 1300 jumps, 19 hours of freefall time in a couple of years, so this was going to be a fun cakewalk, right? I mean, I’ve got more than three times the requisite hours, lots of experience teaching, how hard could it really be? I’d taught parts of many First Jump Courses, taught many wingsuit students, and sat in on several courses. I knew I was ready. How incorrect my thought process would prove to be. Jay began with the syllabus and schedule for the course. It was daunting, but still appeared to be not insurmountable. We did a bit of class work that night but the real class began in earnest Sunday morning at 8:00 a.m. with the dew wet on the grass, sunrise barely behind us, and no coffee in sight, Jay smacked the class between the eyes with a number of videos that showed why the AFF program is so important, why the training would be very precise, and why each jump would be rated with “Satisfactory/Unsatisfactory” with no grey areas. “I’d bust my own mother if she wasn’t doing it right” is something we’d occasionally hear. And I believe it, but wasn’t intimidated by the concept. In fact, the only thing that had me intimidated was learning that repeat World Champions Craig Girard and Eliana Rodriguez were in my class. It’s somewhat difficult for a Hyundai to shine when parked between two Ferrari’s, right? I knew I’d nail this stuff in a heartbeat. The written test was a cakewalk, just missing one question. And that question used math. To say “I suck at math” would be akin to suggesting that “Omar is an OK skydiver.”I use a calculator for two plus two. True story. The ground training process is specific, but I’m used to this stuff, it’s pretty basic if you have the program down (thanks TDog, for providing some good pointers).Passing the written test indeed was a cakewalk compared to what came next... the in-air practicals. Game-on, kids….We were assured the first jump would be our one opportunity to experience a “good student practice jump” where the student would behave and do essentially everything instructed, exactly as instructed.True to his word, Jay jumped like a perfect student. I was on the main side, Alex on reserve side.The jump went well from the Otter; no exit problems, the student responded perfectly to my signals, even if I was a little amped and anxious on this first jump. I thought Alex and I were a solid team. Suffice it to say that Alex did an outstanding job of flying his slot, keeping eye contact with his partner (me) and of doing his part in keeping our “student” corralled.Next jump, Jay paired me and a different partner with Kelly, a newly-minted AFF Instructor Evaluator.She went out the door with legs both bent forward at unique angles, arms in every direction but straight forward, and the only guarantee we had was that she wouldn’t roll onto her back during this practice jump. Manhandling her into a level position without punching her required a great deal of strength. My partner lost his grip, floated up, and next thing I knew, I was alone with my student. I wasn’t going to let her go, except I was required to. And did so.She flew away, turning like a propeller just starting up and gathering speed as she backslid, turned, and orbited. I knew I had fewer than 15 seconds to catch her (which sounds like an eternity, but in truth, it’s the blink of an eye for the second jump as an AFFI Candidate). I caught up and had her blocked in a few short moments, but those same moments seemed like an eternity in themselves. She grinned and decided to go the other way. I think what troubled me wasn’t that the grin was mischievious; it was evil, clearly payback for what she had been subjected to as an AFF candidate. Cruel, cold, calculated evil. But we were having fun, right? My partner was floaty, at least 20’ up and 20’ out from where our student was spinning, but he did eventually make it most of the way back in. I ended up on the reserve side after her spins and subsequent blocks, and so the dance at the bottom was a little different; it was my first experience with dancing on the left. I pulled the handle, deploying my student and she looked at me with a grin that made the previous evil smile appear to be innocent; I’d failed to ride through the actual deployment. The triumph I’d felt at properly feeling the rhythm and cadence of the dance evaporated like palm sweat in a 120 mph wind. Moving on before I exaggerate more than I already am….let’s look at the third jump of the afternoon. It was beautiful. Stunning. The sort of sun and sky that Eloy is famous for, and it was about to be spoiled. This time, I had no partner and no one on whom to place blame for the carnage that was about to occur. Combat Wingsuiting, combat RW could not have prepared me for a single, main side exit in which my student extended arms straight forward, legs nearly as much so, almost as if she’d been laid over top of a fence to dry, face down. I muscled her so that she remained belly to earth and she obviously didn’t like that action very much. She immediately pretzeled her legs with the right leg looking like it was flying over a hurdle in a heat, and the other leg bent 45 degrees forward and bent again at the knee. It was like she was performing a classic freestyle position but on her belly instead of her toes pointing straight down. Arms were practically folded above her head, and it was all I could do to force an arch. Duh…throw a hand signal and there might not be quite so much force necessary…. Thumb down, she arched like a pro. “Today’s skydive is brought to you by the letter ‘U’” as she arched so hard that she plummeted. Thank heaven I hadn’t asked her to wear the lead. I don’t like lead much, and my fall rate range is pretty broad. All those tandems and AFF videos have helped. OK, she’s settled out. Calm, flying great, she gets a thumbs up and a terror-laced grin from her instructor. I give her signals to do a practice pull and toe taps. She does great and so therefore has earned a release. I released and she backslid from the moment I let go of her harness. Damn, that girl is fast, but so am I. I chased her with a side-slide, threw her a legs-out signal. Wow….look at her move forward! Faster than she was going backwards. Now, I’m orbiting and don’t even realize it until I’m looking at her butt in my windshield. So…forward I go, and out goes the hand signal for arch; I was behind her. She didn’t have a rear-view mirror so my only option was to slide sideways, slide my left hand under the BOC as I started to slide past, and toss her another “arch” symbol. Whew! She settled out….Mr Toad couldn’t have had more of his way with me than Kelly did on that skydive. And that was just the first day…. Variations on the theme make for a colorful tale; the ground experiences as we prepped to get into the aircraft were equally interesting but it would spoil the movie if I share too many of the instructor’s tricks as they acted the part of wayward students. Suffice it to say that they’re there to help you succeed, but also there to allow you to fail if you’re not on your toes and looking out for the best interests of the student at all times. The dives aren’t about you, they’re about being sure your student is getting the appropriate attentions and instruction at all times. I won’t bore you with further details of the skydives because they’re all about the same sort of story; carnage, deceit, evil appropriations of an examiner that demands you be able to drive forward in a sideslide while dropping like a stone to do an assisted rollover as they’re spinning with a maniacal grin, laughing at the poor sap chasing them. It’s like “Hare and Hound” with Dr. Dimento as the wily rabbit, always one step ahead. Just as you catch up, they cooperate. In the moment you breathe a sigh of relief, they’re on to the next trick. Carly Simon going through my head with “Anticipation…” Lest you think I exaggerate too much, grab any AFF instructor who has had Jay’s program or anyone who Jay has taught. They’ll tell you I’m not kidding and if truth be told, I’m underselling the experience. Lemme share a small story; If you deploy your instructor/student “for real” by pulling their hackey, it’s an automatic Unsatisfactory and regardless of whether you did everything previous right or not, you weren’t successful on this skydive due to that one fairly significant factor. “Students” wear a simulated hackey that AFF candidates are required to pull at a specific point in the skydive. AFF Candidates will hold the simulated hackey handle til they meet up with the instructor on the ground.Jay didn’t care for the fact that I kept stuffing the hackey handle down my pants when it came time for my own deployment. On my last skydive, we’re standing in the door of the aircraft and my ‘student’ is going through “check out” and in his up/down/arch mode when I realize there is no simulated hackey visible on his main-side lateral.I’m screwed. I absolutely must deploy my student at the bottom of the skydive. I must pull the simulated hackey and show the instructor that I pulled and that I rode through the deployment. That small handle is the proof in the putting that I did exactly as I was trained to do. In other words, those handles are important. What to do, what to do? Worry hammered me throughout this skydive, my last in the series of eval dives. With a “Satisfactory” I’ll be able to catch my flight scheduled to leave Sky Harbor in about two hours. If I get an “Unsatisfactory,” I’m not going home and believe me, the price for that would be very high. I have commitments outside of skydiving, y’know? The point of do or die is one that lasts for about three seconds or 500 feet. I make my decision and dammit, I’m sticking to it. Maybe. I reach for my student’s leg gripper, look at my altimeter and begin the process. I’m counting down. By now, the “dance” is so freakin’ ingrained in my head that I’m doing it in my sleep, so much so that I’m convinced I did it perfectly on this skydive even though video shows I didn’t. Reaching over to where the simulated hackey was supposed to be, I spied it turned behind the lateral. Gave it a yank at the last possible moment, and proudly raised the simulated hackey as I ducked my head beneath his deployment hand (the last thing you want to experience is a bridle wrapping around your neck, or having the deploying hand knock you in the side of the head; it might be construed as interfering with the student). And rode out his deployment. The last thing I remember seeing as my instructor lifted above my head was his look of wide eyes, pointed finger, open mouth, and the smile on his face. We got to the ground, I watched my student land, and debriefed the skydive.Mirth in my instructor’s eyes, he says “Nice job. Now tell me what you didn't like about that skydive."A grin crossed his face told me he was well aware of the location of the simulated hackey. And, I knew I’d passed the program at that point.A wave of relief passed over me and I felt like falling to my knees and crying myself dehydrated, but I doubt any moisture would have come forward. I’d forgotten to rehydrate in my excitement of this last day. I was drained. I was pwn’d. I was reduced to jelly and tissue in this last moment. No way, no how would I have signed up for this experience had I really known what was in store for me, of this I was sure. All week. But… At the end of the week’s worth of mental, physical, and emotional torture, after hearing Lou Gossett in my subconscious screaming “I WANT YOUR D.O.R.!!!,” I’m a better skydiver. I’m a better person, and I’m a more informed instructor. I now know a little more about what I don’t know. As I said before, I'm now firmly on the road to discovery. "SATISFACTORY" or "UNSATISFACTORY", anyone who endures the process will come out a better person on the other side of the hellfire. I promise. I now have a new respect for those that have undergone this process before me. I understand why they are looked to with a unique sense of appreciation at every dropzone, I understand that the program is as much or more about teaching the next step in the educational process of qualified skydivers as it is about providing a license to teach the uninitiated. The AFF rating is a license to teach but it’s more a license to learn. In roughly 18 skydives, I learned a lot about what students can and will do. I learned how to best manage those situations with my new found abilities, and learned that if in 18 controlled scenarios I could learn this much, how much can I learn in a year, two years, five years of teaching a variety of students? I’m excited at the prospect. Respect and appreciation is due where it’s due, and I’ll take the opportunity to point out that as skydivers, we all have foundations made up of the bricks of those around us. Jack Guthrie, Jay Stokes, Ed Dickenson, Norman Kent, Mike McGowan, Debbie Z, Lance B, Kelly W, Joey, Chris, Phil, Blake, Craig, Eliana, Alex (I’ll jump with you any day, kid), Nikos, Jeff, Justin, Scotty, Scott, Chuck, friends on dropzone.com…and so many others are the bricks that have helped pave the road on which I have driven as a skydiver seeking more knowledge. I don’t know how to thank you all for the inspiration beyond paying it forward and being the best instructor I can be as you have been great instructors in my life. OK, enough lovefest. Thank you. It's the little things that make the difference on a skydive whether for the better or worse. Taking instructon from Norman Kent's camera course that taught me to anticipate movement, taking instruction from Ed in the tunnel that helped me develop a very high range of fall rate for a heavy person, and being part of numerous FJC and FFC courses helped me develop a comfortable ground patter and rhythm. All the pre-AFF prep you can do, I recommend you take the time to do it. You'll be glad you did. Whether you went through AFF, Static Line, IAD, take a moment to thank your instructors; they worked hard to get to where they are, to be at a point where they can intelligently and safely teach others, including yourself. It’s a big, dangerous world out there and instructors walked just a few feet ahead of you, checking to make sure it’s the best environment within which we all learn. Buy em’ a beer, give em a smile, even if it’s been a long time passed by. Receiving my rating from Jay Stokes, Certification Unlimited (and current President/USPA) In the event you’re wondering by now, students are a little less safe; I squeezed through my AFFI course. It’s an expensive patch and logbook endorsement, but one I urge towards anyone with an inkling to teach. I wouldn’t trade the experience for the world. Blue skies and puffies.... ~dse
-
From Student to the 100th Jump Making it to my first Nine-way and then suddenly being welcome into RW jumps During early 2005, I became interested in big ways while I was still a student skydiver. As a deaf person, I discovered the deafskydivers.org website, and they were planning an upcoming Deaf World Record event. They required 100 jumps and a B license to participate in the event. A daunting goal, this gave me the incentive to jump as often as I could at my home dropzone. At jump #99, the largest formation I had ever jumped in was a three-way. For my next jump, I set forth trying to get the biggest RW formation the drop zone would let me build. This became a nine-way, made mostly of Skydive Gananoque's instructors. For my 100th jump, we created a successful 9-way jump even though I funneled the exit! Before this jump, I had a hard time finding willing RW buddies. Word went out I'd accomplished a two-point nine-way. Now I was suddenly being invited into four-ways, five-ways, and six-ways, jump after jump! As a result, my learning experience experienced a big bang after this milestone jump. photo by Dave "Fuzzy" Hatherly Deaf World Record 2005 First experience being “cut” from a bigway event November 2005 was my first skydiving vacation. I flew to Florida to participate in Deaf World Record. It was like a deaf boogie, organized by the infamous Billy Vance and John Woo. Before the event, I went to Skyventure Orlando for the first time. I was floored to learn that John Woo had 20 hours of tunnel time, and is a World Team member having completed the 357-way World Record the previous year. He told me he had about 700 jumps. His story was an inspiration, even if it was an impossible dream at this time. Over the next few days, 20 of us jumped several attempts to break the 14-way2003 record. I learned a lot, and docked on several formations that exceeded the size of my 100th jump formation. Eventually, they had to give “the speech” to four jumpers to reduce subsequent attempts to 16. I was one of the people to be “cut” from the final formation. My feelings of disappointment disappeared as I witnessed the Deaf World Record from the ground, the subsequent first night jump, and giving my glowsticks away. The photo with the goofy smile tells the whole story of Deaf World Record 2005 experience. Attending Canada Big Way 2006 Failing to get to the 59-way level, but managing to get to the 30-way level I learned about the Canada Record during late 2005, and wanted to see if I could possibly qualify for this event. It seemed far fetched that I might participate in an 80-way but I kept my mind open. During 2006, I completed my first 20-ways during boogies when the Twin Otter visited my Cessna home dropzone. The dropzone told me to go and attend the Canada Record anyway, to 'try out' and see if I was good enough. At this event I had my first taste of big way education, such as stadiums, radials, sheep dogging, red zone. Alas, I was cut before I went past a 21-way. The event proceeded to complete a 59-way while I jumped a side 20-way camp for people who were cut from the main formation. I learned many valuable lessons, including from Guy Wright: Never look up when I fall low. After that advice, despite still being a sloppy flyer, I consistently recovered from falling low during these jumps. I made many bad impressions with Guy Wright, however, TK Hayes invited me to participate in a 20-way. Later, it became apparent there was too many jumpers, and it became two separate 30-ways instead. This became the consolation prize: My first multiple-plane formation load, and my first 30-way, that I completed, docking 14th. Guy Wright's Big Way Camp 2007 Struggle trying to stay current During 2007, I had a major downturn in my jumping frequency due to job and love life situation. Nonetheless, I attended a Guy Wright big way camp at the same dropzone as the Canada Big Way 2006 event. However, I got cut very early during the first day as I was very uncurrent and my previous impression at Canada Big Way 2006. In addition to my lack of currency, I had also gained weight, so I had much more difficulty falling slow, so I kept falling low too often! Discouraged, I gave up on big ways for the remainder of 2007 except for the easy 20-ways that occurred at Gananoque's Twin Otter boogies. Perris P3 Big Way Camp May 2008: Finally Persistence Wins! Finally reaching the 50-way level In the previous two years, I kept hearing about the famous “Perris Big Way Camps” as being the best camp to learn about big ways. I was getting current again and I worked a little over an hour of tunnel time and 20-way jumps previous to the camp. Finally having the prerequisite jumps, I attended the Perris big way camp for May 2008. They require 250 jumps with 50 jumps in the preceding 6 months. It was to become the best skydiving vacation ever. As a deaf jumper, I was very challenging to the Perris P3 team, because I often required a little more maintenance than everybody. Load organizers dislike high-maintenance jumpers, and it was always a challenge to make myself as low maintenance as possible. I was struggling trying to learn as much as possible, with the help of other jumper writing notes for me! I persisted and climbed my way through ever-bigger formations, and the final jumps on the final day, I was to become part of an outer weed whacker (“weed whacker of last resort”). On the third last jump, I fell low. On the second last jump, I successfully docked but others in my whacker did not make it. I approached a discouraged-looking guy and encouraged him, good job, you can still do it. He was a guy, very much like me, who was trying so hard. I gave him a good pat on the back and gave him the encouragement. The thrill of diving fast from a trail plane, and slowing down on time for a dock. I almost fell low on this jump, but I docked – DOCKED! Then I committed the sin of looking away from the center and to other jumpers docking on me. He was struggling, going to fall 1 foot low below me – but I made a last minute decision to drop my level slightly below, while still docked, and help catch him. We docked in a mutual grunt of effort. Right in the nick of time, the final person, about to go low too, caught the very end of the weed whacker and promptly pulled our entire whacker low again, a whole 2 feet below the formation level, with the chain becoming almost diagonal! However, we quickly leveled out without funneling. We DID IT. I was sloppy, the video showed my instability as I caught the other skydiver, but I felt I played “hero” on this jump – helping other new big way jumpers like myself complete the formation. While I was not ready to truly play the role of hero, I had so badly wanted the formation to be complete – and it was my job in the weed whacker of last resort to try to make it succeed. On the other hand, skydivers are supposed to look towards the center of formation. Despite this succeess, I still had lots to learn. But it was time to celebrate – I was so happy I was part of a complete 49-way formation! photo by T.C. Weatherford Perris P3 100-Way Camp September 2008 Now reaching the 100-way level By now, I was starting to think I might make it into the next World Team if I tried hard enough. I started to hear that the next World Record might be happening in year 2010. I then made a decision to gamble and “go for broke” for the Perris P3 September camps, and try to bring myself to the 100-way level. The Perris camps were organized as a 50-way camp the weekend prior and a 100-way camp the weekend after. I had only gotten a conditional invite for the 100-way camp based on the performance of my 50-way camp, but planned my vacation as if I was going to possibly be accepted into the 100-way. As a deaf skydiver, I hunted down interpreter help to try and decrease my maintenance level even further. Jan Meyer stepped up to the plate and offered to be my debrief-room interpreter and to double as a dedicated big way coach. I surpassed the performance of my previous Perris May 2008 visit. It worked – I qualified for the 100-way camp. The next week, I finally did my first 100-way as I had dreamed of doing someday. The Future... Even though I am still very much a relative newbie to bigways still yet to be part of an invitational big way event, I now have a new goal: Be part of The World Team within my lifetime, whether in 2010 or later! Although I now have enough experience to be invited to the smaller invitationals listed at the bigways.com site, I still have a long way to go, and lots yet to learn!
-
CANOPY FORMATION PARACHUTING - CF (Part 2)Part 1 may be read here Packing the Canopy You will want to pack your canopy for a CF jump in a way which will ensure that: it opens fast and reliably it opens on heading all canopies involved open with identical timingA good way to achieve this is to pack the main similar to a reserve canopy, as the requirements for a reserve opening are about the same. Indeed, many CF teams do so. Since there are different methods of reserve packing, it is recommended that all jumpers involved in a team or group should use the same packing method for safety reasons. Doing so reduces the probability of collisions and unintended different opening levels to make sure that each team member has an optimal set up for his way to the formation. Type of Exit and Exit OrderA good exit speed is 70 to 80 knots with little prop blast. Newcomers to CF will enjoy greater success if the jumpers exit one after another in the same way students perform “hop and pops” and remain stable. It is essential to remain in a symmetrical body position until the canopy is completely inflated to assure that the canopy opens on heading and continues flying straight until you want to fly your pattern towards the docking position. With experience comes a tighter exit timing, and this practice becomes even more important. If your canopy does not open on heading you can easily end up in a dangerous collision or at least in a bad position during the approach to the formation. Also, other jumpers can be disturbed as they try to avoid the errant canopy. In general you will exit in the order of your position in the formation. Competition teams might use different techniques to speed up the build of their first formation. TimingTeams with more experience will eventually develop an exit with two or three jumpers standing in the door, jumping with only very little delay, and pulling in sequence to create a perfect set up for the build of their first point. In this type of exit, the last jumper leaving the plane (front person in the door) deploys first. The next jumper deploys when he can see the beginning deployment of the jumper above. This leads to a set up with the lower canopy slightly in front, which creates a perfect set up for a final approach. Set-Up for Building the FormationIn most cases it makes sense if the person flying the Base sets up on heading, flying with a little brakes and slightly lower than the jumpers that will dock next. That gives the next jumpers the potential to fly to their docking position because altitude is our fuel. A good position for the final approach of a single canopy is slightly higher and to the side (perhaps slightly behind) of the canopy to dock, onflying parallel with it. The optimum setup of course depends on the flight characteristics of the formation to dock on. For docking on a fast sinking formation, it’s probable that the setup will be lower than for docking on a floaty formation. The necessary experience to estimate the perfect set up will only come with the jumper and quality of your jumps Body Position Fig2.1 To keep your canopy flying straight with even controls, body position must be symmetrical. Shoulders should be square and arms in a “box position” with legs slightly spread and bent as shown in the sketch of a stack. If you lift one leg from that position while stretching the other one your canopy will start to turn towards the stretched leg. If done with intention, this can be a useful tool. For example, a stair step formation might benefit from stretched-leg control. Bent legs also provide the potential to compensate for tension in a formation and to dampen oscillations. Reducing AltitudeWhen getting into the setup position for your final approach to the formation you may find yourself higher than desired (if your are too low or far behind you won’t be able to get into the formation). There are different ways to lose extra altitude without using much space. It always makes sense to stay in a small area because long distance movements take much more time. Additionally you may interfere with the waiting position of another jumper. Furthermore, you might have difficulties estimating your exact position. Below, you’ll find methods of losing altitude. Cross ControlsIf it is important to use very little space, you can easily lose altitude by using cross controls. That means you’ll pull down one front riser, then compensate the move your canopy would now make by applying the toggle on the opposite side. Because the canopy is being distorted it sinks and will pick up speed to the distorted side. The toggle action evens out this momentum so that the canopy ends up sinking in place, assuming that the right balance is applied. Doing so you can get into the desired set up position for your final approach without disturbing another jumper in his set up position close to the formation. Rear Riser StallA similar result can be achieved by performing a rear riser stall. To do so, you grab the connector links on your rear risers and pull them down carefully. This is not very hard to do. Because the main part of the lift is being created in the first third of the profile where the A- and B-lines are attached to the front risers, this is a fairly light pull.. At first, the canopy will begin glide flatter without losing much speed. This range can be useful if you find yourself far away from the drop zone on a down wind flight pattern and want to get as close to the DZ as possible. If l the risers are pulled down a little further, the canopy will smoothly begin to stall and sink very fast. This technique can help to lose a lot of altitude. However, it should be practiced with only two jumpers involved before being used in a big way jump. It is not recommended in a tight echelon as the canopy may come out of the stall bailing out to the side, and interfering with others in the lineup. Rear RiserIf you are too low and need to gain altitude on the way to your waiting position, or if you’ve gotten behind the formation, you can use very light pressure on both rear risers to fly a fatter path without losing much forward speed. This has to be done very carefully because it you pull them down too much you will lose speed and only millimeters further, end up in the rear riser stall previously mentioned. About the oldest technique to lose altitude is the “sashay.” The sashay begins with a radical toggle turn away from the formation and then a reverse movement as soon as the canopy has tilted to the side; this movement is stopped out with both toggles. It is not very efficient, utilizing a lot of area and you may lose track of your position relative to the formation. It takes a lot of practice to get good results with this radical maneuver. Over the TopAlso from rotations comes the “rotation over the top“. The move begins with going to deep brakes quickly. As soon as the canopy rocks back grab both front risers and quickly pull them down without letting go of your toggles. It takes less force than you might expect because if done at the right moment, the front riser pull will coincide with the canopy having almost no lift and no tension on the lines. Next, you riser down little further than your final destination, release the risers, and swoop into your docking position by using the toggles. Today some successful teams are using a combination of the two techniques mentioned above. However, these should be considered advanced skills, to be discussed in another article. Techniques for ApproachesThe most challenging part of a CF jump is the build of the initial two-way formation or the dock on a single canopy. Remember, a formation will usually not perform as well as a single parachute. Docking on a larger formation always gives you a little extra performance relative to the formation since you have a single canopy with all of its lift potential. Good technique(s) is/are required to dock with a single parachute of similar performance. That means you’ll need to gain some momentum when attempting to dock on a canopy flying by itself. The only way to do so is by setting up higher and not too far behind the canopy you’ll be docking with. The canopy to be docked upon should slightly hold brakes to make things easier. The docking jumper begins his approach setting from a position with his feet approximately at the level of the canopy he’s docking on; slightly behind or a little to the side. The approach is initiated by using front risers to pick up speed and controlling the direction of flight. Now pilot the canopy to a position slightly lower and slightly behind the final docking point. The final move is performed via toggles (reducing speed), swooping up to the desired level, and aiming the docking cell to the desired position (center cell for a stack or end cell for a stair step). It is essential not to have too much energy left when docking and also not to end up too low. If you end up too low the dock will fail. If you find yourself having too much left-over energy, you should abort the dock for safety reasons and use the potential energy to fly to a good position for a new setup and another attempt. Building the FormationsIn principle, there are only two or three ways of making approaches. Building a StackTo build a stack, the jumper who is docking sets up slightly behind and above the canopy he’s docking on while the jumper to be docked upon flies straight holding a little brakes. The lower canopy stays in brakes until the docking center cell has touched his back. If the dock is perfect and he has some experience, he can take foot grips hooking his feet behind the center lines. If not, he can release his toggles and grab the docking canopies nose get it into the right position and then take the foot grips. Having done so, the lower canopy pilot gets back on the toggles to control the formation. Never release the toggles before the docking canopy has actually touched you because if you do, your own canopy picks up speed and flies away from the canopy trying to dock. In any case it is important that he releases both toggles evenly to prevent the formation from spiraling. It is also very important that the docking pilot can see at least the lower legs of the jumper he’s docking on. Should the legs become shorter and shorter you need to add more brakes. It an absolute NO to pass under a jumper you intended to dock on. If you have the impression that this is about to happen you must abort the attempted approach by either stalling radically or turn away with one front riser pulled down. It can be extremely dangerous to fly underneath and in front of a formation because your burbles can cause canopies in the formation to collapse. Also you could lift up with the middle of your canopy under the jumper you wanted to dock on ending up in a wrap. That means if you perform any kind of dock on a formation you have to be in full control of your canopy at all times and able to abort if not. Otherwise you are not qualified to do CF jumps. Fig 2.2 If the docking canopy ends up higher than wanted, it’s not necessarily a problem. The docking jumper can park his canopy with his nose in the center against the lines of the top canopy and slide it down by moderately using his front risers until the top jumper is able to reach for his grips. Approaches to lower positions in a stack or plane will need a lower set up than for high positions because the formation begins to sink more with its size - especially the “plane” formation. Speed teams may still want to dock positions three and four from a higher position and perform a riser dock by aiming their slider to the jumpers feet instead of the center cell. Building a PlaneA plane formation begins with a stack. Next, the top jumper climbs down the center A-lines and once the slider has been reached, he now hooks his feet behind the front risers of the lower jumper. The lower jumper helps by putting on some brakes to increase the lift of his canopy. If the top jumper needs to pull himself down on the A-lines, it must be done with uniformity to prevent the formation from oscillating sideways. Building a StairstepThe Stairstep is the second basic type of formation. The technique for building a stairstep dock is similar to the techniques explained previously but because the Stairstep is far less solid than a stack or plane, everything has to be done with lighter input and greater precision. The set up for the final approach is slightly to the side of the formation. To make a clean straight and precise dock you’ll want to keep it relatively short with not too much potential. You may start with one canopy width to the side of your target canopy and your canopy slightly lower than the canopy to dock. The approach should be from the side rather than from behind so that the jumper to be docked upon has a good view of the line he wants to catch as well as remaining in the clean air to the side of the docking canopy. Also in this type of dock you should never get too low or lose sight of the target. The docking end cell should end up at the hip to the shoulder of the docked body. The docked jumper can now hook his outside foot behind the outside A-line of the docking canopy with his body staying outside the docking cell. If the grip taker should need to use a hand grip to guide the docking canopy to a good position for taking ther foot grip he has to be well aware to maintain his body position in the harness to prevent unwanted influence on the flight of his own canopy. The docking pilot puts on some outside front riser trim as soon as the top jumper has taken his grip to prevent his canopy from coming up on the opposite side. After having set his canopy by doing so he may release some of that trim or maybe even all of it. Sometimes it gives you enough trim to stretch the outside leg to keep the bottom canopy flying nicely. Sometimes no further trim is needed any more but still you should keep your hand on the outside front riser ready to apply trim again if needed. The set up for stairstep docks in lower positions may be somewhat lower. None-the-less be aware that a stairstep formation flies fast and flat compared to other formation types. If your setup is too low your docking time may become very long. The build of the stairstep, stack, or plane can of course also be done in reverse order with the lower canopy flying in little brakes and being the target and the top canopy flying the approach. The technique is referred to as the Top-Dock and will be explained with techniques of sequential CF later on. Flying in the FormationAs in free fall skydiving you have to keep on flying after you docked. In a stack for instance, especially in the bottom position, you need to make sure that your canopy does not get too light and floats up. All canopies should have slight tension on the center A-line to make the formation healthy. In a plane it is important that all cells of all canopies are inflated. If not the jumper in question can reinflate his closed cells by putting on some brakes. Perhaps he will also have to maintain some toggle trim to keep his canopy’s nose open. Also a jumper next to a closed cell can help by pulling the nose open. Good awareness is needed in formations with stairstep grips like stairsteps, diamonds or boxes. Especially jumpers in lower positions need to always keep their canopies from coming up or around. Possible techniques are: outside front riser trim asymmetrical leg position and inside toggle. Signals within the FormationTo signal information to other jumpers in the formation there are two ways. You can either shout a command by addressing the jumper with his name or use certain signs. In bigger formations it is more convenient in most cases to use signals instead of vocal communication to avoid noise and confusion. The signs and commands to use must be known well to everybody. In case of vocal information you must never use negative commands. If for instance you shout “don’t cut away!” and the other jumper misunderstands he will cut away. In this case you should have said “hold on!” for example. In large formations there are two very useful signals to the jumper below you: Twisting your foot sideways means the jumper whose canopy is on that foot needs to get lighter for example by putting on some brakes or easing the front riser pressure if possible. Shaking the foot vertically means get heavy which means put on some front riser pressure or signal further down if the jumper(s) below is (are) light on you as well. Piloting a FormationStack and plane formations always follow the top canopy and are controlled by the top jumper also called the pilot. The stair step needs more caution than the stack because it is connected less stable. Diamond formations act similar but in bigger formations the pilot might need some assistance by all the out side wing people to help keep the formation flying straight or to help turn the formation. Bigger diamonds are fairly inert. It takes some time to make a big diamond turn. The most attention is needed in stair steps. In a turning stair step the bottom jumper always needs to compensate the change in the flight characteristic of the turning stair step versus the straight flying one. If the formation is turning away from him he needs to release some of his outside front riser trim and if the formation turns towards him he needs to increase the trim on his outside riser. Because the links in a stairstep formation are similar to pivot points these formations need to be turned very carefully. Separating a FormationSeparating a formation needs at least as much attention as building one, especially for safety reasons. Also should it be done high enough. Bigger formations should be separated at 1.500m (5.000ft) and smaller ones at 900m (3.000ft). Small formations can be split in reverse order of building letting go one jumper after another. The jumper whose turn it is to go shouts the names of the ones holding him and they drop him. Then he clears the proximity of the formation immediately to give room for the next jumper to leave it. Larger formations in the shape of a diamond of up to 36 jumpers can be split by using a technique called STARBURST. The starburst is being started by the designated person calling “starburst! - starburst!” which is to be echoed through the formation. Then one person starts a count down calling “ok – ten, nine…..two, one, break!“ Everybody else joins the count loudly to make sure that everybody is able to hear it. On “one” everybody get his hands on the controls and on break lets go of the grips to fly out of the formation radially away from the center. Peter A. Pfalzgraf Rheingaustr. 24 12161 Berlin [email protected]
-
 By Ian Drennan I wasn't really sure what to expect when arriving at Deepwood Ranch in Deland for the PDFT Tryouts. So much of my skydiving career had been spent preparing for this moment, yet when it finally arrived I felt very unprepared. I can't deny that going into the event I was in competition mode, not sure what to expect, but sure I was going to give 100% no matter what they threw at us. Little did I know that this would feel, and be, nothing like a competition, and nothing like anything I'd ever experienced before... After a brief welcome by the PDFT we were all taken to a house where we were given free rein to divide our living space as we saw fit. The mood was good; everyone was excited, and nervous, as to what the coming days would bring. Surprisingly when it came to picking living space, most people gravitated towards the people they'd never met or had spent limited time with. There were of course, requirements for each area - thankfully our space was dubbed the "No Snoring" zone :) I had expected the atmosphere to be tense; there was so much unknown and so much riding on this event for each and every person there. Yet the mood was upbeat and encouraging - the tone for the week had been set. We woke on Tuesday morning, way earlier than any human should have to be awake (that's 6am for me... what can I say, I'm not a morning person!) - still, the rooms were abuzz with excitement and everyone anxiously scurried out to start the day. After breakfast the introductions began, lead by the PDFT and John LeBlanc (who blew off a meeting to spend more time with the group!). As the introductions progressed, each participant revealed more and more about their background, upbringing, and motivations behind pursuing this dream. This 3+ hour experience flew by as, surprisingly, people quickly took to a "heart on the sleeve" approach, laying out their innermost insecurities, fears, thoughts, and dreams.Once the introductions were done, we were assigned groups (picked by the PDFT) of 5 people. Each of the 3 teams was then assigned a task: prepare a group presentation on a set topic (each group had the same topic) within the hour, and each team member was required to spend an equal amount time speaking. This exercise quickly allowed groups to get a feel for personality dynamics within each team and, hopefully, learn to work as a group. Well, I can't speak behalf of the other groups, but Group 3 rocked the house :) I was lucky to be paired with a fantastic group of people, all bringing different strengths to the table. The groups were not just responsible for a single presentation, but rather were together for the week and assigned different duties for each day - dish washing, cooking, or grounds maintenance that would be done in between the scheduled activities for the day, and interviews. Tuesday night was brought to a close by the group’s first rock session. Much like the Native American Talking Stick tradition, this concept allowed people to voice opinions – uninterrupted - discussing themselves, their teams, the day, or anything that sprung to mind in a positive, or negative, fashion. Once again each individual surprised me with their honesty, and their ability to take constructive criticism. Around 11pm, after a long day, we packed it in and went back to the house - exhausted.....I don't think I've ever seen so many skydivers in bed at such an early time :) Wednesday we woke to poor weather, so the group took the opportunity to do their individual presentations. We were entertained with a variety of topics, from cooking, to building water towers, to snowboarding, juggling, fresca ball, and even how to hot-wire an airplane! Each member added their own personal flair. I think it was here that it really struck me what an amazing job the PDFT had done selecting the 15 members. I remember looking around and realizing how level the playing field was. Each individual was strong in different ways, and it was clear that the team could pick any 4 and still have a spectacular outcome. After the presentations, everyone blew off some energy by playing some of the newly introduced games or learning to juggle. It was quite a sight to behold. Group 3 took to cooking that evening, and with little deliberation began the cooking assembly line. Surprisingly, Travis Mills (from group 2) joined us in our food preparation. Travis, a onetime sous-chef, took the time to help us rapidly prepare our ingredients (that man is a chopping machine!!). I began to notice how well we were working together. As usual, after dinner, everyone sat around the fireplace, chatting, trading stories, etc. It was here that JC took it upon himself to introduce Zip-Zop. Every single person participated in the game (despite enormous suspicion), including Jay, Ian, and Shannon from the PDFT! I won't ruin any surprises, but needless to say - JC is a prankster....oh, and JC if you're reading this....I'm plotting my revenge... On Thursday we woke to beautiful weather. The energy levels were almost uncontainable....we were finally going to JUMP! The team had something special in store for us today: We were going to do a mini-competition. After a few practice rounds the competition started - interestingly enough, the mood wasn't competitive; it was supportive. I can't speak for others, but I've never felt so relaxed before. Each round was just downright fun. The highlight, for me at least, was the expression round - not an event I normally do well in, so needless to say, I was elated with the final outcome. After the competition it was back to chores where our group was to help Kim, the land owner, chop wood for his house (and our fire pit). It was here that what was happening really became clear to me. Our group was unable to audibly communicate, since Tommy D was using the chainsaw to cut wood. But somehow we still needed to work together to load up the truck and get a system going. We fumbled a bit the first few minutes, each struggling to find our place....but then, something happened: We began to draw on what we knew of each over the last few days and created yet another assembly line - seamlessly operating in unison. We actually got so efficient that we chopped, and loaded, and entire truck full of wood in 20 minutes all with minimal communication! Returning from the wood chopping experience, I was summoned to my interview. This was it, this was the moment to shine in front of the team, and give them every reason why I should be on the Expansion Team. I consider myself fortunate to have competed, and become friends, with the team before this day - yet it was still intimidating. I cannot imagine how some candidates, who'd never met any of them, felt at that table. The team was warm and welcoming though, and it felt far more like a discussion than an interview. Offering up direct questions and answers, I felt I represented myself well. I walked away with a smile thinking that good things were coming... and then it hit me, and it was like getting hit by a Mack truck. All these doubts entered my mind: "What if I get offered a slot, can I live up to the public expectation of a team member?"; "What if I just blew it?", etc. You see, in all my dreams of becoming a PDFT member, I'd actually never stopped to think what would happen if I actually got it. I know I wasn't the only one. I didn't have too long to dwell on my insecurities since the night's activities were about to start after dinner. This time JC once again had an icebreaker game. This one was more a mind game, and boy did he mess with my mind :) The rules of the game were simple: You had to figure out the rules of the game, and when you did you had to guide (but not tell) players who hadn't figured it out yet. Much to my frustration I wasn't getting it and, as more and more around me figured it out, my frustration grew. Fortunately, Ryan was the most frustrated and, in a fake temper tantrum, provided comic relief. It was now time for our Rock Session. The team once again kicked it off, providing examples of how negative, but constructive, criticism to other teammates. Surprisingly, the candidates sessions remained largely positive. It was a very emotional experience for everyone involved. Drained and filled with self-doubt, I headed to bed. Friday morning was the first morning all week, that no one was on time to breakfast. Mentally exhausted, and nervous, we gathered ourselves and headed out for the final day. The mood was definitely serious - we all knew what was happening today. We kicked off the day with a grueling exercise: We had to pick who we thought the new team should be, as well as a 'heart' team made up of 3 other people we'd love to fly with and then explain to everyone in a few short words, why we made the choices we did. It was here we got a tiny taste of what the PDFT was about to go through. It was incredibly tough to pick so few people from so many qualified people. In the end, after everyone's choices were vocalized, the choices were spread evenly among the group - this was definitely not going to be easy. Deciding to jump, each group got paired with a PDFT member and did a formation jump. The exercise was in trust, and it was here I noticed that I needed to be more trusting of my teammates in the air. Time was now out though and the PDFT needed to go and deliberate, and while they deliberated gave us carte blanche to jump and do whatever we wanted to, to blow off steam...and blow off steam we did :) I took the opportunity to work on my trust issues by encouraging everyone there to swoop me while I sat in a kayak on the pond - after all, if I couldn't trust these people, who could I trust? It was one of the most enjoyable things I've ever done in my life. I had my own swoop show, with each person trying to outdo the other on the pond. It was total and utter carnage - and it was great! My favorite memory is of Travis Mills screaming by doing a ghost-rider with the biggest smile I think I've ever seen anyone have. After a quick hike through Deepwood Ranch, it was time to return to hear the final announcement. The team arrived a few minutes later than expected, with a somber, yet relieved, look on their faces. It was clear they'd made a decision. Addressing the group the team announced that they'd almost not reached a decision that night, they had dropped the list to 6 people but had been unable to narrow it further. My heart jumped. With us all hanging on every word, the team announced that they'd made a change in plans and had decided to expand another 2 slots as "next on deck" or alternates. These candidates would be given first dibs at any future opportunities, or expansions, within the PDFT but would not be considered 'the final four'. First Jens Thorgenson's name was called. I was immediately thrilled; Jens and I had started building a strong friendship and respect, and I thought he was a wonderful choice. Next they announced me and my heart raced - it was unexpected, but ultimately perfect for me. I was ecstatic! In a weird way, I felt like the pressure was off, but felt no sadness at not making the final four. I knew, no matter who was picked, it was going to be a good choice and the PDFT was going be stronger than ever. Before announcing the final four, Ian Bobo emotionally reminded everyone that the blue jerseys weren't an indication of self-worth, and that each person there was a great candidate. The words were sincere, and they rang true. Once the final four were announced, through tears of joy, and sadness, everyone took the opportunity to congratulate them. Looking around I realized this is what the week was all about - cheering your team on, and we were ALL a team. We all left the next day as better people, with a deeper respect for everyone there than any of us could have imagined. I often try to explain the experience to people, but realize that it falls short of doing the whole process justice. All I can say is that it changed me in a way I can't describe. I've had many people asking me what happens from here? What does "next on deck" mean? Honestly, I don't know where this is going, but I know it's going to be a hell of a ride.
 -
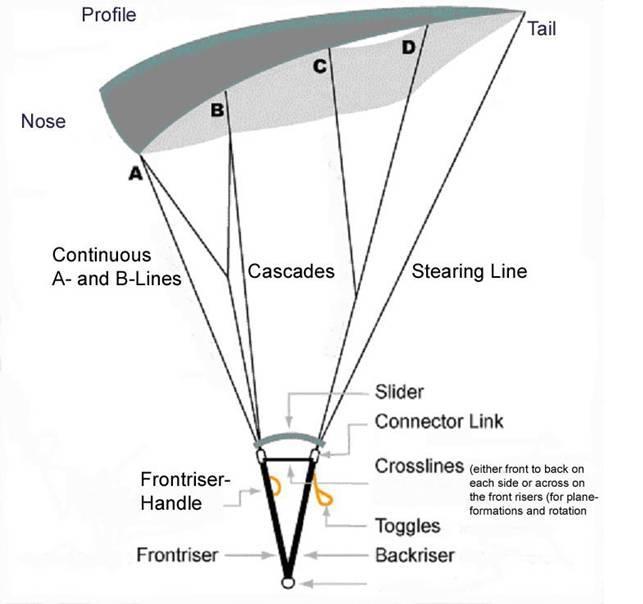 By Peter Pfalzgraf In the early days of CReW (as canopy formation skydiving used to be called) I wrote and published a little booklet for those who were interested in learning the new sport. Things have changed a lot since then. So, I found it necessary to publish something new to make general information on our sport available to everybody interested. This essay combines techniques and hints from Europe and America. The latest input came from the training camps for the new canopy formation world record attempts aiming for a 100-way formation. Canopy and Harness (Figure 1) The times are gone where they had all-around canopies that could be used fairly well for any kind of skydive. Such canopies as the Cruisair, ¬U¬nit, Pegasus, Cruislite and Fury were once very common. Today, the best parachutes for canopy formation parachuting (briefly known as “CF”, in the old days) are 7-cell canopies. These parachutes are the safest concerning deployment and stability in flight, especially in turbulent conditions. It is no coincidence that reserve parachutes and canopies for BASE jumping are mostly 7-cell canopies. Triathlons and Spectres with Dacron lines can be used for casual CF jumps, although Lightnings are the CF canopies of choice. If you intend to do a CF jump today you are well advised to use a canopy that has been designed for this kind of activity. As a compromise for your first attempts, you may use a 7-cell canopy with a thick profile (for instance a student or accuracy canopy). Never attempt CF jumps with elliptical canopies, canopies with wide wing spans (in comparison with the depth of the profile/length in direction of flight) and/or a low profile. Today’s CF canopies are available in different sizes for different weight classes. It is important that people intending to join a CF jump use the same type of canopy with the same line length and trim. Furthermore, the wing loading (weight under canopy per square foot) should be reasonably identical to guarantee similar flight characteristics. The container of your harness should be big enough for the packing volume of the canopy to make sure it can be closed properly (safety!). There should be no handles, container flaps, pop-top pilot chutes or anything else sticking out that could get caught in another jumper’s lines. Those things could result in unintentional reserve openings or problems on separation. The bridle should be short or even better, self retracting to prevent your pilot chute from being caught in the other jumper’s lines while you are in a formation. You can imagine that separating a plane formation with one jumper’s pilot chute entangled in the other jumper’s lines will most certainly result in serious problems. Additional Equipment The altimeter should be worn in a way that makes sure it does not get snagged and can always be seen while you have your hands in the toggles. The helmet should provide not only head protection but also allow good hearing. It should not cause wind noise that might affect your hearing. Every CF jumper should carry a hook knife that can be used in case of an entanglement or wrap. Sometimes it only takes one line to be cut to get free and save a reserve ride. The hook knife of course should also be worn in a way that prevents it from being caught or ripped away. Your shoes must not have any hooks. They should fit loose enough that you can get rid of them if need be in order to get free. It is very useful to wear long socks to protect your legs against bruises and line burns. Aerodynamics of the Airfoil Lift is the force that keeps a canopy in the air. Opposite to a round canopy that only creates a big air resistance to slow down your descent using a large area of fabric, the square parachute, or airfoil, really produces lift like the wing of a glider for instance. The square footage of an airfoil is approximately one-sixth to one-quarter of a round canopy, and yet has a far lower rate of descent. The lift of the airfoil consists of 1/3 high pressure under the profile (similar to the round canopy) and 2/3 low pressure on the top surface created by the undisturbed airflow. This effect is the important matter for us. The physical reasons for this effect aren’t pertinent to this particular discussion. What is most important is to know that the main part of the lift depends on the undisturbed airflow on the top surface of the square canopy, forward speed and the shape of the profile. The lift increases with forward speed and grows with the thickness of the profile. The air resistance of the canopy slows the forward speed down. Due to the different pressure at the upper and lower surface of the profile air will flow around the sides of the canopy from the bottom to the top following the pressure difference. This effect reduces the lift and is called induced resistance. As a consequence of this, the maximum lift is in the centre of the airfoil. The stabilizers on either side of the profile are designed to reduce the loss of lift by hindering the airflow from the bottom to the top surface. Another way to reduce the loss of lift is to make the airfoil very wide so that the percentage of wing area being affected becomes comparably small. A good sample for this solution is the paraglider. This shape of airfoil is, of course, not good for CF activities. Because of the airflow around the sides and also around the tail, a parachute gliding through the air leaves a track of turbulence. The side turbulence creates a zone of turbulent air on either side beginning at the trailing corners of the airfoil. The turbulence of the tail creates a turbulent zone rising from the trailing edge of the canopy. It is clear that a parachute or canopy formation flying into such a turbulent zone will be affected by losing lift. Even aircraft flying through the turbulence of a canopy formation will lose considerable altitude. Figures 2 and 3 show the shape and position of the zones of turbulence. In a formation these phenomenon cause effects that can be noticed clearly. Just the top canopy in a formation gets only undisturbed airflow and has the maximum possible lift. All canopies having a body in front or on a front corner will lose lift due to the turbulence caused by the body out in front. Aerodynamics of the basic Formation Types Knowing the things mentioned above, we can predict that any type of formation cannot perform as well as a single canopy. That is useful for building formations as it gives the single canopy the potential to approach and dock on a formation due to its extra lift and forward speed. In principle all formations consist of a few basic types. Let’s look at the conditions in these. The Stack The stack (Figure 4) is the most basic formation. To build a stack one jumper sits on top the other jumper’s center cell and hooks his feet behind the center A-lines of the lower canopy similar to sitting on a chair. There will be some tension on the lines because the lower canopy in this type of formation will have a little less lift. In a stack the body of the top jumper is in front of the center cell of the lower canopy. The turbulence of that body meets the airflow of the lower canopy exactly at the point where the main lift is created and leads to a considerable loss of lift. This means that a stack will sink far more than a single canopy. The Plane The plane (Figure 5) is created out of the stack. The top jumper climbs down the center A-lines and hooks his feet behind the front risers of the lower jumper underneath the slider. The lower jumper supports him by putting on some brakes to increase the lift of his canopy. For this formation type one or two cross connectors are required, which either connect the front connector links (one line) or two lines that connect the front and rear connector link on either side. Otherwise the top jumper might slide back up due to his plus of lift and pull up the slider, which would result in a collapsed lower canopy. In a plane formation, the turbulence/loss of lift effect is not as strong. As the top jumper’s body is beneath the two canopies, one might think there is no loss of lift at all, yet the line contact causes deformation in the lower canopy and additionally forces both canopies into a new aspect ratio. This leads to a loss of performance. A single canopy will perform better than a biplane. If a plane becomes bigger there will of course, be canopies with bodies in front of them. Planes with more than four canopies will sink faster as the plane formation grows larger. The Stairstep In a stairstep formation (Figure 6) the top jumper is positioned outside of the lower canopies end cell. He takes a foot grip on the outside A-line. Flying the stair step requires much more experience than flying a stack or plane formation because the link is not as stable. It is more of a pivot point than a stable connection. The lower jumper has to compensate for the influence of the upper jumper’s body to the flight of his canopy. To prevent the lower canopy from coming up and around you can put some tension on the outside front riser of the lower canopy or the lower jumper can stretch the outside leg while lifting the inside leg. The stair-step is far less turbulent than the stack and plane. The body of the top jumper only causes turbulence on the outside corner of the lower canopy and that is a part of the airfoil that contributes only a minor amount of lift. That means that a stair step formation is only slightly less efficient than a single canopy. Because only one side of the lower canopy is affected, the other side will perform better and cause the canopy to rise and drive forward. If the lower jumper does not compensate for this, his canopy might come up and around, leading to a wrap. To prevent that the lower jumper will start to compensate for the difference as soon as the top jumper has taken his grip. Possible ways to compensate include putting tension on the outside front riser and stretching the outside leg while lifting the inside leg. One might also apply some slight inside brake. You can determine how much trim is needed by easing up on the risers or brakes after the canopy is set. Sometimes the formation will fly well with only slight trim or none at all. Nevertheless, the lower jumper should keep a watchful eye on his canopy to immediately compensate, if necessary. That wraps up part one. Join Peter in a week or so for Part 2, when we'll dive deep into building and controlling these formations.
 -
 Skydiving requires an action to survive. Freeze, fight or flight are natural reactions to stress but they do not work for skydivers. There is very little time to think about what to do next when the ground is approaching fast. Hence, our response must be quick. We can separate a human reaction into three process: perception, assessment, and execution. These processes happen consecutively. The faster we complete them, the quicker our response is to the changing environment. Let's examine how education and training affects these processes. Perception is the process during which we become aware of information: we look at the altimeter to know the altitude, we look around to see if no other canopies are moving to collide with us, etc. Education and past experiences play a major role in a person's perception. We are not necessarily aware of what we look at. Education trains us to look for the right information in the right places. For example, if we do not look around after our canopy opens to see where the drop zone is, we will not turn to fly toward it. On the other hand, even if we see where the landing area is, we may not know how to detect if we can reach it. As a result, we may not make a turn to fly toward the landing area in time. Books and instructors tell students where to look and what to see, while videos show us examples. However, once students are in the air, they must make a conscious effort to look in the correct direction and focus on the right information: "It's landing time. The ground is moving very quickly. It should not move so quickly. Ohh... I must look at the horizon, I must not look directly underneath." The goal is to make proper perception a habit, because conscious effort is slow. Habits develop with practice, and practice takes time. A student has not yet developed habits and may forget to think about what to pay attention to, but help comes from the instructor over the radio: "Prepare for landing flare. Eyes on the horizon..." One does not develop a habit by taking a class, reading a book or watching a video. Instead, these sources supply knowledge that can be used during practice, which eventually leads to habit. Simulation of a situation, on the other hand, does help to develop a habit, in a safe environment. The emergency procedures that every jumper practices before every jump (you do, right?) is the example of a "simulation". In such "simulation" we create situations and responses ourselves. Another example of a "simulation" is hanging in a harness during a safety day. In this circumstance, an instructor creates an emergency situation for us. Dirt-dive is an example of a non-emergency "simulation". Airplane pilots take the concept of "simulation" further by using flight simulators (http://en.wikipedia.org/wiki/Flight_simulation). The military have used skydiving computer simulators (these are similar to flight simulators) for some time. Nowadays, computer parachute simulation software is available for everyone. The second process in our reaction sequence is assessment - making a decision about what the acquired facts mean. We look at the altimeter and it's 2000 feet. Nothing to be done just yet, or maybe we still have a problem with the canopy, or maybe we see that we are not making it to the landing area, etc. Education has the largest impact on the process of assessment. We are taught what actions are required in different situations. At the very beginning, all we need to do is to pick the right action from the proffered set of actions. Speed of the recall is important. Repetition is key for a quick recall. Taking a class, reading a book, or watching a video are good ways to refresh our memory (safety days help us do exactly that). The disadvantage of these methods is that they cover very limited number of situations and conditions. For example, we are told that to get back from a long spot we can use rear riser input, but that's only true for a certain ratio of your canopy forward speed and the speed of the wind. In some situations, we may have to use front risers or brakes. Now instead of a simple memory retrieval task, we have to do some reasoning. We may have all the knowledge to do the reasoning properly, but it's slow and error prone (time pressure and adrenalin rush do not help rational reasoning). Simulations offer an efficient way to condition memory by repetition. A computer simulation also allows for an infinite amount of situations with different conditions. It's easier to make a decision when we have already seen such a situation before. Execution is the process of acting on the chosen response. Muscle memory allows us to speed up this process. Instructors, books, or videos can not help this process. Muscle memory is developed by repeating an action... but we already know that simulation is good for that! Pulling the cut away and reserve handles while hanging in a training harness or before your reserve is due for a repack are good examples of muscle memory training: we feel how hard we need to pull the handles, what the proper motion of the hands are, etc. Computer simulation can help as well, but it is most effective with a special hardware, which is not yet available at a reasonable price. We have covered three processes that contribute to our reaction: perception, assessment, and execution. We repeat them over and over again. Every time we do something, a new set of conditions manifests itself. There is a dynamic and complex relationship between the situation and our responses to it. Instructors, books, and videos can only mention a very small set of examples. Traditional simulation methods (use of the imaginations or/and an instructor) are also quite limited. A computer simulation, however, provides real time feedback for all possible actions that we can exercise in the simulation. We can judge the correctness of our actions based on what happens next. Simulation has always been an essential part of skydiving education and training. Computer simulation takes this concept further and allows for even better results. We have seen how it can help us when other means of education and training are less efficient or can not help at all. One may ask: "How good must a "computer simulation" be to be used for training?". A similar question would be "How good must a picture be in a text book?" The answer is "As long as it (simulation or picture) reasonably illustrates the required concepts." No educational tool can or should be used by itself. The purpose of the tools is to make a student think, ask the right questions, and develop the correct responses. Given our limited attention span, it's always a compromise between focus on safety and focus on other things, especially for novice jumpers. The faster we get our habits and muscle memory developed, the safer our jumps become. This is why it's important to understand what tools are available to us, and what their limitations, advantages, and disadvantages are. In his book "The Parachute and its Pilot" Brian Germain phrased it this way "When we can acquire the right information, and access this data at the right time, we have a pretty good chance of walking away from sketchy situations." Our goal is "to acquire the right information." We can do this most efficiently when we understand what educational and training tools we have in our disposal: classes, book, videos, simulations, etc. The newest tool in the skydiver's toolbox is computer simulation software. This software greatly complements the other means of education and training. Which, in turn, will result in a safer and more enjoyable sport. Author Information: Alexander Shyrokov is the founder of Static Line Interactive, Inc.
 -
"Turn coordination" is a topic that, until recently, has been mostly unapplied to ram-air parachute aerodynamics. In simplest terms, this refers to the degree to which a flight vehicle is aligned to the relative wind during a turn. Another way to look at this is the degree to which a turning aircraft is pointed at the relative wind with regards to the yaw axis. A "clean turn", from an aerodynamic perspective, is one that keeps the nose of the aircraft pointed at the relative wind throughout the turn. When flying airplanes, this prevents the passengers from spilling their drinks, as well as saving fuel and preserving airspeed. In parachutes however, this aspect of turning has mostly been ignored. As parachutes become faster and faster, the time has come to begin thinking about this aspect of our canopy flight for several very important reasons. The first has to do with the ability of the pilot to level off at any point during the turn. Lets face it, sometimes the ground creeps up on us. Flying an aerodynamically sound turn increases the likelihood that you will be able to convert your airspeed into lift in a timely manner. If you are sliding sideways through the sky because you are simply jamming a toggle down, you are not prepared to interface with the planet. The relative wind is jumping across the bumps on your parachute, creating turbulent flow, while the suspension line load is getting shifted to one side of your canopy. When you attempt to stab out of an uncoordinated turn, there is a hesitation before the parachute begins to change direction and level off. If the ground gets to you before this happens you may find yourself watching Oprah in your hospital bed for a while (not that I have anything against Oprah). The second reason for flying a coordinated turn has to do with overall parachute stability. In an uncoordinated turn, the nose of your parachute is not pointed at the oncoming relative wind. It is sliding sideways. This means that the pressure in your wing is being compromised, in addition to the wingtip on the outside of the turn being presented to the relative wind. If you hit turbulence during this kind of "sloppy" turn, you are much more likely to experience a collapse of this side of the parachute. In other words, if you are turning right, your left wing more likely to fold under. Interestingly, when an aggressive, uncoordinated toggle turn is released, the opposite tends to happen. When the right toggle is released, the right wing surges forward as the drag is released and it is presented to the relative wind, opening the door for a collapse on right side of the parachute. Either way, this can result in way too much daytime TV. A fundamental problem...There is a fundamental problem with the way in which most of us were taught how to turn our parachutes. They said: "if you want to turn right, pull down the right toggle." Simply pulling on a toggle increases the drag on the right side of the parachute, retreating that wing tip. At the beginning of the turn, it is purely "yaw" energy. It is like the pilot of an airplane stepping on the rudder pedal. As a discrete action, steering toggles are an incomplete input. We need some "roll" energy. The harness is more than a way to attach the jumper to the parachute. It is also a way to manipulate the canopy itself. If the right leg reaches for the earth as the left hip reaches for the sky, the parachute will turn to the right. It is true that smaller parachutes will respond quicker to such inputs than larger ones, with elliptical canopies responding the quickest, but harness input will have an affect all parachutes. Most importantly, when used at the initiation of a turn, harness steering converts a toggle turn into a coordinated maneuver. This is true if you are under a Lotus 190 or a Samurai 95. When flying an airplane, all turns begin by initiating roll energy with the ailerons, (rotating the yolk), followed by an application of the rudder to coordinate the turn. The old airplanes had a string on the cowling (hood) to show the direction of the wind-flow, while newer ones have slip indicators on the instrument panel. If only we had such information while we were flying our canopies. Ah, but we do… Trailing behind your wing is all the yaw axis coordination data you will ever need. It is called your pilot-chute. If you are flying a coordinated turn, your bridle will remain parallel to the ribs of your canopy throughout the turn. If at any point it goes slack, whips around like a snake or drifts off to one side, you are not flying a clean turn. You are not carving your wing through the sky; you are skidding out of control. The relative wind is not following the valleys of your ribs; it is hopping over the bumps, tumbling into chaos. Try this on your next jump. Look up at your canopy while you are flying straight and simply yank a steering toggle down to the ½ brake position. You will immediately see what I am talking about as your pilot-chute swings off to one side. Next, lean in your harness, lifting one leg-strap to yield direct roll axis input. It may turn and it may not, depending on the wing. This is not important. Then, while holding the harness input, pull the steering toggle to turn toward the direction of your harness input. You will notice that the pilot-chute is trailing straight back, even in a sharp turn. Once you have experienced your first real coordinated parachute turn, it is time to develop new habits. This takes time. I find that when learning a new skill like this, it is best to have a simple way to remember the process. In this case, try using the following sequence for every turn you make: 1) LOOK, 2) LEAN and 3) TURN. This is mnemonic was taught to me by a great paragliding instructor and skydiver, J.C. Brown. Rather than thoughtlessly jamming a toggle down, look where you are about to go, lean in the harness to establish the roll, and finally, pull the toggle down to flow deeper into the maneuver. When you play with this kind of turn, you will find that the parachute simply feels better; that you feel more in control over the wing. You will also find that you can better bump both brakes down during the turn in order to reduce your decent rate, or even level off completely. While practice is necessary to perfect the technique, all parachute have the ability to transition from a descending turn into a level flight turn, into a soft beautiful landing. If you know how to carve your way out of a low turn, there will never be a reason to hook into the ground, ever. Although many skydivers still think of their parachute simply as a means to get back down to the ground after a skydive, learning how to use the system the way it was meant to be used will increase the chances that you will get back down to the ground safely. Gravity pulls equally on those who love canopy flight as those who abhor it. From twenty years of teaching parachute flight I have learned this: you can only become great at something that you love. The more you understand, the more you will explore. The more you explore, the more you will feel control. The more in control you feel, the more you will love it. And that, ladies and gentlemen, is what it is all about. BSG Brian Germain is a parachute designer, test pilot, advanced canopy flight instructor and author. Brian's book The Parachute and its Pilot has become the worldwide source for canopy flight information and is available at a gear store near you, or through Brian's website: www.BigAirSportZ.com