0

General

    Essential Skydiving Safety Articles

    Image by Mike McGowanIn skydiving, knowledge is not only power but can also be the difference between life and death. Being educated on how to handle each situation you may find yourself in is of vital importance and you should never stop learning. No matter how sure you are of your abilities and your safety procedures, there's always room to improve. We encourage everyone to attend safety and training courses that will allow them to further develop your skills, while at the same time improving your safety. Fortunately for those looking to learn, we have a network of extremely skilled and trusted skydivers, who over the years have provided us with some truly excellent articles on matters of safety.
    With it being Safety Month, we thought that we'd compile a list of 10 of the best safety related articles we've published on Dropzone.com over the past 12 years. Read and share!
    Flying and Landing High Performance Parachutes - by John LeBlanc
    Downsizing Checklist - by Bill von Novak
    Cleaning Up Your Turns - by Brian Germain
    Another Look At No Wind Landings - by Scott Miller
    The Horizontal Flight Problem - by Bryan Burke
    Collapses and Turbulence - by Brian Germain
    Line of Flight Explained - by Melissa Lowe
    Exit Separation - by JC Fallo
    Ten Things That May Keep You Alive - by Bill von Novak
    Do Skydivers Care About Safety? - by Bill Booth

    By admin, in General,

    Employee Development: The Often Ignored, Yet Very Important Aspect of Training

    Image by DeltaBravoAs spring draws near it is time once again to start thinking about the summer jumping season. Most drop zones will start to organize their safety day activities, gear will be inspected, and repacks scheduled. However, what many of us forget to do is spending some time developing our coaches and instructors after all, professional skills can be forgotten during the winter months just as easily as safety rules and regulations.
    For many drop zones, instructional development stops after the candidate’s progression card is signed off and the certification is issued. What we fail to realize is that instructional skills are perishable and everyone can benefit from annual employee development training. What I would like to discuss here are some methods the average drop zone can use to develop their instructors. Understandably not all of these are possible at every drop zone, and individual drop zones may have to modify these methods to fit into their procedures, but these are simple and can be done with little imposition on the drop zone. Before I talk about training techniques I would like to discuss certification and training records.
    I am not about to suggest that drop zones start massive files on their people, but the drop zone owner is an employer and even though most of the employees are classified as independent contractors, the DZO/DZM should have a basic training folder for each instructor. Some things that might be useful to include would be copy of class 3 medical certificates for tandem instructors, copies of CPR/First Aid certification cards, awards, and even the latest logbook entry once a year (I’ll discuss the last two more later on). Although none of these items fall into the privacy act, the DZO/DZM should still keep the files locked up and they should only contain the document copies, never the originals. This will prevent the information from being passed around or discussed publicly. Now that we have the staff, and their records are in order, how are we going to mold them?
    To renew an instructor certification, the individual must attend an instructor’s seminar. The majority of the time that seminar is the annual safety day, but instructors need something more. I have heard many DZOs/DZMs make the comment that the requirements to become a certified instructor should be made more stringent. I even heard one person advocate that a coach should have a minimum of 500 jumps. Although that sounds great in theory, logistically it is almost impossible. Instead of just forgetting about instructors and coaches after they have become certified, get them all together once a year. Pick one of them to give the ground portion of the First Jump Course while all the other instructors are the students. This will allow for all of the instructors to provide constructive feedback to each other and it will give the instructors a chance to relearn something they may have forgotten. One thing that is frustrating for a new student is when one instructor says, “Remember? In class you were taught to….” When in fact that was something the other instructor forgot to teach in class. By holding annual employee development training not only will the instructors benefit, but so will the students.
    Free Fall Drills
    Another technique is to practice free fall drills. It happens to all of us. We, as humans, can get sloppy with our techniques overtime. Two instructors or coaches jumping together would be in a position to debrief each other. This can be done as a fun jump, but as long as it is not a free fly jump or a “zoo” dive. After all, we are not free flying with first jump students and they are jumping exact dive plans. I do want to stress at this point that instructors must help each other out. If it is in the plan for one person to act like a first jump student, then act like one, but let’s be honest, how many first jump students actually put their helmet on backwards and start playing with the aircraft controls as soon as they get in the plane? Although I’m sure it does happen on occasion, not to the extent that I see people acting it out when teaching new instructors. Discuss with each other what you have seen over the past year, but don’t make the training so unrealistic that it is ineffective.
    Have an instructor day at the wind tunnel. Since wind tunnels are beginning to spring up in more places take advantage of it. Video the time in the tunnel and spend some time doing dirt drills working on areas that need improvement.
    Emergency Training
    Many DZs will invite the local rescue squad out on safety day and there are others that don’t like to do this because they do not want to scare the new jumpers. I can understand both sides of this, but it doesn’t take away from the fact that this is a dangerous sport. It is a good idea for all instructors to have basic first responder training specific to the types of injuries that could be experienced at the DZ. Subjects such as C-Spine immobilization, when to move an injured person and when not to should be taught to all instructors. What about the injured person’s helmet? Should it be left on or taken off? How do you safely remove an injured person from the swoop pond? When the call is placed into 911, what information is the most helpful? Does the staff know the address to give the 911 operator (that is a good thing to type up and put by the phone, by the way). This brings us back to the training folder.
    One of the things that would be a good idea to keep in the folder would be copies of awards and maybe even a copy of a recent logbook entry. If there is ever an accident or fatality at the DZ, the DZO/DZM will have to deal with the media. By having key information handy, the DZO/DZM will be able to make a quick and informative statement to the press if needed. For example, if someone were to get hurt during a tandem jump, the DZO could say, “This is a very unfortunate accident and we are looking into the cause right now. The instructor is highly experienced and has over 10,000 jumps, 9,000 of them being tandem, and just two months ago was awarded the USPA badge for 50 hours of free fall.” Many people don’t like talking to the press, and that is the subject for another article, but the fact remains; by just saying no comment you leave the uneducated alone to make up their own answers based on hearsay, rumors, and their own fears.
    As you can see, there are various ways for a drop zone to develop their instructors. Although not every way is possible, nor has every possible way been covered, we must remember that drop zones are businesses, instructors are employees, and once in a while, employees need refresher training too.
    Corey Miller C-38834
    Corey has a Master’s Degree in Aeronautical Science, specializing in Human Factors and Education.
    He has over 30 years of experience in both aerospace and military aviation.

    He is currently the Quality and Safety Manager for the ATM Program in Kabul Afghanistan but he calls the Oklahoma Skydiving Center his home.

    By coreyangel, in General,

    Depth and Breadth: The Red Pill or the Blue Pill

    Is it better to be a jack-of-all-trades or a master of one? Is it best to aim singlemindedly for depth, or to barrel out into the wild blue yonder of breadth?
    If you don't know me, let me introduce myself: Hi. I'm Queen Breadth. The beginning of my airsports career some years ago coincided neatly with critical mass in a pile of new disciplines -- and, conveniently, with my own launch into location independence. Suffice it to say, I was more than happy to race around the candy store with my hungry paws in everything, everywhere. It was manic, it was orgiastic…and it was, in hindsight, perhaps not the best idea. Before I had 150 jumps in my logbook, I had 27 dropzones on the list. I started skydiving, BASE jumping, paragliding and speedflying concurrently enough to be worthy of a tidy facepalm. I got my BASE number in four jumps. I've jumped, hucked and flown on five continents. The Venn Diagram that represents the jumps and flights I've done versus the jumps and flights I've done in new places, with new equipment, in new conditions…well, to be honest, it's pretty much a circle.
    And guess what?
    If you show up to a plane, a launch or an exit point with me and you have depth in what we're doing, you're going to be, like, "seriously?!"
    Seriously. Because -- in all this sexy, sexy breadth -- I've hardly gone to depth in anything.
    There are a flurry of reasons I'm besotted with breadth, of course. Breadth is a beautiful thing.
    Breadth gives you flexibility. It forces you to flex the muscles of your judgment; to strengthen them. It requires boldness, but it teaches you to respect the vast library of stuff you don't know. It requires a wide understanding of conditions, and the patience to watch them tell their story to you over the course of hours (sometimes, in the foot-launched stuff, days). It encourages you to develop a unique, procedural approach to novelty that serves you everywhere else in your life. Breadth fills your life in the sky with adventure, introducing you with automatic intimacy to people and places you'd otherwise never have met.
    But breadth has a dark side. Breadth can kneecap confidence, as it requires you to play in the shallows of an ocean of unknowns. Where depth offers long-term mentorship, breadth offers friendly, experienced passers-by who gauge your skill solely by what they see in clip on Facebook. …And breadth costs a friggin' arm and a leg in excess baggage fees, believe you me.
    So then, winking at me from the other side of the bar, there's depth.
    Ah, depth.
    Depth gives you the confidence of complete focus; if you use it correctly, depth can be a very busy workshop. Working systematically within a certain set of accustomed variables, you can add and subtract one or two and be able to rather scientifically observe their impact. Depth provides a meditative space to make adjustments, removing the big question marks from your gear and surroundings. A bonus, off-label benefit: depth has a way of delivering the assertiveness you need to express any necessary boldness in outside disciplines (to a point).
    Depth can also dig ruts so deep that they become nearly inescapable. Depth provides rich soil for absolutely gonzo complacency. Depth can result in problematic overconfidence. It can also atrophy your judgment -- one the one hand, you can feel undeservedly godlike in situations where you're quite literally out of your depth; on the other, elements that are simply unfamiliar can easily feel reflexively unsafe. Most nailbitingly (for me, at least), depth can push you into uncurrency outside the blinders.
    I think, as in all things, it's about finding a balance. Perhaps depth and breadth are the X and Y axes of airsports. After all -- and I'm a living example of this -- neither depth nor breadth work well in a vacuum. But I also think it's about making a conscious choice, and making the trade-offs in full acknowledgement. Doesn't depth work best when you unscabbard your sword and tap the shoulders of what you really want to do? Doesn't breadth work best when you approach it as an adventure-with-airborne-benefits, not as a snarl of jumps to dash between like a semi-crazed corgi in an agility contest? Don't happy athletes strive for both depth and breadth in their right season?
    Right now, I'm choosing depth. I'm writing this from a wind tunnel in Slovakia. This summer, I traded my accustomed nylon here-there-and-everywhereness for the singular delight of not just doing a bunch of cool stuff in a bunch of cool places but really, deeply learning -- for the fibers of my body to understand, and for the nuances of the practice to be etched forever in my System 1.*
    Mindfulness of depth and breadth is counsel I wish I'd received at the outset. It may have adjusted some of my early decisions -- not to be more conforming, but to be more aligned with deeper, autotelic goals. And I wish I could share it with more people: The kid who toddles in with the singleminded goal of wingsuit BASE. The new jumper who does something different on every load, running from the feeling of underachievement into the waiting arms of novelty. The guy who tells me he'll try a paragliding flight "after [he's] done with BASE jumping."
    Where do you sit on the depth/breadth spectrum? Am I missing part of the story?
    * There's a reason there's a link here. Seriously: Read this. It'll change your world.

    By nettenette, in General,

    Demo Skydiving for N00bs

    How To Be A Hero, Kinda
    Maybe you’re a limelight magnet and maybe you’re not-- but if you like to mess around with parachutes, the limelight might follow you regardless. Even if you don’t necessarily seek it out, there’s a chance that someone will find out you’re a skydiver and ask you to--well--jump into something. A grand opening, for instance, or a wedding, or a local event.
    Before you slink away, hold on! If you’ve got the experience under your belt, there’s really no reason to turn it down out-of-hand. This could be a great learning experience if you’re able to commit the time and wherewithal to put in the planning. Expanding your skill as a jumper is always a worthwhile endeavor.
    After all, a demo (or, as it is officially known, an exhibition/display jump) doesn’t have to be a stressful proposition. Unless you’re Kenyon Salo (or anyone else on the Denver Broncos Thunderstorm team), it doesn’t necessarily stipulate a nail-biting night jump that swoops you through a spiderweb of cables to a landing in front of a screaming stadium audience. It may surprise you that, for demo jumps performed under specific conditions, you don’t need a USPA D-license or a pro rating. Spoiler alert: It doesn’t even necessarily mean that you’re landing in front of an audience. Doing a demo jump simply means that you’re jumping into a location other than an official registered drop zone.
    To get a little clarity, I talked to Neil Amonson, who has been a demo jumper par excellence for quite some time. Once a member of the legendary GoPro Bomb Squad, Neil now runs Jump For Joy--an incredible skydiving-driven inspirational/educational youth project. (You should stop scrolling right now and sign up.) For a little help getting your homework started, read on.

    Give It Time
    A demo starts -- of course -- on the ground. If you’re approaching the idea of doing a demo jump for the first time, you should give yourself about a month’s worth of lead time to make all the necessary arrangements and file paperwork. Aside from the not-insignificant challenge of finding an aircraft to do the deed, you can expect more than a few checklists to work through, the details of which change according to the details of your unique jump plan.
    Determine Your Level.
    If you skew to the new, you’re very likely going to find your footing as a Level One or “Open Field” demo jumper.
    While the experience and license requirements are the same between the two. but Level One and Open Field jumps are classified differently based on area. If the landing area covers up to 500,000 square feet, the landing area is classified as Level One. If it clocks in at more than 500,000 square feet, that’s when it becomes a "open field.”
    “There are some little details between the two that makes a Level One slightly more advanced,” Neil explains. “For my jumps, when I measure up the LZ and see how many square feet it is, that lets me know how complex of a demo it is likely to be. ‘Open field’ is a piece of cake and very low stress. Level 1 is still pretty easy, but I probably couldn’t do it blindfolded. Level Two is more serious--and a stadium usually has my butt a little puckered.”
    “Because it shows up on the paperwork, I think the level system helps the FAA understand how much risk is involved,” he adds. “The lower the level of the LZ, the less they probably stress about the jump as well.”
    To jump into a Level One or Open Field LZ, you’re going to need at least a USPA C license and 200 jumps in your logbook, 50 of which must have been made within the past 12 months and five of which need to have been done on the same model and size canopy you’re planning to use on the demo.
    If you’re significantly more seasoned, you can hook up with an Instructor-Examiner and get your PRO rating to do Level Two demos. This is the rating you’ll need to jump into any stadium, no matter now big. (Ask anybody who has jumped into a stadium why that’s the case, and they’ll probably tell a rotor story that’ll curl your hair.)
    Assess the Landing Area
    If you’re considering a demo, your first stop should be a technical requisition of the landing area. (If this wasn’t going to be the top item on your list in the absence of advice, we would perhaps recommend binning the idea of a demo entirely.)
    If you’re a level-one demo jumper, you’ll need loads of room. You’ll soon see why the “open field” moniker applies. For a Level One jump, you’ll need to be jumping into a landing area no smaller than 250,000 square feet. When you’re jumping into an area over 500,000 square feet, you’re in an “open field.” Most open-field athletic areas constitute a Level One area.
    That might sound enormous--and it is, at a minimum of 500’x500’--but don’t sniff too soon. The additional stresses of a demo jump are going to make the experience sufficiently interesting to hold your attention.
    Get The Rest of Those Ducks In a Row
    After you’ve collected all your in-date identification (specifically, your parachuting license and reserve repack card) for presentation, you’ll be working with the aircraft operator to do the paperwork. Get ready to leap into the exciting world of waivers, any required secondary insurances and the holy NOTAM.
    Let’s take a second to define “NOTAM,” if this is the first time you’ve come across the term. NOTAM is an acronym that stands for “Notice to Airmen.”* A NOTAM is, essentially, a heads-up to pilots and the FAA at large that flags what you’re up to in the airspace. A NOTAM allows you and your aircraft to fly a stated altitude and pattern within a stated time window. As well as Google Maps, you’ll also be using a website called Skyvector to complete your filing, because the FAA will want see your LZ on a sectional chart as well as a satellite image.
    It’s important to note that a NOTAM is not a guarantee that your jump’s gonna happen. It can be turned down by the FAA. Neil suggests filing a 7711-2, also called the "Application for Certificate of Waiver or Authorization,” no matter what level of demo you’re planning.
    “While it's not required for Open Field and Level One landing areas, it's the one piece of the puzzle that absolutely ensures that everyone that needs to be on board is on board,” he explains. “It's basically the golden ticket from the FAA that says ‘we approve of your plan.’ I used to try and skirt the rules for doing the paperwork and--even though I was legal!--one time, the FAA called my pilot and told them not to let me jump because we disagreed on what type of landing zone it was. Ever since then, I’ve done a 7711-2 for every demo and I haven't had one turned down in ten years.”
    While page 169 of the SIM explains how to fill out a 7711-2, Neil says that a little mentorship will go a long way.
    “The best way to learn how to fill it out is to have a local pro-rated jumper--who has filled one out before--let you see one they’ve submitted,” he explains. “If you were just to look at the application, it’s kind of confusing, but when you see it filled out it makes more sense.”
    Take note: The higher-profile your jump, the more likely it is that the FAA will come out and watch to make sure you didn't ask permission for one thing and then do another.

    Dial In Your Comms and Your Crowd Control
    You’ll need to conspire with a ground crew to manage your adoring crowd in accordance with the guidelines in the SIM (unless you’ve figured something else out and gotten it officially waivered). For Level One demo jumps, the crowd management suggested by the USPA allows skydivers to drift over the spectators with sufficient altitude (250 feet) to prevent a hazard to anything or anyone on the ground. (That means you’ll be landing at least 50 feet from the spectators. The USPA, in its benevolent wisdom, doesn’t want you toddler-bowling.)
    “A rule that is often forgotten about,” Neil warns, “is the requirement for ground-to-air communications between the ground crew and aircraft. This is easy accomplished with a radio--or even texting, when you’re only going up to hop-and-pop altitude.”
    “There also needs to be a backup, if those comms are lost,” he adds, “that can signal to the jumpers that the LZ is not safe. That’s your ‘no comms’ plan. On my demos, the ground crew usually puts a big X down where we are supposed to land. We tell the ground crew that, if we lose comms and we should NOT jump, to remove the X from the LZ. If we look out of the plane and don't see the X marking the spot, we know something happened, and to stay in the plane. In all the years I’ve been doing demos, we've never actually needed to do this, but it's good that your ground crew knows, in case the FAA shows up, to make sure you are sticking to your plan.”
    ...And Don’t Jump When It’s Not Jumpable
    Great! So you have your filings approved, your ground crew is stoked, your crowd is assembled and your prop is turning...but the trees are bending over more than a little bit at the top and there’s weather creeping in. The USPA recommends a maximum wind of 15 mph for a demo jump. What now?
    “The hardest part of a demo just is knowing when NOT to jump,” Neil notes. “It is soooo hard to say no when it's game day and you just want to pull it off the winds are strong and gusty.”
    “Also watch out for the winds aloft,” he insists. “Your spot is everything. There have been a few times I've done demos where we’ve drifted into the next county, and that always happened because it was calm on the ground but NUKING up high-- our pilot wasn't a jump pilot so he didn't think it was important--and we mistakenly assumed that calm winds on the ground meant calm winds above the ground. Whoops.”
    Use Your New Skills For Good>
    Demo skydiving inspires people. It does! There’s something semi-magical about descending from on high and (hopefully) touching down like goddamn Tinkerbell in front of a cheering crowd. That crowd’s general concept of what-is-possible for themselves, the world and physics will change, at least a little bit, for the good...and that’s almost certainly worth the effort of prep and paperwork. N’est-ce pas?
    *This author looks forward to a verbiage change away from crusty old gendered language. “Notice To Airpersons,” perhaps?

    By admin, in General,

    Dangers of Being a Hero - Camera Safety Advice

    Norman Kent is not only one of the leading skydive photographers, but he is also an advocate for safety relating to freefall photography and the use of mounted cameras within skydiving. Norman has been jumping with a camera since the mid-70s when at only 25 jumps, he strapped on a Kodak Instamatic.
    Over the past 40 since, Norman has established himself as a leader in the skydiving photography world and is a well respected member of the community.
    In the past, we've run several articles relating to the safety of camera usage. In 2013, Melissa Lowe published a piece titled "Hey Bro, Check Out My GoPro" which tackled the topic and included conversation with Norman Kent over the potential safety issues of the camera.
    Since that time, the popularity of action camera use in extreme sports has skyrocketed, with more and more individuals focus being shifted towards the media capture side of the jump. Norman Kent has released a new video on his Youtube channel titled "Dangers of Being a Hero", in which he addresses and revisits some of the topics relating to action cam safety.
    In the video Norman runs through several series of video which illustrate just how easy it is for snagging to occur on the camera, and continues to express how despite the fact that many people feel as though the risks are exaggerated, that the incidents are occurring, even if only rarely has it thus far resulted in death or injury.
    "It's not the equipment itself, it's the attitude of 'it's only a GoPro'"
    Norman Kent continues on in the video to look at alternate mounts that can be used to minimize snag potential and further ways in which one may be able to increase their safety when flying under a camera.

    By admin, in General,

    Coaching in the World of Skydiving

    A self-taught man usually has a poor teacher and a worse student. -Henny Youngman
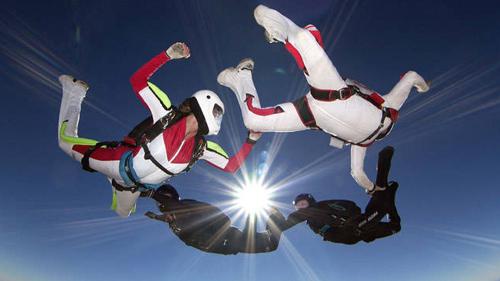
    Skydiving is a sport in which all all participants seek improvement in skill and confidence in their skills. Coaching plays a significant role in setting goals, testing the goals, and reviewing the tested goal. The illustrations in this article are from wingsuit students, and this conversation is predominantly directed towards coaches beyond Cat G/H USPA standards whether they’re teaching canopy control, freeflying, RW, wingsuiting, CRW, freestyle, accuracy, or any other aspect of the skydiving culture.

    This article predominantly speaks to advanced coaching, yet the principles also apply to ISP coaching.
    Students have a right to expect a quality experience. Students also have a right to expect that they’ll complete a training investment with greater skill, competence, knowledge, or a combination of abilities. Not only should coaches/instructors be well-versed and trained in how to instruct,they also must keep current in the sport using resources available via USPA, community education, advanced instruction, and reading books benefiting both the coach/instructor and the student in the long run. The USPA provides an excellent primer in the basics of training, yet it’s extremely beneficial if additional resources are pursued.
    In short, being an effective coach/instructor involves continuing education and seeking the best methods and practices in teaching vs finding the fastest way to receive and keep a rating. A good coach or instructor creates the foundation upon which a student makes conscious decisions throughout their skydiving career.
    A proper program provides kinesthetics, muscle memory training, horizontal and vertical training positions. Well-spent time on the ground provides for a much better in-air experience.
    Unfortunately (as in any educational setting) there are coaches in skydiving who are good in the sport yet cannot skillfully teach. Many coaches do not understand the methodology behind practical training. Instead, students are taught using the theory of “this is how it worked for me, now you go do it.” A skilled trainer/coach/instructor, on the other hand, should be able to teach on virtually any topic to anyone, because they properly understand the process of breaking down a task or objective into a series of attainable goals that eventually combine into a skill or greater self-empowerment.
    When one is seeking out a coach, identifying the person most naturally skilled in the objective you wish to achieve seems intuitive. However, selecting someone who is a world champion in this or an award winner of that, may actually be counter productive. The champion has spent most of their time refining the final 2% of their skill necessary to put them above another competitor. Further, they may not have the skill set to properly pass along their skill set, simply because it is self-contained, self-trained, and misses the logic and requirement to understand the skill from a no-knowledge starting point.
    When one is making the decision to become a coach, having an instructional background or seeking training from a coaching professional or attending a few instructor-skills classes will make a significant difference in your effectiveness as a teacher. Most USPA Coach Examiners offer a basic level of instructional technique, yet it’s recommended that coaches receive additional training from outside educational resources.
    Coaching isn’t about you. It’s about the student. Too much information too quickly is overwhelming and students are unable to retain key points. This is easily the number one mistake rookie coaches and instructors make when trying to help someone reach a goal. It’s especially true when helping someone new in their discipline or activity. While it seems like the right thing to do, it isn’t. Refrain from teaching about hips, head, arms, legs, feet, shoulders, elbows, knee pressure, stomach/core, and angular motion all at once.

    It’s just not going to work.
    A good coach understands biometrics, understands how to improve poor body position with a single (at most two) changes, and can process the cause of body position issues very quickly.
    Additionally, a good instructor knows how to assess individual learning styles by asking a few short yet revealing questions. By applying techniques targeted for each person’s individual learning style, the training session becomes even more effective.
    A capable and professional coach/instructor:


    Has a series of goal-identifying questions.
    Uses multi-layered listening skills.
    Has learned both tactical and strategic coaching methods (do they have multiple methods to achieve a specific result?)
    Discovers in-the-moment coaching opportunities that ignite an effective and fun dialog.
    Crafts coaching approaches that lead to student success.
    Understands the importance of “centering”.
    Recognizes what levels of information are “TMI” at an individual level.
    Can demonstrate flying skill to provide in-air feedback and proximity. 
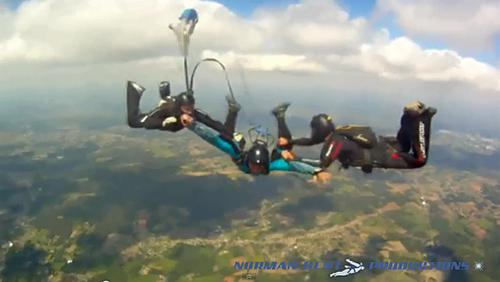
In the below video, a skydiver attended different wingsuit schools wanting to achieve the same objective. The two jumps are back to back. The video on the left is a coaching jump at School “A” and the right half of the video is the next coached jump/same task trained at School “B.”
    School “B” uses a “pro-active coaching” method including kinesthetics/proprioception based on standard sport instruction.
    The results demonstrate very different results for an identical task. Quality coaching does make a significant difference in speed and quality of advancement.


    An “instructor” must determine whether they are a “Coach” or a “Counselor.” A coach provides direction to orient and train for a specific skill set agreed upon by student and coach. Coaching is a mentorship process. A counselor, on the other hand, is a supportive process where the student is largely responsible for self-training and obtains feedback from a peer more skilled in the task or discipline.
    Using the above video, note the proximity of the coach to the student in the “B” side of the video. The coach knows in advance of where the student will be (In skydive coaching, the student is virtually always the base of the coached skydive). The student has specific tasks to perform that are tested on the ground prior to boarding aircraft. The coach has specific responses to perform when the student performs their portion of the objective. During the debrief, challenges to achieving the task are identified and discussed by the coach and student, with both parties providing input and feedback during the debrief process.
    The coach is causing a poor body response/result via their position relative to the student, and providing incorrect hand signals. The student is forced to look up, creating a brake. The end result in this instance is deep potato-chipping and instability (as seen in the video).
    SAFETY
    A coach’s foremost responsibility is to the safety of the student. A primary motivation for students is to not only progress in their discipline of choice, but to also be safe in the pursuit of excellence.


    In the above video, the coach intentionally flies into a hazardous situation where both he and the student are at risk (Left side of display. Aside from a violation of the FARS (in the USA), diving after a student into clouds is not something any coach should be doing. A coach should never add risk to a jump but rather, take all available steps to decrease risk to a student and themselves.

    The coach/student combination on the right side of the image demonstrate proper proximity, keeping both student and coach in a safe environment.

    Coaches/instructors must possess appropriate skills that ensure safe practices are at the fore of every jump.


    In the above video (FFC-4) the coach intentionally flies into a high-risk situation. This is unacceptable. Aside from a violation of the FARS (in the USA), diving after a student into clouds is not something any coach should be doing. A coach should never add risk to a jump but rather, take all available steps to decrease risk to a student and themselves. Coaches/instructors must possess appropriate skills that ensure safe practices are at the fore of every jump.
    BRIEF/DEBRIEF
    New coaches often discover where they may have lacked in communicative skills during the initial training process (although these errors typically make themselves known in the ground test/dirt-dive phase) and find themselves improving as a result of beginning from a consistent training/debriefing method. A debrief session usually begins by asking the student for a self-assessment of the jump, and finishes by showing video after the coach has provided observations. This is also where professional instructors summarize the experience using the GROW method (Assess the Goal vs the Reality of the jump, identifying the Obstacles/Options challenging the task, and what our Way forward to success should be) or some facsimile of the process.
    On the left is School “A” and on the right is School “B,” both being First Flight Course/wingsuit training examples. In the video on the right, the coach is flying to the student (student is base) and maintains proximity in order to best provide hand signals and responses to the student’s maneuvers. For video debriefing, the instructor should be close to best identify body position changes and how they affect flight.
    Not being near the student also creates an unnecessary risk to everyone on the jump.


    STUDENTS
    When choosing a coach, look for;
    Reputation for quality of instruction/experience in the discipline
    A long-term safety record
    Measurable tasks and progression that achieves a specific, desired outcome or finishing point.
    Access to supplemental or specialized equipment (if necessary)
    Availability, flexibility, and ability to create a program suited to individual needs
    Cost of training/Value compared to cost When meeting with a coach:


    Set goals. A good coach will help define what’s achievable.
    Define exactly how you and the coach will attain the goal. People are unique, and have different ways they learn, different paces at which they learn. Can the coach tailor their program to meet your needs?
    Be sure that each jump includes a comprehensive debrief. This is critical to any progression in any discipline.
    Remember that all training is not equal. Quality coaching may cost a small bit more, particularly discipline or activity-specific training. If it’s skill advancement or safety-related, it’s virtually always worth the minimally extra cost. Receiving and providing coaching should be a win/win experience for both parties . Adding to a skillset benefits everyone in the sport, and improves the skill and safety culture within our sport.
    Blue skies!

    ~dse
    Further Reading:

    http://www.grapplearts.com/Blog/2012/04/sensory-learning-styles/

    http://www.lbspractitionertraining.com/pd-courses/practitioners/working-with-adult-learners/257-25-kinesthetic-learners

    http://serendip.brynmawr.edu/exchange/node/1699

    https://www.coachup.com/benefits_of_private_coaching

    http://www.brianmac.co.uk/articles/article017.htm

    About DSE:
    Douglas Spotted Eagle/DSE (D-29060) is a trainer, producing and developing training systems and curricula for software and hardware developers and manufacturers such as Sony, Adobe, Canopus, Avid, Ulead, Panasonic, and Apple. He has developed standardized teaching methods specifically targeted to the skydiving environment, and is a full-time instructor at Skydive Elsinore as a Coach Examiner, AFFI, and PRO-rated skydiver.

    The Skydive Elsinore Wingsuit School has instructed nearly 800 First Flight Courses, and over 4000 Wingsuit training jumps, and has developed a standardized training program used by many dropzones around the world.

    By admin, in General,

    Climb Out, Freak Out, Chill Out

    A beginners guide to filming competitive 4-way
    This article is for jumpers that already have some experience flying camera and are trying to expand on their knowledge of how to film formation-teams in a competition setting. I will focus mainly on 4-way, because I believe it to be the most difficult FS discipline to film (aside from VFS), due to the many different exits and faster key speeds. However, once you have a firm grasp of shooting 4-way, the same principles can be applied to 8-way and larger formations.
    During a competition, whether it be a local meet or the nationals, it is vital that you give yourself all the advantages you can to do the job right. It is advisable that you jump with two cameras with differing wide-angle lenses. Film the team with the tighter view in mind, so if a grip goes out of frame, you can always revert back to the other camera with the wider view. The difference between first and second place can come down to only one point. So our goal is to have an “NJ free” (Non Judgeable) competition for all 10 rounds. If at any time during a jump a grip goes out of frame, the videographer can cost the team a point or more. Jumping with two cameras is not necessary for training, however you want to do a few training jumps before a meet with the exact set up that you are planning on using. This may expose any flaws or issues with your equipment.
    Training should be more difficult for you than competition. Push yourself to fly close to the formation. Train with your back up wide-angle lens, this will force you to be closer and more aggressive in getting the shots you need. This will make every competition feel much easier. Do not be afraid to try new things. Sometimes we have to leave our comfort zones to learn something that may benefit us in the long run.
    Climb OutIn most cases the camera flyer is in charge of the spot. Not having to worry about this little detail allows the team to focus on their jump. As you climb out on the camera step, think of flying your body as soon as you expose yourself to the airflow. Even though you are on the airplane, miss-presenting yourself to the wind can make your job a lot more difficult.
    You can practice climbing around on the airplane while it is parked. Get a feel for where everything is. Continue to practice until you can climb out of the plane in a smooth and controlled manner. Speed will come with time. Do not forget to practice climbing back into the plane. Sometimes you will find yourself climbing out right as the red light turns back on. If possible, one of your teammates can block some of the wind and help you get back inside. Remember to become familiar with different aircrafts when you travel to another drop-zone to train or compete.
    Freak OutNever trust an exit count! It is easy to get impatient on the camera step, waiting for the team to get ready. Teams can sometimes take a while in the door to get ready, especially if they are trying something new. Do not interpret a “wiggle” as a count. Be patient and watch for other signs like a helmet releasing a head jam.
    Every team’s exit count is different. Before every jump, most teams will take the time to dirt dive and practice their exit from a mock-up. You can learn a lot about the team by just simply watching them on the ground, so take as many opportunities as you can to learn the exit count and timing.
    Leading or Peeling?The exits covered here are from an otter, a left-handed door.
    Keep in mind that your relative position to the team is much closer on the aircraft than what it will be in freefall. You will need to create this gap quickly during the exit by falling slow. This is where camera wings and strong legs can be very helpful.
    Teams and coaches prefer the leading exit over the peel exit, because it gives them a great view of their timing, presentation, and heading. This method is much more conducive for the video debrief.
    For this exit I have my left foot on the camera step and my right hand on the handle. (When you have your right foot on the step, you expose more of your body to the exiting team.) After the team has given the count and is in the process of leaving the airplane, I find it helpful to try and run my right hand across the fuselage. I try to feel the rivets of the plane as I kick off the step. This helps ensure that I am in the correct position relative to the formation. As for your timing on this exit, you will know you have left too early when you can see the bottom of the airplane, and you will have left too late if you make contact with the team. For all exits, this is where your timing becomes crucial.
    Peeling is usually considered the safer choice of the two exits, because you leave right after the team. This way, you will not leave too early because of a misinterpreted count and you do not have to worry about the teams burble.
    For this exit, I have my right foot on the step with my right hand on the handle. I swing my body back so that my left foot is touching the fuselage. Now all I have to do is wait for them to come out the door. Leave with the last person and follow the team down the hill. Remember to present your hips correctly into the relative wind and keep the team in those cross hairs.
    Chill OutAfter the exit, all you have to do is keep the team’s grips in frame for the next 35 seconds. Remember that the different formations rarely stay in one place. As the team transitions from one formation to the next, you may have to adjust your own relative position to the team to keep them all in frame. Improving your individual flight skills will allow you to make these necessary corrections quickly and without thought.
    Although the “hard part” is over, you still have to be in the right position to get a judgeable video. Being close enough is the first part, but probably more importantly is being “steep” enough. Your angle in relationship to the formation is crucial. The steeper you can get, the better. It is very difficult to see all the grips when you are shallow. This is especially true on exit. If at any point, other than the exit, you can see sky, you are not steep enough. You should also only be able to see the top/back of the team’s helmets (no faces). The distance from the team will vary on the size lens you are using.
    An additional detail to pay attention to is the background. As the videographer, you can make the judge’s job easier by turning to a heading with a solid background, such as a forest, lake, desert floor, etc. Multicolored backgrounds, such as buildings can make the image very distracting and the formations harder to judge.
    Doh!Making contact with the formation can occur either on exit or in free fall. We want to avoid this scenario at all costs; however, accidents can and do happen. If you find yourself falling towards a formation, get as big and flat as you can! The last thing you should do is ball-up. Your natural reaction is to protect yourself, but by doing this you will only make things worse. Not only have you sacrificed all your lift and will now impact the team with greater speed, you have also given up on the chance that your airflow may be returned to you as the formation continues to move to the next point.
    I think that it is a good idea for camera flyers to understand what the team is exiting and how the formation will fly. I believe that a deeper understanding is necessary than just to know whether a formation is long or round. Being able to anticipate a formation’s movements, direction, and timing will greatly improve your video quality. Be pro active! Ask your team what formations they are going to perform. It will take some time, but being able to “speak” a little 4-way will not hurt.
    You can educate yourself on these formations by reviewing the IPC dive pool online. Memorize how each formation flies as it comes out the door; more importantly, think about how they might block your airflow. As the team debriefs their jumps, you should do the same. Take a look at your own timing, framing, and distance. Strive to make each video jump better than your last.
    Competition vs. TrainingWhen it comes to competition camera flying, there is a big difference between a “Gun for Hire” and a Teammate. In order to make this transition, you need to change your approach and mind-state from just being there for the ride, to being part of the action. As a teammate, you are taking on much more responsibility than a “gun for hire”, such as: archiving and cataloging all media footage, taking pictures, submitting photos to magazines and sponsors (if applicable), checking in with manifest for calls, spotting, chasing down cutaways, etc. Your team needs to be able to depend on you to do all of these things. Creating a great training environment becomes key. The more the team can focus on their training, the better.
    Helping a team to perform at their best can also aid you in achieving your best. Being able to perform at your peak during a high-stress competition can be very satisfying and rewarding. A positive attitude and an eagerness to learn is the start of becoming a good competitor. Hard work and embracing the training process is what will turn you into a great competitor.

    By admin, in General,

    Choose a method of skydiving training

    Be Aware of the Risks Choose a method of training Find a Drop Zone Set a date and jump! Get licensed Depending on how much time you have, how much cash you've got to spend, and how strong your nerves are, you have three options for what method of skydiving you'll use for your first jump: tandem, static line, and accelerated freefall (AFF).
    These methods vary in that some are designed to give you a quick experience and introduction to skydiving while others start with full blown first jump courses that will set you on the path to becoming a certified skydiver.
    Consider your options. Think about the experience you'll get out of each of these and your reasons for doing it. Then pick one. Whichever method you choose to expose yourself to the sport we know you won't regret it. You'll have fun, broaden your horizons and shift your boundaries.

    Tandem Jumping
    Tandem jumps are a very popular way to make your first jump. They allow the curious potential student to experience, first-hand, the thrills of skydiving without the stress of AFF or SL progression. Most dropzones are set up to offer tandem skydives under two different scenarios: the "one-time fun jump"", or as part of a hybrid training method sometimes called "tandem progression."
    The former only requires about 30 minutes of ground preparation; the latter is generally completed after a fairly standard First Jump Course (FJC) which can last up to four hours or more. Tandem jumping, by definition, consists of an experienced jumper called a "Tandem Master" or "Tandem Instructor" and the passenger. The tandem master rides on the back and wears an extra-large parachute system capable of carrying weights of up to 500 pounds; easily able to safely suspend two people. The passenger (or tandem progression student) wears a specially designed harness that attaches in four points to the front of the tandem master. A tandem freefall generally lasts between 45 and 60 seconds, followed by a four minute canopy ride to the ground.
    Tandem jumping provides an obvious advantage for the adventurous spirit who cannot adequately meet the physical or proficiency requirements for the S/L or AFF jumps. By relying on Tandem Master's skills, they will still be able to experience the thrill of skydiving.
    It should be noted that, in the United States, tandem jumping is conducted in two different modes: as a "ride" by manufacturer-rated Tandem Masters, and as bona fide skydiving instruction by USPA Tandem Instructors who also hold the manufacturers’ ratings. Only USPA-rated Tandem Instructors can teach tandem as a part of hybrid skydiving instruction. In most of these hybrid courses, a student makes three or four tandems and then finishes training starting with a level four AFF jump. The utility of this hybrid method is that there is never more than one instructor involved in any one skydive, thus freeing up staff to more quickly train the student load. Jumps made with a USPA-rated Tandem Instructor count towards student proficiency, those made with a non-USPA rated Tandem master do not.
    Tandem jumps range in cost from as low as $70 dollars (US) to over $300, so it’s best to shop around for the best deal.

    Static Line Training (S/L)
    This method has evolved over the last ~30 years from its military origins into a successful method for training sport parachutists. The student gets 4-5 hours of ground training and is then taken to an altitude of about 3000 feet for the jump. The jump itself consists of a simple "poised" exit from the strut of a small single engine Cessna aircraft, or the side door of a larger aircraft. As the student falls away from the plane, the main canopy is deployed by a "static line" attached to the aircraft. The student will experience about two to three seconds of falling as the parachute opens.
    Subsequent S/L jumps require about 15 minutes of preparation. After 2 good static line jumps, the student will be trained to pull their ripcord for themselves. The student then does 3 more static line jumps where they demonstrate this ability by pulling a dummy ripcord as they leave the plane (the static line is still initiating the deployment). The student is then cleared to do their first actual free fall.
    The first freefall is a "clear & pull", where the student initiates the pull sequence immediately upon leaving the aircraft. Next is a 10 second delay jump. Subsequent jumps go to progressively higher altitudes with longer delays. After 25 free falls, and meeting certain other basic requirements, the student receives their A license and is cleared off student status.

    Accelerated Free Fall (AFF)
    The AFF program was instituted in 1982 as an "accelerated" learning process as compared to the traditional static line progression. The AFF program will give you a true taste of modern sport skydiving. The ground training is a bit more extensive than S/L (~5 hours) because the student will be doing a 50 second freefall (that's right!) on his/her very first jump. The student will exit the aircraft at 10,000-12,000 feet along with two AFF instructors who will assist the student during freefall. The instructors maintain grips on the student from the moment they leave the aircraft until opening, assisting the student as necessary to fall stable, perform practice ripcord pulls, monitor altitude, etc. The student then pulls his/her own ripcord at about 4000 ft.
    The official USPA AFF program is a 7 level program. Levels 1, 2, & 3 require two AFF instructors to accompany the student. These dives concentrate on teaching basic safety skills such as altitude awareness, body position, stability during freefall and during the pull sequence, and most importantly- successful ripcord pull. On level 3, the instructors will release the student in freefall for the first time, to fly completely on their own.
    Levels 4, 5, 6, & 7 require only one freefall JM (less $$) and teach the student air skills such as turns, forward movement and docking on other people, moving forward, "superman" exits from the plane, etc.
    Each AFF level is designed to take one jump, and requires about 45 minutes of training. After successfully performing the objectives of each level, the student moves on to the next level.
    After graduating Level 7, the student enters a less structured educational program called the Integrated Student Program, where they jump on their own and with coaches to improve their skills and learn more advanced maneuvers. Once they reach 25 jumps they are ready for their A license. Once they have their A license they are free to jump however they choose, within the dictates of good judgment and the guidelines of the USPA’s Basic Safety Recommendations (BSR’s.)
    Prev: Be aware of the risks Next: Find a Dropzone Prev: Be aware of the risks   Next: Find a Dropzone   More related information:
    The Student Skydiver's Handbook Sample: AFF Course Material Safey and Training Articles Safety and Training Forum Skydiving Glossary

    By admin, in General,

    Can Yoga Improve Your Skydiving - You Might Be Surprised

    ByNadene Beyerbach
    Want to improve your skydiving skills, but don’t have thousands of dollars to blow in the wind tunnel? Try yoga! Yoga has been around for thousands of years. What is commonly considered yoga in Western society is actually Hatha Yoga, focusing mainly on physical yoga postures. However, yoga is not just a series of postures or poses. Yoga is meant to integrate the mind, body and spirit, and to achieve a state of enlightenment. For skydiving, this means developing your insight, awareness and focus, as well as balance, flexibility and stability.
    Not just an effective exercise for improving skydiving skills, yoga is also extremely convenient to practice at the dropzone. The simplicity of yoga means that you can do it virtually anywhere and need very little to get started. The most important thing you can do is wear comfortable, loose fitting clothing that you’re able to move easily in. A yoga mat is ideal, since it will allow you to grip with your feet and go deeper into the poses. However, poses can be done on grass, a towel or a blanket, if necessary. You can experiment with different yoga postures, breathing, meditation and relaxation exercises to see how they affect your skydiving. Try the following to get started:
    Complete Breath: A complete, “three part” breath consists of deep, continuous breathing through the nose. It is referred to as “three part” breath because you breathe first into the throat, expanding through the ribs, then deep into the belly. Slowly exhale, drawing the belly back in. Slow, deep breathing both energizes the body and calms the mind. Try using complete breathing when you’re concentrating on flying a body position that requires a lot of effort. For a relaxed and stable exit, you can also try exhaling completely as you leave the aircraft.
    Meditation/Relaxation: Simply close your eyes and focus on your breathing. Let your mind go blank. As thoughts enter your mind, just return your attention to your breath and let the thoughts float away. Meditation reduces stress and tension and improves concentration. Try meditating for a few moments on the ride to altitude before you begin any mental rehearsal. This will allow you to visualize your intention for the jump from a calm and centered place.
    Physical Postures: There are many different types of yoga postures to explore. Standing poses, seated poses, forward bends, back bends, twists, inversions (upside down poses), balance poses and relaxation poses are just some of the different types of postures. Let’s take a more in-depth look at sun salutations, twists, inversions and balance poses.
    Sun Salutations are an ideal warm-up for skydiving. Sun salutations are made up of a series of poses, flowing continuously from one move to the next. As you move through the poses be sure to hold each one for a few deep breathes. Begin by standing with your shoulders back and body properly aligned (Mountain Pose). Taking a deep breath, stretch your arms overhead, then fold forward at the hips and let your head hang toward the ground (Forward Fold). Step back with your left foot into a lunge. Follow with your right foot, pushing into your hands and feet to create an inverted V shape (Downward Dog). Lower your body toward the ground (Plank), then straighten your arms, looking up and lifting your chest toward the sky (Upward Dog). Now return to your starting position: Push back into Downward Dog, lunge on the right leg, fold forward, and finish by inhaling deeply in Mountain Pose. Try this sun salutation before gearing up for your next jump. You’ll instantly increase circulation, mobility, and flexibility.
    Twists offer back relief for skydivers who do a lot of bellyflying. If you spend a great deal of time arching, try a Half Spinal Twist to release tension in your back. Sitting down, bend your right leg to bring your foot toward you. Lift your left foot and place it on the outside of your right knee. Looking over your left shoulder, place your left arm behind you and your right arm around your knee. Breathe deeply and twist through your spine. Along with relieving tension, spinal twists will increase flexibility in your back and neck to help you further improve your RW skills.
    Inversions are poses performed upside down (with your feet above your head). They improve circulation and increase the flow of oxygen throughout the body. Inversions allow you to become comfortable in an upside down position and to work on balance with your center of gravity above your head. To try the Half Shoulder Stand, lie on your back and pull your knees to your chest. Support your back with your hands and straighten your legs above your body. Your weight should be on your shoulders, not your neck. Breathe deeply and remain strong through your core to help you balance. The Half Shoulder Stand is an excellent inversion to work on if you’re learning to fly head down.
    Balance Poses deserve special attention when it comes to skydiving. There is no better way to develop balance, strengthen stabilizer muscles, and increase mind-body awareness. Warrior 3 (also known as Airplane) is a good pose to begin working on your balance. Start by standing tall and lifting your arms to shoulder-height. Place your weight on one leg, lifting the opposite leg and leaning forward until you form a straight line. Hold for a few deep breathes, then repeat on the opposite side. Holding a balance pose will quickly make you aware of your alignment and body position. If you do any freeflying, adding balance work to your routine could give you the edge you’re looking for.
    Enjoy your adventures in yoga! Test out the suggestions in this article and continue to experiment with different postures to find what works best for you. Always work at your own pace and stop if you experience any pain or discomfort. Remember, it’s about the journey, not the destination, so don’t worry if you’re not an expert right away. To learn more, consider attending a yoga class or inviting an instructor to teach at your dropzone. With practice you’ll start to notice improvement in your skydiving skills through increased mind-body awareness, balance, focus and control. Keeping your body strong and flexible will also help to protect you from hard openings and not-so-perfect landings.
    Blue skies, or as we say in yoga, Namaste.
    Nadene Beyerbach is a skydiver and yoga instructor. She is certified by Body Training Systems as a Group Centergy instructor and is a member of the Canadian Yoga Association. Learn more about skydiving specific yoga at Flex Fly.

    By admin, in General,

    Camera Considerations 101

    Flying with a camera can be a lot of fun, and is a reasonably easy goal for new skydivers to achieve.
    The USPA SIM Section 6.8E recommends that a skydiver have 200 skydives before putting on a camera. The first question often asked is “Why 200 jumps?” I believe the answer to that question is that in times past, the D license (which at one time required only 200 jumps) meant that a skydiver had experienced enough of the basics of skydiving that he/she could begin exploring additional responsibilities during a skydive. By no means is anyone with only 200 jumps generally prepared to be a good nor safe camera flyer, but everyone needs a benchmark from which to begin. This article isn’t about debating the merits of jump numbers; I’d recommend potential camera flyers stick with the SIM and the findings of the USPA.
    Before beginning, you’ll need to make a couple of gear decisions straight off, and this article is to help you prepare for those decisions.
    HEADGEARChoosing a helmet is the first and potentially most important decision in flying a camera. There are a lot of good helmets out there; each manufacturer has their own ideas about why their helmets may be better than another helmet. What your first decision will be isn’t as much about a brand, but rather a type.

    P>There are two types of helmets; those that are primarily side mount, and those that are primarily top mount. Most side mount helmets do offer at least a small top area to which a second camera or other fixture may be mounted. Most of the top-mount helmets are designed to place everything on the top of the helmet. Each type of helmet has its own advantages and disadvantages.
    Freeflyers and inside RW/FS skydivers tend to prefer side mount camera helmets not only because of the profile of the helmet, but due to the way the air moves around the helmet. Those that are shooting four/eight-way FS might prefer a top mount not only due to the greater stability of a flat-top profile, but that the larger top area allows for two cameras to be mounted (one acts as a backup in case a camera fails in competition). Commercial photographers tend to prefer flat top systems so that they can mount larger cameras, or have enough space to mount a DSLR and video camera from the same perspective point.
    One point to consider aside from the primary flying format; top mount helmets with properly centered weight are less injurious to the neck over repetitive openings.
    VIDEO CAMERAVideo camera models change pretty quickly, so it’s pointless to recommend models vs features.
    While recommending a brand is tempting to avoid, Sony camcorders have a strong position in the skydiving market for several reasons.

    -External control. This is very important, as you’ll want to know whether the camera is on, recording, battery failing, or nearly out of media. There are a couple brands of control devices that provide this information.
    -Electronic Image Stabilization (EIS). This is fairly important for freeflying, and much less of an issue for tandem shooters. Avoid Optical Image Stabilization in most cases. The floating lenses of an OIS system makes it difficult to shoot a stable image under any but the most optimal shooting situations (very difficult to achieve).
    Small is in; cameras don’t need to be large to produce large results. Keep weight on your head to a minimum and your neck will thank you over hundreds or thousands of openings.
    If your intent is to wear a camera merely to document skydives with friends, low-cost camcorders such as the GoPro Hero and similar small cameras are wonderful. If your eventual goal is to work towards shooting tandems or teams, you’ll want to consider a higher quality camera. A current favorite is the Sony CX series of camcorders.
    LENSESMost camcorders do not offer lens widths sufficient for most inside or tandem-oriented skydiving. Wide angle lens adapters are commonly found on camcorders used for skydiving. For most skydiving use, a .5 or double field of view lens is sufficient. If you’re flying inside video for FS or Freeflying, a .3 or more than double wide field of view is generally desired. Anything more wide than a .3 is typically going to be relegated to handcam or specialized use.
    Depending on the size of the camera’s lens thread, a step-up or step-down ring might be necessary. Step-down rings almost always assure a vignetted shot (black circle around your video frame), whereas step-up rings rarely cause a vignette. Step-up and step-down rings are very inexpensive. Some are plastic, others are aluminum. Some professionals prefer plastic rings so that if a riser strike or line catches on a lens and tears it off, the plastic ring will give way before damaging the camera. While this is likely true, plastic rings also deteriorate in strength when exposed to sunlight. If you use a plastic step ring, be sure to periodically inspect it to be sure it’s not become brittle or cracked due to sun exposure.
    RINGSIGHTSAlthough it’s tempting to want to outfit a helmet with everything right from the start, it’s a good idea to add parts one step at a time. A ringsight is a good tool for some disciplines; it helps the videographer know where the camera lens is looking, and some types of ringsights help with framing and distance.
    Ringsights aren’t necessary for inside shooting of FS or Freeflying. No matter what, a ringsight is a snag hazard regardless of how much care is taken to prevent it from being so. The risk can be lessened, but not entirely removed. The ringsite should be one of the last accessories added to a camera helmet.
    In lieu of a ringsight, consider a “paper asshole” or a punch hole reinforcement sticker, mounted on your goggles. This can serve the same purpose and yet completely remove the snag hazard of a ringsight. A circle or dot can be drawn on goggles as well.
    To sight in a dot on a goggle; face a plain wall on which, you’ve taped a target. A paper plate works well for this exercise. Stand back from the wall at a distance of about ten feet. Put on the camera helmet, turn on the camera, and have a friend hold your head/helmet so the paper plate is dead center in the camera’s display. Keep your eye looking forward; don’t be tempted to roll the eyeball up/down/sideways. Keep it straightforward. It might take a moment to get comfortable holding your eye straightforward while a friend guides your head/helmet to the centerpoint/target.
    Once you’ve relaxed, focused on the target, and the target is in the center of the camera, mark your goggles (one side only, usually the right side) with a DRY ERASE marker. Remove the helmet, remove the goggles/glasses, and then put them back on and check to see that a reasonably accurate target acquisition occurs. Otherwise, repeat the aiming/targeting process.
    It’s worth mentioning once again however, a ringsite should be one of the last accessories added to a camera helmet when you’re a newcomer to camera flying. A ringsight adds an unnecessary snag hazard.
    STILL CAMERAAgain, it’s very tempting to buy a camera helmet with everything in one shot, and as mentioned previously, is a poor decision for newcomers to camera flying. Learning to fly with a video camera will help develop the skills necessary for flying a still camera.
    DSLR cameras are popular, as they record stills to a memory card, making for fast previewing of photos taken during a skydive, and for tandems, DSLR’s are necessary for fast delivery of photos to tandem students. Though Canon and Nikon are both popular brands of cameras for skydiving, most any kind of camera can be modified to accept a bite, tongue, blow, or hand switch for taking skydiving photographs.
    MOUNTING DEVICESThe device used for mounting a still or video camera to the camera helmet is critical, particularly for video cameras. If the mounting device isn’t rock-solid, the camera will shake or shudder in freefall, resulting in an unstable image. Sometimes this shudder/shake will be blamed on the video camera when the blame lies squarely on the camera mount. Check whatever mounting device you’re considering to be sure it will not move either at the time of purchase, or after it’s been in use for a period of time. Personally, I’m a big fan of the Cookie Composites Padlock systems and the Really Right Stuff mounting systems. Neither are inexpensive, but if you want solid video and clean stills, a solid mounting system is critical.
    CONTROLLING SYSTEMSCamcorders and still cameras need hands-free operation. Video cameras can be manually started/stopped in the aircraft, but for convenience and comfort, most camera flyers use a control system of some sort. Sony tapeless systems offer essentially one controller choice; the HyPeye products from GetHypoxic. All of the camera control systems also offer an indicator that indicates the status of the camcorder such as Power On/Off, Standby, and Record modes. In lieu of these indicator devices, you can always wear a small mirror on the wrist next to the altimeter, and view the Record light on the camcorder. I’d recommend a plastic mirror vs a glass mirror in case your wrist strikes the side of the aircraft.
    Still cameras/DSLRs require some sort of trigger device to cause the camera to snap a shot. Conceptus manufactures tongue and bite switches for Canon cameras. Custom Nikon switches are available from The Ranch Pro Shop and other resellers. Some Pentax cameras use the Canon connection (2.5mm plug).
    It’s difficult to recommend a bite switch, hand switch, tongue switch, or blow switch; everyone has a preference. I personally prefer a tongue switch, but many friends like bite switches. Some like hand switches. You can also “roll your own” from inexpensive parts available at Radio Shack.
    JUMP SUIT/CLOTHINGSome camera flyers opt for jumping with or without a camera suit, or a suit with “wings.” Although it’s a personal preference, camera wings provide the camera flyer a more stable flying platform (when used correctly) provide the for a great deal of range and control that isn’t quite so easy to achieve when wearing a standard jumpsuit or freefly suit. If you’re looking at flying with tandems, wings are often an important part of the jump. If you’re shooting freefly work, you probably won’t want to wear wings.
    There is a lot to learn about flying a camera. Getting good at RW is perhaps the best thing you can do to prep for flying a camera with tandems and four/eight way teams. Understanding burbles, trapdoors, safe zones, and having good belly skills that include side sliding, the ability to orbit, and a very broad fallrate are all important aspects of camera flying.
    This article does not discuss the challenges of camera flying and make no mistake; there are many dangers. One such danger, is that the camera flyer is always focused on the action in front, and never able to turn to see what’s happening behind him/her. Another danger is that in order to “get the shot” some camera flyers lose altitude awareness and may find themselves well below appropriate deployment altitudes.
    Spend time talking to the camera flyers on your dropzone, reading the forums, and pay attention to some of the videos you’ll find on Skydivingmovies.com, YouTube, and Vimeo. All have examples of good and bad camera flying. You can learn a lot just from watching the techniques of others.

    By DSE, in General,

0