0

Gear

    Is It Time For A Reline: Here's How to Know

    Do your suspension lines have a noticeable five-o'clock shadow? Maybe it’s time for your gear to spend the weekend with your friendly neighborhood rigger. If you’re unsure, you’re not alone--plenty of skydivers hem and haw about this particularly important aspect of canopy maintenance.
    Looking for a little more convincing? Here’s a brief education on line maintenance by Karen Saunders, one of the few (and one of only two women) to hold the lofty Advanced Rigger ticket from the British Parachute Association. Karen has seen enough fuzzy line sets to give any sane canopy pilot the night sweats, and she wants to make sure it’s not you that gets to live the nightmare of a mid-swoop snap.
    1. Go with your gut.
    “Trust your instincts. If you think that maybe your lines are looking a bit shabby, they probably are. Most people will look at their line set and say, That looks a bit shit, but I’ll do something about it tomorrow. Tomorrow turns into a week, and then a month. Before you know it, you’ll have a line snap or an off-heading opening. Fix it before you create yourself some problems.”
    2. Know what you’ve got.
    “The most important thing is to know what type of line is on your parachute. Most people don’t--and if they don’t, then they won’t know how many jumps they can expect to get out of that line set before it needs to be replaced. And they also won’t know whether to expect to have line shrinkage or whether it is going to go the other way and simply snap when it reaches the end of its life cycle. Vectron and HMA will do just that if you don’t take care of them: Snap. They won’t give you a warning aside from the fact that they will start to fray as they age.
    The other thing to think about is where your line set actually comes from. Most people will buy their line sets from manufacturers, but there are riggers out there that will make cheaper line sets themselves. I can spot a manufactured line set from anything else in a flash, but most people couldn’t--and maybe that’s the line set have got on your canopy that you bought from somebody in good faith. It is always best before you buy anything to get it checked out.”
    3. Get some visual reference.
    “Once you know what line type is on your parachute, look at Performance Designs’ line wear charts for your lines to get an idea of what wear actually looks like. It may surprise you. Using that reference as an example, you can see how deterioration looks over a given period of time and what percentage of strength you lose.
    You can test your new knowledge immediately by looking at the bottom part of your brake lines and the stabilizers. Those lines are always going to take the brunt of the wear. Generally, having the bottom part of your brake lines replaced at the first sign of wear is going to save you a whole world of problems.”
    4. Watch for the warnings (if you have a line type that broadcasts them).
    “If your lines are made of Spectra or Dacron and you need a reline, you can expect to get some bad openings: an off-heading or big surges after opening. That’s generally because the slider is moving up and down your lines, heating them up and shrinking them.
    If your parachute opens and it is not on-heading, then it is generally an indication that it is going out of trim. You need to get somebody to look at that. When you do, they might look at it and tell you that the lines are okay; maybe it’s just your body position causing the problem. If they look at your lines and go holy shit, man, you need to replace straight away, then you have your answer. Either way, you’ll have peace of mind.”
    5. Don’t get tunnel vision.
    “Don’t just look at your lines. Your lines are suspended by some binding tape which needs checking as well. Especially after a hard opening, be sure to look at the tape where each line is attached to your canopy, as well as the fabric around it.
    Kill lines are another thing. Everybody forgets that a kill line wears out in the same way as a suspension line, except a lot more quickly. If your kill line is made out of Spectra and has shortened, then you’re going to start having problems with your openings. The dead giveaway is finding that your pilot chute is turned virtually inside out every time you land.
    A kill line wears throughout the bridle. The weakest point doesn’t have to be at the bottom or top--it can snap right in the middle--so make sure you pull it through from both ends when you check it. Pull it as far as you can from one end and then pull it as far as you can from the other end to have a good look.
    Finally: If you’re getting a new line set, please, please, please replace your slinks as well. Don’t put a new line set on it and put an old set of slinks on it. That defeats the object of this exercise. They are not infallible. They do fail, and the last thing you want is for a slink to fail at 200 feet, because you’re not going to survive that.”
    6. Remember: The integrity of your lineset isn’t a good place to save a few bucks.
    “The costs to reline aren’t as bad as you might think. I can tell you roughly what I charge, but I can’t speak for other riggers. That said, I will always look at something for free, and if someone asks me for it, I will always give my advice for free, and that’s also the way most of the riggers I know like to work.
    I charge 15 pounds, which equates to about 20 U.S. dollars, to replace both lower brake lines. If the lowers go from the cascade all the way to the toggle, I charge 40 pounds--which is something like $60. If you compare that amount of money to losing a brake line when you’re flaring--or when you are at 100 feet--you see the value. You have to weigh the cost of your own safety.
    If you don’t happen to have a rigger on your dropzone, then go to an experienced jumper. See them and say, Hey, I’m a bit worried about this. What do you think I should do? If they look at it and start laughing, you have your answer.”

    By admin, in Gear,

    New Sony Action Camera Goes Mini

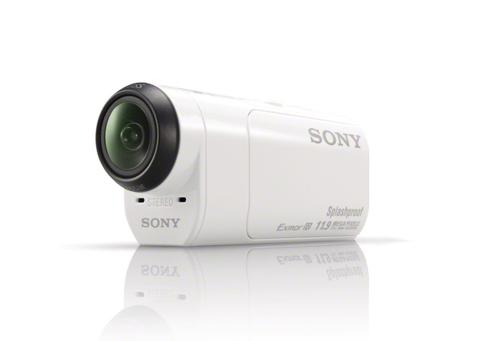
    Sony has unveiled its latest action camera which focuses on reducing size. The Sony Action Cam Mini (HDR-AZ1VR) was announced earlier this month at the IFA 2014 electronics show in Germany. While Sony's action cameras have always been small, the electronic giant decided that they could reduce the size even further by removing the GPS functionality from within the camera and instead moving it to an accompanying wrist-mounted device.
    The Sony AS30 and Sony AS100 weighed 90 and 67 grams respectively. The new Action Cam Mini weighs in at 4 grams lighter than the AS100, at just 63 grams with the battery included. The size of the camera itself is quite a bit smaller than both the AS30 and AS100 with a Width/Height/Diameter measurement of approximately 24.2 x 36.0 x 74.0 mm, while the AS100 had a height of 46.5mm.
    The smaller size is going to be good news for skydivers who are looking to minimize the risk of snag for cameras that are helmet mounted.
    As to be expected the Action Cam Mini will shoot in full HD with options to either shoot at 1080p at 60 or 30fps, or to shoot at 720p with the option for 120 fps slow motion recording. The camera will include an F2.8 Zeiss lens with a 170 degree field of view and an Exmor R cmos sensor. Still photographs can be shot at an impressive 11.9 megapixels. It will also include Sony's trademarked SteadyShot image stabilization and be splash proof, with a waterproof housing included that allows for 5m of depth protection.
    The wrist mounted device that comes with the Sony Action Cam Mini allows for data transfer between the camera and the internet, allowing users to live stream camera footage. Something else the wrist mount does that may prove invaluable to those who have the camera mounted, is that it both acts as a remote and offers live view. This will allow users to see exactly what is being recorded and adjust body position if needed, to achieve specific angles. It can control up to five cameras at once and will be water resistant.
    While we have yet to see any footage from this incredibly small camera, if Sony's other action cameras are anything to go by, we can expect a lot from the Sony Action Cam mini. During our action camera shootout we were extremely pleased by the results of the Sony AS100, which took the top spot.
    Release date for the Sony HDR-AZ1VR is late October.
    Specifications


    Image sensor
    1/2.3-type back-illuminated Exmor R CMOS sensor with 11.9 megapixels (effective, approx.)

    Image processor
    BIONZ X
    Video formats

    XAVC S: 


    1920x1080 60p/50p(50Mbps)


    1920x1080 30p/25p(50Mbps)


    1920x1080 24p(50Mbps)


    MP4:


    PS:  1920x1080 60p/50p (28Mbps),


    HQ:  1920x1080 30p/25p (16Mbps),


    STD: 1280x720 30p/25p (6Mbps)


    SSLOW: 1280x720 120p/100p (6Mbps)


    VGA:  640x480 30p/25p (3Mbps)


    HS120(HS100): 1280x720 120p/100p (28Mbps)

    Lens type
    ZEISS Tessar® F2.8
    Angle of view

    SteadyShot OFF: approx. 170°


    SteadyShot ON: approx. 120°

    Image stabilisation
    SteadyShot
    Audio
    Stereo microphone
    Data
    Multi/Micro USB Terminal (Supports Micro USB compatible devices)


    Wi-Fi/NFC


    GPS

    Dimensions
    WxHxD 24.2 x 36.0 x 74.0 mm (approx.)
    Media card compatibility
    MP4: Micro SD/SDHC/SDXC Memory Card (Class 4 or higher), Memory Stick Micro™ (Mark 2)


    XAVC S: Micro SDXC Memory Card (Class 10)

    By admin, in Gear,

    Garmin Announces New Virb X and Virb XE HD Cameras

    Garmin have just announced two new action camera models that will be released this summer. The Virb X and the Virb XE are the latest attempt from the US founded company to establish themselves as more than just a sports equipment and navigation manufacturer. The original Garmin Virb action cam was released just less than two years ago, and showed that Garmin can do cameras too. After the release of the Virb, which was met with overwhelmingly positive reviews from both users and critics alike, they then introduced the Virb Elite, which added new functionality and recording options.
    The new Virb X and Virb XE cameras seem to be quite a step up from the Virb Elite, and it appears that the duo is a response from Garmin to the GoPro Hero 4 series which was released last year. However, the focus of Garmin seems to be different to that of GoPro.
    First thing we noticed, was the change in design from the original Virb cameras. Garmin have moved away from the flatter, elongated design that we saw in their first models and instead have adopted the more square approach, resembling that of the Sony and GoPro devices. In their press release Garmin brings attention to the flat lens cover in the front, aimed to help water in sliding off easier.
    At this point, with the original Virb being released in 2013 - we decided not to focus on how Garmin has improved on its previous Virb - but rather with how it compares to one of the most popular modern action cams out there today, the mid-level GoPro Hero 4 Silver.
    Recording vs Connectivity/Functionality
    Many would have expected the new Virb X and Virb XE to support 4k video recording, as it's a direction where most action cam manufacturers seem to be focusing. However, the Virb X will only offer a maximum recording resolution of 1080p, while the Virb XE will allow for 1440p at 30fps. By comparison, the GoPro Hero 4 Silver offers users up to 15fps at 4K, 30fps at 2.7k and up to 48fps at 1440p - as well as offering the standard HD recording options.
    Instead of focusing on increasing resolution, Garmin have put their trust in the development of connectivity and storage. Despite falling short on recording options both the Virb X and the Virb XE surpass the Hero 4 Silver in terms of connectivity and increased storage capability. Whether or not this will be as easy to sell as telling people that the camera can record 4k video, is yet to be seen, but perhaps Garmin is onto something. Despite the ability to record in 4k video, in every day practice it is not often that one will actually be able to make proper use of that resolution of recording, and most individuals still record at 1080p.
    Of particular interest to skydivers, is the added ability to overlay recorded data through both standard camera functionality, as well as extra information which can be included through the connectivity between the camera and a sports device. This means that pitch and roll data, speed data, elevation and more can be recorded and overlaid onto the video. See the video below for a demonstration of what is available with the new Virb cameras.
    Unlike the Hero 4 Silver, both of the new Virb cameras will come with GPS built in. Both the Virb and Virb XE will take Micro-SD cards, and support up to 128GB cards. Both the earlier Virb Elite and the GoPro Hero 4 Silver support up to 64GB cards, so the fact that the new Garmin cameras can handle double the storage space, will definitely be marked as a big positive by many.
    Other noteworthy functionality:
    The inclusion of a gyroscope based accellerometer is another feature that is not present in a lot of the other action cameras currently on the market.
    Both the Virb X and the Virb XE will also be waterproof to 50m, without needing any additional casing.
    Both cameras will have multi-camera live control and preview for up to 10 cameras.
    ANT+ connectivity


    Pricing
    On paper it appears as though the Virb X and Virb XE are going to be valid choices to look at when looking to buy one of the new action cameras on the market. They look good, offer some great functionality and did I mention that they were well priced?
    The Virb X will retail for just $299 while you'll need to drop $399 for the Virb XE.
    Final Thoughts
    Despite being stuffed with great new connectivity and some nifty new features, there are some questions

    raised over the choice to stick to limited recording options for both cameras. Currently the Virb X offers

    very limited options even for recording in 1080p in comparison to its competition. The Virb X offers only 25 and

    30fps at 1080p, where we would have liked to see 60fps being offered. Similarly, Garmin could have really

    put their foot down by offering 4k recording on the Virb XE.
    Because of the low price though, if 4k recording isn't on your list of priorities but you find yourself

    wanting the flexibility of being able to shoot at 1080p/60fps, the Virb XE can offer you that.
    The real test is yet to come when subjects like how it handles transition between lighting conditions, low

    light noise levels and video quality can be tested hands on.
    Compare the Virb X, Virb XE and GoPro Hero 4 Silver


    Feature
    Garmin Virb X
    Garmin Virb XE
    GoPro Hero4 Silver


    Wifi
    Yes
    Yes
    Yes


    Bluetooth
    Yes
    Yes
    Yes


    Accellerometer
    Yes
    Yes
    No


    Preview Screen
    No
    No
    Yes


    GPS
    Yes
    Yes
    No


    Recharge Method
    USB
    USB
    Mini-USB


    Recording Time
    2 Hours
    2 Hours
    2 Hours


    Storage Type
    Micro-SD
    Micro-SD
    Micro-SD


    Maximum Storage Size
    128GB
    128GB
    64GB


    4K Recording
    No
    No
    12.5/15 fps


    2.7k Recording
    No
    No
    24/25/30 fps


    1440p Recording
    No
    30 fps
    24/25/30/48 fps


    1080p Recording
    25/30 fps
    24/25/30/48/50/60 fps
    24/25/30/48/50/60 fps


    960p Recording
    25/30 fps
    50/60/100 fps
    50/60/100 fps


    720p Recording
    25/30/50/60 fps
    25/30/50/60/100/120 fps
    35/50/60/100/120 fps


    WVGA Recording
    120 fps
    240 fps
    240 fps


    Camera Megapixels
    12 MP
    12 MP
    12 MP


    Burst Mode
    10 p/sec
    30 p/sec
    30 p/sec


    Sport Computer Control
    Yes
    Yes
    No


    ANT+ Connectivity
    Yes
    Yes
    No


    Sport Data Overlay
    Yes (Garmin Apps)
    Yes (Garmin Apps)
    No


    Phone Remote Connectivity
    Yes
    Yes
    Yes


    Multi-Cam Control
    Up to 10 Cams
    Up to 10 Cams
    No


    USB Connection
    USB
    USB
    Mini-USB


    Micro-HDMI
    No
    No
    Yes


    Price
    $299
    $399
    $399


    By admin, in Gear,

    Introducing The Kraken

    “She’s a wing of legends. The Kraken is the ultimate 'party in the front and business at the back', she's super responsive and holds tight when pushed hard. She is the canopy equivalent of Che Guevara, Marilyn Monroe and Brian Jones all in one. The Kraken is a must have for any wingsuiter and will have the pilot grinning ear to ear as they fly back to whatever landing area they can make it to. Kidding. Kinda.”
    We have released the Kraken, finally! Designing the Kraken was a long process because it was new to us: the Kraken is our very first wingsuit specific parachute. Traditionally NZ Aerosports has focused more on flight performance than on opening a canopy in a wingsuit wake. So it took us a few years, but ended up with a very technical end result: a canopy full of cool features and ideas that makes it very different from any existing wingsuit canopy. The result is a low bulk, long lasting canopy with very reliable and stable openings that lands like a dream.
    Typically, canopies low(er) in aspect ratio and ellipticity (fat 7-cell canopies) have better heading performance, and stability in flight. The problem with this is that wings shaped like this are not exactly renowned for their glide performance and sharp handling. The solution to this problem was a combination of ideas floating around the head of NZ Aerosports’ aeronautical engineer Julien Peelman, and the production and test jump team. We looked to our deep understanding of modern day wings, aerodynamics, and type of ingenuity that produces world class skydiving parachutes – our trademark.
    Key features of the Kraken
    3D Designed: We are now using Catia V5 to design canopies. This is one of the most advanced 3D CAD softwares available. It gives us more freedom to design the canopy down to the finest details and helps generate the most accurate panels possible. The result is a more accurate shaping, a smoother surface, and better aerodynamic efficiency.
    CFD Tested: The Kraken shape has been tested using CFD (Computational Fluid Dynamics), which gives us, among other things, a better understanding of her behavior in turbulence and during recovery.

    Photo Chris Stewart
    Anticipating the zag: First debuted in our Crossfire 3, The Kraken is designed so its panels are designed directly in the shape they will have during flight by taking into account the Zig-Zag distortion. This spreads the load evenly through the fabric and makes the wing more structurally efficient.
    New Rib Shape: The Kraken has benefited from research on rib shaping that was originally used to design our new range of hyper-performance wings, Petra and Leia.
    New Crossport Design: Crossports have been strategically placed in the Kraken to have the least influence on the upper surface shape while allowing a good air circulation between the chambers. They are bigger toward the center of the canopy to help with symmetrical openings. They have also been designed with an elliptical shape that optimizes their area while reducing the upper surface distortion.
    Powerband: We've added the split leading edge Powerband to all our new canopies since we pioneered it with Petra. It allows us to better control the aerodynamic shape in the nose area, which prevents parasitic drag.
    Curves in the right places:
    We’ve realised that by sewing our reinforcing tape in parabolas (arcs) on the ribs, we spread the load applied to the top surface more efficiently, meaning less distortion and a more efficient top surface.
    Don’t say slit:
    We’ve put a vent on the lower surface to help promote fast center cell inflation. This means better, more on heading openings in the messy wake of a wingsuit. It’s not a gaping hole like a BASE vent, it’s a… horizontal opening... that seals after full inflation.
    There’s a hole in my slider?!:
    We became so fond of vents that we put one in the slider! We found that by creating a channel for the air to go straight through, we reduced the crazy oscillation often seen during parachute openings. Those oscillations can contribute to off headings etc, so that’s nice!
    Big holes:
    To help out its closest neighbors, the crossports leading from the center cell to the closest outboard cells are enlarged. Promoting symmetrical central inflation means promoting on heading openings!
    Keeping it short:
    Shorter lines mean more flight stability, and easier rectification of any pesky line twists – both good things for the whole wingsuit deal!
    High-tech, low bulk:
    Because it’s 2019, we haven’t used untreated cloth (F-111) for our wingsuit canopy. Instead, we’ve tracked down a low bulk ZP (treated with silicone) fabric, and used that for the majority of the wing, with the Powerband and top center panel made out of standard ZP for extra longevity.
    Riser equality:
    We’ve included a bit of internal structure that means your bridle will load both your risers more evenly during the early stages of deployment. Because of how it looks, we’ve called it the ‘Bow-tie’ – and as we all know, equality is classy!

    Photo Chris Stewart
    Little tail thingys:
    Mini-ribs in the tail of a canopy sharpens its profile, which reduces drag and increases glide performance by “a lot more than we thought”.  This translates to more fun in the sky, and a better flare on the ground. 7 cells are not usually known for their amazing flare power, so it all helps!
    Improve your pull-out game with a snatch:
    Symmetry is good, and so it is with your pilot chute. We’ve discovered that using snatches help with our wingsuit openings, so we have stocked up on them and highly recommend to purchase one with all Kraken purchases!
    Inward Rotated end cell:
    While most ribs are perpendicular to the lower surface, the end rib is rotated inward to reduce the size of the end cell and prevent it from losing its shape. This reduces tip vortices and induced drag.

    Photo Chris Stewart
    New line trim:
    Despite being a relatively docile canopy, the rectangular planform has been compensated with a trim just a notch steeper than you would think. This helps with up wind penetration, fun and is one of the reason for the great flare.
    New Stabilizer shape:
    The shape of the stabilizer has been modernized to prevent it from flapping too much in flight. It also helps the slider to sit in the right position. Custom Sizing The Kraken is available in any size between 119 and 189 so that you can get the perfect wing loading for you at this stage in your canopy progression.
    See the Kraken’s key features interactively on Emersya: https://emersya.com/showcase/5GFIH0C9Q0
    Key flight characteristics of the Kraken
    Openings The modern day wingsuit is capable of  incredible glide, but this efficiency brings its own set of complications when designing a parachute to match. The biggest factor is the turbulent wake formed behind the wingsuit – right where the parachute is deployed. Kraken openings are quick but not hard – you’ll feel inflation immediately. The vent helps control the heading. Once the center cell and adjacent cells inflate, the canopy slowly pressurises with a predictable reliability. The Kraken will sail on level seas even with linetwists! Inputs Intuitive and precise, each input delivers a predictable response. From opening to landing the Kraken is a confidence builder. Toggles Big inputs will produce an immediate response - the pilot will feel in control from first point of contact.
    Stall point
    The slow flight characteristics were a very important design factor for the Kraken, so there is plenty of warning before she stalls, and will recover to normal flight in an easy and stress free transition when slowly letting the toggles back up.
    Rear risers
    There’s lots of feel and response – the Kraken has fantastic glide! Milk those rears and disprove the myth that all wingsuiters land off! Front Risers F is for fun! Yep, the Kraken can dive!
    Performance
    The Kraken has loads of zip! Fly her nice and slow for those busy landing patterns when you want lots of vertical separation. Or dive her at the ground and drag some turf. There’s plenty of fun to be had!
    Recovery Arc
    The recovery arc is longer than typically experienced with similar 7 cell designs. For someone who wants to have their cake ( a nice sensible wingsuit canopy) and eat it too (swoop the shit out of it), then go go go! Flare The Kraken has a wide range of performance, the flare is one of the most important aspects - she wont disappoint. Those nil wind tiptoe landings will feel very natural. More information available from:
     

    By Meso, in Gear,

    Four-Armed is Forewarned

    Altitude awareness is easily the most important aspect of skydiving and it’s no wonder that audible alert systems were one of the first technological inventions in the earlier days of skydiving. Like most things technical, significant advances have been made, and any device that provides information/feedback during a skydive is a valuable addition to any skydiver’s tool kit.
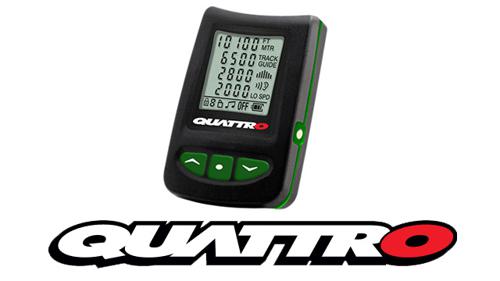
    Larsen and Brusgaard, the foremost authority on altitude-measuring/awareness devices, launched a new product named the “Quattro,” in early 2014. With four user-programmable altitude notifications/alarms, the Quattro has become incredibly popular.
    Why?
    It’s important to understand what an audible offers skydivers involved in precision activities. Once relegated only to scream at a skydiver that they’d missed their point of deployment, audibles are now used for indicating user-controlled altitude alarms, while still providing feedback for deployment, hard deck, cutaway, or other altitudes warnings.
    From a wingsuiting perspective, I cannot imagine anyone not owning a Quattro. With the ability to generate seven notifications in flight, wingsuiters have no reason to not be set for exact breakoff points, maneuver points, deployment, entry and exit gate-points for performance training, competition points, and the list goes on and on.
    Wingsuiters fall at different rates, and with radically different wingsuits, everyone has different needs and wants. With this in mind, I’ve put together a few bullet points on where the Quattro benefits wingsuiter pilots.
    COACHING: Frequently, wingsuit coaches have a “no more work altitude” that is different than deployment altitudes. For example, I want students to not perform tasks below 6000’ but frequently continue stable flight until 4,500. As a coach, I want these notification alarms in addition to my own personal alarms of 3,500’ and 2500’ and my hard-deck alarm at 1600’.
    As an FFC/First Flight Course coach, students are given specific tasks at specific altitudes on the climb to altitude. The Quattro provides three “climb to altitude” alarms that a coach might use to remind him of those points where the student should be providing feedback or information. For example, students might be giving a verbal description of the skydive at 5000’ or indicating their countdown and waveoff point at 6,000’. In any event, climb-to-altitude alarms serve a multitude of value.
    PERFORMANCE TRAINING: Wingsuiters competing in FAI Performance Categories need to enter their performance gate at 3000m/9842’ and exit the gate at 2000m/6562’ and while the mandatory Flysight can provide these entry/exit indicators, competitors can benefit from a pre-gate announcement that the Quattro can provide, in addition to deployment indicators.
    ACRO COMPETITION: In Wingsuit Acro, the competition clock starts as the competitors exit. In non-compulsory jumps, synchronization is frequently part of the jump, and having set points for an action, particularly where wingsuiters may not be facing each other (back to back flying), an alarm or series of alarms can provide valuable timing information. The multiple alarms are also good for notifying competitors when they’ve reached their competitive deck, while still providing the “standard” three alarms for deployment, reminder, and hard-deck.
    HIGH ALTITUDE JUMPS: Wingsuiters engaging in high altitude jumps are flummoxed that most audible systems cannot provide feedback above 10,000’. The Quattro is capable of informing the wingsuiter as high as 19,990.
    Although the Quattro offers a broad spectrum of alarm settings, users are not required to enable them, and this is one of the features I appreciate most about the Quattro; users may configure the system to be as personal as needed, turning on/off various alarm points.
    Wingsuiters focused on performance frequently do not want to look at their wrist or chest mount altimeters if they’ve got a good performance groove happening, and full-face helmets often make it impossible to see chest-mount altimeters when in a performance configuration; an audible provides valuable feedback when cranking a chin around to see a visual may have a negative impact on performance.
    The unit allows for offsets, so if the landing area is a different elevation than the point of take-off, audible settings can be user-adjusted if the offset is known. Otherwise, the unit will recalibrate itself every 14 hours to the last MSL point of take-off. Manually zeroing the Quattro is as easy as pressing the center button a couple of times (this is the same procedure for generating altitude off-sets).
    As with previous L&B; products, the Quattro uses a pair of 2325 batteries, easily found at most any electronics store or grocery store that offers a wide variety of button batteries. In my experience, the batteries seem to be good for about 1000 jumps, or about a year. However, the Quattro and Optima seem to be very forgiving when the battery indicator says “replace me.” I’ve tacked on another 300 jumps after the indicator told me I had an empty battery.
    While just about any discipline in skydiving can benefit from the Quattro’s numerous features, wingsuiting is one aspect of the sport that frequently demands “more.” Wingsuiters love data, feedback, and algorithms designed just for them, and the Quattro certainly delivers. It probably helps that some of the folks at L&B; are avid wingsuit pilots, and have taken time out to really dig into what makes wingsuiting and wingsuiters just “a bit different” than other skydivers, and in the Quattro, they’ve really done it well. Although I’m not a speed skydiver, I can only surmise the multiple alarms would also benefit the speed discipline.
    Several helmet manufacturers have recognized the value of L&B; products, and have custom-fit slots for the Quattro (or Optima2, Solo) audible, and some have given exterior access to the audible. One feature I very much appreciate in my Tonfly helmets is that I can access the audible from the outside, letting me know my altitude settings are correct, that my battery is good, and that the unit is active (I frequently turn it off if I’m not going to be jumping for a few days). The unit display turns off after 14 hours, but will reactivate if it senses a climb to altitude. Unless manually turned off, it is always ready to jump. During frequent/daily jump cycles, I don’t bother to turn off my Quattro.
    By the way, for the color coordination-conscious skydiver, these are available with custom-configuration buttons, just like the Optima and Viso.

    By admin, in Gear,

    Squirrel Suits Release 'The Swift' Beginner Wingsuit

    Earlier this year we brought you the article Inside Squirrel Wingsuits, where we talked with Squirrel founder Matt Gerdes about the then new wingsuit manufacturing company. We discussed what set Squirrel apart from other wingsuits and where the company was aiming to go to from there. You can now find Squirrel wingsuits on a number of extremely skilled and well known flyers, and Squirrel is seemingly establishing itself as a trustworthy and reliable wingsuit company.
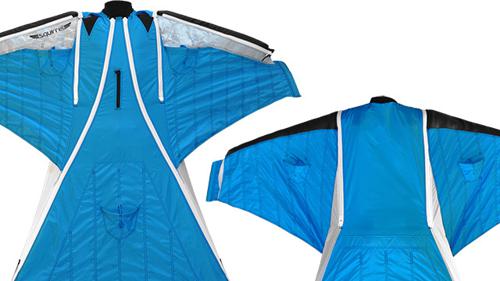
    The latest addition to the Squirrel inventory is the Swift. The Swift is a suit that is marketed as a beginner suit for both BASE jumpers and skydivers. While it is said to be easy to fly, it is stressed that the Swift is by no means limited to beginner flying and still a competent suit for intermediate and even experienced wingsuit pilots. When developing the Swift, Squirrel wanted to bring to the table a wingsuit that would be forgiving to fly, while at the same time providing the performance needed in a BASE environment and when flocking. There is also a focus on agility and the suit is said to be great for acro, backflying and other quick maneuverability.

    The Design
    Inlets
    The Swift's inlets are catered to efficiency, with the surface area being larger than on some other beginner wingsuits. Both arm and leg wing pressure is able to be adjusted using the internal zips, doing so will ensure that you are able to manage your ride to be softer, if you are a newer pilot.
    Leading Edge
    Leading edge construction is a pivotal and complicated matter in wingsuit design. While rigid structures on the arm would allow for enhanced performance, it would pose a safety risk, but at the same time an overly flexible design would cause a loss of performance. One of the key elements to developing a good wingsuit is to find the perfect balance between a rigid, high performance design and the safety that comes with the more flexible design. Squirrel suits say that they've found the right ingredients to allow the high performance, along with safety; thanks to their three-layer leading edge design. While the exterior layer is finished in Glideskin, a flexible, durable and smooth material, the middle layer is made from a static, non-flexible air-mesh material which is sized wider than the Glideskin. This stronger, more fixed middle layer ensures that the profile does not become deformed. Finally on the interior is a Lycra finish which provides a smooth surface. Only the first few centimeters of the wrist will allow for full flex, as to allow for easy BOC and brake toggle access.
    Planform
    Squirrel have gone with a stance and sweep that is extremely similar to their more advanced wingsuits. This will allow those who begin flying on the Swift to easy adapt and progress to some of the more advanced Squirrel suits. Should you begin jumping with a Swift and then later move on to the Colugo, you'll find the transition easier due to a familiarity. Likewise if you had to move from the Colugo to the Aura.
    Profile
    The Swift has taken its profile from the advanced Squirrel suit, the Aura; with adaptions made to the Swift's lower surface area and shorter chord. Squirrel say that the thickness of the Swift is similar to that of the Colugo, and was chosen because of the focus on stable trim flight.
    Features
    There is a focus that all performance enhancing features in a wingsuit should be standard. The aim from the company is to bring you excellent performance and features included in the price of the suit. All Squirrel suits include: Foam padded foot cavities, internal pressure-zips, nut-sack storage compartment, chest pocket / belly-cam access, mylar reinforced leading edge and rubber BASE soles.
    Access
    "Keep it Simple and Safe" has been the mantra for Squirrel and with easy BOC and brake toggle access being a focus in reliable deployments, the suit has been designed to allow for just that. Cutaways are totally unnecessary, says Squirrel, pointing out the extremely easy BOC access and ease of access for the brake toggles, in any situation. The Swift has been designed to bring the flyer the excellent performance while never compromising on safety.


    Features
    Force Feed - A 3D reinforced inlet with maximum intake to drag ratio. Developed as a primary safety feature.
    Innie-Outie (BASE Mode / Skydive Mode) - This feature allows you to easily change between BASE or skydiving mode. In BASE mode the harness will be located on the inside of the chest compartment, for reduced drag and optimum glide; this is enhanced by the zips being completely closed. In skydiving mode the handles are completely exposed at the chest, allowing for easy access and an increase in safety.
    RAD (Rapid Arm Deployment) - A simple arced cut at the wrist allows for increased ease in the reaching of the pilot chute and toggles. A small, yet highly effective feature.
    Get Stiffie - A Mylar-reinforced bottom surface on the leading edge ensures that the profile structure is maintained, as well as providing efficient feeding to the inlets.
    Get Stretchy - In BASE mode, the flexibility of the panels near the shoulder relieve stress on the suit during openings. Bar-tacks in areas also help prevent seam failure.
    Light Ribs - Porcher Sport Skytex ensures that the suit is light and durable, while at the same time being more stable than mesh. This helps in reducing weight and pack volume.
    Glideskin - This flexible and durable material is used on all Squirrel suits and is used on the leading edge, where it is able to provide a stable profile while at the same time allowing for flexibility at the wrist area.
    Airtight Construction - All Squirrel suits are tested thoroughly for airtight symmetry in order to ensure the highest build quality possible.
    Super Sexy Zippers - While safety and performance are at the top of the list, the Swift is also a good looking suit. The suit uses custom ordered YKK #10 Coil zips. You will have the ability to choose between five colors of zips when ordering your suit.


    By admin, in Gear,

    Squirrel Releases SUMO Tracking Suit

    Squirrel Wingsuits have just released the latest addition to their inventory. The SUMO is a tracking suit, the first to be manufactured by the company. The suit is aimed towards both BASE jumpers and skydivers, and catered towards all levels of experience, from beginners through to advanced trackers.
    It was the decision of Squirrel to opt for a 2-piece tracking suit system as opposed to a single piece suit, aiming to bring the comfort and ease of use found in 2-piece systems while providing the performance of a 1-piece suit. The driving concept behind the SUMO was for a tracking suit that balances both volume and stability, while making internal pressure and quick inflation vital points in its design.
    The SUMO has an included “No-Wobble System” which secures the pants to the knee area. This feature, which can be toggled to be active or inactive, helps prevent movement while tracking, giving you better performance and is recommended for proximity BASE jumps, multiways and flights that demand only the best performance. It is attached to the area using Velcro, which can then be easily left unfastened, should one not wish to fly with the No-Wobble system.
    The suit is tapered slightly from waist to ankle, to increase the ease of handling. It is also quick to inflate after exit and is said to provide excellent forward speed with simple and intuitive control.
    Squirrel have built the SUMO tracking suit with the same high standards that have made their wingsuits such a success.
    It is highly advised that BASE jumpers first practice jumping with the SUMO from by skydiving it until they have become comfortable with the way it flies.


    SUMO Tracking Suit Features

    Force Feed
    The majority of power in a tracking suit comes from the pants, and the SUMO benefits from an array of mylar-fed inlets which rapidly inflate and maintain pressure inside the suit.
    Quick Starts
    The SUMO's oversized arm inlets provide immediate control after exit. Upper arm inlets allow early inflow after exit, and the shoulder inlets maintain pressure in flight, through all angles of attack.
    No-Wobble
    Inside the pants at the knee, Squirrel have added a Velcro enclosure which anchors the pants to your leg, reducing pant-leg wobble and increasing control and performance. This is one of the most crucial features of the SUMO, giving the pants a more precise and solid feel when maneuvering in high speed tracks.
    Air-Tight
    A high collar, cinched wrist, and extra-long torso help in reducing leakage and maintaining jacket pressure.
    Plenty-Pockets
    There are four zipped chest pockets which provide plenty of space for phones / emergency electronics / gear storage, and the jacket is lined with airmesh and lycra/fleece for comfort and structure.
    Reinforced
    The knees of the SUMO are heavily reinforced with Cordura, with 5mm of closed cell foam padding for protection and structure.
    Toe-Tension
    There are three toe-tension settings available , which use a lightweight and simple buckle/strap adjustment to maximize fit performance.
    Zips
    Highly durable and custom colored 10C YKK zips run up both legs.

    By admin, in Gear,

    Know Your Gear: Harness and Container Systems Part 2

    Harnesses: Fitting to your body and effects to consider...

    During part 1 (take a look here) we described the different parts of a skydiving harness and the materials used on it. On the second part we are a bit more practical. Here we will go through most (all?) harness options and designs, independently of the manufacturer. We will see what they are and which purpose they have, so you can decide if they are for you or not. Most manufacturers are open to offer non standard options if the buyer asks about it. However, there is a significant number of options that are specific for a subgroup of manufacturers, and therefore you can't freely mix and match every single option explained here.

    To keep things ordered we will go from top to bottom of the harness. Let's go!
    Risers

    Going from top to bottom, the first thing you find are the main risers. As simple as they seem to be, they have a significant number of options.
    Webbing

    The first thing to decide is which type of webbing you want on your risers. In this time and age there is little debate: If you are not an outlier you'll want type 17 risers. There are multiple reasons. The main technical reason is that it makes it easier to pull down the slider to stow it behind your head. Type 17 is also preferred to type 8 because of its lower bulk and cooler appearance (which is, of course, not a technical reason). It typically comes paired with minirings, which are also less bulky than traditional rings and "cool" looking.

    Regarding webbing, a second option is to have risers sewed in half, reducing its cross section and drag. This option is only available in type 17 risers and has a very specific audience: hardcore swoopers. They need to reduce drag as much as possible, to squeeze out all the performance in their canopies. If you are not a hardcore swooper you can ignore this option. Moreover, some manufacturers advise against these low profile risers if you are going to deploy at terminal speed.

    The last bit regarding webbing on risers is its length. 21" (53 cm) is the standard length of many manufacturers. As usual, check first with them to ensure that is true. You can also order them shorter (if you have short arms) or longer. It is normally recommended to have them as long as possible, but allowing to reach the slider. That's because with longer risers the canopy can "open up" a bit more, and you'll have more range in all your controls, particularly in toggles. That also means that you can stall your canopy easier, so the whole system has to be in balance.
    Diving loops

    Diving loops are nowadays kind of standard, and even rigs targeted at newly licensed skydivers have them. There are, however almost as many kinds as manufacturers.

    The simplest type is a loop of type 17 webbing sewed close to the top of the front risers. These loops are easy to manufacture, cheap, and play no role on hooking your main canopy. On the flip side, they lay flat against the risers, making them more difficult to grab and causing distractions, and are harder on the fingers.

    Another common type of loop uses tubular webbing. The advantage of this type of loop over the simple type 17 is two-fold: It is easier on the fingers, allowing to hold the front risers longer, and the loop tends to stay open, making it easier to grab. Sometimes these loops have extra material inside (stiffeners or bungee cords) to ensure they stay open when you need them. It is also possible that the tubular webbing is sewed in the inside part of a regular type 17 loop.

    In recent years the so called "louie" loops have become more popular. These loops have a double layer of webbing, and stay easily open. But their most distinctive feature is that they wrap the loop used to connect the canopy to the risers. That implies 2 things: First and foremost, they require more attention when connecting a canopy. The soft links (these loops do not accept hard links) have to go through the diving loops and the connecting loops. Routing the soft links just through the diving loops can have serious consequences. The stitching could break and the whole line group could be released. The advantage of these loops is that it allows the canopy pilot to pull from the highest point of the risers, giving more range and a more comfortable pull.


    Diving loop with tubular webbing on the inside for added comfort and to keep it open.


    Louie loop. Note how the soft link has to go through the link loop and the dive loop.  

    The last thing to comment here is that CRW dogs typically have dive blocks instead of dive loops. Dive blocks are easier to grab and release, which makes them more useful than loops in that environment.
    Toggles

    Manufacturing techniques vary wildly between different rigs. So much, that we won't cover them in too much detail here. What is important is that the toggles stay secured until you grab them. To the best of my knowledge, that is true for every modern reputable manufacturer. Nevertheless, we can analyze the different components/options, even though each manufacturer uses its own technique and rarely offers changes to it.

    Brake line retainer: That's the part of the toggle that goes through the cat's eye in the brake lines. Normally it is a "hardened" piece made using multiple layers of webbing. Some manufacturers use a straight pin instead. While this seems like a good idea, it opens the door to misrigging, since the pin fits through the guide ring. That could result in the brake line pulling on the pin and its pocket, which could be easily damaged.

    Toggle retainers: The toggles need to be secured in place. This is achieved with either stiffer parts inserted in pockets in the risers (just like the brake line retainer), straight pins inserted in tighter pockets, or snaps. The number of stiff parts and pins varies between 2 and 3. The orientation also varies. That is why some cases require an upwards motion before pulling the toggles down to release them. Should snaps be used, it is important to remark that the snaps should perforate an extra piece of webbing sewed in the risers, not the webbing of the risers itself.

    Slack retainers: These are loops sewed on the back side of the back risers. They can be a simple piece of tape (which tend to let the slack a bit more loose), or a elastic (which secures the slack better, but makes the slack stowing more tedious).


    Toggle with stiffener on top and pin on bottom, tape slack retainers and closed top pocket. Other options are stiffeners on top on bottom, pin on top, extra stiffener pointing downwards on top, elastic retainers and open (at the top) top pocket.  
    Additional guide rings
     

    Some riser manufactures have the option of placing an extra set of guide rings at the top of the risers. This way, during full flight, the brake lines go through this set of rings, but not through the normal guide rings. To stow the brakes the cat's eye has to go through the normal rings, the toggle has to lock the brake in place, and the excess can be normally stowed. The benefit of this option is to have a smoother transition to rears, and reduce the length that the brake line is traveling, since it doesn't have to go down to the guide ring and up again towards wherever the pilot has his/her hands. If you are into canopy piloting, or if you need to have very short brake lines, this might be an interesting option for you.
    3 rings

    The last set of options in the risers is the 3 rings system. The first thing to decide here is if you are happy with today's standard: Minirings. The vast majority of sport rigs have them today, mostly for aesthetic reasons. They work just fine, and you rarely see rigs with large rings nowadays. But the pulley minirings form is slightly less effective than in large rings. That means that the force needed during cutaway might be higher. Modern risers have extra housings for the cutaway cable -sometimes with teflon inserts-, to avoid them from being pinched in twists, and make cutaways more difficult. The usage of these housings in modern risers offsets the extra force required to cutaway with minirings in most cases. Another thing to consider is that typically minirings come with type 17 risers, and large rings with type 8 risers, even though other combinations are possible. So the type of webbing you want on your risers might tip the balance for you, if you are undecided.

    Aerodyne, to keep the aesthetics of minirings but without compromising on pull forces, designed a modified 3-ring release system. The "miniforce" rings system is essentially the same as other minirings systems, but with an enlarged middle ring. That improves the pulley efficiency and reduces the load in the white loop. If you want to use these risers in a container not manufactured by Aerodyne, check first with your manufacturer about component compatibility. We will talk a bit more about this at the end of the section.


    Aerodyne's "miniforce" 3-rings system.

    Lastly, you can decide the hardware finish. There are 3 main options in the market:

    Cadmium plated steel: This is possibly the oldest type of hardware used in skydiving that is still sold today. It works well will all kinds of webbing, the plating offers corrosion protection and it is generally cheaper, despite the extra costs associated to dealing with cadmium's toxicity. However, the plating can flake off over years, and then corrosion might happen, depending on the environmental conditions and how you treat your gear. Moreover, it is not shiny, which goes against one of the (sadly) first principles of skydiving: You have to look cool.


    Cadmium plated steel 3-rings system after more than 1000 jumps.

    Stainless steel: This kind of hardware is the most commonly used today. It offers better corrosion protection than plated steel, since there is not plating that can flake off. It is and stays shiny. And it slips more. 3-rings release system can lose about 5% efficiency (more force transmitted to the small ring) because of the reduced friction. Arguably, in well manufactured miniring systems, it doesn't play a role.


    Stainless steel 3-rings system after 100 jumps.

    Black hardware: This is the latest addition in hardware finish. It is steel hardware with an oxide layer, that gives it its matte black color. It is relatively recent, so field experience is more limited than stainless steel and cadmium plated steel. Some people claim that after hundreds of jumps it doesn't have significant usage marks. However, at least in some cases, marks are pretty visible (see also the pictures of chest rings).


    Black 3-rings system after 100 jumps.

    The chosen finish will affect the 3-rings system, buckles, chest and hip rings, and RSL shackles. However, whatever you choose, it won't affect the grommets or housings of your rig. Maybe something to consider.

    Some people mix risers with different hardware materials and from different manufacturers. This works fine in most cases. However, you are stacking the odds against you if you are not careful. On one hand dimensions and placement of all the parts should match. RSL ring side, cutaway cable inserts and length of cable, large ring dimensions -that can be different even among minirings systems-, large ring placement -higher or lower in the MLW-. All these are things to consider. There have been already fatalities rooted in a poor mix of components (reverse risers on a Javelin container). On the other hand, NAS-804, the specification required by TSO-C23b, states "The use of dissimilar metals, especially brass, copper, or steel in intimate metal-to-metal contact with aluminum or aluminum alloy, shall be avoided, whenever possible.". So, in principle, unless you know better, you should avoid mixing types for extended periods of time, as you might cause premature degradation of your hardware. Also, "miniforce" risers work fine with Aerodyne rigs. But the enlarged middle ring might not release cleanly in other rigs. Check compatibility with the manufacturer of your rig before using that mix.
    Chest rings

    Exploring down our harness we get to the chest strap junction. Most manufacturers -but not all- add chest rings to articulate their harness, either by default, or as an option. A fully articulated harness (with chest and hip rings) is supposed to be more comfortable, as the webbing doesn't need to bend and fold as much as a non-articulated harness. However, the chest is an area where these deformations are not really pronounced. As much as your body moves and twists in freefall, your upper torso stays pretty rigid. Nevertheless, chest rings help to avoid awkward and uncomfortable webbing twisting when the harness has been made for a larger person than the wearer. In these cases, the tendency is to overtighten the chest strap to compensate and secure better the jumper. That brings both chest junction together more than they should, and without rings the webbing would be unnaturally bent at that point. Of course, in an ideal world, every skydiver would have a harness that fits them properly, so this would never happen.

    Besides the arguable increase in comfort, chest rings are an excellent investment if, for whatever reason, the harness needs to be resized or repaired in the lower MLW. With chest rings the area affected is reduced to the webbing between the chest and hip rings. Without chest rings, the amount of work (and price) for this would be significantly higher, since the MLW is sewed to more components that would need resewing or replacement.

    Like the 3-rings release system, the chest rings can have different finish. More unique to chest rings is their orientation, and its influence on fitting and chest strap width. The chest rings used in every modern harness/container system are always very similar to the large ring in the 3-rings release system. The only possible difference is the bend in the slot where the MLW is threaded, which might or might not be present. In the chest, manufacturers orient the ring in 2 different ways: With the threading slot towards the upper MLW, or towards the chest strap. There are a few subtle implications:

    Rings with a vertical orientation (threading slot towards upper MLW) accept more naturally type 17 chest straps. In roughly half the circumference of the ring, the manufacturer has to accomodate the lower MLW and the chest strap, so commonly type 17 is used for the chest strap. That doesn't mean that type 8 is not possible. It is, but being it more bulky, it is less convenient.

    Rings with a horizontal orientation (threading slot towards chest strap) accept more naturally type 8 chest straps. I have yet to see this configuration with type 17, but it is, in theory, possible. Looks would be compromised for no reason though, so it is unlikely you'll see it either. Another thing to consider with this configuration is the range of motion of the upper MLW. Here, it can slide to the sides easier (the ring stays in place and the upper MLW can slide on it) than in vertical configuration (where the whole ring has to move and overcome the friction with the chest strap and the lower MLW). What that means is that when flying steep head down angles, the harness can slip down (up?) your shoulders easier than in other cases.


    Black chest ring after 1000 jumps. Note the shiny side on the right.

    Chest ring with the threading slot towards the upper MLW and a type 17 chest strap.

    The last option to consider regarding chest rings is the use of padding under the rings. Not many manufacturers offer it, but it is nevertheless possible.


    Chest ring with the threading slot towards the type 8 chest strap. The additional tape keeps the padding secured under the ring. Chest strap

    As we mentioned already, there are two chest strap widths to choose from. Regarding strength, there is no real difference, since the weakest point is the friction adapter, which is rated at 500 lbs independently of the width. Type 17 is less bulky and has less drag, which some swoopers would care about. It is also true that these same swoopers, the ones that can notice the difference, would completely remove their chest strap after opening and stow it away (while using a belly band to secure themselves). So this is also a moot point. At the end, this is one of these options that are completely a matter a personal taste.

    Another option regarding chest straps is their length. Most manufacturers have a standard length, which is typically around 19" (48cm). Normally this can be extended at no cost. Long chest straps allow the jumper to open up their harness and therefore their canopy, for increased efficiency. With a long chest strap it is also possible to lean forward during landing for a more active canopy piloting position. Regardless the length of your chest strap, if you are going to loosen it as much as you can, you should pay attention to its termination. Type 8 chest straps have a folded end that acts as a stopper and prevents the chest strap from being accidentally unthreaded. Type 17 terminations are sometimes not that effective, depending on how it was done.


    Termination of a type 8 chest strap. The tip has 4 layers to make it stiffer and the tab prevents the strap from being accidentally removed.


    Terminations of type 17 chest straps. The top picture has an extra tape, that creates a tab. The bottom picture has a stiffener at the tip. Note how fuzzy they are, specially the one on top. That's the effect of rubber instead of the normal elastic bands. Lastly, some manufacturers offer wide webbing loops in the chest strap to stow it. That replaces the default elastic bands, that tend to stretch over time loosing effectiveness, and can also get lost. This option is more common on type 17 chest straps than on type 8. Whatever you choose (elastic band or webbing loop) avoid rubber bands anywhere in contact with webbing. Rubber bands are fairly abrasive. As a result they will weaken your webbing and make it look fuzzier.
    Handles

    The next decision point coming down the harness affects the cutaway and reserve handles. The most common combination is a pillow for the right side (cutaway), and a metal ring for the reserve ripcord. But there are variations.

    Pillow handles are popular among freeflyers, because they are less snag prone than other options. Many of them use pillows for both the cutaway and reserve handles. The obvious downside, is that they make grabbing and pulling them more complicated. A pillow requires your whole hand to grab it. On top of that, it has a similar texture to your jumpsuit fabric, so if you are not looking and you have a loose suit you can grab part of your jumpsuit by mistake. To make them easier to grab, some manufacturers make sure they have a harder core. Others make them extra fat. And others sew an extra layer of a less slippery material. You can also embroider pillows for extra "flashiness", which is not possible with other types of handles.


    Reserve pillow handle, with embroidery, a pocket between both pieces of webbing on the MLW, and a spectra ripcord.
    Metal rings have been around a longer time than pillow handles. They are easier to grab (you can simply hook your thumb through them) and have a very distinctive feeling, so you can't possibly grab your jumpsuit fabric by mistake. On the other hand they are easier to snag when your buddy is grabbing your harness or with a small camera during exit. To mitigate that, some manufacturers offer low profile D rings, that stick out less than traditional D rings.


    Reserve D ring with a pocket between both pieces of webbing, and a steel cable ripcord.

    The last option is having a webbing loop with a stiffener inside to retain its open shape. These handles are very common in tandem rigs. However, in sport rigs they are rarely used. They are compromise between pillow and D ring handles.

    The reserve ripcord has been made of a steel cable for a long time. It works well in most cases, and most manufacturers stick to it. Others give the option of using a spectra ripcord with a bungee inside. In some cases this is the default for new rigs. The claimed advantages are many. Since spectra is more slippery than steel cables, it reduces the pull force required. In case of a dislodged handle, the bungee will keep it close to the housing and minimize the area in which it will be bouncing around. It is also cheaper to manufacture and inspect in some cases (steel cables have a hidden swage inside the pillow to keep them connected to the handle). However, it is slightly easier to misrig (the reserve pin can be threaded through just some fibers of the ripcord, instead of through the loop) and can be damaged by a sharp edge in the housing easier than a steel cable.

    The next option here is the material of the cutaway cable. Almost every manufacturer offers "lolon" coated cables. These are the standard yellow cables that most people are familiar with. They are reliable if the user/rigger ensures proper length and maintenance. The maintenance requires regular cleaning and lubrication of the cables. This is often neglected, which can result in increased pull forces during a cutaway. An alternative material is teflon coated cables. These are orange or red, and are currently in use just by Parachute Labs and their Racer harness/container. The advantage is that they don't require periodic cleaning and lubrication. However, getting them right is more complicated, as teflon doesn't stick easily to the cable. That resulted in the past in the core of the cable detaching from the coating, leaving the sheath locking the 3-rings release system. Regardless of the material you chose, it would be smart to check regularly your cables for cracks or other issues to avoid similar situations, as in theory it could also happen with "lolon" cables.

    Finally, there are a few ways to construct the pockets for the handles. The most common ways are either sandwiched between the 2 pieces of webbing of the MLW, or with a specifically manufactured pocket made of fabric wrapping the MLW webbing. As long as the velcro is in good condition, both are equally secure. On rigs with chest and hip rings the pocket wrapping the MLW is more common, as there is extra stitching necessary to secure the MLW in place, right where the handles are. Another advantage of the fabric pocket is that velcro is placed further away from webbing, avoiding possible contact and damage. On some older rigs, the cutaway handle might be attached just with a simple velcro strip, without extra pockets or in between the MLW. This is easier to disengage accidentally.


    Reserve pillow handle, with pocket wrapping the MLW and a steel cable ripcord.

    Cutaway pillow handle, with a simple velcro strip on the back side of the MLW.
    Hip rings

    More important than chest rings, are hip rings. However, they are more difficult to evaluate for a variety of reasons. The most important one, is that each manufacturer puts together in that junction a different set of harness components. Let's see this in more detail:

    MLW, laterals and front and back leg straps: Some manufacturers might connect together in a single round ring 4 different components. This has a couple of disadvantages, and that's why it is not a common configuration. First and foremost: it connects the leg straps too far up. The angles then could be a bit more awkward and less comfortable, particularly if you are a tall person and want to sit on your harness during canopy flight. Secondly, with 4 connected components there is little room for a belly band.


    Round hip ring connecting 4 different components (lower MLW, laterals and front and back leg straps).

    MLW, laterals and a single leg strap junction point: This setup is far more common than the previous one. Having the front and back leg strap junction working independently from the ring, and therefore placing this junction further down in the harness, allows to have a more comfortable fit. The angles of the leg strap become more natural. Nevertheless, the consequence of this is that the leg strap becomes slightly more stiff. There is a non-articulated junction between front and back leg straps, and they move as a single component. Most manufacturers design the geometry of this junction in a way where the back leg strap connects to the ring, and the front leg strap connects to the back leg strap. Rigging Innovations does it the opposite way in their Curv. There these roles are reserved and the front leg strap is connected directly to the ring. As a result, when the leg strap moves forward, it pulls in a bit more on the hip ring, and consequentially on the whole container.


    Round hip ring connecting 4 different components (lower MLW, lateral, belly band and leg strap)

    MLW and front and back leg straps: This arrangement is also very common. The ring is placed further down than in the previous case, which allows to connect independently the front and back leg straps, while preserving comfortable angles. Laterals are connected to the MLW above the ring in this setup. That junctions is very stiff, and right above it is the handle pocket. The small area in between absorbs whatever angle change you induce by leaning forward, so it ends up bending sharply. Another effect of this arrangement is that having the rings below that junction makes belly bands sit further low than in harnesses with rings connecting laterals. But the positive side is that both parts of the leg strap can move independently. Some people like them to move "at once", and so opt for a setup that adds an extra piece of fabric that softly links front and back leg straps and slightly covers the ring.


    Hip ring connecting 3 different components (lower MLW and front and back leg straps linked with an extra piece of fabric). Note how further up is the lateral junction.

    Each arrangement is a tradeoff. Depending on your body type and chosen discipline, you might prefer one setup or another. Part 3 will focus on body types and will explain how theses tradeoffs might affect you.

    As with chest rings, repairs are easier on harnesses with hip rings than without them. Another thing in common with chest rings is that hip rings are also affected by your choice of hardware finish.

    An option related to hip rings is the belly band. This component can have 2 different functions. Most people that use them do it in their swoop setup. They undo completely their chest strap, and stow it away. To stay secured in the harness they use belly bands. The second group of people interested in belly bands are people whose harness has laterals that are too long. With a belly band they can pull their hip rings a bit forward, making their container stay closer to their lower back and move less in freefall. That is particularly important while freeflying. Of course moving the hip rings too much forward can distort the harness geometry and affect comfort. If you are in this situation chances are that you should get your harness resized.


    Hip ring connecting 4 different components (lower MLW, front and back leg strap, and belly band). Note how this setup places the belly band lower than in a setup with a ring connecting to the lateral.
     
    Laterals

    As we saw in part 1, the laterals are the part of the harness that connect the back of the harness with the lower MLW. They are critical for comfort during freefall and under canopy. Too long and you will have a huge gap between your back and your container. Too short and they'll make your harness feel too tight and uncomfortable. The default construction, with the laterals coming straight out of the edge of the backpad, works fine if your back is significantly wider than your container. But in many cases that's not true, the container and back are about the same width, and there is a measurable gap between the back side of the laterals and your back.

    Many manufacturers try to find a way to contour to the side curvature of your back (back to front, at the belly level). That makes the container more comfortable and it stays in position without moving around much. There are essentially 2 schools for that. The most common is to find "cut-in" laterals, where they are inserted in the backpad not at the edge, but somewhere more centrally. This style of laterals are in contact with the jumpers back, and typically they are padded for extra comfort. Another type is to have the webbing coming straight from the edge, get to the hip junction, and come back a bit more towards the center of the backpad, wrapped in padding.

    There are alternatives to the two main approaches. Infinity and Sife provide floating laterals as an option, where the lateral webbing goes through the webbing slot of the hip ring, which moves freely. Sife adds padded stabilizers to that configuration. Mirage has the laterals coming straight out of the edge of the container, but has two elastic bands coming from the center of the backpad, acting as a sort of elastic stabilizers. Lastly, as in some student rigs, SunPath added adjustable laterals to their Aurora wingsuit rig.


    Straight laterals coming out of the edge of the container.

    Padded stabilizers. The outermost component is simply an stiffener wrapped in fabric, without major structural purpose.

    Floating laterals. Note how the ring can move freely through the webbing of the lateral.


    Elastic stabilizers.
    Leg straps

    Leg straps are the remaining piece of the harness. And of course, there are multiple options here as well. In part 1, we already saw multiple adapters. Each manufacturer has its default set of adapters. Nevertheless, some of them, can install an alternative style if you ask them. These adapters are also affected by the chosen hardware finish. As it has been mentioned before, stainless steel is more slippery than cadmium plated steel. The teeth of the adapter could also be harder and sharper if they were the same design as plated adapters, which could damage the webbing and make the whole system work differently. That's why both types of hardware have slightly different designs. These effects are also part of the reason to have double layer straps, to make them thicker and slip less. Besides this, adapters are normally thread-thru. But it is also possible, even though not common, to order B-12 snaps. They allow to clip-in the leg straps, instead of having to put your legs through them.

    We have seen lots of options targeted for swoopers in the upper side of the harness. The bottom side also has options for this discipline. It is possible with some manufacturers to order wider leg straps, so sitting in your harness for long periods is a bit more comfortable. The tradeoff is that they are more uncomfortable during freefall and on the ground. Since swoopers tend to slide during their landings, the leg straps suffer a great deal of wear. That's why it is also possible to use leg strap covers, that can be easily replazable once they are worn out. That way, your harness stays intact.

    The last optional bit is the freefly bungee. It's functionality has been already discussed in part 1. There are basically 2 designs: Connecting the inner part with 2 webbing loops and a bungee; or connecting the outer part, with the bungee routed through a channel that hides the knots and distributes the tension.


    Freefly bungee connecting the inner part of the leg straps and knots exposed.


    Freefly bungee connecting the outer part of the leg straps and knots hidden in the channels.
     
    More harness options

    There are even more options than what we have covered so far. But they are difficult to classify going from top of the harness to bottom. For instance, embroideries. Laterals, leg straps, mud flaps (right below the 3-rings) are all areas were you can include any embroidery. Mind you, the embroidery is done in fabric, not in webbing. So for instance, to add an embroidery to your laterals, they have to have a piece of fabric covering the webbing.

    Other example are hook knifes. There are 2 common pockets for hook knifes: In the mud flap, or in the leg strap. Some manufacturers also add a hook knife pocket integrated in the fabric that makes their handles pocket. There are multiple models of hook knifes: Cheap plastic handle with a single blade, harder plastic with single or double blade, metal handle and single or double blade, or full metal knifes. Even though it is unlikely that you'll need it, it is recommended to avoid the very cheap knifes made of brittle plastic.

    Some manufacturers make contoured yokes, that adapt better to your shoulder area. It is also possible that they offer an "inverted yoke", where the container seams are inwards, looking a bit neater and slightly more comfortable on that area, since the sharper binding tape won't be rubbing against you. Every manufacturer also offers padding. Some include full padding (yoke, backpad, stabilizers and leg straps) as a single option. Others separate it in 2 or 3 areas, allowing you to choose with more granularity. Besides the standard padding, made normally out of some spacer foam, some manufacturers also offer "deluxe" padding in their backpad, made of a more comfortable material.

    Rigging innovations has gone an extra mile in the harness design of their Curv container, and offer 3 unique things. The first is what they call the bio yoke. There, they essentially separated the part of the yoke in contact with your shoulders, and the part of the yoke that connects with everything else inside the container (risers, reserve risers and housings). This way the part in contact with your body is more flexible and comfortable. The second is what they call the bio curve. This is a half container half harness feature. It simply contours the container so it follows the curvature of your back, avoiding gaps there. The third thing is a new leg strap geometry, which has been already discussed in the hip rings section.
    End of Part 2

    This concludes part 2. As you can see, there are tens of options, which create hundreds of combinations. Each manufacturer has their defaults and their common options. If you are buying a new container and want an option not listed in their order form, ask them. You might be surprised. If you are buying an used container, hopefully this will help you to decide on which harness designs and options are important for you, to narrow down your search in the wild second hand market.

    Part 3 will be the last part of the series. There the focus will be on how different harness designs might fit different body types, and how the wrong dimensions in parts of the harness will affect your flying, comfort, and potentially even safety. So if you enjoyed part 1 and 2, keep an eye out for part 3!

    By admin, in Gear,

    Todd Shoebotham Talks Pilot Chutes

    Todd Shoebotham, Owner and President of Apex BASE, Helps Jumpers Get the Details Right
    Note: This article discusses pilot chutes in a BASE environment and should not be used in relation to skydiving.
    Ah, the pilot chute.
    Our beloved little workhorse, it’s the first thing we take out and the last thing we put in. It gets dragged around. It gets abused. For all the obsessive fawning we do over our canopies, our pilot chutes get surprisingly little love.
    If you’re looking to change that--and learn a little more about the sizes and styles of pilot chutes that you should invite on your BASE jumping adventures--then you’ve come to the right place. We pinned down the inimitable Todd Shoebotham and picked his brain about it in order to share his infinite wisdom with our beloved public. We’re pretty sure you’re going to learn a few things, so lean in and listen!
    1. Keep your fingers out of harm’s way.
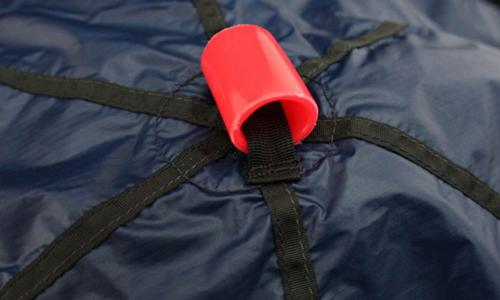
    Does your pilot chute have a tube handle? According to Todd, the data suggests that fingers have an uncanny tendency to make their way into that little tunnel at pull time, which can make for some seriously awkward Chinese-finger-trap deployments. “A few people have reported reaching back and going up to the knuckle into the PVC,” Todd says. “Or getting their fingers underneath the handle. When you’re reaching back, that’s certainly not what you want.”
    This problem can be solved in multiple ways. If you do have a PVC-style handle with a potential finger trap, Todd recommends taping over the ends in order to eliminate this possibility. Apex pilot chutes forego the tube for handles that wrap rubberized, textured fabric around a solid foam cylinder.
    “Compared to the old-style PVC handle, this is much lighter, too,” Todd explains, “And that lightness helps the pilot chute get orientated properly.”

    2. Travel with a well-curated collection.
    Since pilot chutes are available in everything from little 32-inch versions to behemoth 52-inchers, it can be challenging to determine what you really need to carry in your gear bag as a traveling jumper. Todd suggests that carrying a quiver of three to four will reliably cover your bases.
    “On the smaller end, we typically set people up with 36-inch pilot chutes,” he explains, “But we still stock the 32s. The 32-inch PC is probably the least-popular one in our range, because we believe they only belong on the lightest parachutes.”
    “We used to see 36s on wingsuit-specific rigs,” Todd adds, “But we’ve been seeing a lot of people with wingsuits favor bigger PCs because of their lower airspeed at deployment.”
    From there, Todd suggests having a 42--”the workhorse in the middle”--which covers your standard Potato Bridge jumping, and a 46- or 48-incher, depending on the size of your canopy, for objects more along the lines of a low cliff or structure.
    If you have a little more room in your luggage and you’re looking to jump a lot of subterminal objects, Todd suggests a 38-inch pilot chute. “Most people aren’t going to be using a 36 or a 38 handheld,” he says. “If you’re in that 5-to-6 second range, it’s a nice pilot chute to have, the 38. It is a slightly different pilot chute. It is not as strong of a pull, but you still have plenty of room there. I might not use it on all 400-foot objects, but definitely on some of them, and it is a little nicer flying with a slightly smaller pilot chute.”
    3. Make adjustments to compensate for your choices.
    According to Todd, there are mistakes to be made here in both directions. On one hand, unnecessarily oversizing is an easy mistake to make. While it’s not necessarily dangerous, it can negatively affect your jump if you don’t keep your delay relative to your PC choice (and create unnecessary distortion to the canopy during extraction, to boot).
    “If you don’t have the appropriate pilot chute for your jump and you don’t adjust your delay accordingly,” Todd says, “You might not like the results. If you were going to extremes in exposing a big pilot chute to a lot of airspeed, you would be stressing out parts of the canopy and your body. For instance: if you should really be using a 42 but you have a 46, you’d better go a little short on this one and enjoy the view from under canopy a little longer rather than taking your normal delay for that jump. I know you don’t want to, but that’s the pilot chute you’ve got.”
    “Also keep in mind,” he continues, “That we have seen peculiar behavior when some large pilot chutes are jumped slider-up. You can get some pretty weird interaction if you do that; the slider just seems more reluctant to come down. Personally, I think it has to do with the distortion that the canopy went through during line stretch; at any rate, we do not recommend it.”
    Take object familiarity into consideration.
    Since larger pilot chutes generally provide snappier openings, Todd asserts that object familiarity is a major factor to consider when choosing a pilot chute.
    “If it is your local object and you’ve really got things dialed in, I can see downsizing,” Todd says. “But if you’re a visiting jumper, you’re going to probably need to treat it a little differently. For example: If all the locals are using a 46, I’ll probably be using a 48 to stack the cards in my favor. If I make enough jumps there to become comfortable with the surroundings, I can see transitioning down to the 46.”
    “At the end of the day,” he insists, “You have to remember: In BASE jumping, really small changes in performance do matter. Make sure you’re prepared.”

    By admin, in Gear,

    Freefall Data Systems LLC Launch New Altimeters

    Freefall Data Systems LLC launched two brand new skydiving altimeters on December 18, 2017. SonoAlti an audible altimeter that can be set using Bluetooth® wireless technology. ColorAlti is a patent-pending reconception of the peripheral vision LED altimeter. It can also be set using a free app called FDS Altis that is available on Apple’s App Store or Google Play.
    SonoAlti


    SonoAlti was conceived to remedy the classic problem many jumpers have of trying to set—or remember how to set—their audible altimeters. It has three different types of alarms (ascent, freefall, and canopy) and up to eight of each type can be set. The volume of each type of alarm can be set individually and the user can select from a sound bank of 64 different alarms. The unit is always on and has a rechargeable lithium polymer battery with a life of approximately 200 jumps or three months. Although it is not its primary function, SonoAlti also includes a speed tracker feature, which allows the user to get real-time feedback during a jump of vertical descent speed via beeps. In addition, SonoAlti tracks jump numbers as well as freefall and canopy time. Using the app, one can obtain information about the last recorded jump and view altitude and vertical speed graphs (up to seven minutes of data). These graphs can be saved as photos to the user’s mobile device.
    ColorAlti


    For ColorAlti, Freefall Data Systems LLC took the idea of peripheral vision altitude awareness and started from scratch. Unlike Elemental Technologies’ now defunct Chroma, ColorAlti contains a color LED, enabling it to display up to 256 different colors. The altimeter can be used in two different modes: continuous and discrete. In continuous mode, the light on the altimeter gradually blends through the colors of the rainbow according to two altitudes and colors of the user’s choice. In discrete mode, the light abruptly shifts to user-defined colors at altitudes of the user’s choosing. Up to eight of these discrete alerts can be programmed for ascent, freefall, and canopy. The unit has a flexible yet rigid gooseneck housing that is able to stay in place even at very high freefall speeds.
    Freefall Data Systems LLC
    CEO and Senior Engineer Casey Mongoven (D-33972) founded Freefall Data Systems LLC in 2016 in Lompoc, California. Casey designs all hardware and software for FDS products. He is also an active USPA Coach Examiner, AFF and Tandem Instructor with over 3000 jumps.
    http://freefalldatasystems.com/

    https://www.facebook.com/FreefallDataSystems

    By admin, in Gear,

0