Clean Up Your Turns
"Turn coordination" is a topic that, until recently, has been mostly unapplied to ram-air parachute aerodynamics. In simplest terms, this refers to the degree to which a flight vehicle is aligned to the relative wind during a turn. Another way to look at this is the degree to which a turning aircraft is pointed at the relative wind with regards to the yaw axis.
A "clean turn", from an aerodynamic perspective, is one that keeps the nose of the aircraft pointed at the relative wind throughout the turn. When flying airplanes, this prevents the passengers from spilling their drinks, as well as saving fuel and preserving airspeed. In parachutes however, this aspect of turning has mostly been ignored. As parachutes become faster and faster, the time has come to begin thinking about this aspect of our canopy flight for several very important reasons.
The first has to do with the ability of the pilot to level off at any point during the turn. Lets face it, sometimes the ground creeps up on us. Flying an aerodynamically sound turn increases the likelihood that you will be able to convert your airspeed into lift in a timely manner. If you are sliding sideways through the sky because you are simply jamming a toggle down, you are not prepared to interface with the planet. The relative wind is jumping across the bumps on your parachute, creating turbulent flow, while the suspension line load is getting shifted to one side of your canopy. When you attempt to stab out of an uncoordinated turn, there is a hesitation before the parachute begins to change direction and level off. If the ground gets to you before this happens you may find yourself watching Oprah in your hospital bed for a while (not that I have anything against Oprah).
The second reason for flying a coordinated turn has to do with overall parachute stability. In an uncoordinated turn, the nose of your parachute is not pointed at the oncoming relative wind. It is sliding sideways. This means that the pressure in your wing is being compromised, in addition to the wingtip on the outside of the turn being presented to the relative wind. If you hit turbulence during this kind of "sloppy" turn, you are much more likely to experience a collapse of this side of the parachute. In other words, if you are turning right, your left wing more likely to fold under. Interestingly, when an aggressive, uncoordinated toggle turn is released, the opposite tends to happen. When the right toggle is released, the right wing surges forward as the drag is released and it is presented to the relative wind, opening the door for a collapse on right side of the parachute. Either way, this can result in way too much daytime TV.
A fundamental problem...
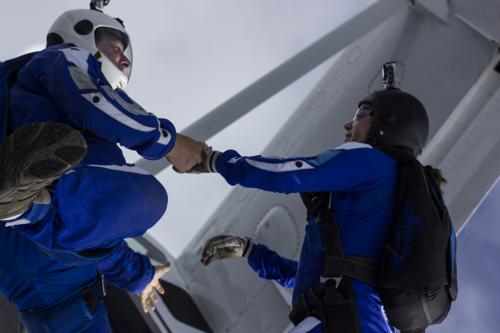
There is a fundamental problem with the way in which most of us were taught how to turn our parachutes. They said: "if you want to turn right, pull down the right toggle." Simply pulling on a toggle increases the drag on the right side of the parachute, retreating that wing tip. At the beginning of the turn, it is purely "yaw" energy. It is like the pilot of an airplane stepping on the rudder pedal. As a discrete action, steering toggles are an incomplete input. We need some "roll" energy.
The harness is more than a way to attach the jumper to the parachute. It is also a way to manipulate the canopy itself. If the right leg reaches for the earth as the left hip reaches for the sky, the parachute will turn to the right. It is true that smaller parachutes will respond quicker to such inputs than larger ones, with elliptical canopies responding the quickest, but harness input will have an affect all parachutes. Most importantly, when used at the initiation of a turn, harness steering converts a toggle turn into a coordinated maneuver. This is true if you are under a Lotus 190 or a Samurai 95.
When flying an airplane, all turns begin by initiating roll energy with the ailerons, (rotating the yolk), followed by an application of the rudder to coordinate the turn. The old airplanes had a string on the cowling (hood) to show the direction of the wind-flow, while newer ones have slip indicators on the instrument panel. If only we had such information while we were flying our canopies. Ah, but we do…
Trailing behind your wing is all the yaw axis coordination data you will ever need. It is called your pilot-chute. If you are flying a coordinated turn, your bridle will remain parallel to the ribs of your canopy throughout the turn. If at any point it goes slack, whips around like a snake or drifts off to one side, you are not flying a clean turn. You are not carving your wing through the sky; you are skidding out of control. The relative wind is not following the valleys of your ribs; it is hopping over the bumps, tumbling into chaos.
Try this on your next jump. Look up at your canopy while you are flying straight and simply yank a steering toggle down to the ½ brake position. You will immediately see what I am talking about as your pilot-chute swings off to one side. Next, lean in your harness, lifting one leg-strap to yield direct roll axis input. It may turn and it may not, depending on the wing. This is not important. Then, while holding the harness input, pull the steering toggle to turn toward the direction of your harness input. You will notice that the pilot-chute is trailing straight back, even in a sharp turn.
Once you have experienced your first real coordinated parachute turn, it is time to develop new habits. This takes time. I find that when learning a new skill like this, it is best to have a simple way to remember the process. In this case, try using the following sequence for every turn you make: 1) LOOK, 2) LEAN and 3) TURN. This is mnemonic was taught to me by a great paragliding instructor and skydiver, J.C. Brown. Rather than thoughtlessly jamming a toggle down, look where you are about to go, lean in the harness to establish the roll, and finally, pull the toggle down to flow deeper into the maneuver.
When you play with this kind of turn, you will find that the parachute simply feels better; that you feel more in control over the wing. You will also find that you can better bump both brakes down during the turn in order to reduce your decent rate, or even level off completely. While practice is necessary to perfect the technique, all parachute have the ability to transition from a descending turn into a level flight turn, into a soft beautiful landing. If you know how to carve your way out of a low turn, there will never be a reason to hook into the ground, ever.
Although many skydivers still think of their parachute simply as a means to get back down to the ground after a skydive, learning how to use the system the way it was meant to be used will increase the chances that you will get back down to the ground safely. Gravity pulls equally on those who love canopy flight as those who abhor it. From twenty years of teaching parachute flight I have learned this: you can only become great at something that you love. The more you understand, the more you will explore. The more you explore, the more you will feel control. The more in control you feel, the more you will love it. And that, ladies and gentlemen, is what it is all about.
BSG
Brian Germain is a parachute designer, test pilot, advanced canopy flight instructor and author. Brian's book The Parachute and its Pilot has become the worldwide source for canopy flight information and is available at a gear store near you, or through Brian's website: www.BigAirSportZ.com

Body Language: Helping Your Canopy Open Better
Many factors determine the way your canopy opens. The design of the canopy and the way it is packed are two important factors, but body position also plays a major role.
We learn to deploy our canopies in a basic, stable position as students, and many of us don't give this skill much more thought after that. Unfortunately, we sometimes develop a few bad habits that have a negative effect on our openings.
Even after making thousands of jumps, people have been surprised to find that a few small adjustments to their body position during deployment can significantly improve their openings.
This article is about deploying a parachute, one of the most important things you do on every skydive. It might be a good idea to practice these techniques on the ground before trying them in the air. You might even want to make a solo jump and try some practice pulls using these techniques before it's actually time to deploy.
If you are not a licensed skydiver yet, or have just recently earned your license, you should discuss this article with your instructor before trying anything you read here. He or she may want you to focus on more important skills, like altitude awareness and basic stability, rather than adding anything new to your pull sequence.
No Need for Speed
The speed at which you are falling when you deploy your canopy can have a large effect on the forces generated during the opening. As your airspeed increases, these forces also increase.
Many of today's canopies are designed for relatively slow openings, and some will not be affected greatly by a little extra speed at deployment time. Some jumpers even find that their canopies open better when they are falling a bit faster. This is not something you should take for granted, though.
Higher airspeeds might not cause a canopy to open hard as long as everything else is just right, but small variables tend to have greater effects at higher airspeeds. If you rush your pack job one time and let things get a little sloppy, or if your canopy is starting to go out of trim, extra airspeed could make the difference between an opening that is slightly abrupt and one that really hurts.
Slowing down before you deploy can provide a greater "margin of error" and reduce the effects that other variables have on your openings. Slowing down can be especially helpful if your openings are frequently or even just occasionally faster than you like them to be.
Vertical or "freefly" body positions like head-down or sit-flying allow you to reach much higher airspeeds than "flat" body positions. This extra speed makes flattening out and slowing down before you pull particularly important. Both beginners and experienced freeflyers should keep this in mind when planning their dives. Even if you don't freefly, simply tracking at the end of a belly-to-earth jump can significantly increase your airspeed, and you may still find it helpful to "flare out" of the track and slow down before you deploy.
To flare out of a track, spread your arms and legs and de-arch slightly for a second as shown in. This will help bleed off any excess speed. Keep your arms and legs spread out and maintain a slight de-arch while you wave off, remembering to look around for other jumpers. As you finish your wave-off and start to pull, relax back into a normal arch. If done correctly this doesn't take a significant amount of time and becomes a natural part of your wave off.
What Are You Looking At?
Take a moment to notice where you are looking while you reach for your pilot chute. If you jump with a video camera, look at some of your openings on tape. What do you see in the video as you pull? Are you looking up at the horizon, or down at the ground below you? Do you look back toward your pilot chute handle as you reach for it? Do you look over your shoulder after you pull?
Older skydiving rigs used spring-loaded main pilot chutes activated by a ripcord. Even in the late 1990's this type of system was still used on most student rigs. Those of us who were trained using this type of system were taught to look for the ripcord handle before grabbing it. We were also taught to look over one shoulder and "check" after pulling the ripcord. Looking over your shoulder changes the airflow over your back and helps clear pilot chute hesitations, which are common when using a spring-loaded main pilot chute.
Most licensed jumpers use hand-deployed main pilot chutes, and these are becoming the standard for student training as well. Even if years have passed since they transitioned to a hand-deployed pilot chute, many experienced jumpers still have the habit of looking for their pilot chutes as they reach for them and checking over one shoulder after they throw them. Unfortunately, it's almost impossible to look over your shoulder and keep your shoulders level at the same time. Looking over your shoulder also tilts your container to one side.
Although large, docile student canopies may not get offended if your shoulders and container are uneven, more responsive sport canopies will be much happier if you keep your shoulders level. Having your shoulders and container tilted as the canopy deploys can cause off-heading openings, line twists, and can even cause a hard opening.
Most of us have our pilot chutes mounted on the bottom of the container, so trying to look for the handle is really useless. Even if you still use a legstrap-mounted pilot chute, you probably can't see the handle very easily in freefall. Since hand-deployed pilot chutes are thrown into the clean air next to your body, pilot chute hesitations rarely occur and checking over your shoulder every time isn't necessary.
Some people have a habit of looking straight down as they deploy. This tends to put you in a slightly head-low attitude, which can increase your airspeed slightly. It can also amplify the opening force your body feels, since this force will mainly be transmitted to your shoulders when the canopy reaches the end of the lines. Also, your legs may swing through a wider arc as the canopy sits you up in the harness, making the opening feel more abrupt.
Instead of looking for your handle or looking down at the ground, try lifting your head up and looking out at the horizon as you reach for your main deployment handle. This puts you in a more head-high attitude. The opening forces will be transmitted farther down through the harness instead of being concentrated at your shoulders.Looking at the horizon also helps keep your shoulders and container level as you pull.
After throwing the pilot chute, bring your arms back into a neutral freefall position and think about keeping your shoulders level as the deployment bag lifts off of your back. You can also push your hips down slightly and bend your knees just a bit, as if you were in a very slow backslide. This keeps your head and upper body high.
In the past, some jumpers have recommended "sitting up" during the deployment. This can actually work well as long as it is done correctly, but if you sit up too much or too soon there is a risk of increasing your airspeed or even becoming unstable. Simply lifting your chin, looking at the horizon, arching a bit more, and relaxing your legs slightly has a similar effect to consciously sitting up, and you're less likely to overdo it.
Some people who jump with side-mounted cameras believe it's necessary to keep their heads down when they deploy, to prevent a riser from hitting the camera. This might be an issue if you have narrow shoulders or wear your chest strap very tight, leaving less room between your risers. It also might be a problem if your camera sticks out from the side of your helmet quite a bit. It's best to minimize this problem by keeping side-mounted cameras as small, streamlined, and snag-free as possible. If you're convinced it's necessary to keep your chin down, at least keep a good arch and relax your lower legs to keep your shoulders higher than your hips, and also focus on keeping your arms and shoulders level in the relative wind.
Back in the Saddle
As soon as the canopy sits you upright in the harness, try putting your feet and knees together for the rest of the opening . Putting your legs together helps keep your weight even in the harness and reduces the chances of an off-heading opening. This is especially effective if you are jumping an elliptical-type canopy. Just the weight of your legs swinging around or a small weight shift in the harness can cause some of these canopies to start turning.
If you grab your risers as the canopy is opening it's best to hold the lower part of the risers, just above the 3-Ring system. If you grab the risers up near the toggles you might make the canopy turn by unintentionally pulling one riser or releasing one brake. If you hold on to the bottom of the risers, you can still slide your hands up quickly to steer with the risers or release the brakes if necessary.
Some jumpers try to keep their openings on heading by actively steering with their rear risers while the slider is still up against the canopy. This works with some canopies, but other canopies don't like it at all. You may get better results if you just relax, sit still, focus on keeping your weight even, and wait until the slider starts to come down before making any corrections with the risers.
Watch Where You're Going
In a first jump course we are taught to check our canopies to make sure they open correctly. Although this is important, it can also create a very bad habit. Many jumpers look up at their canopies as soon as they start to open, and continue watching the canopy through the entire opening sequence. Some people continue looking up for several more seconds while they collapse their sliders and release their brakes.
If another person opens close to you, you may only have a second or two to react in order to avoid a collision. Staring up at your canopy for five or ten seconds after you deploy is like driving down the highway while staring up at the roof of your car.
Fortunately, a few techniques can help you avoid this problem.
Many students are taught to count out loud while their canopy deploys, saying "arch, reach, pull, one thousand, two thousand, three thousand…" If you don't do this already it's a good habit to create, and can help you keep track of time during the deployment sequence.
You will hear and feel different things during each stage of the deployment. A second or less after you throw your pilot chute, you should feel the snatch force pull you upright in the harness. This is the force of the canopy fabric hitting the relative wind as it comes out of the deployment bag.
The canopy will then snivel. The snivel is the portion of the opening where the slider stays against the bottom of the canopy, reducing your airspeed before the canopy starts to inflate. There will still be a lot of wind noise during the snivel, and you will still have a sensation of falling. This may last for a second or two, or even for several seconds.
The inflation occurs as the slider moves down the lines and the cells fill with air. Things become quieter once the canopy inflates. Even under a canopy that inflates very slowly and smoothly, you will still feel the transition from falling to gliding. You may also hear the slider flapping above your head once it comes down.
Once you become more aware of these sensations you will find that your other senses can tell you as much about your opening, if not more, than your eyes do. Soon you will feel comfortable looking out in front of you during the entire opening, rather than watching the canopy itself. This allows you to watch for other jumpers, and many people find this reduces off-heading openings as well.
"But," you may ask, "if I don't watch my canopy open, how will I know if I'm having a malfunction?" Take the advice of someone who has cut away a number of misbehaving canopies: you will probably know right away if you are having a malfunction. They tend to feel very different from a normal opening, and you will probably know something is wrong before you ever look up.
If you start to count after throwing your pilot chute, and reach "two thousand" or "three thousand" without feeling the snatch force, there is obviously a problem. This would be an acceptable time to look back over your shoulder and check for a pilot chute hesitation or pilot chute in tow.
Once you know how many seconds the snivel usually lasts on your canopy, you will also know if that part of the opening is taking longer than normal. You can usually feel line twists right away, and if you start spinning wildly you'll surely want to look up at your canopy and see what's bothering it.
What if the opening feels perfectly normal? Unless you need to avoid another jumper right away, you should still look up and check your canopy right after it inflates. You might not notice a tear, broken line, or similar problem until you look up. Even in these situations, if the opening felt normal then the canopy is probably flying well enough to give you a low rate of descent. Assuming you deployed at a reasonable altitude, you should have enough time to do a control check and execute emergency procedures if necessary.
If you've been watching your canopy open every time then you might not feel ready to stop doing this during your very next jump, but you should start developing better habits as soon as possible. Start counting when you throw your pilot chute, and notice how long each stage of the deployment sequence takes. Pay attention to what you are hearing and feeling during the opening. Soon you won't need to watch the whole deployment, and will be able to pay more attention to your body and your surroundings.
Improving your body position and increasing your awareness when you deploy your canopy can produce great results. You might not remember everything in this article during your next jump, but at least think about trying these suggestions one at a time, at your own pace. You might be amazed by the difference a few small changes can make.
About the author: Scott Miller runs the Freedom of Flight Canopy School at Skydive DeLand in Florida (www.freedomofflight.tv) and holds canopy skills camps at other DZ's throughout the year. He has worked at several drop zones as an AFF instructor, tandem instructor, and freefall photographer, and also worked as a test jumper for Performance Designs.
This article first appeared in Skydiving Magazine, Volume 25, Number 7, Issue #295, February 2006. Printed here by permission of the author.

Belly Fly 101
You just graduated AFF or you got your A license. You can execute all the skills required of you in the sky. Now it is time to take it to the next level. Tunnel flight can help you hone your skills that you have already, and most definitely help you learn some new skills. The wind tunnel can give you confidence, awareness and much needed experience at a time when it is hard to come by any of those things.
The wind tunnel is perfect for anybody. Wind tunnel coaching through the whole AFF and A-license experience is standard issue for all Central Florida drop zones. Coordinating the circle of awareness, motion, fall rate, turns, docking and practice pulls are all possible in the wind tunnel.
The first thing that you should learn is the relative work position. The position is the root for all movement. The reason is every time you want to move; you always start and stop in the learned belly position. Your chin should be up. Your eyes should be focused in front of you, not looking down. Your arms should be relaxed so they do not cup air or carry stiffness. You should have pressure on your shins so you do not back slide. You should be bent slightly at the knees so you do not constantly move forward. Your body should be symmetrical. Asymmetry causes turning. Your hip should be in its most arched position. Sometimes it takes a bit of moving down to actually get a good arch.
After the neutral position is learned then the 6 points of motion are taught down, forward, backward, up, and sidle siding left and right.
The first thing I teach after the standard position is to move down. The reason is the worst thing that can happen to a newbie in the wind tunnel is to catch air and ascend high up; so the instructor cannot reach you easily. Anything above 8ft high off the net makes it challenging for your instructor and dangerous for you at first. To move down, simply arch more. If that does not do the trick, take up less surface area by getting smaller. You should move right down to the net. Some times I keep first time students on the net for a rotation or two so they do not bounce around. In the lower wind speed it is easier to make mistakes and not fly up against the wall. Once general body awareness is attained, the controller can turn up the speed a little more. The first time student can fly off the net with a little more speed after they can go down. I also teach going down first, so if the student does get up a little higher than they like, they can easily come back down.
The next thing to learn is motion forward and backward. Most people come into the wind tunnel with built in movement in their technique. In order to stay perfectly still you must learn to go forward and backward first. Forward motion is accomplished by putting both feet back at the same time and then relaxing back into the neutral position and coasting to a stop. Moving backwards is done by putting both arms forward in front of you while you relax your legs towards your butt and coast back in to a neutral position for a stop.
I do not teach "braking" until the student can do the first 4 points of motion. The reason is for most students early on braking is too much to think about. Initiating subtle movements and coasting to a stop slowly is more effective in the beginning.
Flying in the sky is like flying on a football field, plenty of room to roam. Flying in the wind tunnel is like flying in a bottle, close proximal flying. Small movements are a necessity. Deep diaphragmatic breathing will lessen the tension carried in the body and relax your mind.
After a student can go down, forward and backward; I teach them how to go up. The two easiest ways to teach a student how to go up is by them taking up more surface area or de-arching with their hip. The easiest way to move up is to get longer with your arms and legs and flatten your torso. This cups air and pushes your body up like a board. The second way to move up is to de-arch at your hip. This will catch air in the pocket your hips and torso make and accelerate you upward.
Each method for going up works in different scenarios. If a person you were jumping with slowed up very quickly de-arching at the hip would be a good way to slow down in the sky. Keep eye contact with the person! If that same jump partner ascended relative to you very slowly then getting longer and flatter would be optimal.
Side sliding would be your next skill to learn. Side sliding is moving sideways while facing forward. It is very important to do this with a straight torso. Bending at the torso is inefficient and usually causes a turn. To keep your torso straight and move side ways, use your arm and leg at the same time to push you across the tunnel. The most popular rookie mistake is to push with just your hand. If you push with just your hand you will turn instead of side slide. You should push both your foot and your hand at the same time. Initiate the movement and then cost to a stop. This will create a seamless side slide.
Make sure to arch when you side slide to keep on the same level or plane that you initiated the motion on. Once you can go back and forth seamlessly both ways with out changing levels at all; then learning more advance side slide techniques would be warranted.
Turning is also a very important skill that can be learned in the wind tunnel. I start to teach turning usually right after the first 4 points of motion are learned. I progressively perfect my student's turn as side sliding is attained. The most important turning skill is to turn slowly in the wind tunnel. More often then not students like to "crank" turns out when they start. In the sky that might be all well and good, but most students are moving when they turn. If you turn with precision at first, then the progression will come easy.
Keep your head up and maintain a huge arch when you turn. Most students look down and de-arch when they turn. The sheer act of spinning creates lift. Coupled with de-arching spinning can send you up to the huge fans that power the wind tunnel. It is important to arch even harder when you turn to maintain your levels throughout.
Another popular mistake is to relax your legs on your butt when you turn. This makes for interesting times. Relaxing your legs will make you back slide while you are turning. Keep the shin pressure you have when you turn. Some students need to think of putting their feet out when they turn, just to keep the legs in the same place through out the completion of the turn.
The Mantis position is popular in more advanced relative work. We will cover it in the scope of this article because the vast majority of new fliers want to learn it. My opinion is that it should be learned after 6 points of motion, 90 degree turns and 360 degree turns. Early on in the progression, I believe that most students are too stiff to learn the Mantis properly.
Once a student can move their arms freely without causing instability or motion, then it is time to refine the basic relative work position into the Mantis. The student should try to bring their hands closer to their ears first to reduce drag on the arms. Remember the whole idea of the Mantis is to fly a more aero-dynamic position not to learn it because it looks cool. Most students press their elbows down at first. This usually causes tension. After a student can fly with hands closer to their ears instead of the basic relative work position, all the time, perfecting the Mantis position should be tackled. The hands should come closer together like you are hugging a small volley ball while laying your body on a flat surface. Dropping your elbows down into the standard Mantis position should be the last step to learning it.
It is very important to fly in the wind tunnel. The wind tunnel is the most revolutionary tool to be introduced to the sport of skydiving since the three ring system and tandem jumping. Now that wind tunnels are popping up all over the world, they will subject more and more people to our sport. Our numbers will grow in a prolific fashion and we will finally get the market penetration that our sport has long yearned for.
If you get frustrated in the tunnel keep trying. In all likelihood your frustration stems from only a few places. A bad instructor, people looking at you when you fly, the constant presence of glass or chicken wire and the inability to just go "buck wild" like you can in the air can lead to frustration. The wind tunnel is so much fun. With the right training regimen, repetition and a good instructor the sky is truly the limit to your skills.
Steven Blincoe is the founder and head coach of the New School Flight University in Orlando, Florida. He has 4,000 skydives and 500 hours of wind tunnel time. He specializes in wind tunnel camps and will scower the globe in the next few years to spread the art of tunnel coaching. Please feel free to contact him at www.blincoe.org or 530-412-2078.
Skydiving Incident Reporting: For Skydivers
None of us want to think about a member of our skydiving family getting hurt or killed, much less getting hurt or killed while skydiving. Even further down the list is having to talk to a journalist about a skydiving incident. As distasteful as it is to try to explain to a whuffo reporter why a fellow skydiver was injured or killed while jumping, though, it's actually an opportunity to improve the image of the sport.
As we well know, most journalists aren't skydivers and at best have a tough time explaining the circumstances of a skydiving incident. They often get it wrong with a common theme of "The parachute didn't open." But while it is certainly their responsibility to get the story right, they can't do it without help from the experts-which in this case is you, the skydivers who were present during an incident and are designated media contacts.
Avoidance and condemning of the media for their often poor explanation of skydiving incidents is common among skydivers, but we can do the sport far more justice by working with journalists towards a proper article than by blowing them off. It requires more effort, to be sure, but more accurate coverage of these incidents can help dispel the image of skydiving as a ruthless sport in which some participants die despite doing everything right.
Take the common statement of "The parachute failed to open," for example. This implies that the gear is at fault, when we all know that it's a very rare situation when the skydiver can do everything right and still die. Almost 100% of the time, a skydiver dies because of a primary (e.g., no pull, low pull, low turn) or secondary (incorrect response to a malfunction) mistake. The public doesn't understand this. While it might not seem important that they do, think of the number of times you are asked by non-skydiving friends and coworkers why you skydive, or hear a comment of how they can't believe you skydive, all with the overtone of why would someone want to do a sport that everyone knows will kill you. Do you get tired of that? I do.
The simple fact is that a large percentage of the non-skydiving population thinks that people who die skydiving die through no fault of their own, thus they think skydivers are a bunch of adrenaline junkies who don't care if they die skydiving. We know that's far from the truth, but when news articles don't give the whole story for long periods of time, this is the result. Additionally, it's frustrating to all of us skydivers when the story isn't right.
Following are some suggestions for dealing with the media in the event of a skydiving incident. Thankfully, most of you will never have to do this, but if you do perhaps this will help.
Send them to the source. If you are not the S&TA or other appointed drop zone media liaison, do not discuss the incident with a journalist. We all know that rumors bloom fast and furiously on drop zones, particularly in situations such as this. What began as a simple low turn by an inexperienced jumper on a smaller canopy than he was used to can quickly become an evasion of traffic, a dropped toggle, avoidance of an obstacle, etc., via the rumor mill. Whether you saw the incident or not, don't talk about it to the media and don't offer any opinions unless you're the media liaison. Refer any reporters to the S&TA or DZO, or whomever the drop zone has designated as the media contact. This person's job is no fun, but it's their responsibility to investigate the incident based on witness accounts and gear information, to prepare a complete report, and to deal with the media (and the coroner if the accident was fatal). Again, no one but the designated media contact should be talking to the media.
Don't dodge the press. We'll give chapter and verse to anyone who asks about most things related to skydiving, but when it comes to chatting with a reporter about a skydiving incident we often clam up. Why? Because we're afraid they'll get it wrong again. But if we don't give them information, we're guaranteed a minimal or misleading report of the incident. If we want these incidents to be reported accurately, the information has to come from us-the S&TA or designated media contact.
Be professional and courteous. Don't say, "You shouldn't be writing about this," because they will anyway, and this will just annoy the reporter and make it more likely that he/she will write something negative about the situation, the drop zone, and/or the sport. Also, it will burn a bridge that can be used for publicizing positive events at the drop zone such as charity events or milestones. Anytime you speak as a skydiver or skydive in front of non-skydivers, you are an ambassador for the sport whether you like it or not. Use this interaction with the media as a chance to portray skydiving accurately, and in the best light possible in a bad situation, by being honest and helpful. Avoid the "us vs. them" kind of interaction; this doesn't have to be a challenge where either you or the reporter gets their objective at the other's expense.
Think about your description beforehand. In all likelihood, reporters won't be there right away following an incident, unless it occurs during a demo. In either case, coverage of the incident will turn out better with better information, and you will be able to give better information after thinking about the incident a bit and getting it clear in your mind.
Be specific, but simple. It's pretty clear by now that I'm asking for more accurate reporting of skydiving incidents, and this isn't a problem for skydivers. What is more of a problem, especially if we're distracted by the substantial emotional impact of the incident, is that we'll talk to a reporter in the same way we'll talk to fellow skydivers-discussing things in skydiving terms rather than lay terms--if we talk to them at all. This doesn't improve the coverage, it just makes their eyes glaze over. For example, don't say "The right toggle came unstowed from the toggle tip keeper, allowing the cat's eye to come off of the loosely stowed brake and sending the canopy into a left-hand spiral to the ground," Instead, think about your audience (the general public as well as the reporter) and say, "It appears that a minor malfunction during deployment caused the parachute to spiral down, and so and so did not correct it in time to avoid the hard landing from the spiral."
Refer questions about a jump plane crash to the National Transportation Safety Board (NTSB). It is extremely counterproductive to speculate about the cause of a jump plane crash without an investigation report. If you are asked about a jump plane crash, refer reporters to the designated NTSB public affairs officer once he/she has arrived on the scene. We don't like it when uninformed reporters speculate about the causes of skydiving accidents, and the pilot (if he survived) and his family won't appreciate uninformed speculation about the plane crash either.
Offer to review the article before publication. It's not often that you will get the opportunity to do this, but you might if you offer it. What better chance will you get to ensure that the coverage is accurate? Of course, the reporter will reserve the right to accept or reject your changes as they choose, but the chance to review the article before publication is something not to be turned down.
The relationship between skydivers and the media has not always been a good one in general, as is often the case when laymen try to describe technical pursuits. That can't be changed overnight. But things won't get better without a responsible effort from both sides, hence the two-part coverage of this topic directed to both groups. A better working relationship between skydivers and the media, both for good and not-so-good events, will benefit both of us.
If you found Part 1 of this series useful-"Skydiving Incident Reporting for Mass Media Reporters"-please feel free to copy it and give it to any media representatives (print, web, or television) whom you think would benefit from it.
Sidebar: Recommendations for Working With Police
Working with the police in the aftermath of a skydiving incident is about as much fun as dealing with the press, but there are a couple of things they should know about the investigation that will make things easier for everyone.
First of all, the gear is only to be removed from the area by the coroner, not the police or the local rigger. When the coroner gets there, the drop zone representative and hopefully a rigger should be there to help answer any gear questions.
Most policemen don't know how to investigate the gear or scene, so removing evidence (gear) hampers the ability of those skilled in accident investigation-the coroner and your S&TA, rigger, or whoever is designated to investigate-to determine what happened. If the police want to rope off the area without disturbing the scene, that's fine. But if they try to remove the gear without it being investigated by the coroner, politely advise that they will get far more information if they will wait until the coroner, along with the S&TA or rigger, can inspect the scene and the gear with them. Don't get angry with them-which is easy to do when a member of our skydiving family has died and the police and/or media seem to be handling things wrong. Anger will only introduce further tension into an already awful situation, and make it less likely that things will get handled with skydiver input.
When the coroner is finished with the gear, the police often will impound it, do whatever they need to do with it, then release it to the FAA. The FAA then will usually inspect the gear with a rigger of their choice as part of an investigation.
Working with instead of against the police can help us get better answers to a skydiver's death than a feud. Make every effort to keep things civil and helpful, and this unpleasant situation will be minimally unpleasant for all concerned.
Thanks to Randy Connell, S&TA, S/L I, AFF I, for his contributions to this article.
Christy West is a journalist and gold/silver skydiving medalist with over 1,800 jumps.
An Inconvenient Truth Regarding PLF's
When I started skydiving round parachutes were the only parachutes available. The landing under a round canopy had a high straight down component. Although Para Commanders had a noticeable forward speed under no wind conditions, landing in winds over 10 mph were again straight down. Due to straight down landings most injuries were to the ankles because one tended to sit down on the ankles during a less than perfect timing of the landing techniques required by round parachutes. Use of the Parachute Landing Fall (PLF) greatly reduced the extent and severity of landing injuries. Virtually all successful skydivers were experts at PLFs because not every landing was executed perfectly, no matter how many jumps one had, and sooner or later one had to land a round reserve. In the classroom it required a block of at least two hours to teach landing the parachute because so much of the time was devoted to teaching an actual PLF. The complete PLF technique is not a natural, readily apparent procedure. During the actual jump about half of the students would perform a PLF and the other half wouldn’t no matter how much time and practice was spent on PLFs. The injury rate was quite high. About 1 in 20 first jump students would suffer some type of ankle injury.
With the advent of square parachutes, and particularly with the advent of placing students under square parachutes, the landing injuries changed. Each experienced person reading this article will realize that the injuries from landings that we see today are not limited to ankles. This is because the parachute is moving the jumper across the ground in almost all circumstances. However, there are cases were a person would be descending straight down even today. A high or rapid or deep flare by a student would be one example. In this case the PLF position for landing would definitely influence the ability of the student to walk away from their mistake.
In my opinion there are instances when use of a PLF for a botched landing is NOT beneficial to the jumper. A downwind landing is such an instance. The PLF introduces a roll and a square parachute introduces a large amount of speed. For the sake of this example, assume the wind is blowing at ten mph. The jumper has made a mistake and is landing downwind. He/she has the presence of mind to have the toggles at his/her ribs (half flight) for an air speed of ten mph and a ground speed of 20 mph. Please bear with me for the easy math.
20 mph = 20 mph X 5280 ft/hr = 105,600 ft/hr
105,600 ft/hr = 105,600 ft/hr divided by 60 minutes/hour = 1,760 ft/min
1,760 ft/min = 1,760 ft/min divided by 60 sec/min = 29.33 ft/second
At 20 mph ground speed a person is moving 29.33 ft per second across the ground. At half flight the downward speed (3 to 5 mph) would be somewhere between 4.4 ft/sec and 7.33 ft/sec. I believe that in this example the best outcome for the jumper would be to try to absorb as much of the initial downward velocity as possible with their legs (knees bent and pressed tightly together) and then NOT ATTEMPT A PLF.
The danger inherent to a high speed roll/tumble is a direct result of the laws of physics. An example using a cylinder will illustrate the principle. I am 52 inches around the shoulders so let’s talk about a perfectly round cylinder, 52 inches in circumference, moving in the air just above the ground and oriented perpendicular to the line of flight.
At touchdown the cylinder is going to pick up a rotational (angular) velocity based upon the speed across the ground (linear velocity) divided by the circumference of the cylinder. Excluding friction, which will slow the cylinder by scraping, the cylinder will initially roll across the ground at 29.33 ft/sec divided by 52” (circumference) per rotation.
52 inches divided by 12 inches per foot = 4.33 feet (circumference)
29.33 ft/sec divided by 4.33 ft / rotation = 6.77 ROTATIONS PER SECOND!!!
If this seems quite a lot, it is. However, this is why occupants of a rolling vehicle are thrown so far from the vehicle in a rollover car accident (buckle up?). In the rollover case the rotational speed (angular velocity) of the vehicle rolling is translated to the linear velocity of the thrown body. The thrown objects, including unbuckled occupants, are thrown hundreds of feet.
Returning to the skydiver, I am not a perfect cylinder. I am more of an imperfect ellipse (oval) seen from above. This is not to my benefit in a rolling landing as the ground (not perfectly smooth) will have a tendency to turn me into a round object by attempting to break off my protrusions (shoulders, arms, knees, etc.) This is complicated by the fact that the PLF was developed using round parachutes which did not have flare capability. As such the arms in a round canopy PLF were above the head, elbows bent and cushioning the head from the sides. This positioning essentially extends the arms along the long axis of the cylinder. With a square parachute our hands are down at our sides (hopefully) controlling the flare. During the rotation of a PLF, and particularly a rotation of 6.77 rpm, the hands and arms are thus exposed to quite a bit of trauma due to impact with the ground, more than once, as the roll proceeds.
What one hopes for is the best case scenario where the jumper is rolling from shoulder to shoulder across the ground. The worst case scenario would be tumbling head to toe across the ground. Unless one is a trained gymnast this would expose the head and neck to several impacts with the ground. A real life roll/tumble would probably fall somewhere between these two extremes. At a rotational speed of 6.77 rpm a PLF would risk head and neck injury. At a rotational speed of 6.77 rpm, even a perfect PLF has great risk to shoulders, arms, hips and legs.
There is a solution to this downwind landing possibility. It is easy to train and easily understood by newcomers and experienced skydivers alike. The simplest way to prepare for as many landing scenarios as possible is to assume the PLF position, fly the parachute and slide on one hip in the event of a forward motion, high speed landing. I teach our students to envision holding a dollar bill between their knees and squeezing a quarter between their glutes (“feet and knees, dollar and a quarter”). Actually doing so puts one into the PLF position.
When the person discovers a downwind mistake has been made, he/she should assume this PLF position. At touch down the jumper should try to absorb as much as possible of the downward impact with their feet but lean back in the harness. Under no circumstances should the person allow themselves to be thrown head first. The jumper wants to stay on their feet as long as possible, tending to sitting down. As the person sits down he/she wants to transition (during the squat) onto a hip. One does not want to impact directly onto the butt. The spine will tolerate torsion (bending) but very little compression. Sitting down directly onto the butt could cause spinal problems on its own (disks and vertebrae). Absorbing the actual butt touchdown with the hip will allow the spine to flex. Hitting a rock with the tailbone while sliding across the ground could be quite painful as a likely result is a cracked tailbone. Hitting a rock with the hip while sliding across the ground might possibly bruise the hip, an easier recovery than any spinal injury. The jumper should perform a baseball slide into second base ensuring that they remain sliding feet first. The person will get dirty. Done properly, one may see damage to the leg strap cover on the hip, but a dirty/torn jumpsuit and/or a dirty/scraped hip cover will be all that one sees.
During a proper landing (into the wind) and under reasonable conditions, if a person is in a PLF position (feet and knees, dollar and a quarter) accompanied by a flare anywhere near half–flight, the parachute will lay the student down in the first half of a PLF. This is all that is necessary with a properly sized square canopy. The “lay down” is a result of the fact that most students are not true into the wind at touchdown and thus the square parachute almost always imparts some degree of forward AND sideward motion to the student.
The occurrence of downwind landings is relatively rare. However, bear in mind that most of these are done by a jumper off student status (off radio assistance). This person has received very little if any formal instruction since the first solo landing class. So the technique must be simple to learn, retain and execute months after the initial training.
Since I began teaching this concept, decades ago, I have not had a single jumper injury related to downwind landings when my advice was put into practice.
My motivation for writing this article comes from the words that I hear when traveling to other drop zones and the words that I read in articles such as “Incident Reports”, “…you should have done a PLF”. This is not always the case, particularly with today’s parachutes. A PLF is no longer a panacea for all conditions. I also want to point out that, in my opinion, the instructor showing a first jump student a PLF accomplishes nothing at all. Having each student perform a PLF on the ground is no better. For a person to learn a PLF requires repetitions by the student, MANY repetitions, from an elevated platform.
A person or publication telling anyone that he/she should have done a PLF, which the person has never actually learned, is not accomplishing what the student needed and the knowledge that the publication is trying to disseminate.

Swooping is Not a Crime
A large sector of the skydiving population is currently in danger of extinction. This is because of the widespread proliferation of new DZ rules that prohibit 270 turns for landing or ban high speed approaches entirely. Consequently, many jumpers now find themselves homeless and considering alternate sports - not a good thing for skydiving.
These new restrictions come in the name of safety. We have lost many
friends this year due to canopy collisions, and the management at
several dropzones has responded by adding new rules in an effort to
prevent such accidents from happening in the future. There are several
aspects within this direction of policy that concern me.
Remember 9-11? We felt unsafe after the tragedy, and so we willingly
gave up many of our rights as free citizens. Now they are taking
nail-clippers away from little old ladies. It is getting ridiculous, as
is the policy banning advanced approaches. It is a knee-jerk reaction to
fear, and I think we all know where that slippery slope leads.
"My rights end where your rights begin."
This is the fundamental idea that forms civilization. In other words, if I fly my parachute into you in the pattern, I am in the wrong. I think everyone agrees with this and it therefore can and should be asserted that if my behavior does not have an effect on anyone else, I should be allowed to continue to do what I am doing, provided I am doing it in a safe manner.
We all need to challenge ourselves. This is what keeps us showing up at the dropzone every weekend. Thousands of people enjoy the challenge of high speed approaches and define the swoop landing as an essential part of their experience. They wait all week to get a few jumps in over the weekend, and now many of them are unable to get what they came for. To take that away is to cut many people off from the very reason why they skydive in the first place. Is that really where we want to go with this?
We cannot afford to alienate anyone. There are precious few experienced skydivers in the world and I would argue that we are the reason for the dropzone in the first place. I understand that there are a few DZOs that are doing very well running purely tandem operations, but this is the exception, rather than the rule. Most dropzones are a business of passion, rather than a pragmatic financial pursuit. If we wanted to make a million dollars, we would have done something else with our time. We do this because we love it.
The atmosphere created by having fun jumpers around is essential to the success of a dropzone, even if the profit is significantly less. Sport jumpers give the tandem students a reason to come back and learn how to skydive. They come back for the jumping, true, but they also come back for the connection to other people. They want to be part of a community, as do we all. We must therefore allow all aspects of the sport to continue to proliferate so that our numbers may grow.
It is that simple.
We can create sustainable solutions.
It is possible. We simply need to think things through and adapt to the changing needs of a growing sport. I remember the debate on my dropzone as to whether or not we wanted to let the students jump ram air canopies. Many were concerned that the "squares" were too much responsibility and that students could not be trusted. Are we saying the same thing about ourselves now?
We need to trust each other. True, we need to create a structured environment in which we can create a degree of predictability in the air over our DZs. Otherwise none of us would be able to manage all the variables in our heads. But as soon as we start back-peddling away from danger, we are becoming more similar to the groundlings we pass on the road on the way to the dropzone.
We must have specific runways where the high speed pilots can land safely, out of the way of everyone else. We must communicate our intentions in the loading area. We must create sustainable vertical separation before reaching pattern altitude. Most importantly, we must increase our level of awareness under canopy so that no matter what the circumstances, we can fly in traffic without risk of running into each other. We do this by remaining calm and keeping our eyes open.
We need to stop pointing fingers and making over-protective rules, and simply do what we need to do in order to be safe and still have fun. Let's work together and unite as a whole to make the dropzone a welcoming place for everyone.
Brian Germain
www.TranscendingFear.com

Canopy Skills Drills
Learning to fly our parachutes is absolutely necessary for long-term survival in this sport. The philosophy that the canopy is simply a means to get down from a skydive is gradually becoming a thing of the past. This may be as a result of individuals with such an attitude dropping out of the sport due to canopy-related injuries, or from the insurmountable fear that comes as a result of a lack of control over their experience. Regardless, many jumpers have been taking an increased interest in flying their parachutes better.
Reading and talking about canopies is the beginning of this process. We must understand the principles that allow our canopies to fly. To make a real difference in our capabilities, however, we need to physically experiment with our parachutes in flight. We must practice in the real world.
Here are a few exercises that will increase your abilities to save your own life, and enhance your feeling of control while under canopy:
Pitch Control Exercises
Manipulate the canopy on the pitch axis using the brakes.
Look at canopy to notice the amount of pitch axis change.
Notice the difference between "soft" and "sharp" inputs: slow application vs. quick.
Why?
Controlling the pitch angle is how we manipulate the angle of attack of the wing. Without a dynamic change to the angle of attack, we will be unable to increase the lift of the parachute enough to change the direction of flight from its normal full flight glide to level flight. This maneuver is essential for safe landings.
Pitch Control With Bank Angle
Begin a turn using a single steering toggle.
Apply the opposite toggle while still in the turn.
Experiment with soft versus sharp inputs to negate decent.
Look at canopy to notice pitch changes.
Why?
Having the ability to control the pitch axis while in a bank is what gives the pilot the ability to control the decent rate while in a turn. The natural tendency is to loose altitude in a turn, but this is not necessarily the result of turning with bank angle. By increasing the angle of attack while in a bank, we can increase the amount of lift that the parachute is producing, and even alter the flight path to level flight despite significant bank angle.
Dive Arrest: Toggle Turns
Place the canopy in a spiral dive using a single steering toggle.
Arrest the dive as quickly as possible by sharply applying the opposite toggle as well as the inside toggle; the inside toggle is not applied until the two are matched in the degree of input. When the toggles are matched, a short stab of collective brake pressure is usually all that is needed to achieve level flight.
Exercise both banked recovery and wings level recovery.
Why?
Turning too low is the preliminary cause of many injuries in our sport. Unfortunately, most canopy pilots assume that bank angle must be eradicated before arresting the dive. This leads many to waste valuable altitude in the process of leveling the wing. In situations with very little altitude remaining, this may delay the collective brake application until it is too late. By rehearsing a transition to zero decent while still in a bank, the pilot becomes accustomed to applying the toggle on the outside of the turn as a learned instinct, reducing the chances of a turn leading to serious injury.
Dive Arrest: Front Riser Dive
Place the canopy in a dive using the front risers.
Rehearse dropping the front risers and quickly stabbing the brakes.
Rehearse both straight front riser dive recovery as well as turning dives.
Why?
While acceleration on final approach can be great fun and usually leads to longer swoops, the acquisition of speed is not really the hard part. What keeps us alive is the judgment and skills necessary to save us when we dive the canopy too close to the ground. If we rehearse the solutions to the dangers, the likelihood of a dive resulting in serious injury is reduced. Letting the front risers up slowly may be the best way to get a long swoop when the dive is rounded up slowly and with ample altitude. Unfortunately, this muscle memory may not serve us when we are really low. In the time it takes to smoothly let up on the front risers we may find ourselves planted in the ground like a shrubbery. Dropping the front risers allows the pilot to keep their hands down, ready to stab the brakes aggressively to arrest a mortal dive. A short, sharp, shock on the brakes may be all that is necessary to place the jumper back under the wing, and to the higher angle of attack that saves their life.
Slow-Flight Practice
Place the canopy in 90% brakes and hold for 60-90 seconds.
Make controlled heading changes of 45-90 degrees.
Notice the difference in responsiveness as compared to full flight turns.
Notice that lifting a toggle on the outside of the turn reduces the risk of stalling the wing on the inside of the turn.
Why?
Most pilots spend the majority of their canopy ride in full flight. This means that the feeling of the canopy in this mode is most comfortable to most people. It also means that flying in deep brakes places many out of their comfort zone. This means that most people are feeling somewhat uncomfortable just prior to putting their feet on the ground every single jump. In fact, this anxiety often causes people to hold their breath, and then offset their steering toggles toward the end of the landing in order to get to the ground sooner. They simply want this part to be over. In order to land with great consistency, we must become intimately aware of the flight performance of our parachutes in very deep brakes. The more time we spend in this flight mode, the more comfortable we will be. If we are to land well, we must be as comfortable with deep brakes as we are with full flight.
Brian Germain is the author of The Parachute and its Pilot, a canopy flight educational text. Brian is also the President of Big Air Sportz parachute manufacturing company, and teaches canopy flight courses all over the world. To learn more about parachutes, or to order the book, go to: www.BrianGermain.com .
By BrianSGermain, in Safety,
Big Canopies in Turbulence
I have spent much of my life studying parachute stability. It has become an obsession of sorts, spurred by a fairly sizable stint in a wheel chair- funny how that works. I have designed and built many, many canopies with the goal of creating collapse-proof canopy. I have failed. It is impossible.
This is the case because, despite the best efforts of the designer to increase internal pressurization and dynamic stability, the canopy can still be flown badly and become unstable. This will always be so. The job then, falls on the educators, and on the pilots themselves to learn and rehearse the essential survival skills that increase the chances that the correct action will be taken in the spur of the moment.
I stated in my original article on turbulence, entitled “Collapses and Turbulence”, that the key is to maintain lots and lots of airspeed and line tension. I still hold that this is generally the truth. However, upon re-examining the situation, I have realized that my perspective on the situation is based on my frame of reference. I fly sub-100 square foot cross-braced speed machine that falls out of the sky like a homesick bowling ball. I do not really represent the whole. The average-size parachute is 150-170 square feet in the civilian world, and much larger for students and military jumpers. In further exploring the issue from the perspective of lighter wing loading and larger parachutes, I have discovered that this is not necessarily best way to fly a larger canopy in chaotic air. Here is why this is so:
If the parachute has a great deal of drag, i.e. a light wing-loading, thick airfoil or is a large parachute in general, the rules change. Such canopies are less capable of maintaining high speeds unless flown very aggressively. Due to the high drag variable at the canopy end of the drag equation (“Rag Drag”, as I call it) the excess airspeed makes the canopy itself want to retreat behind the jumper far enough to reduce the airspeed far below the unadulterated full flight speed. This momentarily increases the likelihood of a collapse. The parachute levels off in mid air, slows down, and for a brief moment, becomes vulnerable to collapse.
Therefore, when flying a canopy with a short, powerful recover arc, aiming to increase the speed beyond full flight becomes a double-edged sword. If the timing is wrong, such as when leveling out high (prematurely), the situation can become very dangerous. The truth is, leveling off well above the ground is dangerous for any wing-loading, and can happen with any parachute due to an incomplete plan or an imperfect execution.
Parachutes flown below one G, at speeds less than full flight speed tend to be more susceptible to collapse. So, if the pilot is quick with their "Surge-Prevention Input", (what paraglider pilots call "flying actively", the risk of collapse is significantly reduced as the negative pitch oscillations will be minimized, thereby diminishing the likelihood that the wing will reach a low enough angle of attack to actually achieve negative lift and dive toward the jumper (i.e. collapse and scare the daylights out of you).
Given the fact that the only preventative or corrective response to a collapse is to stab the brakes as quickly as possible, the sooner the pilot responds to the forward surge, the less the input necessary to avoid or correct a collapse. Therefore, a canopy with a great deal of slack in the brake lines will require more motion on the part of the pilot to create any appreciable effect. This means that a canopy that is in full glide, with the toggles all the way up in the keepers and three inches of excess brake line trailing behind will take longer to see an increase in the angle of attack due to the control input than one with no slack in the brakes at all.
So then the question is posed: “Do we shorten the brake lines on larger canopies to help the pilot prevent collapses?” The answer to this is no, we cannot. This will result in serious bucking during front riser input. It will also mean that following a few hundred jumps, the canopy will be in significant brakes when they think they are in full flight, due to their “lazy arms” pulling the tail down when they should be flying arms up. This will result in lower average airspeeds that will reduce the parachute’s flare power, as well as it’s penetration into the wind. This will also result in more oscillation and distortion in turbulence.
The answer comes to us from our sisters and brothers in the paragliding world. They teach their students to hold a touch of tension on the brakes when flying through turbulence. The goal here is not to put on the brakes and deform the tail, but to simply take up the slack on the brake lines, in preparation for a 12-24 inch strike on the toggles to prevent a collapse. Some teach their students to hold about 5 lbs of pressure on the brakes, while others teach that we should hold no more than two inches below the “Feel Point”. Either way, taking the slack out of the brakes is like standing ready in the door, even when you can't see the count.
So, on larger canopies, it appears that a light touch on the brakes may help prevent collapses. However, it is not because the canopy is more stable in this configuration, but simply that the pilot is more prepared to prevent the wing from surging forward in the pitch window. Once the wing has passed through that parcel of turbulent air, however, the job remains to regain the full flight airspeed, while maintaining positive G's. Letting the wing surge back into full flight too quickly can send the wing out of the frying pan and into the fire. Get it back to speed gently, but get back there as quickly as possible. These are opposing goals, so the actions of the pilot once again become pivotal, calling upon trained skills and acute attention to sensation.
Ultimately, the best way to handle turbulence is to deny it battle. Despite what your ego is telling you, you already have enough jumps. I know you want more, but sometimes the best way to go is to sit on the ground and watch the inexperienced jumpers get experienced.
Live to fly another day.
Brian Germain Big Air Sportz www.bigairsportz.com
Skydiving Emergencies And Procedures
Skydiving Emergencies
The bulk of the content from this section is republished with permission from Chapter 4 of Parachuting: The Skydiver's Handbook by Dan Poynter and Mike Turoff. Although rare, the fact of the matter is that there are a number of possible emergencies in skydiving that could either hurt or kill you. The emphasis in this section is on education. If you are uncertain about anything speak to your jumpmasters.
On The Ground
Briefings and Safety Considerations
Hazard Briefings
Alcohol and Drugs
Health Concerns
Scuba Diving Alert
Some Fear is Good for You
Airport Safety
In The Aircraft
Emergencies in the Aircraft
Airplane problems
Open parachute in the airplane
On Exit
Exit Emergencies
Exit hazards-static line
Exit hazards-AFF
Dangling static line
Student in tow
Static line not hooked up
Pulling high is dangerous
In Freefall
Freefall Emergencies
Accelerated FreeFall (AFF) emergencies
AFF: Loss of one jumpmaster
AFF: Loss of both jumpmasters
Five-Second Rule for loss of stability
Loss of altitude awareness
Goggles
At Deployment
Deployment Emergencies
Lost handle
Hard pull
Pilot chute hesitation
Pull-out v. throw-out
Trapped pilot chute
Pilot chute in tow
Under Canopy
Canopy Emergencies: Breakaway
Jettisoning the main canopy
Two Action System (TAS)
The Single Operation System (S.O.S)
Canopy transfer
Harness shift
Parachute Mulfunctions
Total malfunctions
Partial malfunctions
Major partial malfunctions
Bag Lock
Horseshoe
Violent spin
Line overs
Partial malfunctions that may be majors or minors
Rips and tears
The snivel
Slider hang-up, at the canopy
Slider hang-up, halfway
Broken suspension line(s)
Minor malfunctions
Line twists
Premature brake release
Broken steering line
Steering line(s) won’t release
Pilot chute "under/over" problems
End cell closures
Combination malfunctions
Two canopies open
Tandem jumping malfunctions
Large ring and ripcord handle
Change of emergency procedures
Breakaway training
Emergency priorities
Canopy collisions
On Landing
Landing challenges
Turbulence
Dust devils
Thunderstorms
The tree landing
Power lines
Water landings
Buildings
Other obstacles
Exit Order Safety
Brian Germain and wife Laura Kraus launch an exit over Voss, Norway. Photo by Ron Holan
There are many different views on exit order, although only some of them are based in science. The following exit order plan is based on the principle of "prop blast penetration": the degree to which a jumper remains under the aircraft based on the drag produced by their body position. When a jumper assumed a low drag body position, head down for instance, they follow a longer arc through the sky on their way to vertical descent.
The fastest falling skydivers are freefliers, which means that they remain under the aircraft longest. If freefliers exit the aircraft first, their trajectory will take them toward, and often beyond the trajectory of flat flyers exiting after them. This fact has been proven time and again in the numerous close calls that have led to the creation of this exit order model. Therefore, the best way to create maximum separation between jumpers at deployment time is to have the FS "flat" jumpers exit before the freefliers, regardless of deployment altitude.
Beyond this, we must also consider formation size when planning exit order. Since the last groups out of the airplane are more likely to land off the dropzone, large groups tend to exit before small groups based on the "needs of the many outweigh the needs of the few" principle of human civilization. I concur that this is a good plan, but for another set of reasons. Large groups tend to open lower than small groups due to task fixation and the need for adequate tracking time to create safe separation. This means participants of large formations should open closer to the dropzone. Further, smaller groups have the option of breaking off early, tracking perpendicular to the jumprun and pulling high to compensate for long spots, while the complexity of building a large formation makes it difficult to take such steps toward safety due to the peer pressure associated with the situation.
Photo by Ron Holan
The Exit Sequence
So this brings us to the preliminary plan of sending the flat flyers out first, in groups largest to smallest, then the freefliers. However, since inexperienced freefliers most often remain under the aircraft for a shorter period of time than vertically oriented freefliers performing perfect zero angle of attack exits, the order should be lowest experience to highest. This also allows the more experienced freefliers to observe the exits of the novices, giving them the opportunity to give helpful advice, and to provide extra time in the door if necessary. If the previous skydiver or group is still under the airplane, do not jump. When in doubt, wait longer.
Following the flats and then the vertical skydivers, we have the students and tandems. The order can be varied here, although there are some reasons to support sending the tandems out last. First, landing a tandem off the DZ is safer than landing a student into an unknown location. Second, students can sometimes get open lower than planned, which not only increases their risks of landing off, but puts the instructors at risk of landing off even more as they open lower than their students. Tandems on the other hand have the option of pulling whenever they see fit, which allows the camera flyer to get open high as well.
The last groups to consider are those involved in horizontal skydives, such as tracking, "atmonauti" or steep tracking, and wingsuit pilots. The truth is, experienced horizontal skydivers can safety get out of the way of other jumpers quite easily, and can exit in any part of the order. However, in the case of two or more horizontal skydiving groups, plans must be created and followed with vigilance. For instance, one tracking group can exit first and track out and up the right side of the jumprun, while another group can exit last and offset toward the left side of the jumprun. Three horizontal groups on the same aircraft are best handled by adding a second pass, although there is a great deal of room for creative answers when wingsuit pilots are involved.
Photo by Ron Holan
Timing the Exits
The amount of time between groups must vary based on the groundspeed of the aircraft. On a windy day, with an into-the-wind jump-run, the aircraft may move quite slowly across the ground, reducing separation between jumpers. This requires significant time between exits, perhaps as much as 15 seconds or more on a windy day or a slow airplane. The separation between groups can be increased quite easily on windy days by crabbing the aircraft with respect to the upper level winds, a practice that has become increasingly common at large dropzones. For a scientific explanation of exit separation, please read John Kallend’s PowerPoint, found here.
Many jumpers believe that once the freefall is over, there is no way to prevent a collision. However, given the glide ratio of modern parachutes, we have the ability to close the gap quickly after opening by pointing our canopies in the wrong direction. Given the fact that the vast majority of skydivers will be opening reasonably close to the jumprun, immediately flying up or down the line of flight is pretty much always a poor choice. Therefore, once you have cleared your airspace and pulled, your job is to look for traffic in your immediate vicinity and then fly your parachute perpendicular to the jumprun heading. I like to call this “Canopy Tracking”. Once you verify that the others are open and note their location, you can begin to navigate toward the play area and then to the pattern entry point. This all requires a great deal of awareness and adaptability, as even the best plan can change quickly in a complex environment.
The bottom line is this: keep talking. Every load is a brand new set of circumstances, and requires a good deal of thought and planning. Make sure everyone arrives at the loading area no later than the ten minute call to allow for healthy preparation time. Most accidents and close calls could have been easily avoided by skydivers talking to skydivers, and skydivers talking to pilots. Take your time in the door, keep your eyes open and take care of each other. It is a big sky up there, and when we work together, safety is the likely conclusion.
Brian Germain is a skydiving safety advocate, and has written numerous books and articles on the topic. He has a regular spot on Skydive Radio called Safety First, and has made over 150 safety related videos, all available through AdventureWisdom.com