AFF Training - Level 8
Napoleon Skydiving Center: Level 8 - Solo Dives
Congratulations on your successful completion of the New Napoleon
Skydiving Center's Accelerated FreeFall Program. You are probably
wondering "Where do I go from here?". The answer is that whether
you have 10 jumps or 10,000 jumps, there is always more to learn.
As an AFF Level VII graduate, that journey begins with (surprise)
level VIII. The Level VIII program is a series of solo dives
designed to accomplish three goals:
Perfect the skills learned in the AFF program.
Build confidence in your ability to exit an aircraft at a lower
altitude (should that need arise).
Develop the ability to identify and use a rig equipped with a
"hand deployed" main pilot-chute.
These goals will be accomplished over the 4--8 solo dives of the
Level VIII program. Once these goals have been reached, you'll be
ready to start making coached dives with experienced skydivers
to work on your air skills. Relax, have fun, be safe, and see you
in the coaching program....
AFF Level 8 (Page 1) - AFF Skills
The first phase of the NSC Level VIII program is a series of two to four
solo dives to practice the things you learned in the AFF program.
The emphasis here is on having fun and building some confidence your
ability to skydive "on your own". You will also be practicing for
the next phase which is a low altitude "clear and pull" dive.
TLOs
Perfect ability to perform poised and diving exits.
Perfect ability to start and stop controlled turns.
Practice backloop and frontloop maneuvers.
Practice tracking to gain horizontal separation for opening.
Practice for "Clear and Pull" by maintaining stability while
performing a PRCT within 5 seconds of exit on at least two dives.
Maintain good altitude awareness.
Perform dives in a safe manner.
Wave off, then pull at or above 3000 feet.
Land within 20 meters of target (record distances in logbook).
Dive Suggestions
The exact format of these solo dives is up to you, but it will probably
resemble the AFF Level VII dive flow somewhat. It is important to
use a good ground reference when practicing turns to enable you to
judge your ability to start and stop them on heading. When practicing
tracking, do so in a direction perpendicular to the aircraft's line-of-flight
to stay clear of groups exiting before or after you. It is suggested that
solo jumpers leave the plane after the smallest RW group, but before tandems
and AFF groups (which open higher). Remember that the priority on all
skydives is Pull, Pull at the assigned altitude (before 3000'), Pull stable.
AFF Level 8 (Page 2) - Low Altitude Exit
Throughout the AFF program, dives were performed from high altitudes
to give a maximum amount of freefall learning time on each dive.
Unfortunately, due to circumstances beyond our control, skydivers
must often exit the aircraft at lower altitudes due to mechanical
or atmospheric problems. This dive is to get you acclimated to
the lower altitude exit.
TLOs
Ability to perform a stable exit.
Initiation of deployment within 5 seconds of exit.
Land within 20 meters of target (record distance in logbook).
Dive Suggestions
The first low altitude exit should be performed between 4000 and 5000
feet. The exit is not dramatically different than the exit you used
for Levels I--VI (poised exit). In this case though, you will be
initiating the main ripcord pull before reaching terminal velocity (which
would take about 10 seconds). To insure stability at subterminal speeds,
a hard arch position is used. This is accomplished by putting
the hips and chest into a "maximum arch" position. Additionally,
the arms and legs are extended straight. When performed correctly,
it should look like the letter "X" when viewed from the front or
back.
When performing the actual dive, exit the aircraft from the poised
position and perform a hard arch. Give a two to three second count
and then initiate a main ripcord pull in the usual manner, recovering
immediately to the hard arch position. This dive is also
good for practicing your spotting skills since you will probably be
the only one exiting on this pass. Remember that you are not at
terminal velocity, so a 3 second delay translates to only about 150 feet
of altitude loss (versus a 500 foot altitude loss at terminal velocity).
AFF Level 8 (Page 3) - Transition to Hand Deploy
Most experienced skydivers use rigs employing pullout or
throwout main canopy deployment systems. These systems eliminate
pilotchute hesitation and make packing easier. They also demand
more proficiency of the jumper.
TLOs
Understand and identify pullout and throwout deployment systems.
Be able to pack a throwout deployed pilotchute.
At least ten practice pulls on a throwout deployment system.
At least one jump with a throwout deployed main canopy.
Land within 20 meters of target (record distance in logbook).
The Pullout Deployment System
Though it was developed after the throwout system, the pullout deployment
system is actually more like a traditional ripcord deployment system.
In the pullout system, the deployment handle is attached to a straight
closing pin and to the base (or bottom) of a springless pilotchute.
As the deployment handle is pulled, the pin is first extracted from
the container closing loop. As the handle is pulled further, the
pilotchute is pulled from the now open container and inflates, pulling
the handle from the skydiver's hand. The handle is usually mounted on the
bottom of the container.
The Throwout Deployment System
The throwout system was the first "hand deployed" pilotchute system
developed. The handle is attached to the apex (top) of the pilotchute.
The pilotchute itself is externally packed (usually in a pocket on the
legstrap or bottom of container. The pilotchute is extracted from its
pocket and released at arm extension. It then inflates and pulls a
curved pin from the closing loop, opening the container.
Using a Hand Deployed System
In any hand-deployed system, there are several things to be aware of:
Stability is important. If activated in an unstable position, the
hand deployed pilot chute can easily entangle with the jumper.
Note that this does not mean that the pull can be delayed until
stability is achieved! The priority is still Pull, Pull by the assigned
altitude, Pull stable.
The pilotchute should be released at full arm extension. Releasing
it sooner can allow it to be "sucked" into the jumper's burble.
The handle will be in a significantly different position, possibly
one that cannot be seen.
To prepare for your first hand deployed jump, have a staff member demonstrate
the correct technique for folding the pilotchute. Then make several (ten
or more) practice pulls on the ground, concentrating on maintaining good
form and a good arch. Finally, perform at least one skydive using the
hand deployed system. Plan your breakoff and pull at least 1000 feet higher
than usual to allow for the new deployment procedure (but make sure to
alert others that you are doing so).
Where do I go from here?
Now that you have completed the solo dives of the level VIII program,
you are ready to begin skydiving with others. Your immediate goal
should be to qualify for a United States Parachute Association
"A" License. The minimum requirements for that license beyond
what is accomplished in the AFF program are:
Twenty (20) freefall jumps including 5 minutes of total freefall time.
Landed within 20 meters of target on 5 jumps.
Unintentional water landing training.
Participation in at least three 2--way relative work jumps.
Pass a written exam.
Note that application for any license requires documentation
of the requirements (usually a logbook entry). When you are ready,
you may contact any of the AFF Instructors for information on taking
the exam and applying for the license.
You should also have begun accumulating your own skydiving gear. At
a minimum, you should already have ordered or received:
A hard, Protec style, helmet (which NSC requires until 50 jumps).
A jumpsuit appropriate for your size and weight.
A visually accessible altimeter (either chest mounted or wrist mounted).
Goggles.
You should also be in the market for a complete rig (main parachute,
reserve parachute, and harness/container system). There are many
manufacturers of parachutes and containers, each of which produces several
product lines and sizes. Ask staff and other jumpers for suggestions on
the type of gear they recommend (but remember they are only
suggestions). A new rig will cost between $2500 and $4000
depending on the choice of components. A used rig will cost less, but
should be carefully inspected by an FAA rigger prior to purchase.
There are many other items that are useful for skydiving, many of
which can be obtained through regular sporting goods sources.
Gloves are necessary for skydiving whenever the temperature on
the ground or at altitude drops below 40 degrees farienheight.
Equipment should be stored and transported in a protective container
like a duffel, gear bag, or hard case. A USPA Skydiver Information
Manual has information necessary for passing the license exams and
performing special dives like night or demonstration jumps.
Finally, keep in mind that you are entering a new sport quite unlike any
you previously have experience with. Jumping with others will be
helpful, but you must carefully determine the experience level and ability of those wanting
to "coach" you. Just like "Two drowning men cannot save one another", two recent AFF graduates cannot effectively teach one another to skydive, and may actually represent a hazard to each other.
NSC offers several coaching programs and many jumpers enjoy coaching novices.
Staff members can introduce you to available coaches who we feel do a good job. If you have questions about the ability of someone wanting to coach you, ask. Freefall time is
expensive and we want you to make the most of yours.
Good luck, have fun, be safe.
Dale Southard,
Safety and Training Advisor,
Napoleon Skydiving Center,
AFF/I, VTM, Sr. Rigger, D--11216
Level 1
Level 2
Level 3
Level 4
Level 5
Level 6
Level 7
Level 8
AFF Training - Level 4
Napoleon Skydiving Center: Level 4 - Turns to Redock
Congrats, you are halfway through the AFF program. In the aircraft you should
be paying careful attention to the spotting procedures. On the ground, you
should be well along learning how to do a JMPI and packing. Under canopy
try using risers (front and rear) for control up high.
Though you are still a student, you should start preparing for the time
when you will be off student status and jumping on your own. Safe skydiving
requires good equipment. Begin talking with your instructors and other jumpers about what type of equipment you should purchase. It is recommended
that you start by ordering an appropriately sized jumpsuit, helmet, goggles
and altimeter. In fact, you can begin using these items before you complete the AFF program.
TLOs
Start and stop controlled turns.
Forward motion to redock.
Wave off, then pull at or above 3000 feet.
Dive Flow
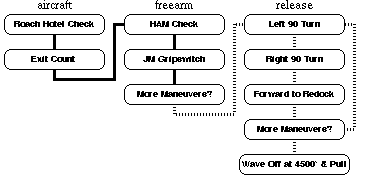
Running Description
Roach Hotel Check: Check In, but no check out.
Exit Count: C-182 Prop, Up, Down, Arch; Otter Center, Out, In, Arch.
HAM Check: Heading, Altimeter, Main JM.
JM Gripswitch: Jumpmaster switches from side to front.
More Maneuvers? Check Altimeter, if above 6000 feet signal with a nod yes. If below 6000 feet signal with a head shake no. In either case, JM has the final authority.
90 degree Turns: performed using a combination of bending and tilting the upper body. Initiate
by looking over the arm in the direction of the turn. Bend upper body toward the turn at the waist and tilt shoulders by raising the shoulder opposite the direction of the turn by 3--4 inches. Keep arms in the same position at the shoulders and elbows, all motion should originate at the waist. Recover to box man as new heading is attained.
Forward to Redock: At the completion of the 2nd turn, the JM will back up from 5--10 feet.
Move forward by extending legs at the knees and bending arms at the shoulders. Keep elbows locked at 90 degrees. Hold position until redocked on JM, then recover to boxman.
More Maneuvers? Yes if above 6000, else no.
Wave Off: at 4500 feet by crossing hands above head twice with a large sweeping motion
of the arms.
Pull: at 4000 feet.
Primary Canopy Check: Shape, Spin, Speed, Twist.
Release Toggles, Secondary Canopy Check, Controlability Check.
Canopy Control: halfway down, halfway back. Flare at 10 feet, knees together, PLF if necessary.
Collapse the Canopy, Field Pack, and Return.
Level 1
Level 2
Level 3
Level 4
Level 5
Level 6
Level 7
Level 8