Headdown - Everybody wants to learn!
The winter is coming and you’re thinking about where you're going to jump to clear your winter doldrums. When you get to where you want to jump, everybody needs to freshen up their skills, maybe learn some new ones. One of the most popular skills to learn is Headdown. As a coach I have seen a lot of ways to learn the position. Some people, if you manually stick them in the position and hold them there, will learn it in a few jumps. Other fliers don't have it so easy. Well this article is for you!
We will learn what to concentrate on in the Headdown position, but more importantly how to work around the problem with other skills, which I think contribute and can sculpt the Headdown position. These skills being back flying, flat back tracking and flat belly tracking.
Headdown
Headdown is probably the most technical of the freefly positions. It requires balance, skill, strength, and a refined technique. I teach the straddle position first, because it is easier to balance and conceptualize early on. You should have your head, shoulders, hips, and ankles completely in line. Your head should be pointing straight towards the Earth with your field of view consisting of the horizon with a half sky/half ground ratio.
People who fly on their bellies a lot usually have a huge arch in their torso, which causes them to go to a back track, or belly track (we will get to how that is important later). Others usually have a kink in their hip so their shoulders and head are in one plane and their hips and ankles in another plane. This causes a steep track on their belly.
Most of the concentration, once you have acquired the skill of keeping your body all in one plane, should be concentrated on the hips, legs and feet. First, You should have tension in your butt so you are straight, this can fix the hinged at the hip problem addressed above. Second, you should squeeze your quads taught so they push outwards, but remain in the same plane as everything else and keep the full extent of your leg straight. Third, you should have your toes flexed up towards your head. Picture yourself hanging from a bar upside down by your feet. You should feel air on your toes when you get it right. Pressure should be felt on your toes much like someone standing on your feet.
Once you have the straddle position, the progression calls for 360 turns both ways, forward and backward motion, and then docks.
We won't get into the technique of daffy Headdown, but it is extremely useful to slow down, fly in the tunnel with the lower speeds, and for heavier people to fly with others.
Back Fly
People often ask why they need to learn to fly on their back. The answer is simple. Headdown is a balance between flying on your back and on your belly. When the Headdown position is correct, no wind should be felt on your back or belly. This position requires the awareness of air being on your back or belly, so you can achieve no air on the torso. Since most people can fly on there belly relatively well, then it is imperative for you to learn how to fly on your back to acquire the Headdown position.
The back fly position can be attained in the tunnel first, because it is much safer. Start on the grate. Relax your torso so it is convex. Put your hands above your head, and relax them. Do not push down towards the grate unless you want to slow down, or go up! Let your head relax and sit in line with your torso, while looking straight above. Keep your hips 90 degrees just like sitting in a chair. Keep your legs wide for stability.
Back fly also has many everyday uses. Flying with tandems on your back is not only fun, but honestly the best video angle. When you are flying with an inexperienced sit flier and they cork you can match their speed on your back, until they can get vertical again. Lastly, you can use back fly to fly with relative workers, or once again get an interesting camera angle from below.
Two words of caution! First, tighten up your rig when you fly on your back because the rig tends to shift from the wind below and can turn you. Second, I do not recommend flying on your back with other people unless you can competently fly in the wind tunnel on your back with a coach, as not to cause a huge difference in speed and thus a high speed collision.
Tracking
When first learning the Headdown position people either track towards the coach or away. I think it is very useful to learn to flat track on your belly and back. If you learn to fly both positions well with a coach, then control of the Headdown position is easier.
Belly flat tracking is a little different than the steep track taught in the majority of AFF programs. A flat track has the ankles, hips and shoulders all in one plane.
The progression suggests to learn to turn left and right, adjust your fall rate with your torso, and finally increase your speed with your legs. Turn left and right with your arms first as to make the adjustment slow. Then start to adjust the trim of your body for more powerful turns. Adjust your fall rate in tracking by arching to go down, and cupping with your torso to go up. Lastly, squeeze your quads tight for speed.
Back tracking is fun and challenging. It can be used in Headdown, to track up to formations and to close huge distances. Make sure to slow down well before you reach your target.
The first problem most people have when they back track is they have a kink at the hip. This creates more of a back fly rather than a track. Squeeze your butt, or push your hips forward to get flat. To gain more speed, put your legs together and press your ankles down slightly.
With all these positions and abilities under your belt, Headdown will be easier to learn. The awareness and skills you learn from these alternate positions can in the end help you conquer Headdown.
Remember, try to freshen up with a coach and in the tunnel before you start flying with other people. Headdown, along with these other positions is never easy, but persistence mixed with awareness and the right guidance always pays off.
Swoop high, don't lag on jump run, and pack your instructor's parachute. Later!
The New School Fligh University Web Site
Steven Blincoe is the founder of The New School Flight University in Lake Wales, Florida. He has 4,000 jumps total and 300 hours of Skyventure Orlando wind tunnel time. If you would like to contact him you can at blincoe.org, or 530-412-2078.
By admin, in Disciplines,
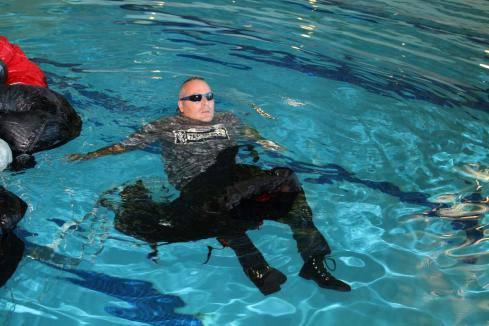
Getting Wet: Wingsuits In The Water
An unplanned water landing is a frightening scenario for many skydivers; it’s
one of the reasons that live water training is required for a USPA B License (If
you didn’t truly get wet when working on your USPA B license, your instructors
weren’t doing you or anyone else any favors). Add a wingsuit to the mix and it’s
enough to give pause to even the most experienced skydiver. In 2010 alone, we’ve
had three known unintentional wingsuit water entries in the USA. Wingsuits can
fly further than skydivers can, and water is an attractive hazard to fly-over.
Toss in a low deployment, restricted movement, and some adrenaline and a normal
skydive can get really exciting really fast.
OK, so it’s not quite the same as Houdini and his locks, and skydiving in a
“prom dress” or freefall in a straight jacket isn’t nearly as difficult as some
make it out to be. However, emergency situations do require a different
approach. Wingsuit skydivers should pre-plan for an unintentional water landing
even if flight over water isn’t an issue at their home DZ. A boogie or other
special event may put wingsuit pilots into unfamiliar situations where water is
present. Flotation devices should be a part of that pre-planning process if
over-water flights are a common occurrence. TSA allows for up to four Co2 cartridges to be carried as part of a "life-vest unit."
USPA Training And Recommendarions
Section 6.2 of the USPA Skydiver Instruction Manual (SIM) guidance for
unintentional water landings tells us to:
a. Continue to steer to avoid
the water hazard.
b. Activate the flotation device, if available.
c. Disconnect the chest strap to facilitate getting out of the harness after
landing in the water.
d. Disconnect the reserve static line (if applicable)
to reduce complications in case the main needs to be cut away after splashing
down.
e. Steer into the wind.
f. Loosen the leg straps slightly to facilitate getting out of the harness after splashing down.
(1) If you
loosen the leg straps too much, you may not be able to reach the toggles.
(2) Do not unfasten the leg straps until your feet are in the water.
g.
Prepare for a PLF, in case the water is shallow (it will be nearly impossible to
determine the depth from above).
h. Flare to half brakes at ten feet above
the water (this may be difficult to judge, due to poor depth perception over the
water).
i. Enter the water with your lungs filled with air.
j. After entering the water, throw your arms back and slide forward out of the harness.
(1) Remain in the harness and attached to the canopy until actually in the
water.
(2) If cutting away (known deep water only), do so only after both
feet contact the water.
(3) If flotation gear is not used, separation from
the equipment is essential.
k. Dive deep and swim out from under the
collapsed canopy.
All of these same procedures apply when wearing a wingsuit, yet
preparations for an unintentional water landing don’t stop there. We still got
work to do.
Prior To Entering The Water
It goes without saying that the best way to avoid a water landing is to avoid
being over the water. However, sometimes it cannot be avoided. In addition to
the previously mentioned, USPA-recommended actions, the wingsuit should be
unzipped as much as possible prior to landing. This includes armwings, legwings,
and body zippers if possible. Do not pull the cutaway/release cables on the
wingsuit (assuming the wingsuit has cutaway cables, not all do) if the arms can
be unzipped. An armwing that has been cut away will be much more difficult to
move and unzip once it has filled with water and your arms are still in the
sleeves (For example, the newest Phoenix-fly wingsuit arms might be cut away, as
they detach the full wing from the arm, but the arm will still be inside a foam
sleeve making it difficult to swim). The tailwing may act as a drag point and
force the upper body forward, putting the skydiver on his belly. Enter the water
with feet and knees together. Flying at half brakes should allow the canopy to
continue forward. Do not flare. Take a deep breath prior to entering the water.
After Entering The Water
The canopy is a potential point of entanglement. It is recommended that a
main canopy be cut away once you are fully in the water. If there is a current,
this will prevent the main from dragging you along with it. A reserve cannot be
cut away without a hook knife (if you are going to carry a hook knife, carry a
metal, not plastic hook knife. A $5.00 hook knife will not do the job). Roll
backward or sideways onto your back. If you have not deployed the reserve, the
reserve will keep you floating for approximately 30 minutes in fresh water,
longer in saltwater. With the tail (and perhaps the armwings) potentially being
still inflated, being on your back will prevent the tail and rig from forcing
your face into the water. Try to remain calm, breathe deeply and begin the
process of removing goggles, helmet, and legstraps (chest strap if it was not
undone in the air). The arm and legwings of a three-wing style wingsuit are
similar to a ram-air parachute; there is an inlet and air fills the cells. These
same inlets and cells can fill with water as easily as they fill with air.
Although water in the cells alone will not cause the wingsuit to sink, movement
of the wing will cause the suit to be dragged downward. This means that
attempting to tread water will drag you under. Do not attempt to tread water,
but rather keep your legs motionless. If there is any current, it is imperative
that you stay on your back and try to keep your head upstream. Keeping the legs
apart will help achieve this goal. Even a slow current will move your body very
fast. Remaining calm is perhaps the most important aspect of clearing the suit
and surviving.
Jeans, boots, and gloves can make the task of escape a little more
difficult than expected.
Once you are fully unzipped and your legstraps loose, slide your rig and
armwings off. After the upper body has been freed, “sit down” in the rig and
suit to put you head-high. This allows the torso to roll forward so that it’s
possible to dive deep and away from the rig, allowing the legs to escape from
the legstraps and tailwing. Although the USPA SIM instructs skydivers to swim
away from their rig, I have made the personal choice that I
will not swim away from my rig if the reserve has not been deployed. It
may be used as a flotation device and might be the difference between life and
death. I will cut away the main canopy and swim away from the main.
This is my personal decision and is in opposition to
USPA recommendations. Follow at your own risk.
During the various water experiments, there were a total of 49 water entries
in various conditions and wingsuits, all with a rig or dummy rig in place, many
with a main canopy attached. Performance Designs Sabre II, Silhouette, and Storm
canopies were used. We jumped into still water 18’ deep, 6’ deep, current pools
34” and 24” deep with speeds up to 7 knots. We also jumped into wave pools with
swells of up to 3’, which are small to moderate compared to coastline
swells.
Tossing the main canopy into the 7 knot current
pool.
Summary
During these entries, three things became clear;
Go into the water with as many zippers undone as possible. Your chest strap
should also be undone for best possible speed once in the water. while this may
seem logical, in at least two of the three unintentional water landings, the
wingsuiter forgot to unzip arms while dealing with other issues.
Get onto your back as quickly as you can. Stay on your back as legstraps,
zippers, helmet releases, and goggles are removed. You may want to consider
leaving the helmet on if in moving water and head protection is needed.
Take a deep, calming breath. Even though my experiments were intentional
water landings, they were still nerve-wracking when the suits were fully zipped
up. Being jittery is entirely likely. Staying calm and keeping heart and
breathing rates down may easily be the difference in survival, particularly in
cold water.
Be sure to stay clear of the canopy and lines. Currents may drag the canopy
around a bit. Rescuers might have an easier time finding you if they can spot
the canopy in the water so staying somewhat near but well clear of canopy and
lines is a good idea. A hook knife should be part of your kit.
When landing in water that has a current, try to keep your head upstream
while getting out of the suit. Leave the helmet on to protect your head from
rocks and other objects. Stay as far away from the canopy as possible. This is
easier said than done. Note that in the video, the current combined with the
canopy drag was more than two men could manage even in shallow water. This is
where a hook knife would be beneficial.
If the rig has a reserve still packed in it, it will float. It also is very
easy to escape once the legstraps are undone, as it will remain on top of the
water as you dive forward away from the container.
"Exiting" from the 3 meter board, fully zipped
In conclusion, if over-water wingsuit flights are planned, seriously consider
a floatation device. They will not have a significant impact on the comfort of
the suit, and are not relatively expensive. ParaGear, ChutingStar, and other
skydiving supply shops sell these devices. Remember that CO2 cartridges may not
be carried aboard a commercial flight, so you’ll need to source or ship
cartridges to your final destination.
If a flotation device is not part of your gear/kit, have an advance plan in
the event of a water landing. There have been at least three known unintentional
water landings in the US this year; only through luck and calm procedures did
the wingsuiters survive. Read the Incident Report below to see how one survivor
described his experiences and how multiple errors led him into the water.
Big puffies and blue skies (and calm waters, I suppose)! -d
Douglas Spotted Eagle is a USPA AFFI, Coach Examiner, PRO, and PFC Senior
Examiner (North America) on staff at Skydive Elsinore.
Student’s Incident report:
#####
Name [Deleted]
My
age: 31
Years in the sport: 4.5 yrs.
# of skydives: 287
# of
Wingsuit SD’s: 7
# of BASE: 70+
I recently purchased a new Phantom2 Pheonix fly wingsuit and was super eager
to get in the air. I got to the DZ and got on the first available load which was
a 10 minute call. On any typical skydive, an immediete 10 minute call upon
arrival isn’t so bad, but setting up a wingsuit system quickly is not a great
idea, but I did.
Mistake #1: I forced myself to have to rush to get on a load to do a
technical jump for no apparent reason. In the end, I don’t think my rushed
preparation lead to the actual situation, but I guess my mind wasn’t where it
should have been.
I was the last to exit from 12,500?. I had a really great (mostly stable)
flight, flying around some clouds. At pull time, like most jumps, I was out over
the ocean. I took one last look at my wrist alti at 5K’. Based on my audibles
4000? warning, I’m guessing I was open between 3500?-3000?.
Mistake #2: I shouldn’t have pulled that low with a WS on with my low
experience level.
Mistake #3: I have made 6 previous WS jumps. All more than 2.5 years
ago. I did not physically or mentally dirt dive this jump before getting on the
plane.
After a stable pull (I felt), I immediatley opended with line twists. I’ve
had line twist before with this canopy/harness (Sabre 1, 150; 9 cell/Infinity
dom;1997) and was able to kick out of them in the past. This line twist began to
accelerate instantly. I made 3-4 attempts to kick out of it, but with the
restricted movement of my legs in the WS, and spinning horizontally around the
canopy, it didn’t do much at all.
Mistake #4: I was under too small of a canopy for a WS jump. My exit
weight= 240lbs. Wind loading= 1.6. I should have been under a more docile (7
cell), or larger canopy.
So, having no luck with my kick attemps, I chopped it. It took me a few
seconds to locate my handles (one hand on each). In my haste, I did a “T-Rex”
style cut-away. As soon as I saw my right riser clear, I let go of the handle
and pulled the reserve (also “T-rex”). Obviously leading to my main still
dragging off my left shoulder.
Mistake #5: I was jumping a borrowed rig. Although I’ve had about 20
uneventful (other than line twist) jumps with this rig. I wasn’t really familiar
with it.
Mistake #6: Probably the biggest one. I DID NOT CLEAR MY CUT AWAY
CABLE/HANDLE COMPLETELY!
Mistake #7: This goes right along with the above…Pulling my reserve
WAY TOO SOON!
I think because of my slightly slower descent rate (caused by my main still
being attached), and my reserve already fired, I felt the second set of risers
bouncing around on my head and saw all the lines whipping in-front of my face. As
the reserve was slowly coming to line stretch, the lines were beginning to
entangle with my helmet (actually the camera on my helmet)
Mistake #8: Wearing a camera on a “student” WS jump.
With the lines still “somewhat” relaxed, I thought of dumping my helmet but
instead I picked/brushed the lines off the camera, clearing them. A split second
later, I felt the canopy pressurize and go to complete line stretch. Instantly,
the reserve risers had forced my head completely forward, making my chin squeeze
into my neck. I knew I had MAJOR line twists on my reserve now too.
So now, I’m under one collapsed main still dragging off my left riser, and
one tightly twisted up reserve to my right side, still fully zipped into my WS,
and I’m getting choked from behind by the reserve risers and can’t lift my head
to see any of it. I knew I wasn’t “falling” anymore and that the canopies were
not entangled. I don’t know, but the reserve must have been “un-spinning” because
the pressure was slowly coming off the back of my neck and the twist opened up
enough to squeeze my head back through, behind the risers.
Mistake #9: Not sure if I could have prevented this one. If my arms
had been unzipped and out of the wings (which they weren’t) I may have been able
to reach back during the reserve deployment, and guided the risers in-front of
my head before pressurization.
At this point, my first objective was to finally cut the main off so I could
get completely out of my reserve line twists. The main was still being held on
by 1cm of ripcord cable still in the three ring release closing loop. In any
case…I was focused on getting that last tinny bit of rip cord out of the closing
loop. I had “tunnel” vision on trying to pick at the centimeter of cord. There
was too much tension on the riser so I couldn’t get it out. I was definitely not
thinking clearly at that moment. ALL I had to do was find my cut-away handle
floating behind me and pull it another 1/4 inch. In retrospect, the dragging
main (acting like an anchor) may have kept my reserve from continuing to twist
and spin me into the ground/water. I’m not sure if completely cutting away at
that point would have been any better.
Mistake #10: Had I been thinking clearly, I would have found my handle
and finished the job of cutting away.
At this point I stopped all attempts to correct anything. I saw that I was
about 300 yards(?) of the beach, over the water at about 500-300?(?) up. I knew
I was going for a swim. The swell was small (2-3?), but definitely was not flat
and calm. In preparation for my mid day swim, I started unzipping
everything…chest, arms, legs, chest strap. I then reached above the reserve line
twist, grabbed the rear/right line set and did a “rear riser” turn towards the
visibly shallower water over the reef. I don't know if that helped at all because
I pretty much felt like I was under a round canopy with no directional control.
I just knew I was drifting towards the reef now. Not knowing the shallowness
above the reef gave me a second of pucker factor, but at this point I had not
much control or time anyway. I then did a “backwards” PLF (obviously with no
flare, toggles still stowed and twisted). I slammed the water pretty hard.
Mistake #11: Although this is what saved me from serious impact, I
landed in the water with a WS on….not good!
While I was underwater, my wingsuit quickly turned into a tunasuit, but
before I even had time to deal with the next hurdle……..I stood up.
I was now standing 300 yards out in the surf, in 3 feet of water with both
canopies attached and the WS on, all filled with water. I was getting dragged
in-land with the swell a little bit, but had plenty of time to finally cut-away
the main and completely step out of the WS. I saw all the scrambling of people
on the shore. I was soon reached by a couple of skydivers and a rescue kayak. We
loaded up the rig on to the kayak and swam back to shore.
Mistake #12: I probably should have made my first priority to un-zip
my wings. Although, at no point did I feel like they were restraining my movement
(until I wanted to steer towards the reef). I guess I unzipped them right when I
had a moment and thought it was totally needed.
#######
Massive thanks to:
Lake Elsinore Casino
Tooele City Pool
Raging Waters/SLC
Skydive Elsinore
Skydive Utah
Performance
Designs
Rigging Innovations
Teledyne Instruments
Joey Allred, Aaron Hutmacher, Jose Calderon, Mannie Frances, Karl Dollmeyer,
Scotty Burns, Chuck Blue, Jarno Cordia, Bence Pascu, Joe Turner, Frank Hinshaw,
T.K. Hinshaw, Tom Deacon, Jim Crouch, Jack Guthrie, Scott Callantine, Jeanie
Curtis, Mike Harlon, Chris Squires, Robert Pecnik, Jeff Donohue, and Andreea
Olea.
By admin, in Disciplines,

Getting Into BASE
For BASE jumping information, BASE jumping articles, photos, videos and discussions visit BASEjumper.com
This article was written entirely by Tom Aiello, BASE 579. Tom has made over 500 BASE jumps in the past 30 months, from more than 100 objects. He is not an authority or expert of any kind on BASE jumping or any other type of parachuting, so all his advice should be taken with a grain of salt. Copyright 2002. Permission to reproduce and distribute in this exact form only is hereby granted.
Virtually every time I tell someone that I'm a BASE jumper, their first question is "how could I get into that?" After answering that question dozens of times, I decided to write it all down, so that I can avoid repetition induced laryngitis.
There are as many different ways of getting started BASE jumping as there are jumpers. But, after some soul-searching, some discussion with friends, and some internet research, I've decided that the course I wish I had followed, and the one I've tried to set people on, goes something like this.
Check the Fit
BASE jumping is not for everyone. Give yourself a long hard, look, and decide if BASE really fits you. It's virtually impossible to objectively evaluate yourself, so it might be helpful to have a (close and tactful) friend help you with this step.
Does BASE jumping fit your physical abilities? BASE is not really about personal fitness (although it helps) or athleticism (which only comes into play in advanced sub-disciplines). In BASE, the important physical abilities are reaction time, coordination and balance. Evaluate yours. It may be helpful to ask some of the following questions: If you are sitting at a desk, and knock a pencil off, do you pick it up off the ground, or did you catch it in mid-air? When you spill a bottle of beer, do you have to get up and get a new one, or do you right it before you've lost most of it? How often do you trip or stumble?
Does BASE jumping fit your mindset? The best BASE jumpers are organized to the point of anal retentive. They also have an intellectual curiosity about almost everything. Have you ever wondered how the reserve system on a skydiving rig works? How many times did you trust your life to it before you starting wondering? Are you always trying to find a pull-up cord to close, or do other people ask you for them?
Do you make correct decisions in pressure situations? BASE jumpers need to react quickly, and correctly, in life threatening situations. Have you ever been confronted with an oncoming car in your lane? How did you react? Did you have to think about it, or did it just happen for you?
BASE will best fit a person who is intellectually curious, has good reactions, responds quickly and correctly (without having to think during the emergency), has excellent coordination and is highly organized and detail oriented. You can definitely still be a BASE jumper who has trouble with one or two of these things, but if you are weak in most of these areas, BASE is not a good sport to take up.
Make the Decision
Make absolutely certain BASE is really what you want. This sport is dangerous, sometimes illegal and very addictive. It will take over your life. I would never advise someone to get into it (and I have found it to be the most rewarding experience of my life). In my short time in this sport I've seen two life flight helicopters from the outside, two more from the inside, the back of a police car, several broken bones and a funeral. I've also spent three weeks in Intensive Care and 18 hours in neurosurgery. Are you sure you really want to do this?
There are lots of different reasons to get into BASE, and I have given up trying to decide which are the "right" ones. The important thing is that your reasons are important enough to you to outweigh the potentially enormous costs of BASE jumping. Unless you are a NASCAR driver, BASE is by far the most dangerous thing you will ever do. Statistically, you have something like a 5% chance of dying by the end of your BASE career. Worse, your chance of serious injury (think hospital time) is more like 95%. I know three BASE jumpers with more than 500 jumps who have not spent serious time (more than a day or two) in the hospital due to BASE accidents. Even they agree that it is just a matter of time until they are seriously injured. If you are not ready to die BASE jumping, you are not ready to BASE jump.
Go to this web site: http://juliabell.home.att.net . Read the entire thing. Seriously.
Still want to be a BASE jumper? Then read on...
Do Your Homework
Next you need to find out everything that you can about BASE jumping. Talk to every BASE jumper you can. Read every article you can find about BASE, rigging or weather. Get on the internet and find everything you can about BASE (there is a whole lot more than you'd think). I have included several of my favorite references at the end of this article, but there are many, many more.
Get Your Head Straight
Now that you've made the decision to jump, make sure that you have the right mentality. There are two important pieces of that mentality that will keep you alive in this sport.
Never do anything that doesn't feel right to you. If you're not ready for something, don't do it. We all determine our own learning speeds, and there is no way to know in advance what you'll be comfortable with. Don't be pushed into doing things you're not ready for by overeager partners or teachers.
Never be afraid to back down. It takes far more courage to back off the exit point than to jump. There are definitely times when it is right to back off, and knowing when to heed that little voice in your head is critical to your survival. This sport is very, very serious, and taking it lightly will hurt, maim, or kill you in short order.
The rest of your mentality you'll develop as you go, learning from other jumpers, from experience (both positive and negative) and from the rest of your life.
Tell Your Family
It is the responsibility of every BASE jumper to tell their family that they are involved in BASE, that they understand the risks, and that they have chosen to take those risks.
Sit down with your family and talk to them about BASE. This is obviously an extremely difficult proposition. Facing your family with your decision to engage in a life-threatening activity cannot be easy. However this discussion is important both for you and for the sport of BASE jumping.
An honest, open discussion with your loved ones will make them feel more included in your decisions. They will generally be more impressed with the maturity and thought that has gone into your decision to jump. This can help avoid the arguments, tantrums, and guilt trips that might otherwise be thrown at you by family and friends who don't understand your activities.
An explanation, by you, that you understand and accept the risks involved, will help prevent your family from attacking other members of the BASE community in the event of your injury or death. There have been far too many cases of the families of dead jumpers accusing, confronting, suing and even prosecuting other jumpers as a result of fatalities. Don't let this happen to your friends.
Write a letter to your friends and family, to be opened in the event that you die BASE jumping. In the letter, explain why you have chosen to take up BASE, what you hope to get from BASE jumping, and why you are willing to risk death for it. Give sealed copies to (at the very least) your family and your BASE mentor. Do this to defuse any conflicts that might arise from your death.
Make the Skydives
First, make at least 200 skydives. You need to make these skydives in order to practice accuracy, tracking and canopy control skills. You also need to establish a general comfort level with parachutes, free fall, and split second decisions. The skydivers who are best prepared for BASE generally jump large, 7 cell, F-111 canopies, have had a number of malfunctions and responded correctly, and are comfortable with multiple skydiving disciplines. If your only focus is BASE jumping, don't succumb to the temptation to become canopy swooping freeflyer. Instead, focus on CRW and Accuracy as your skydiving disciplines.
To practice tracking make entire skydives in max track. Don't count on the limited tracking on break off, or on the balanced tracking of a tracking jump. Make the whole dive tracking as hard as you can, with camera and coaching if possible, and work on getting the most lift, and the most drive out of your track.
For accuracy practice, it's best to use the canopy that you intend to BASE jump with. Try to set up low (under 500 feet), to simulate the BASE environment. Don't forget to make approaches cross- and down-wind as well, since you will often have to do this while BASE jumping.
For canopy practice, you should make some CRW jumps (on a CRW canopy) and then do some canopy drills on your intended BASE canopy. CRW is a great way to learn canopy flight characteristics in tight spaces before you get into the BASE environment (and CRW with your BASE canopy is an excellent drill-after you've learned some CRW skills).
Be sure you've made several night jumps during your skydiving career. In many places, BASE jumps are made almost exclusively at night (to avoid arrest, incarceration, and gear confiscation), and comfort with flying and landing your canopy at night is essential to survive these jumps.
Make some jumps on your BASE canopy to learn its performance envelope. Pay particular attention to riser input, practicing riser turns and riser flares. Make sure you practice your riser turns before popping your toggles-that's the way you'll have to do it to avoid smacking the side of a cliff one day. Obviously, you'll want to practice them after grabbing the toggles, as well.
Find a Mentor
While you are learning to skydive, you will doubtless meet skydivers at the drop zone. Try to find and meet the local BASE jumpers as well. Your goal should be to find someone with 200 or more BASE jumps, who you think will be a good teacher, and whom you get along with. You also have to trust them with your life (that is what you will be doing, after all).
Get a BASE Rig
Now, with proper canopy skills and an instructor, you need to find a BASE rig. Your best bet is to buy a new, Velcro closed, BASE specific rig from a major manufacturer, and put a real BASE canopy in it. You can also find good used gear (check the classified ads on the BASE board: www.blincmagazine.com). The key is to get actual BASE specific gear. Lots of people will try to sell you converted skydiving gear (Ravens, Cruiselites, Pegasus's, etc). Avoid this and get real BASE gear. Everyone has different preferences in gear, but the key is to find actual, purpose built, BASE gear.
Take a First Jump Course
So, now you have the pre-requisite skydiving skills, an appropriate rig, and you've found an instructor. Time to go jumping, right?
Wrong. Now it's time to get to work. Before you can make your first jump, you still have to learn basic rigging and packing, dead air exits skills, and simple ethics. There are two ways to do this.
The simplest is to cough up US$1000 or so, and take a first jump course from one of the major gear manufacturers. Since most of us don't have an extra grand to throw around, we tend to try to skip this step. I don't recommend this. It really is worth the money to get qualified, professional instruction. You wouldn't try to make your first skydive without paying for instruction, would you? Even if you had a friend who swore he "knew all about it", and could easily "take you for a jump."
First jump courses are also available from various BASE organizations around the world, such as the Australian BASE Association (which maintains a database of qualified instructors in Australia) and the Norwegian BASE Association (which has classes available at Lysefjord in an attempt to minimize accidents at that popular site). If you have the money, though, my preference would be to take your course from an American manufacturer, as their "teaching object" (a 486' bridge over water, with a huge grassy landing area) is generally the safest for a first time jumper. There is a similar object in Southern Europe, and Robert Pecnik offers a First Jump Course there.
Lots of people try to save some money by getting their friends to "teach" them. This is a bad idea for several reasons. First, you don't know that your friend really has the qualifications to teach. Second, you don't know that he's really motivated to do a thorough job teaching. Sure, he can get you off for that first jump, but what did he teach you about dealing with your unstable launch on jump number 12? Third, you will learn more if your First Jump Course is not taught by the same mentor who guides you through your next 20-50 jumps. Finally, these "informal" first jump courses can drag on for weeks, months, even years. If you contract with a real business, you know the exact dates of your course, and you can plan for it.
Watch Some Video
Now that you have an idea of what a BASE jump ought to look like, get your hands on some BASE video. The best video for this is the "Lemmings Exits" series from Bridge Day (http://www.lemmingsvideo.com/). Try to get several years of "Lemmings Exits", and whatever other BASE video you can find. Watch the video, preferably with your BASE mentor. Evaluate each jump. The more errors you can see before jumping, the more likely you are to avoid them yourself.
Get Started
Now you're ready to start jumping. After your First Jump Course, you should have a solid knowledge of gear, rigging and packing, some theoretical knowledge of malfunctions and solutions, and a practical set of launches to work from.
The next step is to get home and make as many jumps (in as short a time) as possible with your BASE mentor. Ask as many questions constantly. Try to learn as much as you can. Once you feel comfortable (and so does your mentor), start branching out and jumping with other people. Ask them the same questions (they may have different answers). Watch different people pack. Watch different people jump. Always ask why things are done a certain way.
Keep Learning
Now that you have 20-30 jumps, and can hang with the local crew, you can consider yourself a solid beginner. There is still a lot more to learn, see and do. Never stop learning. In addition to being a good way to stay alive, it's one of the most rewarding things about the sport.
Some Resources
First Jump Courses:
Consolidated Rigging
4035 Grass Valley Highway
Auburn, California 95602
530 823-7969
530 823-7971 fax
[email protected]
http://www.crmojo.com
Basic Research
236 East 3rd Street, Unit C
Perris, California 92570
909 940-1324
909 940-1326 fax
[email protected]
http://www.basicresearch.com
Morpheus Technologies
5107 Lantana Street
Zephyrhills, Florida 33541
813 780-8961
813 788-7072 fax
[email protected]
http://www.BASErig.com
Robert Pecnik
[email protected]
Australian BASE Association
Tom Begic
Director of Safety and Operations
[email protected]
Must See Web Sites:
http://www.basejump.org Click on the "Articles" link, and read ALL the "Must Read" articles.
http://www.blincmagazine.com Pay special attention to the "Knowledge BASE" and "BASE Board" sections.
http://www.crmojo.com Especially look through the "Articles" section of the "Library".
Books:
Understanding the Sky. Dennis Pagen. Sport Aviation Publications; ISBN: 0936310103; (February 1992): Buy this book. Read it, then keep it. You'll want to read it again when you have around 100 BASE jumps, and then again around 500 jumps. Each time, it will become more useful.
Groundrush. Simon Jakeman. Jonathan Cape; ISBN: 0099232618; (July 1993): The first (and so far only) book ever published about BASE jumping.
Album of Fluid Motion. Milton Van Dyke. Parabolic Press, Inc.; ISBN: 0915760037; (May 1982): The most valuable picture book I've read. You may not understand why it matters at first, but once you start jumping cliffs and buildings in wind, the basic concepts in this book become invaluable. Don't worry about the technical jargon-just look at the pictures.
BASE Gear Manufacturer Web Sites
http://www.crmojo.com
http://www.basicresearch.com
http://www.BASErig.com
http://www.vertigobase.com
Used BASE Gear Classifieds On Line
http://www.basejumper.com/
Other Informational BASE web sites of interest
http://www.basejumper.com
http://www.vertical-visions.com
http://juliabell.home.att.net
http://www.bridgeday.info
http://www.thebasepoint.com
And one inspirational web site:
http://www.yosemite.org/vryos/
© Copyright 2002 Tom Aiello. Permission to reproduce and distribute in this exact form only is hereby granted. Please address any questions, comments or corrections to the author at [email protected].
By admin, in Disciplines,
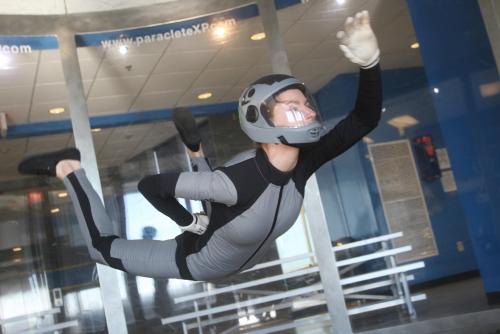
From Tunnel to Sky
Training Wind Tunnel Students to be Great Skydiving Students
by Kirk Verner and Gary Peek
Photos by Michael Breweri
Tunnel student Emily Young
The advent of vertical wind tunnels has created not only an incredible new air sport, but has also provided us with a very realistic simulation of freefall skydiving. This simulation can be used to provide both accurate and efficient training for skydiving students.
As wind tunnels proliferate around the world, more and more people are going to begin skydiving having already experienced flight in a wind tunnel. Many of them will come to skydiving having performed maneuvers that skydiving students experience not only in their initial skydives, but in their more advanced training jumps as well.
At some point, nearly every dropzone and skydiving instructor will need to plan how to use this technology to both enhance and replace traditional training for freefall.
Advice for the tunnel instructor:
Keep in mind that the sport of skydiving and the skydiving industry are extremely concerned about legal issues and liability. Trusting a student's instruction outside of the normal skydiving channels is a huge leap of faith for both dropzones and skydiving instructors. It may be a long time before tunnel training for skydiving gains widespread acceptance, so have patience and try to cover all the bases during this transition.
In all likelihood, a tunnel instructor is going to have to hold a skydiving instructional rating from a national organization in order for their instruction to be used toward skydiving, for example, an USPA AFF instructional rating in the US.
Logging tunnel skills and experience
In order for a person trained in a tunnel to transfer their skills and experience to skydiving, they are going to need some reasonable verification of their training. Tunnel management and tunnel instructors would do well to create their own logbook to help their students take proof of their time and skills to dropzones and skydiving instructors. This logbook should include items like the date, location, flight time, maneuvers, and instructor signature, but could also include multiple ways to contact the instructor, since using proof of tunnel training will be new to many dropzones and skydiving instructors. They will likely feel much more comfortable with their skydiving student if they can discuss their tunnel training with the tunnel instructor if needed. If a specialized tunnel logbook is not available, a skydiving logbook could be used just as well, with the advantage of the student already having a logbook when they start skydiving.
Suggested progression for a tunnel student working toward being a skydiving student
In order to allow an AFF instructor who does not have tunnel flying experience to feel comfortable with the progression of students you have trained in the tunnel, there are a number of skills that the student should be able to demonstrate. These can range from basic stability all the way to advanced maneuvers, depending on the amount of time spent on instruction in the tunnel.
In most cases, a single phase of tunnel training will be all that a potential skydiving student will need. If the goal of the tunnel student is to skydive, they may be eager to do that as soon as possible.
In some cases however, a tunnel student may have begun tunnel flying without the goal of skydiving in mind, and may have accumulated significant time in the tunnel before deciding to skydive. Or, they may prefer the efficiency of the tunnel to learn the more advanced maneuvers before skydiving. If the skills outlined in a second phase of training are learned, the student may be able to advance very quickly in their skydiving progression.
Phase 1 -
Phase 1 training would include basic stability, neutral body position, heading control, fall rate control, forward and backward motion, docking, simulated altimeter checks, and simulated pilot chute throws. This training can be used to provide the student with the basic stability and maneuvers to allow them to jump with a single AFF instructor and to quickly advance to skydives and aircraft exits that will deliberately introduce instability.
Phase 2 -
Phase 2 training would include controlled turns, intentional unstable maneuvers, "delta" and tracking body positions, and the backslide body position. This additional training can be used to allow the student to quickly perform the maneuvers necessary to advance to the "coached" phase of skydiving training.
Ways to add realism to skydiving training in a tunnel
In order to provide a more realistic simulation of skydiving, a tunnel instructor may have their student wear a skydiving rig along with one of the "Tunnel Wrap" or "Rig Condom" devices, used to enclose skydiving rigs in order to prevent accidental deployments when worn in tunnels. Also, a simulated altimeter training device can be helpful to allow the student to practice the position of their arm when checking altitude.
Advice for the skydiving instructor:
For legal liability reasons, all skydiving students need to be given instruction in all areas related to making a skydive. However, most of us realize that students that have been trained in a wind tunnel, especially in skills related to skydiving, are going to progress through the skydiving freefall skills at a rate that no traditional skydiving student could. This may allow for a considerable savings to the student in time and number of jumps.
In all likelihood, a skydiving instructor is going to have to hold an instructional rating from a national organization in order to be be allowed to train students, for example, an USPA AFF instructional rating in the US.
Aircraft
A skydiving student of any kind may have no knowledge at all about aircraft and the dangers that they can present. Students need to know how to avoid propellers, enter the aircraft and position themselves properly, to protect their handles, and to find and wear their seatbelts. Remember that tunnel students are probably not used to having a rig on their back and may not realize what the flaps are rubbing up against.
Since most skydiving exits from aircraft are difficult to simulate in a tunnel, a skydiving instructor will need to tell the student what to expect for a particular exit. The advantage for a tunnel trained student is that if an exit causes instability, the student will be able to correct this almost immediately and quickly continue with the skydive.
Gear
One thing that many tunnel students are unlikely to have experienced is having a parachute system on their back while flying. If the student rig is sized well for the student and adjusted well on their back, this will likely not be an issue at all since they have learned and felt a great deal of stability in their body during tunnel flight. However, if your dropzone is one of those who still uses one-size-fits-all student rigs with large parachute for all students you will need to pay close attention to the adjustment of the rig if the student is a small person.
If a tunnel student has been flying in a tunnel for a while, or is very serious about tunnel flying, they may already have their own jumpsuit, helmet, and goggles. Their jumpsuit may or may not have grippers, so an instructor may not be able to easily take a grip on the student, but then again, why might they need to? If the student has enough tunnel time it is very unlikely that the instructor would need to take grips to control the student, but perhaps they would feel uncomfortable without grippers. If the student is required to wear the dropzone's jumpsuit it should be appropriately sized and probably be rather tight unless they are a larger student.
If the student's personal helmet and eye protection is appropriate for skydiving then having them use their own gear would be best. But if the student is required to wear a radio for canopy guidance there might be some serious tradeoffs. If the dropzone uses radios that are mounted on the helmet, the student may need to wear the dropzone helmet and goggles. However, if the radio is mounted on the student's chest strap, then perhaps telling the student to raise the face shield on their helmet once under canopy to hear the radio better might be sufficient.
Where will they be placed in our progression?
One of the first questions that your student or your dropzone owner may ask about a tunnel trained student is "With their experience flying their body, what "level" or what "category" are we going to have them start with?" (In reality, you may need to create a level or category specifically for them for at least a few jumps.)
Realize that there will be a huge difference between a student that has 15 minutes in a tunnel compared to one that has several hours. If the student's tunnel instructors have done specific training in preparation for their student learning to skydive, there may actually be only a few freefall related skills for the student to learn and demonstrate.
Body Position
When you are initially training your student and practicing a skydive on a creeper or other training device, you may see your tunnel trained student use a body position that is different than what you would normally train your skydiving student to use. Well, if your student has more than a few minutes of tunnel time using that body position, then you should usually just let them continue to use it. Trying to make them do something different that what they were initially trained to do will waste time and may make their performance worse. This also includes some maneuvers such as turns, which may be taught differently by tunnel instructors.
Freefall maneuvers
Most freefall maneuvers used in skydiving can be simulated and practiced in a tunnel, perhaps with the exception of the lengthy movements made during tracking or backsliding. Although tracking can be simulated in a tunnel, the skydiving instructor will still need to make sure that the student can track in a straight line in order to provide separation before deploying a parachute.
Most skydiving instructors will be concerned with the altitude awareness of their tunnel trained student, and perhaps for good reason, given the extended period of working time provided by a tunnel. However, the normal training given to skydiving students regarding the dive flow should give the student sufficient time and altitude awareness. A simulated altimeter training device with an altitude that can be set to count down would be extremely valuable.
Canopy control
Knowledge of parachutes and how to fly them safely is something that no tunnel student will know until they are trained on it. All of the normal canopy training subjects will need to be taught. The good news is that the increased confidence that a tunnel trained student has in their freefall skills will allow them to relax and to use more of their energy and thought learning canopy skills.
If your tunnel student turned skydiver is not catching on to canopy control after having mastered the freefall skills, you can always do what you would do to a student that started as a skydiver. They can always do a number of clear-and-pulls and concentrate on improving their canopy skills. This may also provided them with more opportunity to practice spotting in the aircraft.
About the Authors
Kirk Verner and Gary Peek have known each other for over 30 years. They both learned to skydive in the early 1980's at Archway Skydiving Centre in Sparta, Illinois, owned by Kirk's father Dave Verner. Both Kirk and Gary are on the United States Parachute Association Board of Directors, Kirk as a National Director and Gary as the Central Regional Director.
Kirk managed the Paraclete wind tunnel for 10 years and now manages the Paraclete dropzone. Kirk is an active AFF instructor and teaches students trained in the tunnel to be skydivers using Paracletes' tunnel to skydiving program. Kirk is also a world champion formation skydiver, having been on the Arizona Airspeed teams for 13 years.
Gary is an active Tandem and AFF instructor, and teaches students locally, as well as when he visits dropzones in the region. He is also a Master Parachute Rigger, a Commercial Pilot, and Cessna 182 jump pilot.
By admin, in Disciplines,
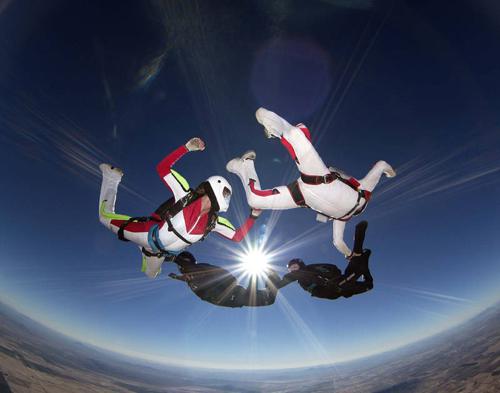
Freestyle
Freestyle is defined as a solo free fall discipline that involves choreographed multi-orientation static and dynamic maneuvers.
Generally speaking, it combines the dynamics of gymnastics and ice skating with the elegance of dance. The free stylist executes precise acrobatic maneuvers including loops, spins, twists and poses while falling at speeds of up to 200+ miles per hour.
Team Composition:
A freestyle team consists of a performer and a videographer. Teams may consist of members of one or both genders, but the gender of the team is determined by the performer. If the videographer and performer are of the same gender, either may serve as the videographer on any particular round.
Freestyle Competition:
In freestyle skydiving there are seven rounds, two of which are compulsory. The remaining five are free rounds. The content of the compulsory rounds contains four compulsory sequences drawn by the Chief Judge, which must be performed in order of the draw. The compulsory rounds are performed in rounds 2 and 5. All sequences must have a static start and stop.
The content of the free rounds is chosen entirely by the team, and there may be any number of different free routines within the set number of free rounds. Each jump is from 13,000 feet with working time beginning when the first team member leaves the aircraft and ends 45 seconds later.
Scoring:
The compulsory routine is scored for the quality and correctness of execution of the sequences, with 10 being a perfect score.
The free routine is scored in four different categories: difficulty, execution, artistic impression, and camera work.
Judging rules:
The calculation of the official score for each round is as follows: (USPA rules 2004)
Compulsory rounds:
All five judges evaluate the routines. For each compulsory sequence, the highest and lowest judges' scores are discarded. The average score is calculated by adding the three judges' scores and dividing by three with no rounding applied.
The average scores of all four compulsory sequences are added, and the result is divided by four and rounded to the first decimal place.
Free rounds:
Two judges evaluate the difficulty and execution criteria, with three judges evaluating the artistic and camera criteria.
The scores for difficulty and execution are added and the result divided by four with no rounding applied. The scores for artistic and camera are added and the result divided by six with no rounding applied. The two results are then added, then divided by two and rounded to the first decimal place.
The first International freestyle skydiving competition was held in 1990. In 1996 the International Aeronautical Federation (FAI) gave freestyle skydiving official recognition, and free stylists competed alongside other established skydiving events at the World Cup of Skydiving in 1996, at the World Championships in 1997. Freestyle remains one of the most appealing skydiving events to media audiences.
By admin, in Disciplines,
Freeflying
Freeflying is the ability to fly your body in any position, in any direction, at any speed at any given time. This includes, but is not limited to, headdown, sit, stand, back, belly and any kind of flying you can imagine. There are no limits to freefly except those created in your own mind.
Freeflying Safety
Freeflying is exciting, new and so much fun. Safety must always be an issue. By maintaining a safe flying atmosphere you allow yourself to have more fun. Flying safely relates to the level of experience of those with whom you fly. The basics of freeflight can practiced in a safe atmosphere as long as the size of the flying group does not exceed the skill level of those individuals flying together. 2-ways are the best way to train your freeflying skills.
Freeflying involves many different flying positions which relates to many different speeds ranging from 90-300 miles an hour. There is a logical progression to safe learning of freefly. It is best to first have an understanding of how to fly your body in slower flying positions before moving on to faster ones. Learning to control speed, direction and proximity at slow speeds increases awareness and reactions. These are the methods which keep everyone safe in the sky.
As stated earlier, smaller groups are the safest way to fly. One-on-one flying is the safest way to experience flight with someone else. It allows flyers to maintain visual contact with each other at all times. As experience increases and awareness grows, flying with more people can be fun and safe. This is dependent on the skill of the fliers and how well everyone has planned their dive. There are certain safety rules for breakoff. Once again speed is an important factor. Breakoff altitudes are slightly higher for freefly jumps, 4000ft because of higher speeds. It is also important to gently transition into a track to avoid radical changes in speed. Track for clean air and check. A slow barrel roll before deployment is highly recommended to insure clean air. Following the simple rules of small groups, planning, awareness and breakoffs, insures safety and fun for everyone.
Freefly Safety Equipment
Container: A tight fitting container which does not allow for exposure of risers and pins is essential to every freeflyer. Increased airspeeds and varying body positions make closure necessary.
Altimeter: Two altimeters, visual and audible, are necessary for freeflying. Altitude awareness takes on a new importance when dealing with the faster speeds of freefly.
Clothing: It is important to wear clothing that does not restrict movement and will not cover any handles.
Helmet: A hard shell helmet is recommended.
Cypres: Cypres is recommended to all those who can afford it. The potential for collisions exists. Therefore, it is best to be prepared.
By admin, in Disciplines,
Formation Skydiving
Free Flyers would call Formation Skydiving "belly-flying", with the earth always below, and the skies above. Formation Skydiving is much more than this, and entails quite a long history. Already in the 70's, freefall veterans experimented for a long time to hook up two people while falling straight down. Currently, the span of Formation Skydiving begins with a two-way and ends with a 246-way as the official world record. It's a social affair in the air: skydivers are holding hands and legs and both at the same time to build all kind of different formations of all sizes. Organizers and coaches are engineering the puzzle. Formation Skydiving has two different areas: recreational skydiving, also known as fun jumping, and the competitive arena.
Recreational Formation Skydiving
Bellyflyers meet on all kind of different occasions to build their formations in the sky. They are filling their local jump planes on the weekends, as well as weekday sunset loads, to the maximum capacity. As the number of bigger events with larger aircraft continues to grow, they meet with skydivers from all over the country, sometimes all over the world, to build their formations up to the present potential. The current world record is a 300-way formation.
Formation Skydiving Competition
More ambitious bellyflyers are sharpening their flying skills at training camps and go out to compete. Formation Skydiving has become a very well organized competition arena. Regional leagues and meets are offering competitions for all performance levels over the whole season. Nationwide championships bring the best teams of the country together (such as the National Skydiving League Championships and the U.S. National Championships). The national champions of all countries in the world compete each year at the World Cup or at the World Championships. The best teams of the world are invited to compete at the World Air Games. Formation Skydiving is slowly forging its way to becoming a part of the Olympic Games.
The Formation Skydiving competitions are recognized by the IOC (International Olympic Committee) and sanctioned by the FAI (Federation Aeronautique Internationale), the IPC (International Parachuting Committee) and by the USPA (United States Parachute Association) in the United States. The sanctioned competition disciplines are: 4-Way 8-Way 16-way.
Competition teams perform up to six rounds per day at the competition. After exiting the jump plane, all teams have a certain amount of time available (4-way 35 seconds, 8-way and 16-way 50 seconds) to perform the same pre-determined sequence of formations and maneuvers. The team with the most accumulated points wins the round. At a competition, all teams must perform between six and ten rounds. Each competition round has a different sequence of formations and maneuvers. Freefall videographers are filming the performance and deliver the footage to the judges for evaluation. The major events have live broadcast of the freefall and live judging.
U.S.A. and France have been the dominating the nations in Formation Skydiving. The 8-way discipline has never seen a different winner than the U.S. 8-way team in the history of 8-way competition. In 4-way, U.S.A. and France have been taking turns in bringing home the gold medal. Only the Swiss 4-way team "Blue Magic" has interrupted this series once in 1983. The French national team is holding the world record in 4-way with 36 points in 35 seconds. The U.S.A. is holding the world record in 8-way with 31 points in 50 seconds.
Twenty years ago, the world record holders in 4 way were scoring 8 points in time, and no one would ever have believed that our sport would have advanced to currently scoring 36 points in time. This rapid progression is testimony that formation skydiving is truly a professional, athletic sport with highly trained athletes, and is a skill that can be developed and cultivated like many other professional sports in our culture. We all look forward to where our sport will take us in the future. Until then, the belly flyers continue to train hard, compete well and enjoy the journey.
By admin, in Disciplines,
Flying Techniques for New 4-Way Teams
(This article was first published in Parachutist magazine under the title "The ABCs of 4-Way", and has been published with consent of the author)
4-way is a group activity, so jumpers should learn it as a team. This article offers advice for doing just that. As such, it is geared toward jumpers new to 4-way, but you don’t have to be a student to be “new to 4-way.” Jumpers with experience in other disciplines like freeflying, canopy RW, or skysurfing can be new to 4-way. Even jumpers with experience on big-ways can be new to 4-way flying.
Before you read another word, remember this: Learning 4-way is a gradual process. You have to start with simple drills and work your way up, adding to your skill set as you go. The skills you learn in the beginning will be useful down the road, even in the most complicated block moves. So, learn 4-way correctly from the get-go.
Here, then, are suggestions for learning 4-way flying techniques from the ground up, so to speak.
Train with video.
No team should jump without video. Jumpers might have to swallow a little pride the first time they see their screw-ups on video, but it’s well worth it. Video helps jumpers identify and correct problems before they become bad habits, and it saves money. What might have taken a couple hundred jumps to learn in the pre-video days, jumpers today can learn in 20 or 30 jumps. Camera flyers deserve every penny put toward their slots.
Match fall rates and fly no-contact.
A team’s first few practice jumps should be devoted to finding a compatible fall rate and basic body control. Both can be accomplished on the same jump. Here is a good drill: Launch a 2-way with the other two jumpers exiting as close as possible.Build a Star then drop grips and try to stay level with the formation and in your slots. Adjust your fall rates to match that of the fastest falling jumper.
Jumpers who float after adjusting their body position should wear weights on the next jump. If three of the jumpers are arching the whole time to stay down with the fastest-falling jumper, that jumper should probably wear a looser jumpsuit on the next jump. The rest of the jumpers should wear slick suits. It might take several jumps to get fall rates and body control worked out, but it is important. You can’t do 4-way if you can’t stay level and in your slot.
Practice turning in place.
After jumpers learn to fly no-contact and fall at the same rate, they can move on to turning in place. Here is a drill: From a no-contact Star, two jumpers across from each other turn 90 degrees (either direction) while the other two jumpers stay put (facing in). Fly these positions while staying in your slots. Try to stay close enough so you could take grips if you wanted to. After a designated jumper gives the “key,” go back to the no-contact Star. (A “key” is a signal to break for the next point.) Make two or three jumps doing this drill, then two or three more, this time substituting 360-degree turns for the 90-degree ones.
Practice single formations.
After teams can fly no contact and turn in place, they can start on randoms(single formations) selected from the 4-way dive pool *.
* The 4-way dive pool is published in USPA’s Competition Manual. The dive pool is used for parachuting competitions around th world and is agreed upon by the IPC (International Parachuting Commission) at the beginning of each year. In the 4-way dive pool, single formations are called “randoms.” As of this writing, there are 16 randoms in the dive pool.
Teams should start with simple randoms, where jumpers are facing in and nobody moves more than 90 degrees to go to the next formation.
The following illustration shows a sequence of three simple randoms.
Jumpers perform the sequence in the order shown (Star-Satellite-Zipper) then repeat the sequence. (For more challenging flying, a team can build the Zipper before the Satellite.)
(Note: The Zipper is not a formation in the current 4-way dive pool but it is a good tool for learning how to stay level.)
Techniques to practice while performing this sequence include:
Flying with little tension on grips.
Paying attention to the keys. If you can’t see the person giving the key, look into the eyes of a jumper who can see the key – it will tell you a lot!
Moving smoothly and in control to the next point.
Stopping the move and flying level before taking grips.
Once teams can do drills like the one above, you can move on to more difficult randoms.But they shouldn’t do so without proper coaching.
With all the formations in the dive pool, new teams can easily get lost in a fog deciding how to transition (move from one point to the next). What might look like a good move for one jumper might hinder the moves of other jumpers. Dive engineering is not rocket science, but it requires experience to see the most efficient moves for each jumper.
Let a coach map out the moves so the team can focus on performance.
Practice exits.
The success of any 4-way jump depends on a solid exit. New teams should dedicate several jumps to exit practice. They should start with simple exits where all jumpers can look into the center. And they should check with a coach before they go up to make sure they are doing it correctly. A good way to focus only on exits is to jump at a lower altitude, say 6,000 feet so there is little time for anything but the exit.
With 16 randoms and 22 block sequences in the 4-way dive pool, there are 38 possible exits. But the same principle applies to each. Jumpers exit as one stable unit by presenting themselves and the formation to the relative wind*. The formation should ride smoothly on the relative wind without buffeting or creating undue tension on grips.
* Relative Wind is the air coming at you from the direction you are falling. On exit, the prop blast is the first type of relative wind you encounter, although this lasts only a second or two. As you fall away from the plane, the relative wind comes more and more from straight up from the ground.
Learn your slots.
On a 4-way team, there are four slots: Point, Outside Center, Inside Center and Tail. The camera flyer, the fifth (and invaluable) member of the team, does not turn points with the team, so the camera position is not discussed here. (But be good to your camera flyer – you can’t do without video!) The Point typically flies in the “front floater” position on the high end of the formation as it leaves the plane. He or she is responsible for launching out and up on exit.
The Point usually makes bigger moves, especially in the block sequences. Typically, this slot is given to the jumper who is better at the longer moves.
The Outside Center flies in the “middle floater” position and works with the Inside Center to build the center of most formations. The Outside Center also catches the Point in some block moves.
The Inside Center exits from inside the door across from the Outside Center. It might appear that this is an easy position since the jumper is often facing out, but timing and body position are important. The Inside Center exits “with” the group and normally presents his or her chest to the relative wind. If the relative wind catches them in the back, they can fold underneath the formation.
On some teams, the Outside Center gives the count and keys transitions. On other teams, the Inside Center gives the count and keys the next point. For this reason, both the centers should be able to lead the skydive and fly their slots at the same time.
The Tail usually flies in the “rear floater” position and is responsible for anchoring the formation down as it flies off the plane. Sometimes it appears that the Tail exits early. Whether this is true is up for debate. The important things are timing and placement. As long as the Tail stays low on exit, the formation has a better chance of flying smoothly on the relative wind.
Learn to fly on the hill.
Experienced 4-way teams transition to the second point right off the plane while the formation is semi-upright relative to the ground. This is called flying “on the hill.” New teams should not try to transition on the hill until they can consistently pull off good exits. Even then, they should transition to simple formations where not much movement is involved. Also, teams should not try block sequences on the hill until they can consistently transition to single formations.
Here is a simplified look at hill flying. The exit is the first part of hill flying. Moving to the next point is the next part. As long as the exit formation flies stable on the relative wind, you can make the same moves on the hill that you make when the formation is falling at terminal velocity. You just have to put more punch into some moves because the air is a little “mushy” (meaning the formation hasn’t yet reached terminal velocity). Probably the hardest part about hill flying is learning to ignore the fact that it seems like you’re sometimes standing on your head (or vice versa) when making your move.
In Summary:
If you can perform the techniques discussed in this article, you’re a darn good skydiver. But you have so much more to look forward to, like block sequences where you fly with piece partners. But don’t jump ahead just yet. Piece flying injects a completely new set of dynamics into 4-way flying and builds upon the fundamentals discussed in this article.
So learn the basics first. Learn them as a team. Find a compatible fall rate before you practice randoms. Learn how to make smooth, controlled moves. Set aside jumps for practicing nothing but exits. Learn all the randoms in the dive pool. Then keep practicing. Spend an entire season doing randoms if necessary. Then you will be ready move on to the block sequences.
Don’t expect miracles overnight, but do expect rewards for hard work. It might be weeks before your team has a breakthrough, but when you do, it will be exhilarating! The light will come on for the team all at once - you’ll see it in each other’s eyes in freefall. You’ll feel it in the rhythm of the skydive. And, most important, you’ll see it in your score!
By elightle, in Disciplines,

Diving and Tracking Safety on Large Formation Skydives
Image by Brian BucklandBy Ed Lightle
This is the first of two articles geared toward safety on big-way formation skydives. This article deals mostly with the freefall part of the skydive whereas the second article “Canopy Safety on Large Formation Skydives” deals mostly with safety under canopy. To get the most benefit, it is recommended that you read both articles.
In Formation Skydiving, hundreds of big-ways are completed every year without incident. This is a testament to both the skill level of today’s formation skydivers and the screening process utilized by big-way organizers. To qualify for most big-way events, a participant must obtain the recommendation of a big-way plane captain or organizer and must have recently participated in a big-way camp or big-way event.
Organizers take safety seriously. A safety violation on a big-way, whether at a training camp or on a big-way attempt, will get a jumper benched when an honest learning mistake might not.
Diving and tracking on big-ways are special areas of concern. With longer diving and tracking times and more jumpers in the air, big-ways naturally increase the risk of a freefall collision. But this risk can be eliminated if jumpers use good common sense and think safety on each and every jump. Here are some tips that can help.
Watch Jumpers Ahead of You While Diving
As soon as a diver leaves the plane and gets squared away, he must identify the base and the jumpers who will be docking ahead of him in the formation. He must keep them in sight while he dives, stops, sets up and moves in to dock. He should constantly scan the sky in front of him, starting from the base and extending all the way out to the person he will be docking on. He should keep an eye out for camera flyers as well.
Because several divers are heading to the same sector of the formation, each diver must follow a straight line from the plane to the area outside the formation where he wants to be stopped and ready to follow jumpers ahead of him into his slot.
A jumper should never dive directly behind another diver in case the leading diver comes out of his dive early. The trailing diver should always stay a few feet off to the side.
Don’t Zigzag
If a diver flares (comes out of his dive) early, he should not zigzag from side to side to bleed off altitude. If he does, he risks being hit by jumpers who are diving behind him. To bleed off altitude at this point, he should either get back into his dive (if he has a lot of distance to make up) or assume a fast fall position while keeping jumpers ahead of him in view.
Get to the Red Zone on Time
Another area of concern is getting down to the red zone in time. (The red zone is the area around and outside the formation where jumpers have stopped their dives and are lined up and moving straight ahead and down into their slots. From a camera flyer’s perspective, jumpers in the red zone look as if they are lined up in various seats in an imaginary football stadium as them move down to their slots on the field.)
A jumper who arrives late in the red zone more than likely has to maneuver around jumpers who are already closing on their slots. He also prevents later divers from getting to their slots. All of this increases the chance of a collision.
A more serious situation can occur when a jumper arrives so late that the first wave of jumpers is breaking off. This is not serious if he immediately turns and tracks away with this first wave. If he doesn’t, he risks a head-on collision.
Break Off with Your Group
To maximize horizontal separation and avoid congestion, jumpers on big-ways break off in “waves”. Imagine how congested it would be if everybody on a 100-way turned and tracked at the same time! On a 100-way, for example, the outer wave might break off around 7000 feet, the next wave around 6000 feet, the next wave at 5000 and so on until only the base group is left. Obviously, the outer wave tracks the furthest horizontal distance and the base tracks the shortest. Again, a jumper who doesn’t arrive in the red zone until break off should turn and track with the outer wave.
Track with Your Group
When their wave breaks off, jumpers should track away in groups. A group can consist of a few jumpers from one whacker and a few from an adjacent whacker with one jumper in the center of the group designated the tracking leader. At breakoff, jumpers from each whacker turn in the direction of the tracking leader, track side by side for a few seconds, then fan out away from the center.
A jumper who goes low should move off to the side, assume a slow fall rate, and try to get above the formation until the outer wave breaks off, at which time he should turn and track away with them.
Flat Track, Don’t “Dive” Track
A jumper should stay level with other trackers in his group, and everybody should “flat track” to conserve altitude and maximize horizontal separation. “Dive” tracking (very steep tracking) is not acceptable behavior on a big-way,” says Kate Cooper-Jensen, big-way organizer and multiple world record holder, adding, “A jumper can almost stop dive tracking simply by choosing to alter his body position during the turn away from the formation.”
To initiate a flat track, a jumper assumes a slow fall position while turning away from the formation, essentially de-arching as he turns. This prevents him from immediately dropping into a dive track below other jumpers in his group. Keeping his hips elevated as he finishes his turn, the jumper then locks his knees, points his toes, and points his head toward the horizon. His arms are initially extended 45 degrees away from his sides and his feet shoulder-width apart. As he picks up speed, he rolls his shoulders forward, and brings his arms closer to his sides and his feet closer together. He should feel the lift as he picks up speed.
Open at the Same Altitude as Your Group
As an additional safety measure, opening altitudes of the various waves are staggered to maximize separation and make it easier for jumpers to account for open canopies around them. According to one theory, groups in the middle wave open at the highest altitudes while the outside and base groups open at the lowest. The result is a curve of open canopies, starting lowest at the base, curving up in the middle then down again on the outsides.
Conclusion
A successful big-way is a team effort with the goal of building a completed formation the safest way possible. Diving and tracking on a big-way is like driving on the highway. A safe driver knows more than just how to push the accelerator and go fast. He maintains a safe distance from the driver in front, he doesn’t switch lanes without looking, and he doesn’t cut in front of other drivers just to beat them to the exit. He gets to where he needs to be in plenty of time without causing an accident. So does a safe big-way formation skydiver.
By admin, in Disciplines,
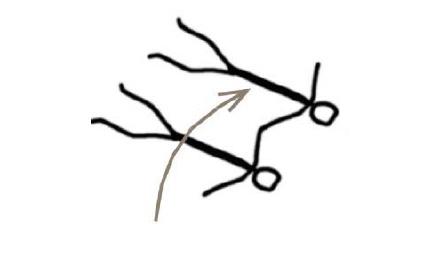
Competition Rules for Atmonauti Skydiving
1. AUTHORITY
The competition will be conducted under the authority granted by the Atmonauti
Committee of the Sports Skydivers Association. All participants accept these rules and
regulations as binding by registering as a competitor for the competition.
2. DEFINITIONS
2.1 Atmonauti Body Position
Atmonauti is the term given to the technique that intentionally utilises the torso (as
an aerofoil) to generate lift, while ‘diving’ at an angle of between 30deg – 75deg to
generate relative wind required for lift.
Use of the torso to achieve lift allows freedom of limbs to achieve a range of
handgrips and foot docks, essential for the ARW2 and SFIDA competition formats.
2.2 Atmonauti Relative Work
2.2.1 Sequences and Blocks, including transitions and inters, to include
Frontmonauti, Backmonauti and Footmonauti positions.
2.2.1.1 Frontmonauti: Head first into relative wind, torso to earth
2.2.1.2 Backmonauti: Head first into relative wind, back to earth
2.2.1.3 Footmonauti: Feet first into relative wind, back to earth
2.3 SFIDA “Challenge”
Neutral Navigator sets direction, angle and speed, Competitors compete side by
side of the Navigator and aim to score highest points for that jump by virtue of
preset docks and grips, to include transitions.
2.4 Team
An Atmonauti Relative Work Team will consist of two (2) competitors and a
videographer. For SFIDA no team will exist and two (2) competitors will compete
against each other navigated by an appointed qualified navigator. The
Videographer will be independent from the competitors.
Grip and docks
2.4.1 Grip: a recognisable stationary contact of the hand or hands of one
competitor on a specified part of the body or harness of the other
competitor, executed in a controlled manner.
2.4.2 Dock: A recognisable stationary contact of the foot or feet of the one
competitor on a specified part of the body or harness of the other
competitor, executed in a controlled manner.
2.5 Heading
The direction in which the “leading edge” of the performer faces. further defined in
terms of Backmonauti and Frontmonauti positions
2.6 Leading edge
A specific body part of the performer (either head or feet) which is the first point of
contact with the relative wind generated from the angle of attack
2.6.1 Frontmonauti: Head first into relative wind, torso to earth
2.6.2 Backmonauti: Head first into relative wind, back to earth
2.6.3 Footmonauti: Feet first into relative wind, back to earth
2.7 Axis
2.7.1 3 axis – F (flight direction), P (Perpendicular to F) & H (Horizontal)
2.8 Atmonauti position
Objective is to achieve head-on relative wind (or a custom “tube”) at an angle of
between 30deg – 75deg to the ground, with horizontal movement in relation to the
ground, whilst searching for lift with the torso - freeing up the limbs to achieve hand
grips and foot docks.
2.9 Move
A change in body position, and/or a rotation around one or more of the three body
axes or a static pose.
2.10 Navigator
Neutral Navigator responsible for setting direction, angle and speed. No eye contact
or assistance should be present.
2.11 No Fly Zone Frontmonauti<.p>
Behind, below, and not on head level during the approach (i.e. must be above,
ahead and on head level).
2.12 No Fly Zone Backmonauti
Ahead, above, and not on head level during the approach (i.e. must be below,
behind and on head level).
2.13 Head level
The level of the approaches - utilising the head as reference in relation to the angle
of attack set by Navigator.
2.14 Total Separation
Is when all competitors show at one point in time that they have released all their
grips and no part of their arms or body have contact with another body.
2.15 Inter
Is an intermediate requirement within a block sequence which must be performed
as depicted in the dive pool.
2.16 Sequence
Is a series of random formations/free moves and block sequences which are
designated to be performed on a specific jump.
2.17 Scoring move/formation
Is a move which is correctly completed and clearly presented either as a free move
or within a block sequence as depicted in the dive pool, and which, apart from the
first move after exit, must be preceded by a correctly completed and clearly
presented total separation or inter, as appropriate
2.18 Infringement
2.18.1 An incorrect or incomplete formation which is followed within working time
by either
2.18.1.1 Total separation or,
2.18.1.2 An inter, whether correct or not.
2.18.2 A correctly completed formation preceded by an incorrect inter or incorrect
total separation
2.18.3 A formation, inter, or total separation not clearly presented
2.18.4 In SFIDA, where one or both competitors cause instability to the navigator,
adversely affecting the other competitor on the same jump.
2.19 Omission
2.19.1 A formation or inter missing from the draw sequence
2.19.2 No clear intent to build the correct formation or inter is seen and another
formation or inter is presented and there is an advantage to the team
resulting from the substitution.
2.20 Working Time
Is the period of time during which teams are scored on a jump which starts the first
moment and competitor (other than the videographer) separates from the aircraft,
as determined by the Judges and terminates a number of seconds later as specified
in chapter 3.
2.21 NV
Moves, inters, or total separations not visible on screen due to meteorological
conditions, or factors relating to the videographer's freefall video equipment that
cannot be controlled.
2.22 Rounds
Minimum 1 round to call the meet.
2.23 Backmonauti
The performer will be on heading flying on his back with his back towards the earth.
2.24 Frontmonauti
The performer will be on heading flying at the defined angle as per atmonauti
definition with his back towards the sky.
2.25 Footmonauti
The performer will be on heading feet-first flying at the defined angle as per
atmonauti definition with his back towards the ground.
2.26 Formation
A record attempt formation is considered as built when two or more competitors fly
on heading with a predefined dock or grip held for minimum 3 seconds, and is the
basis for the Atmonauti Linked National/World Records. A free move formation,
however, is merely a recognisable stationary contact of the hand/hands or foot/feet
– and does not require to be held for 3 seconds as per record attempts.
3. ROUTINES
3.1 The discipline is comprised of SFIDA and Atmonauti Relative Work.
3.2 Number of rounds:
a. SFIDA: a total of 4 competition rounds will be completed with a minimum of one
round to be completed before a meet can be called.
b. ARW: a total of 5 competition rounds will be completed with a minimum of one
round to be completed before a meet can be called.
3.3 All SFIDA competitions will be judged by an elimination process where the two
highest scoring competitors in any given round will compete against each other in the following round and the second and third ranking competitors will compete
against each other and so forth.
3.4 In the case of a tie for a specific round, the previous total points are added to
identify the highest total average per competitor.
3.5 Should a tie persist, a one jump tie breaker will be performed with the highest
scoring competitor moving to the next round.
3.6 A tie breaker may also be required for placing 1st, 2nd, 3rd.
4. THE EVENTS
4.1 The discipline will be comprised of the following events:
4.1.1 ARW Events: Exit altitude is 11 000 feet AGL; working time is 40 seconds.
4.1.2 SFIDA Events: Exit altitude is 11 000 feet AGL; working time is 40
seconds.
4.1.3 For meteorological reasons only, and with the consent of both the Event and Chief Judge, the Meet Director might change the exit altitude and/or working time and continue the competition. In this case the following
conditions will apply:
4.1.3.1 The working time will be:
a. 20 or 40 seconds for the ARW Events
b. 20 or 40 seconds for the SFIDA Events.
The reduced working time must be used if the exit altitude is lowered (ref 4.1.1 and 4.1.2). The next round must commence if working time is changed and all competitors will be scored on
the same working time for a specific round.
4.1.3.2 The minimum exit altitude will be:
a. 7 000 feet AGL for the ARW Events
b. 7 000 feet AGL for the SFIDA Events.
The maximum exit altitude will be 13 000 feet AGL for all
events.
4.2 Objective of the Event
4.2.1 The objective of the event is for the a team (ARW) or single competitor
(SFIDA) to complete as many scoring moves as possible within the given
working time, while correctly following the sequence for the specific round.
4.2.2 The accumulated total of all rounds completed is used to determine the
placing of teams for ARW and the process of elimination as defined in chapter 3 is applied to determine the placing of individual SFIDA
competitors.
4.2.2.1 For ARW if two or more teams have equal scores the following order of procedures will be applied:
4.2.2.1.1 For determining final standings:
a. the highest score in any completed round;
b. the highest score starting with the last completed
round and continuing in reverse order, round by
round until the tie is broken,
c. the fastest time (measured to hundredths of a
second) to the last common scoring move in the
last completed round.
d. one tie break round if possible (for the first three
placings only).
4.3 Performance Requirements
4.3.1 Each round consists of a sequence of formations depicted in the dive pools
of the appropriate annexes, as determined by the draw.
4.3.2 It is the responsibility of the team or individual competitor to clearly present
the start of working time, correct scoring moves, inters and total separation to the judges.
4.3.3 Scoring moves need not to be perfectly symmetrical, but they must be
performed in a controlled manner. Mirror images of moves and whole
block sequences are not permitted.
4.3.4 In sequences, total separation is required between block sequences,
between free or random moves, and between block sequences and free
moves.
4.3.5 Where degrees are shown (180, 270, 360, 540) this indicates the approximate degrees and direction of turn required to complete the inter as intended. The degrees shown are approximately that amount of the circumference of the subgroup's centre point to be presented to the centre point(s) of the other subgroup(s). For judging purposes, the approximate degrees and direction of turn of subgroups centrepoints will be assessed using only the two dimensional video evidence as presented.
4.3.6 Contact or grips are allowed between subgroups during execution of the
inter.
4.3.7 Where subgroups are shown, they must remain intact as a subgroup with
only the depicted grips.
4.3.8 Assisting handholds on other jumpers or their equipment within a
subgroup/competitor or a scoring formation are permitted.
5. GENERAL RULES
5.1 Teams may consist of competitors of either or both sexes, except in the female
event where (except for the videographer) all competitors must be female.
5.2 The Draw
5.2.1 The draw of the sequences will be supervised by the Chief Judge. Teams
will be given not less than two hours knowledge of the results of the draw
before the competition starts.
5.2.2 Event Draws: All the «Block sequences» (numerically numbered) and the
«Free moves» (alphabetically marked) shown in the appropriate annex will be singularly placed in one container. Individual withdrawal from the
container, (without replacement) will determine the sequences to be jumped in each round. Each round will be drawn so as to consist of three
or four scoring formations, whichever number is reached first. Alternatively this draw can be done on a Recognised electronic scoring/judging system as approved by the Meet Director and Chief Judge.
5.2.3 Use of Dive Pool: Each block or formation will be drawn only once for the scheduled rounds of each competition. In the event that additional rounds are necessary, due to the tie-breaking jump-off, the dive pool for this round will consist of the blocks and free moves which were not drawn for the scheduled rounds. In the event that all of the remaining blocks and formations do not complete the tie breaking round, the draw will continue from an entire original dive pool in that event, excluding any blocks or formations which have already been drawn for that round.
5.3 Competitors are not allowed to use a wind tunnel (freefall simulator) after the draw
has been made.
5.4 Jump Order
5.4.1 Determined by a draw.
5.4.2 Should conditions or availability not allow for Jump Order to be executed
as per draw, Competitors ready and present shall be given first option to
continue with the rounds.
5.5 Video Transmission and Recording
5.5.1 Each team shall provide the video evidence required to judge each round.
Each freefall Videographer must use the video transmission system if
provided by the Organiser.
5.5.2 For the purpose of these rules, «freefall video equipment» shall consist of the complete video system(s) used to record the video evidence of the team’s freefall performance, including the camera(s), video media, tape recorder(s), and battery(ies). All freefall video equipment must be able to deliver a PAL digital signal through an IEEE 1395 compatible connection (Firewire) or composite video compatible connection.
5.5.3 As soon as possible after each jump is completed, the freefall videographer must deliver the freefall video equipment (including the tape(s) used to record that jump) for dubbing at the designated dubbing station.
5.5.4 Only one video recording will be dubbed and judged. Secondary video recordings may only be used in NV situations.
5.5.5 The dubbing station will be as close to the landing area as possible.
5.5.6 A Video Controller will be appointed by the Chief Judge prior to the start of the Judges’ Conference. The Video Controller may inspect a team’s freefall video equipment to verify that it meets the performance requirements as determined by him/her. Inspections may be made at any time during the competition which do not interfere with a team’s performance, as determined by the Event Judge. If any freefall video equipment does not meet the performance requirements as determined by the Video Controller, this equipment will be deemed to be unusable for the competition.
5.5.7 A Video Review Panel will be established prior to the start of the official training jumps, consisting of the Chief Judge, the President of the Jury, and the Chairman, or acting Chairman, of the Atmonauti SSA Committee.
Decisions rendered by the Video Review Panel shall be final and shall not be subject to protest or review by the Jury.
5.5.8 If the Video Review Panel determines that the freefall video equipment has been deliberately tampered with, the team will receive no points for all competition rounds involved with this tampering.
5.6 Exit Procedure
5.6.1 Exit first (prior to FS, AE, Wingsuiting on the same jump run) at altitude.
There are no limitations on the exit other than those imposed by the JM for
safety reasons.
5.6.2 The exit will be controlled by the Navigator in SFIDA and Team Principle in ARW2. Exit commands will be made using an appropriate signal system, and should be discussed prior to boarding with the pilot.
5.6.3 Atmo groups will be required to fly minimum 45 degrees off jump run in order to create horizontal separation to freefall groups exiting after atmonauti group.
5.7 Scoring
5.7.1 A team will score one point for each scoring move performed in the sequence within the allotted Working Time of each round. Teams may continue scoring by continually repeating the sequence.
5.7.2 For each omission two points will be deducted. If both the inter and the second move in a block sequence are omitted, this will be considered as only one omission.
5.7.3 If an infringement in the scoring move of a block sequence is carried into the inter (ref. 2.8), this will be considered as one infringement only, provided that the intent of the inter requirements for the next formation is clearly presented and no other infringement occurs in the inter.
5.7.4 The minimum score for any round is zero points, except where zero points have been awarded and penalty/ies imposed.
5.8 Rejumps
5.8.1 In a NV situation, the video evidence will be considered insufficient for judging purposes, and the Video Review Panel will assess the conditions and circumstances surrounding that occurrence. In this case a rejump will be given unless the Video Review Panel determines that there has been an intentional abuse of the rules by the team, in which case no rejump will
be granted and the team’s score for that jump will be zero.
5.8.2 Contact or other means of interference between competitors in a team and/or their Videographer shall not be grounds for the team to request a rejump with regards to ARW. In the case of the SFIDA category adverse whether conditions such as bad visibility (in cloud), any contact or other means of interference between the navigator and competitiors and/or between the Videographer shall be grounds for the individual competitors
to request a rejump – granted at the sole discretion of the Atmonauti Event Judge.
5.8.3 Adverse weather conditions during a jump are no grounds for protest. However, a rejump may be granted due to adverse weather conditions, at
the discretion of the Chief Judge.
5.8.4 Problems with a competitor’s equipment (excluding freefall video
equipment) shall not be grounds for the team to request a rejump.
5.9 Training Jumps
5.9.1 Each team in each event will be given the option of one official training jump before the draw is made.
5.9.2 The aircraft type and configuration, plus the judging and scoring systems to
be used in the competition will be used for the official training jump.
5.9.3 Two sequences will be created by the Chief Judge. Only teams performing
one of these sequences will receive an evaluation and posted score.
6. JUDGING
6.1 The official training jump and competition jumps will be judged as the Videographer
provides the video evidence. The Chief Judge may modify this procedure with the
consent of the FAI Controller.
6.2 The judging will, as far as practical circumstances allow (landings out, rejumps etc),
be judged in the reverse order of placing.
6.3 Three Judges must evaluate each team’s performance.
6.4 The Judges will watch the video evidence of each jump to a maximum of three times at normal speed. If, after the viewings are completed, and within fifteen seconds of the knowledge of the result, the Chief Judge, Event Judge or any Judge on the panel considers that an absolutely incorrect assessment has occurred, the Chief Judge or Event Judge will direct that only that part(s) of the jump in question be reviewed. If the review results in a unanimous decision by the Judges on the part(s) of the performance in question, the score for the jump will be adjusted accordingly. Only one review is permitted for each jump.
6.5 The Judges will use the electronic scoring system to record their evaluation of the performance. At the end of working time, freeze frame will be applied on each viewing, based on the timing taken from the first viewing only. The Judges may correct their evaluation record after the jump has been judged. Corrections to the
evaluation record can only be made before the Chief Judge signs the score sheet. All individual Judge’s evaluation will be published.
6.6 A majority of Judges must agree in the evaluation in order to;
• credit the scoring move, or
• assign an omission, or
• determine an NV situation.
6.7 The chronometer will be operated by the Judges or by a person(s) appointed by the
Chief Judge, and will be started as determined in 2.13. If Judges cannot determine
the start of the working time, the following procedure will be followed. Working time
will start as the videographer separates from the aircraft and a penalty equal to 20%
(rounded down) of the score for that jump will be deducted from the score for that
jump.
7. RULES SPECIFIC TO THE COMPETITION
7.1 Title of the Competition: Atmonauti National/World/Continental Championships
7.2 Aims of Atmonauti National/World/Continental Championships
7.2.1 To determine National/World/Continental Champions of Atmonauti in the:
• ARW (Atmo Relative Work),
• SFIDA “Challenge”
7.2.2 and
• To determine the world standings of the competing teams,
• To establish Atmonauti formation/distance/other world records,
• To promote and develop Atmonauti,
• To present a visually attractive image of the competition jumps and
standings (scores) for competitors, spectators and media,
• To exchange ideas, experience, knowledge and information, and
strengthen friendly relations between the sport parachutists, judges, and
support personnel of all nations,
• To improve judging methods and practices.
7.3 Composition of Delegations:
7.3.1 Each delegation may be comprised of:
• One (1) Head of Delegation,
• One (1) Team Manager,
• Freefall videographers as.7.3.4 and
7.3.2 At a World/Continental Championship:
• Two (2) ARW2 teams consisting of up to:
Six (6) ARW2 Competitors
• One (1) female ARW2 team consisting of up to:
Three (3) female ARW2 Competitors
• SFIDA contestants consisting of up to:
Three (3) Individual Competitors
7.3.3 At a World Cup:
• Any number of teams per event (composed as for a World
Championship) to be decided by the Organiser and announced in the
bulletins.
7.3.4 Videographers must be entered for each team as part of the delegation and must be a member of the Delegation’s NAC. A Videographer may be replaced at any time during the competition, (with the agreement of the FAI Controller). The evaluation process for the video evidence will be the same for any Videographer. Videographers may be one of the following:
a. One person in addition to the team composition in 7.3.2. This competitor
is to be considered as a team member for the purposes of awards and
medals.
b. Any other person (ref 7.3.6). This Videographer is eligible to receive
awards and medals. This Videographer may jump as a ‘pool’ Videographer and is subject to the same regulations as other competitors on the team.
7.3.5 If any ARW team consists of competitors from the SFIDA, they should be
listed separately on the entry form.
7.3.6 Any ARW competitor can only enter in one ARW team as ‘performer’ but may enter as a ‘pool’ Videographer. A competitor in the ARW event cannot also enter in the Female ARW event.
7.4 Program of Events for SFIDA:
7.4.1 The World Championships is comprised of:
• Up to 8 rounds considered as selection rounds, and
• Final rounds, consisting of 4 quarter finals, two semi finals, one runners
up and one finals round.
7.4.2 Time must be reserved before the end of competition to allow for the
completion of the semi-final, final and runners up round.
7.4.2.1. The quarter-final rounds will consist of the individuals with the 8
highest scores from the selection rounds.
7.4.2.2. The semi final rounds will consist of the individuals with the 4
highest scores from the quarter-finals.
7.4.2.3. The finals round will consist of the individuals with the 2 highest
scores from the semi final rounds.
7.4.2.4. The runners up round will consist of the lowest scores of each
of the 2 semi finals rounds.
7.4.3 A selection round left incomplete must be completed as soon as possible,
but after the round in progress has been completed.
7.4.4 If all the selection rounds are not completed at the starting time of the
quarter-finals, the round in progress will become the semi final or final
round as appropriate. Where this is the semi final, the next drawn round
will be used for the final round. The following procedures will apply
i) The round in progress will be completed if ten or less (in the case of
semi finals) or six or less (in the case of finals) teams remain to jump.
All scores for this round will count.
ii) The round in progress will be performed by only the ten (in the case of
semi finals) or six (in the case of finals) highest placed teams if more
than ten (in the case of semi finals) or six (in the case of finals) teams
remain to jump. The scores of any other teams in this round will be
discarded.
7.4.5 The competition will be organised during a maximum time frame of 5 competition days. Exceptions may be made where a bid is received for
multiple FCE competitions at one time.
7.5 Medals and Diplomas are awarded as follows:
• All team members (ARW) and individuals (SFIDA) in the events will be awarded
medals if placed First, Second or Third.
• Certificates are awarded to all competitors that are placed First to Tenth.
8. DEFINITIONS OF SYMBOLS
8.1 Coding in the Dive Pool annexes is as follows:
8.1.1 Indicates Move by the competitor:
See image 1 top right.
8.1.2 Indicates transition on “defined’ axis by competitor in either direction:
See image 2 top right.
8.2 Visualisation for dock/grip positions, (Ref: 2.5)
See image 3 top right.
See image 4 top right.
By admin, in Disciplines,