0

Disciplines

    Stretching for Freeflying

    Freeflying is a physically demanding sport (as are other disciplines in skydiving) and like any physical activity it is much easier to damage your body if you do not prepare your body properly. Stretching helps prepare your body for the physical activity it is about to go through, by offering some of the following benefits:
    Relaxes your body (which is always good in freeflying)
    Helps your coordination and allows for easier movement
    Gives you a greater range of motion
    Increases your body awareness
    Improves circulation so if you do damage your body it will repair quicker A lot of freeflyers seem to think stretching takes a long time and that it isn’t important. It is very important and if you plan on jumping for a long time then stretching is the way to allow you to keep on jumping as you get older.
    Stretching can take a long time but it can also be a short 10 minutes in the morning. The following is a short and basic stretching routine to help you prepare yourself in the morning. This doesn’t mean you should only do this in the morning when you go jumping, try to do this every morning, it only takes 10 minutes.
    Guidelines for stretching
    If you do not stretch right you can damage your body just as bad as if you do not stretch. Some people think that stretching should be painful, this is wrong. You should feel comfortable in your stretch, feeling a mild tension in the area that your are stretching. You should never bounce into a stretch, take your time, and ease into it until you feel the mild tension mentioned earlier.
    Stretching routine
    You should try to do this routine every morning to get the best effect. Start off by making sure you are warm, a hot shower to warm you up in the morning can help.
    Start by lying on your back, keeping your spine flat to the floor and look up at the ceiling/sky with your head. Start with one leg, bend it at the knee and pull it towards your chest until you feel a mild tension. Hold this position for 20 seconds and then move onto the other leg, taking a 10 second rest in between. [Figure 1]
    Next, lay on your back, keeping everything straight and looking up at the ceiling with your head. Bend your legs, keeping your feet flat on the floor. Place your hands behind your head and lift it up until you feel a tension in the back of your neck, still keeping the rest of your back on the floor. Hold this tension position for 5 seconds and then slowly lower your head back to the floor. Repeat this 3 times. [Figure 2]
    This is a good one if you have bad landings and find you hurt your ankles every now and then. Sit on the floor and have one leg flat. Grab the other leg just above the ankle. Rotate your foot clockwise providing a slight resistance with your other hand. Repeat this 20 times and then do the same but rotating your foot anti clockwise. Do not rush this. Now do the same with your other leg, again making sure you do not rush yourself. [Figure 3]
    Start by leaning against a wall with your head resting on your hands. One leg should be closer to the wall and bent with the foot facing straight forward. The other leg should be straight and behind you, foot facing the wall and the heel touching the floor. Slowly push your hips forwards, keeping your back straight, stop when you feel a mild tension in your calf. Hold this position for 30 seconds and then slowly move your hips back and relax. Repeat with the other leg, again taking your time. [Figure 4]
    Start by standing up straight with your feet shoulder width apart and facing straight forward. Slowly start bending from the hips keeping your knees slightly bent at the same time. Relax your neck and arms, keep bending until you get a slight stretch in the back of your legs. Hold this for 20 seconds and then slowly move back up. [Figure 5]
    Start by standing with the side of your body next to a wall, put the palm of your hand closest to wall against it just a bit higher than your head. Now slowly and gently turn your body away from the wall until you feel a mild tension in your shoulder, You should be between one and two feet away from the wall at this point. Hold this position for 15 seconds and then slowly turn back and relax for a few seconds. Now repeat this with your other hand. [Figure 6]
    Start by sitting on the floor and put the soles of your feet together, hold onto your toes. Now start to gently pull your self forwards towards your feet. Make sure you are moving from your hips and not bending from your shoulders or back. To help try resting your elbows on your knees for stability, this will make it easier. Keep moving forwards until you feel a good stretch in your groin. Hold this position for 40 seconds and then slowly move back and relax. [Figure 7]
    Now you’ve finished the stretching routine make sure you wrap up warm to get the best effect. Do this every morning and you will see a marked improvement in your flexibility and you will be much more relaxed in the air.
    Louis Harwood is a freeflyer from the UK and jumps at Target
    Skysports, in Hibaldstow. He has competed for the last two years in the Artistic nationals, he has two silver and one gold medal in B catagory freefly, freestyle and skysurf. www.avalore.co.uk

    By fuga, in Disciplines,

    Starting a FUN 4-Way Team

    Many formation skydivers cannot afford a thousand training jumps a year. Some can't jump every weekend. Some are married with children. Some are students. Some live in the cooler climates and can only jump six months out of the year. Yet they dream about jumping on a 4-way team. They try not to get their hopes up though. They figure that only single people or those born with silver spoons in their mouths can afford it.
    But that way of thinking is changing. More and more, jumpers on shoestring budgets are finding ways to compete on a recreational basis. They are starting to realize that they don't have to spend a lot of money to learn 4-way. Granted, they probably won't compete with Airspeed or the Golden Knights, but they can still challenge themselves and have a lot of fun in the process.
    So for jumpers who want to jump on a fun team, here are some suggestions for getting started:
    Do you have the time?
    Are you willing to commit the necessary time to the team? Things like work, family commitments, and other hobbies have to be taken into account. You might have money to burn, but it won't matter if you're a Boy Scout troop leader most weekends. If you have a spouse or significant other, will they agree to your being gone on weekends?
    But don't let the term "fun team" fool you. It can actually be more challenging to coordinate schedules for a fun team than for a serious team. With a serious team, members are usually committed to practicing every day of every weekend. With a fun team, however, members must determine which days on which weekends they're going to practice. It takes a little more juggling.
    Do you have the money?
    Time and money are the big commitments. Even if you can spare the time, can you spare the dime? Okay, corny rhyme but you get the point. Don't get your teammates' hopes up if you know you won't have the money. Also make sure your spouse or significant other knows how much money will be involved.
    Can you take criticism?
    Some jumpers don't like the pressure of competing but perform admirably on recreational jumps. On a team, both your RW and interpersonal skills are constantly under scrutiny. Your every move is going to be caught on video. As coach and friend, Woody (John Woode) always says: "The video doesn't lie." Jumpers who don't like to be under the microscope might want to think twice about signing up for a team.
    Find jumpers who can agree on common goals
    Once you decide you have the time, money, and tough skin, look for other jumpers who can agree on common goals for the team. Your personalities can be as different as night and day, but you can still jump together if you agree on common goals for the team. For example, if two team members want to practice full-time, buy team jumpsuits and go to the Nationals, while other members only want to practice two days a month and forget the Nationals, compromise might be difficult to reach. Teams in this situation might want to think about forming two teams, one serious and one just for fun.
    Ask around and you will find that you have more in common with other jumpers than you think. Most jumpers have jobs, families, and hectic schedules. But that's the beauty of a fun team - it lets you schedule training around everybody's life, not the opposite.
    Tip: Find a couple alternates who can fill in when regular members can't practice.
    Set team goals
    Once you find jumpers with compatible goals, schedule your first meeting. Find a setting for the meeting where everybody can relax and take as much time as they need. Agree to meet as a team at least twice a month.
    At this first meeting, agree upon basic goals for the team, such as showing up for practice on time and notifying the team if you have to miss a practice. Elect a team captain and somebody to create a team-training schedule. Ask team members to provide a calendar of their availability for the entire season, along with contact information (phone numbers and email addresses). Schedule another meeting to distribute the schedule and clear up any discrepancies.
    Determine the cost
    In one of your first meetings, map out a team budget and agree upon how each team member will pay. Let's say you want to make 100 training jumps, attend four meets, and go to the Nationals. Here is an estimate of what it might cost (per person) based on figures from the 2003 jump year in the US.
    100 Training Jumps @ $17/jump (including video) $1700 4 Regional 4-Way Meets (6 jumps each @ $21/jump) $504 Team Jumpsuits (optional) $325 Registration for the 4 Regional Meet $100 U.S. Nationals (10 jumps @17/jump) $170 Registration for U.S. Nationals (per person) $60 Transportation and Food $500 Total $3359
    Competition is not for the feint-hearted, even when it comes to money. But most DZO's give teams a discount on ticket prices if the team trains at that drop zone and buys tickets in bulk. If each team member purchases just 50 tickets to start the season, the DZO collects $3400 up front (at $17 a ticket). It's money in the bank for the DZO and a commitment to the team from each jumper.
    Tip: Set a deadline for collecting money for jump tickets from team members.
    Get good coaching
    Many DZ's have an RW organizer or coach who is willing to offer advice to new teams. Normally, this kind of advice is free. Even if the coach charges a small fee, it is worth it because it will save you many jumps flailing around by yourselves. Coaching is also available at most local competitions to help teams work out exits and engineer skydives. They can also help with the mental side of skydiving such as how to conduct team meetings and how to mentally prepare for the skydive. So don't be afraid to ask for help. You're only cheating yourselves it you don't.
    Keep a team notebook
    In the pressure of training, it is easy to forget what you've learned. This is where a team notebook comes in handy. You don't have to write down everything, just a few reminders about how to do a particular move. Then when you're scrambling to dirt dive at a meet, you can refer to the notebook to refresh your memory. Make a page for each random and each block (currently, there are 16 randoms and 24 blocks in the 4-way dive pool).
    Tip: Create the notebook on a computer so you can print a copy for each team member.
    In Summary:
    There is more than one way to start a team, and the suggestions offered in this article might be old hat to experienced competitors. But for jumpers new to 4-way, they provide a good starting point.
    If you get nothing else out of this article, remember this. Team jumping is a commitment of time, energy, and money. It is a group effort. Everybody has to be dedicated, committed, and focused. They have to be able to perform under pressure. They have to be able to get along with people. And, most of all, they have to believe in what they're doing. If you are willing to do all this, then what are you waiting for? Go find yourself a team!
    © January 5, 2004 Edward E. Lightle

    By elightle, in Disciplines,

    Wingsuit Progression

    kydiving today is rife with would-be wingsuit pilots. Ask any number of new jumpers what discipline they want to pursue, and more than likely you’ll have a majority vote for wingsuiting. This is thanks in no small part to the viral popularity of wingsuit BASE videos in recent years. Let’s be honest, even your mom is sick of watching people fly ‘The Cheese Grater’ line at Aiguille du Midi. And while that trend seems to be tapering off somewhat (perhaps as the number of true terrain flyers left in the sport is itself dwindling), there are no shortage of noobs eagerly awaiting their first prom dress.
    But, for those who have already cranked out the requisite jump numbers, done their FFC, and are now exploring the freedoms of human flight, what path marks the best progression into the world of wingsuit wizardry?
    DISCLAIMER: I’m going to set aside any brand loyalties and personal biases towards/against manufacturers. There will be no suit-specific insights or recommendations. The point of what follows is to provide some simple and easy to follow suggestions through a safe and effective
    While there is no doubt that putting in serious work on a small suit is better than jumping quickly into a bigger suit, there is some divergence as to how long your mentor(s) and/or more senior jumpers/coaches may suggest that you remain in your entry-level suit before upsizing. [There is even some discrepancy as to what is deemed an appropriate entry-level suit…but I think for the most part your FFC coach should be able to walk you through that one…]. For my part, I can say that while having put 150 jumps on the small suit I started with was certainly enough for me to be safely flying a bigger suit, there’s also no doubt in my mind – looking back now with the benefit of hindsight – that I would’ve continued to benefit tremendously from growing my skillset and utterly mastering the smaller suit before moving onwards and upwards.

    To clarify, wingsuits can be considered as belonging to one of three very basic overarching “platforms”: small suits, medium suits and big suits. [This is by no means a comprehensive dissection of suit design, merely a simple and inelegant framework to help guide the discussion]. Small suits have wing-roots near the hips, and a tail that does not extend to your feet. Medium suits have wing-roots near the knee and a tail that goes straight across your feet. Large suits have wing-roots near your feet and a tail that extends past your feet.
    The obvious analogy, here, is parachute size. It’s easy to get caught up drooling over the tiny table-clothed sized wings that you see people flying online or at your home dz. [Insert any number of panty-dropping related clichés here…]. And in your hurry to get down to a smaller, “cooler” wing, you may rush through some key skills that you should already have deeply ingrained in your muscle memory and sight picture, on a larger and more docile/forgiving canopy, before continuing to progress to smaller and more aggressive parachutes. The only difference is that, with wingsuits, the reverse is true. I mean, who wants to spend 150-200 jumps wearing some tiny little baby dress? Ain’t nobody got time for that!! Am I right?! Well...no.
    The problem with this logic is two-fold:
    1) The more time you spend in a smaller suit, nailing down an array of skills and mastering the suit, the better you’ll fly in a bigger suit. This means that, in the grand scheme of things, you may well become the badass flyer you want to be even faster if you master a solid foundational skillset in a beginner wingsuit before moving on to bigger suits.

    2) The more surface area you add (as you increase suit/wing size), the more challenging and demanding the suit is to fly. As you increase size, you dramatically increase the power of the suit, and also the inherent danger of flat-spins, hard pulls, no pull-finds, losses of control, etc. While more powerful in the right hands, larger suits can also be less forgiving of pilot error. This is especially dangerous for pilots who skip a step in their progression – upsizing by more than one platform at a time.
    Recent events have tragically proven that no one is invincible to the effects of poorly chosen gear. If there are any positives to take away from the great losses our sport(s) recently suffered, they are the lessons we must learn from those who paid the highest price.
    Choose the right tool for the job! It doesn’t matter if you’re in the mountains or at the dz. Exercise good judgement and your chances of playing safely are far greater.
    It seems simple enough. But this requires an honest self-evaluation of your skill set, and an assessment of what job (type of flying) you want the tool (the suit) to perform…and in what specific conditions/environment. Always consider these factors together and choose accordingly.
    But let’s be real, my advice carries little weight relative to the allure of the sky and BASE gods you might still be watching on repeat on your YouTube or Facebook feeds. And it’s more than likely that my words are also outweighed by your own ego and pride (I know this of myself firsthand…).
    So I asked someone with just a little more experience to share his thoughts – someone who’s become synonymous with wingsuit progression – both in the sky and in the burgeoning scene of the wingsuit tunnel…and also in what some view as the pinnacle of wingsuit progression and human flight: the wingsuit jet-pack. In all domains, Jarno Cordia is an authority on wingsuit flying. And with the obvious benefit of his 4100+ wingsuit jumps, and countless hours of R&D; spent analyzing flight, and designing and testing suits, Jarno had the following to say about finding your own wingsuit progression:

     
    I think too many people look at 'good numbers' as a sign of being in control of a suit. The fact that you fly a certain distance or time just means you have a good feel for the performance, but, safety wise, the actual control is where the real importance lies.
    Learning to not just fly your suit straight, but in steep dives, turns in various ways, flat, steep, mellow, sharp, backflying, and barrel rolls. Though these may not all seem like skills needed to fly (especially) bigger suits, when your only aim is performance competitions or base, on bad exits, or tumbles, it’s those skills and spatial awareness that will make a big difference.
    It’s also important is to realize 'doing two dozen jumps without incident' is not the same as 'mastering a suit' and quite often people mistake their uneventful jumps as a sign for being ready to move up to bigger suits. Make sure you are in complete control before upsizing, and not just 'getting by' by doing some straight line flying and a few flares.
    In terms of learning, the small suits provide much more feedback and direct results in terms of what you're doing. Though, these days, bigger suits seem to be the focus. And in marketing various companies try to sell big suits as 'the new small'. Note that in the end, you're the one flying it, and not the 10.000 jump wonders in slick marketing videos.
    Nobody ever became a worse a pilot from flying a small suit, and the majority of my personal jumps I still enjoy doing in actual small suits. Acrobatics and performance…the actual inputs and feeling don't change. When flying with the right technique, any suit or size can be flown the same. Just certain techniques needing to be done with bigger or smaller moves, but any time spent on a small suit is never wasted.
    Both in BASE jumping or skydiving, the skills learnt on a small suit in terms of turns, and emergency response will be of vital importance. Big suit or small suit, the inputs are the same, but the response on a big suit are much faster and more aggressive, and sometimes violent. In all other serious disciplines, issues with flying, tend to be fixed with a strong focus on skill. A common problem in wingsuit flying is that coaches, though not all bad in intent, can sometimes put too much influence on students to look for gear solutions instead of focusing strictly on technique. This makes our discipline one that's sometimes too much resorting to blowing cash on nylon, instead of on skills.
    Gear for sure can be a factor in your flying, as not every suit, model or brand has the same degree of precise control. But make those decisions by trying various suits in the same category, as any suit upsize will on the first few jumps feel like you've just been handed a jetfighter with afterburners. But in the end, it’s the fine control that matters most, and across the board, most manufacturers have similar size models in terms of capability.
    It’s the steering and control that matter most, be it belly, backfly, acro, flocking or performance. There, demoing suits of various manufacturers in the size you're familiar with will tell you a lot more about the control, and allow you to make informed decisions, instead of basing it on the brand your (sponsored) coach may be trying to push onto you.
     
    There’s no doubt that placing your focus strictly on skill attainment – instead of relying on jump numbers, positive flysight data, or lack of problems flying a suit – is the most effective way to gauge a safe progression. I must admit that I personally regret not having kept my smaller suit, which I now wish I had for flying with newer pilots, and for generally tossing around all over the sky in ways that I’m not yet able to do as confidently on my big suit. But, as Jarno pointed out, money inevitably comes into play. And we can’t all keep throwing it towards gear hoping to become better pilots. So, in order to max out your value and your safety, please consider asking yourself the types of questions raised above relating to skill acquisition, suit mastery, and finding the right tool for the job as you progress.
    The link below also provides a great progression chart (free to download) with an indication of levels/skill that is often used at wingsuit boogies around the world:
    http://flylikebrick.com/skills-database/
    Fly safe folks!
     

    By admin, in Disciplines,

    Looking for the perfect team

    You might as well be searching for The Holy Grail.
    How often have you heard of a team who's had a big argument and broken up before, during or immediately after Nationals, having already spent an exorbitant amount of money? Most of the time this could have been avoided by simple communication, honesty and a little bit of compromise from the outset. Instead, the 'volcano effect' takes hold, and petty grievances, built up over the course of the year, come to an ugly head, usually at an important and stressful event - like Nationals.
    Quite often the issue that causes the break-up seems pretty minor a couple of months down the line. But it's an all-too-common practice in skydiving, and one that detracts from teams and individuals being able to perform at their best. Most teams require two years minimum to even scratch the surface of their full potential. It takes time for teams to gel to the extent that they have true communication, anticipation and knowledge of working together. But this all-pervasive attitude, which makes it acceptable to break up a team over somewhat insignificant differences, prevents the sport and individual skydivers from growing and progressing.
    It's the syndrome of seeking the 'perfect' team, and it's become so commonplace in skydiving that we could almost be forgiven for thinking it's acceptable.
    What is 'the perfect team'
    Most competitive skydivers have an idea of what the 'perfect' team is. They look at teams like Airspeed, Deland fire and Sinapsi PD, see these teams communicating and performing well, and make the assumption that to some degree, team members are virtual clones of each other. They never see individuals disagreeing or arguing, and believe these must be 'perfect' teams comprised of 'perfect' skydiving
    individuals with 'perfect' personalities. They imagine how great it would be to be part of a team like this, and that their own problems stem from being unable to replicate this perceived 'perfection' in their own teams.Because of this unrealistic expectation, too many talented skydivers waste their time not training with a team at all. There's nothing worse than not training - in fact, some of my steepest learning curves have come from being part of what could be described as 'dysfunctional' teams.
    In a similar way, teams waste time by constantly replacing 'flawed' team members in search of the 'perfect' team dynamic; instead they should be working together, getting over personality differences to achieve a common goal, which is performing at the team best.
    It may come as a shock but - there is no perfect team!
    The truth is that on any team, individuals have their own ideas, flaws and times of stress - and often disagree with their teammates. Our unique qualities and imperfections make us part of this diverse human race, and differences are inevitable. I can't think of a more diverse group of people than Airspeed 8 - our disagreements ranged from how many jumps to do, to physical training and jumpsuit colours (you should see what we finally came up with in 1996)!
    Despite this, I often hear how up-and-coming jumpers idealise the top teams and think they always get along perfectly with each other. The result is that when a disagreement naturally occurs on their own team, they assume it's an inherent and insurmountable fault in the team - and subsequently break up or switch members. Differences like this are to be expected, and are part and parcel of team training, no matter what level you're at.
    A reply I often hear to this is, 'Yeah, but we're not Airspeed,' - implying it's easier to deal with team disagreements and personality conflicts when you're a professional team; if you have to put up with it for 'work', then somehow, you can. But when non-pro teams nowadays are spending between $5,000 and $25,000 per person per year on this sport - it seems like a few minor differences could be worth dealing with for longer than just one season! More to the point - there's really no alternative, if you want to perform, you have to deal!
    It's easy for teams to think their issues are unique, and that problems can't be resolved because of this; however, the case is most likely that the individuals are not willing to work out their 'unique' issues. Usually the problem is nothing more than the result of someone's need to express themselves, and this, in turn, being taken the wrong way. Problems like this could have been resolved months earlier with the input of a good coach, or by using truthful 'pass the rock' sessions where team members get the opportunity to vent and communicate openly.
    Teams need to realise that what they're going through is normal, and conflict is part of a natural evolution for every team. There is not a single team that does not go through conflicts. The difference between a successful team and a failing team is that the former works out their differences, whereas the failing team does not. It's not a matter of individuals being unable to resolve their conflicts - it's simply that they are unwilling to. Airspeed has gone through few big decisions without some pretty heated opinions being cast around the room.
    Because every team goes through the same cycles of development, it's worth outlining what those cycles are, so they know what to expect. One way of looking at how teams grow and mature is to use Bruce Tuckman's 'forming, storming, norming, performing' model.
    Forming - Stage 1

    The 'honeymoon phase'
    When most teams join up, they all seem to get along - everyone is excited about the new team and keen to get started; this is also known as the 'honeymoon phase'. Most skydivers are jubilant that they actually have a team to skydive with, morale is high, and negative personality traits are kept in check. It's very important in the 'forming' stage to get an experienced coach for guidance and direction. Many teams also benefit from having a team leader, and this is the time to appoint them.
    You should also spend quite a bit of time discussing your goals and aspirations as honestly as possible, as this will avoid problems down the line. There could be nothing more frustrating than being in a team where people have completely different agendas - one wants to take the team to the World Meet and another just wants to get the swoop at the end of the dive!
    Levels of commitment in terms of number of jumps, tunnel, money and time should be discussed as a priority, and while not every member of the team will have exactly the same objectives here, as long as they are in the same ballpark the team can succeed. It's important to come to a workable compromise and move on - rejecting a team whose goals don't precisely match yours, and ending up not jumping, is much worse than doing only 200 team jumps that year instead of the 300 you wanted to do!
    Individual long-term goals can even be different - it's fine if one person eventually wants to become a World Champion, and another just wants to compete for a couple of years before moving on to other things - as long as the collective team goal is agreed upon and compatible for the duration of the agreed term of the team. I refer to this as 'buying into the contract'. The key agreements of this 'contract' are:
    Individuals agree to work together to achieve the common goal.
    Individuals agree to communicate honestly with each other, more commonly known as having regular 'pass the rocks'.
    Individuals value their differences, i.e. they recognise that every person has a different background and personality, and will therefore have different ways of relating and behaving.
    Individuals seek to gain insider learning about their impact on the team, i.e. thinking before speaking and recognising that what they say has the potential to impact the team in a negative (or positive) way. Individuals should be responsible and accountable for their actions and words.

    Storming - Stage 2

    Guess what? The honeymoon is over!
    This is the frustrating stage of learning with the team; individual quirks start to come out and team members vie for position as they attempt to establish themselves. Cliques can also start to form within the team - questions and uncertainties come up and the 'contract' itself may be questioned. This is where most teams sow the seeds of inevitable self-destruction.
    Simply put, this is the stage where arguments might occur over block techniques, individual performance and styles of relating. Even table manners, personal hygiene and fashion sense can all come under attack! It's important to realise that this is natural human behaviour in a goal-orientated team environment. It's also important for individuals and the team to reiterate the goals they set and believe that the team outcome is more important than individual needs. At this stage, outside help in the form of a coach experienced in dealing with team dynamics is invaluable.
    I've heard more times than I'd like to recollect, 'I guess I'm just not a team-player'. I don't believe this to be true. That individual is just not willing to compromise, or never bought into the 'contract' in the first place. People who are described as 'team players' are just more willing than others to suppress their need to be heard all the time. I also believe there's no such thing as a natural team player. Anyone has the ability to become a team player as long as they are willing, at times, to put aside their own ego for the good of the team.
    Knowing that the 'storming' stage is normal and can be overcome by focusing and refocusing on the agreed team 'contract' is critical at this time. There's no knowing when the 'storming' will occur, or how long it will last. However the sooner a team recognises it and then accepts it as normal, the sooner the team will leave this phase behind.

    Norming - Stage 3
    Congratulations - you've got further than most teams and are on your way to performing your best!
    This is the phase where the team has recognised individuality as a strength, and has matured as a group. Commitment and unity is strong. It could feel similar to the 'honeymoon phase', but instead of being based on enthusiasm alone, it marks a time of personal growth and acceptance.
    Roles and responsibilities are clear and welcomed: the team's everyday interactions and dealings have become like clockwork, and the daily training routine, including team meetings and 'pass the rock' sessions, is more instinctive and needs no prompting.
    It's important to realise the individuals themselves have not fundamentally changed, and disagreements will still occur - however teammates have come to understand that having their personal needs met is secondary to team growth. The same disagreements teams had in the 'storming' stage suddenly seem less important and are dealt with more quickly and in a more mature manner.

    Performing - Stage 4

    The fun part!
    In this stage the team has a high degree of autonomy and will be running like a well-oiled machine. The team is able to focus on performance; personal issues that would have held them back previously as a distraction have melted into the background and become irrelevant.
    This is also the phase where individual relationships and trust are consolidated within the group. On a personal level, team members trust that each one will always act for the good of the team - communication between piece-partners is open and honest. In the sky, teams feel that everything falls into an instinctual rhythm, more so than a forced or conscious act. Trust in individuals' ability runs high, allowing team members to be sure that others will also fly their slots with confidence. This in turn allows for faster keys, more confident moves, and ultimately, more points.
    Teams should expect that disagreements will still occur - even arguments - but now issues are resolved within the team positively. It's also important to recognise that just because a team has reached the 'performing' stage, they may not be the 'best of friends' - however teammates trust and respect each other, because of the understanding that they are all focused on the common goal, i.e. the 'contract'.
    This phase is more easily attainable than most people think, or believe. It's the most fun part of training, and the pay-offs are numerous. Individual growth, realisation of your potential, a load more points and the best skydiving you'll ever do are just some of them.
    And it's a choice that anyone can make.
    Gary Beyer was a member of multiple World and National Champion team, Arizona Airspeed, between 1995 and 2002. He has since retired from World level competition and dedicates his time to team and tunnel coaching. www.onthelineskydiving.com
    This article was first published in Skydive The Mag (UK) and is republished here on request and with permission from the author.
    Photos by Mike McGowan

    By admin, in Disciplines,

    Is Speed Skydiving Boring

    The Sensations
    Speed skydiving in principle sounds like a high-octane, extreme discipline in skydiving. However, when you hear it’s a solo sport, you then think it “sounds boring”. But it is anything but boring and it’s for one simple reason; speed skydiving has a unique adrenaline-filled freefall sensation. It feels like those first few seconds of normal freefall where you accelerate rapidly, but throughout the entire speed skydive.
    Speed skydiving is measured as an average over the vertical kilometer (from 8,858 to 5,577ft). That means if you do it well, you can expect to reach your peak speed at the bottom end of the measuring gate. Some skydivers say it is hard to quantify what normal terminal velocity is, however in speed skydiving it’s definitely more tangible. The sensation is of freefalling seriously fast and that’s slightly scary whilst giving you a big adrenaline rush!
    Who Am I?
    I jump regularly at Skydive Hibaldstow primarily doing FS team camera work and wingsuiting. Although I have never been on the International Speed Skydiving circuit or a speed skydiving training camp, I always try to attend the UK Speed Skydiving Nationals and seminars. I’m not a freeflyer and I’m not even the best speed skydiver, but I have been enjoying it for 9 years.
    Doing It Well
    Doing it well is another matter of course. I have never done an average of over 270mph, whereas Mark Calland (UK jumper) has been over 300mph unbelievably. Speed skydiving requires you to strike a 3-way balance between feeling the airflow on your body, making fine corrections and relaxing. Putting too much input in or being too ridged and it’s all going to go pear-shaped.
    What to wear plays big part of getting a good average. Some speed skydivers like to wear bright red all-PVC spray on gimp-suits. Sorry but that is too kinky for me! If you can handle them, you can get some good speeds. Many more however prefer to wear a surfers rash vest and some jeans. The jeans help to smooth the airflow, provide some good stability and grip.
    A Typical Speed Skydive
    So let me describe a typical speed skydive. I get out of the aircraft between 12,000 to 13,000ft (the same altitude as the 8-way jumpers at nationals) and for the first 15 seconds, I slowly start to build up my speed by going into a progressively steeper and steeper track. After what feels like a long time, I begin to feel the air on the back of my calves. This is when I know I am now in the vertical airflow phase of the jump.
    Around this point, I feel a sudden acceleration and I know I am passing the 200mph mark. It’s almost like I’m passing through a pressure wave and this is common amongst other speed skydivers. For extra speed, I try to flatten my arms by my hips and bring my ankles together.
    Not long after, I pass through the opening gate of the measured kilometer. By then, I am already doing over 230mph. At this measuring phase of the jump, I’m concentrating on stability with every nerve cell in my body. Ideally, I’m trying not to make any inputs in at all. In fact, I’m trying to relax whilst balancing on what feels like a pinhead. Another sensation is like falling through an invisible narrow tube barely wide enough for my shoulders. I’m talking a lot about sensations in this article, but that is one of the big attractions to the discipline.
    Being symmetrical is also very important. A slight hip twist, one leg in front of the other and I can expect radical oscillations. Simply relaxing often cures the problem and I can continue to job of accelerating away.
    The final and most important part of the speed skydive is the deceleration to 120mph! I do this when I hear my two L&B; audibles beeping away inside my Oxygn fullface helmet. For those that don’t know, I’m completely deaf in one ear. So I pack them next to each other. You wouldn’t want to miss your beeps at those speeds.
    Pulling out of a 250mph swoop is not as gruesome as it sounds. You simply arch your body slightly and you begin to peel out into a swoop. As the speed decreases, you then bring your arms in front of you to a normal flat body position. All this takes less than 4 seconds and this makes you realise how fast you were actually going.
    Measurement
    Once you land, you unclip the two L&B; Pro-Tracks (not the ones from your helmet) from you harness lateral straps and plug them into the Jump Track software, which produces neat and tidy graphs showing your performance. In competition, each competitor does 6 rounds and the average of their best 3 go forwards.
    It’s exciting watching the scores come in and seeing your own progression. You would be surprised that being a fatty has little to do with going fast. I’m on the slim side and 2 out of the 5 worlds fastest recorded times have been by other slim built skydivers.
    Safety
    Having a premature opening of your parachute over 200mph is extremely dangerous. In preparation for a speed skydive, I take a fresh closing loop and shorten it to the point where I can only just get the closing pin in. In addition, I make sure I have two audibles in my helmet and I put gaffer tape on the edges of the visor of my full face.
    There should be no more than three speed skydivers on a load to prevent traffic problems. The first and last part of the jump involve tracking and it’s possible to cover large distances quickly. Being able to keep a heading is vital.
    The last thing is that your BOC spandex must be in good condition.
    Summary
    There are very few disciplines where you can feel how fast you are going and that makes it a real adrenaline buzz. Whilst it is a solo discipline, there is a lot of excited interaction and camaraderie between the jumpers at competitions as they evaluate each other’s jumps and acceleration graphs. You can take part without having to do lots of coached training camps. It’s definitely not boring!
    Doesn’t covering a vertical kilometer in less than 10 seconds sound like fun?
    More information:

    1. Speed skydiving seminar at Hibaldstow

    2. ISSA

    3. Larsen & Brusgaard – Kind sponsors of the discipline

    By admin, in Disciplines,

    The Challenge of 10-Way

    Remember when you were a student? Most of us couldn't exit a plane to save our lives (or pass a level), the skydive seemed so short yet so full of things to do, and when it was over we had this nagging feeling of, "If only there was more time!" Welcome to 10-way.
    If you're an accomplished competition formation skydiver, then 10-way isn't so tough, just another engineering challenge to meet with a little thought and practice. But for most weekend warriors who usually just jump with their buddies to have fun, funneling exits with varying frequency but not quite sure why, 10-way is an event that makes you feel like a student again. But when you start training for 10-way, like when you were a student, a new world of skydiving challenges opens up to you.
    Not only is it challenging--10-way is also a blast! It's some of the most intense skydiving you'll do, because whatever you do, it's got to be very fast if you're going to be competitive. And you don't have to be a full time skydiver to get good at it. As Roger Nelson, program manager at Skydive Chicago and eight-time 10-way medalist, often said, "10-way is the only discipline at Nationals where you can be a weekend warrior and really compete against the best in the world." For example, Skydive Chicago's STL10 team practiced in the mornings from 7 a.m. to 10 or 11 a.m., stopping to allow jumpmasters and videographers to work for the rest of the day, and still won two gold and two silver medals in four competition years.
    And who knows how low the time can go? "We're building 9.2-second jumps, thinking we're pretty hot, but Roger's saying, 'I think we can do eights…' and we did," remembers Frank Shisler, member of Skydive Chicago STL10 in 2000 and 2002. "It's all about focus and intensity; once you step in your slot behind that line, it's a totally different world." When you're really training for 10-way, you give that exit and skydive every last bit of effort you've got. To excel in 10-way, that's what it takes.
    If you just want to play with this new discipline for fun, well, it lends itself to that too. Not being a World Meet event, it tends to be more casual and the experienced teams more supportive than in some other events.
    This article presents the lessons learned from several years of 10-way experience with a recognized top 10-way team, Skydive Chicago STL10. The concepts explained here are valuable to anyone working on 10-way, and will be most useful for those trying to get past good on their way to great.
    Your Mission Is…
    Your goal for every 10-way formation skydive is to build one correct predetermined formation as fast as possible. There's only one point to remember. In theory, it's the simplest competitive skydiving event out there, with the exception of accuracy--get to the right place as fast as you possibly can (or at least faster than the next team). It's almost a drag race between teams, especially in the later rounds.
    Easy, you say? Not necessarily. To be sure, the "new" rules (which went into effect for the 2002 Nationals and were a screaming success) make things a bit easier than they have been in previous years because they now allow grips out the door. This means that you can launch part or all of the 10-way as a chunk, thus making the exit frame (the position of everyone when the last person exits the door) tighter. Then the early floaters and late divers don't have as far to go to the two unlinked jumpers who form the base, making the completion time shorter.


    The rules require the first two jumpers in the base to be unlinked, which can happen with a grip flash after launching a chunk. So technically, you could launch all 10 together, let go of the base two, then dock the two four-ways on the base if you could manage it.
    By the way, all participants except the camera flyer must be lined up behind a line on the floor for exit--no floaters allowed. This line goes from the forward edge of an Otter door to the rear bulkhead on the right side of the plane. Going over this line starts the clock, even if you are obviously just setting up and not ready to exit, so be careful of it until you are ready to exit.
    You have 35 seconds to build the formation in competition, because a five-second hold time is required within the total working time of 40 seconds. If you take longer than 35 seconds to build the formation, it's a bust and you are awarded the full time of 40 seconds.
    Why 10-Way?
    So what exactly will 10-way do for you? It's not a World Meet event. It won't teach you transitions and vertical hops. You can't practice it in the wind tunnel. But it will teach you all about exit dynamics, subterminal relative work, approaching a formation from above or below, and a respect for team cooperation at least equal to that you get from other disciplines.
    Body position on exit is just the beginning. Since there are no outside floaters in 10-way, the way your body is positioned upon breaking the plane of the door (while driving out the door hard) determines how far you (and anyone behind you) will be from the teammates ahead of you. What you do in that split second determines the outcome of your skydive. Contrary to popular belief, 10-way is not all about diving. The first few people out are dive floaters--they bomb the door, but do so either sideways (with their left sides exiting first) or turning to the right (exiting a Twin Otter) in order to float back up to the base. Between dive floating, setting a base, and diving down to the base, there is a wide range of ideal exit body positions based on the slot in question, and every member of a good team has an understanding of all of them.
    On to subterminal work. When 4-, 8-, and 16-way competitors say the exit is everything, they generally mean that the exit separates the best from the really good. In 10-way, the exit is almost literally everything. From the instant you cross that line inside the plane to the instant the last grip closes is your build time. Just to give you a little perspective, SDC STL 10 averaged a build time of 9.79 seconds for the required six rounds in the 2002 USPA Nationals (which they won). If we assume that we spend 8 seconds "on the hill" before reaching terminal velocity, and that a fast exit might hit 2 seconds on a really good day, that means that a top 10-way dive is completed before hitting terminal velocity. That's what we mean when we say the exit is everything--building a formation that fast requires an ideal exit and a lot of flying skill on the hill.
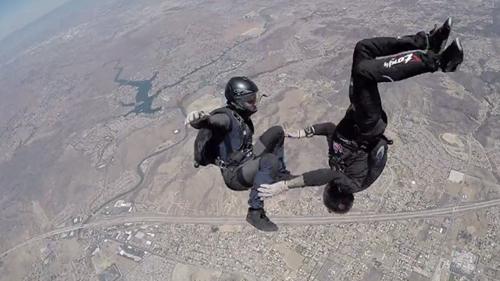
    Once you're out, if you're not the base, you have to dock on it. Since we're talking about sub-terminal hill work, we have to remember that the plane of the formation is still tilted to some degree relative to the ground. Thus, the floaters approach from below and the divers approach from above--which is quite different from the typical larger-formation picture of approaching on level. Here, level is relative to the plane of the formation, not the horizon. And if you want fast times, you don't have time to hit level a distance out from the formation and approach flat. You need the fastest approach, which is a straight line. Besides, if you're building in sub-terminal air, the base is accelerating--so if you pause a ways out, you're usually hosed.
    Cooperation and consistency among all team members is essential to each member's successful performance and thus that of the team as a whole, perhaps even more so in 10-way than in other competitive disciplines. All it takes is one sidestep by one person early in the lineup to hose the whole skydive by giving everyone else an exit they didn't expect (perhaps even involving the infamous door strikes). In a 35- or 50-second skydive, a bump on exit is much smaller in the grand scheme of things. But if your build time goal is less than one-third the working time of a 4-way jump, every fraction of a second counts. That's why every member of a 10-way team has to be on the same word, not just the same page, in order to succeed.
    "You change one person, you change the whole thing," says Shisler. "If you want to be competitive, you have to put in the practice with the same people in the same slots."
    Also, the cohesiveness and discipline you learn with 10-way will benefit you in any other competitive disciplines you choose.
    You get all of these benefits from doing competitive 10-way, and you get to have fun too! The fun and bonding between team members are the biggest reasons why several teams, like SDC STL, compete together with minimal lineup changes year after year.

    Exit Challenges
    Diving out of a plane solo isn't so tough, but if you want to be in the same time zone as your teammates when you exit for 10-way, some grips are quite helpful. So now you're diving out some number of people as a chunk. That doesn't mean that you have to hold onto them forever--the people just behind the base and the divers behind them generally find that holding on just long enough to ensure proximity through the "snap" on exit is all they need (floaters tend to do best without grips, as dive floating individually is enough work).
    Thus, if you are one of the jumpers with a grip on exit, your hold time and release timing will be engineered through trial and error, and consistency is an absolute requirement. Letting go of only one hand earlier than usual will spin the person you're holding. Letting go of both hands early will leave you and everyone behind you too far away (or the floaters too far away, if you are early in the lineup). Letting go too late might screw up the person you're holding.
    Setting up behind the line is a lot like The Price is Right--you want to be as close as possible without going over. As stated earlier, this starts the clock whether the offending body part is a foot over the line or a head leaning over it. Think of the line as a plane, not just a line on the floor.
    Your exit setup will go through a lot of changes before it settles into one that is good for everyone. Practicing on the ground with rigs is a helpful start, but the actual skydives are the real test. Once you've settled on an effective lineup (Jane's foot here, Bill's knee tucked in just so), stick to it unless you're trying to improve something and you let your teammates know. As previously stated, your exit affects everyone else's--so if you're going to change something, talk about it.


    Movement on exit is another challenge--not everyone can move at the same time. If you're first out and start the clock, be sure that you go at the same point in the count, not leading the GO! one time and going right on it the next. This helps set the timing for the later divers, who have to be leaning in the right direction at the right time to exit with the team without either running people over or getting caught napping and being dragged out the door.
    "You're skydiving from the word 'HOT!' " says Shisler. "A lot of casual teams get out (of the plane), get stable, then get together. You can't do competitive 10-way that way. You have to be flying together from the word HOT! A lot of people don't understand that."
    Also, using the door side of the plane for balance is not allowed under the rules, whether during setup or on exit, though you can use the opposite side. (Note: if you lean on that side of the plane, be sure that no part of your rig is caught on a bench or seat belt bolt. I can tell you from experience that this definitely hampers your exit…) Your balance, which is essential to a good exit, depends on your agility, your teammates' balance, and a smooth jump run.
    Speaking of jump runs, consistent airspeed as well as a smooth flight is essential. When traveling to different drop zones, or even with different pilots at home, we found that changes in airspeed produced noticeable changes in the exit frame. With higher airspeeds, everyone is more separated and the times are longer. With a slower airspeed, everyone notices a steeper exit frame and often a longer build time because of the different angle, despite being closer together. So, basing practice flights on the airspeeds specified in the competition manual (85-95 knots) is a big help to a seriously training team.
    If jumprun is bumpy, your exit will stink. It's guaranteed. Don't be afraid to call a breakdown of the lineup and a go-around if the floor is rocking and rolling, especially in competition.

    Formation Build Challenges
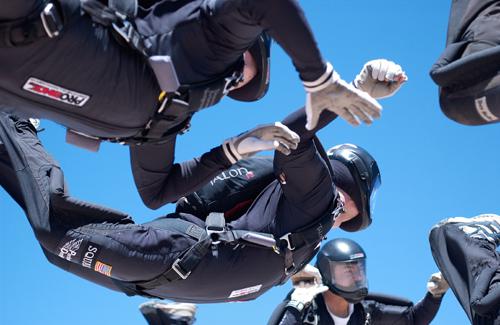
    So now that you're out the door, for most of you it's time to chase the base. You might be tracking uphill with everything you've got, or diving and hoping you can stop without sacrificing a teammate. Either way, aiming for a target when both you and it are on the hill can be tough.
    If you are building a 10-way quickly, in subterminal air, it's a big game of acceleration control--not position control. If you're the base, you try to keep acceleration constant. If you're a floater, you are trying to slow your acceleration and then match the acceleration of the base. If you're a diver, you're accelerating more and then trying to slow--not stop--your acceleration to match that of the base. Matching position with a stationary target isn't so bad, but the acceleration game is a challenge.
    Add to that the fact that you are working in "mushy" subterminal air, and the degree of difficulty rises again. It's a lot harder to make these acceleration changes at this time than it would be in terminal freefall, especially right out the door. Respect the fact that things just don't work quite as well as you want if you're not used to a lot of subterminal maneuvering, and take it easy the first several times. Hitting the base hard can take it out, or it might just change its angle enough to make it cut into or surf on the relative wind more than it was doing before you hit it. This will change the base's position from its normal exit frame, hosing the floaters and divers who haven't docked yet. With a highly practiced team, everyone gets accustomed to a certain exit frame after a certain amount of practice and is already going to that familiar spot on exit rather than waiting to see what the base does. When that spot changes, it messes up things for everyone.
    Of course, at some point everyone has to cross the line in order to figure out just where it is…the takeouts can be spectacular.
    Your vertical approach isn't the only thing that requires a lot of care--you don't want to hit the formation hard on the horizontal plane either. It's essential that the angle of the formation remain the same, ideally where it was planned to be. Large changes in the angle during the build screw up the approaches of everyone who isn't yet docked. When you're approaching the formation on the ragged edge of too fast to stop, it's pretty tough to adjust to an angle change.
    Then, although it's best not to throw off the angle in the first place, it's not necessarily good to quickly fix it either. When time is short and the angle is off, those still approaching are already adjusting their approaches to compensate for the problem. If the base puts the angle back where it was, then those still approaching could be going the wrong way--to the temporary "bad" angle they saw just a second ago. Figuring out how much angle change your team can handle takes a lot of practice and awareness in the base and late floaters/early divers.
    Last, but certainly not least, of the formation build challenges is that of grips. It's easy to snag the first bit of the right arm or leg that comes near you, but it's absolutely vital that you get a solid grip the first time, not just grabbing a fold of a jumpsuit and hoping it will hold. There can be a lot of tension in a fast 10-way build, and you'll surely get a lot of grief if you're the one who lets go.
    Another thing about grips--if you are on the front of the triple diamond, you have no grips. However, if you keep your hands out wide and overlap the hands of the person next to you, it can look like you do--this will look like an incorrect formation. As in the smaller-way RW disciplines, you have to present the formation to the judges correctly in order to get scored. Each slot carries the responsibility for this.
    Slot Specifics
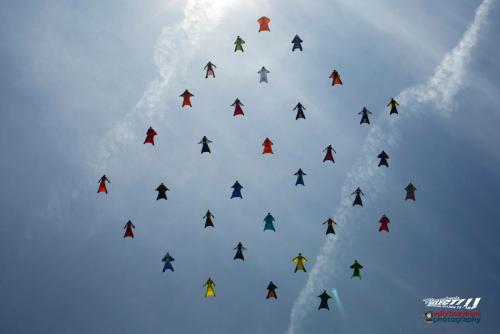
    First of all, the exit is roughly a single file line. Many teams will stack the first couple of people out the door or curve the lineup to shorten its overall length from the door, but the later divers tend to do best when exiting single file so they don't interfere with each other during side-by-side exits. The early slots (usually 1-3 or 4) are the floaters, the middle slots (usually 4 or 5-6) are the base, and the last to exit (usually 7-10) are the divers.
    Floaters--For decades, late divers have had the "glory slots" on larger formations because all eyes were on them as the formation completed. In 10-way, the ideal situation is for the last floater and the last diver to dock at the same time, so there's a lot of healthy competition between the two groups.
    "If you don't get out of the plane in a mode that propels you up, then you're behind the curve and the divers beat you every time," says Ron Olson, four-time 10-way medalist in slots 1 and 2. "You've got to know where your target is--the sooner you spot it and the angle it's coming at you, the quicker you can adjust to where you need to go. You need to be able to cup air and look where you're going at the same time, and go where you look. You're pointing your toes and driving at it hard, then all of a sudden you're level with it, it's coming at you, and you're trying like crazy to stop.
    "The rest of it is looking at the divers and knowing that if you slack off, they'll beat you there," he laughs.
    With a quick build, floaters certainly have to work hard. First they're anchoring in the airplane to stay behind the line even though others might be leaning on them, then they're going up as hard as they can go, then they're stopping as hard as they can and punching out a hard arch to stay with the base as it continues to accelerate. No 10-way slot is for tentative flyers, but the floater slots in particular are best filled by skydivers who know how to get maximum performance out of their bodies--whether it's tracking up hard, slamming on the brakes with your knees almost in your chest, or backsliding in your slot to keep up with the formation sliding down the hill.
    And like divers who need to go fast and stop quickly, floaters benefit from a lighter body type. "Lighter people have a better chance of recovering when they're behind the curve," Olson notes. However, you have to be able to match the base's fall rate when you dock, so if you are so light that you can get to the formation quickly but not stay down with it, you might need weights even if you are a floater.
    Another key to a good floater performance is a consistent base, says Paul Wold, four-time 10-way medalist in slots 2 and 3. "You've got to leave the plane going to your slot on the base, or you're too slow. But you can't leave the plane going to a spot like that unless the base is in the same place every time."
    Base--Just in case you haven't heard the word "consistent" enough yet, "consistent" is the hallmark of jumpers suited for these two slots. The 10-way is "initiated by two unlinked jumpers"--that's you. Your job is to get out of the plane the same way and speed every time, and to set a stable fall rate every time and a stable heading for each formation.
    It sounds like a job for a drop-test dummy, but it isn't. On exit, you might have two or three people hanging on you, so not only are you towing them out as you start the "train," you also get to deal with any of their issues as well as your own. It's your job to fix any problems that arise so that you exit where and as fast as you are supposed to be. Regarding the formation build, as anyone who's done larger formations will tell you, sometimes you have to fight like hell just to stay still when other people are docking on you. And of course, all the effort you put into staying still includes vertical and horizontal force, and it's tougher to fly hard in mushy sub terminal air.
    Base flyers should ideally be skydivers with lots of subterminal maneuvering under their belts, not career-long late divers or super floaters. People who are used to a lot of contact and working towards multiple points (particularly with competition RW teams) tend to have the subterminal flying skill and solidity (sometimes described as "roots in the sky") that these slots really need.
    Solidity means that when someone docks too hard, you can almost instantly adjust to minimize their effects on the rest of the formation. This requires split-second reactions and strong flying skill, the kind an instructor needs when manhandling a creative student. This slot isn't for "delicate" flyers who are easily bumped out of position. Also, the base can't be maxed out in terms of fall rate (slow or fast), because the adjustments could go either way (more on weights later).
    Position isn't just related to fall rate and your spot in the sky, it also involves the right angle for everyone. You'll find that once you get your exit to be fairly consistent, everyone ends up in about the same place relative to each other in the exit frame. So you plan each formation's angle to give everyone the shortest approach to their slots. If the base doesn't set that ideal angle, then everyone has further to go and thus the time is slower. And as previously discussed, maintaining the angles throughout the build is also the job of the base and anyone who has already docked.
    With practice, you develop an image of the exit frame you expect to see, and any significant changes then offer the option of accommodating them. If, for example, a floater flipped on exit and dropped down, you might punch it out a bit to help them out. But you don't want to go all the way to where they ended up, because then you make nine people work to save one. Ideally, you go to a point in between where everyone else goes a little further, and that floater goes a little further, and your time is better than if you went all the way to the floater and made the divers make up the entire distance.
    Divers--Even experienced large-formation divers often get humbled when they switch to a good 10-way team, because much is the same, yet much is different. If you're building a fast 10-way, the divers can't go into a max no-lift dive at all because they'll blow right past the formation (this is the most common mistake). As stated earlier, this is a game of acceleration control, with emphasis on the control.
    It starts with "not listening to the count, but feeling movement and being prepared," says TJ Hine, two-time silver and two-time gold medalist in 10-way with Skydive Chicago STL (TJ has been #9 for the last two years). "You've got to be skydiving from the word 'HOT!' " The right exit for a diver is one where he isn't getting pushed or pulled, instead flowing out the door smoothly behind his teammates with grips on the laterals to maintain proximity out the door.
    Hitting the door is a concern for the later divers, but tends to start earlier in the lineup (such as when someone in the middle or an early diver cuts the corner to the right when exiting). Thus, the divers mainly rely on their teammates to put the train in the middle of the door so that everyone makes it out clean. Shin guards on the front of the shin or the outside of the calf can be quite helpful when working out lineups and exits early in the season.
    Once you're out the door, "The big thing is how you release--you can push people around with the release, but don't hose your teammate," says TJ. "Figure out where the air throws you with your release and don't fight it. Design the formation from there, not from the lineup." For example, Skydive Chicago STL designed formations so that #9 was the last one in, not #10, because #10 (Tommy Shannon) always got thrown past TJ and to his right on the release, in a leapfrog type of move.
    Next is the approach to the base. "The big thing is being aware of the base as fast as possible, not so much the person you're docking on," TJ explains. "Go for your airspace relative to the base." If you chase the person you dock on, then if they are out of place, so are you.
    When slowing down to dock, you might find that swoop cords or baggier suits are quite helpful to a diver. As with floaters, leaner-bodied jumpers have a better time with diver slots; the floaters need to conserve altitude early, while the divers need to do so at the end of the approach to keep from passing the base.
    Also, as with all slots, you have to hang on tight when you get there. "You need death grips on first grip," TJ adds. "The later guys can really put tension on the formation.
    "The faster times are when people don't think, just react," he summarizes.
    Weights and Swoops
    It's well recognized in smaller-way RW disciplines that weights are necessary to equalize fall rates for various team members, and 10-way is no different. Whatever it takes to get all members to a matched mid-range fall rate, whether it's weights for one or a looser suit for another, then that's what should be done.
    For example, as stated earlier, if you're a floater with a small build relative to your teammates, you might still need to wear weights in order to keep up when docking on and flying with the formation. The base might experiment with weights for a time, especially if all floaters or the divers are consistently faster to the base than the opposite group. Weights seem to have a significant effect on the base's initial acceleration out the door, which is what the floaters and divers evaluate for their target position. As previously stated, the fastest times are when the last floaters and divers dock at about the same time, so if one side has an advantage, you have to "handicap" them to get a better overall time.
    As a diver, however, you probably don't want to wear weights unless absolutely necessary to match the formation's fall rate, as they decrease your ability to slow down your dive.
    Regarding slowing the fall rate, remember that major changes in fall rate are the norm for non-base flyers in 10-way. Swoop cords are often used by divers to make the change from fast to slow easier, smoothing their docks. Swoops can be very handy for a diver who needs to stop hard, but make sure that they're not so tight that they restrict your movement. It's not good if they float you up in the formation or keep you from reaching your toggles comfortably.
    Video
    Last but certainly not least of the slots is your (hopefully) dedicated videographer. As SDC STL's 2000-2002 videographer and proprietor of Skycam Productions, Mike Wood, says, "If it's not on video, it never happened."
    What's the most important thing about capturing a fast 10-way on film? "Don't screw up," Mike laughs. "I carried two cameras in competition just in case. There's absolutely no room for error. If a floater or diver goes low, they can fly back up and maybe get a worse score, but not having video gives you a 40 (the maximum score). You have to be there absolutely as quick as possible. If I'm one second behind, it costs the team. You have to be there before the last floaters and divers so you can see the last grip close on video to stop the clock.
    "A lot of people don't take filming 10-way as serious as other disciplines because it's fun," he adds. "But it can be a very competitive thing just like 4-, 8-, and 16-way. It has its own challenges that make that one point very difficult to do fast, as well as filming that one point. With unpracticed teams, it might be 10 seconds before the first two people hook up. With us, it's over by then. There's no time to screw up and fix it. We're shaving tenths of seconds, not 5-10 seconds per jump. Even a 12-second jump is over very fast.
    "To me, the biggest challenge is getting in your own little spot in the sky without hitting the floaters or the divers," Mike continues. "The exit is coming out so fast (with a medal-class 10-way) that you have to jump many times with the same people in order to learn to react to the base's colors. You have to let half the lineup go past you to (be in position to) film the break in the base grips. Then you have to beat the floaters and get up over the top without running into the divers, because now you're close enough to get in their way if you're not careful."
    So what's the procedure for getting the perfect 10-way video? Mike is happy to explain. First, you have to be solid and ready to hang on for awhile on climbout, he says, to allow the team to set up inside. "I usually hook my left foot inside to help hold on, then pull it back when the last guy steps into the lineup," he says. "It helps signal the front guys that the count is coming, too. And you have to know how to angle your head to see the whole line before exit. You want it clearly shown, not on the edge of the frame. But don't put your head in too far--one fill-in videographer learned that lesson when he got his lens peeled off by the first guy out the door.
    "Then on the count, you watch the blur of bodies stream past until the base colors come out," he goes on. "A lot of times, you drop off a little too soon until you get used to your team. I'd slide down the fuselage, not out to the side, since as the floaters hit the door they are immediately spinning around to come back up and it's easy to get in their way. Then you pop up to stay out of the divers' way. You have to get right over the top; if you're too flat, you can't see all the grips.
    "It's not hard so much as practicing with your team a lot to learn where to be and where not to be," he sums up.
    Training Logistical Challenges
    With all the jump mechanics out of the way, you might wonder what could be next? The answer is: Lots! For example, if your team can build a 10-way in under 15 seconds, why go to 13,000 feet? You can do training jumps from a lower altitude, saving time and money, and allowing easy back-to-back loads if the rest of the load is climbing to full altitude. For the last three years, Skydive Chicago STL ended up doing training jumps from 6,000 feet--sometimes as low as 5,200 feet--and still built the planned formation nearly every time.
    However, keep in mind that if you only allow enough altitude for a fast build time, you can't rebuild a funnel--so don't try. A good bet is to plan enough altitude to accommodate your fastest build time plus at least ten seconds to allow a build in spite of a bobble. Besides, you're supposed to hold it for 5 seconds anyway--it's good to get in that habit early.
    Another key is to document your progress--write down your build times on the various formations every time. That way you can see which ones you need to work on, and which ones you can't wait to draw at Nationals.
    Thirdly, we've all heard the old saw about how you play like you practice. Well, that means you have to practice like you'll play, which means practicing all or most of your jumps out of a Twin Otter, as that is the only aircraft used for 10-way at Nationals. Not only do you require a Twin Otter, you also require a Twin Otter flying at the same airspeed (85-95 knots) as are specified in the USPA Skydiver's Competition Manual. It's a good idea to check with drop zones where Nationals have been hosted to see what exact airspeed and power settings have been used in previous meets to ensure consistency between practice and competition.
    The last significant training hurdle is that of over-analyzing the skydives. We all know that each skydive is a little different (or a lot!), but that's easy to forget when you're looking at only 10-second skydives and working towards cookie-cutter consistency. Don't get too bogged down in the particulars of every single skydive--look at your team's performance over a period of time and jumps before you make conclusions about your improvement or backsliding.
    There is certainly a lot of effort, thought, and engineering behind a successful 10-way team. But there is also a lot of camaraderie, friendship, and learning--there has to be for 11 people to keep working towards the common goal of a highly competitive 10-way. Not to mention the pure thrill of achieving a fast time with the simultaneous cooperation and skill of 10 of your closest friends.
    The challenges of navigating the road to top-level competition status, both technical and cooperative, make 10-way competitors better all-around skydivers--who had a blast while they were getting better!

    By admin, in Disciplines,

    Mixed Formation Skydiving - The Next Big Thing

    Mixed Formation Skydiving Is Ready To Take Over The World
    Andy Malchiodi--neck deep in his multi-hyphenate (medalist/coach/musician/filmmaker) life--didn’t set out to co-invent a skydiving discipline. He just wanted to enjoy competition. Luckily for us, he did it anyway. He’s quick to refuse to take credit for being the first person to combine flat and vertical orientations into one discipline, but there’s no denying that he’s the one who has done the most to make it official.
    The building blocks were there, but Mixed Formation Skydiving (“MFS”) in its current iteration wasn’t even on the radar when Andy’s freefly team, SoCal Converge, was stacking up medals on the competition circuit. From 2008 to 2012, Converge won four U.S. National Championships, took back-to-back gold and silver at the World Championships and racked up two world records.
    “In my years of [freefly] competition with SoCal Converge,” Andy begins, “Even though we were working within an artistic discipline, we really thrived on--and enjoyed training--the compulsory rounds. In those years, the freefly compulsories were essentially 2-way MFS; teams flew two flat points out of a 10-point pool over two rounds.”
    As well as being fun to fly, Andy and his team saw several very compelling elements in these compulsory rounds.
    “We noticed a lot of cool stuff,” Andy explains. “You can train this without a videographer in the beginning--you can just de-brief from your GoPros until you recruit one. You can take it home to a small drop zone with a small plane. People are attracted to the idea of fusing all four primary orientations into one discipline. For those people, it’s a discipline with it’s own identity. And for those who only wish to focus on the vertical, it’s a stepping stone to 4-way VFS.”
    “The beauty of it is the modularity,” he explains. “Even newer skydivers, who aren’t freeflying yet, can do the flat points and grow into it.” To be clear: The advanced class does not do any of the belly or back points, and some of what are considered the more difficult vertical points are omitted from the advanced dive pool as well.
    Clearly, the latter makes MFS a very compelling inclusion into a newer skydiver’s arsenal. With the inclusion of the flat points, 2-way MFS is a discipline unto itself, where the training progression from advanced to open nicely follows a well-rounded skill-building arc. “You might choose to do advanced MFS,” Andy says, “When you’re at a skill set where you can’t quite take on the VFS open dive pool, but you’re interested in doing VFS.”
    “It was initially my hope,” Andy continues, “That advanced do two purely flat rounds and four vertical. The open class would then ‘mix’ them. The current rules are designed, by suggestion of the USPA, to appeal to those who want to use MFS as a method of progression into VFS.”
    In 2011, as Andy and Converge were getting excited about the possibilities of their nascent discipline, the freefly compulsory rounds changed. The rules moved away from speed compulsory rounds and into artistic compulsories, where teams receive four moves to style a routine around.
    “It is pretty different than it used to be,” Andy sighs, “And we weren’t very happy to see that change. We had our reasons for believing it was good the way it was. So I took it upon myself to take that really good stuff and make it its own discipline.”
    Andy had a lot of work in front of him to create an official space for MFS. He took the moves that existed in the pre-2011 artistic freefly compulsory dive pool, brought in several of the points that existed in the wind tunnel competition dive pool (which, at the time, wasn’t as widespread as it is now) and started to work out the details.
    The biggest challenge Andy faced surprised him. MFS is, after all, at heart a formation skydiving discipline--and, in formation skydiving, you cannot have one point that begins or ends with the same grip of another point. “You would think,” Andy muses, “That with multiple orientations--head up, head down, belly and back--that would open up infinite options, and you wouldn’t have a problem creating points that didn’t start or stop with the same grip as another point. It was more challenging than I would have guessed.”
    The tunnel competition dive pool, developed in great part by Arizona-based skydiving legend Jason Peters, included several points that--unsurprisingly, considering its non-FS provenance--did not abide by that FS-specific rule. “At the beginning, if you watched a very fast 2-way tunnel draw,” Andy explains, “It looked like a game of patty-cake, because you would finish one point and then begin the next point with the same grip. Pulling off that grip and going right back to it looked kinda funny.”
    Challenging as it was, Andy stayed the course to, as far as possible, mirror MFS’s rules and regulations to match existing formation skydiving disciplines. He brought a few other top-shelf skydivers to help him work out the engineering puzzle--among them, Ari Perelman and Rook Nelson. The think-tank communicated with the USPA (specifically, James Hayhurst, Director of Competition, and Randy Connell, Competition Coordinator) to get multiple sets of eyes on the points, rules and regulations. With all those collaborators on board, 2-way MFS enjoyed an intuitive and logical evolution as it came into its own.
    With staunch USPA support, MFS made its public debut in 2013. The first test event, at the U.S. Nationals, was “very well attended;” Andy remembers, “Everyone was very enthusiastic about it.” The first official event was MFS’s inclusion in the 2014 U.S. Nationals. From there, the discipline has consistently ramped up with every passing season.
    “It’s easy to see why. It creates very challenging and intriguing engineering dilemmas,” Andy grins, “And there are a couple ways you can slice the onion there.” The training videos say it all.
    Official international recognition is the next logical step, and MFS’s next big push is the one that will send it over the ocean into Europe and Australia. Slotting into place at the IPC level would allow MFS to be included in events like the World Cup and the World Meet, and that’s exactly what its inventors intend for it. So far, the U.S. is the only country with 2-way MFS on the docket--which is stupefying, considering the discipline’s flexibility, portability and low infrastructural requirements.
    “They’re waiting to see how it goes in the U.S.,” Andy says, “And they’re slow to move, but the more competition skydivers who push for MFS at their Nationals level, the closer we’ll get.”
    Interested? Check out the 2-Way MFS dive pool from the USPA website. To learn the MFS ropes, reach out to Andy himself, Jason Peters or Nik Daniel with Axis Flight School.

    By admin, in Disciplines,

    Learning to Fly With Weights

    With today's fast fall rates, weights are essential for lighter weight jumpers. Small jumpsuits are not enough, especially when jumpers in the base are also wearing smaller jumpsuits. There is nothing more embarrassing than making a nice swoop to your slot only to pop three feet above everybody else when you break for the second point. Been there, done that.
    But it is not as simple as just slapping on ten pounds of weight and swooping. There is a learning curve involved. Jumpers wearing weights for the first time face the fear of going low. They have to learn how to fly with the extra ballast. They have to learn how to fly like a heavier jumper. That means they have to set up a little higher on approach. They also have to stop a little sooner then they are used to doing. Maybe for the first time, they have to fly cautiously. And some jumpers have to learn how to use different amounts of weight for different sizes of formations. It is a challenge, but one you have to face head on if you want to get invited on the good loads.
    For jumpers wearing weights for the first time, the roles can suddenly be reversed. The big boys in the base might get their chance to watch the lightweights sucking air as they go low. (I'm sure this puts a little smile on the big fellas' faces.) But don't fret. Show the big boys how quickly you can pop back up and get in. For those of you who have never had to worry about going low, here's a little primer.
    If you go low, move away from the formation and turn sideways to the formation. While keeping the formation in sight, lower your head and spread your arms and legs out as far as possible to assume a flat stance. Push down on the air as much as you can with your hands and feet. Crunch your gut muscles if you have to. Hold this position until you are far enough above the formation to make a good approach. (Forget the old 'hugging the beachball' theory. That actually lets air spill out all around you.)
    Let's say you made it in and you're fairly proud of yourself. You glided smoothly into your slot without having to fight to stay down with the formation. Of course, you had to watch your altitude. No more approaches from below the formation. The weights kept you honest.
    Now it's time to move to the next point. When you let go, you feel like you're in sequential heaven! You don't have to swim and flail to stay down with the big boys. You simply move laterally to your next position. What a treat!
    But don't get too cocky just yet. The next point is a "floaty" one. The big boys in the middle quickly build a 4-way compressed accordion and you are moving around to pod the end. "What happened?" you think as you sink two feet below your slot. Whoops! You've never had to watch your altitude this closely before. "Hee-hee!" go the big boys again as they watch you recover (again).
    But you're a good jumper and it only takes you a second to pop up and move into your slot. You tell yourself that you'll watch your altitude a little closer on the next move, and you do. The last point is a round and you feel like one of the big boys as you meet them in the center and don't have to work to stay down with them.
    "Piece of cake," you think to yourself. As you track off, you feel some of the old cockiness returning. But the cockiness starts to fade after you land and start wondering if the big boys will let you jump on the next load with them. Well, don't worry about it. You might not be ready for another big-way just yet. In fact, your next step should be to check out the weights on some smaller formations, preferably 4-ways. Remember I said that some jumpers have to use different amounts of weight for different size formations?
    So don't rush things. Check out the weights on several smaller ways. Depending on how often you make it out to the DZ, this could take several weeks, even months. Just remember that you are learning to fly all over again. You might have gotten into some bad habits by flying like a lightweight. I know I did. I had gotten used to diving down and not stopping until I was level with the formation. Then I'd make a perfectly level approach from where I had stopped. Boy! Did I ever get my wake up call the first time I tried this with weights.
    Another factor to consider is where to wear the weights on your body. From my experience, vests seem to work better for women and belts for men. It's just pure physiognomy. Women are typically lighter in the upper torso area, men in the hip area. But this isn't a hard and fast rule. Take me for instance. I wear both a vest AND a belt, but I only carry three pounds in the vest, whereas I carry six in the belt, nine pounds in all.
    What works for one person may not work for another. A couple of guys at my home DZ wear about ten pounds in a belt. All I know is that without the weights I wouldn't be jumping on the hot loads at my DZ. I wouldn't be doing hot 4-way either. I'm sure if you talked to my DZ's head organizer, he would tell you that I have made great strides in my performance since getting the weight thing figured out. It was hard work but it was darned well worth it. I know I'll be in some of the hot skydives in the year-end videos!

    By elightle, in Disciplines,

    How To Tube: A Guide To Getting The Most From Your Tunnel Sessions

    Part One: Instructor vs. Coach
    A tunnel coach and a tunnel instructor are different things. This can be confusing as they may look the same, sound the same, perhaps wear the same suit and even be the same person performing two different roles from one session to the next. They will all high-five you too many times.
    What exactly does an instructor do? What exactly does a coach do? What are the differences between the two and how do they apply to me? Also, what is spotting and who does it? Do I need some? Also, how do I go about finding a good coach that is the correct fit for my personality and flying goals?
    What does a tunnel instructor do?
    An instructor is an human employed by the facility itself to oversee and conduct the tunnel sessions. This includes managing the time, keeping everyone safe and teaching students as and when it is required. Instructors are also responsible for taking turns controlling the tunnel and during downtime performing maintenance around the building.


    Coaches provide tuition in different ways. Sometimes from outside the chamber...


    ...And sometimes from within. Instructors provide support where it is needed.

    What does a tunnel coach do?
    A tunnel coach is an accomplished flyer that buys time from the tunnel as a private individual and offers it as lessons to potential students. Coaches buy bulk time from the tunnel company to secure it at the cheapest available rate and sell it on to their students including a fee for their services.
    Do I need to get a coach?
    Yes, no, sometimes, maybe, yes.
    At any given tunnel there is an instructor in the immediate vicinity of the action at all times (watching from the doorway or in the chamber itself). They are present for safety and are available to teach anyone in their session who requires help. You can go to the tunnel without booking a coach and have the instructor teach you, but there are a few things to consider:
    1. Instructors learn on the job - they begin with a very basic amount of training and advance through levels of qualification while working at their tunnel. This means the instructor for your session can be a veteran of many years or a new employee conducting their very first class.
    2. Instructors have other duties to perform. The busier the tunnel is the less time the instructor will have to talk to you before and after your session. If they have a birthday party of tiny children to fill with joy they will probably not have the time and energy to discuss your backfly position in any detail.
    3. You will likely get a different instructor each time you visit. While there is something to be said for mixing up the sources of your learning, there are couple of things that are important to consider - An instructor you do not know might want a demonstration of your skills before they will teach you anything new, thus eating into your valuable time. Also, the more you fly and more skills you acquire, the higher the chances that an instructor will not be qualified to teach you anything new.
    4. If you want to learn head down flying you need to have a coach to give you feedback from the front as the instructor will be holding on to (spotting) you from behind. (While it is possible to learn this from just one appropriately qualified person, it is a very inefficient and time consuming way to do it). Both instructors and coaches will tell you to get a good coach.
    5. As you gather more experience and your skills grow, you will recognise the times when you might or might not want or need coaching for a particular session. There are times when you a required to have a coach in order to progress, and there are times when you can improve by practising alone or with a group of friends.

    For learning head down you will need the help of both an instructor and coach.
    The coach (left) is there to teach you what to do. The instructor (right) is there for your safety.
    An instructors job is to spot transitions when required.

    What is spotting?
    Spotting is the term used to refer to the techniques used by by instructors to control and catch flyers in the flight chamber.
    This term is commonly used in two ways:
    1. As action. For example - A student flips onto their back and is caught by the instructor. This is a spot.
    2. As method. For example - An instructor is teaching a student how to sitfly. The instructor is doing the teaching, but is also spotting the student should anything go wrong.
    The duty of spotting falls to the instructor of the session. The flying activity that takes place will be equal to the level of qualification of the instructor. The exception to this is that if there is another person in the tunnel that has more advanced qualifications. An example of this might be another instructor doing some private coaching outside of his duties at the tunnel.
    Tips for finding a good coach:
    There is no enforced rating system for coaches. As a result of this there are many excellent ones and just as many terrible ones. Someone can easily be a very accomplished skydiver but have skills and methods that simply do not translate well to the tube, just as a tunnel coach might be the best flyer you have ever seen and have never set foot in a jump plane.
    - Does your coach provide a proper briefing and de-briefing? It is very important to have the right information and suitable practice before your session begins. This can mean the difference between rewarding progress and frustrating failure. If your coach turns up at the last minute or books their sessions so they are back-to-back with another student and have no time to brief you then they are crappy - get someone else. Does your coach de-brief you properly with video after your session? Deconstructing and analysing your flying can often be the part of the process in which you learn the most. If your coach stays in the tunnel with another student or disappears without de-briefing you properly then they are crappy - get someone else.
    - Always find out peoples experience level. Ask around, it doesn’t take much to find out if someone is full of shit.
    - Does your coach have time to perform a backflip or some such each time you get in and out of the tunnel? If yes, you have a crappy coach who is more interested in their flying skills than yours. Get someone else.
    - Does your coach perform moves or fly in a way that is beyond your current skill level while you are flying together? If yes, you have a crappy coach - visual feedback is an important tool for your progress. Your coach should be using their body position to teach you about yours. Get someone else.

    Coaches will sometimes be qualified to spot transitions themselves.
    Sometimes the instructor's help is not required.
    Sometimes the instructor's help is mandatory.
    Many tunnel instructors also offer their skills as coaches. As a general rule people who have honed their skills working as an instructor make the best coaches. However, there are a few things to consider:
    Advantages:
    Instructors make their bones by doing a lot of sessions with people of all levels of ability. This makes them very efficient at communicating ideas and techniques both in and out of the tube.
    An instructor who offers coaching will likely be able to perform any spotting you require. This makes the logistics of booking sessions easier and the sessions themselves more efficient.
    Disadvantages:
    An instructor who offers coaching will be required to arrange their private sessions around their duties for the facility. This can affect their availability and make booking sessions more complicated.
    An instructor might be broken. Tunnels work their employees hard and pay them very little - this can harm a worker’s attitude toward other humans. A broken instructor will likely be off to do something else soon, but until then they can be reckless and unprofessional.
    Good coaching from an accomplished flyer is a worthy investment and an important part of speedy progress. Tunnel flying is expensive so everything you can do to aid the efficiency of your learning helps - a little leg work before your actual tunnel sessions can go a long way. Get involved involved in you local flying scene, either at your local tunnel or dropzone - there will be established individuals or teams that can help you directly or put you on the right path. If you are brand new then don’t be afraid to ask questions - everyone starts from the beginning and everybody knows how much there is to learn. Don’t be shy - good quality instructors and coaches value students that constantly enquire about the techniques and processes involved.

    By joelstrickland, in Disciplines,

    An Introduction to Piece Flying on Formation Skydives

    (This article was first published in the August 2004 issue of Parachutist as “One Good Turn Deserves Another”. Since then, the article has been updated and improved.)
    Turning a piece on a formation skydive is not as simple as yanking it around and hoping it will stop where it is supposed to. Jumpers in the piece must help it stay close and level throughout the turn, and they must help their piece partners start and stop the turn without rotating it too far or slamming it into the other piece.
    A piece that is yanked around too fast can rotate too far or even injure somebody. A piece that is not completely turned or turned incorrectly can drift away and actually become harder to control. This article shows the correct (and safe) techniques for turning pieces on recreational RW loads.
    Meet the minimum skill level
    Before jumpers participate in a skydive that involves piece turning, they should meet the requirements for a USPA A license, which means that they can do individual 360-degree turns, dock on another skydiver, maintain eye contact, track, wave off, and pull. In addition, jumpers should be able to dock on small formations such as a 4-way Star.
    Start with partial turns
    Newer jumpers should start with partial turns (180 degrees or less) on small formations. Here is a fun drill. Build a 4-way Open Accordion, break it in the middle, turn the two pieces 180 degrees and re-dock. This puts the jumpers who were on the inside on the outside, and vice versa.
    In this drill, think more about “trading places” with your piece partner than about turning the piece. The piece will automatically rotate if you move to the slot vacated by your piece partner. As you move, try to help place your piece partner in the spot you just vacated, keeping your piece level with the other piece as you do. Repeat the process to place yourselves back in your original slots then repeat the drill until breakoff.

    Move on to 360-degree turns
    Once you can do drills like the one described above, you are ready to move on to 360-degree turns on small formations. A good drill for this is the Zig Zag – Marquis 4-way block.
    A “block” is a two-formation set in which jumpers build the first formation, split into pieces, rotate the pieces then reconnect them to form the second formation. In competition, experienced teams speed up their turns by rotating the end of one piece over the end of the other piece – in essence, reducing a 360-degree turn to 270 degrees or even less. But in this article, we only discuss flat turns because they normally work best on recreational loads where the objective is not speed but smooth level turns.

    In the Zig Zag – Marquis block shown above:
    To start the turn, Jumpers A and B break grips and turn approximately 90 degrees to the right and stop, keeping each other in view over their left shoulder (helps them stay close and level). While this is happening, Jumpers C and D stay put except to extend their arms to let Jumpers A and B move.
    Once Jumpers A and B have moved, Jumpers C and D “trade places”, keeping each other in sight over their left shoulder as they move. When their legs almost touch, they stop, look over the other shoulder (called a “head switch”) and place Jumpers A and B together in the Marquis.
    While Jumpers C and D are finishing their turns, A and B also do a “head switch” and keep each other in view and on level while they are placed together.
    All jumpers should help keep the pieces level throughout the turn.
    Notes:
    To be safe while they trade places, Jumpers C and D do not move directly at each other, but slightly offset so that their legs do not collide.
    Also if they focus on “trading places” rather than spinning their partners around, the pieces are more likely to stay close. The same concepts used for the Zig Zag – Marquis example above can be applied to turning pieces in larger formations. Consider the following example.

    In the 9-way example above:
    Jumper A turns approximately 90 degrees to the right and stops, keeping the other pieces in view over his left shoulder (helps him stay level and close).
    Jumper B moves into the space cleared by Jumper A. At the same time, Jumper C moves into the space vacated by Jumper B.
    As soon as Jumper A feels the piece rotating, he looks over his right shoulder for the other pieces and stays level with them as the turn finishes.
    As the turn finishes, Jumpers B and C place Jumper A back into his original slot.
    All jumpers should help keep the pieces level throughout the turn. Note: Everybody’s initial moves should create enough momentum to keep the piece rotating. If it starts rotating too fast, Jumpers B and C can lower their right knee temporarily to put on the brakes. Similarly, if the piece stops rotating too soon, they can lower their left knee until it starts moving again.
    Rotate pieces on their center points
    To keep the pieces close throughout the turn, each jumper must help the piece rotate on its center point. Jumpers in each piece should watch the other piece over one shoulder as the turn starts, then “head switch” and watch it come back into view over the other shoulder as the turn completes. This helps keep the pieces close and on level and emphasizes the following point: If you keep your target in sight, you will be more likely to fly to it.
    Get the right grips
    In the dirt dive, jumpers should practice the grips they will be taking in the air. This way they won’t be fumbling around for grips when the piece starts turning.
    Also a grip should not hinder a piece partner’s ability to fly. This is especially true of leg grips. Do not grip at or below the knee because this hinders your piece partner’s ability to move his leg. Instead, grip as high as you can on the outside of his thigh so that when he moves his leg your grip doesn’t move much at all.
    Tip! High, outside leg grips also help people with short arm spans to fly when they have Sidebody grips. Sidebody grips consist of an arm and a leg grip on the side of your piece partner. It is much easier to fly if your arms aren’t all stretched out.
    Slow is Fast
    If the pieces drift apart and get on different levels during a turn, jumpers should not try to make up the distance too quickly. They should get the pieces level first then slowly make up the horizontal distance. Slamming the pieces together in a rush can possibly injure somebody or even cause a funnel. At the very least, it creates a wave throughout the formation that must be dealt with before jumpers break for the next point. If jumpers break before the formation settles down, they will more than likely end up on different levels again. It actually takes less time to get the pieces level and fly them smoothly back together than it does to slam them together then have to deal with an unstable formation. As often is the case, slow is fast.
    Give it time
    Like any skydiving technique, learning to turn pieces effectively takes time. Don’t expect to run straight from your A license exam to jumping on the hot RW loads. Practice on small formations first. Do some 4-way; there is no better training tool for learning how to turn pieces.
    With practice, you’ll learn to anticipate your moves and to work with other jumpers in the piece. Piece turning is definitely a group effort and when everybody is working together, it feels like the piece has eyes and a mind of its own as it does a smooth, quick and controlled 360-degree rotation then stops on a dime and makes a perfect re-dock on the other pieces!

    By elightle, in Disciplines,

0