0

General

    How Density Affects Your Destiny

    When Tiptoe Landings Disappear Into Thin Air
    When you come screaming in and tumble halfway down the landing area at a new dropzone, it’s unlikely that you would chalk your misery up to “pressure altitude corrected for nonstandard temperature and humidity.”
    Maybe, however, you should – and if you know a little more about how it works, maybe you won’t find yourself in that grass-stained position. It’s called density altitude, and the struggle is real.
    1. Remember the ball pit.
    You remember playing in the ball pit in the indoor playground, right? You’d take a running leap into the middle of the pit, diving into a big, forgiving pile of colorful plastic that cushioned your fall. If you took a running leap into a ball pit with just a few scattered balls rolling around at the bottom, you’d expect a different result.
    The sky is kinda like that.
    When we talk about air density, we’re referring to the number of air molecules in a given volume of space. High-density air has more molecules -- more balls. Low-density air has fewer.
    2. Respect the ball pit.
    Just like an empty ball pit doesn’t slow you down on your way to the floor, low-density air doesn’t slow down the wing as much as high-density air does. This changes the canopy’s flying dynamics, making the system fly faster – sometimes, much faster – than normal.
    As you might imagine from the term “density altitude,” altitude has a lot to do with the density of air. It’s inversely proportionate, so higher altitudes have lower density altitude – fewer air molecules in a given volume – than lower altitudes. This makes sea-level landings more docile than those at, say, Mile-Hi Skydiving in Denver or Skydive the Wasatch in Utah.
    3. Factor in the other variables.
    Altitude density is not simply another name for air density. It’s affected by a few more factors. Altitude density combines the effects of temperature, humidity and weather systems with altitude to measure the altitude at which your airfoil behaves as though it’s flying. If you travel for boogies, you may have experienced this in your skydiving career: with a few temperature and pressure changes, your canopy might behave as though it’s flying at Mile-Hi when you’re jumping in Moab.
    If you’re a little confused by that, you’re not alone.
    The key to understanding is to know that density altitude tells you where your canopy “thinks” it’s flying under standard temperature and pressure conditions, that highly evasive moment of total equilibrium. The “standard” comes from the fact that temperature and pressure decrease predictably as altitude increases. As such, a “standard” temperature and pressure can be assigned to any given spot on the altitude scale, dropping proportionally with altitude from the standard 15 degrees Celsius at sea level.
    Take a weather system through that same point, however, and you’ll need to start making some adjustments. a high-pressure area pushes more air density into the equation, and a low-pressure system does the opposite. Heat it up, and the molecules spread apart, lessening the pressure/density; cool it down, and the molecules snuggle in together, increasing the pressure/density.
    Humidity is a little more complicated, but super-interesting. When the weather is humid, we tend to describe the air as “heavy.” That description is utterly (and somewhat surprisingly) unscientific, as water vapor weighs almost half as much as dry air. When it’s humid, heavy dry-air molecules such as oxygen and nitrogen are replaced by much lighter water molecules, greatly decreasing the density of the air.
    4. Review the Cliff Notes.
    It’s easy to misunderstand (or misremember) the terminology. High density altitude means fast landings. Low density altitude means slower landings.
    Altitude and temperature are the factors that will deliver the most noticeable changes to the way your canopy flies. Humidity will affect your experience less. (Remember that – in this order – low, cold and dry equals slow, that high, hot and wet equals fast.)
    Consider upsizing to a more docile rental canopy if you’re making a big jump in density altitude (for example, from a coastal DZ to a high-mountain DZ).
    Higher density altitude? Your canopy will eat up more altitude in a turn and stall at a faster forward speed. Be ready.
    When you’re setting up a landing in a place with a significantly higher density altitude than you’re used to, give yourself plenty of room to land (and a bit of privacy for a PLF, if you care about such things). You won’t be able to just plop it down as you’re accustomed to, so focus on flying your canopy all the way through the flare and your almost-certainly-necessary run-out.

    By nettenette, in General,

    How Cognitive Bias Is Messing With Your Skydiving

    Three Cognitive Tools to Help Keep You In One Piece

    Image by Kenneth Grymen Uncertainty is a foundational element of skydiving, and managing that uncertainty is one of our most important responsibilities in the sport. Right? Right. Unfortunately: what we know from laboratory experiments is that when humans come up against probabilities—all of which are, technically, conditional probabilities—our minds seize up when they try to make an inference from that data.
    We all hold carefully constructed illusions that comfortably surround the ideas of certainty, responsibility and safety. Learning about the structures we build out of those illusions forces us to open up to the idea that we don’t know jack. And man, we don’t like to do that.
    As a culture, we’re also tripped up by the fact that statistical thinking isn’t a cornerstone of our educational system. We’re friggin’ terrible at juggling statistics, in fact. (Esteemed mathematician John Alan Paulos calls this phenomenon “innumeracy”: literally, an illiteracy of numbers.)
    With that in mind, co-nerd along with me on this path to understanding how we stumble around in our own heads. Clearly, a library of cognitive phenomena relate to our beloved sport; I’ve picked my favorite three biggies to start the conversation.
    #1: The Dunning-Kruger Effect
    If you walk away with only one new tool in your cognitive toolkit, let that be the Dunning-Kruger Effect. The Dunning-Kruger effect is a relatively new discovery, as these things go. It was set out in experiments run by David Dunning and Justin Kruger at Cornell in 1999.
    The Dunning-Kruger Effect is a cognitive bias (defined as a systematic deviation from rational thinking) that prevents people from being able to know with any accuracy how skilled and/or informed they are. Basically, the research found that incompetent people overestimated (sometimes, hilariously vastly) their own abilities. Skilled people, however, tended to downplay their competency.
    What repercussions does this have for you as a skydiver? Holy dachshund puppy in a hot dog bun. SO MANY. It only takes a little extra listening to recognize it in the people around you--and yourself. Our sport is--just like the rest of the world--chock-full of the “confident incompetent”: those who lack the metacognitive ability to recognize that they (at least for now) suck.
    What’s a smart skydiver to do? Firstly and most importantly: Underestimate your abilities and the abilities of the jumpers around you. Get professional coaching to uplevel; that’ll come with a bonus of an outside perspective on your actual skills. Then make it a project to find truly competent fun jumpers to enrich your educational environment. Remember: People who know nothing are far more likely to make themselves be heard than people who know a lot. The fun jumpers who actually know a lot will likely be much quieter, so it’ll take more work to find them.
    #2: The Stress-Influence Tendency
    Every human makes decisions under varying intensities of stress; far fewer of that number regularly, intentionally make life-and-death decisions under stress. Of that smaller population segment, a pretty large fraction does it for a living. For fun? Yeah. We’re a weird crowd. We play stress games. We need to play them as consciously as possible.
    The Stress-Influence Tendency pops up when the stakes are high and not enough information (or cognitive resources) are present to reasonably guarantee a good choice. Here, it’s the pressure that matters. High-pressure environments dramatically change human decision-making strategies. You might think that your decision-making under pressure is solid, but you’d be wrong: Studies that compare outcomes often show vast differences in decision-making quality between high-pressure and low-pressure environments.
    Here’s why.
    According to psychologist (and Nobel Prize laureate besides) Daniel Kahneman*, we humanbeans have two routes to the endgame of a decision: the fast route, labeled System 1**, and the slow route, labeled System 2***. System 1 is snappy and pretty much automatic, kicking in to respond to an external stimulus. System 1 can be the result of genetic hard-wiring (Eek! A rat! Climb up the bookcase!) or long-term, hard-practiced skillbuilding (Eek! A rogue toddler in the LZ! Braked turn!). These responses have a tendency to feel involuntary.
    System 2, on the other hand, has to do a bunch of library research and take up the whole damn operating system to do its work. System 2 puts together a spreadsheet and a PowerPoint presentation of the pros and cons associated with each option. It’s the farthest thing from involuntary, but it can flexibly check, modify, and override the decisions from System 1, if given the chance. Ideally, System 1 sits down with System 2 and offers a solution, and System 2 either vetoes that judgement call or gives it the blessing of reasoning.
    An overdose of stress, however, pulls that chance right out from under System 2. It diverts all the cognitive resources that System 2 needs for its ponderous function, subbing out instinct for conscious reasoning. In lots of cases, that works out just fine. The problem is that System 1 is simple. It’s a habit memory system. It’s rigid; it only has a hammer, so everything looks like a nail. System 2 can bring the rest of the toolkit to bear on the problem, but only if it has the chance to get there.
    The only way to reliably get System 2 into the room is to reduce the amount of stress you’re under. Strive to limit your variables. Example: Doing your FWJC? Awesome. Doing your FWJC at a new dropzone in suboptimal conditions? You just locked yourself in with System 1 and chucked the key out the window. If you need a more reasoned solution for a problem than the one System 1 throws out first, you’ll be out of luck.
    Another thing: When you’re learning new skills that overlap with skills you’ve trained deeply, be mindful that your System 1 responses are going to overwhelmingly favor what you’ve trained. (This is why swoopers have a tendency to over-toggle paragliders, and why multi-thousand-jump skydivers sometimes panic-pull off of big-wall BASE exits in the opening phase of their low-speed belly careers.)
    #3: The Availability Heuristic (a.k.a. The Availability-Misweighing Tendency)
     

    Because our decision-making process has its roots in the systems that sent us scrambling for food and running from better-physically-adapted beasts, those systems are built for immediacy. They’re designed to make quick assumptions and finalize a decision using that scant criteria while consuming as few resources as possible in the process. The system works like a search engine, and we’re only ever really interested in the top three results. In precisely the same way as a search-engine ranks its resultant listings, the system ranks the stuff that pops up according to the number of times it has been accessed. “Availability” is analogous to top-ranking search position. Top ranking alone creates the illusion of truth and reliability. It’s easy to forget that simple repetition got it there.

    Beliefs, in kind, propagate by repetition, and our sport is no exception. Examples abound. A nail-biting number of skydivers (and aircraft operators, besides) remain super-casual about seatbelts in the jump plane because it’s pretty rare that a forced landing makes the news, making them cognitively unavailable for decisions. Make no mistake: There are plenty of forced landings goin’ on. In another example, the prevalence of a certain brand of gear on your dropzone (or in the advertising you consume) will make it significantly more “available,” driving your purchase decision more than you realize. And another: A regional community’s oft-repeated mantras (Ex.: “If we didn’t jump in clouds, we’d never jump!”) are most certainly available due to repetition and not the unaltered truth.

    Thinking outside of availability takes work. It takes curiosity. Often, it takes the willingness to say or do something out of lockstep. How often do you visit the second page of the search results? Maybe it’s time to start.

    As I said before: There are loads of these cognitive heuristics that, in one way or another, bring their kerfuffle to bear on your skydiving (and, of course, your life at large). Most of these biases complicate the problem by tending to overlap and interweave, creating a series of false bottoms and fake doors in your thinking. Learning to recognize them is a good first step; the rest of the demolition work is up to you.
     
    * Daniel Kahneman, Thinking, Fast and Slow

    ** “Intuition” in the “stress induced deliberation-to-intuition” (SIDI) model

    *** “Deliberation” in the SIDI model

    By nettenette, in General,

    Highway To The Dangerzone

    Image by Lukasz SzymanskiHeadin' into twilight

    Spreadin' out her wings tonight

    She got you jumpin' off the deck

    And shovin' into overdrive...
    When I was learning to wingsuit, I sang it in my helmet. Every time.
    True story.
    Anyway.
    We can all agree that -- in addition to fun, of course -- skydiving is about pushing personal limits and building personal skillsets. We might also agree that skydiving is not necessarily about putting yourself directly in the path of actual mortal danger. There are inherent risks (and, if we’re being honest, we kinda love them), but we don’t love the idea of spending a couple of seasons healing up from a broken pelvis. Right? Right.
    There are multiple danger zones in skydiving, and it’s actually something of an autobahn -- in that there are no posted speed limits to reach them. To put it another way: most of them exist as much for brand-new skydivers as well as battle-worn multiple national champions. As a skydiver, it’s important to take these just as seriously, no matter how much of a n00b or dropzone hero you might be.
    Danger Zone 1: Meat-Based Collisions
    If you’re not flying on proper level with a group, you’re officially in Danger Zone 1. Flying on level keeps you out of the broken-bone zone if a member of the group suddenly corks or prematurely deploys. It keeps you out of pesky burbles, and it helps you keep meaningful awareness of where everybody else is flying around you. Invest in the coaching that will help you get (and stay) on level in formations of any kind.
    Also important: don’t just fly on level. Fly on-heading. Off-heading collisions hurt more than same-heading collisions. And never risk a 180-degree collision, even if you’re totally sure there’s nobody on your six -- it’s just not worth it.
    Danger Zone 2: Nylon-Based Collisions
    Once you’re dangling from your fabric, you have another danger zone to contend with: potentially crowded skies. According to the USPA, the most likely moments you’ll veer into oopsie territory here are:
    a) right after deployment and

    b) after entering the pattern.
    Instead of putting yourself in a place where you’re nimbly avoiding (or tragically not-avoiding) other jumpers at close quarters, be smart about it. Break off from other jumpers with room to spare. Create horizontal and vertical distance from everybody else in the sky (including the guy who’s almost certainly lurking behind you). Finally, keep your head on a swivel -- especially during that troublesome base-to-final bit, where everybody will be trying their best to kill you.
    Danger Zone 3: The Basement
    The basement is the biggest, baddest danger zone there is. It is, after all, where the ground lives. The ground is a monster that’s just waiting for you to stop paying attention because it wants to eat you.
    You’re going to enter this danger zone every time -- there’s no avoiding it. When you do enter it, you’re going to want to be under a canopy you’re controlling, over a landable bit of dirt, with a plan that accommodates as few obstacles as possible. This means that you must get that first canopy out at an altitude at which a second canopy is an option. It means that you must make sure that your equipment is maintained to prevent preemie brake releases. It means that you must either avoid or manage the hell out of low turns. And it means you’re going to need to know how to land that thing in water.
    The ground is waiting for you to make a mistake -- and it’s hungry.
    So, if you happen to be on the highway to the danger zone, try taking the next exit. Most people will indeed say hello to you, even if you never get it on the red line overload.
    I promise.

    By nettenette, in General,

    Hey Bro, Check Out my Go Pro

    The sleek, low-profile design, an easy-to-use system, so small it’s hardly there, and it’s oh-so-glorious high quality images – the Go Pro, Hero. In this social media society, the Go Pro is seductive, yet it’s oh-so-risky. For all you rebels at heart, those willing to learn, and especially those with less than 200 jumps - let’s lay down some tracks about being courted to don the camera.
    As an AFF Instructor and having been in the sport for nearly two decades, I have developed a hearty outlook about jumping a camera. But let’s slip on a bit of perspective mixed in with a bit of old school and new school thinking. So to round out this discussion, I interviewed two well-respected and well-known camera flyers about the topic – Norman Kent and Brian Buckland.
    Norman Kent, a life-long photographer and artist has been jumping a camera since 1975. Norman only wanted to try skydiving once. However, he experienced something so captivating, he saw an opportunity to capture the moments of beauty that was so different and so freeing in the sky. He admitted to be a fast learner, however he first strapped on a camera only having 24 jumps – it was a Kodak Instamatic with 126 cartridges.
    Norman didn’t have a skydiving photographer mentor. In fact, there weren’t many people strapping cameras on their heads in those days. It was an arduous and expensive venture for those willing to try. And for Norman, he made his own contraption by using a motorcycle helmet with no chin cup, wired a mechanical plunger, and confessed he didn’t know anything. So as he jumped his equipment, the air pushed the helmet up and the buckled strap choked him as the helmet moved all over his head and he fumbled in the sky. While these set backs were disappointing, it did not detour him. Instead, he was motivated to invent something that worked better - this approach lead to many camera helmet and jumpsuit innovations over his career, leaving a legacy of pioneering in camera flying.
    I asked Norman what he thought of today’s USPA’s current regulations for jumpers to wait until they had 200 jumps to fly a camera. “Regulation is a good idea, a good guideline,” he says. “It sounds hypocritical to say because I started with the ‘yahoo’ approach, but it’s wise to wait.”
    I’ve known Norman for a long time. I’ve seen him jump enormous contraptions carefully constructed upon his head. He’s a proficient and a well-respected camera flyer and we talked how different it is today with the Go Pro being so small. I ask him if he sees any dangers. “It all comes down to the attitude of the jumper,” he begins. “Because the Go Pro is small, it’s inviting people to use it who aren’t even in photography. It’s [jumping a camera] not so simple and there are dangers involved.”
    Norman and I both agreed that there is a shift in thinking in skydiving from the renegade days of the past. The development of tandem jumping and social media have greatly changed the image our sport, attracting more types of people to experience skydiving that the thinking of the past has to change.
    Norman elaborates, “People learn so differently that I’m not pro-regulating, I’m pro-educating. We need to develop a training or an awareness program [about jumping a camera.]” Although he recognizes the dangers happening, he also sees this as an opportunity for the sport. “This is an opportunity for coaches and instructors, for inventors, for schools…” Norman is currently working on a project for a You Tube production geared towards camera flying educational purposes coming out later this year.
    Let’s bring it back in the day where these young lads photographed below are sporting some serious state-of-the-art camera gear in 1988.
    Brian Buckland comes from an entirely different background. Brian made his first jump in 1994 and didn’t jump a camera until 5 years later and racked up about 500 jumps. Brian’s philosophy was to become a proficient flyer first; so he logged about 200 belly jumps, then learned how to freefly. During this time he notes that he was becoming more aware of his routine with gear checks, canopy skills, and landings. Finally the time came and he strapped on his first camera – a Canon Rebel 2000, with film.
    Brian went to Radio Shack after buying an off-the-shelf flat top camera helmet to wire up a shutter release. He admits to being nervous since his routine greatly changed with having to be concerned with battery life, clean lenses, and correct camera settings, in addition to checking his gear and high fiving everyone. When he landed from his first jump, he looked over his wares and was surprised how well they turned out. He submitted them and they were published.
    “I learned about photography after the fact [of getting the first photo published]. So I went to a continuing education course for photography and started translating that to the sky.” Over the years Brian has developed a systematic routine and is busy the entire flight making sure everything is in order prior to jumping. “It’s important to be comfortable with gear, build good habits, and safely skydive with others.”
    Brian also didn’t have any skydiving photography mentors. However, he looked up to the likes of Norman Kent, Joe Jennings, Mike McGowan, Tom Sanders, Craig O’Brien and later, Jason Peters. Now with established photographers in the sport, I asked Brian what he thought of USPA’s camera regulations. “The numbers are decent because the time in sport and time in the air are important in building a comfort level. Adding something new when you’re new and not comfortable with the everything else, something like a camera becomes a distraction.”
    Both Norman and Brian elaborated how the common attitude is, “it’s [Go Pro] not a camera, it’s so small, you-don’t-even-notice-it” attitude. Brian conveyed a story how, against his advice, a tunnel instructor with about 100+ jumps had lost two Go Pros! And we’ve all seen the photo on Facebook with an AFF student’s pilot chute wrapped around an instructor’s Go Pro. The Go Pro is a snag hazard and most people who wear them use non-cutaway helmets and screwed on mounts.
    This is an excerpt from USPA on September 1st, 2011:

    Adhering to Camera Recommendations
    USPA has been receiving an increasing number of calls and e-mails from Safety & Training Advisors and instructors regarding what to do about inexperienced skydivers who want to jump with small-format video cameras, such as the GoPro. Many new jumpers seem to feel that the small camera does not pose a risk, and they simply want to wear the camera while jumping. For that reason, the new jumpers do not consider this to be a video jump that falls under the 200-jump recommendation in the Skydiver’s Information Manual [SIM].
    The truth is that even though the camera itself may be small, it still represents a significant snag hazard to any jumper. This is especially true considering the various camera mounts jumpers use. In addition to the snag hazard, no matter how much a jumper thinks the camera will not become a distraction during the jump, it will. There are plenty of cases of newer jumpers forgetting to fasten chest straps or creating dangerous situations in freefall, etc., that were directly attributed to the distraction of the camera.
    USPA’s camera recommendations appear in Section 6-8 of the Skydiver’s Information Manual. Be sure jumpers at your drop zone are following these guidelines. They exist for very important reasons.
    The SIM is an excellent outline about camera safety and requirements, but it doesn’t educate. I agree that too many people have a careless attitude about the jumping camera equipment too soon and that we need more education. We’re fortunate to have an organization that mediates our government relations, memberships, insurance, etc. However, they do not govern, they suggest and that gives us the freedom to self-police safety amongst ourselves. If we want to see change for the better, we need to take it into our hands and pass on good information.
    Allowing newbie’s to jump camera equipment just because they’re “heads up” isn’t a qualifier to allow them the privilege to wear one. I visited a DZ and asked the S&TA; about their policy of jumpers with sub 200 jumps wearing a Go Pro. The answer I received was, “If their heads up, it’s ok.” I quizzically looked at him and said, “How do you know he’s heads up? Have you jumped with him?” Two hundred jumps is, although not the best, a measure of experience. At least I can assume they’ve earned their B-license (including the canopy progression) and have a bit of time and experience. I don’t have a chance to jump with everyone to qualify someone with sub 200 jumps “heads up,” and who’s to judge whose heads up anyways?!
    There’s so much more to just jumping a small-little-thing like the Go Pro. Because of social media, there are ethics that ought to be tied into this conversation. Excited newbie’s may use their footage unjustly and this effects more than the person jumping it. For example, Gerardo Flores – an uncurrent, 30-jump wonder sneaks a camera on his jump and has a “near death experience” that goes viral on the web. This situation affected the skydiving community negatively and gave a sneak peak to the public how “reckless” skydivers can be. Not to mention other videos that go live streaming on the web.
    I asked Brian what advice he’d give to those thinking about jumping any kind of camera and he said, “Be comfortable with yourself well before strapping on a camera. Be proficient under the parachute, build your awareness, know your emergency procedures, know your gear and wear the proper gear. Then, learn about the camera prior to jumping it.”
    Although Norman and Brian didn’t have mentors, both have been a huge help and inspiration to aspiring camera flyers over the years. Both have made themselves available to help give direction and may be reached through their websites, www.BrianBuckland.com and wwww.NormanKent.com. And stay tuned for Norman’s upcoming video on You Tube, "The Dangers of Being a HERO".
    Now, for all you rebels at heart and those willing to learn, I cannot tell you what to do but share my experience. However, when you meet the camera flying requirements, it’s like earning the rite of passage to don a camera on your head. Throw in a bit of education in there and believe me, it’s totally cool and absolutely worth the wait.

    By MissMelissa, in General,

    Hearing Safety For Skydivers: It’s A Thing

    What Skydivers Don’t Know About The Holes in the Sides of Their Heads

    Image by Lukasz SzymanskiThere are plenty of things in this life that you don’t want to hear. I know.
    Your girlfriend telling you she’s leaving you for her co-worker who buys roses instead of jump tickets. The wind tunnel peanut gallery tittering at your epic layout biff. The dude at the bonfire yammering on about his siiiiiick proxy flight in his brand-new sponsored Air Mattress 4.
    But what if you never got to hear anything at all anymore? And what if it was your fault?
    If you want to keep the good sounds coming in to your skyward-tilting brain, you’d better take some responsibility. There are probably some things you don’t know about the holes alongside your head, after all.
    1. Hearing loss is forever.
    Once you’ve damaged the lining of your inner ears, there’s nothing that can be done to bring it back. There’s no medication to bring your old ears back -- nor is there a surgery that sets things straight.
    Hearing loss that’s attributable to skydiving happens because of damage to the cilia of the inner ear. (Cilia are the tiny, hair-like cells that vibrate with the pressure of sound waves and tell the brain about it.) Too much exposure to those waves wears them right out. Once they can’t wiggle anymore, it’s over. They don’t bounce back.
    2. You might go crazy, too.
    Alongside general hearing loss, you might get a bonus symptom: tinnitus. If the cilia are bent or broken due to excessive sound exposure, they can dribble out random electrical impulses to your brain, causing you to hear sound where none exists. Basically, this results in a constant ring/roar/buzz/hiss/squeal that lives inside your head 24/7. If that sounds like hell, you’re absolutely right.
    3. It’s louder up there than you think.
    Decibel levels are not linear; they’re logarithmic. Linear measures are measured with addition and subtraction (for example: four miles is twice as long as two miles). Logarithmic measures ratchet up by factors of ten. This means that every increase of 10 on the decibel scale represents a 10-fold increase in the intensity of the sound it measures. Noise that clocks in at 20dB is 10 times louder than a sound of 10dB. 30dB? 100 times louder...so look differently at decibel measures than you do at the numbers in your bank account.
    The noise we’re subjected to on the ride up hovers over 90dB -- which government standards decree is only healthy for around seven and a half minutes. We’re in the tin can for 20-30. You do the math.
    4. Monotony is worse than variety.
    I used to produce music videos for a living (which is less fun than you’d think, but that’s another, boozy story). The production team was always required to provide the crew and talent with earplugs; if the production assistant forgot them, it was crucifixion time. That’s because OSHA, the US Occupational Safety and Health Administration, enforces requirements limiting workers’ exposure to a time-weighted average noise level of anything over 85 dB.
    As skydivers, we don’t have to listen to that same damn godawful excuse for a song over and over (thank god), but we’re actually exposed to something that’s actually worse for our health than boy bands: level monotony. A long exposure to a same-pitch drone -- such as engine noise -- is more damaging than sounds that change in pitch, like loud music. The droning sound wears away at the cilia with the same sound waves, like waves crashing on the same part of a beach over and over in the same way.
    5. You can plug your holes.
    Many skydivers wear earplugs from gear-up to landing. Some take them out for freefall; others take them out for the canopy ride. Figure out what works for you and allows you to reliably receive information from your audible. It takes some discipline (or self-tricksiness) to remember, but it will help you in the long run. Try keeping a pair taped to your altimeter to help you remember to put them in.
    Helmets with padding over the ears are less effective than earplugs, but they can still help.
    6. You don’t need expensive earplugs to skydive.
    The drugstore cheapies will do. When you place them, make sure they’re snug -- but that you can still feel them move around when you slide your jaw around (so you can equalize pressure, if necessary).
    7. You can still pretend you can’t hear.
    When Siiiiick Wingsuit Proxy Guy looks at you, ever hopeful for adulation, you can still give him back a confused “huh?” and wander off.
    Better yet: take your earplugs to the bonfire.

    By nettenette, in General,

    Health Gymnasium

    Health gymnasiums
        Those who can afford time and expense involved many wish to take advantage of the facilities offered by health gymnasium. None of the equipment and other facilities provided by gimnasium are strictly necessary to the process of getting fit, but they can add interest and variety to your physical exercises. Two other advantages offered by good gymnasium are constant supervision, which enables you to exercise with safety confidence, and a congenial atmosphere. Exrecising with people who share common purpose can provide extra enjoyment and incentive.   It is necessary first of all to distinguish between the different types of gymnasium. Training fymnasium are essentially for athletes and other men and womenwho wish to develop their skills for particular athletic activities. They provide facilities for athletes to keep themselves for their chosen sports. Health gymnasium provide advice, instruction and facilities for everyone who wishes to become or keep fit, whatever his or her initial physical condition. Their clients range from professional athletes to office workers who wish only to make the best use of their lunch hours.   Health gymnasium vary widely în quality. When choosing one of yourself, you should check that is staffed by qualified and responsible instructors. You may feel flattered to be attended by a sports celebrity, but professionally trained physiotherapists and physical education instructors can be equally, if not more, beneficial to an unfit person. You should expect to be asked details of your medical history, and to be carefully examined before being allowed to use all the facilities.   Three types of exercise   The accesories provided in health gymnasium to help you exercise range form simple wights and benches to more sophisticated equipment such aș pulleys and rowing machine. These accesories are appropriate for different kinds of exercises.   Isometric exercises, the simple type involvea applying muscular strenght by pulling or pushing immovable objects. The muscles are tensed amd this tension is sustained for short periods of time. Because little movement is involved în these exercises, they develop static rather than dynamic strenght.   Isotonic exercises involve pulling or lifting an object to certain position and then returning it to its original position. They cause the muscles to contract as you move but, because the weight or force employed is to the same degree throughout the exercise. The weight or force used can only be that which you cadn lift or pull at the weakest point in the range of motion involved and at other points your muscles are not sufficiently strained to develop în strenght.   The third type of exercise, known as  isokinetic, requires more sophisticated equipment. Isokinetic exercises can be designed for particular needs. For example, a person who is training for a particular sport can do exercises that stimulate exactly the demands of this sport, and also developed precisley the muscles he or she most needs.   Massage   Facilities for massage may be available at health gymnasium or sauna baths. Massage is used in physiscal therapy as a means of rehabilitating patients who are suffering from certain physical pain or aliments but, as a mean of getting or keeping fit, its value is very limitated.     Sauna baths Sauna baths may be attached to health gymnasium or may exist as separate establishments. Most sauna baths are organized according to similar basic principles, although Finnish sauna baths retain their original national characteristics. They have an invigorating effect on the whole body and aid physical and mental relaxation, but their effect on the whole body and aid physical and mental relaxation, but their effect are temporary rather than long-term.    
    Sauna baths provide a healthy and enjoyable means of relaxation, but the sudden rise and pulse rate can be dangerous. Pregnant women and people with high or low blood pressure, should therefore avoid them.  

    By admin, in General,

    GetHypoxic HYPEYE D Pro

    Get Hypoxic HYPEYE D PRO Remote Camcorder Indication and Control System
    Settle back with a cup of good coffee as this is going to be lengthy; the product does a lot more than meets the eye!
    I received my HYPEYE D PRO controller and expansion in the mail today; I was overjoyed. I knew it would be a good product, as I already owned two HYPEYE MINI camera indicators.
    Just in case you ve been in the air too long, don't fly a camera, or simply haven't paid attention to technology, the camera control protocol known as LANC or (Local Area Network Control) is not a part of the crop of new camcorders being issued by Sony (or Canon). LANC is a tape-based protocol, and none of the new camcorders are tape-based, but rather are Hard Disk Drive (HDD), DVD, or Flash memory-based in design.
    Tape is very much on its way out, and will not exist as a common format in the foreseeable future. Absent a LANC controller, camera flyers struggle to start/stop the camcorder, not to mention the lack of an indicator usually mounted on a ring sight to indicate the status of the camcorder. True, a small mirror might be mounted on an altimeter to view camera status, and of course, camera flyers can cut large holes in their camera boxes for access to on/off switches and record switches, so it s not as if all is lost with the disappearance of LANC. But it is terribly inconvenient for most of us.
    Sporting a rubberized/weather proofed recessed button, this unit is solidly built. Early camera switches were fairly unreliable and affected by riser slap, high humidity, water, or the camera helmet being laid upon the ground and accidentally triggering the camera button. None of the above has any impact on the operation of the Get Hypoxic HYPEYE D PRO (damn, that s a long name) camera controller, due to the way it s built.
    Designed to be mounted either inside or outside the helmet, the switch housing offers a threaded hole in the back of the unit allowing for an included nylon screw to mount it to the outside of a helmet or other mounting surface. Even though this may expose the switch to a riser slap, the nylon screw should break/release in an entanglement.
    The switch housing is identical in size to the pre-formed port found in many camera helmets, allowing for a .65 to be drilled, allowing for a flush switch on the outside of the helmet with the bulk of the switch housing inside the helmet. Double stick tape or gaffers tape (not included) can be used to secure the switch to the helmet or mounting chassis. That s not all, nor is it the only way to be mounted - more on that later.
    I used the Expansion kit to set up my own switch access that is smaller than that of the HypEye, but it is not weather resistant like the HypEye switch. The switch housing has two rubber inserts for accessories available for the HYPEYE D PRO. The first is a female 3.5mm jack that allows for a debrief cable to be plugged into the helmet/switch directly, thus eliminating the need to remove the camera from a camera box/housing, or from a mounting plate in order to view the video. The debrief cable will likely be essential for any team camera flyer or AFF instructor wanting to debrief a jump. Not only is removing the camera from the helmet a pain, but also wears hard on the camera and box, this allows additional wear on the camera and helmet to be avoided. Techno-geeks will probably install a female 3.5mm jack in their helmet so the debrief cable doesn't need to be plugged into the HYPEYE D PRO switch housing too. I've already seen one team using the debrief port on an LCD monitor in the aircraft as they climbed to altitude for another jump, again saving the hassle, time, and potential error involved with removing the camera from the housing or helmet. If your last camcorder came with a four-contact 3.5mm cable (has yellow, red, and white connectors on the end) you won't need to purchase the HYPEYE D PRO DEBRIEF CABLE.
    The other rubber plug is an access port for the HYPEYE D PRO EXPANSION CABLE KIT. This is the kit that got me really excited about the unit because it adds so many features to the HYPEYE D PRO. In my opinion, this is what makes the HYPEYE so spectacular. The Expansion Cable Kit is optional at a cost of $29.00 USD.
    So what does the Expansion kit add?
    A plug that connects to an L&B; Optima audible altimeter. This allows a separate set of LED s on the HYPEYE indicator to flash when the Optima is triggered. The indicator will flash slow flashes at the first altitude set in the Optima, faster flashes as the second altitude is reached, and very fast flashes when the final altitude is reached by the Optima. This feature isn't only for the camera-flyer; deaf skydivers will find this feature very useful. Unlike the L&B indicator which is fragile and stiff, the HYPEYE indicator is on a flexible cable and can be mounted any number of ways to suit the users desire and need.
    Bite Switch input. Yup, the Expansion Kit allows owners to plug their existing 2.5mm bite switch cable into the system, triggering stills from a video camera. Some cameras can only shoot 3 stills during a jump, but camcorders like the Sony CX7 or HC5 may be turned into a still-only camera, allowing for reasonable quality stills to be taken with these small HD camcorders.
    External Switch/Remote Switch connection. This allows the rubberized nipple switch found in the HYPEYE housing to be bypassed and the system controlled by a third party switch. This is what I've done with my system. All electronics are mounted inside the recesses of my BoneHead Flat Top Pro helmet, and I've mounted my own softswitch on the side of the helmet. This is useful for custom buttons, but also would allow a pilot to trigger an exit camera or similar.
    Zoom Memorization. Ever gone on a jump only to find that the zoom button had been moved, and everything was blurry, deeply zoomed, or both? This feature tells the camera to be zoomed in at a user-defined point. This will hopefully reduce the number of absolutely ugly vignettes found in so many skydiving videos, allowing users to slightly zoom in past the point of the lens adapter rings.
    Remote on/off of camera functions. Imagine this; you re in the door of the aircraft ready to jump, and notice that you've forgotten to turn on the camcorder. The count begins as you yell WAIT! With the HYPEYE D PRO, pressing the switch will turn on the camera even if the on/off switch of the camera is in the off mode! (this is camera model dependent, and won't work with all cameras, but it s great with the CX and SR series cameras)
    A audio/microphone input rounds out this system very nicely. If the camera is in a typical housing, the internal microphone is buried, often under Neoprene or other material designed to securely hold the camcorder. An external microphone isn't only helpful, but essentially necessary for tandem interviews in this situation. Or you can just connect your ipod and burn to DVD for your 4way team with no post production work at all. Here is where users will find a weak point in the HYPEYE system; the installation instructions for the Expansion Kit recommend placing a dab of glue on top of the connector. After a quick call to Get Hypoxic I learned this was to prevent years of vibrations from inadvertently dislodging the cable. I needed to either use a hot glue gun or fingernail polish to create a bead on the cable once installed in the switch. It wasn t difficult, but I wondered why a swage or something similar wasn t molded to the otherwise well-designed cable. It would save users the headache of finding a glue gun or borrowing fingernail polish from someone. I used the hotglue, it was easier. See the GetHypoxic website for very detailed photos and instruction on how to achieve this.
    What's to love
    Weatherproof, recessed nipple button
    Audio/ Line-Level Microphone input
    Audible altimeter connection
    Super-bright LEDs
    Debrief port
    Zoom memory
    Bite Switch ready/input
    Remote control of all camera modes
    The camera connection side of the system is an AVRemote S cable system exclusive to Sony camcorders. What makes this unique is that these right angle cables will fit inside of most camera boxes where a straight connector absolutely will not. It s obvious that Get Hypoxic designed this connector and its slim profile, as the Get Hypoxic name is molded into the cable connector, as it is in the Expansion Kit fantail.
    The indicator side of this unit has several micro LED s in it. These indicate a number of different functions depending on the mode in which the camera is operating. Ready/Standby is indicated by a blue LED, Record indicated by a red LED, and warnings for batteries, sleep, error, or tape end indicated with a yellow LED. However, double-clicking the switch will put the camera automatically into different modes. Want to switch from video mode to stills only mode? No problem, just double-tap the HYPEYE switch. Wanna go from stills to playback? Same action.


    What's Not So Lovable:

    Big round cables are space-killers in tight helmets
    Zoom reset is slow
    Requires tools and additional adhesives for certain setups like the Expansion Kit
    Debrief port is part of switch, making it inconvenient for in-helmet setups
    Pricey WARNING: THESE LEDS ARE BRIGHT!

    Users may find them too bright if they're mounted close to the eye such as in a ring sight configuration. Using a Morse code-like tap sequence, the LED s may be dimmed in five different levels. (Out of the package settings are at the most dim preset) Military users will appreciate the exceptionally dim light in those covert training ops, and night jumpers will appreciate not being blinded by the camera flyer s indicators as well. These same LED s will also indicate altitudes triggered by the Optima, if the Expansion Kit is part of the setup. Be aware that the batteries in the Optima will affect the brightness of the altitude indicators. Camera status indicators are not affected by the Optima battery level.
    Speaking of military users, Get Hypoxic has said that they ll soon have an armored, aluminum billet version of the HYPEYE available at a higher cost. (comes stock set at a low brightness level, for your protection)
    There are some things I wish were different. The HYPEYE uses a very high quality silicone-covered rounded cable. A flat cable would have been more appropriate given the very tight confines of most helmets, yet it should be mentioned that flat ribbon cable is very expensive and not terribly durable. The molded fantail/distribution point of the Expansion Cable kit is also somewhat larger than I would have liked. In my Tonfly CC1, it took significant effort to keep the cables from impacting how the helmet fits, but it is possible. As my TonFly helmet does not have a ring sight (used for wingsuit camera) I appreciated the very stiff plastic in the indicator side of the HYPEYE D PRO. The user-programmable zoom depth is slower to get to zoom point than it should be, yet this is camera-dependent, so not really GetHypoxic's fault.
    Cable size aside, I feel this is one of the best-designed tools available to camera operators in any sport application where space and control are considerations whether they re using tape-based HDV camcorders, newer DV cams, or AVCHD camcorders. Congrats to Get Hypoxic for presenting a very well thought out, fully-featured product that skydivers can actually use, that seems to be very tough (I have only 22 jumps on my system). This tool is 110% real as far as I m concerned. It s hot, not hype.
    Get the Hypoxic HYPEYE D PRO Remote Camcorder Indication and Control System at Get Hypoxic or most skydiving gear outlets.
    HYPEYE D PRO-$99.00 MSRP
    PRO Expansion Kit-$29.00
    HYPEYE D PRO Debrief cable kit-$10.00
    The Hypoxic Hypeye D Pro is also available on Amazon: Hypoxic HYPEYE D Pro Remote Camcorder Indication and Control System.

    By DSE, in General,

    Find a reputable Drop Zone

    Be Aware of the Risks Choose a method of training Find a Drop Zone Set a date and jump! Get licensed Well, now that you've made up your mind that you want to do this you can't just rent a parachute from the costume store on the main street and take a leap out of your cousin's Cessna! Not only would it be illegal it might prove to be an unhealthy way to enter the sport!
    So where can you go? There are few ways you can find the nearest DZ to you:
    Dropzone Database The Dropzone.com Dropzone Database lists more than 700 DZs all over the world. Organized by region, country and state you can browse and search the database till you find a DZ near you. There's a lot of information on our pages and in most cases you can jump straight to the web page of the DZ for more information. You can also read reviews by other Dropzone.com members who have jumped here before. It's a great resource!
    USPA If you're in the USA, call the United States Parachute Association at 540.604.9740 or visit their web site to get the name of an affiliated drop zone in your area.
    Dropzone.com Forums Dropzone.com has more than 32,000 members and with more than 1.2 million posts to the forums you'll be certain to hear from someone. Register for a free Dropzone.com account and ask about DZs in your area in the Dropzone.com Forums.
    Google it! Yes, as you know you can find almost anything on Google. Use your city or region name and "skydiving" or "skydive" as keywords and see what it spits out.
    Yellow Pages Look in the Yellow Pages online in your local phone directory. You're bound to find some skydiving ceters under "parachuting" or "skydiving".
    Ask around You probably have some friends who have done it. Are they still alive? If so, then go to the same place they did; that way, you can feel assured of your safety. ;-)
    Skydiving clubs - If you're in college, most universities have skydiving clubs. This offers a cheaper and easier way to get into the sport. Plus, nothing brings people together better than absolute terror. You may even make some friends. How do I tell a good Drop Zone from poor one?
    Most dropzones that provide regular student training will be affiliated with the official skydiving organizing and regulating body in your country. The United States Parachute Association (USPA) is the representative body for sport parachuting within the US, and a member of the FAI (the international equivalent). Representative and regulating bodies like the USPA usually develop and monitor safety and training doctrine for the sport. In some cases they also provide liability insurance for students and DZs in the case of damage to property. Ask about their official affiliations and benefits when you contact a DZ.
    In the USA the USPA has successfully instituted rating programs for Coaches, Instructors, and Instructor-Examiners to ensure that only properly trained and qualified personnel work with students. In the USA you should insist on USPA Instructors and Coaches. If you're outside the USA, do not hesitate to ask about the rating programs for Instructors in your country and the qualifications of those people you'll be working with.
    Do not be afraid to ask to see your Instructor or Coach’s rating card. It should show the appropriate rating and expiration date. Also note that currently, most Tandem Instructors are certified by both the the equipment manufacturer and USPA.
    USPA affiliation is not required, and does not guarantee a DZ to be a "good" DZ, and non-affiliation does not mean the DZ is "bad". However, the USPA, through their diligence and caution, has compiled an excellent safety record over the years.
    Use the Internet to do some research of your own. Reading the DZ reviews in the Dropzone Database is a good idea. Remember to always take everything online (good and bad) with a pinch of salt. If at all possible, one of the smartest things to do is to visit the DZ before you make your jump. Ask if you can sit in on a FJC. Hang around, talk to some people and pick up on the vibe.
    Prev: Choose a method of training Next: Set a date and jump! Prev: Choose a method of training   Next: Set a date and jump!   More related information:
    Dropzone Database Events & Places to Jump Forum Skydiving Glossary

    By admin, in General,

    Filming your first four-way team

    First things first. I assume they're giving you some sort of compensation in the form of a free slot (since you're just starting out) or maybe slot plus a small amount of cash (maybe to cover pack jobs). Understand that since they hired you, they probably expect you to do certain things, only some of which you're actually going to be able to deliver because ... you're just starting out.
    I can absolutely freekin' guarantee that your footage isn't going to look anything like the camera flyers at Arizona Airspeed can produce. You're just not going to do 1,000 jumps with your team this season, so nobody should expect the same results. Make certain at least the team captain understands this. If your team captain or the coach of the team expects otherwise, you may want to consider walking away right now. I'm not kidding. I saw a perfectly acceptable camera flyer get psychologically and verbally burned by his team last season because they just didn't have a freekin' clue as to how difficult "Airspeed-quality" camera flying is.
    If, on the other hand, they understand where you're at in your camera-flying career and are willing to work with you, then it can be a beautiful learning experience for everyone.
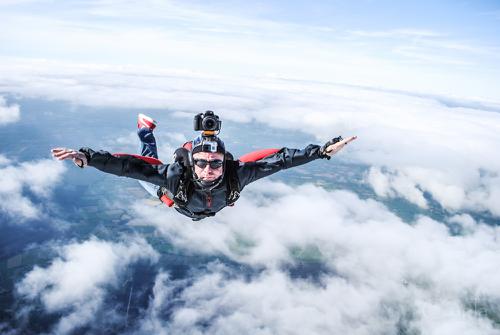
    Flying 4-way camera, you're not just flying the camera anymore. The team may decide you have other duties as well. Do they want you to handle the manifest duties? Do they want you to watch the clock so they can focus more on creeping? Are you going to be responsible for the spot? Will you have to dub tapes for everyone at the end of the day? This can be time-consuming. They're off in the bar having a cold one and you're in a debrief room makin' dubs for 40 minutes! Talk to them about it. Get that stuff understood so there are no surprises. Surprises cause arguments. Arguments are not conducive to good flying!
    One camera flyer I know has been at it so long and has been burned so many times that he has what he calls his "List of Demands" and when he talks to a team he gives them a printed copy of it and says "That's the deal, take it or leave it." Now, since you're just starting out, you probably can't do this just yet, but keep it in the back of your mind. At least with him, there are no surprises. Just a thought.
    The first day
    So it's the first day of training and time to get on the airplane. Make absolutely freekin' sure that everyone knows the break-off plan. Typical might be that at 4,000 AGL the team turns and tracks while you pull in the center. (Maybe 4,500 for a newbie group.) Make certain they all understand the consequences of not tracking -- you'll eventually come down to meet them and you'll both die. I shoot my team's break-off and freeze-frame it when I dub the debrief tape just to make a point of showing which person is leaving last. I've never mentioned it in those terms, but I think it does get the point across when you see the same person not getting away as fast as the rest of the team.
    Communicate to the team that's it's not only important that they turn and track, but it's also important that they do not pull high. Pulling high is where you are, not them. They shouldn't be pulling any higher than 3,000. This ensures they have separation from each other AND you.
    What's really nice about 4-way is that certain things can be somewhat consistent and therefore I feel a bit more safe. You shouldn't have to worry about what the break-off altitude is for this jump, if the team break-off plan is always 4,000. Pretty simple, we're doing 4-way, break-off is 4,000 -- period, end of discussion. We can now focus on other things and not have to worry about break-off. Simple.
    Same deal with most of the rest of the flow. Ten minutes to boarding the plane, check your gear, put it on and walk down to the mock-up. Five minutes to boarding the plane the team arrives at the mock-up and goes through the exit and does pin-checks. Board the plane in the same order, sit by the same person, check your camera at 6,000, do another pin-check at 9,000, handshakes at 10,000, put your helmet on by 11,500. CamEye II blue light on the red light, red light on the green light. OK, that's my routine, but you get the idea. Consistency will keep you on schedule, give you several opportunities to catch small errors and correct them.
    Not all camera flyers' offices on Twin Otters are created equal! Handles come in at least three distinct flavors and steps in at least two. Placement of handles and steps varies from plane to plane even on the same dropzone and even if the A&P; mechanic was really trying to be consistent! Door frames are also inconsistent in how much they have little bits poking out that can whack into your left knee or attempt to grab your reserve handle on climbout. It may piss you off, but them's the facts. Look the planes over carefully and learn which ones to watch out for.
    The exit
    For a camera flyer, there are basically two parts to the skydive: Exit and everything else. Blowing the exit can make everything else irrelevant, so I'll start with that.
    As I mentioned before, there are several version of handles and steps you'll have to deal with. Depending on the exact type of exit you're planning on doing, your hand and foot placement as well as your posture on the step will vary.

    There are three basic exits.
    Leading - leaving perhaps slightly before the 4-way team. This is the "classic" 4-way exit you'll see from Arizona Airspeed. There are a lot of timing issues involved with this exit and I'll go into some of them a bit later. When done well, it's a beautiful thing. When done poorly, it's a disaster! Try to learn this exit as quickly as you can, but I can guarantee you some spectacular disasters in the process. I do a lot of 4-way camera flying and even after three years of really trying to nail it, I still blow it from time to time.
    Trailing - leaving perhaps just slightly after the team; it's also known as the peel. Almost bullet proof because you leave the airplane in your own clean air, but teams and coaches don't like it because it's difficult for them to see exactly how well they were presented on exit.
    Semi-peel - also known as the 3 O'clock or 90. The team really has to launch away from the airplane for this to work and it has the same team/coaching issues as the trailing exit, but the camera flyer is a heck of a lot closer and it's very easy to see the grips so I think there are actually advantages to using this for competition, but like I said, teams and coaches might think differently. This is the exit you'll most likely see from The Golden Knights.
    For each exit, it's fairly important to know exactly what to expect from the team in terms of timing and their presentation. You're a fifth member of that exit and you want to place your body in an exact location just the same as the rest of the team -- you're just not taking grips. I think it's important that you go to the mock-up with the team, find out what formation they're taking out the door and do a couple of practice exits with them every time you go up. For a leading exit in particular, find out where the tail and inside center are going to be and plan on not being in their burble right off the plane.
    Depending on the team and their skill level, you could use any of the three basic exits. For coaching purposes, almost all teams will want you to give them a perfect leading exit. In reality, this may or may not be possible due to your experience level or theirs. It's definitely something to discuss with them. The team, the coach and you should understand that a leading exit is not always the best choice for competition purposes and may not always show what they wanted to see for coaching purposes either.
    Leading exits
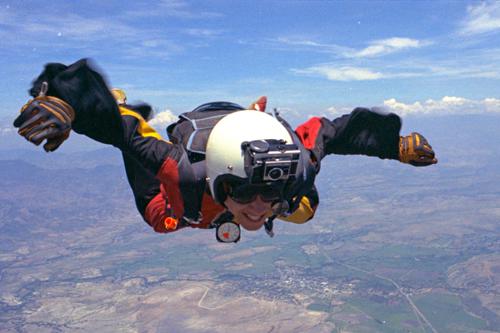
    Get out on the camera step as best you can. Ideally, you'll have your left foot on the camera step and your left hand on the camera handle with your body hugging the airplane, right foot trailing and right hand maybe on top of the fuselage. At least, that's the way the boys over at Airspeed do it. Me? I can't do it that way and my guess is that depending on your body type, the handles, how much you can twist your neck and a bunch of other factors, you might need to do something slightly different too. Ultimately, your goal should be to be comfortable, stretched pretty far back with maybe just a little flex remaining in your left leg with which you can spring back off the camera step.
    You may find it a good idea to have your camera sight centered on either the left wheel of the Twin Otter or maybe the butt of the tail flyer. This gives the team somewhere to go in the video.
    If you can see the exit count, cool, but don't trust it. I usually watch for other subtle signs like a helmet popping under a head jam or maybe the tail flyer's butt leaving the plane. What is GREAT is if you can get the outside center to swing his left leg in time with the exit count -- of course, that's not going to work for all the exits, but it helps. Try to explain to the team that consistency on their part with the exit count means you'll be able to get them much better footage. Some teams do wacky things for a count -- I hate wacky. A nice rhythm of ready, set, go works wonders.
    For the leading exit, I go on go. That is to say, right with the team. Me -- I'm a fat boy. If I leave too early, it's a pain in the ass to try to get up in a position where I can still see all the grips. You'll know you've left too early if you can see a lot of the bottom of the airplane and they're still in it! You'll know you've left too late in a leading exit when you whack into the team. I try to leave on go, pop my wings to get another slight bit of separation and then track up and over them as they fall down the hill. For me, what I want to see is the center of the formation falling below the horizon as quickly as possible after exit. As the team falls down the hill, drive up and over them. When I exit, I shift my focus from the before exit picture to place my ring-sight on an exact spot in the formation -- maybe the center grip on a Meeker for instance. Each formation is slightly different and will all call for a slightly different spot.
    For the leading exits, look at the dive pool and think about how they might fly on exit. More importantly, think about how they might block your air on exit. Nice roundy thingies like Meekers aren't too much of a problem. Evil longy thingies like Monopods can be a huge problem depending on what the tail does. Some nice semi-roundy thingies like Satellites might look easy, but might have a tendency to "cut in" so that you can't see all the grips. It won't always be your fault, but you might always get blamed for it if people don't understand.
    Trailing exits
    In almost the exact opposition of the leading exit, don't lean back but try to stand up on the camera step and get your body high. Go ahead and put your focus on the center of the formation and don't worry too much about the count. Just keep the focus on the center of the formation and follow it down the hill. I try to think about placing my body in the 12 o'clock position just over the point flyer. Bingo, works like a charm. You don't really need to drive your body anywhere during this exit, the team will flatten out as they come down the hill and you should already be in pretty much good position. You will, however, be facing down jumprun as opposed to up jumprun for the leading exit.
    Semi-peel exits
    If you know the team will launch away from the plane, you can try a semi-peel exit. Almost the same as the trailing exit, but you don't really wait for the team to go by you. You leave just after the center has cleared the plane. Your body comes off at a 90 degree angle to jumprun and you may want to think about back sliding a bit under the plane.
    Everything else
    Once you've exited the airplane, there's pretty much nothing more you can do about the moment, so let it go. If you left too early on a leading exit, don't think about it -- do something about it! If you've left too late on a leading exit, you need to do something about it NOW! Keep working the issue until you've gotten things in hand. Keep focusing on where the sight should be, but keep working the problem. If you're going to whack into the team, keep trying to get big and maybe you'll be able to slide out of it. If you give up and put your hands in front of you to cushion the blow, you'll only speed up and hit them harder.
    Your goal should be to get close enough and steep enough to the team so that all the grips are visible. If the team flies apart during a transition, you must get higher and try to keep them all in the frame. As they rejoin, come back down so they don't look like ants! A nice secondary goal would be to keep on heading. Pick a road in the background and keep the teams original jumprun heading relative to it. This let's the team and coach look for things like unintentional rotations of the formation. As you get used to flying with the team, try to get closer and steeper. As you get steeper, you'll find that it becomes a bit more difficult to stay on heading. Teams have a tendency to move quite a bit horizontally as they turn pieces and make transitions. Obviously, if you're right over the top, you'll have to side-slide, back-slide and do all sorts of chasing.
    Breakoff and opening
    OK, you've exited, shot freefall and it's about time to breakoff.
    On breakoff (let's call it 4,000), I might give the wings a little pop and deploy as I continue to watch the team. As I said before, I usually watch to see who has left the formation last and will show that on the debrief tape just to subtly drive the point home.
    As the d-bag comes out of the container, I begin to sit up and shift my ring-sight to the horizon in an attempt to have my head, neck and back in a straight line as the canopy opens. I feel that this gives the best protection against neck strains, but obviously, this might not work for you. It does work well for me. No matter what your body position, you want to get your hands on your risers as quickly as possible between the time you deploy and full inflation. An additional benefit of looking toward the horizon during inflation is that in this head level position, you can watch out for team members doing short tracks and high openings.
    Individual team members probably have more than enough separation from each other, but if one dumps a little high and you maybe have a little bit longer snivel and they have a 180 opening, well, it can get interesting and you need to react pretty damn fast. Looking out toward the horizon lets you see what might be coming up to meet you, and you may even be able to shift your weight during inflation to avoid it.
    After opening, look around to see who in your team is where. Give 'em a quick head count and see if there were any cutaways. If there was a cutaway, first look to see if you can spot the reserve. If the jumper looks OK under the reserve, then check to see if anyone is chasing the main and freebag. Especially watch for the freebag -- they can be a lot harder to find than the main. Make sure that at least one team member is following each piece down; main, reserve freebag and jumper. Fill in where required.
    If everyone seems OK under canopy, then unclip your wings, release your thumb loops, stow your slider, turn off your camera, release your brakes and start flying back to the landing area. Since you're probably the high opener, you should have plenty of time and altitude to scan for traffic and fit in with the landing pattern. Usually, there's no need to rush and spiral down between canopies -- try to be predictable. With the ring-sight in front of one eye, you don't have the best vision so be a little more careful.
    Once you've landed, if you can, go over and do high-fives with the team, but generally keep your comments to yourself. Generally speaking, you're not a judge and you're not their coach. They usually already know if they brain-locked or went low so additional negative comments from you aren't helpful. However, positive comments about really cool jumps are almost always welcome.
    Wrapping up
    As soon as you get back to the packing area, put your rig down, head over to the debrief room and dub the tape. You don't need to stop to talk with anyone at this point -- just dub the dang tape. Teams seem to vary on exactly what they want dubbed on their tapes, but usually I slate the first jump of the day with a date and just give them a few seconds before exit until the last guy breaks off. During competition, usually you'll slate EVERY jump. Some teams seem to like to see a slo-mo of their jump from exit to the second point, but some do not, so you might want to ask about it for team training purposes. You'd never do this for competition.
    After you dub, pack and be ready to get on the next load before doing any socializing. The key point here is that the team should never have to wait for you -- not to pack, not to get to the plane, not EVER.
    I have to admit that when I'm doing team training I usually don't pack -- I hire a packer. This cuts into my profit margin, but I find that I have a heck of a lot more energy at the end of a +20 jump weekend! I also have two rigs so that if the team wants or needs to do back-to-back loads it's really no issue. Having two rigs also means that if I have a cutaway, then I can continue to jump with minimal impact to the training.
    At the end of the training day, typically the team members want dubs of the entire day. Ugh! Well, you can cut down on this particular chore by using one of the team members' tapes as the debrief tape during the day. I also cut this chore way down by having several VHS decks in my team room. I was able to pick up VHS decks pretty cheap ($75 each) and this also means that I never have to worry about having a back-up!
    Photos: © Paul Quade

    By admin, in General,

    Exceeding Expectations

    Image by Lukasz SzymanskiThe challenge for any business is to exceed the expectations of its customers, especially when expectations are already high. The businesses that can pull this off will gain loyalty and earn valuable word of mouth marketing from their satisfied customers.
    Exceeding expectations is a challenge for the skydiving industry. Everyone who books a skydive already has very high expectations… after all, this is a major event in many people’s lives.
    Having traveled and visited drop zones all over the US, one of the biggest issues I see is a narrow sightedness when it comes to the guest experience. Too often, drop zones are focused on doing just one thing well: the skydive. Though this is definitely what we should be focused on (it’s what people are there for), we’ve lost sight of the complete experience; if the operation isn’t running efficiently, high expectations will turn to disappointment in short order.
    The common culprit in a poor customer experience is wait times. No one likes to wait. Yet here we are, charging a premium price, taking reservations and then expecting people to happily wait for several hours before they jump.
    Informing customers about wait times over the phone and in e-mail confirmations (usually 3 - 5 hours) doesn't make this practice any more acceptable or palatable to our customers who are conditioned to expect instant gratification. In a world where we can order something on Amazon.com and have it show up at our doorsteps the next day (or in some markets, the same day), we shouldn’t expect our customers to adapt to our antiquated practices. Rather, we should be challenging ourselves to find ways to better adapt to modern customer expectations. If we fail to do this, we will undoubtedly face the fallout of negative reviews online.
    How To Exceed Expectations
    To exceed expectations, a business must recognize its weaknesses through the eyes of the customer. The best way to do this is to ask them. However, if you want honest feedback, don’t survey your customers immediately after their skydive; they’ve just had one of the most amazing experiences of their lives, of course their immediate feedback will be positive. When I managed a DZ, I was always under the impression that we were doing a great job because when I surveyed customers following their skydive they always raved about their experience. Only when I started to survey our guests 24 hours after their jumps did I become aware of organizational problems that needed to be addressed. These ranged from employee language on the plane, (not good when your business is located in the Bible Belt) to major frustrations with wait times, to dissatisfaction with media quality. If you want to have a finger on the pulse of your organization, survey your guests after they’ve had time to come down from their initial adrenaline high. If they’re dissatisfied, they’ll typically tell you!
    Understand The Touch Points
    There are usually 20 interactive points of contact that a customer will have with a drop zone. If a DZ wants to gain a competitive advantage in a busy marketplace and see digital word of mouth marketing spread, they should be focused on improving these customer touch points. The goal should be to reach a five star level of service at every touch point. This is not an easy task, but it’s what has separated brands like Disney, The Four Seasons, REI and Zappos from all of their competition. This way of thinking should not be precluded from skydiving - especially considering the time and expense that goes into running a DZ. If we’re investing so much time and money into our operation, why not be the best we can be?
    Below is a list of 20 customer touch points every DZ should be aware of. I challenge all of my clients to rate themselves on a scale of 1 to 5 with 1 being poor and 5 being excellent. The caveat is that the score for each touch point must be graded on the organization’s weakest link within the category. For example, if four out of five instructors give great service and one is average, then the score must be graded on the weakest instructor. Now you see the challenge!
    The Touch Points

    Website
    Social Media
    E-mail exchanges
    Phone Interactions
    Road Signage
    Parking Lot (the condition of it)
    Greeting at manifest
    Condition of the bathrooms
    Quality of DZ Food (snack bar or vending machines)
    Quality of training
    Wait Times to Make Skydive
    Presentation of the Jumpsuits
    Presentation of the Instructor
    Presentation of the Videographer
    The Aircraft
    The Ride to Altitude
    The Skydive
    Time it Takes To Receive Media
    Quality of the Media
    Quality of Materials (certificate of achievement)
    The Closing (defined as a thought out ending highlighting accomplishment) In today’s digital world, word of mouth can make or break a business. If you want to leverage this powerful tool to your benefit, then you have to start consistently exceeding customer expectations. Take a step back and view your business through the eyes of the customer. Focus on the entire experience, not just one element within it. Remember, the actual skydive is only one component of the overall customer experience. Strive to make every component as incredible as the skydive itself, and you’ll turn customers into raving fans.

    By admin, in General,

0