Accelerated Free Fall (AFF)
The AFF program was instituted in 1982 as an "accelerated" learning process as compared to the traditional static line progression. The AFF program will give you a true taste of modern sport skydiving.
The ground training is a bit more extensive than S/L (~5 hours) because the student will be doing a 50 second freefall (that's right!) on his/her very first jump. The student will exit the aircraft at10,000-12,000 feet along with two AFF Jumpmasters (JM) who will assist the student during freefall. The jumpmasters maintain grips on the student from the moment they leave the aircraft until opening, assisting the student as necessary to fall stable, perform practice ripcord pulls, monitor altitude, etc. The student then pulls his/her own ripcord at about 4000 ft.
The AFF program is a 7 level program. Levels 1, 2, & 3 require two freefall Jumpmasters to accompany the student. These dives concentrate on teaching basic safety skills such as altitude awareness, body position, stability during freefall and during the pull sequence, and most importantly- successful ripcord pull. On level 3, the JMs will release the student in freefall for the first time, to fly completely on their own.
Levels 4, 5, 6, & 7 require only one freefall JM (less $$) and teach the student air skills such as turns, forward movement and docking on other people, frontloops, backloops, "superman" exits from the plane, etc.
Each AFF level is designed to take one jump, and requires about 45 minutes of training. After successfully performing the objectives of each level, the student moves on to the next level.
After graduating Level 7, the student enters a more free format stage called "Level 8" where they practice and hone their skills by themselves and in small groups until they obtain 20 freefalls and qualify for their A license.

The Skydiving Handbook - Chapter 3 (Flying Your Body)
The principles of freefall flight are quite simple; after all, you are dealing with just two things: your airfoil (body) and the wind. In a perfect, relaxed arch, or box man, you will fall straight down at a constant rate. To an observer falling along side, you appear stationary. You only seem to be falling relative to someone not in freefall, such as an observer in the airplane or on the ground.
The box man is the neutral freefall position from which all maneuvers are carried out. Relative to a stationary observer, by altering your body position you can turn in place, move up and down, backwards and forwards, or sideways. You can even turn upside down or fly standing up. In fact, no one really knows the limits of body flying yet!
From the box position you can easily initiate turns, forward, backward, and sideways movement, and changes in fall rate. From the side, the body presents a continuous smooth curve to the wind. The head is up, the arms higher thanthe body, and the legs are bent at a 45-degree angle, leaving the lower leg slightly extended into the wind.
From above, the elbows are straight out from the shoulders and the hands are at least as far out as the elbows. The knees are slightly spead so that the feet are as wide apart as the elbows.
Seen from the front, there is a smooth curve from side to side with the hips at the lowest point. Note that head, shoulders, and knees are all held high relative to the hips and chest.
The basic moves are well understood. The most commonly used maneuvers are turns, forward and backward movement, and faster or slower falling. All are accomplished by changing the flow of air around your body. If you think of your box man as being balanced on his center in a neutral position, all he has to do to turn left is deflect more air off his right arm than his left. This is done by simply banking like an airplane - left arm down slightly, right arm up in proportion. The turn will continue until he resumes the neutral position. Lowering one knee relative to the other accomplishes the same thing. That's why an unintentional turn can often be stopped by assuming a neutral position and then giving a little "legs out" to increase awareness and balance the legs.
Turns are also based on deflection of air. In the neutral position, equal amounts of air spill off both sides of the body. To turn right, our box man banks his arms, just as an airplane does in a turn. More air flows off the left side, creating a right turn. Note that the position of the arms relative to each other does not change; both arms tilt as a unit. The rest of the body remains neutral. To stop the turn, simply return to neutral.
Forward motion works on the same principle of deflection. To deflect more air to the rear, resulting in forward motion, bring your arms back a few inches and extend your legs. This tips your body slightly head down, air rushes back off your torso and legs, and you slide forward. The two elements combine to create forward movement. Naturally the opposite motion - arms out and legs in - will make you backslide.
Now think about how to go up and down. Everyone knows that given the same power, a streamlined vehicle can go faster than one that isn't. It slips through the air easier, just as a canoe knifes through the water more easily than a barge. So to speed up, you simply arch more, letting air slip off easily. Flatten out, or lower your knees and elbows, and you will fall slower. Incidentally, the faster you fall the more stable you are because your center of gravity is further below your control surfaces (arms and legs.)
Test yourself:
1. If you reverse your arch, what will happen? Is this position stable?
2. Think about forward and backward motion. What would you do to fly sideways?
Proceed to Chapter 4 (The Skydiving Universe)

Ten things that may keep you alive
Skydiving is a sport where you never stop learning. Even if you could, somehow, come to know everything, the sport is evolving constantly, and someone who's an expert one day is a newbie the next. Often, the learning we do isn't just academic - it can make us perform better, even keep us alive when there are problems. With that in mind, here are ten things that may keep you alive when things really hit the fan:
1. Know your limits. Everyone's limits are different, and are based on their experience, background, physical and mental fitness, and natural abilities. Some people think well under pressure, some need to drill and drill so their natural tendency to freeze is overcome. Some are incredibly flexible, some need 'crutches' (like sleeves or weight) to control their fall rate. It's important to be honest with yourself when deciding your limits, even if it goes counter to the alpha mentality that most skydivers have. We're all human.
2. Respect your limits. Don't do things you're not ready for, and don't let other people talk you into doing them. This comes up very often when women jumpers enter the sport - suddenly they have a lot of male friends who want to take them on 20 ways, free fly jumps, demos etc well before they'd ask a male jumper. And while it is technically possible to safely take someone with 20 jumps on a 20-way (you could do it with 19 AFF-JM's) it's usually a bad idea.
3. Push your limits. This may seem in contradiction to 2) but it's important. Once you know your limits, and respect them, you can start overcoming them. Do you have a problem with fall rate? Find a slow (or fast) skydiver and do a 2-way, with the other jumper going slower and slower (or faster and faster.) Is your canopy control so-so? Try drills - learn to flat turn and flare turn, a little more on each jump. Follow someone else. Do no-contact CRW. Learn to sit fly.
Pushing your limits isn't just a feel-good thing, it actually helps you survive in the sport. If you learn how to fly a small elliptical well, you will have much more control over your slightly larger square - and that can save your life if someone cuts you off on final. CRW can be fun, but can also be the difference between life and death if you have a cypres firing and have to land two canopies.
4. Push your limits, one at a time. This is even more important. It's possible to learn to do demos, as long as you learn the basics - canopy control, obstacle landings, spotting. Trying to learn these all on your first demo is asking for trouble. Small canopies, same thing. You can certainly learn to jump a VX 97. Doing it all on one jump - going from a Sabre 150 to a VX 97 - is a huge mistake. First transition down to a smaller Sabre, then learn to fly it. Then switch to an elliptical of about the same size, and learn to fly _it_. Once you get to that VX 97, you will have the background to fly it well - and you will be much, much better prepared to fly any canopy in between.
5. Learn flat and flare turns. You should be able to do a 180 in the air without your canopy diving at all, and you should be able to turn at least 45 degrees during your flare. Every year, several people die because they turn too low. I'm convinced that many of these aren't intentional hook turns, but accidental low turns to turn into the wind or avoid an obstacle. Knowing how to flat and flare turn might have saved their lives.
6. Learn more about your gear. What color is your reserve? Your reserve toggles? If you ever look above your head and see four sets of risers, how will you tell them apart? What color is your freebag? You can learn all this by watching your rigger pack your reserve, and even more by doing it yourself (under supervision, of course.)
Read up on TSO testing of your gear, and learn about the limits it was tested to. If you know that, you can keep your own flying within its operational limits. Learn about what's in a Cypres, and how it judges altitude. Learn the difference between Dacron and Spectra, and how to pack a pullout rig.
7. Get related experience. Pilots have a distinct advantage over other jumpers when something goes wrong in the plane, because they know how to read the signs, and they know how to operate around aircraft. They have a better idea what to touch and what not to touch, and can more easily communicate with the pilot (and, in rare instances, ATC.) You don't have to get your instrument rating - even a few lessons will teach you a lot about aerodynamics, aircraft weight and balance, stabilized climbs and descents, elevator trim and its importance, etc.
Or learn to climb. Serious climbers (except, possibly, sport-only climbers) are their own riggers, and understand the ideas behind an equalizing anchor, dynamic vs static rope, and nylon to nylon friction. Many of those transfer to the kind of rigging that gets done in skydiving, and if nothing else, will help you make sense of how rigs are designed.
8. Get out of your drop zone. Drop zones tend to have "flavors" to them, and are sometimes homogenous when it comes to skills or equipment. Kapowsin, for example, seems to use nothing but Infinity's, and for a while Air Adventures was nearly 100% Reflex. Some drop zones are mainly free fly, some RW, some do a lot of demos. By getting away from the familiar, you'll learn more about other disciplines, other equipment, even other ways of thinking. You'll also meet some really cool people - you can't talk to Bryan Burke, John LeBlanc, Tony Domenico or Adam Filipino, for example, and not learn something. Unfortunately, not every drop zone has them, so you have to hit the road.
9. Buy your beer. It sounds like a selfish tradition, designed to punish new jumpers. It's a whole lot more than that, though. The key is that, if you buy the beer and give it to people, they will ask you what it's for, and you will end up talking to people (up to 23) about what just happened. Since this usually happens at some significant time (say, right after your first cutaway) this is a really important time to talk about what just happened without being embarrassed about it. (Well, maybe you will be anyway, but tough.)
On the flip side - if someone buys beer for the DZ, and you're an experienced jumper, don't just grab a bottle and run. Find out who bought it and why they bought it. That beer isn't quite free - the price is that you have to pass on the knowledge that _you_ first learned when it seemed like you were buying a case every other weekend.
10. Teach others what you know. There is no better way to learn than to teach, and it helps others as well. If you want to become an expert at emergency procedures, teach part of a few first jump courses and watch other people screw their procedures up. If you want to learn a lot about RW, organize. If you want to learn more about skydiving in general, teach a graduate course. Just the act of putting everything down on paper and talking about it will lead you to research to make sure you're right, and you'll get feedback when you actually do the teaching.
Skydiving at Night
So you want to make a night jump and don't know what to expect? Here is an example of how many dropzones run their night jump procedures and what you need to know before you participate in night jumps.
Before you even sign up for night jumps at a DZ you need to do a few jumps at the location during the day. Open somewhat high on at least one of the jumps looking and examining the potential hazards and outs if you end up in any direction from the DZ at night. Also before the end of the day arrives you need to have at least 1 glow stick and 1 strobe light that can be easily turned on under canopy.
Typically most dropzones will hold a briefing before dark to go over the procedures for the specific location or situation. You will most likely then be asked to sit in a dark room with no lights for a period of time to allow your eyes to adjust to the darkness
Typical things that are covered during night jump briefings include:
Prep work
In plane procedures
Exiting
Opening separation
Under canopy behavior
Landing
Before you can even prepare your eyes for the night skydives you need to prepare your equipment. First take the time to actually do a proper pack job on your main. Last thing you want to add to an already complex skydive is a reserve ride. You need to securely attach a glow stick to your altimeter or use a clearly lighted altimeter. If you are going to use a glow stick it is best to activate it before you start preparing your eyes then cover it with duct tape that is pulled off right before you jump. This insures that your glow stick is not a dud and it also keeps the light from shining on people's eyes. You also need to securely fasten your strobe light to you or to your rig. Attaching it to the rear of your leg, rear of your helmet or back is preferred since as the strobe fires your body will be blocking the light from getting in your eyes, but it is still very visible to everyone else. Some DZ's also require you to attach glow sticks to an arm so you need to listen during the briefing for individual DZ procedures. The most important thing in the preparation of the equipment is for the strobe and light sticks to be securely attached.
One of the most important things you can do to maintain your night vision is to avoid looking at any lights during your climb to altitude. Make sure your jump plane does not have any interior lights on, that no one is using flashlights, or anything else to light up the plane. The only color light that should be used inside the plane is a red light since that does not affect night vision. If there are any other light sources or colors (from jump lights) cover as much of them as possible to maintain your vision and still maintain their functionality.
According to the USPA SIM first time night jumpers are required to do a solo before they do any group night skydives. It is a really good idea to spend your first time in freefall at night looking around to make sure you find the landing area and pulling at your correct altitude. Typically groups are sorted by both group size and wing loading of the people in the skydive. Usually people with higher wing loadings are the first out on night jumps for reasons to be detailed shortly. After the groups and solos have been sorted most good night jump organizers will dictate exit order and pull altitudes. Usually with larger planes such as Caravans, Otters, Skyvans and Casa's two passes are made to allow for a greater horizontal separation then normally is allowed. Discuss with the pilot and S&TA; what the needed delay is for proper night jump separation. Exit on time, but as during the day do not rush the count. Just prior to exiting you need to activate the lights in the altimeter or uncover the glow sticks. DO NOT activate the strobes yet. In the last rewrite of FAR 105.19 the FAA changed the wording so the strobes no longer have to be active in freefall and since the lights of others in the group could affect your vision keep the strobes off. You do need a strobe that's visible under canopy still though.
At most DZ's each night jump group is separated by a solo skydiver. The first group out the door is assigned the lowest pull altitude. 3000 feet is a standard first pull altitude for the first group to allow proper separation and more time to deal with the complexities of night canopy flight but this may change with the group experience and DZ procedures. Each solo or group exiting after the first group is assigned an altitude 500 feet higher then the previous group up to usually 4500 to 5000 feet. Pull at your correct altitude. Do not pull higher then your altitude since the combination of horizontal separation, vertical separation and wing loading separation make for the safest possible night jump environment for you.
Once under a good canopy you need to do a few things differently than you normally would. The first is do not collapse your slider. The flapping noise that it makes can be heard by other canopies that might be getting close to you. You also need to turn on your strobe light. Do not do any spiraling or altitude loosing maneuvers since this will eliminate the vertical separation factor that the assigned pull altitudes established. Remember that. In a lot of cases of near misses on night jumps its usually discovered one jumper spiraled down to the other jumpers' level. Fly a very conservative pattern with no hook turns, S turns or other erratic flying. As you are flying constantly be scanning for the dropzone, outs, hazards and other canopies in the air. Hazards at night are different then hazards in the day since its easier to mistake a river for a road or not see power lines. If you are going to land off, try to avoid landing extremely close to roads since there are probably power lines above them you can not see. Always assume a PLF when landing off at night since you will not be able to clearly see the landing area.
Typically most DZ's will light their landing areas by having the jumper's cars facing into the wind with the headlights on. Jumpers must plan and fly a flight pattern that has them passing over the cars high enough to miss them, but low enough that they do not out fly the lighted safe landing area. Overshooting the landing area is acceptable if the jumpers know the terrain and know of any potential obstacles they need to avoid. Notice the wind direction as you are boarding the plane, in some locations near large bodies of water the winds will change 180 degrees at night as the temperatures change. Take note of the lights and wind direction before you are set up to land. Also to safely land at night the jumpers are best advised to concentrate on the horizon more then looking down. Looking down will distort your vision and cause you to assume you are at the wrong height for flaring.
If you learn nothing else about night jumping learn about the shadow effect. In a lot of situations where the moon is at your back as you are landing you will see a large black canopy rising up on a direct collision course with you. This is your shadow that you are flying into. Lots of jumpers have made avoidance turns only to pound themselves into the ground breaking bones or killing themselves only to find out it was their shadow they were avoiding. As soon as you land depending on the DZ procedures and where you landed, most DZ's either have you walk towards the cars or to the side of the lighted landing area. Others have you stay where you are until your entire pass has landed. Check in with either manifest or the organizer as soon as you land.
Additional safety items to be taken into consideration are to carry a cell phone and the DZ phone number with you. Carry a DZ business card or pamphlet with you to make sure you have the correct local DZ phone number and not just a 1-800 number that redirects to them. This way if you land out you can call to let people know where you are or if you need help. Give your cell phone number out to manifest so that if you do not check in right away they can try to contact you. Leave the ringer set to high so if you are injured the rescue parties can locate you that way. Also a whistle around your neck can be used under canopy to scare away any canopy coming close to you or if you are coming close to them. The whistle is also a great way of assisting responders to find your location if you are hurt at night. As with all jump activity, the use of any alcohol or drugs is not only against the law, it is dangerous to others and STUPID. If you or others are unable to refrain from said activities do not get on an airplane to jump. Also some jumpers go the extra steps of attaching a glow stick to their main risers so in the case of a cutaway it is easier to track and then retrieve from the ground. Discuss the best method of doing this with your rigger or S&TA.; If a jumper lands off field do not rush into a truck to get them, slowly drive towards them with your head lights on high with someone walking in front of the truck to make sure you do not run over an injured jumper.
This article was compiled by Eric Boerger D-26333 with assistance by Keith Laub, Michael Owens and Art Shaffer.
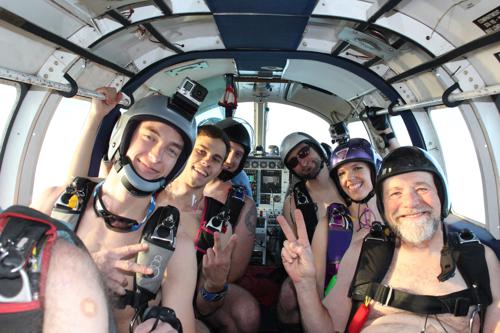
All About Naked Skydiving
Advice From Jeff Dawson, The World Record Holder for Birthday Suit Skydives
Milwaukee might seem like an odd place to rack up a truly epic number of naked skydives. You might expect conservatism and bitter winters to, y’know, get in the way. However, that’s exactly what Jeff Dawson--based at Sky Knights, near Milwaukee--has been doing for more than two decades. Of a little under 4,000 skydives, Dawson has done 722 of them naked, which is the world record by a long shot. Along the way, he has founded the Society for the Advancement of Naked Skydiving, or “SANS,” which keeps track of the world’s current naked skydiving records. (See what he did there?)
At any rate, Dawson presents a wealth of hard-earned wisdom for skydivers eager to strip down before they jump out. Whether you’re doing the traditional birthday-suit huck for your hundredth or a way to pass the time while your jumpsuit is at the cleaners, Dawson has you (un)covered. We reached out with our most pressing questions.
Q: Why is it that you love jumping naked so much?
Dawson: It started off it was a naughty thing to do. I am a fairly conservative person, and it was naughty, so it was fun. Then it got to be the thing, and now it has become a creature all its own.
The fact is that I’m not really a group-skydiving guy. I like just to get out of the airplane and enjoy the world around me by myself, just enjoying the awe of the situation. Naked skydiving makes that just so much better. You are just hanging out there. Nobody can see you. There isn’t a care in the world. That, to me, is pure freedom.
I never set out to be the world record holder for naked skydiving. It just happened. I don’t go out to see how many naked skydives I can make; it’s just that I like doing it and the club I belong to is very naked-jumping friendly. I have made naked skydives where nobody has said one word about the fact I was naked. They are just so used to it.
I have made at least one jump in every calendar year for almost 21 years, and I have made at least one naked jump every calendar month for 16 years. I did three naked jumps this past December when it was maybe 20 degrees Fahrenheit. At Sky Knights, they call [a wintertime naked jump] a “Dawson Pop” because I’ll be doing a hop-and-pop naked.
Q: Okay--some basics. Since we all quite obviously have to wear some gear when we jump out of a plane, what is actually considered a “naked jump”?
Dawson: Everybody has their own idea of what qualifies. For the purpose of the Society of the Advancement of Naked Skydiving, we say wrist to wrist and neck to knees. That allows safety equipment: a helmet, goggles, gloves, altimeter, shoes and socks if that’s what you choose to do. I have done only one jump where I was completely, 100% naked (with the rig, of course). No helmet, goggles, shoes, altimeter, socks...they called it a “naked naked” jump.
Q: Did you start doing the naked thing before you started jumping or did you start doing the naked thing after you started jumping? Have you always been into naturalism?
Dawson: Absolutely not. I made my first naked jump on my 100th skydive, but as far as the rest of it goes, no. I don’t even wear shorts in the summertime; always pants. I have nothing to do with nudism, naturalism...anything like that. Except for the naked skydiving.
Q: What was it about that first naked skydive that got you into it?
Dawson: Actually, it wasn’t that first one that got me going. Actually, it wasn’t that first one that got me going. I didn’t do another naked jump for probably 3 or 4 years afterward. A young female jumpmaster who liked to skydive naked put together a 4-way for a jumper’s hundredth jump, and she asked me to be a part. I think that was September 2001.
The same thing happened a month later in October. We decided that we would see if we could make at least a 2-way every month for a year. We did, and of course there were several other people involved at different times. After a couple of years, she moved away, but I just kept going.
Q: If someone is visiting Sky Knights on any given weekend, how likely is it that at least one person is going to be naked at some point?
Dawson: Pretty likely. I do it more than most people, of course. If the conditions are right, I usually do my last jump of the day naked.
Q: What’s the first step to doing a naked skydive right?
Dawson: The first thing you have to do is to see if your dropzone even allows naked skydiving. I travel a lot and have been to a lot of different dropzones and talked to a lot of people about this. You have to understand that there are plenty of dropzones that actually can’t facilitate naked skydiving; where if there is any nakedness going on of any kind, the dropzone will get kicked off the airport because that’s in their contract, or charter, or whatever.
Then you have to decide how public you want to make it. Cameras and social media are out there in such prevalence today that you have to be careful that someone’s livelihood could be endangered if this type of thing got out in the way that things do now. Unless you want the entire dropzone out at the landing area with cameras, you’ll have to have help to keep it quiet and under wraps. I blame social media for the fact that naked jumping isn’t as popular now as it used to be.
Q: How can you set about controlling those variables?
Dawson: If you want to do a naked jump stealthily and not have the whole dropzone watching, you can make that happen by arranging for a separate pass or landing area--or just talking to the people who are on the jump and asking them to turn off their cameras. People should understand that it’s a very legitimate concern.
Q: How do you go about preparing for a naked skydive?
Dawson: First off, I would definitely suggest doing it with someone who has done at least one before.
You will want to decide what you are going to do about clothes. Sure, you’ll have a 200-square-foot toga to wear, but what next? Personally, I have a set of shorts that I wear over my leg straps, and then I have a pocket on one of the leg straps. When I am in the plane, I take the shorts off and put them in my leg pouch to put on after I land. I have seen people tie shorts onto a leg strap with pull-up cords. I knew one person who actually stuffed his shorts in the tail of his canopy. Amazingly, it didn’t affect the opening. You can always stash clothes at the landing area, of course.
When you’re gearing up, make sure that your straps are relatively tight. We have a saying for the guys: Make sure that you have your junk in the right spot, because you can always cut away from a line-over but you can’t cut away from a nut-under.
Nipples can be a problem, too. You can deal with that by either locating the chest strap above the nipples so that they’re out of the way or use band-aids to reduce the snag hazard, especially if you wear jewelry there. I have never seen it myself, but I’ve heard of at least one person who had jewelry ripped out of her nipple.
Q: What’s different about the jump itself?
Dawson: What tends to happen is that, after one person decides they’re going to do a naked jump, a bunch of people get on it. It can easily turn into a big zoo, with a dozen people on the jump who have never jumped naked before. That’s not a good idea.
Naked jumping is entirely different from clothed jumping in that it changes the amount of control you have over your bodyflight. There’s a whole different dynamic: for instance, coming into a formation. If your mode normally is to come in fairly hot and slow down last minute to enter the formation, you’ll soon discover that that doesn’t work as well with a naked jump because you don’t have the drag. People often find they can’t stop. So if you can do it with 2 or 4 people--something like that--it usually works out better.
When you’re in freefall, you’ll feel like the container is falling off of your back--or is not centered--because it’s touching your skin and you can actually feel where it is. Don’t freak out. If you’ve done your straps up nice and tight, it’s not actually coming loose; it just feels different.
Also: You don’t want to get too wrapped up in the naked part of the skydiving and forget about all the other parts, which brings me to probably one of the most important parts about naked skydiving. This goes for any kind of extraordinary skydive. You’re still making a skydive, and you still have to do it safely. You have to make sure your equipment is right, and you do all of your checks. It is really easy to get caught up--especially if we’re talking about a 100-jump person--in the excitement of what’s going on, and forget about the things that are necessary.
One more word to the wise: Choose a day when the conditions are right for a stand-up landing. If you slide in even a little bit, you are going to know it. Even grass acts like sandpaper.
Q: Any final words of wisdom?
Dawson: Do everyone a favor and be cool about it. If you go out and flash unsuspecting tandem students and airport authorities, then you’re crossing the line.
Sky Knights operates a PAC in the summertime and when I’m ready to make a naked skydive, there will usually be tandems on the load. I won’t surprise them with my nakedness. Before they are even manifested, I’ll find out from manifest who they are, introduce myself and ask if they’d mind if I’m on the same load. I’ll also do that with other jumpers I don’t know. Most people are fine, especially when I tell them it’s going to be a world record--because every time I make a naked skydive, it’s a world record.
I try to be sensitive about who is on the load and not make anyone feel embarrassed. Being polite about it has allowed me to do all those jumps.
Got at least one naked jump? Join SANS! It costs a whopping $5 dollars to join, and with that membership fee you get a member number, a certificate for the wall of your cubicle, some stickers and a refrigerator magnet.
Static Line Training (S/L)
This method has evolved over the last ~30 years from its military origins into a successful method for training sport parachutists. The student gets 4-5 hours of ground training and is then taken to an altitude of about 3000 feet for the jump. The jump itself consists of a simple "poised" exit from the strut of a small single engine Cessna aircraft. As the student falls away from the plane, the main canopy is deployed by a "static line" attached to the aircraft. The student will experience about two to three seconds of falling as the parachute opens.
Subsequent S/L jumps require about 15 minutes of preparation. After 2 good static line jumps, the student will be trained to pull their ripcord for themselves. The student then does 3 more static line jumps where they demonstrate this ability by pulling a dummy ripcord as they leave the plane (the static line is still initiating the deployment). The student is then cleared to do their first actual freefall.
The first freefall is a "clear & pull", where the student initiates the pull sequence immediately upon leaving the aircraft. Next is a 10 second delay jump. Subsequent jumps go to progressively higher altitudes with longer delays. After 20 freefalls, and meeting certain other basic requirements, the student receives their A license and is cleared off student status.

The Skydiving Handbook - Chapter 7 (Landings)
There are two goals when landing your parachute: the first is to land safely and the second is to land where you want to. Clearly, the first goal is much more important than the second one, yet a surprising number of skydivers have had the opportunity to consider their values at leisure while recuperating from landing injuries. A parachute is only as safe as the person operating it.
As soon as you have determined that your parachute is functioning properly, it is time to start thinking about the landing. Look for potential landing sites - any level area free of obstacles will do but we try to land at an established point, our student landing area, if we can. Usually you can get back over this landing area with at least a thousand feet of altitude left. If this is not the case check the area below you and between you and your target for possible hazards; if you are not positive you can make it safely to the planned landing area, you must select an alternate site. Do not go below the thousand foot mark without making a firm decision about where you will land!
Assuming you have made it over the target above one thousand feet, you should turn into the wind and check your ground speed. This is especially important on windy days. Remember the higher the wind speed is, the less ground speed you have when holding, and while running with the wind your ground speed will be higher. Keep this in mind and avoid getting too far down wind of your target area. (Helpful hint: if you can find your canopy's shadow on the ground it will show you exactly how fast you are going!)
As you hold into the wind you can make a rough guess as to how far you could fly in, say, 250 feet of vertical descent. Take that estimated distance and lay out an imaginary line of that length from the target to a point downwind. Now just work your way to that point and stay near it until you are about three hundred feet up. Turn towards the target. If your original guess was good, you would slightly overshoot the target. A small "S" turn - ninety degrees one way, then 180 back to the approach, and ninety degrees back into the wind - will line you up on a good final approach. As long as you start your final approach a little high, you can continue these "S" turns to adjust until you are on approach at the right altitude.
Remember that your first priority is to land safely, not necessarily in the target. You may have to share the landing area with another canopy, in which case you need to avoid flying in front of or near them. For example, if you are on one side of the target and another student is near the other side, stick to your side rather than aiming at the middle. Be careful to always look before you make a turn and assume the other canopy pilots may not see you. Whoever is lowest has the right of way. Also look for dust devils. They can turn or even collapse your canopy and should be avoided.
Most skydivers like to set up their final approach by using a pattern similar to the kind airplanes use approaching an airport. After your ground speed check at one thousand feet, work your way down wind until five hundred feet. Then turn cross wind (90 degrees to the wind direction) until you are over that imaginary point where your final approach begins. This type of pattern lets you observe wind indicators as you refine your estimate of where to turn onto final. Another useful tip: the more turns you do, the harder it is to tell where you are going, because your descent rate and forward speed change in a turn. A few smooth, slow turns will set you up better than lots of radical ones. At an altitude of about one hundred feet you are committed; just let the parachute fly straight ahead and limit any corrections to turns of ten degrees or less.
The last part of the approach is the flare. This procedure is simple: pull down both toggles simultaneously to slow down your parachute to a comfortable landing speed. To get the most out of flaring, you must be flying full speed on your final approach, so keep your toggles all the way up until it is time to flare. (An exception is if you have poor depth perception, when the lighting is bad, or when the surface is uncertain such as water or corn. Then you may be better off approaching in partial brakes to slow your approach, giving you a little more time to assess the situation.) The flare should be done when your feet are about two to three body heights above the ground. A smooth flare over about three to four seconds will work better than a fast, hard flare, but the main thing is to have both hands all the way down when your feet are three or four feet off the ground. If you realize you started the flare low, speed up; if you started high, slow down. Do not, however, let your toggles back up once you have started to flare. This will cause your canopy to dive forward and result in a hard landing. The illustration showing a canopy's flight during a flare will show the consequences of a badly timed flare. Too low, and you have a lot of forward speed even though your descent is slow. Too high, and you will have a lot of downward speed even though your forward speed is low. That is why you should flare a little high and slow on a calm day, a little low and fast on a windy one.
Let's quickly review the three most important points for a safe landing. First, always pick a safe place. Be sure of your landing site before you reach 1,000 feet! People who hit hazardous things such as cars, buildings, or power lines almost always do so because they did not choose a safe landing site high enough and were forced to land in a bad location when they realized, too late, that they could not make the target.
Second, never land in a turn. We know that a parachute's descent rate increases dramatically in a turn, and that speed remains for a few seconds after the turn is stopped. Landing in turns is by far the biggest cause of skydiving injuries. These low turns are usually made by people who did not pick a safe area and turned at the last moment to avoid an obstacle, or by people who thought landing on the target was a higher priority than landing safely.No low turns!
Third, land into the wind. This one is too obvious to need elaboration; the slower you are going, the softer you land. However, landing down wind or cross wind is less likely to cause injury than landing in a turn or on obstacles! On a breezy day, turn towards your parachute after you touch down and pull in one line to collapse the canopy. You may need to run around down wind of the canopy.
Test yourself:
1. The United States Parachute Association limits student and novice jumpers to wind conditions of fourteen miles per hour or less. Why are winds over fifteen miles per hour considered dangerous?
2.Turbulence that can make steering difficult or even collapse your canopy can be caused by three things. Hot, rising air such as dust devils is one and high winds passing over obstacles are another. What else could cause dangerous turbulence on landing? Where would you expect to find turbulence on a windy day?
Proceed to Chapter 8 (After the Landing)

Learn to Skydive Online
When we first posted that we were launching a live online canopy course, the beginning of
many online adventure safety courses, a number of people asked me if I was joking. In the adventure community, actions have always spoken louder than words, and the internet is for surfing entertaining videos, not training. Although I fully understand the irreplaceable value of on-site instruction, there is a lot of work to do in a short time to get it done. People are dying out there.
USPA has wisely issued a mandate to help promote participation in canopy courses in
order to expedite the proliferation of the information that saves lives. This is a wonderful step, however the limited number of highly skilled canopy flight teachers causes a bottle-neck of resources. We need the information to get out there faster than we have the ability to spread it. Hence we find ourselves in the place that inspires innovation like no other, need.
Live online “e-learning” programs have been fully embraced by the corporate world in
recent years, and increasingly by universities and colleges as well. The choice to go with these high tech teaching systems has been partly financial, as it is far cheaper to implement than in-person training in the long run. It is also far greener because instructors no longer need to travel as much to accomplish the same goals. Lastly, corporations and learning institutions all
over the world have chosen to use the internet for education because of the vastly increased scope of potential students, as distance can be taken out of the equation. These compelling reasons have caused significant advancement in the technology that makes remote teaching possible, and huge breakthroughs have been made which allow interactions to be surprisingly
natural. Further, online testing can be utilized to allow instructors to get a feel for how well they are conveying the information, and what they need to focus on in the next sessions.
The implementation of this new model of instruction is still very much in its infancy,
however we are already finding that this futuristic method of information proliferation actually has several benefits over in-person training. When you take a canopy flight course, for instance,
you cannot control the weather. In most cases, the instructor is flown in from far away and is only on site for one weekend. If the weather does not cooperate, you are in for an all-theory course. With online courses, we are able to teach the group over the course of a month.
Chances are, the students will get the opportunity to jump in that time to practice what they have learned, and even get someone to video their landings to upload for the next course. Even if the participants do not get to jump, the longer duration of the course allows for deeper information association and transfer to long-term memory, as well as giving the students the opportunity to formulate better questions to help them get exactly what they want out of
the experience. If they don’t remember something from the class, they can even log onto the website and watch the course all over again. This is not possible in the traditional instruction paradigm.
Some will say, “But there is no substitute for being able to ask questions of your
instructor in the flow of the session. The new live online training systems allow participants to “raise their hand”, so-to-speak, and get the answer they need when they need it. If the students have a webcam as well, the interaction between the student and teacher is nearly as intimate as an in person discussion once the participants grow accustom to the new medium. For some people, this online format actually allows them to come out of their shells a bit more since they are not actually in a room full of strangers.
There is no doubt that on-site, hands-on instruction will remain the backbone of all
adventure training. There is a great deal that can only happen in a purely organic environment, which is why people like me will continue to pound the pavement and travel to a new dropzone almost every weekend. It is essential. However, the vast majority of skydivers do not have access to such camps but once or twice per year, and by then many of them will have already gotten hurt or even killed. If we are to truly strive to improve the safety of our sport in every way possible, embracing eLearning is an indispensable step toward getting the information out there in a reasonable time frame. The internet transcends time and space like nothing else known to mankind, and if we are serious about safety, than we must cast aside our reservations, and like the first pilots of ram-air canopies, we must give it a whirl. The fear of change is understandable. When we change, we risk things getting worse. However, if we do not try to improve and evolve, in the context of a changing environment, we are essentially moving backwards.
The technology passed down to us from wartime allowed our sport to come into
existence, and now the corporate world, sometimes equally sinister, has created a technology that will allow great students to connect to great teachers, anywhere in the world. The precious information that was once held by only a few mentors with a limited number of weekends in the year can now be disseminated at an exponential rate, and the possibilities for improvement of our sport and other adventure pursuits are endless. This is a truly incredible time. So when someone asks me if adventure training through eLearning is a joke, I have to ask them to
consider the possibility that any initial resistance to change is merely the inertia of habit and a little bit of fear. The future is being born right now in the present, and all we need to do to move forward into the vast potential of this new era of instruction is an open mind and a sense of adventure.
Brian Germain is a parachute designer and test pilot, and runs canopy flight skills and safety courses all over the world. Brian has made over 14,000 jumps in his 25 years in the sport. He is also the host of the “Safety First” segment on SkydiveRadio.com, and the creator of many educational videos. Brian is the author of the widely popular canopy flight text The Parachute and its Pilot, as well as Transcending Fear, Greenlight Your Life, and Vertical Journey. His websites are
www.BIGAIRSportZ.com , www.Transcendingfear.com and his online training programs can be found at www.AdventureWisdom.com. Brians highly aclaimed YouTube channel is: www.youtube.com/bsgermain
Camera Considerations 101
Flying with a camera can be a lot of fun, and is a reasonably easy goal for new skydivers to achieve.
The USPA SIM Section 6.8E recommends that a skydiver have 200 skydives before putting on a camera. The first question often asked is “Why 200 jumps?” I believe the answer to that question is that in times past, the D license (which at one time required only 200 jumps) meant that a skydiver had experienced enough of the basics of skydiving that he/she could begin exploring additional responsibilities during a skydive. By no means is anyone with only 200 jumps generally prepared to be a good nor safe camera flyer, but everyone needs a benchmark from which to begin. This article isn’t about debating the merits of jump numbers; I’d recommend potential camera flyers stick with the SIM and the findings of the USPA.
Before beginning, you’ll need to make a couple of gear decisions straight off, and this article is to help you prepare for those decisions.
HEADGEARChoosing a helmet is the first and potentially most important decision in flying a camera. There are a lot of good helmets out there; each manufacturer has their own ideas about why their helmets may be better than another helmet. What your first decision will be isn’t as much about a brand, but rather a type.
P>There are two types of helmets; those that are primarily side mount, and those that are primarily top mount. Most side mount helmets do offer at least a small top area to which a second camera or other fixture may be mounted. Most of the top-mount helmets are designed to place everything on the top of the helmet. Each type of helmet has its own advantages and disadvantages.
Freeflyers and inside RW/FS skydivers tend to prefer side mount camera helmets not only because of the profile of the helmet, but due to the way the air moves around the helmet. Those that are shooting four/eight-way FS might prefer a top mount not only due to the greater stability of a flat-top profile, but that the larger top area allows for two cameras to be mounted (one acts as a backup in case a camera fails in competition). Commercial photographers tend to prefer flat top systems so that they can mount larger cameras, or have enough space to mount a DSLR and video camera from the same perspective point.
One point to consider aside from the primary flying format; top mount helmets with properly centered weight are less injurious to the neck over repetitive openings.
VIDEO CAMERAVideo camera models change pretty quickly, so it’s pointless to recommend models vs features.
While recommending a brand is tempting to avoid, Sony camcorders have a strong position in the skydiving market for several reasons.
-External control. This is very important, as you’ll want to know whether the camera is on, recording, battery failing, or nearly out of media. There are a couple brands of control devices that provide this information.
-Electronic Image Stabilization (EIS). This is fairly important for freeflying, and much less of an issue for tandem shooters. Avoid Optical Image Stabilization in most cases. The floating lenses of an OIS system makes it difficult to shoot a stable image under any but the most optimal shooting situations (very difficult to achieve).
Small is in; cameras don’t need to be large to produce large results. Keep weight on your head to a minimum and your neck will thank you over hundreds or thousands of openings.
If your intent is to wear a camera merely to document skydives with friends, low-cost camcorders such as the GoPro Hero and similar small cameras are wonderful. If your eventual goal is to work towards shooting tandems or teams, you’ll want to consider a higher quality camera. A current favorite is the Sony CX series of camcorders.
LENSESMost camcorders do not offer lens widths sufficient for most inside or tandem-oriented skydiving. Wide angle lens adapters are commonly found on camcorders used for skydiving. For most skydiving use, a .5 or double field of view lens is sufficient. If you’re flying inside video for FS or Freeflying, a .3 or more than double wide field of view is generally desired. Anything more wide than a .3 is typically going to be relegated to handcam or specialized use.
Depending on the size of the camera’s lens thread, a step-up or step-down ring might be necessary. Step-down rings almost always assure a vignetted shot (black circle around your video frame), whereas step-up rings rarely cause a vignette. Step-up and step-down rings are very inexpensive. Some are plastic, others are aluminum. Some professionals prefer plastic rings so that if a riser strike or line catches on a lens and tears it off, the plastic ring will give way before damaging the camera. While this is likely true, plastic rings also deteriorate in strength when exposed to sunlight. If you use a plastic step ring, be sure to periodically inspect it to be sure it’s not become brittle or cracked due to sun exposure.
RINGSIGHTSAlthough it’s tempting to want to outfit a helmet with everything right from the start, it’s a good idea to add parts one step at a time. A ringsight is a good tool for some disciplines; it helps the videographer know where the camera lens is looking, and some types of ringsights help with framing and distance.
Ringsights aren’t necessary for inside shooting of FS or Freeflying. No matter what, a ringsight is a snag hazard regardless of how much care is taken to prevent it from being so. The risk can be lessened, but not entirely removed. The ringsite should be one of the last accessories added to a camera helmet.
In lieu of a ringsight, consider a “paper asshole” or a punch hole reinforcement sticker, mounted on your goggles. This can serve the same purpose and yet completely remove the snag hazard of a ringsight. A circle or dot can be drawn on goggles as well.
To sight in a dot on a goggle; face a plain wall on which, you’ve taped a target. A paper plate works well for this exercise. Stand back from the wall at a distance of about ten feet. Put on the camera helmet, turn on the camera, and have a friend hold your head/helmet so the paper plate is dead center in the camera’s display. Keep your eye looking forward; don’t be tempted to roll the eyeball up/down/sideways. Keep it straightforward. It might take a moment to get comfortable holding your eye straightforward while a friend guides your head/helmet to the centerpoint/target.
Once you’ve relaxed, focused on the target, and the target is in the center of the camera, mark your goggles (one side only, usually the right side) with a DRY ERASE marker. Remove the helmet, remove the goggles/glasses, and then put them back on and check to see that a reasonably accurate target acquisition occurs. Otherwise, repeat the aiming/targeting process.
It’s worth mentioning once again however, a ringsite should be one of the last accessories added to a camera helmet when you’re a newcomer to camera flying. A ringsight adds an unnecessary snag hazard.
STILL CAMERAAgain, it’s very tempting to buy a camera helmet with everything in one shot, and as mentioned previously, is a poor decision for newcomers to camera flying. Learning to fly with a video camera will help develop the skills necessary for flying a still camera.
DSLR cameras are popular, as they record stills to a memory card, making for fast previewing of photos taken during a skydive, and for tandems, DSLR’s are necessary for fast delivery of photos to tandem students. Though Canon and Nikon are both popular brands of cameras for skydiving, most any kind of camera can be modified to accept a bite, tongue, blow, or hand switch for taking skydiving photographs.
MOUNTING DEVICESThe device used for mounting a still or video camera to the camera helmet is critical, particularly for video cameras. If the mounting device isn’t rock-solid, the camera will shake or shudder in freefall, resulting in an unstable image. Sometimes this shudder/shake will be blamed on the video camera when the blame lies squarely on the camera mount. Check whatever mounting device you’re considering to be sure it will not move either at the time of purchase, or after it’s been in use for a period of time. Personally, I’m a big fan of the Cookie Composites Padlock systems and the Really Right Stuff mounting systems. Neither are inexpensive, but if you want solid video and clean stills, a solid mounting system is critical.
CONTROLLING SYSTEMSCamcorders and still cameras need hands-free operation. Video cameras can be manually started/stopped in the aircraft, but for convenience and comfort, most camera flyers use a control system of some sort. Sony tapeless systems offer essentially one controller choice; the HyPeye products from GetHypoxic. All of the camera control systems also offer an indicator that indicates the status of the camcorder such as Power On/Off, Standby, and Record modes. In lieu of these indicator devices, you can always wear a small mirror on the wrist next to the altimeter, and view the Record light on the camcorder. I’d recommend a plastic mirror vs a glass mirror in case your wrist strikes the side of the aircraft.
Still cameras/DSLRs require some sort of trigger device to cause the camera to snap a shot. Conceptus manufactures tongue and bite switches for Canon cameras. Custom Nikon switches are available from The Ranch Pro Shop and other resellers. Some Pentax cameras use the Canon connection (2.5mm plug).
It’s difficult to recommend a bite switch, hand switch, tongue switch, or blow switch; everyone has a preference. I personally prefer a tongue switch, but many friends like bite switches. Some like hand switches. You can also “roll your own” from inexpensive parts available at Radio Shack.
JUMP SUIT/CLOTHINGSome camera flyers opt for jumping with or without a camera suit, or a suit with “wings.” Although it’s a personal preference, camera wings provide the camera flyer a more stable flying platform (when used correctly) provide the for a great deal of range and control that isn’t quite so easy to achieve when wearing a standard jumpsuit or freefly suit. If you’re looking at flying with tandems, wings are often an important part of the jump. If you’re shooting freefly work, you probably won’t want to wear wings.
There is a lot to learn about flying a camera. Getting good at RW is perhaps the best thing you can do to prep for flying a camera with tandems and four/eight way teams. Understanding burbles, trapdoors, safe zones, and having good belly skills that include side sliding, the ability to orbit, and a very broad fallrate are all important aspects of camera flying.
This article does not discuss the challenges of camera flying and make no mistake; there are many dangers. One such danger, is that the camera flyer is always focused on the action in front, and never able to turn to see what’s happening behind him/her. Another danger is that in order to “get the shot” some camera flyers lose altitude awareness and may find themselves well below appropriate deployment altitudes.
Spend time talking to the camera flyers on your dropzone, reading the forums, and pay attention to some of the videos you’ll find on Skydivingmovies.com, YouTube, and Vimeo. All have examples of good and bad camera flying. You can learn a lot just from watching the techniques of others.

Action Therapy: When Skydiving Saves Lives
Adam Martin and David Winland are here to tell you that skydiving saved their lives: from self-destructive tendencies, depression, drugs, and possibly even the emotional quicksand of post-traumatic stress disorder (PTSD). They call it “Action Therapy”, and it’s the working title of a grassroots documentary they are creating on an iconic summer road trip to as many dropzones as possible before their money runs out. Their mission is to highlight the sport’s everyday stories of beauty and personal meaning: no high-profile stunts here, just tales of transformation.
These two friends, who met through skydiving, have different but equally harrowing stories. Three and a half months after his father committed suicide, Martin decided to go skydiving. His family assumed that the grieving son had a death wish. On the contrary, the idea of taking a previously unimaginable risk was a way of pulling himself out of a self-destructive spiral. Winland, on the other hand, speaks freely about surviving childhood abuse: “Everyone has dysfunction in their families and lives, but mine was really bad. I had cigarette burns on me. There were some terrible people. Instead of getting counseling, I bottled it up and started using drugs and fighting. I’d go out and just raise hell.”
Martin, 30 years old, and Winland, 38, both largely credit skydiving with their recovery. Winland, a single dad, says he was burned out and worried about his ability to sustain relationships: “When my daughter was born, that just kind of got better. But I still had that really severe issue of, I didn’t communicate well and I didn’t trust anyone. I love my daughter and she was the focus on my life, but I was still angry. Once I started jumping, I was just able to let everything go. I’m a single dad. I have custody of my daughter. I don’t know if I would have been able to do that if I was the same person I was before jumping. I got custody right as I started in the sport, and it has helped. That’s why we have the name Action Therapy. Both of us have been helped so much just by exiting that plane.”
The duo hopes that sharing real stories will reach people in a dark place. “I hope someone watches our documentary and says, that kid was going through a shitty time in his life, and he did something to pull himself out. So if it helps someone get out of a bad time, whether through skydiving, or something else – go do it,” says Martin. He goes on, “My father was a medic in Vietnam, and there’s no doubt in my mind he had PTSD. But he was raised on a Montana ranch where men kept their feelings bottled up, so we never really talked about it. Maybe this could have saved my dad. Maybe if my dad had something like skydiving, he wouldn’t be gone right now.”
In addition to Martin’s father’s service, Martin and Winland were deeply inspired by a meeting with Todd Love, the triple-amputee wounded warrior who has refused to let his circumstances prevent him from skydiving (as well as wrestling alligators, going white-water kayaking, and completing the challenging Spartan Race). Along the way, they hope to raise awareness and funds for the Wounded Warrior Foundation.
These two newer jumpers (Martin has 230 jumps and Winland 296) have the easy banter of friends who have spent too much time in a car together already. They are an odd couple: a tattoo artist who hates golf (Winland) and a golf pro (Martin), now living and working together towards a shared dream. “Skydiving is a great equalizer, a crazy group of people,” says Martin.
They can almost finish each other’s sentences, and the words of encouragement flow easily. When Martin talks about his father (“I can’t bring him back – I have to move forward in the right way”), Winland chimes in: “He’s so proud of you and your accomplishments!” And when talking about how skydiving has helped ease his fatigue with the world of golf, Martin adds, “I know it’s helped David with his tattooing, too.”
The philosophy is simple: no matter how heavy the burden, skydiving will lift it. “It’s not the adrenaline rush every time,” says Martin, “It’s just fun and it puts a smile on my face, so I keep doing it.” Winland adds, “I was always quick to pull my roots up. The people I’ve met jumping feel like home.”
If you want to get some Action Therapy, share your story, or just give this enthusiastic two-man team a high-five, you can find them at Skydive Chicago’s Summerfest boogie or on the last stop of their tour, the Lost Prairie boogie in Montana.
Keep up with them online at the Action Therapy Facebook page. They have already visited: Skydive Arizona, Skydive San Diego, Tsunami Skydivers (Oceanside), Skydive Perris, Skydive Elsinore, Monterey Bay, Bay Area Skydiving in Byron, Skydance Skydiving in Davis, Sacramento, Lodi, and Oregon.