0

Gear

    Safire 3 - Jill Grantham's First Impressions

    Jill Grantham is a travelling gypsy from Australia with 1900 jumps and 12 years in the sport. She has hair like Rapunzel, a penchant for lords and ladies and is as sweet as her favorite candy.
    What is your canopy flying experience?
    I have historically been a consistently terrible canopy pilot due to low confidence (slid in on my butt for 11years). Before I got Lady Safina (my new Safire 3 129 from NZ Aerosports) I was flying a Safire2 139, for 800 jumps. I have now done about 150 jumps on Lady Safina at a bunch of different dz’s with weather etc. But I am loving flying this canopy.
    Lady Safina, how I love thee, let me count the ways:
    Amazing flare! No matter what sort of things I do with regards to my landings (I’m currently learning to do a front riser approach) there is always a good enough flare to stand me up. This is giving me the confidence to try and progress to higher speed landings rather than straight ins and not worry about getting dumped if I come out too high.
    Slightly easier to get on the front risers
    Slightly faster opening than the Safire 2, which is not too fast and helpful to not be hanging up a slow opening canopy in amongst traffic.
    More responsive to harness turns.
    Feels more solid in bumpy wind conditions
    Heaps and heaps of range to get back with the rears from a long spot.
    Plus she is really pretty. Is there anything you don’t like about the Safire 3, sorry, Lady Safina?
    She is a Beta test canopy that was built for me before the Safire 3 was released to the public. I was having inconsistent openings to begin with. After filming some openings and sending some feedback a mod was made to mine and all subsequent Safire 3 models - and now she opens great!
    What do you notice different in the Safire 3 to your previous Safire 2?
    I feel like the Safire 3 is just overall more responsive. I definitely feel like I am more in control and can actively fly her. We work together a bit more. With the Safire 2 I felt more like a passenger. Could have been the difference in size a little too of course!
    The rears are better for getting back from a long spot and the fronts are a bit easier to get on than the Safire 2. She still pulls out of a dive pretty quickly - you can’t hold the fronts down too long before they’re pulled out of your hands.
    Who is the Safire 3 suitable for in your opinion?
    I think she is suitable for beginner and intermediate canopy pilots. Especially good if you are a bit nervous or don’t want to push it, you can have a lovely safe easy flight to the ground.
    You have heaps of range to set yourself up in the pattern, which helps you not become cornered by having too small or too big a canopy...and if you don’t want to do much other than float down softly it will allow you to do that.
    If you do want to start flying it more, and seeing what you can do with it, then it is a really responsive wing and awesome to try out some new things on. But because the flare is so good it doesn't matter soooo much if you don’t nail the landings while you’re learning, because the canopy sort of fixes your little mistakes up :)
    What's the main benefit or advantage to you personally of having a Safire 3 rather than another canopy?
    Aside from her being the prettiest Lady I have seen?
    When I’m flying her I feel comfortable enough that I can choose what is appropriate for the situation and group and fly her how I need to to be safe and keep everyone else safe too.
    The increased responsiveness and flare have made me confident to try more when flying her.
    She has really changed my attitude towards skydiving. I feel more in control of how I am flying her rather than feeling a little bit exposed to the elements. She is basically all those empowering girl songs in canopy form!.
    ** Jill Grantham received early access to the pre-released version of the Safire 3 gratis from New Zealand Aerosports. The article above was Jill's unpaid opinion on her experience with the canopy.


    By admin, in Gear,

    The Slickest Rigs From PIA 2017

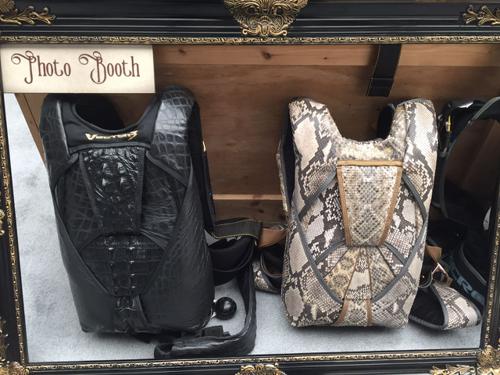
    Each year some of the manufacturers show off some unique and exciting rig designs at PIA, sometimes these rigs are actually able to be put into use, while others are simply demo rigs to show off some really cool design concepts.
    This year saw a couple of really awesome looking rigs, with a transparent rig from Sun Path and an amazing "steam punk" rig from the guys at United Parachute Technologies.
    United Parachute Technologies


    Sun Path


    Which of these rigs would you most like to be flying?

    By admin, in Gear,

    BlackVue SC500 POV Camera Review

    POV cameras are popping out of the ether these days, and a small company in Korea, previously specializing in dashboard cameras, has entered the POV fray with their small box Blackvue camera. The Blackvue closely resembles the frame of the GoPro, and that’ll be the first comparison most folks will make when looking at this camera.
    Size and weight-wise, the BlackVue is identical to the GoPro, JVC Adixxion, Swan, and the majority of other POV cameras, and the profile isn’t terribly different from its main competitor.
    Why would one look at the Blackvue SC500 (or any other competitive camera)? Price, form factor, simplicity/ease of use/setup all fall into a consideration. The Blackvue is ridiculously simple with few buttons, no menus to scroll through, and the simple modes assure perfect recordings every time.
    The camera features Wifi output for monitoring, an included/detachable LCD display, and is capable of shooting 60p footage for smooth slow motion. The housing is a rubberized, non-water/weatherproof housing that mounts on a stickypad/thumbscrew system (compatible with GoPro mounting accessories).
    The camera is essentially choice-free, in that it offers three shooting modes.
    30p (standard/default 1920x1080/30p)
    Still Photo (also capable of timelapse)
    High Speed (1280 x720/120p)
    IMAGE QUALITY
    Let’s start with the most important aspect of image quality.
    Image quality from this camera is about what I expected it to be. It’s not “drop your jaw this is incredible” good, and it’s not really poor, either. It’s better than some of its competitors, lesser than others so I’d refer to it as “average.” The camera features a Sony Exmor imager, similar to the imager used in the Sony AS-15 cameras, and I’m a bit surprised that Pittasoft didn’t take greater advantage of the features this sensor offers. They’ve tuned the sensor to be quite dynamic, as this screengrab demonstrates.
    The lens is a fixed 170 degree lens, similar to most of the competitor POV cameras. The glass is exposed, as there is no cover/protection for the lens in the housing. The lens does come with a small rubber cover that is easily lost and falls off if the camera is tipped over. It is possible to sit the camera farther back in the housing, if the LCD display is removed, thus providing some lens protection via the housing.

    The BUTTONS
    There are only three buttons on the camera (unless one counts the LCD power button on the LCD pack). One button powers the camera and selects the mode (Video/Still/High-Speed). One button for Wifi on/off, and the record start/stop button.
    The removeable LCD pack also has its own power button.
    Buttons are large, so operating the camera while wearing gloves won’t be any kind of an issue. The built in speaker provides audio for playback, and also provides status indicators when buttons are depressed. However, this speaker/audio indicator is hard to hear in a noisy airplane.
    INDICATORS
    All indicators are found on the front of the camera. This is where the first weakness in the camera is found. The indicator lights are small, and difficult to read in daylight. The record light is also dim and although the streamlined look of the record indicator is sexy, it’s also difficult to see in a well-lit aircraft cabin. In the 120p test footage, you can see the camera operator squinting and covering the camera to shade it from the sun, as it was challenging to see whether the camera was recording or not.
    BlackVue would do well to take a page from their competitors playbook and put a larger indicator light in their next version.

    The HOUSING:
    The housing is unique; a rubber “O” ring design surrounds the entire camera. The intent is to dampen vibration and provide protection against scuffs and scrapes common in the action sport environment. The housing is capable of holding only the camera, or the camera/LCD combination. The housing offers a pair of holed mounting tabs, identical to the GoPro camera mount system, and in fact, the two are compatible. This is a huge benefit to camera owners, as they have access to the full complement of GoPro mounting accessories. Smart move on the part of Pittisoft to jump on this before any of their competition has realized that when it comes to camera mounts, standardization is a good thing.
    This system is not waterproof, nor even weather resistant. While I’d have no problem using it around mist, clouds, etc, I’d also be very uncomfortable in any environment where water might cover any significant portion of the camera. Pittasoft does have a waterproof housing in the works at an undisclosed price.


    Best viewed in 720p
    CONNECTING POINTS
    The camera provides a mini HDMI port for instant viewing on a monitor. This is critical for debriefs, as when one is working between loads, it is time-consuming to remove a microSD card and read from a computer or other playback system.
    The camera also offers a USB port, suitable for charging or playback over a computer. Both ports are covered by a removable plastic plug. Like other small format cameras using this “feature,” I find it annoying, as it’s a small plastic part easily fumbled while wearing any kind of glove, and may easily be lost.
    BATTERY LIFE
    There is no easy way to say it; battery life is unimpressive. Out of six jumps, the battery failed on three of them, even though I disabled the LCD screen. The unit had been charged prior to each jump, and turned on to check on the ground prior to boarding the aircraft. It’s possible my unit wasn’t entirely up to speed, yet even after charging overnight, the unit couldn’t manage two jumps in a row with the LCD preview enabled. There is no indicator for battery level if the LCD display is disabled, yet the LCD preview eats most of the battery. Wifi is also a battery-killer, but fortunately, the WiFi indicator is very obvious, and unless cell/wifi preview is absolutely necessary, users would be wise to leave it off (this issue is similar with all the POV cameras, but the Blackvue seems to be a bit more wifi power-hungry than some of the others).
    In speaking with the folks at Pittisoft, they indicated that they’re now shipping a firmware offering better battery life.
    SUMMARY
    All in all, this is a very simple camera, easier to operate than most of the POV offerings out there due to its limited functionality. Some people are looking for easy-to-use and this camera absolutely offers “easy.” Picture quality is on par with cameras costing more, and offers a better image than some of its same-price counterparts. It’s super-fast to set up and as there are no menus to cycle through, there is virtually no chance of not knowing which mode the camera is in.
    Its light weight makes it perfect for many other applications; I particularly appreciated how well it flies on a UAV drone.
    The price is competitive, the camera is very easy to operate, and the build is robust. I for one, am looking forward to seeing how Pittasoft’s new camera does in the rapidly broadening POV market.
    Price: 300.00 USD
    Available online and at some retailers now.
    About The Author

    DOUGLAS SPOTTED EAGLE is an audio and video pro. He is a Grammy recipient with DuPont, Peabody, and Telly awards lining his studio; he is also a participant/producer in multiple Emmy winning productions. Douglas is the Managing Producer for Sundance Media Group, Inc. and VASST, authoring several books and DVDs and serving as a trainer and consultant for videographers, software manufacturers and broadcasters. He is the author or co-author of several digital media titles including Digital Video Basics (VASST), The FullHD (VASST), and Vegas Editing Workshop (Focal Press) among many others. - See more at: http://www.dropzone.com/about/Contributors_895.html#sthash.oSWvVDbz.dpuf

    By admin, in Gear,

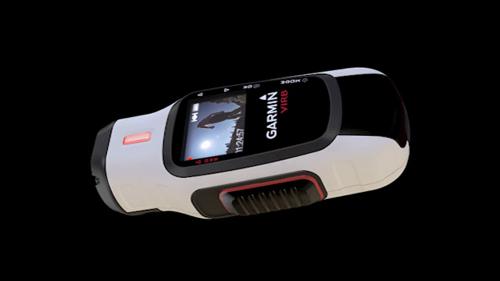
    Introducing the Garmin VIRB Action Camera

    Get ready for the Garmin VIRB, the latest new action camera to be revealed. While Garmin are well known for their GPS navigation devices, the company also boasts a variety of other technology devices, many of which revolve around maritime activity. In recent years Garmin has released several marine radio communication devices, as well as dabbling in the production of camera technology. However, Garmin has decided to take a step in a new direction - joining companies such as GoPro, Sony, Contour and JVC in the production of POV action cameras. It's a brave step by Garmin, but if they manage to effectively integrate the device with their other products, there may well be room for them in the GoPro dominated market.
    Garmin VIRB Design
    Upon first sight the device is quite good looking with an appealing display screen on the top of the camera, and a large power button on the side of the device. For those who helmet mount their action cams, this small change from what other cameras typically offer can really make things easier, allowing you to feel whether or not the device has been turned on or off. The build of the device looks almost like a hybrid between the Contour and the Drift HD action cams. The main concern when looking at the VIRB design, is the convex lens, which seems to extend a fair degree out from the camera. While the Sony AS15 has a similar design, there is no getting around the fact that the exposure of the lens would in turn pose a risk of damage, especially in sports where you'd expect the camera to take a knock. Garmin do show an image of the VIRB with lens covering housing attached, but it remains unclear whether this extra housing is the underwater housing, which is an extra option. The device will be made available in either black or white.
    Technical Details
    The VIRB is as expected, a high definition recording device that will allow video recording in 1080p quality, with a 16 megapixel CMOS processor and allow for up to three hours of filming from a full charge. Data is recorded onto a MicroSD card, with a recommendation of Class 10 - as to be expected with HD recording. The device will also sport a 2000mAh rechargeable Lithium-ion battery. Out of the box the VIRB is waterproof for 30 minutes to a depth of 1 meter, while the purchase of a scuba diving housing device will extend that depth to 50 meters. The display screen is 1.4" large and while remaining on, uses very little battery life. The "WideVü" lens is comprised of 9-element glass and offers the user three modes of recording: Wide, Medium and Narrow. Built in lens distortion correction and stabilization enhances video quality.
    True 1080p HD Recording
    16 Megapixel CMOS Processor
    1.4" Chroma Display
    2000mAh Lithium-ion Battery
    ANT+ Wireless Connectivity
    VIRB Desktop Software
    Waterproofing
    Wi-fi Connectivity (Elite)
    Device Pairing
    It is clear that from the start Garmin would have to provide a form of functionality that separates them from other action camera manufacturers on the market, and this is where device paring comes into play. Using ANT+, the VIRB will be able to connect with other Garmin devices such as watches, remotes and cycling computers. While Garmin hasn't revealed exactly what one can achieve with the pairing of their devices with the VIRB, it certainly opens up a new avenue that most of the other action cameras lack.
    Options and Pricing
    There will be two VIRB options available, the basic VIRB device which will retail for $299.99 and then the VIRB Elite which will set you back $399.99. The differences between the two devices lie mainly in the functionality available. The VIRB Elite will offer wifi connectivity, allowing you to connect the device to your iPhone or Android smartphone. In my opinion the main selling point for the Elite is the ability to track your elevation, speed and other variables. This data will then be able to be overlayed on your video. While certainly limited to a small group of people, when in "Ski Mode" the device will also be able to detect whether or not one is on a chairlift and in turn pause recording for that period.
    With the VIRB scheduled for a September release, there isn't enough video footage to really make a claim as to the camera's quality. Though it's expected that the camera will rank up along with the other action cams out there, and it's certainly worth keeping an eye on. In the mean time, for a preview of the device's recording quality, you can view the official advertising video for the Garmin VIRB below.

    By admin, in Gear,

    Four-Armed is Forewarned

    Altitude awareness is easily the most important aspect of skydiving and it’s no wonder that audible alert systems were one of the first technological inventions in the earlier days of skydiving. Like most things technical, significant advances have been made, and any device that provides information/feedback during a skydive is a valuable addition to any skydiver’s tool kit.
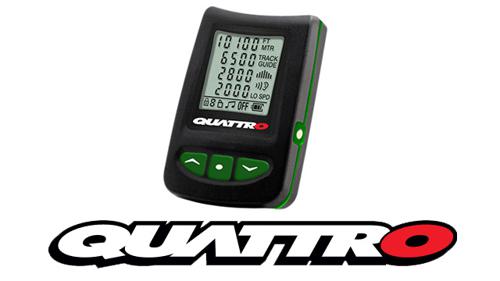
    Larsen and Brusgaard, the foremost authority on altitude-measuring/awareness devices, launched a new product named the “Quattro,” in early 2014. With four user-programmable altitude notifications/alarms, the Quattro has become incredibly popular.
    Why?
    It’s important to understand what an audible offers skydivers involved in precision activities. Once relegated only to scream at a skydiver that they’d missed their point of deployment, audibles are now used for indicating user-controlled altitude alarms, while still providing feedback for deployment, hard deck, cutaway, or other altitudes warnings.
    From a wingsuiting perspective, I cannot imagine anyone not owning a Quattro. With the ability to generate seven notifications in flight, wingsuiters have no reason to not be set for exact breakoff points, maneuver points, deployment, entry and exit gate-points for performance training, competition points, and the list goes on and on.
    Wingsuiters fall at different rates, and with radically different wingsuits, everyone has different needs and wants. With this in mind, I’ve put together a few bullet points on where the Quattro benefits wingsuiter pilots.
    COACHING: Frequently, wingsuit coaches have a “no more work altitude” that is different than deployment altitudes. For example, I want students to not perform tasks below 6000’ but frequently continue stable flight until 4,500. As a coach, I want these notification alarms in addition to my own personal alarms of 3,500’ and 2500’ and my hard-deck alarm at 1600’.
    As an FFC/First Flight Course coach, students are given specific tasks at specific altitudes on the climb to altitude. The Quattro provides three “climb to altitude” alarms that a coach might use to remind him of those points where the student should be providing feedback or information. For example, students might be giving a verbal description of the skydive at 5000’ or indicating their countdown and waveoff point at 6,000’. In any event, climb-to-altitude alarms serve a multitude of value.
    PERFORMANCE TRAINING: Wingsuiters competing in FAI Performance Categories need to enter their performance gate at 3000m/9842’ and exit the gate at 2000m/6562’ and while the mandatory Flysight can provide these entry/exit indicators, competitors can benefit from a pre-gate announcement that the Quattro can provide, in addition to deployment indicators.
    ACRO COMPETITION: In Wingsuit Acro, the competition clock starts as the competitors exit. In non-compulsory jumps, synchronization is frequently part of the jump, and having set points for an action, particularly where wingsuiters may not be facing each other (back to back flying), an alarm or series of alarms can provide valuable timing information. The multiple alarms are also good for notifying competitors when they’ve reached their competitive deck, while still providing the “standard” three alarms for deployment, reminder, and hard-deck.
    HIGH ALTITUDE JUMPS: Wingsuiters engaging in high altitude jumps are flummoxed that most audible systems cannot provide feedback above 10,000’. The Quattro is capable of informing the wingsuiter as high as 19,990.
    Although the Quattro offers a broad spectrum of alarm settings, users are not required to enable them, and this is one of the features I appreciate most about the Quattro; users may configure the system to be as personal as needed, turning on/off various alarm points.
    Wingsuiters focused on performance frequently do not want to look at their wrist or chest mount altimeters if they’ve got a good performance groove happening, and full-face helmets often make it impossible to see chest-mount altimeters when in a performance configuration; an audible provides valuable feedback when cranking a chin around to see a visual may have a negative impact on performance.
    The unit allows for offsets, so if the landing area is a different elevation than the point of take-off, audible settings can be user-adjusted if the offset is known. Otherwise, the unit will recalibrate itself every 14 hours to the last MSL point of take-off. Manually zeroing the Quattro is as easy as pressing the center button a couple of times (this is the same procedure for generating altitude off-sets).
    As with previous L&B; products, the Quattro uses a pair of 2325 batteries, easily found at most any electronics store or grocery store that offers a wide variety of button batteries. In my experience, the batteries seem to be good for about 1000 jumps, or about a year. However, the Quattro and Optima seem to be very forgiving when the battery indicator says “replace me.” I’ve tacked on another 300 jumps after the indicator told me I had an empty battery.
    While just about any discipline in skydiving can benefit from the Quattro’s numerous features, wingsuiting is one aspect of the sport that frequently demands “more.” Wingsuiters love data, feedback, and algorithms designed just for them, and the Quattro certainly delivers. It probably helps that some of the folks at L&B; are avid wingsuit pilots, and have taken time out to really dig into what makes wingsuiting and wingsuiters just “a bit different” than other skydivers, and in the Quattro, they’ve really done it well. Although I’m not a speed skydiver, I can only surmise the multiple alarms would also benefit the speed discipline.
    Several helmet manufacturers have recognized the value of L&B; products, and have custom-fit slots for the Quattro (or Optima2, Solo) audible, and some have given exterior access to the audible. One feature I very much appreciate in my Tonfly helmets is that I can access the audible from the outside, letting me know my altitude settings are correct, that my battery is good, and that the unit is active (I frequently turn it off if I’m not going to be jumping for a few days). The unit display turns off after 14 hours, but will reactivate if it senses a climb to altitude. Unless manually turned off, it is always ready to jump. During frequent/daily jump cycles, I don’t bother to turn off my Quattro.
    By the way, for the color coordination-conscious skydiver, these are available with custom-configuration buttons, just like the Optima and Viso.

    By admin, in Gear,

    How the Pros Keep Their Canopies In Perfect Form

    Canopy wear-and-tear can sneak up on you--and, if you’re new(ish) to the swooping trade, you might not know exactly what parts of your equipment need extra attention. Since a dedicated canopy pilot plies his trade on the basis of impeccable nylon, only a seasoned pro’s advice on the matter will do. To that end, I caught up with multi-disciplinary virtuoso Pete Allum to ask him for his best tips and tricks for keeping that kit in fighting shape.
    Pete started skydiving in 1979, and it didn’t take long for him to clamber up on his first podium. Since 1985, Pete has stood on national- and world-level podiums almost every year (sometimes, more than once). In the pursuit of all that gold--and in the course of his extensive coaching work--Pete has made more than 32,000 skydives. It’s safe to say, then, that he’s seen a few canopies through their life cycles. Here’s what he has to say on the subject.
    1. Pack your own parachute as much as possible.
    When you’re hopping and popping like a broken record, the last thing you probably want to do is wiggle around on a packing mat. Pete suggests that you should suck it up and make the effort, because your personal attention is the most important factor in your gear’s fitness. After all, your packer’s job is to get it in the container. Your gear’s overall well-being is your job.
    “If I’m jumping 20 times a day,” Pete explains, “I certainly won’t be packing it every time, but I want to make sure I have my own eyes on it regularly. Even if I have a very heavy schedule, I’ll make sure to pack it myself at least a couple of times a week. That gives me the opportunity I need to see the things I wouldn’t if I only jumped it. When it’s in my hands, I can check for problems like closing pin damage, dinged grommets and center cell discoloration from sweat.”
    2. Don’t be shy. Keep your standards high.
    Non-ideal openings accelerate wear-and-tear on your gear (as well as your body), so it falls to you to make sure that some standards are being upheld when a third party is compressing your fabric. Pete advocates a professional, proactive position, especially when it comes to stows.
    “Packing stows vary widely, and not everyone is aware of how important it is to be consistent,” Pete admonishes. “So it’s a good idea to make sure your packer is using the same large stows throughout and double-wrapping every stow on the bag.”
    Finally, make sure the packer is dressing the container’s flaps correctly. If they don’t, Pete notes that creases will form, building memory in the fabric over time. These ever-deepening furrows can cause degradation as the container ages.
    3. Watch the wear points on the lines.
    With high performance comes high mechanical stress. A small, aggressive canopy has a tendency to shake the system like an energetic rottweiler thrashes a favorite chew toy, so you’ll need to keep an even more vigilant eye on your canopy’s wear points: especially the lower control lines and the places at the top and bottom of your lines where your grommets like to grind. If there’s even a hint of fraying on your lines, bringing your gear to a rigger should rise to the top of the to-do list.
    “When I’m in Florida, it’s the easiest thing in the world to bring it over to Performance Designs, so I’ll pop over at the earliest sign of wear,” Pete says. “When I’m farther afield, my standards have to relax a little, but it’s still a top priority to get it done.”
    4. Give your pilot chute an extra look.
    Pete recommends that you check for wear at the bridle attachment point at every opportunity. Beyond that, he notes that you should occasionally tug out the kill line and check it for fraying, twisting and shortening.
    “The system has a couple of inches of margin,” Pete explains, “But if the kill line measures outside that allowance, you need to take it to a rigger.”
    5. Keep an eye on how many jumps you’ve already put on the canopy.
    Especially if you aren’t a logbook-lovin’ kinda jumper, it’s easy to lose track of a canopy’s jump numbers. According to Pete, that will need to change. When it comes to jump numbers, swoopers don’t enjoy the luxury of unintentional ignorance.
    “Especially if you’ve been jumping someplace hot and/or dusty, it pays to know exactly how far along you are,” Pete advises. “As soon as the ticker goes over 200 jumps, I start to pay way more attention, even though the line set is expected to last much longer than that.”


    6. Be an active participant in a high-caliber team.
    When your zoomy descent becomes the focus of your skydiving days, your need for a professional team of advisers increases exponentially. Take time to build relationships with the very best, most enthusiastically recommended riggers, packers and coaches you can find, and don’t hesitate to reach out to them for guidance. It takes a village to raise a safe (and super) swooper, after all.
    To pursue the perfect swoop under the matchless tutelage of Pete Allum, reach out to him through Flight-1.

    By admin, in Gear,

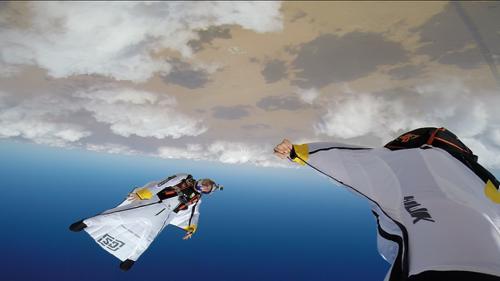
    S-Fly Introduce 'The Hawk' Wingsuit

    With the Hawk, the S-Fly team were looking to design a suit that maximizes manoeuvrability and agility in the skydiving and BASE environments.
    By maximising the pilot’s abilities to perform rolls, flips and precision carving from both back and belly with smooth transitions, the Hawk allows the pilot to creatively express their flying style.
    While extremely maneuverable, the Hawk still provides the lift and power while flying on your back or belly, to allow dynamic acrobatics without dropping out or sacrificing excess altitude. The result is a really fun, very fast and powerful freestyle acrobatic wingsuit designed for intermediate to expert level pilots.


    The Design
    The high performance and maneuverability of the Hawk was achieved by building upon the already successful Verso platform. S-Fly increased the surface area of the arms, extended the leg wing, adjusted the profile and sweep of the arm wing to maximise speed.
    Additionally, in classic S-Fly style, there are no grippers allowing free wrist and hand movement.
    The inflation and pressurization of the Hawk is where the guys at S-Fly feel the suit really stands apart in the modern wingsuit market. The suit remains inflated while transitioning through all maneuvers and positions, but with a smooth unhindered feel. This smooth and consistent inflation of the Hawk is powered by the specific design and placement of the inlets and the four independently fed elements of the wing.


    The Airfoil
    The Hawk’s arm and leg wings are fully pressurized in flight. The two arm wings are fed by wide mesh valves located along its leading edge. The leg wing is fed by three pronounced and reinforced inlets located on the front and three on the back. This system ensures optimum distribution and pressurization while minimizing drag in all positions.
    The “body” is comprised of a single cell that runs from the chest, down the circumference of the legs and to the ankles. The “body" is an evolution of the original mono-wing design from S-Fly. Through the extensive testing phase, it was found that this design allows unique and total freedom to move the pelvis, giving the pilot unencumbered and precise lateral movement without compromising performance. Through the mesh valves located on the arms, and two inlets placed high on the back, the “body” is effectively inflated while flying on the back and belly.


    The Hawk is constructed with Parapack light which is much lighter, has the same aerodynamic properties and is equally durable to normal parapack. The suit is surprisingly light and strong the fabric feels and how much faster it feels in comparison to other fabrics used during the prototype phase.
    Options

    *Quick Zip Cut arm wing release system

    Textured BASE soles

    Chest zipper port for camera access

    Fast leg zipper opening strap

    By admin, in Gear,

    Aerodyne Release Pilot7 Canopy

    Aerodyne recently announced the release of their new canopy, the Pilot7. This new main, which was initially developed with wingsuiters in mind, is a 7-cell variation of the popular Pilot canopy which Aerodyne have sold for over a decade. The original Pilot canopy is in fact the company's most successful product, with the 9-cell elliptical holding an average rating of 4.67/5 based off 69 votes in our gear section.
    Aerodyne say they found their design for the Pilot7 heavily influenced by the strengths of the initial Pilot, and wanted to ensure that the new canopy lived up to the expectations set by its older sibling.
    Something for Everyone
    Both beginner flyers and experienced wingsuit pilots have reportedly demoed the Pilot7 with great results and public feedback as to the performance of the canopy. The company claims the Pilot7 provides 'superbly consistent openings', while in flight offers the pilot something fun and agile, while still remaining stable and easy to fly.
    "It has a flat glide and a powerful flare, likely more so than any 7-cell you’ve experienced.", claim Aerodyne.
    It was clear that solid, reliable openings were a key factor for this canopy during development, and testimonials from those who have been demoing the Pilot7 seem to confirm that Aerodyne have really hit the nail on the head with regards to the reliability of openings.
    While the focus of the Pilot7 was wingsuiting, Aerodyne say they expect that the canopy may become popular in other demographics of jumpers. Due to forgiving openings, handling characteristics and low pack volumes of the canopy, it could serve as a great choice for all skydiving skill groups, however could prove especially useful for beginner skydivers.
    Materials
    The standard version of the Pilot7 will come in ZP, while there are also the options for Aerodyne's honeycomb low pack volume ZPS and their new UltraLPV material.
    "This builds the top skin and stabilizers from ZPX, and the ribs and bottom skin from FX-11 (the low pack volume material used in the SmartLPV). We use the ZLX lines to create an amazingly low pack volume canopy."
    Available sizes: 117, 137, 147, 167, 187, 207, 227, 247 sq ft.

    By admin, in Gear,

    Is It Time For A Reline: Here's How to Know

    Do your suspension lines have a noticeable five-o'clock shadow? Maybe it’s time for your gear to spend the weekend with your friendly neighborhood rigger. If you’re unsure, you’re not alone--plenty of skydivers hem and haw about this particularly important aspect of canopy maintenance.
    Looking for a little more convincing? Here’s a brief education on line maintenance by Karen Saunders, one of the few (and one of only two women) to hold the lofty Advanced Rigger ticket from the British Parachute Association. Karen has seen enough fuzzy line sets to give any sane canopy pilot the night sweats, and she wants to make sure it’s not you that gets to live the nightmare of a mid-swoop snap.
    1. Go with your gut.
    “Trust your instincts. If you think that maybe your lines are looking a bit shabby, they probably are. Most people will look at their line set and say, That looks a bit shit, but I’ll do something about it tomorrow. Tomorrow turns into a week, and then a month. Before you know it, you’ll have a line snap or an off-heading opening. Fix it before you create yourself some problems.”
    2. Know what you’ve got.
    “The most important thing is to know what type of line is on your parachute. Most people don’t--and if they don’t, then they won’t know how many jumps they can expect to get out of that line set before it needs to be replaced. And they also won’t know whether to expect to have line shrinkage or whether it is going to go the other way and simply snap when it reaches the end of its life cycle. Vectron and HMA will do just that if you don’t take care of them: Snap. They won’t give you a warning aside from the fact that they will start to fray as they age.
    The other thing to think about is where your line set actually comes from. Most people will buy their line sets from manufacturers, but there are riggers out there that will make cheaper line sets themselves. I can spot a manufactured line set from anything else in a flash, but most people couldn’t--and maybe that’s the line set have got on your canopy that you bought from somebody in good faith. It is always best before you buy anything to get it checked out.”
    3. Get some visual reference.
    “Once you know what line type is on your parachute, look at Performance Designs’ line wear charts for your lines to get an idea of what wear actually looks like. It may surprise you. Using that reference as an example, you can see how deterioration looks over a given period of time and what percentage of strength you lose.
    You can test your new knowledge immediately by looking at the bottom part of your brake lines and the stabilizers. Those lines are always going to take the brunt of the wear. Generally, having the bottom part of your brake lines replaced at the first sign of wear is going to save you a whole world of problems.”
    4. Watch for the warnings (if you have a line type that broadcasts them).
    “If your lines are made of Spectra or Dacron and you need a reline, you can expect to get some bad openings: an off-heading or big surges after opening. That’s generally because the slider is moving up and down your lines, heating them up and shrinking them.
    If your parachute opens and it is not on-heading, then it is generally an indication that it is going out of trim. You need to get somebody to look at that. When you do, they might look at it and tell you that the lines are okay; maybe it’s just your body position causing the problem. If they look at your lines and go holy shit, man, you need to replace straight away, then you have your answer. Either way, you’ll have peace of mind.”
    5. Don’t get tunnel vision.
    “Don’t just look at your lines. Your lines are suspended by some binding tape which needs checking as well. Especially after a hard opening, be sure to look at the tape where each line is attached to your canopy, as well as the fabric around it.
    Kill lines are another thing. Everybody forgets that a kill line wears out in the same way as a suspension line, except a lot more quickly. If your kill line is made out of Spectra and has shortened, then you’re going to start having problems with your openings. The dead giveaway is finding that your pilot chute is turned virtually inside out every time you land.
    A kill line wears throughout the bridle. The weakest point doesn’t have to be at the bottom or top--it can snap right in the middle--so make sure you pull it through from both ends when you check it. Pull it as far as you can from one end and then pull it as far as you can from the other end to have a good look.
    Finally: If you’re getting a new line set, please, please, please replace your slinks as well. Don’t put a new line set on it and put an old set of slinks on it. That defeats the object of this exercise. They are not infallible. They do fail, and the last thing you want is for a slink to fail at 200 feet, because you’re not going to survive that.”
    6. Remember: The integrity of your lineset isn’t a good place to save a few bucks.
    “The costs to reline aren’t as bad as you might think. I can tell you roughly what I charge, but I can’t speak for other riggers. That said, I will always look at something for free, and if someone asks me for it, I will always give my advice for free, and that’s also the way most of the riggers I know like to work.
    I charge 15 pounds, which equates to about 20 U.S. dollars, to replace both lower brake lines. If the lowers go from the cascade all the way to the toggle, I charge 40 pounds--which is something like $60. If you compare that amount of money to losing a brake line when you’re flaring--or when you are at 100 feet--you see the value. You have to weigh the cost of your own safety.
    If you don’t happen to have a rigger on your dropzone, then go to an experienced jumper. See them and say, Hey, I’m a bit worried about this. What do you think I should do? If they look at it and start laughing, you have your answer.”

    By admin, in Gear,

    Squirrel Reveal Wingsuit Targeted Epicene Canopy

    The guys over at Squirrel have just released a video for their latest canopy, the Epicene. The almost 4-minute long video, which includes a "Rick Roll", also discusses why the Epicene is a great canopy for wingsuit pilots.
    While Squirrel have historically focused primarily on BASE orientated products, the Epicene is focused towards the skydiving community, though wingsuit flyers in particular. Squirrel have stated that while the Epicene is the best choice for wingsuit flying, it is also perfectly adequate for free flyers as well.
    The Epicene is built with wingsuit openings in mind and is made in such a way that it reduces the risk for line twists and unpredictability, while at the same time opening quickly and also catering to the responsiveness.
    The video also puts focus on the pack size of the canopy, with both TJ Landgren and Mike Swanson praising the F-111 hybrid canopy's pack volume.
    While Squirrel first began releasing information about this canopy mid-2014 it only fairly recently went on sale to the public, and you can find more information on the Squirrel website.
    Editor's Note: Adjustments were made to this article regarding previously misstated information relating to time of release.

    By admin, in Gear,

0