0

Gear

    Squirrel Reveal Wingsuit Targeted Epicene Canopy

    The guys over at Squirrel have just released a video for their latest canopy, the Epicene. The almost 4-minute long video, which includes a "Rick Roll", also discusses why the Epicene is a great canopy for wingsuit pilots.
    While Squirrel have historically focused primarily on BASE orientated products, the Epicene is focused towards the skydiving community, though wingsuit flyers in particular. Squirrel have stated that while the Epicene is the best choice for wingsuit flying, it is also perfectly adequate for free flyers as well.
    The Epicene is built with wingsuit openings in mind and is made in such a way that it reduces the risk for line twists and unpredictability, while at the same time opening quickly and also catering to the responsiveness.
    The video also puts focus on the pack size of the canopy, with both TJ Landgren and Mike Swanson praising the F-111 hybrid canopy's pack volume.
    While Squirrel first began releasing information about this canopy mid-2014 it only fairly recently went on sale to the public, and you can find more information on the Squirrel website.
    Editor's Note: Adjustments were made to this article regarding previously misstated information relating to time of release.

    By admin, in Gear,

    Oregon Scientific ATC Chameleon Review

    Eyes In The Back Of My Head.....
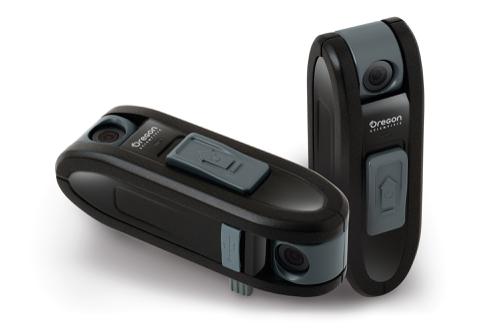
    Remember when Mom told you she had "eyes in the back of her head?" With the Oregon Scientific Chameleon, she really could have em’!
    Ever wanted to see what’s happening behind the camera? Without the hassle of two cameras, syncing in post, and splitting screens/picture in picture? With the new Oregon Scientific ATC Chameleon, syncrhonized video with two channels/angles in a single stream is quick and easy. The camera allows users to see what’s coming up and what’s gone by with just one button.
    This camera is unique in that it features dual lenses, shooting two views to a single stream that may be displayed either side by side or over/under. This allows not only for POV, but reactions to the POV. The large button allows even the most thick mitten or glove to turn on/off the camera. Powering up the camera also starts record mode.
    Note: See our comprehensive side-by-side shootout of the top POV Action Cameras here
    Overview
    At 4.5 x 1.5 x 2.25 inches, this slightly larger than average POV camera is a single-button on/record camera. The only user-selectable option on the camera is a switch that allows users to determine whether they’ll shoot over/under or side by side video. All in all, it’s incredibly simple.
    The lenses are both 170 degree field of view lenses. In other words, they’re ruber-wide. Given that capturing action and POV reaction is the goal, they need to be wide, as they’re generally quite close to the subject on one end or the other. The lenses are pretty good on this low cost camera. Each lens can rotate 180 degrees; one rotates vertically, the other horizontally. The camera is not intended for shooting 3D content, as the two lenses cannot overlap or point at the same subject.

    Mounting
    The camera mount profile is somewhat higher than some of the other POV cameras; the dual V-clip mount may easily be removed for flush mounting. This will cover the microphone, but audio is rarely a priority in POV cameras. If for example, mounted directly to a helmet, mudflap, chest strap, or goggle strap, the mount is superflous, and the flush mount ability is likely preferable. Oregon Scientific offers several different mounting options such as ball mounts, flat mounts, adhesive mounts for surf, helmets, etc.
    Recording Media
    The ATC Chameleon stores files on a MicroSD, up to 32GB/Class 6 card. One minor observation; the recessed card slot housing makes it challenging for fat fingers to extract a card. The housing also offers a switch for camera status, a Micro USB port, and a switch for horizontal/vertical views.


    Like most of its small-imager competitors, the Chameleon displays rolling shutter bending at very high shutter speeds. Keeping the camera reasonably horizontal in high light significantly reduces this phenomenon (in all POV cameras).

    Codec
    Like all other POV cameras, the Chameleon also uses the h.264/mp4 codec. It offers a slighly lower bitrate than other cameras; it’s 8Mpbs compared to other cameras at nearly double the bitrate. Like most POV cameras, this low bitrate/high compression is challenged in low light, but in high light and contrasted scenes it works quite well. Audio is a single channel AAC stream, and is similar in quality to most other POV cameras.
    Output
    The Chameleon offers two output resolutions; 1920 x 720, or 1280 by 1440 (yes, that figure is correct, taller than wide). Vertical mode applies 1280 x 720 to each channel, while horizontal mode is VGA per channel. Vertical mode provides for the best imagery in most instances. Vertical mode also allows very easy splits for full-screen views in any NLE system. This is the mode I recommend for most purposes.

    Overall View
    This camera is brilliant in design. Fast, easy to use, and offers a perspective that no other camera currently offers. Sure, one could purchase two separate POV cameras, have two separate streams, sync them in post, and have a similar result. However, it will cost twice as much and take twice as long, not to mention other variables. In this aspect, the Chameleon shines.
    The low bitrate coupled with small imagers makes it a challenge in low light. Additionally, the codec will not open in every NLE or media player. For example, while the files will open in VLC, the Windows Media Player or Quicktime Basic will not open these files on a PC. Corel Videostudio will not open these files, while Adobe Premiere CS or Sony Vegas Pro/Movie Studio does properly decode these files.

    This shot was taken post-sunset. The camera adds quite a bit of gain, shifting color and softening detail in very low light. This is similar to most POV cameras in its class. In this screengrab, the resolution/size shows 1280 x 1400 in over/under mode.
    The split view denies either view the best quality image possible; this is inevitable and I cannot ding the camera for the way it chooses where to split the image. Again, the unique and creative nature of the split view makes up for this, however.
    The creative views possible with this camera are unlimited. It is quite durable, can be dunked underwater (it is not waterproof for sustained periods of time, OS does offer a water housing), and is capable of drops from high areas. I dropped mine from approx 12’ and it was fine, even after landing on tarmac and impacting on the edge of the lens.

    In this image, the compression causes contrast to bleed into highlights and shadows, softening the details in the image, However, as a B Roll and unique view, this won’t be an issue in most scenarios.

    Post Production
    As mentioned, not all NLE’s will properly decode this camera, but most should. Transcoding will be required for users of Final Cut Studio, while FCPX users will not need to transcode files from this camera.
    The width of the lens is the same FOV as most popular POV cameras, so it will cut nicely into other POV cam content. Another option with 155-180 FOV content is that a negative spherize and crop filter may be applied to flatten out a too-wide image.
    Expect to do some color correction. Bear in mind that two channels are now being corrected, so if lighting or color are dramatically different on one channel, the other will likely be adversely affected. It’s quite easy to split channels in any NLE for individual color correction. The standard AVC color correction process (Shift gamma, reduce yellow, pop sat) will help this camera really shine. A tiny bit of edge sharpening will benefit low contrast images (again, similar to other AVC-based camera files).


    Summary
    This camera has some terrific value for the budget-minded action-sport enthusiast. It also offers unique camera angles and an ease of use that is rare in the POV world. The angles alone make it a useful tool in any videographer’s tool box for walkthrus, capturing challenging angles, seeing around corners, capturing body positions while showing the environment, or just plain fun (I put one on a dog collar to capture the dogs ears and the wagging tail). The picture quality isn’t bad, the one-button record makes it ridiculously easy, and the price is definitely right. I’m happy to have a couple in my POV kit; they’ve come in handy already. If budget, a unique view, or simply another tool in the box are considerations, this is a terrific option.
    Price:
    $199.00 retail, available online or in sporting goods stores here.

    For More Information
    http://us.oregonscientific.com/cat-Outdoor-sub-Action-Cams-prod-ATC-Chameleon.html
    For training on AVC or POV Cameras:

    www.vasst.com
    About The Author

    DOUGLAS SPOTTED EAGLE is an audio and video pro. He is a Grammy recipient with DuPont, Peabody, and Telly awards lining his studio; he is also a participant/producer in multiple Emmy winning productions. Douglas is the Managing Producer for Sundance Media Group, Inc. and VASST, authoring several books and DVDs and serving as a trainer and consultant for videographers, software manufacturers and broadcasters. He is the author or co-author of several digital media titles including Digital Video Basics (VASST), The FullHD (VASST), and Vegas Editing Workshop (Focal Press) among many others. Douglas is an accomplished aerial photographer who thrives in the adrenaline-filled world of fast-action videography. He is active as a multimedia producer, trainer, and presenter, utilizing the latest technology as part of his workflow.

    By admin, in Gear,

    How To Show Your Three-Ring System You Care

    Three-ring systems look pretty tough. They’re made of thick, heavy metal, after all – what could possibly go wrong? Bad news: lots.
    The rings are husky little guys, that’s true. However, they depend on the webbing behind them–and the cutaway cables that fasten them in the ready position–in order for them to work. It behooves you to know when and how to maintain the system.
    How Sloppily Maintained 3-Ring Systems Can Cause a Bad Day
    Nylon webbing, the material used to make skydiving (and BASE, for that matter) risers, stiffens over time to conform to the position in which it’s usually stored.
    Sometimes, they “set” so firmly in that position that the risers can’t flex the backing nylon–and can’t detach from the harness when the jumper engages the cutaway system, especially during a low-drag malfunction (such as a streamer).
    This, of course, is a very bad thing.
    The B-Sides
    You’ve probably gotten used to looking at the little snowmen of your three-rings during your preflight gear checks. Great! How often do you look behind them? The loop that connects the cutaway cable to the three-ring system can get dangerously abraded over time. You should peek at it every time you pack.
    The Deep Tracks
    To keep your three-rings in proper working order, the three-rings need to be manually disassembled, the cables checked and the webbing treated to a little massage.
    For skydivers, this is the stuff of riggers. According to Federal Aviation Regulation Part 65-111, skydivers “must be under the supervision of a rigger when performing any maintenance on a parachute system.”
    Don’t let your rigger have all the fun, though. Having a hand in the process has the significant benefit of familiarizing you with the operation of the system and increasing your confidence that it’ll be there when you need it. The best advice is to go through these steps every three months, whether or not you’ve been jumping the rig.
    Check your user’s manual for specific instructions. You can always find this on the manufacturer’s website.
    Pull the cutaway handle. Set the cutaway and connected cables on a clean surface. (Do not pull the reserve handle – unless you need a repack, of course.)

    Inspect the Velcro on the cutaway handle and the seating on the harness. You may need to use a stuff brush to “fluff” the Velcro and clean off any adherence-preventing dirt, especially if you jump at a dusty drop zone.
    Check the ends of each cutaway cable to be sure they haven’t developed any kinks or rough edges.
    Run a microfiber cloth over each cable. While you do, check for smoothness.
    Disassemble the risers.
    Carefully check each riser for signs of wear. Look especially carefully at the white loop that “locks” the cutaway cable to the three-ring system. (You should be checking this loop each time you pack the rig, but this process gives you a better, closer look.)
    Twist and flex the webbing of each riser near the ring system. You can safely be vigorous. You’ll likely feel the problem-causing stiffness as you do this.
    Reassemble the system. Refer to your user’s manual to ensure you’ve done it correctly.
    Before your next jump, have an experienced jumper or a rigger confirm that the system is correctly reassembled.
    Enjoy a little more gear confidence, dear reader. You’ve earned it.

    By nettenette, in Gear,

    Know Your Gear: Harness and Container Systems Part 1

    Know your gear series: Harness, fitting to your body and effects to consider.
    by Damian Alvarez
    The harness is a fundamental piece of your skydiving gear. As such, you know it like the back of your hand, right? Maybe the answer is "well, not really". Many experience jumpers will answer that. Most novice jumpers looking for their first rig also often neglect the importance of a harness that fits them. Coming from "one size fits nobody" student gear, they don't even know how a harness should fit them. This might change once they order their first custom harness/container system, if they ever do. If you want to know your gear a bit better, or if you want to inform yourself a bit better about what you should look for when buying a harness/container, either new or second hand, then this article is for you.
    What is a Skydiving Harness?
    The harness is the part of your harness/container system that is designed to keep your body attached to your canopies. In today's sport skydiving gear, the harness and container are 2 different but inseparable pieces. It wasn't always like that. In the 60s and early 70s harnesses and containers were interchangeable. That allowed to quickly swap components as needed. While this might seem like a good idea at first, these systems had their own set of problems. They were heavy due to the additional hardware needed, and error prone, as they had more room for assembling errors. In the 70s manufacturers started to integrate both into a single harness/container system, hiding part of the harness in the backpad of the container. This concept stays with us almost 50 years later.
    Even though the harness and container are today a single unit, it is important to know that the container is built around canopy sizes, and the harness is built around body dimensions. A byproduct of these two pieces of gear being inseparable, is that rookies typically focus on a single thing: the range of canopies they can fit in the container. That is not an issue when they are buying a custom harness/container (as long as the body measurements provided to the manufacturer are accurate), but novice jumpers start their skydiving career typically by buying used gear. Take a look at your DZ next time you are there, and pay close attention to how different harnesses fit their owners. I bet you'll find a few ill-fitting harnesses among new jumpers. Later on we'll see why this is important. But first, we have to know a bit more about the harness itself.
    Basic Harness Components and Construction
    Before getting into the details of harness construction, it makes sense to take a look at the webbing and tape types used for it. Distinguishing webbing and tape is not obvious. Generally it is considered webbing anything wider than 1" and with a tensile strength higher than 1000 lbs, and tape anything less than any of these 2 parameters. The table summarizes the most common webbing and tape types in harness construction. The pictures below show how they look like and how to distinguish them.
    Common webbings and tapes used in harnesses. Kind    Type Tensile strength Width Common use Webbing    Type 7  6000 lbs (2721 kg) 1 23/32" (4.3 cm)  MLW, laterals and risers    Type 8  4000 lbs (1814 kg) 1 23/32" (4.3 cm)  Risers and straps    Type 12  1200 lbs (544 kg) 1 23/32" (4.3 cm)  Reinforcement around rings    Type 13   7000 lbs (3175 kg) 1 23/32" (4.3 cm)  MLW and straps    Type 17  2500 lbs (1134 kg) 1" (2.5 cm)  Chest straps, main risers    3" Type 4  1800 lbs (816 kg) 3" (7.6 cm)    Confluence wraps Tape    Type 4-B  1000 lbs (453 kg) 1" (2.5 cm)   Reinforcement around rings and confluence wraps

    Type 7 webbing. Has yellow lines at the edge. Photo: Bally Ribbon Mills

    Type 8 webbing. Has a black centerline. Photo: Bally Ribbon Mills

    Type 12 webbing. Has red lines at the edge. Photo: Bally Ribbon Mills

    Type 13 webbing. Has black lines at the edge. Photo: Bally Ribbon Mills

    Type 17 webbing. Photo: Bally Ribbon Mills

    3" Type 4 webbing (Spec. PIA-W-4088). Do not confuse with Type 4 tape. Some authors consider this as tape, not webbing, due to the low tensile strength it has (relative to its width). Photo: Bally Ribbon Mills

    Type 4-B tape (Spec. PIA-T-5038). Do not confuse with 3" Type 4 webbing. Photo: Bally Ribbon Mills
    Now, you can try and take a look at your harness. Can you identify the different types of webbing and tapes used on it? If you do take a look, you'll also notice that in most parts of the harness you have actually two layers of webbing instead of one. There are two reasons for it: to make a stronger harness, and to prevent slippage.

    Harness diagram with its main components.
    Now that we know what are the materials used, we can get into the different parts on a harness. Any sport skydiving harness has the following components:
    Detachable main risers:
    These are the risers that you are most familiar with. They are attached to the rest of the harness via the 3-rings system, and they depart with the canopy when you cut away. They are also some of the parts of the harness that see the most wear. The most common type are the "mini-risers" with "mini-rings". These are made of Type 17 webbing. During the transition period where this style of risers became popular, there were occurrences of riser breakage close to the grommet used for the 3-ring system. This was particularly dangerous with RSL equipped rigs, as if the riser broke below the RSL attachment ring (while the opposite riser stayed attached), your reserve could fire into a trailing main, and you'd be set for a bad day. The Collins lanyard, the double-sided RSL system, or the LOR system try to prevent that from happening, by either releasing the other riser, or by keeping the reserve pilot chute in the container until both risers leave. Regardless of these solutions, to diminish the chances of mini-riser breakage, most manufacturer reinforced their mini-risers with a piece of Type 4 tape sewed between the front and back risers at the grommet area. Parachutes de France opted for an alternative solution, reversed risers, that avoid the grommet piercing the webbing altogether. With these changes, the number of risers breaking was reduced drastically, and is today almost unheard of.
    If you are a student, you are probably more familiar with the "normal" risers, ie: the ones with Type 8 webbing and full size rings. These risers are stronger than mini-risers, and the leverage provided by their bigger rings allow to cutaway with less force. They are however bulkier and have more drag in flight, and have fallen out of fashion among most sport skydivers.
    Non-detachable reserve risers:
    These are the risers that you will get to know one day during a cutaway, if you haven't done so already. They are an integral part of the harness. In many harnesses they are part of the same webbing of your MLW, instead of a separated piece of webbing sewed to it. They are normally Type 7, even though other materials are possible.
    Main lift web (MLW):
    The main lift web, typically shortened to MLW, is the piece of webbing that holds the whole harness together. It takes all the load from opening and during flight, all the way from the risers (either main or reserve) to the leg straps, where you are hanging/seating. Due to that, it is typically the strongest part of the harness, made of Type 7, 8 or 13. Even though this is the strongest part of the harness, it doesn't necessarily mean that other parts are significantly weaker. It can be further divided in upper MLW and lower MLW. Conceptually, you can think about the lower MLW as the part that goes from the chest rings (or chest strap junction) to the hip rings, where your handle pockets are sewed. The upper MLW is the part that goes from the chest rings (or chest strap junction) to the upper part of the junction between MLW, reserve risers, and diagonal back straps. The length of the MLW is normally fixed, except in some student or tandem gear. In these cases the length can be adjusted to accommodate the sizes of different users.
    Chest strap:
    The chest strap is one of the 3 straps you have to fasten to adjust your harness. It secures your torso in place, and keeps it in the space formed by the chest strap, the MLW, and the back straps. It is not designed to take a huge load, since most of it is transferred from the risers to the leg straps by the MLW. The webbing used has typically a lower tensile strength. It is normally either Type 8 or Type 17. The hardware to fasten the chest strap has been also certified with lower loads than leg straps hardware (500 lbs. vs 2500 lbs.).
    There are jumpers today "abusing" their chest straps, by putting a load on them that they weren't designed for. Think of hybrids or Mr. Bills. Harnesses are typically "overbuilt", so they are unlikely to fail due to these practices, particularly with hybrids, due to the limited stress induced in the seams, webbing and hardware (for a 2 belly flier + 1 freeflyer hybrid, just 100—150 lbs. hang from each chest strap). However, on Mr. Bills, the load can be significantly higher. A careful jumper should try to hang on the upper MLW on a Mr. Bill, instead of the chest strap.
    Leg straps:
    The leg straps are the remaining 2 adjusting points of your harness, besides the chest strap. They are attached to the hip rings or sewed directly to the MLW. In some older designs without rings, they could also be part of the same piece of webbing of the MLW. They need to be strong, but sometimes they aren't as sturdy as the MLW. They can be Type 7, 8 or 13.
    Freefly bungee:
    The elastic cord that attaches both leg straps isn't necessarily a part of the harness. However, it has a small but very important function. It prevents the leg straps from slipping up your leg towards your knee. The largest "hole" in your harness is right there, between your laterals and your leg straps, waiting to mess up your day when you have a premature opening while sit flying. Tandem harnesses have a "Y" strap that has essentially the same function. If you don't want to find yourself in a difficult situation like the granny on the video, use this simple addition to your harness. If you still think that this can't happen in a sport harness, well, take a look at the remaining 2 videos and think again.
     
     
    Laterals:
    The laterals are some of the most commonly overlooked parts of the harness. They are relatively small and out of sight, so people tend to forget about them. They are the parts that join the MLW (or the hip rings, depending on the harness design) with the bottom end of the diagonal back straps. This last junction is hidden inside the backpad of the container. They also form an horizontal back strap, which I am considering here as part of the laterals itself, even though strictly speaking, it is not. They are normally made of Type 8 webbing, but Type 7 or 13 are also possible. Their only function is keeping your rig close to your back. It is a simple but important function, and we'll come back to it in part 3 of this series of articles.
    Diagonal back straps:
    If laterals are overlooked, it is safe to say that the diagonal back straps are completely ignored. They sit below your reserve risers and typically wrapped in fabric, and they are completely out of sight from that point on and all of the way to where they meet the horizontal back strap AKA (in this article at least) laterals. Even with the reserve tray completely open, they are out of sight, trapped between the backpad and the bottom fabric of the reserve tray. Like laterals, they can be made of Type 8, 7 or 13. Their function is holding your torso in place and keeping the whole harness together. Without them, the container would support a higher stress, which would wear it and break rather sooner than later. There are multiple configurations possible for them. They can have an "X" arrangement, where the left shoulder straps crosses the back and joins the lateral at the right side, and vice versa. They can also have a "V" arrangement, where the webbing goes down from one shoulder, wraps the horizontal back strap, and goes up again until it reaches the opposite shoulder. Other arrangements are also possible —like "U" for instance, but manufacturers don't discuss these details openly and knowing what is really used would require tearing open the containers.
    Hardware:
    The hardware binds together 2 or more pieces of webbing, either permanently or temporarily. Taking a look at the hardware used in harnesses, you can see 3 different types from the functional point of view:
    Fastening hardware:
    These are the quick fit adapters found in chest straps and leg straps. For the leg strap adapters there are 3 common types: thread-thru, thread-thru with locking bar, and flip-flop, shown in the pictures. All of them are rated for 2500 lbs. The chest strap has a lightweight thread-thru quick fit adapter, rated for 500 lbs, independently of the width of the chest strap.

    Thread-thru leg strap adapter.


    Thread-thru leg strap adapters with locking bars.


    Flip-flop leg strap adapter.
    3-Rings:
    These are the 3 rings we are all familiar with. There are two variants: The original, rated for either 2500 lbs or 5000 lbs, depending on the particular model, and the mini version (RW-8), rated for 2500 lbs. The tandem variants are slightly different in the large ring to allow to connect the student harness, and are always rated for 5000 lbs.
    Hip and chest rings:
    These rings are optional and normally use the same type of ring found in the large ring used in the 3 rings system. In some cases the ring is completely flat, as opposed to the large ring in the 3 rings system, which are bent at the point where they are connected with the MLW. Some rigs have a completely round hip ring, instead of using the large ring from the 3 rings system.
    Junctions:
    Obviously all the different pieces of webbing have to join somehow. These junctions can be of 4 types:
    Rings:
    In a ring junction, the webbing goes around the ring folded on itself —typically with a reinforcement tape in between the ring and the webbing—, and is locked in place with a stitching that follows a given pattern. It is important to note that the pattern is not arbitrary. Its shape, thread and number of stitches per inch determine the strength of the junction.

    Hip ring with Type 8 and Type 4 as reinforcement at the leg straps. Note how the ring is completely flat.
    Stitching points:
    Normal stitched joints are simply that, points were 2 or more pieces of webbing are sewed together with a particular pattern.

    Chest strap junction with Type 8 and Type 7 webbings.

    Hip webbing sandwich with Type 7, Type 8 and Type 12 webbings.


    3 rings junction where you can see most of the webbing types used in modern harnesses. Note how the large ring is bent at the webbing loop, instead of being flat.


    Layers in a confluence wrap below the 3 rings system.
    Confluence wraps:
    Confluence wraps are similar to the previous type, but there a piece of reinforcement tape wraps the junction to make it stronger. These reinforcement tapes are particularly important in high stress areas, like where the 3 rings, the reserve risers, and the MLW meet. One thing to consider when two pieces of webbing are sewed together, is that the strength required to break that junction is way lower when "peeling" than when "shearing". A manufacturer can in most cases design its joints to prevent situations where peeling forces are applied. However, depending on the harness design, these situations might occur. Confluence wraps are added to strengthen joints that are at risk. A couple of years ago, some BASE rig manufacturers had to modify the construction of their harnesses because of this. If you want to know more I suggest you take a look at this excellent article.
    The confluence wrap that stitches together the MLW, reserve risers, main risers and diagonal back straps is normally hidden in the mud flap. But some manufacturers —not all— have another confluence wrap that you have seen a thousand times but probably didn't pay attention to it: the wrap that traps the 3 rings locking loop in the main risers.
    Adjustable hardware:
    Here 2 pieces of webbing are locked in place together with a fastener. As we saw before, they are normally located in the chest strap and leg straps, but there are other possible points, like in student harnesses or belly bands.
    End of Part 1
    Hopefully by now you feel a bit more confident about the construction of your harness. This is important knowledge to better understand part 2, where we will take a look at the different articulations and other options possible in modern harnesses. Part 3 will focus on the proper fitting of the harness, and how a bad fitting can affect our performance or safety in the air. Stay tuned for more!

    By admin, in Gear,

    Shimano Enters the POV Camera Market With the CM-1000

    Action cameras are popping up all over the place, from all sorts of companies. Garmin shocked a few with their release of the Garmin Virb in the third quarter of last year. Now it's the Japanese manufacturer Shimano that has joined the party. Unlike some of the other action camera competitors, Shimano is a long standing company founded in 1921, but is typically known for their cycling, snowboarding and fishing equipment.
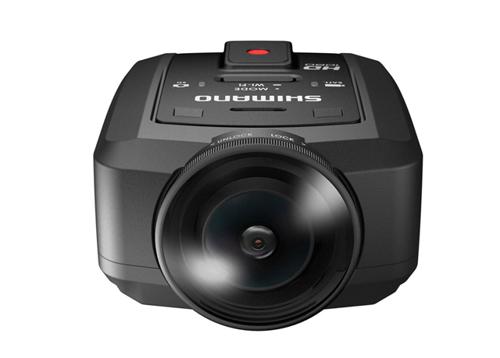
    Shimano will be releasing their first POV action camera in May this year, which will look to compete with brands like GoPro, Contour and Sony. The new 'CM-1000' as it's called, certainly has some interesting features that could allow it to challenge the competitors. Unlike most other POV cameras the CM-1000 is waterproofed to 30 feet without the requirement of any additional housing. The weight is also very impressive, weighing in at just 86 grams; more than half that of the GoPro Hero 3 Black Edition when waterproof housing is attached.
    The most impressive feature for us is the aperture of the camera lens which sits at F2.0, as opposed to most competitors' F2.8. This full-stop increase in light will allow for better low-light performance from the camera, a topic that is often focused on and often falls short in some manufacturers. The sensor is also very impressive, boasting a 16 megapixel backlit CMOS sensor, likely able to produce high quality still images as well as full HD video.
    The CM-1000 will come with multiple lens modes, a standard 135 degree view as well as an ultra wide angle 180 degree view. Another pretty cool feature is the auto image rotation, which will automatically rotate the picture to the correct orientation, regardless of how you hold the camera. Bells and whistles come in the form of ANT+ capabilities, allowing users to connect the device to training devices and heart-rate monitor. Especially useful for those who like to keep track of their data.
    While one would imagine that coming from a company who is renowned for their cycling gear, that their camera would be focused towards cyclists. The CM-1000 seems to target all POV users, with the company's focus put on things like waterproofing.
    In summary, the CM-1000 looks impressive on paper, it has what appears to be a high quality sensor, a large aperture and is light weight. It is however important to remember that these are only a fraction of variables that will affect the overall video and image quality. And it will be interesting to see how the camera handles transition in lighting, as that's always an important factor with POV cameras. Though if it performs as one would expect from a company with a history of quality products and a large development budget, this camera is definitely worth keeping an eye on.
    Shimano's CM-1000 will come with a lens cover and two mounts (one adhesive and the other helmet mount) and USB cable.
    The CM-1000 will set you back $299 on release.

    By admin, in Gear,

    GoPro Hero 4 Silver vs Black - Hypoxic Comparison

    We recently announced that GoPro had planned to release their latest action camera, the GoPro Hero 4. The Hero 4 is set for release this month, and since at the time of our original article, we had little to no footage of what the Hero 4 performed like, specifically in a skydiving environment, we couldn't really make a call on value between the different editions.
    Hypoxic has now however released a video showing a comparison between the Hero 4 Silver and the Hero 4 Black, and the initial results are a little surprising.
    View Full 1920x1080 Hero 4 Silver Image
    View Full 1920x1080 Hero 4 Black Image
    The video was recorded at 80fps for the GoPro Hero 4 Black and at 60fps for the Hero 4 Silver, though little noticible difference is seen in the smoothness of the video in standard playback. There are however some differences between the two cameras, as can be seen when comparing screenshots of the video. We decided to analyze the screenshots from the video and see who really comes out on top between the Hero 4 Silver and the Hero 4 Black. All example pictures are 1080p (1920x1080) cropped at 100%.
    The first thing we looked at when examining the video, were the noise levels. In the example shots above, noise can be seen in the gradient of the sky. Noise levels for both these cameras were good, and it is difficult to pick a clear winner, though for this test I would suggest that the Hero 4 Black comes out on top, though still not a bad result for the Silver Edition.
    Next we took a look at some of the primary aspects of image quality, focusing on sharpness and detail levels. This is where we were quite surprised, with the Hero 4 Silver taking a very clear lead over the Black Edition on sharpness and detail. This is an area where many would expect the top tier camera to perform at its best, and give the buyer a reason to spend the extra $100. Instead we find that the Black Edition lacks in sharpness.
    In the image above, one can note the sharpness/clarity difference easily by examining the helmet and rig on the top two images. The "Mirage" text is sharp and easily readable on the Hero 4 Silver, while on the Black Edition it's blury and hard to distinguish. Also take a look at the buildings on the top images, on the right of the screenshots. Again the Hero 4 Silver is sharper, both with objects in close range to the camera and in the distance. Comparing the skydiver in the orange and blue jumpsuit on the bottom images, also show you that facial details are picked up much better by the Silver Edition.
    Finally we looked at the contrast and saturation, and again we were a little surprised. It was much closer between the two cameras with this test and with regards to saturation, neither of the cameras look oversaturated and they both seem to handle the dark gray and black quite well. When examining the socks of the skydiver, it does seem to handle the whites a bit better on the Silver Edition, both are quite close and very much acceptable, but there appears to be a more crisp whiteness in the left image. This test however is hard to establish with certainty, as the increased sharpness in the left image may suggest crisper colours, while the Hero 4 Black's may appear a bit more washed out due to a lack of sharpness in the image.
    It's important to note that in camera manufacturing, there are variables that can result in batches or individual cameras performing poorer (or better) than the standard. So it's possible that this was the case with the two cameras above. Though whether this is to blame for the Hero 4 Black's lack of image performance, will likely only be told with time, as more footage is shot and released.
    A much more likely reason for the decrease in performance when looking at grabs taken from a video, as pointed out by the user "cbjetboy" in the comments below. Is that the Black is recording at 80fps as opposed to 60fps. This increase in frame rate is likely to have a negative impact on the result seen from a screenshot, as opposed to as if it had been recorded at a lower fps. It is difficult to say exactly how much of an impact this had on the results, but it seems we will need to wait for further comparative testing before we can come to a solid conclusion. Though when comparing the videos themselves side by side, there is little to suggest that the Black Edition comes out any better than the Silver.
    Based on what information we do have though, if you assume that both these cameras are operating at their normal performance levels, unless you're looking to use the 30fps 4k recording that's available solely on the Hero 4 Black, these early tests suggest that you may be just as well of sticking to the Silver Edition and saving yourself $100. The Silver Edition also comes with the perc of having a touch screen for easier navigation and image/video previewing.

    By admin, in Gear,

    How To Buy Used Skydiving Gear (The Smart Way)

    Image by Trigger
    Hey, new skydiver! Congratulations. That A-license stamp looks great in the middle of your forehead. Very flattering.
    Now that you’re in the fold, do yourself a favor: don't dally at the rental counter. It’s an investment (and somewhat counterintuitive) but trust me: you will find it much more cost-effective to buy your first set of gear than to keep renting, but If this is your first set of skydiving gear, you should buy used -- and spend the money you save on jumping. Here’s how to do it right.
    How to Buy a Used Reserve Parachute

    Get comfortable with the idea. Picking up a used reserve -- if it’s in spotless shape -- is a smart place to save a lot of cash. Riggers tend to agree that the cost of a brand-new reserve isn’t justified.
    Choose a damage-free reserve -- no patches, please -- with less than ten rides. Less than five is better.
    If your reserve is old enough to vote, it’s too old to jump.
    How to Choose a Used Main Canopy

    Look for a main with as few jumps on it as you can afford. Newer canopies fly better -- and, importantly, flare better -- than older canopies, because the passing seasons make the fabric more porous. As a rule, you can expect a harder landing from an older canopy.
    It can be tricky, but your best move is to choose a used main with its original line set. Even honest resellers don’t often know for certain the canopy’s actual jump numbers, and the condition of the line set is an inspecting rigger’s best clue.
    Find out where your canopy used to live. If it was jumped seasonally at grassy drop zones, it’ll be in much better condition than a year-round desert dropzone. That silicate desert dust chews up the fabric’s protective coating. Beware of beach DZs, too: seawater landings can result in very serious, sneaky damage.
    Be picky. Do your best to find an undamaged main canopy -- even one that’s been meticulously repaired. These are hard enough to resell that it’s rarely worth the up-front savings.
    Image by Halldor92572

    How to Buy a Used Harness/Container System

    Do not look for a container first. There are so many reasons why this is the case. You must know the exact sizes of both of your canopies before you can choose a harness/container to fit them.
    Have a rigger measure your body. Don’t go it alone. Harnesses are sized and carefully proportioned to both height and weight, and you’ll save yourself time by eliminating the guesswork.
    Ask the seller for the serial number. Then contact the manufacturer with your sizes. Ask the rep whether it’s a good fit for your body and canopies.
    Impossible to fit? Don’t worry. As you’ve undoubtedly noticed by now, non-standard body types are not uncommon in skydiving. However, new A licenses with unique body types sometimes face an uphill battle. Resizing a harness is almost always an option, but it’s can be so expensive that buying simple, new gear may make more sense. If this is you, research the basic, no-bells-and-whistles container systems available: for instance, the Dolphin, the Genera and the Shadow Racer.
    How to Buy a Used AAD

    Be sure that the used AAD meets your basic requirements. Determine that the AAD on offer is within its service life, has met the proper maintenance schedule and is approved for your container system. (Note that both the Cypres II and the Vigil II are waterproof, but the earlier (I) versions are not. Beach/lake dropzone? You know your answer.)
    Determine your timeline. When you buy an AAD – whether used or new – you’re paying a fixed cost per year. The quality of the AAD doesn’t change over time within its approved lifespan, so don’t worry about snagging a unit within a couple years of expiration. (Just save your pennies while the time runs out.)
    Buy new, if you can afford it. AADs are very easy to resell. Purchasing a new one is not a bad choice if you have the cash.
    General Advice for Buying Used Parachuting
    Equipment

    Keep an open mind. It’s unlikely that you’ll find a container that matches all the other criteria and comes in your colors. Accept that fact early.
    Pay a trusted rigger to conduct a pre-purchase inspection on any used gear you buy. The inspection will run you about $25 (or a matching amount of beer). Ask him or her to write down a list of issues – including potential ones – and the cost to remedy them, as if you’re buying a used car.
    Trust your instincts. If you don't like any potential component of your new skydiving kit — even one that has been suggested to you by a skydiving friend or a rigger or a boogie rep – do not buy it. You'll never be happy with it, and starting out with gear you dislike will adversely affect your entire skydiving career. Love the gear you’re in, and you’ll be a better skydiver for it.


    By admin, in Gear,

    The Slickest Rigs From PIA 2017

    Each year some of the manufacturers show off some unique and exciting rig designs at PIA, sometimes these rigs are actually able to be put into use, while others are simply demo rigs to show off some really cool design concepts.
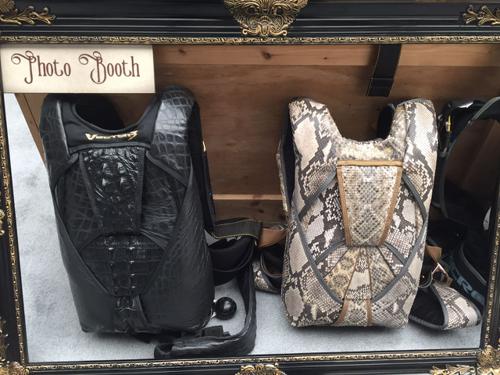
    This year saw a couple of really awesome looking rigs, with a transparent rig from Sun Path and an amazing "steam punk" rig from the guys at United Parachute Technologies.
    United Parachute Technologies


    Sun Path


    Which of these rigs would you most like to be flying?

    By admin, in Gear,

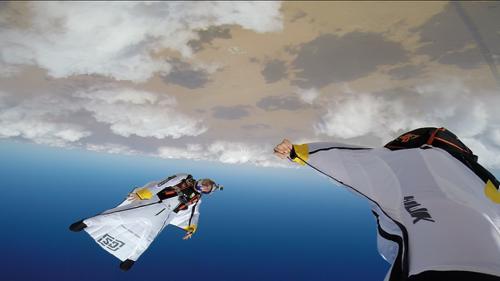
    S-Fly Introduce 'The Hawk' Wingsuit

    With the Hawk, the S-Fly team were looking to design a suit that maximizes manoeuvrability and agility in the skydiving and BASE environments.
    By maximising the pilot’s abilities to perform rolls, flips and precision carving from both back and belly with smooth transitions, the Hawk allows the pilot to creatively express their flying style.
    While extremely maneuverable, the Hawk still provides the lift and power while flying on your back or belly, to allow dynamic acrobatics without dropping out or sacrificing excess altitude. The result is a really fun, very fast and powerful freestyle acrobatic wingsuit designed for intermediate to expert level pilots.


    The Design
    The high performance and maneuverability of the Hawk was achieved by building upon the already successful Verso platform. S-Fly increased the surface area of the arms, extended the leg wing, adjusted the profile and sweep of the arm wing to maximise speed.
    Additionally, in classic S-Fly style, there are no grippers allowing free wrist and hand movement.
    The inflation and pressurization of the Hawk is where the guys at S-Fly feel the suit really stands apart in the modern wingsuit market. The suit remains inflated while transitioning through all maneuvers and positions, but with a smooth unhindered feel. This smooth and consistent inflation of the Hawk is powered by the specific design and placement of the inlets and the four independently fed elements of the wing.


    The Airfoil
    The Hawk’s arm and leg wings are fully pressurized in flight. The two arm wings are fed by wide mesh valves located along its leading edge. The leg wing is fed by three pronounced and reinforced inlets located on the front and three on the back. This system ensures optimum distribution and pressurization while minimizing drag in all positions.
    The “body” is comprised of a single cell that runs from the chest, down the circumference of the legs and to the ankles. The “body" is an evolution of the original mono-wing design from S-Fly. Through the extensive testing phase, it was found that this design allows unique and total freedom to move the pelvis, giving the pilot unencumbered and precise lateral movement without compromising performance. Through the mesh valves located on the arms, and two inlets placed high on the back, the “body” is effectively inflated while flying on the back and belly.


    The Hawk is constructed with Parapack light which is much lighter, has the same aerodynamic properties and is equally durable to normal parapack. The suit is surprisingly light and strong the fabric feels and how much faster it feels in comparison to other fabrics used during the prototype phase.
    Options

    *Quick Zip Cut arm wing release system

    Textured BASE soles

    Chest zipper port for camera access

    Fast leg zipper opening strap

    By admin, in Gear,

    A Guide To Traveling With Your Gear

    Anything precious in your bag, sir?

    Introduction
    Getting into skydiving opens up many opportunities for travel. You might live somewhere where the weather is shit all the time, or simply want to take advantage of the beautiful places available to jump around the world. Traveling with your gear can be a worrisome experience. If you are at all sensible, you should already own both a standard travel insurance policy for your belongings and some additional cover that concerns your physical being and any event in which it smooshes into something unforgivingly solid. However, unless you either arrange additional extended insurance (or jump some wonky old contraption built of very dubious elements), the coverage you are paying for is unlikely greater than the value of a set of modern skydiving gear. Your magical backpack is precious to you, and while traveling abroad you will likely feel most inclined to keep your eyes and hands on it at all possible times.
    Checked or Carry On?
    Once successfully embarked on your career as a skydiver, sooner or later someone will share with you a horror story involving airport security and a parachute. The exact details of this tale are variable, but it will usually involve massive injustice on the part of very ignorant and uncool staff against an innocent and harmless skydiver who just wanted to be perpetually within four feet of their gear by taking it into the aircraft cabin as carry-on luggage - only to be harassed, hassled and sometimes ultimately denied. Situations that escalate this far are rare, but they happen enough among a relatively small community of people to then hang in our collective consciousness as a potential problem - prompting the anxious conundrum of either checking-in one’s rig and thus entertaining the very slim but real possibility of it vanishing forever, or sending it forth through the scanner and risk having to cause a scene because some jobsworth insists on popping your reserve and causing a hundred people in the line behind you to all miss their flights.
    What Is This Thing?
    What is it about a parachute system that draws the attention of security personnel? It seems logical it would be your AAD that is the most curious element: a mysterious little box complete with a with a couple of protruding wires, a numeric display an activation button (eeek!). In fact, the Cypres unit (the AAD everyone should own) does indeed utilise a very small amount of gunpowder in its design (30 milligrams) - although you should not say this to anyone in charge of aeroplanes. It is up to you to not say this and it is important not to say this. Despite being officially harmless according to all the aviation authorities that matter, try explaining away this nugget of information well enough to be allowed to continue on your journey.


    Official looking visual aids can occasionally be very useful.
    Over many years of traveling as a freefly team, we eventually realised that frequently enough one of us would have to explain how a parachute does (and more importantly - does not) work that we began to rotate who went first through security, therefore being the one to get their rig out and do the explaining. We discovered that it seemed not to matter. Sometimes both the first and second rig would pass unassumingly through the scanner, only for the third to be set aside needing the guided tour - thus leaving the two initial team members on their way into the terminal, chortling at the unlucky third and musing about how mystifying and stupid the process is - as if a single rig is but 33% suspicious and only the cumulative effect of several examples passing by in succession is enough to make the final one stand out as suspect.
    Each time an inspection was required we began to quiz airport staff in turn about what they see that makes one’s gear a thing of interest to them. Although as of yet we have received no definitive answers as to exactly why, it appears that the combination of the reserve cable and pilot chute spring that draw attention. A metal cable spiralling into the centre of things just looks unfamiliar enough to be potentially wrong and bad.
    What Are The Rules?


    The gentleman on the left thinks it is cool to go through the airport like this. He is wrong.
    As far as all the major aviation authorities are concerned, there is nothing about a complete parachute system that categorises it as forbidden to travel in either the cabin or the hold of any commercial aircraft. Individual airlines might have their own rules for various types of sporting equipment (which you should remember to look up before you go anywhere), but these are much more likely to concern weight allowances and excess baggage fees than any specific security rules.
    There are various formal documents available that concern skydiving equipment, but I am yet to meet any airport staff in the world that have actually read them. As such, each transit situation will depend entirely on the personal experience of those charged with viewing your bags - and can range from cow-eyed unconcern (most common), through mild curiosity (sometimes) all the way to haughty indignation that you would dare attempt to take such a thing onto an aeroplane and put everyone’s lives in immediate danger (sucks to be you).
    What Happens If You Need To Explain?
    Be nice. Always, always, be nice. Airport staff at any step of the way can very quickly ruin not only your travel day - but you whole trip if they feel it is necessary - and smile-kill you while they do so. If you are required to give a presentation, usually a quick explanation while they swab your harness for naughty residues will suffice and you will be on your merry way. If their concern does persist past this point it will probably be because whoever you are talking to is somewhat (possibly very) convinced that your canopy can suddenly and dramatically fully inflate in the cabin, thus freaking everyone the fuck out and covering the windscreen or something. The best course of action here is just keep repeating in a soothing tone “That is impossible” and “It doesn’t work like that” while remembering to be nice. If that doesn’t work you can even have the employee in question deploy your main pilot chute limply onto the floor. Go nuts! Have them pop the pin and send your deployment bag down to join it. Not matter what happens through this interaction try to make it as fun as possible and educate the staff a little bit about your gear and doing your bit for those that come after. You never know - the difference you make here might mean as much as the next person who passes this way meeting their connection or not.


    Success

    Conclusion
    Many people have traveled with their parachutes as carry-on many times, to many places, for many years, with no problems. Every now and then someone just has shitty luck and another tale of woe spreads it’s wings. If things do go badly for you and there is now way out other than to pop your reserve and/or get everything out in exquisite detail, just get it over with. The best play regardless of how far you have to go down this road is always make security personnel feel that they are doing the right thing. Inside you will be seething with rage but if you are a dick to them in even the smallest way nothing good will come of it other than a long conversation in a windowless room. So be nice.
    Things To Remember:

    1. Put Your Rig In A Bag
    You will look super cool wandering around the terminal with your straps all dangling and your G3 clipped to a hip ring like a six-gun. Right up until someone spills sub-standard guacamole all over you.
    2. Get Some Paperwork
    Airtec produce a nifty credit card thingy that you can whip out to look like a stone-cold professional. It shows an x-ray of a rig that explains why Cypres units are fine for travel and does not mention gunpowder at all. Other AADs are possibly available. For the extra careful there is also a selection of formal documents available in different languages that you can print out and keep in a ring-binder.


    By admin, in Gear,

0