0

Gear

    10 Things To Note Regarding Malfunctions

    Image by Juan MayerWhen are you going to be alone in the sky with a useless bag of laundry and two little handles?
    If it hasn’t happened yet, it’s going to. Sure, there are skydivers with thousands of jumps who have never had to make alternate nylon plans. But don’t be fooled: your first reserve ride is not a question of “if.” It’s a question of “when.” If you don’t feel ready, you’re not alone. Here are ten proven ways to boost your confidence and safety.
    1.Stay current
    Long lapses between jumps are dangerous. Time on the ground dulls skills, sharpens apprehensions and weighs down your jump with the clammy fog of unfamiliarity. Most importantly, it unravels the easy muscle memory you’ve spent so much time and effort to develop -- and muscle memory is of primary importance in the event of a reserve ride. Especially at the beginning of your skydiving career, you’ve got to make the effort to jump at least every couple of weeks.
    2. Give ‘er a spin
    Do yourself a favor and deploy your reserve for every repack. You’ll learn the unique direction of pull for your gear, and you’ll be able to feel out the force you’ll need to exert. If your rigger watches the process, he/she can keep an eye on the deployment and identify potential problems. (Even if you have deployed your own reserve, a repack is an unwasteable drill opportunity for a refresher.)
    3. Just touch your stupid handles, Mr. Bigshot, OK? Sheesh
    Touch your handles in sequence before you enter the plane. It is not beneath you. Being blasé about basic safety doesn’t make you more awesome -- it just makes you more blasé. While you’re at it, check that your reserve handle is seated (so you don’t end up on a reserve ride without the yeehaw fun of a malfunctioning main).
    4. Don’t overthink it
    It’s simple, really. If you believe that your main is unlandable, you’re going to have a reserve ride. Sure -- lots of skydivers have landed under reserves only to realize in hindsight that they could have solved the problem. However, lots of skydivers have gone in while striving to sort out malfunctions that did not improve. If those are the choices, which would you rather be?
    5. Get your priorities straight
    Do not worry about stability. This is the very least of your problems. Worry about altitude. cutaway) handle no lower than 1,000 feet. Initiating a reserve ride below 1,000 feet isn’t always deadly, but it has an unnerving tendency to be. Don’t take the chance.
    6. Hold on tight
    After you pull your handles out completely, hold on to ‘em. You’ll save some money, and you’ll save face when you land.
    7. Make sure it’s out
    This is kinda your last shot at nylon, so you’ll want to be sure it’s working. Arch and look over your shoulder for the reserve pilot chute. Reserves deploy fast, so this head position is gonna butter your bread – but if the pilot chute is somehow caught in your burble, this should either shake it loose or make it clear to you that you need to do some burble intervention, stat.
    8. Don’t chase after your ex(-parachute)
    I’m going to go out on a limb here and tell you not try to run after it and grab it in the air. (People have, y’know, died doing that.) You broke up with each other for a reason, after all; you can reconcile after everybody’s had a little time to cool down. Instead, get your head together and use landmarks to identify where the gear is headed. Then take a deep breath, leave it to the fates, and work on navigating your meat to a safe landing.
    9. Tell the peanut gallery to sit and spin
    When you land a reserve, you’re going to be the talk of the DZ (for about five minutes, usually). During that five minutes – longer, if the loads are turning slowly – you’ll probably be approached by a receiving line of would-be mentors. They’re gonna question your malfunction, and they’re gonna be eager to discuss your decision to cut away.
    My advice: speak to your trusted mentors and co-jumpers about your little adventure in private, and tell the rest to go suck an egg. You were there. They were not. When you need to save your life in the sky, you are absolutely alone. In the entire world, there exists only you and two handles. Your cutaway is your business.
    10. Go to the liquor store
    Buy a bottle of posh booze for the rigger who packed the reserve you rode. It’s tradition.

    By admin, in Gear,

    How to Buy New Skydiving Gear

    (With The Minimum Hit To Your Credit Rating)
    You want it. Bad.
    And you want it your way.
    In your colors.
    And nothing’s gonna stop you.
    If you’ve already done your time at the rental counter (and put some more mileage on a set of used gear, as you must), you’re well within your rights to be ogling the hot new nylon. Custom fit, hotshot technology and all the look-at-me embroidery a jumper could want? Just take my money.
    You’re no doubt aware that this purchase is going to rival car-buying in the cash outlay -- there’s really no way around it. That said, there are some steps you can take to get the best possible deal on your new skyrig.
    1. Use the best brains you know (including yours).
    Start by asking your mentor’s opinion. Then ask your rigger’s opinion. Then ask your hero’s opinion. Ask the very smartest people you know to make their recommendations before you start the conversation with dealers and factory reps (who are, naturally, highly persuasive folk). There’s a labyrinth of pricey options to consider. Expert advice will help you navigate it without losing your shirt on poshity-posh back pads and tie-dye.
    You’ll have to be very honest with yourself about your skill level, your height and weight, the discipline you’ll spend the most time practicing, your annual jump numbers and your (realistic) total budget.

    Spoiler: this is not the fun part.
    2. Be a brand snob.
    Y’know those skydiving gear brands that buy front-fold real estate in all the parachuting association magazines? The ones that always seem to have a pop-up and a smiling face at the major boogies? The ones that place their logos like the tap of a knighting sword on the fine shoulders of the world-champion teams?
    Those are the brands you want.
    This might feel a little like selling out to snazzy marketing. It’s not. If you play your cards right, you’ll have plenty of time in your career to experiment with fringe gear; for now, you need what a top-of-the-food-chain manufacturer brings to the table, namely:
    1. Well-tested components, created in a well-established factory, and the attendant safety track record.
    2. Equipment that’s familiar to any given rigger, thus easier to fix -- with parts that aren’t hard to replace
    Later on, you’ll have the requisite knowledge and experience to branch into buying specialty equipment, experimenting with less-tested technology and trying out the offerings of lesser-known manufacturers. At this point, however, you don’t know what you don’t know – and that can be dangerous. It can also be very, very expensive.
    3. Try before you cry.
    Another benefit of buying from a major manufacturer: the ubiquitous demo.
    The cardinal rule in airsports gear-buying is a simple one: never buy it until you’ve tried it.
    Another note: you’ll certainly see demos on-hand at any major skydiving boogie, but do yourself a favor and evaluate gear outside the frantic context of crowded airspace. (When you’re not constantly chasing a hangover. Yes. You. I know this.)
    4. Blend it.
    *Everything* doesn’t have to be new, you know. In fact, it’s a really good idea to save money by blending new components with old, if you do it intelligently.
    If -- after weighing the value benefits -- you decide to go all-in, try to buy everything together for a package discount. Shop the large gear shops to compare their (often attractive) package offerings. Since they’re all assembling their deals from the same major-manufacturer components, you can feel perfectly confident purchasing the one with the lowest price.
    5. Repeat after me: dolla dolla bill, y’awl.
    Cash, if you can scrounge it together, is going to net you the best price. It’ll give you the best position to negotiate around taxes and shipping fees, and might just let you wiggle out from under the credit card charge that most dealers fold into to their baseline pricing.
    6. Slow your roll.
    Take your time as a buyer on the market -- it pays off. After a couple of seasons, you’ll start to pick up the rhythm of yearly and seasonal sales. Go to as many boogies as you can, browsing the gear and sniffing out event discounts. (Don’t forget to stay for the raffle! Major gear giveaways land in lucky laps.) Get to know your local dealers, who might cotton to you and let you know when there’s a price shift on the horizon.
    Soon enough, all that waiting will pay off -- and you’ll be swaggering to the plane in a shiny new kit that just screams “I will cry like a tiny child if I don’t stand up this landing.”
    7. Buy a stiff-bristled Brush of Shame.
    Just do it.
     

    By admin, in Gear,

    Why Your Canopy Is Slapping You Around

    Image by Lukasz SzymanskiAh, your canopy.
    When you first got together, everything was great. A few tussles over crispy, slippery fabric were the biggest issues you two had. You packed carefully -- lovingly, even -- or you were at least habitually spying on your packer. And after freefall, it was a joy to reach for that pilot chute.
    Now, things are horribly, horribly different.
    What happened?
    Maybe it’s because you stopped paying attention -- or maybe because you’re both getting older -- but something has changed. There have been some bad moments. Violent moments, even. There was that time that you landed from a jump with a three-ring mark and a stunned expression on your face. Your friends asked what happened to you. You started to wonder if it’s time to say goodbye for good.
    Don’t thumbtack that “for sale” sign to the corkboard too quickly, friend. You can save this relationship. Here’s how.
    1. Wrap your head around the dynamics involved.
    When a ram-air canopy opens in freefall, the dynamics of that opening are controlled by two processes: cell inflation (air pressurizing the airfoil through the nose inlets) and bottom-skin spreading (the side-to-side spreading action that takes place as relative wind rushes against the bottom of the canopy). You might not be aware of how separate these processes are, but they are quite distinct.
    Even without cell inflation, bottom-skin spreading is such an efficient phenomenon that a canopy can open entirely by this method, before the cells have a chance to inflate and pressurize. Since the force of that kind of opening is brutal enough to be quite literally fatal, square skydiving canopy designers invented a system to put on the all-important brakes -- the humble slider.
    That funny little square has a single function: to sync up bottom-skin spreading with cell inflation. A correctly packed slider stays at the very top of the lines during the early part of inflation, kept there by the same forces that would smack the canopy open with bottom-skin inflation.
    2. Help your slider help you.
    Make quartering your slider the most important part of your pack job. Be thorough about it. Draw the folds evenly between each of the four line groups, then tug the center of the slider straight down to settle the grommets snugly against the stops. A slider that’s sorted out in this way is a slider that is most likely to present itself correctly to the relative wind (and therefore do its job optimally).
    3. Avoid getting dumped.
    Optimizing your slider is only the first step in the process. The second, as you might imagine, has to do with your tangled handfuls of marionette strings. Incorrect line stows can release prematurely -- or, colloquially, “dump” -- resulting in a configuration wherein the canopy inflates before line stretch. When the lines catch up to the nylon, the jumper gets one heckuva headbanger. (Picture a Great Dane running at full tilt to the end of a long, long leash.)
    4. Keep the right amount of pressure on.
    It should take roughly 8 to 12 pounds of pressure to pull your lines from the stows. If you’ve gotten complacent (or too tired to be trusted), you’re probably going to pay for it.
    5. Use the rule of thumb.
    The loops of line on the outside of each rubber band stow (technically called “bights”) should be approximately two inches long. If that’s longer than you’re used to, that’s normal -- but know that right-sized bights keep about a quarter of the stowed line on the outside of the stow, minimizing the lines’ ability to dump. Luckily, two inches is about the size of the average human thumb, so you have a ready reference when you’re on the packing mat.
    If you happen to have stowless gear, your line dump issues are probably related to uneven folding of the lines (or lazy bag closure). The same pressure principle applies to the closing bands on your system: close the bag with 8-12 pounds of pressure, equal on each side.
    6. Get professional help.
    If you go through all those steps and you’re still not on good terms with your canopy, look elsewhere for guidance. Take your canopy to a rigger for inspection. You may discover a deeper problem -- and he/she might just be able to fix it right up. (There’s no shame in a little counseling, after all. Love is worth it.)

    By admin, in Gear,

    How To Avoid Line Burn (Because Raw Canopies Work Better)

    Image by Keith CreedyC’mon...just how much damage can one little line really do?
    Actually--lots.
    When a suspension line gets out-of-place and slides across neighboring nylon, another line, or another skydiver (in a collision scenario), the damage can be catastrophic. The lines connecting your mortal coil to your nylon conveyance are, after all, thin strands of extremely strong material – and, in deployment and flight, they move very, very fast.
    Line burn is, as you have no doubt extrapolated by now, caused by the generation of heat by friction. The amount of heat a fast-moving line generates is enough to literally melt the canopy – and, under certain circumstances, the line itself. Here are the questions you’ve gotta answer in order to avoid cooking your precious canopy.
    1. How melt-resistant are your lines?
    Both F-111 and ZP nylon melt at 417 degrees Fahrenheit. That’s a lower melting point than almost all the common suspension line materials (Dacron®, Vectran® and HMA), which melt when exposed to heat levels of 482-932 degrees. There is, however, one exception: Spectra®. Spectra®, that tender little princess, melts at just 297 degrees.
    Even if they literally melt a hole in the canopy, all lines but Spectra® will likely survive the incident unscathed. If you have Spectra® lines, however, check them carefully if you discover line burn on your canopy – they are likely sufficiently damaged to require replacement.
    2. Is that crease really a crease?
    Most modern sport canopies used to be made of F-111 nylon. These days, for lots of reasons--from performance to fading mitigation--they’re generally constructed of ZP (zero-porosity) fabric.
    The behavior of these two materials under stress varies widely. When an F-111 canopy suffers line burn, the damage tends to be localized – often, sufficiently contained to be landable. ZP fabric is not so forgiving: high-speed line burns tend to cause major structural disintegrity. In addition to that, burn damage to ZP fabric can be difficult to identify, often appearing as a simple crease in the fabric – though testing to that crease finds it to have been massively reduced in tensile strength. (For this reason, Performance Designs doesn’t use zero-P fabric in their reserve canopies.)
    3. Are you packing for a smacking?
    According to the United States Parachute Association, incorrect packing is the most common source of line burn. The other cause, of course, is canopy collision – but that is a subject for another article entirely. To reduce your risk:
    Don’t throw your canopy in the bag. Take a moment to mindfully arrange the lines towards the center of the pack job, making sure that rogue lines aren’t nestled deep in the fabric where they could cause burn.
    Mind your slider. Keep the slider flush against the slider stops and tucked between the line groups. Not only will this help to mitigate opening shock, it will help to manage the lines as the canopy deploys and keep them from unnecessary intimacy from the neighboring fabric.
    Clear your stabilizers. The stabilizers (the “ears” of fabric that come down slightly on each lateral side of the canopy) have a tendency to tuck themselves in towards the lines when you’re pro-packing. Make sure they’re clear.
    4. Have you already been burned?

    Look for melting and discoloration. Line-burn damage looks very different than puncture damage (or any other clean cut or rip).
    Check your lines. If you notice burn damage on your canopy, it means that the nylon most certainly came into contact with your lines. To check lines for burn damage, use your hands more than your eyes. While seared lines often show signs of melting at the burn point, the easiest way to determine damage is by feel: an undamaged line will feel smooth if you pinch it and slide your fingers down, while burned (or otherwise damaged) lines will feel bumpy and rough.
    Get help. If you notice evidence of line burn – or what you suspect to be line burn – on your canopy or lines, take the damage to your rigger for inspection as soon as possible. Don’t freak out! In many cases, the damage can be repaired simply and economically, with replacement suspension lines and patching.
    Don’t be a dick. If you notice any damage on a rental (or student) rig, don’t hesitate to point it out to your coach or the rental office, whether or not you believe the damage happened “on your watch.” You’d want the same treatment--and you don’t want to be burning your fellow skydivers. Right?

    By nettenette, in Gear,

    What To Ask Yourself Before You Mess With Your AAD

    Image by Ralph Turner You probably have one meaningful interaction with your AAD: you chase the red light.
    Poke, poke, poke, watch. ...Zero. Okay. Off you go.
    Just a quick note, friend: you might want to poke a little deeper. According to the USPA, there have been no less than nine fatalities related to AAD fires at designated firing altitudes that did not result in fully inflated canopies before impact. The point is that these guys chased the red light just fine, but there was likely a difference between what the AAD was told to do and the actual conditions of the jump. A couple hundred extra feet could have made the difference between nine annoying repacks and nine funerals.
    Food for thought, y’know.
    If your equipment is new-ish, your AAD probably has a feature that allows you to change its activation altitude. It’s good to know that feature exists, and it’s good to know how it works -- because it helps you understand that mysterious little whatsit in your rig a little better when you do.
    If you’re ready to explore, do a little introspection first. Here are the important questions to ask yourself before you change the activation altitude on your AAD:
    1.Do you want this to be forever, or just-for-now?
    Most currently manufactured automatic activation devices let you offset the device’s activation altitude to allow for a one-time altitude differential between takeoff and landing area. This will be a factor for you only if you’re making a single wahoo at a dropzone with a significant altitude differential between takeoff and LZ -- or if you’re doing a demo jump with an offset. This method resets when the device turns off.
    If you need a change that sticks around a little longer, don’t despair: both the Cypres 2 and Vigil 2+ have a way to increase the activation altitude until you change it back again. Your owner’s manual will explain how to do this.
    2. What’s the difference?
    The Cypres 2 adjusts in increments of 100 feet, from 750 up to 1,650. The Vigil adjusts in 150-foot increments. For example, if you have a Cypres you’ll add increments +100 feet for a higher landing zone compared to the take-off and increments of -100 feet for a lower landing zone.
    3. When’s it going to give the all-clear?
    When you make a positive altitude correction, the AAD will still disarm at its standard number of feet above the ground zero reference -- the exact same altitude as it does when no altitude correction is set. When a negative altitude correction is applied, however, it will disarm at its standard number of feet above the preset negative altitude correction -- the new landing zone.
    4. How forgetful are you?
    If you’re the type of person to run into sliding glass doors at full clip, wear your shirt inside-out all day and/or infuriate your spouse/partner/lover by brainfarting every single anniversary, beware: Adjusting the activation altitude on your AAD might not be the best idea for total space cadets. To avoid a two-out, you’re going to need to remember that setting and ensure that you’ve got an open, functional main no lower than 1000 feet above it.
    Remember: a slow opening messes with that margin. Think about density altitude, and think about your packing choices.
    Another liability for nutty professors: turning on your AAD in the landing area of one dropzone and driving to another dropzone with a different altitude without resetting the AAD. (Work out how much of a kerfuffle that could be.)
    Finally, balance your know-how with your need. Bryan Burke, Skydive Arizona S&TA; (and über-adventuring renaissance man) has this to say about it: “I’m willing to bet that, for most skydivers, messing around with an AAD is likely to cause more problems than it’s going to solve.”
    5. Which way are you pointing your belly button?
    You may be surprised to know that your body position directly affects your AAD’s activation altitude. AADs work using the metrics of measured air pressure and measured time. Those two parameters allow the little guy to calculate your pretty-much-exact altitude (±3 feet or so) at any given moment as a function of the registered air pressure, as well as your vertical speed related to a pressure variation within a certain period of time.
    But wait! Does that air pressure change depending on where your body has oriented that little AAD? Why, yes. Yes it does, smartypants.
    A belly position puts your AAD in a burble. This changes the atmospheric air pressure registered by your AAD by up to 10 millibars. Interestingly, that works out to a difference of ±260 feet. In an AAD activation scenario, 260 feet is y’know kindof a big deal. The AAD senses that the belly-to-earth jumper is higher than they actually are -- kinda like a policeman working the exit road of a music festival. Be aware.
    6. Why do you even have this little gadget?
    If you have an AAD in order to make your skydiving life painlessly safer, you need to know that it’s not the foolproof set-it-and-forget-it piece of furniture you might think it is. You put so much faith in that thing that you really ought to get to know it a little better. There will, after all, likely be a fatality number ten...and it doesn’t have to be you.

    By nettenette, in Gear,

    Replay XD: Is it the New Generation of Skydiving Camera

    In the earliest days of skydiving, photographers were excited about the advent of the “lipstick camera” for its small form factor and ease of use. The camera(s) could be mounted on a wing, helmet, or other foundation, cabled to a recorder, and used for new angles in aerial production. They were also horribly expensive.
    In modern times, we’ve seen the camera shrink in size, and dramatically improve in image quality. In many cases, this size-shrink inspires kludgy form factors, and this is where the Replay XD camera shines.

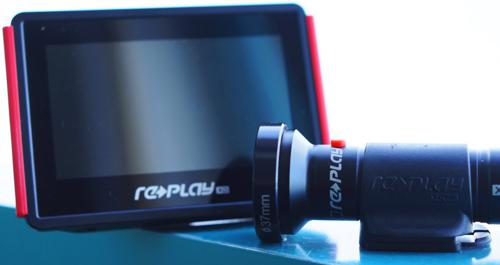
    With a nod to the stylings of the unobtrusive lipstick camera, the Replay XD is very slim in size (same diameter as a quarter), and easy to use. All electronics are packed into this small cylinder, where several features are found that no other camera offers.

    Replay XD shoots in one of three user-determined resolutions; 1080, 960, or 720. Framerates of p30 or p60 are user-selectable.
    The camera is powered up via a button mounted at the front. Users know it’s recording by the red indicator light and the haptic (vibration) feedback that occurs when the camera is put into record mode. The camera may be set up as a one-button record, or other modes may be defined by the user.
    MicroSD cards are used for storage, and the camera supports up to a 32GB card, allowing for ridiculously long record times (up to 10 hours, and Replay offers a battery pack to support long recording times).
    These small cylinder cameras may be mounted at any angle, any pitch, on any surface with great ease. The Replay XD is much smaller in overall profile than any of the other cameras, which is why it’s long been a choice in the motorsports and aircraft industry.
    Mounting the Replay XD is no different than mounting any of the other popular POV cameras; peel n’ stick the 3M tape, and put it where you want it to go. The camera can be rotated in its mount until it has been clicked in place. Once clicked, it’s locked and cannot be rotated.
    The Replay XD uses a 135 degree FOV (Field Of View) so it’s a bit more narrow than some of the other popular brands. However, this also provides for a more natural view, something many sports enthusiasts prefer, as the narrower FOV does not have a distorted image.
    I like that Replay XD offers lens replacement kits for 5.00; this means I’m not spending a lot of cash for scratched lenses, and lenses can be replaced in the field. Replay takes lenses fairly seriously; they’re the only POV manufacturer that offers lens adapters so that external lenses or more importantly, filters, might be added to the camera setup. This is a tremendous advantage for pro’s wanting the best image possible.
    With a mini HDMI connector on the back of the camera, it is the only live output to be found on any POV camera offering. This means that not only can the camera be connected to a broadcast device for live streaming (without the degradation of using low bitrate video via wi-fi), but that the camera may be connected to the battery-operated ReView monitor for checking camera placement, angle, level, exposure on a production-grade monitor. Lastly, the live HDMI output also allows users to plug straight into any television monitor while setting the camera on a helmet and checking the aimpoint.
    Another pro feature, is the ability to access the core functions of the camera and modify camera settings for specific purposes.
    Opening the .txt file at the root of the camera, allows users to modify bitrate (very important), white balance, exposure/compensation, saturation, contrast, audio gain, and more. The menu selections also allow the camera to be set to a one-button record, or one-button power up, second button-record mode. The file settings may be saved off, making it ridiculously easy for a camera monkey to set up multiple cameras.
    Replay XD is also the only POV camera that offers timecode in the stream, providing significant benefit for multicam operations or legal use.
    The camera is capable of shooting interval stills, at full resolution from a 5Mp sensor.
    Files may be custom-named in the .text file, or simply auto-named by the camera. The camera records mp4/AVC files and wraps them in a .mov package, readable by any NLE software or media player on any platform.
    A micro usb connector is used to charge the camera, and to transfer data from the camera to a storage device. Memory cards may also be removed for external read/transfer.
    The Replay XD isn’t waterproof, but I was able to dunk it to around 10’ of ocean, and in any sink or tub. It’s not designed for underwater use (they have a housing good to 100meters), but the camera is quite capable of going through rain, incidental water, and other “wet” situations with ease. The all-billet aluminum camera is ridiculously tough, as seen in this YouTube video where I drove a Dodge Challenger back and forth over a running camera, and even popped the clutch, spinning the camera out from under the car.
    Image quality is what I’d expect out of a POV camera. It’s subjective to say it’s better or worse than other POV competitors. The image sits quite nicely alongside media from high end cameras, and in fact, this camera is used for many broadcast television shows, including live feeds from NHRA and other race competitions. It’s been used in major-motion picture production, and sits nicely in the mix with other high-end POV cameras. The things that set the Replay XD aside are its form factor, the durability, and the features usually found only on broadcast equipment.
    The factory package comes ready to roll; battery is partially charged, memory card included, 2 mount systems, pads, charger, 12V charger, carry bag, USB cable, storage bag for camera, Cordura system storage bag./

    Things I really like about this camera:
    External audio/pro audio capability
    Live external monitor (to any monitor, but the ReView is very cool)
    Lens/filter adapters
    One button operation
    Super low profile/inobtrusive in a wide shot.
    Aluminum billet mounts
    Body durability/toughness
    Image quality with user-defined tweaks
    Timecode for multicam use
    Field-changeable lens covers
    The awesomely wide variety of mounts ranging from lightweight plastic for general use, to billet aluminum for more permanent or high-risk mount locations. What I don’t like:
    USB port. This is a Micro USB port, and the cables are nearly impossible to find in a crunch. If you’ve got the cable with you, great! But if you don’t, and your battery dies, you’ll wish you had a RePower charge kit with you.
    Rubber buttons. At first glance, these are great. But, it is possible to skin them off if they’re struck with great force at the inappropriate angle.
    Rubber water seal O-rings. These keep the camera watertight, but they also can fall off if the back is frequently removed.
    In a tight spot, it’s difficult to get to the release tabs on the low-boy mount. I did find that using a flat screwdriver or popsicle stick got me in there, yet one would think there is an easier way. The camera kit sells for 299.00 with all accessories, and is available from most skydiving supply stores.

    By admin, in Gear,

    The ProTrack II - A Detailed Look

    With the release of the new ProTrack 2 we have a look at exactly how many more things it offers.

    ProTrack II Design When falling through the sky it is not only a jolly good idea to have a little gizmo the beeps in your ear to remind you to do stuff - in many situations it is mandatory. For some people the simplest set of warnings are sufficient - one distinct electronic chirrup for each of break-off and deployment, then an angry screechy one for being lower than is safely acceptable/possibly getting told off about what you just did. However, even the most rudimentary electronic devices now come packaged with a tiny computers buried inside that have enough computational power to perform orbital mechanics and help serve the purpose of pacifying your life’s need to do anything much other than binge watch old episodes of Deep Space Nine on Netflix.
    Original ProTrack Design I bought an original ProTrack as my first set of beeps back in 2007 as I am a big nerd and it was the most fanciest audible altimeter available. I remember being tremendously excited about how it allowed me to download the accumulated digital data from my skydives and then produce graphs from the correlated information to share on my MySpace page - thus proving beyond all doubt I was both cooler and smarter than the people who laughed at me in school for my ongoing interest in toy soldiers.
    Technology moves fast and our insatiable appetite for mobile phones that do more and more has led to some mind-boggling miniaturisation in our daily lives. We are now very used to tiny electronic doodads with little screens that do many things. So - we some beeps to remind us of a few important things in freefall, but how much more is it possible or necessary to do with an audible altimeter if we apply the technology we have available now?
    With this update of the ProTrack, what Larsen and Brusgaard have done is smoosh together the features of the original device with those of their flagship audible altimeter - the Quattro - then sprinkle it with some modern goodness that we recognise from things we see every day in phones and such.
    If we break it down the ProTrack 2 can be divided into categories as follows:
    Things ProTrack Did Already:
    Mass Storage: It records the details of your jumps. Including accumulated freefall time, which is nice - especially if you find adding up units of time a pain in the ass.
    Connectivity: There is much to be said for a digital record of you achievements. A meticulously crafted pen and ink logbook is beautiful artefact of your skydiving career (and still a requirement for advancement in many places), but equally splendid in a different way is a lovingly curated online adventure zone that enjoys all the fruits of modern computing.
    Exit/Deployment Altitude: With time one learns that the altitude advertised by a Dropzone is not always what you get. Many variables determine your precise altitude when you are when you are in the right place to get out of the plane and mostly it is not a big deal. It is nice to have proof if you find you are getting fleeced though.

    Things The Quattro Does That The ProTrack 2 Does Too:
    Low Speed Warnings: These are the swoop alarms we know and love. They are programmed to register low freefall speeds too, which can be right useful if you are into complex wingsuit flocking where they can be set to signal points along a flight path or breaking into groups or stuff like that.
    Beeps Going Up: Having settings to signal certain altitudes in the plane is a convenience that can be beneficial. Efficiency with your jump preparations leads to safer and better skydive and good awareness is crucial.
    Always On: You don’t have to remember to switch it on and off. Unless you want to.
    New Things The ProTrack 2 Does Now:
    Micro USB: Which seems so normal but is new and exciting as the old model came with a cradle thingy that had required you to have a serial port (a serial port?) or, for Mac users - some kind of laborious solution. The JumpTrack software offered by Larsen and Brusgaard has been around a good while and although due for an overhaul it is still used around the world.
    Live Jump Playback: With 2MB of internal flash memory the unit is able to replay the speed profile of your jump in real time. (Approximately 200 jumps with 2 minute profiles or 26 jumps with 15 minute profiles). If you are prepared to put in some effort (like watching side-by-side with video) there are things you can learn from this.
    Economy Mode: These devices don’t use very much energy and if you get the batteries from somewhere sensible instead of a dropzone shop then they don’t cost very much. However, If your jumping is random or infrequent then the ability to actually switch it off properly means your battery will last a while longer. A modest boon, but nice if you gain satisfaction from managing the small things.

    Useful but very 90s looking software. Note the attached videos and images While there are undoubtably people out there who just desire some beeps that beep at the right time and nothing much else, devices like the ProTrack 2 offer extra information that can be very valuable for those that are inclined to manage and study it. Skydiving represents a huge investment in your own skill and experience, and the ability to analyse accurate, reliable data relating to trends in your performance is another way of squeezing a little a little more from your jumps.

    By admin, in Gear,

    A Guide to Buying Your First Skydiving Gear

    This article by Alain Bard is meant as a general guide. We highly recommend contacting your local rigger and instructor before using any of the information provided in this article.
    In the years I’ve been a rigger, I’ve often seen the results of skydivers’ gear buying experiences. Most experiences go well, but some do not, and result in the buyer having to re-sell an inappropriate piece of gear they bought.
    In this article, I am going to try to lay down some advice on how to go about choosing gear. I’m going to try to not go into brand specifics, but rather which components you should get and in what order, buying new or used, and sizing.
    New vs. Used?
    Let’s tackle this one first. Should you buy new or used? Traditional advice is that if this is your first set of gear: you should buy used. You’ll probably only use your first set of gear for the first 100 jumps or so. If you buy used skydiving gear, you can save some money (over new) while jumping your first set of gear, and take your time figuring out what you really want before you commit to buying new equipment.
    Let’s break it down though.
    So to put together a rig, you have to get 4 components: a harness/container, a reserve parachute, an Automatic Activation Device (AAD) and a main parachute. Whether to buy each of these pieces new or used depends on the piece.
    AAD
    Let’s start with the easy one: the AAD. Used or new does not matter, as you’re paying a fixed cost per year for these units. This fixed cost per year varies between $80-160 per year depending on which unit you choose. If budget is an issue, and you can find one used, grab it. Used AADs are rare as they expire faster than the skydiving gear they are in. If your budget allows, you can buy new. AADs are super easy to re-sell if you ever need to.
    Reserve Parachute
    Next up: the reserve parachute. For newbies, I always recommend buying a used reserve parachute, as you can save a significant amount of money here, and the benefit of a new reserve isn’t really justified over the cost of a new one. Reserve parachutes don’t get used very often, and even after 10 years, are usually in next to perfect condition. A 10-year old reserve of the same design is the same as a brand new one, it’s just cheaper to buy. Ensure the reserve has less than 5 or so “rides” and is no older than 15-18 years old.
    Also, ensure it has no holes, patches or repairs, or if it does, make sure the cost is much less, and consider sending it back to the factory to have it checked out first.
    Main Parachute
    For the main parachute, my advice is the opposite to a reserve. I recommend buying a main with as few jumps as possible (under 200 if possible). Buying a new main parachute is preferable, if budget allows. You will use this parachute to save your life 99.9% of the time. Its condition matters. Age isn’t really that much of a concern as much as the number of jumps. I like to make sure a main parachute still has its original lines, because you can tell the number of jumps by the condition of the lines. Trying to estimate the number of jumps on a canopy after a reline is sometimes difficult if the parachute fabric has been kept clean, dry and out of the sun. Another consideration is where the jumps were made. A parachute that was jumped in the summer in Canada or the US Northeast on green grass for only 6 months of each year will be in much better condition than one jumped all year round in desert-like or beach locations. Sand really eats away at the fabric coating and gets into the seams.
    If budget is really an issue, then a modern-design (last 10-15 years) used main parachute with more jumps is OK too, but make sure to have your rigger take a look and don’t pay too much for it, as it’s not going to be worth as much.
    Again, ensure it has no holes, patches or repairs, or if it does, make sure pay much less, and consider sending it back to the factory to have it checked out first.
    Harness/Container
    Last is the harness/container, for 80% of newbies, a used harness/container is probably the right way to go. Newbies tend not to land on their feet 100% of the time, and if you get a used harness/container a little dirty or scuffed up, it won’t matter as much. The problem is getting the right size for both the canopies *and* for your body (ie. harness size). Sizing for canopies is easy enough, but then sometimes it’s difficult to find the perfect sized harness. Having a harness that is a little too big or too small isn’t the end of the world, but it’s not as comfortable as a made-to-measure harness. If the harness is more than a little too big or too small, then resizing a harness is always an option, but it may cost more to have a harness resized than the harness/container is worth.
    For 20% of newbies, their body type makes it almost impossible to find a used harness/container. I’m talking about the 6’ guy who weighs 120lbs, or the 4’8” girl who weighs 95lbs, or on the other end of the spectrum, what you’ll find advertised as “big-boy rigs” for really large and/or heavy people. For these people that fall outside the average body types, while resizing a harness is sometimes an option, getting a new harness/container is sometimes a better option. Some manufacturers make basic rigs with no bells or whistles that end up costing less than a used, fully featured harness/container. I’m talking about rigs like the Shadow Racer and the Rigging Innovations Genera. These are great rigs at an even better price.
    Also, if you are a serving military member, some manufacturers offer incentives (up to 30% off) on new gear. This is a great deal, and a no-brainer. If you are eligible for such discounts, get new stuff!
    Before I move on, I want to mention that when you buy used, you will have to keep an open mind when it comes to colors. It’s the price you pay to save some money.
    So now WHAT should I buy, but more importantly – in what order?
    So you’ve been jumping a certain size main for a while and think you’re ready to downsize and get a different set of gear. Great! Let’s go through it.
    One of the biggest gear-buying mistakes is choosing (or buying) a harness/container first, and then trying to fit the canopies into a container that was not sized for those canopies, so….
    Here’s the order in which you should think about it:
    Select the Reserve canopy first.
    Select an appropriately sized reserve. Your reserve should be big enough to not seriously hurt or kill you in the event of an unconscious reserve landing (no flare). This means that your reserve should be sized according to your wing loading on that reserve.
    For most people, that means I recommend getting a reserve at least one size bigger than the main you intend to jump. So if you think you want to jump a 150-size main parachute, get a 160 or 170-size reserve, and if you're a big guy that jumps a tiny cross-braced canopy, you'll maybe still want a 170-sized reserve (4-8 times larger than your main). You’ll thank me when you actually need to use the reserve.
    Then, pick a main, any main. Well, not really, but decide on the size of main you want to jump. You can pick the type of main later, but decide on size now.
    Now you can think about a harness/container!
    Then and only then start doing the research on what brand of harness/container you want based on the features you think are important to you. Look at harness/container manufacturers’ published volume charts to see which size container you would need to fit the reserve. You want to pick a size of container that fits the reserve and is described as “soft” or “normal” fit (if those descriptors are available). Stay away from a “tight” reserve fit at all costs.
    You’ll quickly notice that not all the manufacturers offer combinations that will fit a reserve that’s larger than a main. That’s really a shame. You should really ask those manufacturers why they don’t offer this.
    An expensive solution to this problem is a low-bulk reserve, which is marketed a being able to pack one size smaller than a regular reserve. So, if you want a container combination that fits a regular 150-sized main, and only fits a 150-size reserve, a low-bulk 160 reserve may be an option. Careful though, it doesn’t scale down. For instance, a low-bulk 126 reserve may not fit in a 113-sized container, or it may fit but be so tight that it interferes with the normal deployment of the reserve. This is bad, and should be avoided.
    So you’ve picked a reserve, and you know what size of harness/container you need, only then should you start looking at the classifieds to see if you can find something that has the right size harness attached to it.
    If you find something that you think fits, or described by the seller as fitting someone your size, ask the seller for the serial number of the harness/container. Then contact the manufacturer of the rig (even if it was made 10 or 20 years ago), and ask them what size the harness was made to fit. Most manufacturers keep data on all the rigs they have ever built, and will be happy to disclose this information to you, and discuss whether it would fit you based on your measurements. There is no need for guessing games. You can know before you even buy whether or not the harness/container will fit you. The only exception to this rule is if the harness has previously been re-sized, which is uncommon.
    Main Parachute
    7-cell, 9-cell, F111, ZP, Hybrid, low bulk, square, semi-elliptical, elliptical, air locked, cross-braced, etc., etc… There are many mains on the market today. There is no right or wrong answer here. It depends on what you want to do. I’ll have to save this topic for another article. Refer to my comments above on age and condition.
    Don’t forget the AAD!
    The last part is to get an AAD. As long as the AAD in question is within its service life, has been maintained at the proper interval (if required), operates normally, and is approved for the harness/container you want to put it in, then you’re good to go.
    So there you have it. It’s not always obvious at first, so I hope this guide will help some of you out.
     
    Alain Bard has been an active skydiver since 2003.
     
    Alain holds the following CPSA ratings: D CoP, Skydiving Coach Level 2, Jumpmaster (JM), Ground Control Instructor (GCI), Skydive School Instructor (SSI), Skydive School Examiner (SSE), Exhibition Jump Rating (EJR), Parachute Rigger (RA).
    He is also a Tandem Instructor.
    Alain is a certified Hot Air Balloon Pilot (Transport Canada)

    Alain is a certified Paramotor Pilot (Transport Canada)

    Alain is a certified Paraglider Pilot (HPAC)
     
    You can find out more about Alain at his website: http://bard.ca
     

    By admin, in Gear,

    Fly Gear: The New School of Tracking Suits

    The first tracking suit was a humble thing indeed.
    Invented by pioneers of the tracking discipline in the unforgiving terrain atop Norway’s bigwall exits, the first suits were resourceful repurposings of the stuff they already had on-hand – the rain gear required by Norway’s reliably inclement weather, and the cigarettes they used to while away the time as they waited for it to pass.
    The “big idea” was simple: increase a tracker’s surface area, and he/she can use it to fly longer, flatter, faster and farther from the danger posed by the solid object behind him. With this in mind, someone -- no one quite remembers who -- burned cigarette holes in their waterproofs, positing that enough air would enter the holes to afford meaningful inflation. Somewhat miraculously, it worked. The rest, as they say, is history.
    The first purpose-built version, the original Phoenix Fly tracking suit, was introduced in 2004. Until recently, it has seen little serious competition: suit tracking was born by and for the BASE environment, and non-BASE-jumpers had little interest in it outside of its contested, folk-wisdomy usefulness as a stepping stone to wingsuiting.
    The past year has changed everything. Skydiving and BASE have both seen an unprecedented boom in participating athletes -- as well as a notable rise in tracking as a specialization. Whether the boom owes to a sharp increase in wingsuit-related incidents or to a renewed interest in tracking subdisciplines such as angle flying is unclear, but the empirical evidence speaks for itself. In any case, suit manufacturers have responded with an explosion of new technologies and designs. The new range aims for lighting-fast inflation, foolproof pressurization, optimized lift-drag ratios and multi-orientational usability. In a couple of cases, the designs even introduce wingsuitesque one-piece construction into the mix.
    I five brand-new suits through their paces in both the BASE and skydiving environments to find out which provide an optimum performance in different circumstances. Here’s the rundown on my findings.*
    *You will note that I am one human, and that, while I have quite a lot of time in tracking suits, I am not any kind of god, savant or superwoman. Your experience may vary from mine. Heck, it’s likely to.
    By Joel Strickland
    The Suits
    Phoenix-Fly Power Tracking Suit
    Currently the most popular tracking suit on the market, Phoenix Fly’s Power Tracking Suit is the more powerful baby brother of Phoenix Fly’s venerable and much-beloved Original Tracking Suit. Along with a bigger general profile, the new suit integrates thicker stiffening fabric, additional gear pockets on the jacket, tougher construction, mesh lining and inlets redesigned to deliver quicker pressurization. Aerialists love its forgiving transitions, and the power zone is relatively easy for lower-experience trackers to find (though Phoenix-Fly suggests a minimum of 120 jumps on the Original Tracking Suit before putting on the Power).
    I found the Power Tracking Suit to be instantly comfortable, and its construction to be thoughtful and solid. While the suit doesn’t have the raw power of some of the other new offerings, it’s accessible, predictable and confidence-inspiring – which is probably why so many personal-best tracks have been performed in it.
    Pressurized Tube 4
    The Tube 4’s predecessor, the Tube 3, was a polarizing piece of gear. Trackers either loved or hated it, citing distinct roll-and-yaw wiggliness and unpredictability during the transition. In response, Pressurized redesigned the Tube 4 from the ground up. Features include inflation-staging leg inlets, zipper safeties and a thicker arm profile. Long, strong stiffeners at the front of the calf effectively smooth the leg profile. Backfly inlets are available (though not standard), and zippers aside the leg open up a sizeable extension to the leg volume.
    Given my previous experience with the Tube 3, I was expecting a rodeo when I tested the new suit in the BASE environment. I was shocked by the new suit’s ease of use: it was a baby-smooth ride from the get-go. Though it took a bit of trial-and-error to find the power zone, the Tube 4’s transition was among the smoothest I’d ever experienced.
    I had a couple of nagging issues with the Tube 4’s construction. For one, I found the vent-stiffening material easily malforms – and quickly “learns” the new shape – when the suit is folded for packing. (Overnight storage on a wide-shouldered hanger reduces the problem, but doesn’t solve it; after all, the suit has to go into a stash bag sometime.) Beyond that, I was constantly fighting my suit’s sticky zippers.
    Tony Suits Masai
    There’s no denying that the Tony Masai, wingsuit manufacturer TonySuits’ first tracking offering, is a head-turner. I was the subject of several baffled stares as I marched across Skydive Empuriabrava in it – probably, because the one-piece Masai looks neither like a tracking suit nor a wingsuit but an idiosyncratic combination of both. Where other tracking suits are distinctly baggy, aiming to inflate across the entire body, the central body of the Masai is unusually trim. This decidedly anomalous design inflates via both front and back inlets on a set of tubular fabric “rails” that run from armpit to ankle and down the inseams. The jumper’s rig zips in just like a wingsuit. The Masai comes standard with Cordura booties, stealth-rubber soles, backfly inlets and a humorously roomy zippered pocket positioned right on the seat.
    When I first geared up in the Masai, I was worried about inflation. In other, far looser suits, a slight bend in the limbs doesn’t noticeably deform the inflating portion of the suit; on the Masai, however, slight changes in the articulation of legs and arms pulled the fabric unnervingly taut to the body. When I jumped it, however, my worries were instantly dispelled. While the Masai tended to misbehave in a steep dive, the suit kept its inflation admirably through the rest of the test maneuvers, achieved solid marks for distance and delivered the crispest transition to and from backfly of any tested suit.
    S-Fly Cruise
    Fly Your Body’s first addition to the field, the Cruise, is getting a lot of attention, and not just because it’s the suit that Fred Fugen and Vince Reffet used for their record-breaking freefly-tracking jump from the Burj Dubai. The Cruise is massive, it’s intelligently designed, and it’s delivering eyebrow-raising results from trackers with low jump numbers.
    The suit features several industry-first advancements. Internal airlocks maintain pressurization. Thumbloops on both sides (so they remain available whether you track with palms up or down) keep the arm stable. An integrated deflector improves airflow around the jumper’s rig. The Cruise comes standard with both front and back inlets and removable booties (as well as the option to order rubber with a BASE tread).
    The wide, one-piece design inflates centrally -- very differently from a two-piece design, which is necessary cinched around the waist. (Jumpers can expect this to result in yaw instability during the first few jumps.) The Cruise’s optimal flying technique moves closer to that of a wingsuit than a born-and-bred tracking suit, and it’s a lot for a newer jumper to handle. However, an athlete with some experience -- and the time and willingness to put a few skydives on the suit -- will likely have the same take-away I did: something akin to jaw-on-the-floor disbelief.
    Squirrel Sumo
    The Squirrel Sumo is aptly named: it’s a very burly suit. It’s so voluminous, in fact, that it’s likely to be mistaken for a small wingsuit in a stash bag. The Sumo comes standard with a bevy of thoughtful details: loads of oversized, difficult-to-deform Mylar inlets, a close-fitting collar and cuffs to prevent air escape, three Mylar-reinforced toe tension settings, Cordura reinforcements and brawny industrial-grade zippers. Uniquely, Squirrel’s suit also includes Velcro-fastened stabilizers on the inner leg to prevent its abundance of fabric from jostling out of position on exit.
    All that fabric, flown correctly, delivers rocketship power. My first skydives on the Sumo were gainers from the back of a military Casa over the open ocean off the coast of Panama, and the suit ferried me back to the island landing area with room to spare. I was pleased to see that it was racking up similar distances to smaller flocking wingsuits without much dialing-in.
    In full flight, the Sumo felt rock-solid. As with any other large suit – especially one that inflates as quickly and sizeably as the Sumo – BASE exits proved a trickier proposition, though the field-leading start speed is well worth the effort to workshop. Note: Squirrel purpose-built the Sumo to maintain solid internal pressure in order to outfly aggressive exits in the BASE environment. Because of that laser focus, you won’t find backfly inlets on the Squirrel.
    [Originally published in Skydive Dubai’s now-defunct Dropzone Magazine, Fall 2014]

    By admin, in Gear,

    Toggles Matter

    It is often the little things in our skydiving day that change the way things go. Paying attention to the details can make all the difference when it comes to preventing malfunctions, and when we get lazy, tired or complacent, our attention gets fuzzy and unfocused. That is when we make mistakes that we regret. One area that often results in malfunctions is errors in stowing our toggles, and there are quite a few ways in which we can perform this seemingly simple act incorrectly, only some of which will be discussed in this article.
    The most obvious aspect of this necessary part of packing that we can mess up is the depth of the toggle in the keeper. If we do not push the toggle sufficiently into its fabric keeper, the toggle will eventually unstow during deployment.

    Premature brakes releases result in countless cutaways each year. Each time we chop, we risk losing our main canopy and our freebag; a very expensive mistake.
    Another facet of stowing our toggles that can result in a premature “brake-fire” is insufficient tension on the portion of the brake line that leads to the canopy.
    This slack can allow a sharp tug of the brake line near the toggle, causing it to pop out of the keeper, and even snap the line itself. A healthy practice when setting your brakes is to pull upward on the brake line above the toggle, ensuring that everything is loaded against the toggle properly.
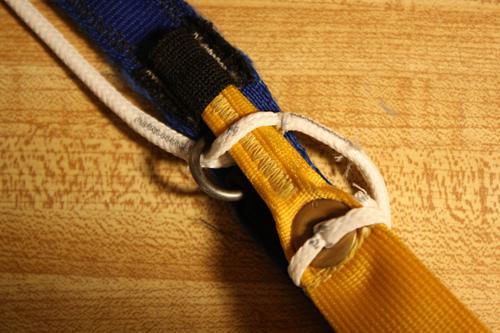
    Yet another common error when stowing the steering toggles is to pass the toggle through the brake line above the guide ring.
    This will almost always result in a premature brake release. It will also usually result in damage to the fabric toggle keeper, as the load on the brake line will go directly to the keeper rather than to the guide ring. I see this one quite a lot, and the jumper is always blown away when I point it out while they are packing. Better a moment of embarrassment on the ground than a premature brake fire in the sky.
    On that note, if you experience a premature brake release, or snap a brake line during deployment, your canopy will turn. On many parachutes, this turn can be quite fast, and it is likely to increase in both airspeed and rate of rotation. This means that time is of the essence when dealing with this kind of malfunction. This, however, does not mean that the correct response is to claw for the stowed toggle like a crazed monkey. Yes, you do need to unstow the remaining toggle, but having this singular goal in mind has resulted in many cutaways, AAD fires and even some fatalities. When you open up in a spin, your first job is to try to stop the spin, while remaining aware of your altitude. If you apply opposite harness input or simply pull the rear riser on the side of the canopy that has experienced the toggle release or broken line, you will slow the situation down. By holding a heading, you will be losing much less altitude, and will afford yourself the time and brain power to properly execute whatever procedure is next.
    Also key to your safety is the condition of your equipment. For instance, if the toggle keeper has become loose due to wearing over time, even sufficiently stowed toggles will unstow prematurely. Since we stow the toggle in the same way every time, the toggle eventually becomes deformed, narrower at the load point, which can cause the toggle to jam when you try to release it.
    Also contributing to this possibility is the inevitable shrinkage of the “cat’s-eye” hole in the brake line on spectra lined canopies. This is caused by heating of the line due to friction as you unstow your toggles. The melting point of spectra is 297 F and the material’s response to heat is shrinkage, unlike George Castanza. Most cat’s eyes begin at about 25 millimeters on new canopies, and by 3 or 400 jumps, it reduces to a 19 or 18 millimeter passage. When combined with a narrow point in the toggle, a brake-lock malfunction is quite likely. This problem can easily be avoided through regular replacement of the mid and lower brake lines, and pinching of the toggle with plyers to create a uniform width.
    When the tip of the toggle fails to extract from the cat’s-eye, it is possible that the jumper unstowed the toggles in a gentle, slow motion, allowing the friction to hold the toggle in place inside the brake line. This phenomenon can often be avoided by making it a habit to always unstow the toggles with a sharp, snapping motion. This method has served me well for many years, and has totally eliminated the “stuck toggle” malfunction for me.
    On the topic of toggles that do not want to release, we have another malfunction that shows up from time to time. There are many things you can do with your excess brake line, depending on your particular riser design and your personal preferences. Some skydivers choose to pass the excess line through keepers on the opposite side of the riser. This is perfectly acceptable. If, however, the free end of the brake line is passed down through the keepers and then around the bottom of the toggle, a complete failure to release is possible.
    This occurs when the upward relative wind blows the brake line up over the toggle during opening.
    The jumper then can grab the toggles below this loop of line and unstow, causing an irreparable knot around the keeper loop on the opposite side of the riser.
    Another way that jumpers sometimes cause a toggle-lock is by passing the excess brake line through the soft links, and then securing the end of the loop through the tip of the toggle. Although this method has proven to be perfectly safe, and may make it easier to pull the slider down after opening, a serious danger exists. If the soft links are not sewn in place with tack-cord, the loop of brake line can get caught on the tab or ring on the soft link, causing a locked toggle malfunction.
    It is true that a toggle-lock does not need to result in a cutaway. If the jumper cuts the brake line with a hook knife, the parachute will fly straight. Nevertheless, this fix requires the canopy pilot to land with a rear riser flare, something that many are not prepared to do. If you have never performed this maneuver in premeditated circumstances, you are not likely to perform the task well in an emergency. As I often say, there is no such thing as an emergency if you have practiced the solutions; it is just a change of plans.
    The last toggle-related problem that I will discuss is failure to stow the excess brake line at all. It is true that many jumpers have been leaving “free range” brake line for many years without incident. In most cases, these are jumpers with small canopies who have very little excess brake line to deal with due to the size of their parachutes. Regardless, it is my experience that it is just a matter of time before this free line snags on something. It might be your GoPro. It might be someone else’s GoPro. It might be the door of the airplane or something even worse that I can’t even think of. The bottom line is, the procedure of stowing your excess line costs you only a few seconds, but it can save your life. Deal with it, please.
    It is the smallest of details that usually result in the worst and best experiences on the dropzone. Skydiving is a sport of tiny issues that add up to big consequences, and if we continue to enjoy the process of paying attention to these little particulars, we can continue to enjoy the sport for a very long time. If we flippantly skip off the tops of the waves so-to-speak, and pretend that the danger does not exist, this sport will prove us wrong in the most painful and terrifying ways. We are always at risk when we skydive, but fear is not what keeps us safe. It is attention to the details, and the positive emotions that come as a result of knowing that we are doing everything we can think of to stay alive. If we are happy, we are more skillful, and skill definitely increases the chances of a happy landing.
    About the Author: Brian Germain is a parachute designer, author, teacher, radio personality, keynote speaker with over 15,000 jumps, and has been an active skydiver for 30 years. He is the creator of the famed instructional video "No Sweat: Parachute Packing Made Easy", as well as the critically acclaimed book The Parachute and its Pilot. You can get more of Brian’s teaching at Adventure Wisdom, Big Air Sportz, Transcending Fear, and on his vast YouTube Channel

    By admin, in Gear,

0