Landing Pattern is an interactive computer simulation program for ram-air parachutes. It is similar to flight simulators, such as Microsoft Flight Simulator. One can fly a landing approach of a parachute in different wind conditions. Currently only Skydive New England is available in
the simulation as a virtual drop zone, but more will be added in the future.
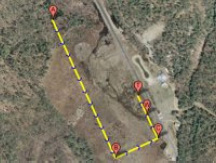
Usually the landing pattern is shown to the students on top of an aerial picture or a satellite image. The pattern has an entry point around 1000ft, then the turn to the base leg around 500ft, and then the turn to the final around 300ft. The altitudes for these points are kept constant, while the position of the canopy
relative to the landing target changes depending on the wind conditions and canopy parameters. Static Line Interactive released a free online service Landing Pattern Estimator that shows you the landing pattern above the satellite image from google maps. Landing Pattern allows you to fly a landing approach. Landing Pattern comes with tutorials that explain each leg of the landing approach.
You can pick the wind direction, wind strength, starting altitude, position for the
jumper, and the type of the altimeter to use (digital or analog). You control the
left toggle by pressing the left mouse button and moving the mouse up and
down, and holding down the right mouse button allows you to control the right
toggle. If you hold both mouse buttons together you control both toggles at the
same time to flare the canopy. You can experiment with normal and flat turns. It is possible to switch between top view, side view, first person view, and free camera. You can show or hide the landing approach guides.
Top view allows you to see the the movement of the jumper from above, which is useful to see the
general shape of the pattern that you are flying. It is easy to see when to turn to
the base leg or to the final leg.
Side view allows to see the difference in altitude between the jumper position
and the proposed landing approach. It is also useful to see the changes in the
canopy pitch as the flare is performed.
After understanding how to fly the approach using the top and side camera views you can use the first person view. This is how you would fly a canopy in real life. You can look at the analog or digital altimeter mounted on your chest. You can also see the proposed landing approach to follow. Use the mouse to look around and locate the target. Free camera allows you to fly the camera around so you can find the perspective that helps you the best.
At the end of the jump you can flare the canopy for landing. After touchdown,
you will see the speed of your landing as well as other statistics about your jump.
You can review the trajectory of the jump and compare the current trajectory
with trajectories from previous jumps.
Author Information:
Alexander Shyrokov is the founder of Static Line Interactive, Inc.


There are no comments to display.
Join the conversation
You can post now and register later. If you have an account, sign in now to post with your account.
Note: Your post will require moderator approval before it will be visible.