Search the Community
Showing results for tags 'safety'.
Found 179 results
-
Never smoke around aircraft, hangers or pumps. Both aviation fuel and aircraft dope present a great fire risk. When moving light aircraft, be careful where you push. They are covered with very light fabric or metal and are easy to damage. The pilot will show you where it is safe to apply pressure. Beware of the prop. It is difficult to see and will make quick mincemeat of anyone who walks into it. Always walk around the back of fixed-wing aircraft and in front of helicopters. Stand where the taxiing pilot can see you; his or her forward visibility is not good. Get into the habit. Leave the dog and the children at home, the airport is not a nursery. If a play area is made available to children at the DZ, remember that they are still your responsibility. If your airport has more than one runway, stay off the active one. It will normally be the one running the closest to the direction of the wind. Remember that planes usually takeoff and land into the wind so look for them downwind. Rules change from airport to airport and at some you will not even be allowed to cross the active. Do not walk down any runway and do not fly your canopy over one under 500 feet. Be nice to all the pilots, they have a lot of clout at the airport and you may need one to fly the jump ship. Be patient with the whuffos (spectators), they are public opinion.
-
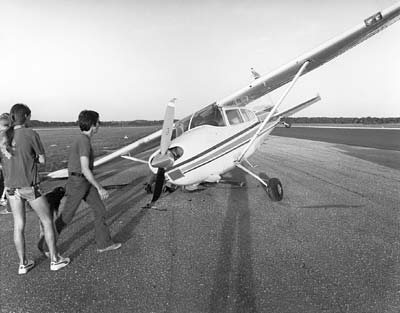 Airplane Problems Engine and structural failures. If the engine is going to fail, it will probably do so when the pilot reduces power after your full throttle takeoff. If the engine quits, he will attempt the best landing he can, straight ahead off the end of the runway. Since you are helmeted, padded with gear and strapped in, you need only assume the proper position to be prepared. Draw your knees up, tuck your head down, fold your hands across the back of your neck and hold your head down to resist whiplash. As soon as the plane comes to a stop, get out FAST. If you are nearest the door, get moving. There are people behind you who want to get out. There is always the danger of fire, particularly if the aircraft has suffered structural damage on impact. Watch where you step, the plane may have clipped through some power lines. They can zap you and they start grass fires. Remember that the wings of the airplane usually contain flammable fuel. Occasionally, the jump ship suffers a structural or other mechanical failure. Twisted-on parts sometimes twist off or a canopy may get draped over the tail jamming the controls. Depending upon the situation and the altitude, your jumpmaster will select one of two commands: PREPARE TO CRASH or GET OUT (jump). The dividing line is usually set at 1,000 feet above the ground since at this altitude there may be enough time for an orderly exit and the pilot will probably be able to land his glider on the runway. The jumpmaster might tell you to jump and pull your reserve on the theory that it is somewhat more reliable and may deploy faster than the main and/or he may be concerned about the setting of your AAD. His instructions will depend on the circumstances of the situation. So, if you are below 1,000 feet when the challenge occurs, you will land with the aircraft. If you are over 1,000 feet when the rubber band breaks, your jumpmaster may direct you to make a normal static line jump, but you will do it all a lot faster; swing out onto the step and go. Student freefallers may be directed to make a jump and pull; this is where they will open their mains as soon as they clear the aircraft, or the jumpmaster may sit them in the door, pull their reserve and simultaneously push them out. It all depends on the altitude at the time of the emergency. Licensed jumpers are next, then the jumpmaster and, in the case of severe structural failure, the pilot. The purpose of getting out of the plane is not only to remove you from the area of danger but to lighten the load making the aircraft easier to control. The jumpmaster goes next to last because he must take care of those in his charge. The pilot goes last (he wears a parachute too) so that he may wrestle the jump ship to keep it flying until you are gone. The above rules are general and are for students. Experienced jumpers may elect to exit lower. For example, if the aircraft is at 500 to 1,000 feet, an expert skydiver may elect to jump and pull the reserve (which presumably opens faster). Of course you will follow the instructions of your jumpmaster, but sometimes you have to make the decision yourself. In the excitement of solving the engine failure or other problem, the pilot may allow the airspeed to drop, stalling the plane and allowing it to spin. In this condition the aircraft drops fast and the centrifugal force may pin you against the side or ceiling. Now is the time make the decision to scramble and get out. Depending on the size of your jump ship and the procedure at your drop zone, your static line may be hooked up on the ground, at 1,000 feet, or on jump run. Whether or not your main is hooked up may determine what type of escape you can make in case of an aircraft emergency. For example, if you hook up prior to boarding, and the plane crashes on takeoff, when you unbuckle and get out, you can expect to unpack your main about eight to 15 feet from the door (the length of your static line). The final point to remember is to watch and listen to your jumpmaster for instructions. When you receive them, carry them out quickly and without panic. Open Parachute In The AirplaneSeveral times in the past, jumpers have been pulled through the side of the jump plane when a container opened and a canopy escaped out the door. Rarely does this result in a fatality but usually there is severe damage to both the jumper and the aircraft. If either the main or the reserve open prematurely in the aircraft, one of two things will happen; the pilot chute and/or canopy will either start out the door or remain in the plane. You have only one course of action for each situation. The jumper whose reserve escaped out the door of this aircraft was lucky; he survived. If the main container opens in the aircraft, it is usually the result of excessive movement by a person in the aircraft. This could happen when you constantly shift positions, rubbing the static line and/or closing flap on an interior surface or snagging the static line on something during movement in the aircraft (from one position to another). With the Instructor Assisted Deployment (IAD) method, these hazards are real because hand-deployed pilot chutes use small closing pins. With long plastic coated cables for a main ripcord, the hazard is much less likely, especially when the ends are tucked into housings on a closing flap. If the main container opens, it is a simple matter to move backward pinning the errant canopy against a wall or flat surface. Show the problem to your jumpmaster immediately. Once satisfied that you have it well secured, disconnect the main canopy from your harness by operating the canopy releases (the method depends on the type of system you are using — your jumpmaster will probably do this for you as well as disconnect your reserve static line device). This is so that if it should somehow get out the door later, you won’t be connected to it. Now sit on the canopy and pilot chute so they won’t get away and ride the plane down. Sometimes the reserve container will burst open while you are in the back of the plane. The pin works its way out, or perhaps since you are in the back of the plane, you are not vigilantly guarding your reserve ripcord handle and it is snagged out as you move around trying to find a comfortable position. Grab the reserve pilot chute and canopy, cover them and hold them tight. Call the jumpmaster’s attention to the problem immediately. The reserve creates a greater potential danger than the main because it cannot be quickly disconnected from the harness. The deploying reserved canopy pulled the static - line student off the step. If, however, either of your canopies start out the door while you’re attached to it, you will follow it out. You have, at most, two seconds, and if you hurry you will experience a near-normal canopy ride to somewhere in the vicinity of the airport. But if you are slow, the developing canopy will act as a giant anchor, extracting you not just through the door but, more than likely, through the side of the aircraft too, causing great injury to you, damage to the aircraft, and exposing others still in the aircraft to great danger. The best solution is prevention. Always guard and protect your static line and/or your ripcord(s), canopy release handle and pins.
 -
In any aviation activity proper flight planning is critical to safety, and skydiving is no exception. If you take the time beforehand to plan for various eventualities, you don't waste precious time making decisions when they arise. Preflight Familiarize yourself with aerial views of the DZ and surrounding area, if they are available. Note locations of obstacles and pick likely outs for bad spots in various directions. Check weather reports, if possible, and note forecast winds at altitude, cloud conditions and any approaching fronts. You are less likely to be blindsided by rapid changes in conditions when informed of their likelihood. Turn on your AAD, if so equipped. Make sure your hook knives are accessible. Find out who on the formation has audible or visible altimeters, AADs and RSLs; make sure they are all operational and properly initialized. Check your and your partners' gear. Make sure you are in agreement on breakoff and opening procedures and altitudes. Face into the wind and see where the sun is. Its position should be the same when you are on final and there is no wind indicator available. Exit Know what groups are around you, what they are doing and what delay is planned between groups (ask around before and after boarding). The Skydive Arizona policy of large to small slow-faller groups, followed by large to small fast-faller groups, followed by students, followed by tandems is the best all-around approach in the business. The more of a delay between groups you can arrange, the better. DO NOT assume that any reasonable delay is reason not to pay attention to other groups in the air - LOOK AROUND! Freefall Dock gently, from the level of the formation. DO NOT swoop into a formation, but make the final approach smooth and deliberate. DO NOT EVER get above or below a formation. Inadvertent deployment can become fatal fast if people are above each other. If low, stay near and to the side of the formation until breakoff. Do NOT begin tracking before breakoff altitude, and DO NOT do anything to increase vertical separation.. Track flat at a common level. DO NOT drop out of a formation vertically. If you have an inadvertent deployment when you are below the formation, the likelihood of someone getting killed is significant. The greatest likelihood of an inadvertent deployment is right after exposing the pilot chute pouch to direct air stream - like when dropping out of a formation in a stand-up. Track to a clear sector while watching the people on either side. While flat tracking, it is easy to split the difference between the people to either side by looking under your arms. Canopy Flight Open at an appropriate altitude. Between two and three thousand feet is reasonable for a high traffic event; any higher opening (for CRW or whatever) should be arranged with the pilot. Do NOT spiral down through a high traffic area. If spiraling to lose altitude, get well off the wind line to stay clear of the spot for other groups, and LOOK AROUND. In a turn, the direction of most likely collision is at the leading edge of the canopy in the direction of the turn, and there is a blind spot where a collision may occur between jumpers whose canopies blocked their view of each other until right before the collision. I reiterate - SPIRALING IN HIGH TRAFFIC IS DANGEROUS! The safest flight path when opening above the landing area is to fly the canopy away from the landing area, perpendicular to jumprun, until far enough out to allow a long, shallow approach to the landing area (leave enough room for obstacle clearance). LOOK AROUND NEAR THE GROUND! Don't fixate on your landing, but pay attention to who is in the area. Keep your head on a swivel, and periodically scan for potential traffic. Do not execute unplanned turns near the ground. If you are cut off on final, executing an avoidance turn must not be a possible response. Landing The safest landing areas are the least popular ones with the most outs. Landing in congested areas or where ground traffic is allowed (e.g., the camping area) can be an invitation to disaster. If you must turn for traffic or obstacle avoidance while setting up to land, use a FLAT TURN. If you don't know how to do so, find out from someone experienced in the maneuver and practice at altitude until you have the procedure wired. Keep your head on a swivel after touchdown. Even if you land under complete control, you might want to dodge someone who is swooping where they should not.If landing out is inevitable, or if safely making it to a designated landing area is in doubt: Pick an open area in which to land by 1,000 feet (300 metres). Corn can be over 12'(4m) tall (a cornfield is NOT like an unmown lawn), so landing between rows and preparing for a PLF will reduce the likelihood or extent of injury. Any changes of color on the ground probably have barbed wire along the boundary. Land parallel to any area changes. Locate any telephone poles or other wire supports by 500 feet (150 metres), and set up to avoid the wires that are sure to go between them. Identify the lay of the land by 500 feet (150 metres), and set up to land alongside any hills. Do NOT land uphill or downhill, REGARDLESS of what the wind is doing. If there is any doubt about the landing surface, or if you are sure to have excess speed on touchdown (like when stuck with a downwind landing) execute a PLF and roll out the landing. Keeping feet and knees together, and not using hands or elbows to break the fall can greatly help avoiding injury.
-
You're off student status, you have your own gear, and you're ready to strike out on your own for a change of scenery. Here's what you can expect to find, and here are some things to know, when you go to a new dropzone. It's worth spending some time to prepare for your adventure. Before Leaving TownThere are many sources for finding dropzones, online or in print. Before leaving town, look up all of the possible dropzones listed within a reasonable range of where you'll be going. Start be searchng the Dropzone.com Dropzone Database. You can also try the USPA web site or search on Google for the state+skydive. Don't forget to ask other people about places they've been. Also, just because a dropzone doesn't have a turbine-engine plane, don't rule it out of consideration. You often learn more in one day at a small dz, finding out or applying things that aren't emphasized at larger dropzones. Check that your gear is in good condition and that your re-pack and AAD are in-date; more dropzones require and check both of these items. Bring a camera to take pictures with the people you meet. You may also want to bring water and food, because not all dropzones have this on site and may be far from a nearby gas station. If in doubt, call ahead and find out the specifics. Finding The DropzoneMapquest is a great way to find your way to the town where the dz is located, but it's usually up to the dropzone to provide the final details for finding the actual facilities - this is a hit or miss situation, when it comes to how accurate this information is. Some places assume that you live in the region and are familiar with the area - then you find that not all of the road signs are visible or even present. Not all of the local gas station clerks will know of the small airports in the area, much less the dropzone. Be sure to have the dz number handy but don't be surprised if the phone is busy, or if you get diverted to an answering machine during the weekend, so be prepared and have printouts of all possible directions. Look for signs to the airport outside the city, or the large orange balls on power lines - these are dead give aways! However, there are times when two small airports are close together, confusing matters for you. If you time things right, you'll find canopies in the air and loads of cars parked out front, covered with skydiving stickers. What to do when you arrive at a new DZManifest is the best place to start - and every good dropzone should have someone who's willing to help you get in touch with the right people, for a complete briefing of the landing area and dropzone "rules", as well as hooking you up with some of the local jumpers. Be open and ready to jump with people of all skill levels, plus both styles of jumping (Freeflying and RW) - the more limits you put in place, the more likely you'll be stuck doing solo jumps. Be ready to do some solo jumps, in case you don't get hooked up with other jumpers who are willing to jump with you or when no one else is available to jump that day. You must be the one to ask others to jump with you; after all, you are the new kid on the block. At manifest, complete their waiver, get a gear check, and find a spot for your gear bag. Depending on the size and location of the dropzone, be prepared for anything, when it comes to the bathroom facilities. Get the scoop on jump tickets - How-much-to-how-much (cost/altitude). Check on the charging and refund policy on jump tickets; often there is a charge-card percentage fee, slightly raising ticket prices. Most will give a full refund of the ticket value, but not the charge-card fee. Some will not refund your jump tickets but they usually don't have and expiration date, so you can use them whenever you happen to return. Buy only what you need, depending on these policies. Get the lowdown on the manifest procedure for getting on a load. Do you pay in advance, pay as you go, pay at the end of the day? Also, do they use monitors to show the loads, do they announce names for the loads, or do they assume you know the load number you're on when they call it? Is there a separate window for manifesting, or do you go back to the main office? Get a briefing on the basics: The exit-order and separation rules - some places have very specific procedures and rules on these, others leave it up to you and your skills - ask and watch others. Landing area obstacles - in addition to buildings, power lines, bodies of water, and the local farmer McNasty, some places have well-known areas of turbulence, small but harmful ditches, hills, or slopes, and hints on landing patterns to avoid them. Most places have several landmarks they use to locate the landing area, like highways, rivers, or lakes that form visual arrows pointing in the direction to look. Ask what is considered a good vs/ bad spot, for that particular dz, and the landmarks used for estimating this from the plane. Always ask where the beer line is located, if they don't mention it to you first. Hard Decks - Some dropzones have set a hard deck as high as 3,000 ft AGL, for good reasons. It doesn't hurt to check on this, especially when the landing area is tight and surrounded by trees, lakes, or densely developed land. Outs - Most dropzones have a good selection of areas to land out, but it's up to you to always stay aware of your surroundings; look out the plane's windows from time to time, to locate the landing area and the open areas around it - check with others to be sure you're not looking at swamps or thistle fields. The prevailing winds - some places have both tetrahedrons and wind socks but not all of them use both or will have rules on when to use which of the two wind indicators. Find out what is most reliable because tetrahedrons tend to rust and stick. Landing patterns - these vary as much as the winds - ranging from the first-one-down sets the pattern (and hopefully into the wind), to always using a left or right-hand pattern, or no particular rule except to avoid others. It's best to stay clear of others when possible and land a little further from the main landing area.. Swooping and hook turns - each dropzone owner has the discretion of allowing hook turns and often have an area designated for this and or swooping. If there is no area for this, keep alert while under canopy and ask if the people before you are going to hook turn or not, so you know not to follow their landing pattern (if the first-one-down rules are used). Loading the plane - If you're lucky, you can walk to and from the plane and landing areas; everywhere else will require a bus, van, or trailer to one or both of these areas. Find out where you need to go for any of these options and how the loads are announced, so you don't miss your call for boarding the bus to the plane or hold up the trailer back to the packing area. Gear Check - few places have a set rule for jumpers to do gear checks for the person sitting next to them. Therefore, it will often be up to you to ask for this. Ask a lot of questions. Ultimately, you're responsible for your actions and should know all that's necessary to jump safely. Your First JumpYou may end up doing a solo "orientation" jump as your first jump. Hopefully that will be the only solo you do and use it to take a good look at what happens on jump run, while others are exiting, and the ground features when in freefall. Have in mind a jump and an exit you'd like to practice. This helps you feel more at ease with what to expect. When jumping with others, this avoids the conversational volley of questions, "Whadaya wanna do? I dunno, whadayou wanna do?" Keep it simple; you're likely to end up working on matching fall rates on your first jump. Be sure to agree on a break-off altitude that's comfortable for you and not the people who have done the last 200+ jumps at their home dropzone. If the plane is different from any one you've been in, ask for suggestions for the exit. Depending on your home dz location, in some areas it's a good idea to wear gloves, especially for your first jump, so you don't freeze your hands or in the event you land out and your landing isn't so smooth, and your hands run into rocks or "other natural abrasives". Check that your altimeter is zeroed, your dytters are set, and your AAD is activated. Gear check, gear check, gear check - touch all handles and check all straps, then check those of the people around you and ask for someone else to check yours before exiting. You're taking in a lot of new information, so make sure you don't overlook anything. You wouldn't be the first to mis-route a chest strap but it could be the last time you'd ever jump. On your way to altitude, remember to look out the windows so you can familiarize yourself with the surroundings and look for the landing area. Have in mind your landing approach. If you're doing a solo, and you're not sure about spotting, don't be afraid to ask the person before or after you to check the spot for you. It's a good idea to pull high, (be sure to let manifest and the jumpmaster and others on the load know) in order to give you enough time to adjust to the area and to have plenty of altitude to make it to the landing area. Keep your head on a swivel. You're in new territories and you want to make it safely back to the landing area - avoid aggressive canopy pilots, hopefully they'll be on the ground before you land. Elect to land in a distant, wide-open area, which has less traffic; then move in closer on the next jump, if you feel comfortable. At larger dropzones, there's usually a "packer's area" - ask, so you're not getting in someone's way of making money. Sometimes, if you accidentally set your rig in a packer's area and leave for a drink, you'll come back to find a packed rig and someone asking for payment. Smaller dropzones may not have any packers, so be sure you haven't forgotten how to pack your own rig. Also, at larger dropzones, there are sometimes separate packing areas for belly flyers and free flyers - a strange and unfortunate thing, in most cases. Your Next JumpsSome dropzones have landing areas at a different altitude than the packing area, especially when a bus/van/trailer is involved in moving between the landing area and loading area. Make the necessary adjustments to your AAD, hand altimeter, and dytter settings. When You LeaveIf you plan to go to a second dropzone during the same day, turn off your AAD before leaving and turn it back on again at the next location. Also, take pictures with the people you jumped with that day and add them to your logbook. Don't forget to swap e-mail addresses when you can. Find out if the dropzone has a stamp to put in your logbook, almost like a customs stamp for your passport. Where To StayThere can be many choices or just your car, so be sure to ask what's available; again, manifest is a good place to start. Many places have something on site, ranging from a couch in the hangar to a full-fledged house with all of the trimmings, and ranging in price from free to something that's usually within the budget of an avid skydiver. If you made friends that day, the local jumpers may offer to let you stay at their homes, another good reason to jump with others and not sticking to solo jumps. If you're not satisfied with these options, then nearby hotels often have discounts for skydivers, be sure to ask before making a reservation. Going to different dropzones is a wonderful experience and it's even more exciting when you go alone, seeing it through your own eyes and not through someone else's expectations. You see and do things differently than you would in familiar surroundings; this also keeps you from becoming complacent in this unforgiving sport. The people you meet become instant friends, if you let them, given the common bond of skydiving. Karen Hawes has jumped at dropzones in all 50 US States, 4 Canadian Provinces, Mexico, Puerto Rico, Spain and The Bahamas.
-
We all know that our sport can be dangerous and deadly when accidents occur. When they do occur the best defense is to be prepared to deal with the injuries that may be present. The local paramedics should be called right away but what if your DZ is isolated from the local town or maybe the injury is minor and does not need professional help. What sort of things should you have on your Drop Zone? Where should the first aid equipment be located? What involvement can the local rescue squad, fire department and police department have? All of these questions will be addressed. While one DZ with a trained medical professional may have first aid equipment items A, B, C, D and E. A local DZ without trained personnel may only have A and B. There are many things that can be useful in the case of an emergency but many medical supplies can be dangerous and deadly if you do not have the proper knowledge to use them. Every DZ should have a basic first aid kit. The kit should include bandages to control bleeding, ice packs for injuries, slings for upper extremity injuries, splints for fractures, ace wraps for sprains, sterile saline or hydrogen peroxide or isopropyl alcohol to clean cuts and abrasions. What else should you have? Shears or heavy scissors to cut off clothing, jump suits or rigs if the need arises. A watch with a second hand. This will allow you to accurately check the pulse or respirations per minute. A stethoscope and blood pressure cuff. These are fairly simple to use and you can learn quickly from a trained medical professional how to take an accurate blood pressure. A pen and notepad can be invaluable. They can be used to record the time of injury, pulse, respirations, blood pressure, phone numbers and also to mark where a pulse can be felt on an injured arm or leg. What else can be useful?There are many things that can be useful to someone trained in the medical field. Things that I have found useful at the DZ are oxygen tanks and masks, cervical collars and intravenous equipment to start fluid resuscitation to name a few. These are not things that should be used haphazardly and can be harmful if not used properly by trained medical professionals. However, if you are the DZO or ST&A; at a local DZ and have trained paramedics, nurses or physicians discuss with them what they would be comfortable having available in the event of emergency and have that equipment available to them. Where should you put the First Aid KitThe kit should be placed in a central location. It should be easily accessible and everyone that will be involved in the case of an injury should know its location. There is no point in having it locked in a locker or office if everyone has to go searching for the person with the key. At some larger DZ's there may realistically be a need for more than one first aid kit depending on the layout of the DZ. If you have a trained medical professional on the DZ and have supplies that should be used only by those with a medical license, separate the equipment. Have a central, accessible kit containing only basic equipment including bandages, ice packs, splints, etc. In a more secure location have a second first aid kit with more advanced equipment that will only be given to those who are trained to use it. Get People InvolvedFor the past few years at Skydive Cross Keys the DZO has worked closely with the local fire department and rescue squad. Every spring the local departments come to the DZ with all of their equipment. On site at the DZ they practice extricating a skydiver from a tree and run drills with different accident scenarios. The fire and rescue personnel also get familiarized with skydiving equipment and learn first hand about the helmets, jumpsuits and rigs. Give your local squad a call and find out if they would be interested in doing similar drills at your DZ. Get the local authorities prepared if you are planning upcoming events at your DZ. If you have a boogie, competition or other large event planned let the local fire and rescue department know when the event will run and how many skydivers you expect. This allows the medical personnel to be prepared for injuries. Most large events that are held at my home DZ have an ambulance stationed at the DZ throughout most of the day. As the busy skydiving season approaches for many DZ's step back and evaluate if you are as prepared as you can be. Talk to local jumpers who are medically trained. Open up the old first aid kit that is on the DZ. Are there things that need to be replaced or added to make the kit complete? Call the local ambulance or fire department and invite them to come to the DZ, practice their drills and receive an introduction to the gear they might run into. Accidents do happen, and the best medicine is to be prepared when it happens.
-
The British skydiver Clare Barnes died when her parachute failed because it was not packed properly, an interim report into the accident claimed today. The Australian Parachute Federation (APF), which has been investigating the incident, blamed poor gear maintenance and incorrect packing of the parachutes for the 24-year-old’s death. Miss Barnes, the daughter of newsreader Carol Barnes and Foreign Office minister Denis MacShane, was killed when attempting her 200th jump with her boyfriend and seven other members of a skydiving club near Melbourne on Sunday. Graeme Windsor, the APF’s national safety and operations manager, said the chain of events that led to her death started with the incorrect packing of the pilot chute, which is used to drag the main parachute from its pack. He told PA News: "Because the pilot chute was not packed properly it did not produce enough drag." The report said: "When Clare activated her main parachute release at the correct altitude, she experienced a high-speed malfunction. It appears that Clare then followed correct emergency procedures by pulling the main parachute release system, followed by the reserve ripcord. Unfortunately, the main parachute did not release as it should have, and the reserve parachute became entangled with it, preventing either parachute from opening correctly." Miss Barnes had taken part in a nine-way formation with the other jumpers but after she broke off, her parachutes failed and she fell. The report went on to list several technical factors which contributed to her death in Barwon Heads, north west of Melbourne. "The pilot chute that drags the main parachute from its pack had not been packed correctly, and was unable to develop fully," it said. The federation also blamed the failure on the fact that parts of the kit Miss Barnes was using was not compatible with the rest of her equipment. "The main parachute could not escape from its deployment bag because some suspension line stowage bands were too large to allow the bag to open under the reduced pilot chute drag conditions," the report said. Mr Windsor explained: "One of the rubber bands was too big so the bag would not open and let the parachute out." The report said the main parachute release mechanism did not work because it contained "non-standard fittings". Mr Windsor said the release mechanism "was not the standard one for the harness she had on". He said the major factors in the tragedy were "poor gear maintenance and packing". Miss Barnes was an experienced skydiver and a licensed parachute packer. "There is no indication at this stage that she did not pack the gear herself," Mr Windsor said. The APF said all factors contributing to the accident had been illustrated in the past. "The combination of all these factors at the one time has led to a tragic loss of one of our experienced members," the organisation said. Renewed advice stressing sound maintenance of equipment will be given out as a result of the accident, the APF said. A final report will wait for the findings of the coroner’s inquest. Yesterday, Miss Barnes’s parents arrived in Australia to make preparations for the funeral, which was expected to take place in Melbourne on Friday morning local time. Fatality Database Entry Forum Discussion Times online
-
One of the things that all most every Dropzone or Boogie waiver has is a space to list an Emergency contact. Most jumpers just fill this information in with the first relative or friends name that pops into their head as they fill out the waiver, but jumpers should fill this section out after carefully selecting a contact. Jumpers should put more thought into this decision then they do into what type of jumpsuit they are going to buy. There are criteria that make people better emergency contacts then others and jumpers should keep this in mind as they make their selection. Potential emergency contacts should meet the following criteria at a minimum: Potential emergency contacts need to be aware of any medical issues or conflicts that you might have. If someone is allergic to something and forgets to put it on their waiver the emergency contact might just be the last line of defense there is to prevent the emergency responders from giving them a potentially dangerous drug or drug combinations. Emergency contacts should have phone numbers to your immediate family members rapidly available so they may inform your loved ones about any potential incidents that might have happened. Poor choices for emergency contacts include people that have never met you or your family before you visit the DZ. At a minimum your emergency contact should have the phone number to contact the person that you would want to be notified of your injury or death first. Another trait that makes a good emergency contact is choosing someone that is not at the airport the same time you are. In the case of something like a plane crash or canopy entanglement you might be involved in the incident with potential emergency contacts. By choosing someone that is not involved in skydiving or at the airport at all you maximize the availability of contacts that DZ personal might be able to reach in the case of an emergency on the dropzone. Contacts should be someone that will be able to initially handle receiving potentially devastating news about you. Choosing someone that is known to be extremely emotional over the phone might be a poor choice as a contact if the Dropzone or medical teams need to ask questions of the emergency contact. Choose someone that will be able to calmly answer any potential questions after being informed that you are injured or worse. Having multiple methods of contacting emergency contacts makes the task of reaching the emergency contact a lot easier for the dropzone personal. Emergency contacts should have at least one phone number and if possible multiple phones. List every phone number in the order that they should be called. Listing mobile numbers, home numbers and work numbers should all be done at a minimum to insure the maximum possibility of reaching someone in a true emergency. Other things that should be used as criteria in potential emergency contacts include knowing who might be on vacation and out of reach at the time of certain boogies, knowing which contacts will be available to rapidly travel to deal with incidents if they happen, and in the case of international jumpers knowing the time difference and how that is going to affect the ability to contact your potential contact. Using these criteria to choose an emergency contact will increase the probability that the dropzone personal will be able to reach and inform people of emergencies involving you, plus it will reduce the anxiety factor on the dropzone staff side in contacting people if they know they will not have to end up calling 10 people to reach someone that has needed answers about you.
-
MOSS POINT - An award-winning skydiver was killed New Year's Eve night attempting a high-speed stunt landing. Michael "Scotty" Agent, a Gulfport resident and six-year employee of Gold Coast Skydivers in Moss Point, was attempting a "high performance" parachute landing when a low turn went wrong and he hit the ground at high speed, officials said. Agent, 34, suffered severe head trauma and was rushed from a landing site at Trent Lott International Airport to Singing River Hospital in Pascagoula, where he died just after 10 p.m. "Everybody is just walking around awestruck," Mike Igo, owner of Gold Coast Skydivers, said of the mood at the office Thursday morning. "We haven't even flown today." Igo said many skydivers enjoy jumping at night, particularly on a night like New Year's Eve. "It is pretty out there with the fireworks and all," he said. Injuries from stunt landings are becoming more frequent in the world of skydiving as more sophisticated gear is developed and avid practitioners work to develop more daring maneuvers, Igo said. "It's just speed," he said. "People are pushing the limits." Agent's gear was functioning properly. Agent was no amateur. A bronze medal winner in landing accuracy at last year's Skydiving Nationals, Agent served as videographer for Gold Coast Skydivers for several years. Gold Coast Skydivers provides skydiving trips and training. "He was a very capable canopy pilot, but the difference between a very awesome high-speed landing and doing what he did is a matter of seconds or a few feet," Igo said. Moss Point police responded to the emergency call at 9:22 p.m. The cause of death listed by the coroner was "massive head trauma." Igo said that of the 3 million jumps made last year, only 28 fatalities were reported. "Statistically, it's a very safe sport. But when you see accidents happen that could have been prevented, that's when it's time to talk about it."
-
A Pacific Aerospace Corporation 750XL, the first passenger-carrying aircraft designed and built in New Zealand, has crashed at sea while being delivered to its American buyer. Early reports said the plane may have experienced mechanical problems. The pilot, Kelvin Stark, 58, of Tauranga, died in the controlled crash, which was observed by an airborne US Coast Guard crew that had guided him through the emergency landing. Mr Stark was delivering the aircraft, one of the first sold by Hamilton-based Pacific Aerospace Corporation (PAC), to Utility Aircraft Corporation, a Woodland, California-based company that converts planes for skydiving and acts as PAC's distributor in the Americas. According to wire reports, the crash took place about 310 miles (496 km) from land at Monterey, California, when Mr Stark was forced to attempt an emergency water landing because he had run out of fuel. The attempt took place during daylight, at around 9 am local time, and appeared to go smoothly, according to Coast Guard Lt Geoff Borree, who was part of the rescue team that observed the crash and had been waiting to drop Mr Stark a raft. His landing "wasn't violent at all," Lt Borree said. "He obviously had some good piloting skills." But Mr Stark did not emerge and the Coast Guard then called in parajumpers, an Air Force plane and a nearby commercial vessel to assist in a deep sea rescue. The jumpers arrived about three hours later and found Mr Stark in the submerged cockpit of his overturned plane, according to the Associated Press, citing Veronica Bandrowsky, a Coast Guard spokeswoman. Rough seas made it impossible to immediately retrieve Mr Stark from the plane and Lt Boree said it was not clear whether Mr Stark had been knocked unconscious on impact or become trapped in the plane after the landing, which had caused the aircraft to flip onto its top. Mr Stark's brother-in-law, Mike Fletcher, told the New Zealand Herald that the plane was either low on fuel or developed a fuel-transfer problem involving one of the fuel tanks inside the plane. The plane should have been carrying enough fuel for 17 hours of flight but Mr Stark reported he was low on fuel after only 11 hours in the air. According to the AP, he had only 45 minutes of fuel left when the Coast Guard team caught up with him at 10,000 feet. Ray Ferrell, one of Utility Aircraft's owners, told the AP that the loss of the aircraft was disheartening, "but it's no comparison to the loss of Kelvin. He was talented man." In August, the first plane off the 750XL's Hamilton production line was purchased by Taupo's Great Lake Skydive Center. PAC says it has firm orders or sales for 18 of the PAC750XL aircraft, which was specially designed for the rapidly growing skydiving market and can carry 17 passengers, but which can also function in a variety of other contexts. It said before the crash that it had received options for another 260 of the new aircraft. The company says that in addition to being the first aircraft designed and built in New Zealand, it is also the first new aircraft built in the last 25 years specifically to target the burgeoning adventure parachuting market. The aircraft can take 17 fully kitted skydivers to 3600 metres in 12 minutes and can cruise at 160 knots for up to five hours with a full passenger load. In October, Mr Stark flew a prototype of the plane to the United States for testing by the FAA. That flight took four days and the plane was fitted out with additional fuel tanks for the trip. The company says the flight took refueling stops at Pago Pago, American Samoa, (a 10.5 hour flight from Hamilton), Christmas Island, part of the Kiribati Group (9.5hr from Pago Pago), Hilo, Hawaii (after 7.5 hrs flying from Christmas Island) and finally reaching Davis Airfield (California) after a mammoth 16 hr flight. Total flight time was 43.5hrs, over four days. The plane crashed while duplicating the last leg of that run, between Hawaii and Davis Airfield. The plane is not yet certified by the Federal Aviation Administration, which will join with the National Transportation Safety Board in the investigation into the crash. The plane and Mr Stark's body are in water judged too deep for recovery. The doomed single-engine turbo-prop, priced at $US994,000 ($1.7 million NZD), was the third off the PAC production line, according to The San Franscisco Chronicle.
-
None of us want to think about a member of our skydiving family getting hurt or killed, much less getting hurt or killed while skydiving. Even further down the list is having to talk to a journalist about a skydiving incident. As distasteful as it is to try to explain to a whuffo reporter why a fellow skydiver was injured or killed while jumping, though, it's actually an opportunity to improve the image of the sport. As we well know, most journalists aren't skydivers and at best have a tough time explaining the circumstances of a skydiving incident. They often get it wrong with a common theme of "The parachute didn't open." But while it is certainly their responsibility to get the story right, they can't do it without help from the experts-which in this case is you, the skydivers who were present during an incident and are designated media contacts. Avoidance and condemning of the media for their often poor explanation of skydiving incidents is common among skydivers, but we can do the sport far more justice by working with journalists towards a proper article than by blowing them off. It requires more effort, to be sure, but more accurate coverage of these incidents can help dispel the image of skydiving as a ruthless sport in which some participants die despite doing everything right. Take the common statement of "The parachute failed to open," for example. This implies that the gear is at fault, when we all know that it's a very rare situation when the skydiver can do everything right and still die. Almost 100% of the time, a skydiver dies because of a primary (e.g., no pull, low pull, low turn) or secondary (incorrect response to a malfunction) mistake. The public doesn't understand this. While it might not seem important that they do, think of the number of times you are asked by non-skydiving friends and coworkers why you skydive, or hear a comment of how they can't believe you skydive, all with the overtone of why would someone want to do a sport that everyone knows will kill you. Do you get tired of that? I do. The simple fact is that a large percentage of the non-skydiving population thinks that people who die skydiving die through no fault of their own, thus they think skydivers are a bunch of adrenaline junkies who don't care if they die skydiving. We know that's far from the truth, but when news articles don't give the whole story for long periods of time, this is the result. Additionally, it's frustrating to all of us skydivers when the story isn't right. Following are some suggestions for dealing with the media in the event of a skydiving incident. Thankfully, most of you will never have to do this, but if you do perhaps this will help. Send them to the source. If you are not the S&TA or other appointed drop zone media liaison, do not discuss the incident with a journalist. We all know that rumors bloom fast and furiously on drop zones, particularly in situations such as this. What began as a simple low turn by an inexperienced jumper on a smaller canopy than he was used to can quickly become an evasion of traffic, a dropped toggle, avoidance of an obstacle, etc., via the rumor mill. Whether you saw the incident or not, don't talk about it to the media and don't offer any opinions unless you're the media liaison. Refer any reporters to the S&TA or DZO, or whomever the drop zone has designated as the media contact. This person's job is no fun, but it's their responsibility to investigate the incident based on witness accounts and gear information, to prepare a complete report, and to deal with the media (and the coroner if the accident was fatal). Again, no one but the designated media contact should be talking to the media. Don't dodge the press. We'll give chapter and verse to anyone who asks about most things related to skydiving, but when it comes to chatting with a reporter about a skydiving incident we often clam up. Why? Because we're afraid they'll get it wrong again. But if we don't give them information, we're guaranteed a minimal or misleading report of the incident. If we want these incidents to be reported accurately, the information has to come from us-the S&TA or designated media contact. Be professional and courteous. Don't say, "You shouldn't be writing about this," because they will anyway, and this will just annoy the reporter and make it more likely that he/she will write something negative about the situation, the drop zone, and/or the sport. Also, it will burn a bridge that can be used for publicizing positive events at the drop zone such as charity events or milestones. Anytime you speak as a skydiver or skydive in front of non-skydivers, you are an ambassador for the sport whether you like it or not. Use this interaction with the media as a chance to portray skydiving accurately, and in the best light possible in a bad situation, by being honest and helpful. Avoid the "us vs. them" kind of interaction; this doesn't have to be a challenge where either you or the reporter gets their objective at the other's expense. Think about your description beforehand. In all likelihood, reporters won't be there right away following an incident, unless it occurs during a demo. In either case, coverage of the incident will turn out better with better information, and you will be able to give better information after thinking about the incident a bit and getting it clear in your mind. Be specific, but simple. It's pretty clear by now that I'm asking for more accurate reporting of skydiving incidents, and this isn't a problem for skydivers. What is more of a problem, especially if we're distracted by the substantial emotional impact of the incident, is that we'll talk to a reporter in the same way we'll talk to fellow skydivers-discussing things in skydiving terms rather than lay terms--if we talk to them at all. This doesn't improve the coverage, it just makes their eyes glaze over. For example, don't say "The right toggle came unstowed from the toggle tip keeper, allowing the cat's eye to come off of the loosely stowed brake and sending the canopy into a left-hand spiral to the ground," Instead, think about your audience (the general public as well as the reporter) and say, "It appears that a minor malfunction during deployment caused the parachute to spiral down, and so and so did not correct it in time to avoid the hard landing from the spiral." Refer questions about a jump plane crash to the National Transportation Safety Board (NTSB). It is extremely counterproductive to speculate about the cause of a jump plane crash without an investigation report. If you are asked about a jump plane crash, refer reporters to the designated NTSB public affairs officer once he/she has arrived on the scene. We don't like it when uninformed reporters speculate about the causes of skydiving accidents, and the pilot (if he survived) and his family won't appreciate uninformed speculation about the plane crash either. Offer to review the article before publication. It's not often that you will get the opportunity to do this, but you might if you offer it. What better chance will you get to ensure that the coverage is accurate? Of course, the reporter will reserve the right to accept or reject your changes as they choose, but the chance to review the article before publication is something not to be turned down. The relationship between skydivers and the media has not always been a good one in general, as is often the case when laymen try to describe technical pursuits. That can't be changed overnight. But things won't get better without a responsible effort from both sides, hence the two-part coverage of this topic directed to both groups. A better working relationship between skydivers and the media, both for good and not-so-good events, will benefit both of us. If you found Part 1 of this series useful-"Skydiving Incident Reporting for Mass Media Reporters"-please feel free to copy it and give it to any media representatives (print, web, or television) whom you think would benefit from it. Sidebar: Recommendations for Working With PoliceWorking with the police in the aftermath of a skydiving incident is about as much fun as dealing with the press, but there are a couple of things they should know about the investigation that will make things easier for everyone. First of all, the gear is only to be removed from the area by the coroner, not the police or the local rigger. When the coroner gets there, the drop zone representative and hopefully a rigger should be there to help answer any gear questions. Most policemen don't know how to investigate the gear or scene, so removing evidence (gear) hampers the ability of those skilled in accident investigation-the coroner and your S&TA, rigger, or whoever is designated to investigate-to determine what happened. If the police want to rope off the area without disturbing the scene, that's fine. But if they try to remove the gear without it being investigated by the coroner, politely advise that they will get far more information if they will wait until the coroner, along with the S&TA or rigger, can inspect the scene and the gear with them. Don't get angry with them-which is easy to do when a member of our skydiving family has died and the police and/or media seem to be handling things wrong. Anger will only introduce further tension into an already awful situation, and make it less likely that things will get handled with skydiver input. When the coroner is finished with the gear, the police often will impound it, do whatever they need to do with it, then release it to the FAA. The FAA then will usually inspect the gear with a rigger of their choice as part of an investigation. Working with instead of against the police can help us get better answers to a skydiver's death than a feud. Make every effort to keep things civil and helpful, and this unpleasant situation will be minimally unpleasant for all concerned. Thanks to Randy Connell, S&TA, S/L I, AFF I, for his contributions to this article. Christy West is a journalist and gold/silver skydiving medalist with over 1,800 jumps.
-
Reporting a skydiving (or any other technical sport) accident isn't an easy job, but making the effort to do it thoroughly can give your readers a better product that tops competing publications in this area. Why is improving coverage of this relatively rare event important? The reason is because turning out boilerplate or inaccurate coverage of these incidents angers many skydivers, who might then become ex-readers, and gives the non-jumping segment of your audience nothing special to take away from the story and thus doesn't reinforce your publication's brand. Accuracy, Not GeneralitiesBefore you think I'm suggesting that you write a full investigative report of any sport accident, let me say that I don't suggest any additional words in your reports. What I am suggesting is making those words count, with more solid information. Often the sentences that appear in skydiving accident coverage are misleading as to the true nature of the accident. For example, the explanation of "The parachute failed to open" that is so often used in such reports is not a simplification for an audience uneducated about skydiving; it's just plain wrong nearly all the time. It's comparable to saying of a single-vehicle accident, "The car failed to stay on the road," implying that the car is at fault rather than the driver. Such a statement implies that the skydiver did everything in his power, correctly, and still his/her equipment failed to function. However, this is exceedingly rare-occurring far less often than once per year. What is far more common is that a skydiver makes a mistake landing a perfectly good canopy (39% of the 35 U.S. skydiving deaths in 2002, the most common cause of death), collides with another skydiver in freefall or under his parachute (21% of the 2002 deaths), or fails to respond correctly to a survivable equipment malfunction (12% of the 2002 deaths). (Note: skydivers do carry reserve, or backup, parachutes; a malfunction of the main parachute does not automatically kill the skydiver.) We all like to think that we'll make all the right decisions when the chips are down, but the unfortunate truth is that nearly all skydiving deaths are caused by "pilot error"-a mistake on the part of the skydiver. This doesn't mean that we have to crucify this person who made the mistake, but we shouldn't imply that the equipment was at fault when it wasn't necessarily the main factor in the accident. Getting the ScoopReporting the specific cause of sport accidents gives more "meat" to your story, which both your skydiving and non-skydiving readers will appreciate. But how do you know what to write when you're not a skydiver and don't understand the topic you're supposed to report? Work with the experts-foremost of whom is that drop zone's safety and training adviser (S&TA). The S&TA is an individual appointed at almost every drop zone in the U.S., and abroad, by each Regional Director of the United States Parachute Association (USPA), regardless of whether or not the drop zone is a Group Member of USPA. This individual is tasked with many different safety and administrative-related duties at their appointed drop zone, one of which is investigating skydiving accidents and fatalities. Investigating incidents is one of the less enjoyable responsibilities of an S&TA. Other interview possibilities include the coroner (if the skydiver involved is deceased) and the rigger (person licensed by the Federal Aviation Administration to pack reserve parachutes, and usually knowledgeable about skydiving gear malfunctions) who inspected the gear--if applicable and if the S&TA directs you to talk to this person. A third possibility is the drop zone owner/manager if an S&TA is not available. The USPA is a good source of general skydiving information, but is not a good source of information on specific incidents. The local sheriff or a representative often becomes a media liaison by default, but unless this person is a skydiver working closely with the drop zone's S&TA, then working only with this person is not good. A sheriff with no skydiving experience is no better information source on a skydiving incident than a reporter with no skydiving experience, and will often garble information he or she is given simply through unfamiliarity with the topic. Ask the previously listed skydiving professionals to explain to you, in layman's terms, the cause of the accident so that you can accurately report it. They may not yet have all the answers, especially if certain equipment malfunctions are suspected, but if you are polite and interested rather than forceful about getting the story before an early deadline you will get a lot more cooperation. A good working relationship with the drop zone in question is ideal, because not only will this help you on this story, but you will also get a much better story for other drop zone events such as charity fundraisers (skydiving is interesting to your non-skydiving readers, and can sell publications when good events happen as well as accidents). Introducing more specifics to your report will be good for your readers, but more information requires more fact-checking. If possible, send a copy of the article to your source at the drop zone before publication. The source will likely jump (pardon the pun) at the chance to review the coverage for accuracy. Don't Make These MistakesSkydivers do not skydive because of a death wish. If that were the case, they'd only make one jump apiece. They most definitely are thrill seekers, but they are dedicated to skydiving safely, even while pushing the envelope, so they can continue to skydive. Portraying skydivers and skydiving as irresponsible, imminently dangerous, or suicidal is an inaccurate disservice. It is also inaccurate to imply that drop zone management is to blame for most skydiving deaths, because it is every skydivers' choice to exit the aircraft; once they have done so, the only person who can keep one safe is himself/herself. For the most part, blaming a drop zone for an experienced skydiver's death (nearly always skydiver error, as previously stated) is similar to blaming the highway system for a motorist's death. The system simply provides the place for the motorist to drive; the drop zone merely provides an aircraft and landing area for the skydiver to jump and land. What a skydiver does with those resources is his or her responsibility alone. Also, keep in mind that stating or implying that a drop zone is to blame for an incident could lead to a libel suit if there is no evidence to back up the accusation. While the following isn't technically a mistake, it is the author's firm belief that in most cases, the practice of including a roll call of any deaths that have previously occurred at a drop zone (or any other sports facility) with an accident article serves no good purpose. If all of these deaths were attributable to the management or equipment provided by the drop zone, then there is something going on that should be exposed. Without proof of such culpability, however, listing previous deaths generally just angers skydivers and creates the mistaken assumption by non-skydiving readers that there is something going on that should be stopped. Again, keep libel laws in mind. Jump Plane AccidentsThankfully even less common than skydiving fatalities, jump plane accidents present a different reporting challenge mainly because aviation accident investigation falls under the authority of the National Transportation Safety Board (NTSB). The local skydivers might or might not have an aviation and accident investigation background, and might or might not know the cause of the accident; they are not the people you should interview about aircraft incidents. Just because the accident involved a jump plane doesn't make it a skydiving accident. The pilot would be a good source if he survived, but NTSB is the final authority on aircraft accidents, and their reports tend to take some time to come out. They do send public affairs officers to the scene of aircraft accidents; these people are the ones you should talk to in this instance. Resources for journalists regarding aviation accidents can be found on their web site at www.ntsb.gov/events/journalist/default.htm. The end goal of this article is more informative, balanced, tasteful reporting of skydiving and other sport incidents in order to better serve readers and thereby the commercial publications they purchase. Thanks to Randy Connell, S&TA, S/L Instructor, AFF Instructor; Chris Schindler, ATP, CFII; and Jim Crouch, AFF/I, USPA Director of Safety and Training, for their contributions to this article. Resources: www.uspa.org www.ntsb.gov Christy West is a journalist and gold/silver skydiving medalist with over 1,800 jumps.
-
 While I was an S+TA, I spent a considerable amount of time telling people they shouldn't be loading their canopies so heavily. 90% of the time it didn't work. Skydivers can have a bit of an ego, and when I told them they probably shouldn't downsize yet they heard "I think you're a crappy canopy pilot who can't handle a smaller wing." So they downsized and broke their legs, backs and pelvises with some regularity. A few years back I met up with Brett, one of the people I'd been lecturing to whle I was an S+TA. He told me that he wished he'd listened to me back then. He had broken his femur during a botched landing, been out of the sport for a while, and then came back and really learned to fly his canopy. He took a canopy control course and actually upsized to get more performance out of his canopy. He ended up coming in first in one of the events at the PST that year. That started me thinking. Maybe the approach I was taking was wrong. Since jumpers tend not to listen to other people who tell them they're not as good as they think they are, perhaps if you could give them better tools to evaluate themselves they could make better decisions about canopy choices. It's one thing to have some boring S+TA guy give you a lecture about not having any fun under canopy, quite another to try to perform a needed manuever under canopy - and fail. In that case there's no one telling you you can't fly the canopy, it's just blatantly obvious. So I came up with a list of canopy control skills everyone should have before downsizing. Some are survival skills - being able to flat turn would have saved half a dozen people this year alone. Some are canopy familiarization skills - being able to do a gentle front riser approach teaches you how to judge altitude and speed at low altitudes, and how to fly a parachute flying faster than its trim airspeed, a critical skill for swooping. It's important to do these BEFORE you downsize, because some manuevers are a little scary (turning at 50 feet? Yikes!) and you want to be on a larger canopy you're completely comfortable with before trying such a thing. The short version of the list is below. Before people downsize, they should be able to: flat turn 90 degrees at 50 feet flare turn at least 45 degrees land crosswind and in no wind land reliably within a 10 meter circle initiate a high performance landing with double front risers and front riser turn to landing land on slight uphills and downhills land with rear risers Details: 1. Flat turn 90 degrees at 50 feet.This is the most important of all the skills. The objective of this manuever is to change your direction 90 degrees losing as little altitude as possible, and come out of the manuever at normal flying speed. Coming out at normal flying speed means you can instantly flare and get a normal landing. If you can do this at 50 feet, and come out of the manuever with normal flying speed at 5 feet, you can flare and land normally. Every year people die because they decide they simply have to turn at 100 feet and know only one way to do it - pull down a toggle. The parachute dives and they hit the ground at 40mph. To prevent this, not only do you have to know how to flat turn, but you have to practice it enough that it becomes second nature. Then when you do need it, you won't have to think about it. To pull off this manuever, start by toggle turning the parachute gently. IMMEDIATELY follow that with some opposite toggle. The idea is that you want to flare just a little to counteract the canopy's desire to dive. Continue adding opposite toggle until you've stopped the turn. At this point let both toggles all the way up. If you feel the parachute accelerate after you let go of the toggles (i.e. it feels like you just flared) use less opposite toggle next time. If you feel like the parachute is diving, like you just did a toggle turn, use more opposite toggle next time. Basically you want to start the turn with one toggle, stop it with the other one, and use just enough toggle to keep the wing from diving but not so much that it does a flare. It should go without saying that this manuever should be practiced up high before you ever try it down low. If and when you do try it out low, start at lesser angles (i.e. try a 15 degree turn first) make sure the pattern is clear and make sure conditions are good (soft ground, good winds.) Work up gradually to a full 90 degree turn. I do think it's important to try at least a gentle flat turn very low; we are horrible judges of exact altitudes when we're at 1000 feet, and it's hard to tell if you've lost 50 feet or 200 in a turn. By trying it out down low, you'll get a better sense of what it can do for you, and you'll have the "sight picture" better set in case you have to use it for real one day. A variation on this is to go to half brakes and then let one brake up. This gives you a flat turn, but by flaring first you "use up" some of the canopy's energy so you can't turn as effectively. On the plus side the turn happens more slowly. If you are about to hit a tree and want to make a last minute turn, this variation might be the way to go, as it combines a turn and a flare, thus reducing your speed before impact. A version of this is currently taught in the ISP, so it might be a good way to make your first flat turns before transitioning to the less-braked variety. 2. Flare turn at least 45 degrees.This does two things - it gives you another tool in your arsenal to dodge last minute obstacles, and teaches you to fly your canopy all the way through to the landing. The #1 mistake jumpers with new HP canopies make is to "reach out to break their fall" while they're flaring; this of course turns the canopy in the direction they are reaching. Most people decide that this is due to a side gust just as they're landing. I remember one jumper at Brown who, amazingly enough, experienced a side gust seconds before he landed (and always from the right) 40-50 times in a row! Learning to flare turn will help eliminate this problem. To flare turn, start with a normal flare, then flare slightly more with one toggle. The canopy will turn. Bring the other toggle down to match it, and the canopy will straighten out. It's a dynamic process; rather than put the toggles at a certain position, you have to speed up one toggle for a second, then speed up the other to match it, before you level them and finish the flare. If you balloon upwards, then don't flare as quickly. If you drop to the ground, bring both toggles down more aggressively when they are 'split.' One thing that helps people is to think about where your canopy is rather than what it's doing. Use the toggles to put it off to one side for a moment, then use them to put it back over your head. This can be hard to practice with a large canopy. I can pull off a 45 degree turn on a Manta, but the flare is over so fast that it's hard to explain what I just did. It's much easier on a canopy loaded around 1:1, so you may want to wait on this one until you get to that loading. Note that if you combine a flare turn with a flat turn, you can pull off nearly a 180 degree turn at just above 50 feet. Also note that knowing how to do flat and flare turns doesn't mean you can always turn at 50 feet and get away with it - sometimes it's better to accept a downwind landing than make a turn at a dangerously low altitude. But if you do have to turn low (say, you're on course for the electrified fence around the pit bull farm) a flat/flare turn will let you either turn and land normally or turn and minimize the damage caused by landing in a turn. 3. Land crosswind and in no wind.These are straightforward. No wind landings are pretty easy; the only issue is that your perception of speed and altitude will be off. Since you seem to be moving faster over the ground when there's no wind (which you actually are) it can seem like a good idea to add just a little brake to 'slow you down' before you land. Resist that urge! Keep that speed in your canopy; you can turn the speed into a good flare only if you start the flare with decent (i.e. full flight) speed. Crosswind landings can be a little more tricky because of that strong tendency to want to "reach out to break your fall." Counter this by flaring with your hands in towards the center of your body. You may have to PLF on these landings, since you'll have some decent forward speed and have some sideways motion from the wind. If you want to get fancy, try a flare turn after you start your flare on the crosswind landing - you can easily pull off a standup landing if you get turned enough before you put your feet down. If these work well you may want to try a downwind landing. The benefit to doing that is it will prepare you to accept a downwind landing in the future; you won't be tempted to turn too low to avoid it. Choose an ideal day for this one, with a slippery landing area (wet grass is perfect) low winds and a clear landing area. Prepare to PLF, and think about "laying it down" on your thigh as you land to start sliding. You can slide across grass at 30mph without getting hurt, but planting your feet and cartwheeling at those speeds can be very dangerous. 4. Land reliably within a 10 meter circle.This is essentially the PRO requirement. This is critical because your accuracy skills are what will keep you from having to turn low. It's very comforting to know that you can land in any 50ish foot clearing if you find yourself having to land out; it's especially important as you get to smaller canopies that need longer and longer runways to land well. Your only option may be a section of road, and you may have to hit the beginning of the road dead-on to have enough room to slow down. The subject of canopy accuracy is too long to do justice to here, but the top 3 hints I've heard are: - If you're not sure if you're going to make it over a wire or tree, look at what it's doing with respect to the background. If more background is appearing from beneath the wire or tree, you're probably going to make it. - As you look at the ground, most points will seem to move away from a central point. Some will rise, some will fall, some will go out to the side. If you look long enough you'll find one point that's not moving - that's where you're going to land if the winds don't change all the way in (which is rare.) - Going into brakes usually makes you land short in high winds, but can extend your glide in no wind. Front risers almost always make you land shorter. 5. Initiate a high performance landing with double fronts, and a front riser turn to landing.I am pretty convinced that front riser high performance landings are a lot safer than toggle turn high performance landings, and double fronts are the safest of all. If you do it too low, or become worried about the landing - just drop the risers and you're back to normal flight. For double front riser landings, set up a normal landing, aiming for a point a little farther away than you normally do. At 100 feet or so, pull down both front risers. Your canopy will drop and accelerate. At some point above the ground (30-10 feet depending on your canopy) drop the front risers. Your canopy will begin to recover. Before it completes the recovery to normal flight, you should be at flare altitude. Start the flare normally. You may need to use less toggle than normal, since the canopy is now going faster than you're used to, and the same amount of toggle gives you more lift. You will also plane out farther, since you have more speed you have to bleed off before you come to a stop. For front riser turns to landing, first try front riser turns out above 1000 feet and get used to how your canopy recovers. Then start by coming in 10 degrees off the windline, and making a gentle front riser turn to line up with the wind at ~100 feet. The canopy will dive and accelerate, so be prepared to drop the front riser instantly and flare if you have to. Also be prepared to steer in the flare, since the canopy may not have stopped turning completely before the flare begins. Done correctly, you'll start the flare with more forward speed, giving you a longer planeout. Make sure your flares are smooth for this! A smooth flare generates more lift for a longer period of time than "stabbing" the brakes. However, don't start the flare at 30 feet - starting the flare that high will slow the canopy down, negating the effects of the front riser approach. If you do find yourself stabbing the brakes to prevent hitting the ground, move the altitude at which you start front risering up. Probably the most critical skill you will get from this exercise is the development of the "sight picture." Below 200 feet your altimeter is pretty useless, and you should be looking at traffic and the landing area anyway. Eventually you'll develop a sense of what "picture" you should see just before you start that riser turn. The picture will vary with wind, landing area etc. If you arrive at the point where you would normally start the front riser turn, and the picture's not right - abort it and land normally. Once you have the picture down, and are doing front riser turns that transition to gradual flares, then start increasing the angle. Once you get to 90 degrees you're going to be gaining a lot of speed, so be sure to adjust your sight picture up to compensate. As always, bail by dropping the risers if you feel like there's anything wrong. Once you drop the risers, level the wing with your toggles and prepare to flare. At worst you'll have to land crosswind - but that's a skill you should have by this point anyway. 6. Land on slight uphills and downhills.Often, land away from the DZ isn't perfectly flat; sometimes you can't tell this until you're at 20 feet. To prepare for this, find a place in your LZ that's not perfectly flat, scope it out, and plan on landing there. There's not too much magic concerning landing on a slope. You flare more aggressively to land going uphill, less aggressively to land going downhill. Obviously not all DZ's have slopes. If you don't have a good slope on your DZ somewhere, you may have to put this one off until you're at a DZ that does have one. Beaches are a good place to practice this, since they have pretty predictable slopes down to the water, and overrunning the landing just means you get wet. 7. Land with rear risers. Knowing how to land with rear risers can help you deal with a canopy problem like a broken or stuck brake line, and can help you make a better land/cutaway decision when you do have such a problem. Again, this is best practiced up high. See how far you can pull the rear risers before the canopy stalls. It will stall much earlier with rear risers; memorize where that happens so you don't do it near the ground. When you try it for real, choose an ideal day - steady moderate winds, soft ground, clear pattern. Be sure to try this for the first time on a largish canopy (one of the reasons you should do these things before downsizing.) Leave your hands in the toggles and wrap your whole hand around the rear riser. That way if things go awry you can drop the risers and flare normally. Start the flare at a normal flare altitude, and prepare to PLF. You may get the sort of lift you're used to, but you probably won't slow down as much before you're near that stall point. Make sure your feet are on the ground (sliding preferably) before you get there. On smaller canopies, you may want to start the flare with rear risers. Then, once the canopy is leveled out, drop the risers and finish the flare with the toggles (which are still around your hands.) That way you get your vertical speed to zero, which is the critical part of a safe slide-in landing, and can still stop the canopy without hitting the ground going too fast. (This is also a technique used by swoopers to extend their swoops BTW.) The above list is not meant to include all the skills you need to safely fly a canopy; it’s just a checklist for a cross-section of skills you should have before downsizing. Some of these will be easier on a larger canopy, and can be practiced right away. Landing downwind, for example, is easier on a larger canopy simply because it can slow you down more before stalling. Some skills are more difficult on a larger canopy. It can be difficult to get a planeout at all on a larger F-111 canopy, so practicing things like a flare turn may best wait until you approach a 1:1 loading on a ZP canopy. At that loading, the canopy begins to perform more along the lines of how we expect a HP canopy to fly. More importantly, skills like the flare turn become both possible and necessary to practice, so you can hone your skills while you are under a canopy that tolerates minor mistakes. As I mentioned in the beginning, these are skills you should learn before you downsize, although some (like the flare turn) can be difficult to practice at very light loadings. If you can't do some of them yet? Get some coaching; it makes a lot more sense to learn them on your larger canopy, before you start jumping a smaller canopy that scares you. Once you can do them all, then try the smaller canopy. And if someday someone cuts you off under the smaller canopy, you'll have the reactions you learned under the larger canopy. Even if you haven't completely adapted those manuevers to the smaller canopy yet, those reactions will more likely than not save your life.
- 2 comments
- 9
-
- 1
-

-
- canopy control
- safety
- See more
-
Wings Level I've been thinking for some time about a final bit of advice, some catchy canopy control phrase, to say to students when they are about to go up. This morning it finally came to me: Wings Level When you're close to the ground keep your wings level This covers a lot of ground. Most of the injuries I can think of violated this principle. You can survive a lot of horizontal embarrassment by pulling your breakables in and doing a PLF. The vertical stuff is what hurts, and that mostly comes when your canopy is not level. There are three common situations: turbulence, SLAMMs and flaring. TurbulenceOne feeling of turbulence is the canopy suddenly rocking/tilting right or left. If it tilts to the right our untrained reaction is to raise our left hand to catch our balance, and lower our right hand to catch ourselves. This causes a hard right turn and slams us into the ground. Under canopy we must retrain ourselves to think "Wings Level!" and counter the tilt with our toggles. Tilt to the right: Think "Wings Level!" Left toggle down / Right toggle up Canopy overhead Back to neutral or continue flaring or ...If we're flaring when this tilt to the right happens another part of our reaction is to raise our left leg up and reach for the ground with our right leg. This is an injury prone position to hit the ground in. Our ground based habits are strong, and it takes some effort and practice to use only canopy control, our hands and toggles, while we're still in the air. Active control is the idea, you fly the canopy, don't let it fly you. SLAMMs - Stupid Last Minute Moves SLAMs - Stupid Low Altitude ManeuversI got this term from Rick Horn. It refers to last minute panic turns. These last minute turns happen when people Get too low before facing into the wind (Get-home-itis) Try to avoid last minute obstacles Chase the windsockLarge scale canopy strategy - thinking ahead - is the approach to focus on here. The idea is to get up wind of target, and then fly a landing pattern. It starts before you even put your gear on. Get a flight planner (an aerial photo of the drop zone). Go outside and look at the ground winds. Draw both left and right hand landing patterns for these winds. Pick one or the other based on obstacles and other factors. If the winds are still the same when you jump, this is the one you will try to use. The actual jump often happens differently than the plan.The point here is to learn a process, a way of thinking, an approach, that keeps you out of the awkward situations and last minute moves in the first place. Now draw the jump run (what have previous loads been doing?). Mark where the first and last groups got out (watch the actual jump or ask people who have just landed where they got out). If the uppers are strong mark both exit and opening point. Now put yourself in the shoes of someone who has just opened. I'm here, the windsock is still the same, so my two possible landing patterns are there, what do I do between now and later to get from here to the onramp, the beginning, of the landing pattern I want to use? Should I run? Should I hold? Should I crab? If I keep facing the way I'm facing now, where will I land? There's an obstacle, a lake, some trees, a power line between here and there. Can I fly over it? Should I fly over it? What if the wind changes and I land on it? Is that a disaster, or just inconvenient? If I can't make it back, where's a clear spot that I can land in? Which way is the wind blowing and therefore what landing pattern should I fly? Can I make it back but the wind has changed, the windsock is moving? What's my new landing pattern and how do I get from here to the onramp? Is the windsock going in circles? Are the jumpers ahead of me landing in all directions? Should I move my landing pattern over a bit and land outside the swarm of clueless sunday drivers? Am I too long but the wind is at my back so I can pull a few inches on the toggles and come down slower and ride the wind back? Am I down wind and don't want to blow away so I should face the wind and pull a few inches on the front risers and get down quicker? Have I by some miracle of forethought made it to the onramp of my chosen landing pattern? How do I handle it now? As a student they told me the 1,000 - 600 - 300 ft technique, but most experienced jumpers guage the pattern by angles and rates. On a light wind day I fly the down wind part at a certain distance from the target so the target is at the correct angle down from me. I fly down wind until the target is maybe 45 degrees behind me and turn cross wind. Once again the target is at the correct angle down from me. At the magic moment I turn on final. If I'm too low in the pattern I can cut across corners and shorten my flight path. If I'm too high I can go into brakes, come down slower but steeper, and bleed off unwanted altitude. If I've misjudged the whole thing, I remember that it's better to land out and walk back than land in and get carried away on a stretcher, so I do my turns onto cross wind and final at a nice safe altitude, and congratulate myself on what good judgement I have. It is hard to stress enough the value of persistently trying to fly your canopy on a predetermined course (get up wind of target, and then fly a landing pattern) rather than zooming aimlessly around and then landing. The value is that trying to make your canopy go where you plan to go in all the different conditions teaches you how to make your canopy go where you *want* it to go in all the different conditions. Canopy control is not simple and it's not easy. There are zillions of variables and circumstances, and on any given jump you don't even know what they all are. If you put genuine effort into this for 200 - 300 jumps you will start to sort out the patterns and learn what you can and can't do. Knowing what you can and can't do is especially helpful in staying out of the SLAMMs when you're landing out. Sometimes, even when you're thinking ahead, you have to make a turn close to the ground. There is a way to do it and still keep your wings level and that is braked (flat) turns. The idea is to first go into the right amount of brakes, half brakes, deep brakes, and then use one toggle slightly up or the other slightly down, or both, to turn. This gives you a change of heading with only a slight bank. If you were really at 50 or 75 ft when you did this, you just have to land that way (PLF). Practice braked turns up high until they feel really comfortable so that when you need one close to the ground it will be easy to do. Letting up from deep brakes near the ground is tricky because you drop quite a ways before your canopy resumes its normal glide path. At some point it's worth spending maybe 10 or 20 jumps edging gradually into this to find out what you can do. It's different with each canopy. Turn onto final in part brakes. At say 150 ft let up slowly and see what happens. Push gradually (that's *gradually*) into deeper brakes, lower altitudes, faster let ups. After while you will get a sense of what you can do. If you keep pushing you will eventually scare yourself and then you will know where the boundary is. FlaringAnother place where you can get wings unlevel is flaring flare too high and then let up flare too high and stall flare unevenlyThere is an old accuracy technique called double clutching, where you let the toggles up 6 or 8 inches (not a foot!), let the canopy fly for a moment, then toggles back down maybe 4 or 6 inches. If you flare too high and just hold it, you will land hard but probably get away with it by doing a PLF. If you flare too high and then let up, you will land much harder and may not get away with it. Even big, slow student canopies can slam you in if you do it wrong enough. If you've been practicing double clutching up high where it doesn't hurt, you can impress your friends and coaches with your great canopy control. If you flare unevenly, one hand lower than the other, you get the canopy tilting one way or the other as in turbulence. Tilt to the right: Think "Wings Level!" Left toggle down / Right toggle up Canopy overhead Back to neutral or continue flaring or ...Some people look at their hands or bring their hands together at the bottom of the flare in order to flare evenly. Those can be good short term techniques, but in the long run it is better to focus on what the canopy is doing. If the canopy tilts or banks I want to counter with one toggle down and the other up regardless of whether it was turbulence or an uneven flare that caused it. The flare works in two stages. The top quarter or top third stops your downward speed and levels you out (for a short while). The bottom part slows your forward speed. This means that in high winds, where you're barely penetrating and your horizontal speed (relative to the ground) is already stopped, you just do the top part of the flare, and you do it much closer to the ground. If you do a full flare in high winds you get picked up and thrown backwards pretty hard. This will impress your friends and coaches but not the way you want. The hard part of flaring in no winds is guessing when to start. You start the top part higher. This levels you out, changes your visual picture, and gives you immediate feedback on how good your guess was. If your guess was good, then do the bottom part and land. If you started too high, then pause for a moment, and then do the bottom part. Part of the trick is where you look. If you look at the horizon then you can't see the ground well enough in your peripheral vision and you can't tell when. If you look straight down under your feet all you see is ground rushing by and you can't tell when that way either. Up higher I'm looking more out ahead. As I'm starting the flare I look ahead of where my feet are going to touch down just like you do on an uneven mountain trail. As my feet are just about to touch down I look more downward just like you do at a rough spot on that mountain trail. What I'm looking for is any rock or uneven spot where I might twist an ankle. If your flare motions are too slow you don't get the effect, but if you yank the toggles down you just distort the canopy and airflow and that doesn't work either. If you back off a little from the yank to a definite, strong motion, it works pretty well. The final bit of flaring technique is to practice PLFs until they are comfortable and natural, because in spite of all this great technique there is nothing like a PLF to save your body and your pride when you misjudge it. A point of terminology is that panic turns are not hook turns. Hook turns, canopy swooping, turf surfing, pond swooping are a form of canopy flying that you can learn about later if you want. If you are interested, then go to some of the larger drop zones in Florida or California or some place and learn from the people who are already good at it. Like any envelope pushing around high speed dirt, it's pretty easy to kill yourself if you fuck up, so it's smarter to build on the experience of others. Meanwhile, in your day to day jumping, keep your wings level when you're close to the ground. Sometimes, in spite of our best efforts, our best training, our best intentions, we have a brain fart and do something stupid. Here's one that ranks right up there with the best of them. One year at Quincy it was hot, it was humid, it was late in the week, I was tired, I didn't want to land out and wait for the pickup, and I had to cross the loading area to get back. The loading area is a pretty wide section of concrete filled with Otters and Casas picking up jumpers, getting fuel, spinning props, planes taxiing in and out, tents full of waiting jumpers. I had seen it in freefall, I had been eyeing the situation from the time I opened. Can I do it? I'm not sure. It's gonna be close. I'll just face that way and decide when I get closer. Can I do it? I'm not sure. Just barely. Maybe. No, I should turn around and land over here. I'm going for it. Concrete. Staying aloft by sheer terror. The slightest gust and ... Shit. Props. I could land on the tail. Massive social humiliation and broken bones but I'd miss the props. Shit. The tent. I'm going to land on the tent. Shit. I'm over. I land. I gather up my chute and walk back thinking that was the stupidest thing I've ever done. To this day I can still hardly believe that I did that. It's not just students who show bad judgement under canopy. Bryan Burke has said that minds are like parachutes, sometimes they just don't work. That means that we must develop the best set of habits and background experience that we can, so that when our minds don't work we might still accidentally do the right thing. Keep your wings level when you're close to the ground. Skr
-
For most of us that have been to the World Freefall Convention (WFFC) before, the excitement begins to build as soon as we drive up to the airport entrance and stop at registration. Just seeing canopies in the air is enough to get our adrenaline flowing and make us hurry to get in the sky so we can have as much fun as the people we see there already. But wait! For safety's sake we need to slow down and take some time to familiarize ourselves with the convention facilities. In particular, those of you who have never been to the World Freefall Convention at least need to take a look at a map of the airport and convention site so you know where to find the best places to park, camp, and land your parachute safely. There aren't many rules at the convention, but the ones we have are important, because they affect the safety and enjoyment of the convention by you and everyone else who attends. We skydivers are generally some of the most safety conscious people around, but the excitement and fast pace of a large skydiving event have the potential for making us forget or ignore the usual good judgment we use back at the home DZ. One of the most important safety rules that we ask you to follow is to not push yourself and exceed your skill or capabilities. This applies in several areas: Getting On A LoadThe World Freefall Convention has the widest variety of skydiving opportunities you may ever experience in a short period of time and at one location. You will have a chance to jump from many types of aircraft and be on many types and sizes of skydives that might not be available to you back at your home DZ. Load organizers will be available for all of the skydiving disciplines, as well as seminars, coaching, and formal instruction by well known skydivers in these areas. These people will do all they can to help you learn to skydive better and to help you get on skydives that are safe, fun, and challenging. Most people who come to the convention seem to be interested mainly in freefall formation skydiving. If you are one of these jumpers the best bet is to start off with a group no larger than you usually jump with, and keep it simple until you are comfortable jumping with people you don't know and with figuring out where you are going to land. Even some experienced jumpers who have been to several conventions in the past try to first find a small group of jumpers and "warm up", while at the same time refamiliar- izing themselves with the convention at a relaxed pace. If you usually jump with small groups it wouldn't hurt to break off a little high on some of the first few loads so you can get some practice tracking a good distance from others in case you want to get on larger loads. Just be sure to use that time tracking, and don't open higher than recommended. Once you have made a few jumps you may get the urge to try bigger formations, and a good way to start is by checking with the load organizers that are available at the convention. The organizers are there to help you get on a skydive quickly, and to plan safe and successful skydives for jumpers at all experience levels. If you have any questions about safety or what type of skydive might be appropriate for someone with your skydiving experience while at the convention, just ask one of the load organizers. They will be happy to help you even if you are not jumping on one of their loads, or if you already have a group with whom to skydive. LandingLanding areas at the convention are generally unrestricted and we would all like to keep them that way, but this depends on your good judgement and common sense. If you are experienced enough and are conservative, you can land right next to where you are parked or camped, but there are plenty of large open areas in which to land, and the short walk you will make back to your packing area in some situations might be well worth the additional safety. While under canopy you will need to constantly be checking for other jumpers that may not see you. Think ahead and plan your landing site and pattern while still high enough to avoid other canopies without requiring evasive maneuvers. Hook-turns (turns more than 90 degrees for landing) are allowed only on approach to the swoop pond (where they are expected) and must not be done anywhere else! As a reminder, there are some situations in which you will definitely want to land in a large open area: If you are jumping a demo canopy with unfamiliar flight characteristics. If you have any problems with your canopy and decide that it is safe to land anyway, for example, a broken steering line, an accidental step-though pack job, or a canopy connected backwards. If you have a reserve ride. Demo GearMost of the major manufacturers of skydiving gear will be at the convention and they will have gear available for you to see and to test jump. However, these people probably do not know you, and do not know your experience level and abilities. If you exaggerate your experience or ability when deciding what gear to try out you are only putting yourself and others in danger. Canopies are the most likely piece of gear that you will have the opportunity to test jump and there will be a wide range of types and sizes available, some of them very high performance types. Be conservative, and take the manufacturer's advice on what canopy to try first. Most importantly, land in an open area that is away from other jumpers. A quick toggle turn required by suddenly finding another canopy in your path could be disastrous in an unfamiliar high-performance canopy. The harness/container systems provided by the manufacturers to test jump or to use when trying out a canopy are always very nice pieces of gear, and some of them even allow you the option of where to put the pilot chute. Still, they are not the same as jumping your own gear. Make sure the rig fits well and that the leg straps are tight and securely in place. Practicing your pull before the skydive is a good idea. In ConclusionThe World Freefall Convention can provide us with some of the greatest opportunities and most fun skydiving times of our lives, but we must exercise a good deal of caution to keep it that way. Please be careful so we can all share in the fun for years to come.
-
It's summer again, and that means the summer boogies are in full swing. Big groups of jumpers are getting together at this and other boogies througout the world, jumping like crazy, trying new equipment and disciplines, and partying all night. While they can be a lot of fun, boogies also present some unique risks and dangers that we have to keep in mind if we want to make it through the summer without injury. Presented below are some tips to help keep you alive and jumping at the biggest skydiving boogie in the world. 1. Do only one new thing at a time. Many jumpers show up and are awed by the array of canopy demos, big ways, new planes (with new exits) and new styles of flying. Indeed, the WFFC is a great place to try new gear and jump new planes. But showing up, grabbing a demo rig with a tiny main, getting on a new type of airplane, and trying head down for the first time is not such a good idea. Want to try a new rig? Great! But first make a few jumps with your old rig. See if the canopy traffic near the landing area is OK with you. If it gets a little too intense, you're still in good shape, because you are familiar with your canopy, and are in a better position to handle lots of traffic. After your first few jumps on your current canopy, you can make a better decision whether a smaller canopy is a good idea, or if you want to land that smaller canopy in an alternate (i.e. larger, lower traffic) area. 2. Make small changes. If you do decide to jump that demo rig, talk to the folks at the canopy tent and get a canopy they recommend. I would hesitate to downsize more than one canopy size at a time at the WFFC, no matter how good you think you are. Put a few jumps on each size or style of canopy before going on to a more aggressive one, so you have some experience you can fall back on if the next landing doesn't go as well. 3. Know who you're jumping with. You're generally not going to know everyone on the dive, but at least make an effort to not to jump with all unknowns. Skydiving is still small enough that your friends probably know their friends, so ask around to determine their skill level. Ask them how many jumps they have, but be aware that this isn't always indicative of skills, and people sometimes lie about their number of jumps (which is really stupid.) The WFFC organizers are a good resource here, since they have a lot of experience matching people and planning safe dives. Even if you don't want to jump with them, you can ask them for recommendations on other people. Chances are one of the LO's knows them or has jumped with them at some point. 4. Jump with a clear head. The WFFC has some excellent parties. But if you were up all night, it might be a good idea to get a little sleep before jumping. Adrenalin can't always make up for a hangover or a lack of sleep, and you need all your wits about you when you're in the air at the WFFC. 5. Plan your outs. The main landing area by manifest is popular, but a lot of people have gotten hurt trying to land there. If dense canopy traffic worries you, land somewhere else. Also, if you open and you think you may not make it back to the main landing areas, pick your outs at 2000 feet, not at 50 feet. You don't have too many options left at that altitude. 6. Learn to flat turn and flare turn. This is really important. You will be in big crowds of jumpers flying back. At some point, someone will cut you off. If it happens at 50 feet you have three choices: make a hard toggle turn (and plow into the ground at a painful speed) run into them or flat turn away. If it happens at ten feet, or after you have begun your flare, you have even fewer options. So be sure you can both flat turn (turn with minimal loss of altitude, using both brakes) and flare turn (turn right and left in the flare) before you get put in a position where you need those skills. 7. Plan your opening altitude and stick to it. At the WFFC, it can be dangerous to open high, since the next plane may be coming along on the same jump run just a few minutes later. There are some aircraft/loads that allow higher openings; check with manifest if you need a higher opening altitude to try out a new canopy (for example.) The WFFC can be a dangerous place. But with a little planning and some common sense, you can spend your time at Rantoul jumping and partying rather than taking that "other" helicopter ride.
-
The Advanced Canopy Control Course is designed for the average skydiver. It will give the skydiver confidence and ability to fly in close proximity to other canopies safely, while providing the skills necessary to avoid problems caused by others. It does not however, address proper tracking and deployment awareness, or landing skills. The purpose of the course is to improve safety by teaching proper canopy maneuvering techniques and to develop a sincere and lasting respect for Canopy Relative Work, through Advanced Canopy Control. The course includes one hour of ground training each day before jumping and is divided into three parts. Each part consists of five jumps for a total of fifteen jumps. There is a multiple choice, true/false test at the end of the course. The course will expose the skydiver to the fundamentals of Canopy Relative Work through Advanced Canopy Control. Areas of emphasis will include proper equipment, dirt diving, aircraft, weather, spotting techniques, exiting, piloting, approaching a canopy formation, catching, proper docking procedures, docking techniques, transitioning, break-off and emergency procedures. At the completion of the course, the skydiver will have learned the basic abilities that are required to avoid potentially fatal collisions with others in congested conditions. The jumper will be better prepared to handle a tight landing situation, dock safely onto various canopy formations, and deal with situations that can rapidly develop when other jumpers do not fly safely. Ground Training - One Hour Each Day Emergency Procedures Wraps Entanglements Communication Docking Formation Funnels Avoiding Problems Instructors Note:If the student has recently graduated AFF, please help with packing, spotting and landing; encouraging on heading awareness, groundspeed/winds and controlled ground approaches without a windsock --should be 100% before & during a skydive... For example, packing: explain the difference between rolling the nose and splitting it. Tail pockets vs. bags. Large toggles that can be kept in the hands when risering, staying on proper heading spotting: judging the aircraft heading whether crabbing, going downwind or upwind. This requires having a sense of speed over the ground. For instance, normal jump run airspeed is about 90 knots. If theres no wind at altitude for the first five jumps, then you will get a feel for 90 knots of ground speed looking down from the door. Then if on later jump runs, if you are traveling half as fast across the ground you could surmise that there is a 45 knot head wind, etc. Encourage this type of analysis along with wind direction; i.e. crabbing characteristics as viewed from the door and even odd occurrences where it would seem that due to a very fast ground speed you might be going downwind unbeknownst to the pilot! Ground approaches: the old method of feet together at 1000' check groundspeed with toes, turn 90-degrees, recheck, turn 90, etc. taking the slowest groundspeed heading as the direction for landing, and treat landings with the utmost respect for 100% awareness! A windsock should be considered a luxury. Think of anything that could cause you an 'accident' sometime and how you would avoid getting hurt. Emergency ProceduresThe first step towards successfully surviving an emergency situation is to have a plan, prior to the onset of the emergency. It must be a well-considered plan, based on experience gleaned from the wisdom of experts and analysis of fatal errors committed by others. Do not limit yourself to a single course of action, however. This is your life under canopy or in freefall. Be spiritual in some way to accept any risk, but always perform at 100% and encourage the student to do likewise. You'll always be happy with the performance and you'll be in control should there be any major challenges. For example: You are wrapped! The canopy is wrapped around your head and the lines are wrapped around your neck. You cant communicate with the jumper below you. Your face is turning purple and consciousness is fading. Your plan was for the guy who wrapped you to relieve the situation by cutting away, since he cant hear you yelling instructions to him. He is supposed to cut away, but he cannot. Unknown to you, he has become wrapped severely and is having his own problems. Therefore, you whip out your trusty Jack the Ripper and lay waste to his canopy, thereby saving your own life.If you are truly confident in your decisions, I believe you will survive and your student as well IF they follow the doctrine of always doing their very, very best. A primary plan is necessary, but dont limit yourself to a single emergency procedure and kid yourself that it is going to work every time, all the time. The second step is to practice it. You should practice your emergency procedures so that they become second nature to you. The middle of an emergency is not the time to become confused or indecisive. You should review your emergency procedures prior to each skydive. You should also quickly review your emergency procedures whenever you become involved in a rapidly deteriorating situation. This will replace potentially paralyzing fear with a positive plan, and the plan will be the first thing that comes to mind. Once your mind goes into survival-mode via 'procedure' --you'll gain additional insight as to how to deal with the problem. Each problem is unique. It's luck in my opinion that you get out of it. You do EVERYTHING you can thoughtfully and distinctly think of one-after-another solutions and go for it intelligently without panic and resolve the issue in time & with altitude. Once you're clear and under a reserve --I suppose if you were really hard-core you could go look for some more action but I would stay clear of anyone and get to the ground safely. The third step is to do it! Sounds easy, but you need to realize you will die if you don't. Definitely --clear it while checking altitude. Speak out loud your actions so they can be heard. Get under the problem with strength & body-English. use the hook-knives, lines off of you --check altitude and yell it out. Clear the air and chop it. Make your OWN decisions. Types of Emergencies:CRW emergencies are divided into two categories, Wraps and Entanglements. A Wrap occurs when a canopy becomes wrapped around a jumpers body. An Entanglement occurs when two or more canopies become entangled with each other. Either way, you are fucked. One way you may still have a good canopy above you --the other, both are twisted together doing their absolute own thing and there's nothing you can do but get away from it by chopping (so long as you are BELOW the bullshit). WrapsA wrap can be compared in severity to a low speed free fall malfunction. With sufficient altitude, you will have time to consider the problem and solve it. The canopy of the jumper above you, who is wrapped, should remain inflated. This gives you substantially more time to deal with your malfunction than you would have during a high speed freefall emergency. But it is very serious. Take care of it while you have the LUXURY of TIME. Do not land a modern square canopy with two people suspended under it. You will have incredible forward speed because of the increased wing loading on the still-inflated canopy. Landing impact will be severe, particularly to the bottom jumper. BUT --if you are in a Bi-Plane at 1500 feet, can't see your pilot-chutes, --plan on landing it --the pilot chutes 'may' be entangled --ain't worth the risk. The rule for wraps: The bottom jumper cuts away first. The top canopy usually remains open, so there is no reason to release it. Also, if the person who is wrapped cuts away, (the top jumper), he will go into freefall with the bottom jumpers canopy wrapped around him. That will only make the situation much worse --definitely for him, perhaps for you too. Usually, you can extricate yourself from a canopy that has wrapped you by sliding it down your body. If not, then the bottom jumper will have to cut away. That will release the tension and make it easier for you to extricate yourself and get free of the fabric. If he can't hear you then he might just cut-away. Then gather-up the canopy to throw it away 'whole' --DON'T throw it away if you think there may be a stray line or two wrapped-around your neck or leg, etc. Keep it gathered-up, stuff it between your legs and land with it. EntanglementsAn entanglement usually results from one person passing through the lines of another persons canopy. This causes the two canopies to become entangled, with the jumpers dangling beneath the partially inflated or completely collapsed canopies. This situation almost always requires both persons to cut away. This can result in both jumpers being subjected to sudden and extremely violent G forces. Usually, one person is suspended higher than the other, but not always. The general rule for entanglements is for the top person to release first. If the bottom person releases his lines first, the risers may recoil upward and wrap the other person. When the top person releases first, he may impact the bottom person on the way by, but he wont have much momentum. The top person is usually the one who passed through the lines of the bottom person, and, many times, his canopy will pull itself out of the mess after it is released. Sometimes the entanglement begins to spin, and one person will be hanging downward while the other one is orbiting the entanglement. This spin may accelerate rapidly. In this situation the orbiter should cut away first. This will fling the orbiter clear of the entanglement and does not alter the other persons orientation to the entanglement. If the jumper who is hanging downward releases first, it can cause the orbiter to change orientation to the mess and could make the situation worse. CommunicationWhen jumpers become involved in a wrap or an entanglement, the first thing to do is to communicate. You need to communicate the altitude, the problem and the plan. When someone has a canopy wrapped around them they may not be able to read their altimeter. In all the excitement they may have forgotten what the altitude was the last time they checked. You certainly dont want them to panic and cutaway. It is very reassuring to hear the altitude called out every 500 feet when you are totally engulfed in nylon. It can also be encouraging to hear that your canopy is OK. --do it. If you cannot get any response from the person wrapped up in your canopy, then you should go ahead and cut away. They probably have nylon across their face or around their neck and cant respond orally. They may not even be able to breath at all. You need to release the tension by releasing your risers, (cutting away) and leaving them with a ten pound mess of canopy --or a re-inflating canopy that jerks their head/leg off from time to time. Point is --better to leave them sooner than later if they are NOT communicating. If you are the person who is wrapped in a canopy, you should communicate that you are working on the situation, if you can. This information should be conveyed at regular intervals. Be cautious of your terminology. Dont say to the other person, "Dont cutaway!", or anything else that could be misunderstood! Once the decision to cutaway has been made, dont panic. Do it right! Keep your shit together. It only takes seconds to do right. Follow the numbers straight-thru and you survive according to the statistics --I think. First, get your hands on both handles and insure that you are clear of any lines. You should peel your cutaway handle off the Velcro, but leave the reserve handle in its pocket. If you have a hard pull on the cutaway handle, you can momentarily release your grip on the reserve handle and use both hands to cutaway. Keep your eyes on the reserve handle, so you can regain your grip quickly. Be prepared to do a freefall delay, if you have sufficient altitude. Look down where you will fall and figure you need around 400 feet or more of clear air beneath you. If there is going to be more than one person cutting away, the first one out needs to freefall for five to ten seconds, altitude permitting! This will provide sufficient vertical separation for the next person who cuts away to safely deploy a reserve. The most important thing that can be done to maintain a margin of safety is to remember your altitude! Most problems begin during docking or break-off. USPA states that the minimum altitude for docking is 2500 feet. How low would you want to be in a wrap? The next question is, how low would you want to be in freefall? USPA states that the minimum safe altitude to initiate a cutaway is 1800 feet. These limits have been determined by years of experience and several fatalities. Respect them. It is also conventional wisdom that a cutaway initiated below 500 feet has almost no chance of being successful. At that altitude you may save yourself by deploying your reserve into the malfunction. It is better to increase aerodynamic drag than it is to accelerate toward the ground in freefall. DockingWhat causes wraps and entanglements? Usually, bad docking techniques. The three factors most often involved are speed, (closure rate), angle, and distance from center. If you have too much speed, your body continues to travel forward after you have docked. The point where the target jumper grabs your canopy remains stationary, but the rest of the canopy continues to move in your direction of travel.. The canopy may then lose pressurization and wrap the person you docked on. Because objects tend to swing in an arc, it is common for the canopy to dissipate its momentum by wrapping securely around the jumper that you docked on. There are good and bad angles to dock from. Docking from straight behind, a zero degree angle of approach, is the safest angle. Docking head-on is obviously the worst angle. A head-on dock can result in injury. Docking with your canopy heading 90-degrees to the target jumpers heading will still give you too much speed. The most efficient angle is 45-degrees to the side of straight behind. Docking unintentionally with an end cell is more likely to generate a wrap than docking with a center cell. These three factors combine to make a dock safe or unsafe. Formation FunnelsAnother cause of wraps and entanglements is when the formation "funnels." This can be the result of the unanticipated collapse of a mismatched or misflown canopy. It can also occur if a canopy in the formation stalls. In a plane formation, the nose of the canopy below you is pushing on your brake lines. Your canopy can stall if you apply as little as half brakes. If someone docks and wraps the corner of a formation, it can cause part of the formation to funnel. It can also funnel at breakoff because the trim of the formation changes as canopies leave it and the stress distributed throughout the formation changes. Another problem is carelessness. Some people dont look where they are going. You should always look before you turn. Dont fixate on the formation. (Many people have gotten wrapped on a freefall jump by not looking where they were going, after opening. If you are looking at your toggles right after your canopy opens, you may experience a sudden and violent encounter with someone else who is doing the same thing). Avoiding ProblemsWhat can we do to prevent or ease wraps and entanglements? The foremost preventative measure is thorough planning. Perform a thorough dirt dive. That is the time to share techniques that will work for the type of formations and transitions that you are planning to accomplish. CRW is very three-dimensional and, therefore, quite complex. Participants can easily miscalculate a maneuver, if they are trying something new. Dont just dirt dive the formation. Share what you know. If someone is approaching too hot, you can spread out your arms. and prevent the canopy from wrapping you. Even if it does wrap, you can extract yourself easier because you wont be cocooned so tightly. Nylon will stick to itself like a Chinese finger trap when it is wound tightly around you. If you can give it some slack it will come loose. You can grab the area of nylon with the most tension, then lift it, if only an inch, then as you let it down it will loosen and start sliding down your body. If you are in a formation and someone below you gets wrapped, hold on to them until they can sort things out. Do not drop them unless they expressly request it. This gives them more time and less to worry about, as it will keep their canopy on heading. If you are planed on the jumper above you and they have become entangled in your lines, you can apply light front-riser pressure. This re-tensions your nose and tends to keep your canopy from spinning. They may then be able to slide up your lines, which will allow their canopy to stay inflated. This front risering must be done initially, as the problem occurs. Once the two canopies become entangled, one or both of you will have to cut away. If an end cell wraps around your foot, it can be difficult or impossible to release. You cant lift the jumpers weight up with one leg. Attempting to do so can injure you. As a canopy starts to wrap around your foot, you should stick the other foot in there, also. This will enable you to lift the jumper who is fouled on you and will allow you to get your hands on the canopy to relieve the tension on your legs and feet. This can help prevent injury. Example wrap: The canopy hits you with its left end-cell. The end cell stays (you gripped-it or snagged it) and the canopy flies around in front of you counter-clockwise (left turn) and continues around and stops back on its original heading when it first made contact with you. Reach over with your right hand andgrab your left front riser, Reach with your left hand in front of your right arm and grab a hold of your right front riser. Stiffen your body and pull your hands together and and out to your sides --this will turn you to the left 180 degrees --repeat the same move again and get the correct grip for a solid point. (Don't forget to present the point) it shows you know what you are doing. If the canopy is collapsing and re-inflating, you dont want to fight it. Have the bottom person cut away. The snatching action of the rapidly inflating-deflating canopy can really damage your ankles. The best strategy to prevent or reduce the effects of wraps and entanglement is to wear proper equipment. All participants should wear thin, leather gloves, shoes, socks and long pants or a jumpsuit. Wrist mounted altimeters are not recommended. Your RSL should be disconnected. AADs are fine. If you are too low and going too fast, you want your reserve coming out, regardless of the circumstances. You need a CRW parachute to do safe and sane CRW. The time to learn CRW is not after completing a freefall opening at 2000 feet on your little micro-lined skyrocket. Learn it from an expert, using the proper equipment, and at the proper altitude. Part One Jumps Basic Techniques 1.Introduction:The student exits 1st and is promptly docked on top by Instructor A. Instructor B docks on the student from below, on Instructor Bs center cell. The student will catch Instructor Bs center cell and take foot grips in his center lines. On command from Instructor B, the student drops the grip. Instructor B will re-dock on the student, approaching from the right side. Emphasis should be placed upon the students technique in properly and smoothly catching Instructor Bs center lines and getting quick foot grips, then returning to toggles in hands. Instructor B is then released by the student, and docks the student from the left. After the third dock by Instructor B, the student then releases his grip on Instructor B and then retreats when Instructor A releases him. The two instructors shall then form a biplane and the student will set up low, on center, and float up for a center dock. (always get the student from the top on their first CRW jump, you never know how they will react and you need to be in control. Keep the docks from Instructor B smooth and accurate, encouraging the student to catch the centerlines without a lot of moving around, etc. Setup with Instructor B quickly for the student. They usually will approach from straight behind, and may even use front risers, however, the plan for the classic bottom-up approach instills confidence, wave them in or tell them to 360 and set up for them if they abort. Make sure they understand if you move to not follow; they wait for you to stop moving and then they continue their approach.). 2.Base Setup Repetitions:Instructor A exits. Student follows 5 seconds later. Student positions canopy next to Instructor A. Instructor B positions himself behind and below. Student leaves Instructor A and positions himself next to Instructor B. The instructors continue to provide various approach angles for the student to practice. (use the rear risers to float up behind the student, telling them to do the same, 360 fast, they do the same. 90 out, 180 back, then on heading, they do the same, creep out front, have them tuck up knees to get to the scrimmage-line be creative!) 3.Sashay Wing Rotations - No Grip:Student exits first. Instructor A docks right wing. Student turns out to the left and back, then down and over to dock left wing on Instructor A. Instructor B then docks left wing on student. Instructor A leaves and student turns out to the right and back, then down and over to dock as right wing on Instructor B. Instructor A waits for student to dock. Instructor A then descends to make contact as right wing on student. (use the word "Point" between formations, get them to react quickly, encouraging direct approaches. Try to get a flow going, have fun!) 4.Sashay Center Rotations with grip:Student exits first. Instructor A docks the student on top; Instructor B docks student on bottom. Rotation begins with emphasis placed on keeping the formation on heading. This should be the students first successful dock. (each time you dock them, tell them to check heading. Make sure they get their toggles in hands quickly after they catch, emphasize the importance of piloting the formation holding steady while someone else is rotating, correcting the heading if necessary after the catch.) 5.Tri-Plane piloting exercise:360,180, and 90-degree turns. Emphasis is placed on recognizing formation appearance, taking proper grips, and observing the leading edge characteristics of other canopies and how to handle them. Also, awareness of the DZ should be emphasized. Instructors should fly slow, leaving student leaning forward on top. (toggles in hand & 4th finger grips on centerlines for stability, arching and proper foot grips. Proper turns, smooth but deliberate.) Part Two Jumps Top Docking, Rotation and Sequential 6.Top Dock, Plane - Repetition:Student spots the jump run, taking mental note of actual ground speed to compare with future spotting during course. He exits 3 seconds after Instructor A to set up for a top dock. Instructor B follows student. Emphasis is on keeping the students focus on instructors canopy leading edge. The instructors leading edge should be kept level with the students body while the student approaches. The student will be given every opportunity to complete his top dock. After the dock, the formation heading is changed intentionally. The student then descends the instructors lines to form a bi-plane. Instructor B sets up behind, low and to the side on heading and the student leaves the top to go back and get him. (help them with vertical separation, but make them work everything else. Tell them not to look at their canopy but keep their eyes on yours. When they climb down the lines, have them do it symmetrically bare handed, then leaving from an arched, straight-legged posture with toggles in hand.) 7.Warping and End Cell Tag:Adding equally opposing forces on the airfoil, with a front riser and an opposite toggle while maintaining heading and stability, the student uses strength and finesse simultaneously. Emphasis is on using deep front riser and deep opposite brake without inducing heading changes. Tagging begins as the instructor flies end cell to end cell and bumps lightly on one side. The instructor then backs-up a little and flies over to the students other side and flies forward a little and bumps again on the end cell. After the instructor bumps each side once, the student unwarps his canopy while maintaining heading, then performs this same tagging on his instructors end cells (Instructor goes into a warp after his 2nd tag). Student gains experience of passing through burble and is encouraged to be aggressive towards bumping end cells. Instructor B stays close throughout dive to increase students awareness. (this is going to be new to them. Explain it as though they were under a round in this warped configuration, where the unwarped canopy has the advantage. The burble can be explained as the area where a bridled pilot chute points teach them where it is so they can avoid it, or use it. Bumping end-cells shows the canopies can take it --repeat the dive to be more aggressive if required., Make sure you just bump fabric-to-fabric (no line groups closing --loss of control). Also, warping can be a great way of top docking from above. --encourage thinking along these lines --ie top-docking, warps, flying 'down the chimney' with a close pair, your own reason for excelling. Get them turned-onto doing their best) 8.Stack-Plane-Side by Side Repetition:A lot of line work with flying & catching fast empasized--not sloppy but more aggressive than last dive... Student is positioned on the bottom at the beginning of the exercise. Emphasis is on smooth, clean docks, creating smooth planes and smooth side by sides with clean break-offs and quick comebacks. Student must show communication skills during all side by sides, i.e., simple conversation. (simple conversation, jokes, good vibe stuff, no yelling, have fun, eye-to-eye. Watch out for risers snapping back into the face during the breaks. Keep aware of handles during grips. Get the toggles back in the hands quickly after breakoffs for a quick turn back into the stack approach. Hit the breaks a little harder for a quick smooth plane then back-off the nose away from the lines and settle it in tight.) 9.End to End, top or bottom:The best sequential drill I can think of for single-flying. 8 seconds between points is a good pace... With the student at the leading edge of Instructor A end cell, the student taps the outside edge of Instructor A canopy with his foot. Then he flies towards the opposite end cell without passing it, and taps it with his other foot. Then the student returns to the opposite end cell without going past. Instructor B is relative and preventing him from going past Instructor A end cell (Instructor B is 1/2 span distance from Instructor A, level with student, on heading). Then student Sashays out across, back & down into a wing position on the bottom of Instructor A and flies from end cell to end cell on the instructors body. The instructor will then sashay into a wing position on the bottom and the dive repeats. Emphasis is placed upon flying relative to the instructor, while using deeper than normal brakes throughout most of the flying. (this is slow, controlled flying. Stay close to them, almost crowding. Its a difficult dive worthy of a thorough dirt dive. This is a good time to introduce the idea of catching with the feet only.) Towards the end of the dive, with the student on top, the student uses a foot-grip-only walking method to get to the other side of the canopy, while maintaining his heading, and he practices until breakoff. (stay light to make it easier on them.) 10.Wedge Rotation - No Grip:Fast dumps, risers, warps --whatever it takes. No grips / No worries. Juyst make the slot as fast you can without waiting for a grip and go to the next point. Call the points to get the dive going faster. Student starts as left wing, then rotates to the pilot position, then rotates as right wing, then pilot again, then rotates as left wing, etc. Emphasis is on proximity flying with contact, where required (You can place your canopy on his hip . but he keeps his legs together and away from any grip, when he rotates as wing on you, you let him touch your body at the hip more or less, but do not take a grip - just fly relative). From the pilot position, the student learns to rotate diagonally across the top skin of the adjacent canopy and down, taking the wing position (as in dive 4 with coaching by Instructor B). In the wing positions, the student is encouraged to make contact with his canopy end cell on the instructors waist area, while staying to his side of the centerline of the pilot. (make sure they can get across your top skin when they leave. Awareness of missing the bridle as they skim the skin is important!) Part Three Jumps: Relax Gain Smoothness and Fly with Finesse Pieces, Wing docking 11.Three Stack Rotation:Clipping the tail, sashaying out & in. Toggle hard & back with front riser & breaks --just teach the method you're best at to 'show' the student. Or: Emphasis is placed on over-the-top rotations, staying on center and docking with minimal momentum. (teach whichever method youre most comfortable with, but teach how to stop the canopy, i.e. dinking the risers after the toggles.) 12.Wedge Rotation with Grips:Emphasis is placed on promptly acquiring grips, preferably with feet only, and maintaining the proper position relative to the other canopy. Hence the hand grip, if used, must be quickly obtained, so that the student can quickly return his hands to his toggles, enabling him to stay relative and on heading. The student is reminded that a legal grip can be with a hand or foot, so long as the shoulder is directly above the grip. (might be a good time to show them some part 53 stuff and get them turned-on to competitive flying. You can also explain the use of outside riser trim, inside toggle or warping when flying in a wing slot.) 13.Tri-Plane Rotations:This exercise involves building a tri-plane. Student is pilot, Instructor A second, Instructor B third. Student leans forward in his harness and applies brakes to float up, creating a two stack with a third canopy planed (called a "One-Two") formation. He then releases his foot grips and rotates up, back and over the top of the biplane, and uses risers to get his canopy level with the shoulders of Instructor B. He then docks on Instructor B, and applies brakes to plane cleanly. Emphasis is placed on a smooth and timely transition from plane to stack, and risering to shoulder level as described. (keep them forward as they slide up to avoid the head or reserve snagging the bottom skin. Make certain you can observe when they release the risers to give them a real-time critique of stopping at shoulder level.) 14.Two-Stack Rotation:Initially, the student will serve as the pilot of a three-stack. Instructor A is second. Instructor B docks third. After the initial formation is completed, Instructor A drops Instructor B. The student keeps his grip and flies his two-stack up, over, down and behind to dock on Instructor B. After the student docks his stack on Instructor B, Instructor B will then release grips and rotate to the bottom of the formation to create another three-stack, with the student on top as stack pilot. The student then repeats the two-stack rotation again. Emphasis is placed upon smoothness, acquiring proper grips, and good, clean riser work. (teach them to step on to their own feet to hold the grip on the lines, then risering down will not cause them to slide down the lines ) 15.Student organizes!Dive ends with a Downplane, and an accuracy landing in the peas. (go along with anything they want. Make them responsible for dirt-dive, pilot communications, spotting, calling points, breakoff everything. Stick to the 2500-foot breakoff rule. If they win at the accuracy buy their jump! Explain that 15 CRW jumps should give them respect for the dangers not to go out by themselves and do CRW with just anyone, but that they should now be able to fly safer and be more aware of others, etc.) AccViaCrw Test Multiple choice (check all that apply), true/false, etc. VISUALIZE EACH SITUATION1. What are the three steps towards successfully surviving an emergency? Altitude awareness, anticipating the problem, wearing the proper equipment. Have a plan, practice it, then do it! Proper flying techniques, trimming the canopy, adjusting float Mental preparedness, a will to survive, fast thinking. 2. How many categories of CRW emergencies are there? 1 More than 5 3-5 2 3. What are the categories of CRW emergencies? Stalls, spirals, unintentional end cell docking Wraps & entanglements Equipment failure, incompatible canopies, line lengths Formation funneling, poor beakoff/transitioning techniques 4. Which type of emergency can be compared to a low speed freefall malfunction? Biplane with pilot chutes entangled Mismatched canopy stall inside formation Wraps Top person passes through the lines of the bottom canopy 5. Rules for wraps Bottom jumper cuts away Top person cuts away first Top person cuts away Bottom jumper cuts away first 6. Rules for entanglements Bottom person cuts away Top person cuts away first Bottom person cuts away first Top person cuts away 7. Who is usually the one that passes through the lines of the other person during an entanglement? The person who docked last The person on the bottom The wing position The top person 8. If you and another jumper are orbiting an entanglement and he is beneath you, you should Tell him to cut away Be the first to cutaway Check altitude, then tell him to cut away Be the last to cut away 9. What is the 1st thing to do if you become involved in a wrap or entanglement? Immediately try to get out of the situation Communicate Get out your hook knife Check your own canopy first 10. If you cannot get any response from the person wrapped up in your canopy you should Maintain a stable heading Apply light rear riser pressure Tell him to cut away Cut away 11. The most important thing that can be done to maintain a margin of safety is to: Remember your altitude Wear the proper equipment Look before you turn Always know where the landing area is 12. When are the two most likely times problems may occur? During Breakoff Using mismatched canopies During docking While in a asymmetrical formation 13. What usually causes wraps or entanglements? Poor communication Improper equipment Mismatched canopies Bad docking techniques 14. What is the safest angle to dock from? 90 degree angle of approach from either side From directly below From above, on center Zero degree angle of approach from straight behind 15. What is the most efficient angle to dock from? From above, on center 45 degrees to the side of straight behind Zero degree angle of approach from straight behind 90 degree angle 16. True or False Docking unintentionally with an end cell is more likely to generate a wrap than docking with a center cell True False 17. If someone is approaching you too hot you could Pull your knees up and hope he misses Spread out your arms to prevent the canopy from wrapping you. Yell at him to abort the dock Try to deal with it after he docks 18. If you are in formation and someone below you gets wrapped... Hold on to them until they can get things sorted out. Yell out "Drop the bottom man" Call for "break it down" Turn the formation into the direction of the landing area 19. If you are planed on the jumper above you and he begins to get entangled in your lines you can... Pull some breaks to lighten the load on him Turn away slightly from the entanglement Tell him to drop you Immediately apply light front riser to retention your nose and help keep your canopy from spinning, 20. As a canopy starts to wrap around your foot you should... Apply deep front riser to sink and get your foot out Immediately reach down and grip the canopy Stick your other foot in there too! Look first, then turn away from the wrap 21. If you have just one foot wrapped 360 degrees Call out for more breaks from the man below Apply deep front riser to sink and get your foot out It should slide off of you on its own Turn away from the wrap and backwards from your canopy 22. If a canopy is collapsing and reinflating... Apply breaks to stable out the airfoil dont fight it have the bottom person cut away Use alternating front and rear risers Get a good grip with gloved hands and wait it out 23. What is the recommended breakoff altitude for CRW? 2500 feet 1500 feet Depends on the experience level Depends on the formation type 24. Under what circumstances is being on top NOT the safest? With a mismatched canopy is approaching the formation When the person on top has little or no experience. When both sides of the formation funnel simultaneously During turbulent wind conditions 25. When is it preferable to spot going downwind? In High winds In lower winds In no wind In average winds WHY?The DZs always visible, heading not as critical. 26. When is it preferable to spot short, going upwind? During high wind conditions When There are freefallers on the plane When there are low winds During multiple jump runs by the same plane WHY?The DZs always visible, heading not as critical. 27. When piloting a canopy formation you should always know where the landing area is True False 28. As your walking towards the plane you notice there are five or six groups of freefallers on the same load. You want to get out short and work towards the DZ since there is no wind. You should Ask the pilot to insure all groups exit on one pass Change your spot to another side of the windline Change plans and get out last avoiding a potential go-around by the freefallers. Get out first and work towards the DZ 29. You are in a biplane at 1500'. You notice the pilot chutes are entangled. You should... Immediately breakoff Try climbing back up to a stack position Retrim the nose of the bottom canopy Plan on landing the biplane 30. You have a canopy docked on your left leg. Another canopy attempts to dock on your right leg however the dock is sloppy and it begins to come around. You should... Drop the good canopy Turn away from the sloppy dock Call for a "break it down" Try to keep the good canopy and salvage the dock 31. How might you achieve greater float without drastically sacrificing forward speed? 1 inch of rear toggles Pick up your knees and apply light front risers Warp the canopy Rear risers 32. If youre approaching a target from beneath and lose sight of the target, you should Frontriser to the side until you can see the target and then setup for another approach. Rear riser back up to dock Use toggles to float Turn with a toggle and go setup for another approach 33. A formation can funnel at breakoff because Canopies may leave the formation in an asymmetrical fashion. Some formations have a tendency to funnel by themselves The trim of the canopies changes as they leave it and the stress distributed throughout the formation changes. Very high winds aloft 34. A planed formation can funnel because - In a plane formation the nose of the canopy below you is pushing on your break lines and you may stall in as little as half brakes. There are too many people in formation No cross connectors are being used People that are docked are not looking where they are going 35. You open your canopy. Everything is wrong. Weather, lots of traffic, (canopies in the air) bad spot. You should Achieve vertical separation Find a landing area. Look for hazards Look for alternate areas e Determine wind direction for landing 36. Your canopy opens, another jumper opens his right in front of you, facing you. You should Execute a rear riser turn away from him Dive down into clean air below you Perform a hard toggle turn to avoid him Call out to him to get his attention 37. When approaching a formation after exit when should you execute your turn to setup your approach When you are directly along side After you pass the side of the formation Before getting to the side of the formation Below and behind the formation Your ground test is over. Please anticipate being tested in the air on future skydives! Be safe AND prepared. And always do your very, very best! AccViaCrw Answers1. What are the three steps towards successfully surviving an emergency? b Have a plan, practice it, then do it! 2. How many categories of CRW emergencies are there? d 2 3. What are the categories of CRW emergencies? b Wraps & entanglements 4. Which type of emergency can be compared to a low speed freefall malfunction c Wraps 5. Rules for wraps d Bottom jumper cuts away first 6. Rules for entanglements b Top person cuts away first 7. Who is usually the one that passes through the lines of the other person during an entanglement d The top person 8. If you and another jumper are orbiting an entanglement and he is beneath you, you should b Be the first to cutaway 9. What is the 1st thing to do if you become involved in a wrap or entanglement? b Communicate 10. If you cannot get any response from the person wrapped up in your canopy you should d Cut away 11. The most important thing that can be done to maintain a margin of safety is to: a Remember your altitude 12. When are the two most likely times problems may occur? a During Breakoff c During docking13. What usually causes wraps or entanglements d Bad docking techniques 14. What is the safest angle to dock from d Zero degree angle of approach from straight behind 15. What is the most efficient angle to dock from b 45 degrees to the side of straight behind 16. Docking unintentionally with an end cell is more likely to generate a wrap than docking with a center cell True 17. If someone is approaching you too hot you could b Spread out your arms to prevent the canopy from wrapping you. 18. If you are in formation and someone below you gets wrapped... a Hold on to them until they can get things sorted out. 19. If you are planed on the jumper above you and he begins to get entangled in your lines you can... d Immediately apply light front riser to retention your nose and help keep your canopy from spinning. 20. As a canopy starts to wrap around your foot you should... c Stick your other foot in there too! 21. If you have just one foot wrapped 360 degrees d Turn away from the wrap and backwards from your canopy 22. If a canopy is collapsing and reinflating... b dont fight it have the bottom person cut away 23. What is the recommended breakoff altitude for CRW a 2500' 24. Under what circumstances is being on top NOT the safest? b When the person on top has little or no experience. 25. When is it preferable to spot going downwind? a In High winds 26. When is it preferable to spot short, going upwind? c When there are low winds 27. When piloting a canopy formation you should always know where the landing area is a True 28. As your walking towards the plane you notice there are five or six groups of freefallers on the same load. You want to get out short and work towards the DZ since there is no wind. You should c Change plans and get out last avoiding a potential go-around by the freefallers. 29. You are in a biplane at 1500'. You notice the pilot chutes are entangled. (Or, you cant see the pilot chutes ) You should... d Plan on landing the biplane 30. You have a canopy docked on your left leg. Another canopy attempts to dock on your right leg however the dock is sloppy and it begins to come around. You should... a Drop the good canopy 31. How might you achieve greater float without drastically sacrificing forward speed? d Rear risers 32. If youre approaching a target from beneath and lose sight of the target, you should a Frontriser to the side until you can see the target and then setup for another approach. 33. A formation can funnel at breakoff because c The trim of the canopies changes as they leave it and the stress distributed throughout the formation changes. 34. A planed formation can funnel because a In a plane formation the nose of the canopy below you is pushing on your break lines 35. You open your canopy. Everything is wrong. Weather, lots of traffic, (canopies in the air) bad spot. You should a. Achieve vertical separation b Find a landing area. c Look for hazards d Look for alternate areas e Determine wind direction for landing36. Your canopy opens, another jumper opens his right in front of you, facing you. You should a Execute a rear riser turn away from him 37. When approaching a formation after exit when should you execute your turn to setup your approach c Before getting to the side of the formation Always do your very, very best! THINK: Energy, Altitude, Position and you'll be there --it's 150 seconds of pure adrenaline & finesse!
-
Six Germans have been killed when two small aircraft collided in clear skies over the southern German state of Bavaria, police said. The crash involved a one-man glider and a Cessna plane with a pilot and four passengers who were planning to do tandem parachute jumps, a police spokesman said. The wreckage of the two aircraft landed in a corn field just outside the rural town of Lechsend, near Donauwoerth north of Munich. The Cessna was burning on the ground and extinguished by firefighters. "All we know at this point is that the two aircraft crashed into each other in mid-air," police spokesman Josef Bauer said. "The wreckage landed in a field just outside of the town. Luckily no one on the ground was hurt." The collision occurred shortly after 12:00 GMT. The victims, five men and one woman, were aged between 21 and 52. The plane was carrying four passengers, including the one woman, who were planning to do parachute jumps. Both aircraft, which were completely destroyed on impact with the ground, had taken off from nearby air fields. "We don't know at what altitude the accident happened," Mr Bauer said when asked about a local television news report saying the crash happened at an altitude of 1,200 metres. He said the skies were clear and visibility was unlimited on a warm summer afternoon. A Reuters photographer at the scene said wreckage was strewn several hundred metres across the field. Police said criminal investigators were at the scene and trying to determine the cause of the crash.
-
As a student skydiver you are guided by your instructors, drop zone management and USPA's Basic Safety Requirements (BSR's) as to the maximum winds allowable for you to safely jump. However, after you graduate from student status and become a USPA "A" license holder, there is no requirement or recommendation concerning wind speeds. And after you purchase your own gear, drop zone management will no longer need to worry about the gear that you are renting from them. From that point on, the decision to jump or to stay on the ground will be a decision that you will be making for yourself. The following article describes some of the things to consider when you find that someone has turned the big fan on "high". Before the Jump:You will find that the maximum winds to jump in is a very individual decision and depends on the jumper's experience, attitude, main canopy size and type, and reserve canopy type. Do not base your decision on what you see more experienced jumpers do because their situation is different, and do not allow yourself to be talked into jumping in winds that are not appropriate for your level of experience and your gear. It does however help to watch more experienced jumpers land when you are deciding whether or not to jump yourself. Watching someone that is your weight and has similar gear will give you a good idea of what to expect on your landing, assuming the wind does not increase any further. In addition to getting the wind speed in miles per hour from a wind meter or other source, you can go to the landing area and observe the winds for a while, noting in particular the gustiness present in that area. With experience you will be able to judge the wind that you can jump in by how the wind feels. Sometimes a lull in the wind may fool you into thinking that the winds have subsided enough to safely jump, but you should observe the winds for at least 5 minutes before coming to that conclusion because another period of increased wind and gusts may follow a lull. If you in fact decide to make a jump when the winds are strong, protect yourself in the event that some unexpected problem arises by wearing adequate head protection and foot protection. After Opening:After your canopy opens and you have begun to fly back to the landing area is the time when you may first begin to realize that the wind has picked up or is much stronger than you were prepared for. As soon as you realize that this has happened, get turned into the wind and check your speed across the ground. If you are backing up there is a good chance that the wind is also very high on the ground. If you have a reserve static line system (RSL) on your rig you may want to disconnect now in the event that you have to release your main canopy. Pulling down on your front risers will increase your forward speed and may help you make it back or at least keep you from backing up as far, but using your front risers also increases your rate of descent, so you will have to use your best judgement as to whether this is really helping you or not. If you do not think that you will make it back to the normal landing area, this is the time to make sure that wherever you do land will be a large clear area. It is especially important not to land behind anything like a tree line or a building. The stronger the winds are, the more turbulence is generated downwind of large obstacles like these. It may be necessary to turn and fly far downwind to get to a suitable area. Approach to landing:As you get closer to the ground there will probably be slightly less wind, but it will be more turbulent, especially if the terrain is anything but completely flat. Your canopy will be more stable if you hold partial brakes. Your arms can act like "shock absorbents" by relaxing some of the tension on the brakes when the gusts come along. Holding some brakes will cause your canopy to fly slower and may even cause you to back up, but this may be better than risking having your canopy collapse. At this point you will be comforted by knowing that you have planned ahead well enough to have chosen to land in a large field with a lot of room behind you in which to back up. Landing:It is usually recommended that you not front riser or turn sharply near the ground when there is turbulence present. This has been known to cause canopies to collapse. Smaller canopies are much more sensitive to small steering changes and to gusts so concentrate on keeping the canopy directly into the wind. You may not need to flare as much as when there is less wind but you must still flare. The main thing to avoid is flaring fully just as a gust occurs. A gust could create enough extra lift to make you go up suddenly and then let you down hard when the gust subsides. Use your judgement and your feel of the canopy to determine just how much to flare and prepare for a parachute landing fall (PLF). After landing:The best advice that can be given here is what we have heard many times as students: Pull down on one toggle, and keep pulling it in until you have canopy in your hand, then run around to the downwind side of you canopy. Even if you have a good landing it is still possible for your canopy to stay inflated and to pull you over and onto the ground. You can usually prevent this by quickly turning around and running downwind with the canopy while it is deflating. If you begin to fall down after landing do not reach out with your hands to break your fall because of the possibility of injuring your arms. Concentrate instead on getting your canopy deflated and do a PLF if necessary, or let the seat of your jumpsuit take the action. If it has become extremely windy or gusty when you land and you are certain that you will not be able to land without being dragged you have one last resort, and that is to pull your cutaway handle to release your main canopy. This of course assumes that you have disconnected the reserve static line (RSL) system and that you are not jumping a single operation system (SOS) that pulls the reserve handle at the same time you cutaway. Do not let your fear of re-connecting your canopy prevent you from releasing it if you really need to. It is not a big deal to release your canopy and it is not very hard to properly re-connect it to your rig. You or your rigger probably do it every reserve repack anyway to test the release system. Quite often a canopy that is released in this manner will land with the risers laying out across the canopy and can be easily straightened out. You may even be able to re-connect it right where you land. Just be sure to have the release system inspected by a rigger and do a good line check before packing. If you decide to release your main canopy, the best time to do it is when you find yourself off balance and know you are going to fall down. If you do this promptly you will simply fall down and not be dragged. You may not even get very dirty! However, if you wait until you are being dragged across the ground by your canopy you may be dragged into a position where you cannot reach your cutaway handle. Once you are being dragged, you are in very bad situation and must do whatever is necessary to get the canopy under control. At this point you will be glad to know that you planned ahead well enough to not be upwind of a paved surface or a barbed wire fence. After everything is finally under control be sure to gather up your canopy tightly to prevent the wind from re-inflating it. Remember, the jump is not over until you are back in the packing area with your gear off. In Your Spare Time:Read your canopy owner's manual! It has a wealth of information in it and contains information on your canopy's flight characteristics. Some manufacturers even have advice on flying your canopy under adverse conditions.
-
Irrespective of how long you've been jumping, piloting today's high-speed canopies is not for the faint of heart. With thousands of landings on old zero performance canopies such as round 1.1s, PCs, Piglets, and Strato Stars, many of our founders are frankly fearful of fast canopies. Moreover, as canopy development continues in the present direction toward ever faster, smaller models, skydivers new and old need to be continuously educated on landing technique. As one who recently returned to skydiving after a lengthy layoff (13 years) I knew I needed to get better acquainted with today's high-speed wings. They were obviously different from what I had been used to. Faster ... make that "swoopier" ... and although they looked to me to be more fun, there were too many people getting hurt under them. Wanting to avoid that, I set out to discover what I needed to know that I didn't about piloting these new canopies. To provide some perspective, before learning these tips I'd rather have had to shoot down-wind accuracy on a round than land a small Z-Po 9-cell on a hot still day. Surprised? Remember that a landing in 110 F temperatures, say at Perris' 1,450 MSL, is like landing at 5-6,000 feet. One of the first persons I got turned onto was John LeBlanc, design engineer for Performance Designs. He explained that my old-fashioned notions about the handling characteristics of ram air wings have little relationship to designs now on the market. New high performance Z-pos are lighter and more durable, but they also demand much more attention to landing. Because what you don't know can hurt you, John tried to explain why I couldn't land a zero porosity canopy the same way as my old ram air. Here is my understanding of how to land today's canopies. While some of these ideas, tips, and techniques are from John LeBlanc please remember that they are all filtered by an old time skydiver: all mistakes are my own. This is advice from a canopy expert interpreted by a relic: Stepping up to the ground?On a nice sunny day, John and I watched some landings at the DZ. He used his hands and feet to show me how, having picked my landing area, it should be done. 'You simply level out,' he told me. 'Convert your forward and down approach into forward speed. Eliminate any down for now, but stay inches off the ground.' Inches? with a high forward speed? That seems scary; why not feet? Says John: "The idea that neophytes should be several feet off the ground is okay for flying super big student gear, but it's not what the goal is, and is definitely not okay on the smaller stuff! Several feet up feels worse and worse as you go smaller, whether you're a neophyte or a self-acclaimed expert. As a result , we (Performance Designs) consider it unwise to go smaller (in canopy size) until you can consistently level out with feet at ground level under your existing canopy. Going smaller won't make it any easier, but rather it becomes more difficult!" John compares good landing technique to getting off an escalator. "The down escalator is like the ideal descending approach, level off and landing." Escalators do offer a good canopy landing analogy. Both modes of transport demand coordinated, mindful movements at journey's end. Try visualizing a landing approach as John describes how your landing will resemble stepping off a descending escalator: "Now, think of an escalator. When it levels out, your feet are just below ground level by an inch or two. You can gently transfer your weight from the step (the harness) to the ground because you are at that level. The forward speed is no problem, because you're at ground level. You're stepping up onto the ground, rather than down to it." "If the escalator dumped you off even as little as a foot high, the first few steps would be tough! This is because your forward speed is still there, as it will be on any no-wind landing. (If you level out too high) you crunch down with a (higher) rate of descent. This is why leveling off several feet up for neophytes is not a good idea. They have to come down sooner or later, and when they do, it will be with a (greater) rate of descent at the time of contact. With a little canopy, that will be a bad landing because it will hurt!" I mull this over. There you are, storming across the turn, just above the ground. While you still have forward speed, your feet just brush the weed tops. As your speed decreases, you provide a tad more flare so as to maintain your feel of the grass. Then, just step up. Step up? Wait a minute, I protest. Easy enough for you to say that stepping out of my harness should be as simple as getting off an escalator, but if it's so easy why do so many people crash and burn? Obviously this analogy only applies to a smooth, known landing surface. Life and landing, I remind John, are both dangerous. Yes, he agrees, "You are wise in emphasizing that brushing the feet applies to a known, smooth landing surface." and adds: but notes that "the altitude of your body should be the same, even if you're lifting your feet to stay clear of a poor surface until touch down time." More importantly, John continues, "As wing loadings go over 1.1 lbs per sq. ft., this technique is a required for acceptable no-wind landings." In my words, if you have a 150 square foot canopy and weigh 170 pounds, and your suspended weight per square foot of canopy exceeds a ratio of 1:1, then you gotta swoop the ground to avoid eating it. Then, a good landing will allow you to cautiously stand up out of your harness, starting from where the parachute is holding you up to where your feet are supporting you. The major tactile feedback is that your weight is transferred from your leg straps to your shoe soles. Low wind landings and high speed dirtWhat about the special challenges of no-wind landing conditions? "You will still stand up out of your harness," says John, "but you'll do so at a fast walk to a run, depending on canopy and wing loading. " The more wing load, the faster you'll have to run. We watch several more landings in which many of the canopy pilots flare too high or too early. One thing hasn't changed about landing, I tell John. Landing softly requires precise timing. How do you time your flare? He explains that if you flare too high, you'll land from higher up with an increased rate of descent, "if its done too soon, it results in a big gain in altitude, which means that you are too high (to land softly) again! " When you flare too high and then crash in on a little canopy, you'll likely get in a few front loops. Of course, if you flare too low or not at all, no matter what size canopy you're under you'll eat much dirt and still do several front loops. People will laugh. Late flares are not considered good form; they tend to dirty your jumpsuit and gear. It's a good idea to avoid them, so you'll eat less dirt less often. As John adds that a good way to learn how, "is to figure it out on a bigger, more docile canopy. (less dirt eaten.)" A backyard swing modelRemember the fun you had as a kid swinging in a backyard swing? You could go real high or not. You could even try to jump out at the top of the arc or lower. Or, if you had a littler kid in your lap, you'd just let the swing slow down to nearly stop and then just step out of the seat onto your feet. You do it so smoothly that there is no fear and no pain. It is satisfying. The little kid is happy but not scared. "The swing can be moving slow or fast, but if you get off at the right time, it's easy in either case." [to step out of the seat and onto your feet. No sweat, no fear. Like on a slow-moving swing, it's easier to time your touchdown under a bigger canopy], "The slow swing (big canopy) is easier to time, and the steps are slow. " A fast moving backyard swing is something like a landing small fast canopy notes John, "The fast swing, (like a small canopy), is harder to time and the steps are quicker. But (even fast steps) don't hurt if you step (up) onto the ground at the bottom, when the rate of descent is exactly zero." Just imagine you are stepping out of that swing seat and onto your feet. If done smoothly it's fun, even satisfying. You've just had a good landing and you know it. But "Now try goofing on the timing ... get off on the upswing; things get real rough if you're moving fast! That is just like finishing your flare too high." The transition from sitting in the harness to standing on the ground is subtle enough for another analogy. Thinking for a moment, he used a child's walking chair: and said something like 'I'm talking about those contraptions they put toddlers into. It's a seat with four wheels, and the kid's feet just barely touch the ground. They can paddle around and get into all sorts of trouble. Or they can quit paddling and just stand up. The difference is so smooth that they hardly notice whether it is their feet or the seat holding them up. That's what a good landing is like.' Yes, John said, "The walking chair analogy. Nice." Putting this to practice, I find the idea of a two-stage flare is helpful for transitioning to the horizontal. First, flare with only about 6-12 inches of toggle. This converts the ground-rush into a swoop just above the ground. At the end of the swoop, when the canopy won't stay up any longer, depress (bury) the toggles for the second part of the flare. After thinking about it, John added these remarks: "OK, I like the idea of a two-stage flare except for the part about burying the toggles at the end. This will make many canopies stall, and others might just quickly mush onto the ground. If your feet are at ground level, then this doesn't make much difference. You step up onto the ground just the same. But, if you haven't realized that you're a little higher than the ideal, you'll get a rude awakening when you bury the toggles. [Burying the toggles then] you drop down onto the ground with a thud." He also strongly endorses flare-practice, before finial approach, while still high up, "I like... practicing the flare a lot. I do it on EVERY jump. its fun!" Practicing upstairs helps because you can hear and feel what your canopy is doing without the distraction of high speed dirt coming at you. Keep "hands-on" canopy controlCanopy control inputs should be smooth and fluid, not abrupt and mechanical. Whatever landing you do make, says John, "you must still keep your hands controlling the canopy, even if you have the urge to swing your hands as you step (or run). If you are unknowingly moving the toggles, the canopy will do some unwanted maneuvers! People also use their hands for balance cause some pretty wild gyrations, too!" However, "If you continue to fly the parachute properly when you are taking your first steps, [then] the parachute will continue to help support you during those initial steps. Again, this technique is not critical on a big canopy, but becomes more and more important as the wing loading increases." So, remember, parachute canopies only do what you tell them to do. They are so responsive that heretofore unnoticed hand movements will give you yaw and cause you to veer off. In other words, they're responsive enough for perfect landings every time. Or they can turn a twitch into a turn. Keep your hands in sight so you always know what they're doing. Smaller is not always smarterWhile today's new smaller Z-Po parachute canopies are faster, most do appear to have wider safety margins than did the squares of yesterday. However, I'm convinced that going to a smaller canopy shouldn't be an automatic goal. For some of us, consistently painless landings require lower wing loadings via bigger canopies. As PD's John LeBlanc puts it: "Square foot for square foot, today's canopies are generally more forgiving than those squares from years ago. But as you downsize from one size modern ram air to a smaller canopy of the same type, you give up some of that forgiveness. "So, make sure you've really got things well under control before you even consider going smaller. On the larger canopy, little technique problems will not affect the softness of the landing noticeably, but the same poor technique will cause problems on the next size smaller canopy." Pat Works, SCS-1 Legal Disclaimer: Serous injury or death can result from applying written techniques to a high speed sport. Although the quotes are from John LeBlanc, Neither he nor Performance Designs endorse, condone, apporve, or reccomend anything herein. Parachutes are dangerous: you could kill yourself using 'em. Copyright 1994 by Pat Works RWu Parachuting Publications 1656 Beechwood Ave. Fullerton CA. 92635 (714) 990-0369 FAX 529-4769
-
Skydiving EmergenciesThe bulk of the content from this section is republished with permission from Chapter 4 of Parachuting: The Skydiver's Handbook by Dan Poynter and Mike Turoff. Although rare, the fact of the matter is that there are a number of possible emergencies in skydiving that could either hurt or kill you. The emphasis in this section is on education. If you are uncertain about anything speak to your jumpmasters. On The Ground Briefings and Safety Considerations Hazard Briefings Alcohol and Drugs Health Concerns Scuba Diving Alert Some Fear is Good for You Airport Safety In The Aircraft Emergencies in the Aircraft Airplane problems Open parachute in the airplane On Exit Exit Emergencies Exit hazards-static line Exit hazards-AFF Dangling static line Student in tow Static line not hooked up Pulling high is dangerous In Freefall Freefall Emergencies Accelerated FreeFall (AFF) emergencies AFF: Loss of one jumpmaster AFF: Loss of both jumpmasters Five-Second Rule for loss of stability Loss of altitude awareness Goggles At Deployment Deployment Emergencies Lost handle Hard pull Pilot chute hesitation Pull-out v. throw-out Trapped pilot chute Pilot chute in tow Under Canopy Canopy Emergencies: Breakaway Jettisoning the main canopy Two Action System (TAS) The Single Operation System (S.O.S) Canopy transfer Harness shift Parachute Mulfunctions Total malfunctions Partial malfunctions Major partial malfunctions Bag Lock Horseshoe Violent spin Line overs Partial malfunctions that may be majors or minors Rips and tears The snivel Slider hang-up, at the canopy Slider hang-up, halfway Broken suspension line(s) Minor malfunctions Line twists Premature brake release Broken steering line Steering line(s) won’t release Pilot chute "under/over" problems End cell closures Combination malfunctions Two canopies open Tandem jumping malfunctions Large ring and ripcord handle Change of emergency procedures Breakaway training Emergency priorities Canopy collisions On Landing Landing challenges Turbulence Dust devils Thunderstorms The tree landing Power lines Water landings Buildings Other obstacles
-
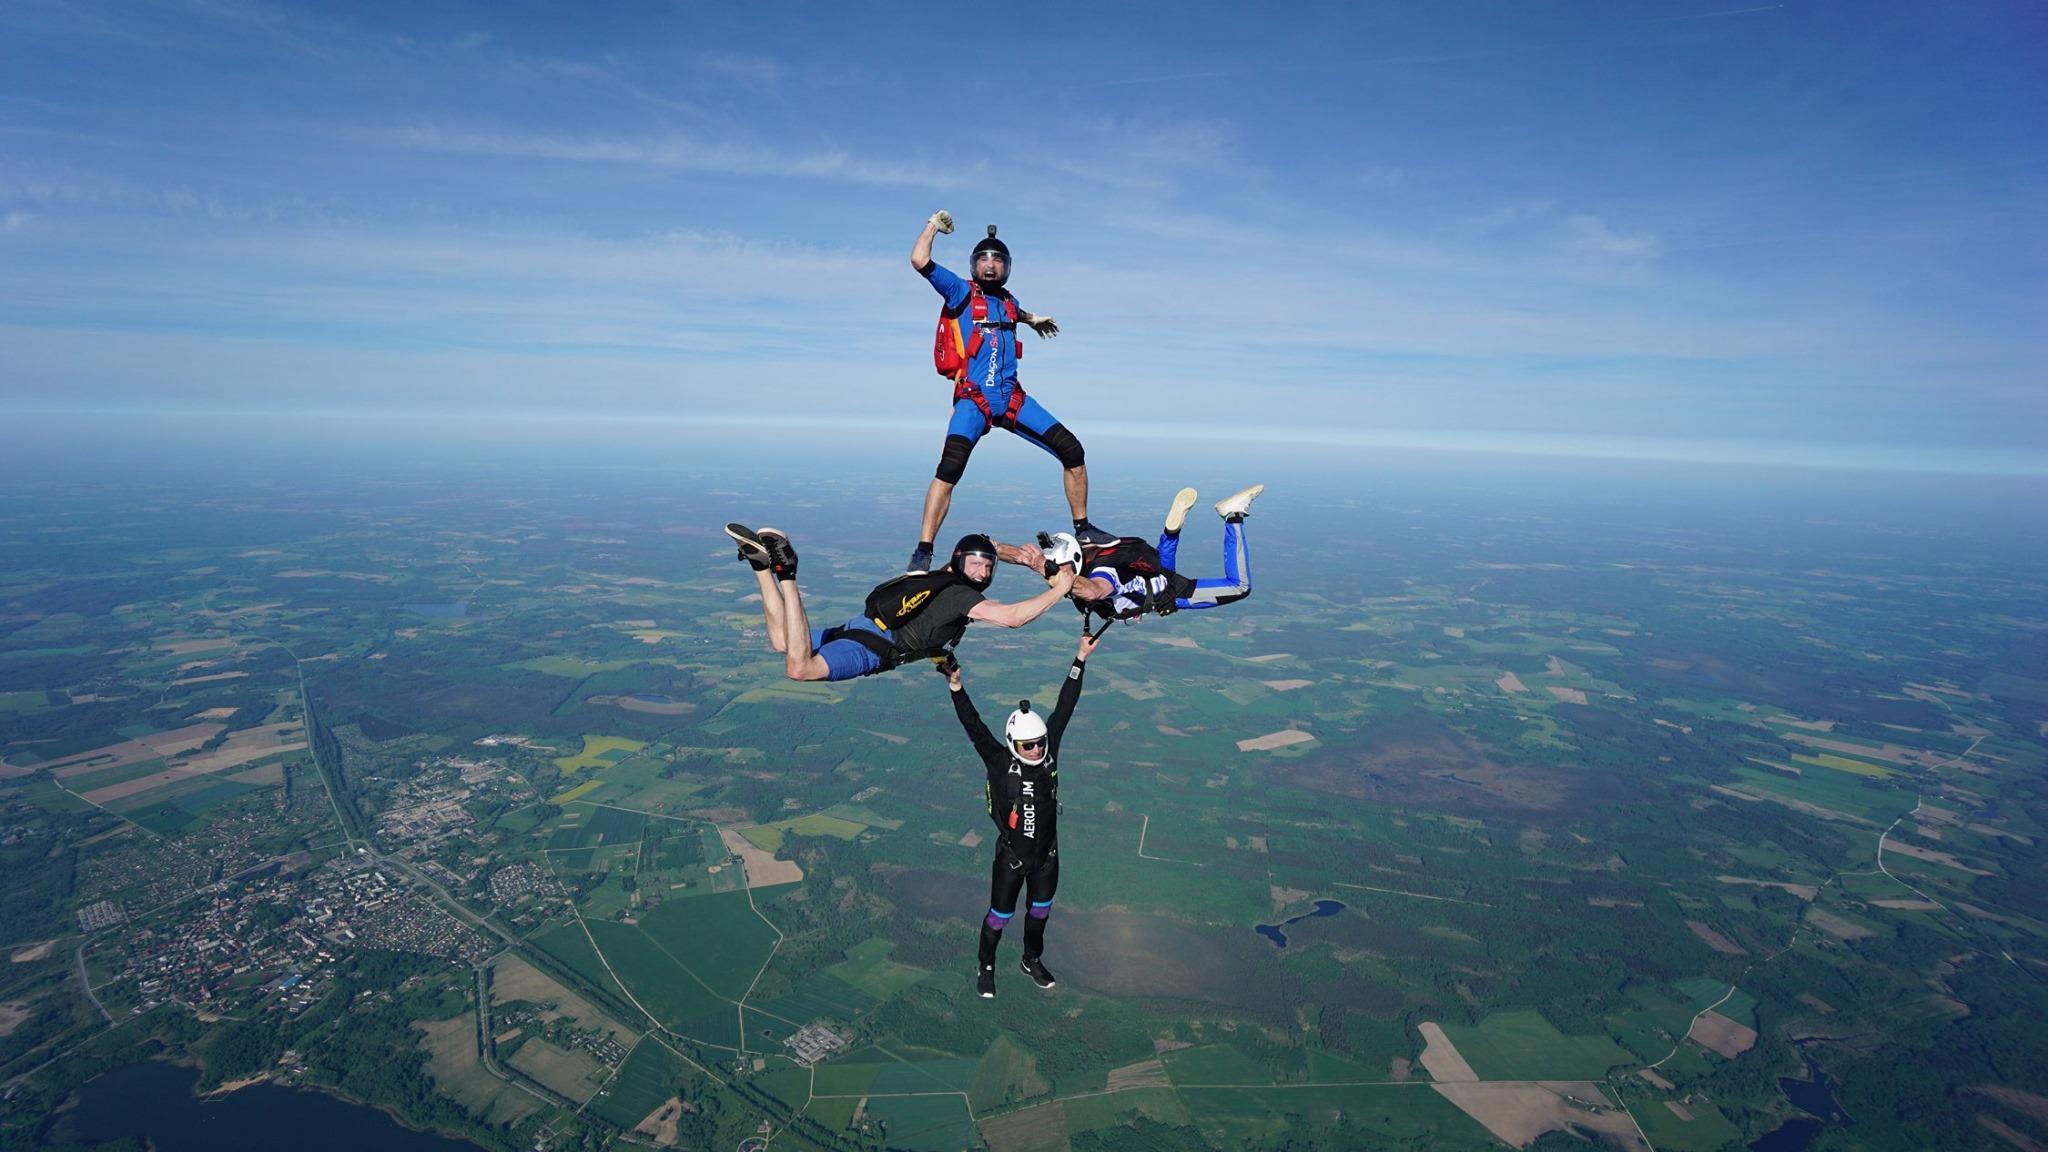 This glossary of skydiving terms accompanies the Student Skydiver's Handbook, by Bryan Burke. Click on the letter corresponding to the first letter of the word you are looking for: A B C D E F G H I J K L M N O P Q R S T UV W XYZ Return to the top of the Glossary to search for more words or just browse them alphabetically. The Letter A AAD. Automatic Activation Device. A device that senses rate of descent and altitude and which will attempts to mechanically activate the reserve parachute if the skydiver passes below a set altitude at a high rate of descent. A/C. Aircraft. Accuracy. Also known as Precision Landing, this is a competition discipline in which the skydiver attempts to land on an established target. At the National level the target is 3 cm in diameter, about the size of a quarter. Accuracy landings of various difficulty, from 20 meters to 2 meters, are required for USPA licenses. See the SIM for details. AFF. Accelerated Free Fall. An AFF student receives training on freefall jumps of 40 seconds or longer, accompanied by a qualified jumpmaster, as opposed to Static Line training which does not involve long freefall in the initial training phase. AGL. Above Ground Level. Altitudes are in reference either to Ground Level of Sea Level (see MSL). Skydivers always use AGL when referring to altitude. Airspeed. The speed of a flying object through the air, commonly used in reference to aircraft or canopies. Altimeter. A device indicating altitude. Angle of attack. The angle at which the wing is presented to the apparent wind. With square parachutes this changes when the brakes are applied. Angle of incidence. The angle at which a canopy is trimmed to glide through the air. Apparent wind. The wind perceived by an observer. See relative wind. ASP. Skydive Arizona's version of AFF, the Accelerated Skydiving Program includes two tandem jumps and an enhanced version of the AFF syllabus. ASTRA. An AAD made by FXC Corporation. Aspect ratio. The ratio of a canopys width (side to side) to breadth (front to back). Seven cell canopies typically have an aspect ratio of about 2.2 to one, while nine cell canopies are usually between 2.8 and 3.0 to one. The Letter B Backslide. To move backward in freefall relative to a neutral reference. Usually unintentional and undesirable, caused by poor body position. Bag. The deployment bag in which the canopy is packed. Base. The core around which a formation skydive is built. Can be a single person or a group of people, depending on the number of skydivers involved. BASE jump. A jump made from a fixed object rather than an aircraft. BASE is an acronym for building, antennae, spans (bridges) and earth (cliff). Beech. Short for Beechcraft, an aircraft manufacturer. Usually used in reference to a Beech D-18, a.k.a. Twin Beech. At one time these were common skydiving planes, but they are becoming obsolete. BOC. Bottom of Container. Refers to the location of the pilot chute. An increasingly common position for main deployment devices, as opposed to belly or leg mounted. Body position. Ones freefall body posture. Variations in body position are what make a wide range of freefall maneuvers possible. Boogie. A gathering of skydivers, usually focused on fun rather than competition. Big drop zones host several boogies a year, often on long holiday weekends. Bounce. To land at unsurvivable speed. Also to frap, or go in. Box man. A neutral, face to earth body position in which the arms form right angles at shoulder and elbow, and the legs are spread at about 45 degrees from the long axis and bent 45 degrees at the knees. Generally considered the ideal position for Formation Skydiving. Brakes. The brake lines of the canopy are synonymous with steering lines. Used together, they slow the parachute. Used independently they result in a turn. Break off. To cease formation skydiving by tracking away from the formation prior to deployment. Bridle. The thin webbing strap from the pilot chute to the top of the canopy. Part of the deployment system which consists of pilot chute, bag and bridle. BSR. Basic Safety Requirements. BSRs are USPA guidelines. They do not have force of law but are generally regarded as excellent minimum safety standards. Burble. The area of turbulence behind an object going through the air, whether a person in freefall or a canopy in flight. The Letter C Call. The time remaining until you are to board the aircraft. For example, a fifteen minute call means you will board in fifteen minutes. Canopy. The construction of fabric and lines used to land safely after a freefall. Usually used in conjunction with a type reference (round, square, zero-p, main or reserve). Cascade. The point where two lines join together so they run smoothly into one. Cascading the suspension lines results in reduced bulk and drag. Cell. Square canopies are made up of pressurized cells, usually seven or nine. Each cell consists of a load bearing rib at each side to which the suspension lines are attached. A third, non load bearing rib runs down the middle of the cell. The cell is pressurized through the open mouth at the front and also through cross ports in the ribs. Adjacent cells share load bearing ribs. Center point. The point around which movement takes place. In an individual the center point is considered to be in the middle of the torso. In a group, it is the point that the formation centers around. Cessna. An aircraft manufacturer. Single engined Cessnas such as 180s, 182s and 206s are the workhorse of smaller drop zones, carrying four to six jumpers. Chute assis. French for sit flying, or freefalling with one's seat presented to the relative wind. Closing loop. The small loop that holds the flaps of the container closed once the pin has been guided through the loop. Coach. A skydiver with some formal training in the art of instructing freefall technique. Container. The element of the parachute that houses the canopies. Technically, the Harness/Container but usually just referred to as the container. Crabbing. A canopy is crabbing when it is flown at an angle sideways to the ambient wind, resulting in a path across the ground that is sideways as well as forwards. Creep. To creep is to practice formation skydiving sequences while laying prone on a creeper. Creeper. A board equipped with wheels on which a skydiver lays to simulate freefall maneuvers. Cross ports. Holes in the ribs of a cell that allow air to flow from one cell to another. Current. To "be current" is to have jumped recently enough to retain proficiency in the sport. Uncurrent skydivers, depending on their experience, must be supervised to some degree when they resume jumping. See the SIM. Cut away. To release the main parachute, cutting away is a standard emergency procedure prior to deploying the reserve. More properly known as a breakaway, the technique did involve using a simple release system activated by pulling a handle. CRW. Canopy Relative Work, now officially known as Canopy Formations. CRW involves flying open canopies in close formation, where the pilots actually take grips on each other's parachutes. CYPRES. A type of AAD. Made by AirTech of Germany, this is the most common type of AAD and the first modern design to be widely adopted by expert skydivers. The Letter D DC-3. A type of aircraft, the Douglas DC-3 is a large, twin engined airplane capable of carrying over 40 jumpers. Like the Twin Beech, DC-3s are being rapidly replaced by more modern turbine engined aircraft. De-arch. To flatten out or reverse one's body position from the normal arched box man. A de-arch results in a slower fall rate than an arch. Dacron. A common construction material for canopy suspension lines. Dacron lines are thicker and softer than so called "microlines". Data card. Every parachute carries a data card with information on the reserve parachute, including type, last date packed, owner, serial number, etc. Dead spider. Slang for de-arch. Decision altitude. The altitude at which a skydiver is trained to begin execution of emergency procedures. Usually 2,500 feet AGL for students, and 1,800 feet for expert skydivers. Deployment system. The components of the parachute that control deployment of the canopy. Includes pilot chute, bridle and bag. Dirt dive. To rehearse a skydive on the ground. Dive floater. A dive floater is a skydiver who is inside the airplane in the exit line up, but leaving prior to the base. This configuration only occurs on large formations. Dive loops. Many advanced skydivers have loops or "blocks" on their front risers to make it easy to grip the front risers for steering purposes. Also called front riser loops. Diver. Anyone diving out of the plane during a formation skydiving exit. Door jam. To practice an exit in the aircraft door of a mock up of it prior to the skydive. DOS - Double or Dual Action System Down plane. A CRW formation with two canopies, both pointed toward the ground. This can also occur to a single skydiver with both main and reserve deployed. Drop zone. Common slang for a skydiving center, also DZ. Dytter. A brand of audible altimeter. The Letter E Elliptical. A wing shape characterized by a tapering leading and trailing edge so that the middle of the canopy is wider, front to back, than the ends. This configuration is typical of many high performance canopies. End cell. The cell furthers out on a canopy. Exit weight. The total weight of the jumper and all equipment and clothing. The Letter F F-111. A fabric common in mid range canopies, F-111 is slightly permeable to air and wears faster than zero-p fabric. Pronounced "F one eleven". FAA. The Federal Aviation Administration is the agency of the US government that regulates aviation activity, including skydiving. FAI. Federation Aeronautique International. The international organization governing air sports. FARs. Federal Aviation Regulations, the laws governing aviation. Fall rate. The speed at which a skydiver falls. Matching fall rate is essential to successful formation skydiving. This is done with jumpsuits, weights and body position. Finger trap. A method of installing a loop in a brake line without producing rough spots on the lines, the finger trap is accomplished by sliding one line into the other. The loop serves as a method of setting brakes in the desired position for the parachutes deployment. Flare. The act of pulling down the brakes of the canopy in order to slow it down, resulting in an increased angle of attack and reduced descent rate. Floater. Skydivers who leave the airplane before the base are called floaters since they must use a slow fall rate to get up to the base. Floating also refers to an exit position outside the airplane. Freestyle. A type of skydiving characterized by acrobatic individual flying, reminiscent of gymnastics. FS. Formation Skydiving, formerly known as relative work. In FS, skydivers attempt to go through a predetermined sequence of freefall formations. Formation. 1) A freefall skydiving formation of more than one jumper. 2) A flight of more than one jump plane. Funnel. A funnel occurs when one or more skydivers find themselves in an unstable body position and end up in a skydivers burble. The resulting loss of stability for the other skydivers usually causes the formation to break up. FXC. A company manufacturing AADs. One FXC design is common on students but considered by many to be unsuitable for expert skydivers. A new FXC design, the ASTRA, went on the market in the spring of 1996 and is relatively unknown. The Letter G Glide ratio. The distance a canopy flies forward compared to down. A canopy with a 3:1 glide ratio flies three feet forward for every foot of vertical descent. GPS. Global Positioning System. By picking up signals from satellites, a GPS receiver can tell the user position over the ground. Used in skydiving aircraft to spot the exit. Grips. Using the hands to hold onto another skydiver in freefall or during the aircraft exits. In formation skydiving, the formations are scored as complete when every skydiver has taken the correct grips. Grippers. Hand holds built onto formation skydiving jumpsuits to make it easier to take grips. Ground speed. The speed of an airplane or skydiver over the ground, as opposed to through the air. The Letter H Hand deploy. To activate the parachute by manually deploying the pilot chute as opposed to pulling a ripcord. Harness/container. The webbing and fabric holding the main and reserve canopies to the skydiver. Heading. The direction an aircraft, skydiver, or parachute is facing. The ability to recognize and maintain heading is crucial to jumping with others successfully. "On" or "off" heading are terms commonly used to describe exits and deployments. Holding. When a parachute is flying directly into the ambient wind, it is said holding. See running and crabbing. Hook knife. A small knife carried in the jumpsuit or on the parachute harness, the hook knife is designed to cut lines or webbing. A small razor blade is recessed in a hook shaped handle to prevent unintentional cuts. Hook turn. A turn of 90 degrees or more executed close to the ground. Because of the high risk associated with this maneuver, hook turns have an unfavorable connotation. Hot fuel. When the airplane does not shut down during fueling. Do not board the aircraft while fueling is in progress. The Letter I In date. A reserve packed within the previous 120 days is said to be "in date". If more than 120 days have elapsed since the reserve was packed it is"out of date" and illegal to use. Instructor. Someone who has held a USPA jumpmaster rating for at least one year and passed an Instructor Certification Course. IPC. The International Parachuting Commission oversees sport parachuting. It is a committee of the FAI. The Letter J Jump run. The flight path taken by the jump plane to put the skydivers in position over the airport. Jumpsuit. A cover all type garment designed for specific skydiving applications such as FS, freestyle or accuracy. Jumpmaster. Someone who has successfully attended a USPA Jumpmaster Certification Course. A jumpmaster has all of the privileges of an Instructor except that they cannot supervise a first jump course, sign off licenses, or manage a student program without an instructor's supervision. The Letter K Key. A signal to move on to the next step in a skydive. King Air. A turbine aircraft made by Beechcraft and common in medium sized drop zones. The Letter L Line of flight. An imaginary line corresponding to the jump plane's path over the ground, the line of flight is a useful reference line on larger formation skydives. Also, during the jump run the skydivers will be distributed along this line of flight. Log book. Like pilots or sailors, skydivers log their activity and achievements in order to document their experience. LORAN. A navigational system similar to GPS except based on ground transmitters, LORAN is relatively obsolete. The Letter M MSL. Mean sea level. Used by pilots when defining altitude, MSL refers to feet above sea level as opposed to above the ground. Pilots always use MSL when referring to altitude. Main. The primary parachute. Manifest. 1) The list of skydivers on the jump plane. 2) The act of going to the office where this list is maintained to put yourself on a plane. 3) The location where manifesting takes place. MARDS - Main Activated Reserve Deployment System Microline. A modern type of suspension line considerably smaller than dacron line. The Letter N The Letter O Organizer. Someone with leadership skills and skydiving expertise who plans formation skydives. Otter. The DeHavilland Twin Otter, a very popular turbine jump ship carrying up to 23 jumpers. Out landing. Landing off target. Out of date. See in date. The Letter P Packing data card. See data card. Peas. Pea gravel, used in the landing area as a target reference and because it is forgiving of hard landings. Pin. 1) The skydiver who first gets to the base. Base/pin are the two people around which many formations are built. 2) The act of docking on the base. 3) The closing pin of the main or reserve container, which should both be checked prior to jumping. Pit. The pea gravel area. Pilot chute. A small, round parachute that acts as a drogue to extract the main parachute from the container and deploy it. PLF. Parachute landing fall. A technique used to minimize injury during rough landings, a PLF distributes the landing shock along feet, calves, thighs, hip and shoulder. Porter. A single engined turbine aircraft carrying up to ten jumpers. Post dive. Review of a skydive after everyone has landed. PRO rating. A USPA rating indicating competence to perform difficult demonstration jumps. Pull out. A type of hand deploy pilot chute where the pilot chute is packed inside the container and pulled out using a handle with a lanyard to the pilot chute. Pull up cord. A piece of cord or line used to pull the closing loop through the grommets of the container. Pud. Slang for the handle on a pull out pilot chute system. The Letter Q The Letter R RSL. Reserve static line. This is a line from the main risers to the reserve cable. In the event the main is cut away, it may pull the reserve pin. Note: this system is only effective in malfunctions where the main is at least partially deployed. RW. Relative work, the term used to describe formation skydiving until a change in nomenclature made by the International Parachuting Commission in the early 90s. Relative wind. The apparent wind felt by a jumper in freefall, relative wind is the result of the skydiver's speed through the air. Reserve. The auxiliary parachute carried on every intentional parachute jump. Rip cord. The deployment system on all reserves and most student parachutes. The ripcord is a piece of cable with a handle at one end and a pin at the other. When pulled, the pin comes out of the closing loop holding the container shut, and the pilot chute is released. Rig. Skydiver slang for the entire parachute, including main and reserve canopies and the harness/container. Rigger. Someone with a certificate from the FAA stating they have successfully met the requirements to be a parachute rigger. Rigger's certificate. The certificate possessed by a rigger as proof of competence. Senior riggers may make minor repairs and pack reserve and main parachutes. Master riggers may make major repairs and alterations as well as packing parachutes. Risers. The webbing that connects the harness to the suspension lines. At the bottom of the risers will be a mechanism for attaching and releasing the risers and harness, usually in the form of a three ring release. On the rear risers are the brakes/steering lines. The suspension lines attach to the top of the risers with connector links, also known as rapid links. Round. 1) A formation where each skydiver has grips on the arms of those next to him, also known as a star. 2) A round parachute, as opposed to a modern ram-air "square" parachute. Running. When a canopy is flying with the ambient wind it is said to be running. This produces the greatest possible ground speed. The Letter S S&TA. Safety and Training Advisor. The S&TA is a volunteer representative of USPA who attempts to disseminate information about safety and act as a liaison between the DZ and USPA. Most S&TAs hold instructor ratings. SCR. The oldest award for formation skydiving achievement, for those who have been in a star of at least eight people in which each person left the aircraft separately and flew to the formation. SIM. Skydiver's Information Manual. Published by the USPA, the SIM is a comprehensive manual on USPA policies and training methods. It also includes FARs pertinent to skydiving. SOS. Single Operation System. This system simplifies emergency procedures by combining the functions of the cut away and reserve handles in a single handle. Seal. Reserve parachutes have a small lead seal on a piece of red thread around the closing pin. This seal indicates the reserve has not been opened since it left the riggers hands. Sentinel. A type of AAD. Single operation system. See SOS. Skygod. Although on the surface this term refers to a superior skydiver, in drop zone use skygod is a derogatory term for a skydiver whose ego has grown faster than his skydiving ability. Slider. A rectangular piece of nylon fabric with a grommet at each corner through which the canopy's suspension lines are routed. Packed at the top of the lines, the slider controls the opening of the canopy by preventing the parachute from expanding too rapidly. Slot. A position in the skydive or on the plane. Uses: "dock in your slot", or "two slots left on the next Otter". Spectra. A material from which microline is made. Spot. The position of the aircraft when the jumpers exit. Spotting duties (selecting the spot) can be done by a skydiver or the pilot. Square. A ram air parachute as opposed to a round parachute. Stabilizer. The vertical strips of cloth depending from the end cells of the canopy. Stabilizers improve the canopy's ability to fly straight ahead and enhance efficiency by reducing tip vortices. Stall. When the angle of attack of a wing becomes too high to sustain lift, the wing is said to be stalled. Static line. In static line deployments the parachute deployment system is attached to the airplane, with a cord ten to fifteen feet long, resulting in deployment immediately after exit. Steering lines. The lines that run from the steering toggles on the rear risers to the trailing edge of the parachute. Steering toggles. Handles attached to the end of the steering lines to facilitate their use. Toggles and lines are configured so they can be stowed in a partially down position to enhance the opening of the parachute. Stow. To neatly arrange suspension lines on the deployment bag or steering toggles in their keepers. Style. A type of freefall competition where an individual skydiver attempts to execute a predetermined sequence of maneuvers in the shortest possible time. Suspension lines. The lines from the risers to the canopy. They are normally in four groups, labeled from front to back as A, B, C and D. They can be further divided into right and left or front and back riser groups, and by type of material. Swoop. 1) To dive down to a formation or individual in freefall. 2) To aggressively approach the landing area in order to produce a long, flat flare and an exciting landing. The Letter T TAF - Tandem Accelerated Freefall where the 1st 3 or 4 stages are done on tandem and then the AFF one on one jumps are done as per the standard AFF program. Tandem. Parachute jumps in which two skydivers, usually an instructor and student, share one parachute system. The student is in a separate harness that attaches to the front of the instructor's harness. Terminal velocity. The speed at which drag matches the pull of gravity, resulting in a constant fall rate. Typical terminal velocity for formation skydiving is in the 120 to 135 mile per hour range, but speeds as high as 300 miles per hour have been reached. Three ring. A parachute release mechanism that utilizes three rings of separate size in a mechanical advantage system. Invented by Bill Booth in the late 70s, the three ring release is almost universally considered the best cut away system available. Throw out. A deployment method in which the pilot chute is stowed in a pouch on the belly, leg of bottom of container. Toggles. Handles on the steering lines. Track. To assume a body position that creates a high forward speed. Used to approach or depart from other skydivers in freefall. TSO. Technical Standard Order. A technical standard that all American parachutes must meet before they can be marketed. Unless specifically exempted by the FAA, a parachute must have a TSO placard to be legal. Turn around load. When the aircraft does not shut down between loads, but lands and picks up skydivers for immediate departure. The Letters UV Uppers. The upper winds, or winds at exit altitude. The "uppers" are often much stronger and occasionally from a different direction than ground winds. USPA The United States Parachute Association is a non profit skydiver's organization. USPA offers guidance and assistance to skydivers in training, government relations, competition, and many other fields. Most drop zones require USPA membership of individual skydivers because such membership includes third party liability insurance. The Letter W Wave off. Prior to deployment a skydiver should make a clearly defined arm motion to indicate to others nearby that he is about to open his parachute. A good wave off is essential to the avoidance of deployment collisions. WDI. Wind drift indicator. A paper streamer thrown from the jump plane to estimate winds under canopy and determine the spot. Weights. Many lighter skydivers wear a weight vest to allow them to maintain a fast fall rate. Wuffo. Skydiver slang for people who don't jump, from "Wuffo you jump out of them planes?" Wind line. An imaginary line from the desired landing area, extending directly along the direction the wind is blowing. Winds aloft. See uppers. Wing loading. The ratio of weight born by a wing to its surface area. In the US, divide your exit weight in pounds by the square footage of the canopy. The Letter XYZ Zero-p. Common slang for a type of fabric relatively impermeable to air. The less air that flows through the fabric wing of a ram air parachute, the more efficiently it flies.
 -
Landing AccidentsAvoid landing accidents by doing all you can to eliminate landing off the DZ.As soon as you're open, evaluate the spot. When faced with a bad spot, quickly find out how far you can go by using the accuracy trick. You can greatly extend your parachute's capability to get you back to the DZ by learning how to use the entire control range to your advantage. The accuracy trick will help you learn how to quickly choose the best toggle or riser position for any bad spot. Why deal with unfamiliar hazards off the DZ? Avoid them through better canopy control. A. The Accuracy Trick DefinedFind the point on the ground that doesn't move. 1. Choose a point on the ground in front of you. If it seems to move towards you (the angle gets steeper in your field of vision), then you will fly past that point. If the point seems to move up or away (the angle to the point gets flatter in your field of vision), then you won't make it that far, unless something changes. If you keep looking between these two points, you will find one point on the ground that does not appear to move in your field of vision at all. (The visual angle doesn't change.) I call that point the "special point" that doesn't move. The visual angle to all other points on the ground seem to move outward from this point as you travel towards it. 2. If the winds never changed, and you never moved your toggles, you would end up crashing into the ground right on that special point! If the winds do change, you can tell right away because the special point that wasn't moving will start to move as soon as the winds change. That means there is a new point that doesn't move. A new special point replaces the old one. That special point will also start to move if you change your toggle position. B. Using The Old Accuracy Trick1. When you have a tail wind and the spot is quite long: Find the toggle position that would take you to a point furthest past the DZ. Then you will arrive at the DZ with the most altitude (and most options) remaining. A simple rule such as, "on a long spot with a tailwind, fly half brakes," may be better than nothing, but it is far from ideal. To avoid the off-airport landing, you may need better performance than a simple guideline can give. With a strong tail wind, it is likely that going to deeper brakes will help even more, but how much brakes? Use the accuracy trick to choose what control position works the best in the particular tailwind you have at the time: Find the special point, then add some brakes. See how you have a new special point as you change the toggles? If the visual angle to the new point is flatter, you are doing better. The visual angle to the old point will get steeper and steeper. Now add some more brakes. If your field of vision changes again just as described, then you're doing even better. Each time you change the toggles, (or each time the wind changes), you will have a new special point. Add more brakes. You're flying really slowly now. If the visual angle to the new point is steeper, then you're not doing as well. If this is the case, the visual angle to the old point will get flatter and flatter. So reduce the brakes back to the optimum.2. If you have a tailwind coming slightly from one side, and you have a long spot, quickly choose the right crab angle to fly a straight path to the DZ. You've turned towards the DZ and have chosen the best brake position that would take you to a point furthest past the DZ by using the accuracy trick described above. You can draw an imaginary straight line between you and the special point, through the intended landing point. If you start drifting off this line, immediately make a crab angle that will keep you on this line. See how the visual angle to the special point changes as you create the crab angle? Adjust the brakes to put that special point in the best position again. If you were really deep in the brakes, you will probably need less brakes after you create a crab angle. Do not "home" back to the DZ by pointing straight at it while drifting sideways. Since the crosswind will blow you slightly off the wind line, you will likely readjust your heading again and again to point back towards the DZ, without ever counteracting the crosswind at all. This means you will be flying a long arc back to the DZ. The quickest way back is a straight line, so crab rather than home!3. What about a headwind on a long spot? If you have a headwind, the special point that doesn't move will be quite close to you. If you need to fly past this point to get to a safe landing area, you will probably need to use front risers. (Make sure your canopy is quite stable on front risers before using this technique) How much front risers? Use the accuracy trick to find out! Try a little front riser and the special point will move. (The angle will start changing). Try a little more and it will move again. Try a little more. Did the point move the wrong direction? That's too much front riser. See how this method works to determine the best control position in any bad spot situation? How about a headwind coming from slightly from one side? 4. Don't forget to leave yourself plenty of safety margin. Use the accuracy trick in this way to get back to a safe place, but be careful to avoid fixating on this technique so much that we forget to use our safe options while they still exist. Make sure you leave yourself plenty of altitude and maneuvering room to plan a safe approach and landing. II. Learn To Fly Defensively A. Defensive Flying Has Two Basic Parts1. Developing such high skill that you get to the ground safely in spite of the stupid things people are doing all around you. 2. Developing such good judgement that you make your decisions in a way that helps create safer situations for yourself and others. B. Stage The Approaches To Avoid Heavy TrafficMany of the worst accidents are collisions that occur at landing time, often because there are just too many canopies going too many directions to be safe! Staging the traffic can help reduce this risk. 1.To create more seperation from other traffic. After opening decide quickly whether it is best to float or dive, assuming the spot is good enough to allow for some maneuvering. The goal is to prevent a high frequency of landings occurring in a short period of time. Less traffic density means less chance of an accident. This is similar to the idea that eliminating tailgating reduces the chance of accidents on the highway. To stage the approaches to the landing area, you must look way ahead and predict how the traffic will arrive at the landing area. Then, adjust your fight path so that you have as little traffic as possible when you are landing. The more people on the load using this technique the better! Noticing heavy traffic when you're already on final approach is too late! Planning is the name of the game.2. How do you stage the approaches? First, look all around you after opening. See where everyone is. Ask yourself two questions: Are you near the top of the bunch or near the bottom? Is your canopy loaded more heavily or more lightly than the others? Then: If you're more towards the bottom, and have an average wing loading for the group: You should land as soon as possible. You're trying to stretch out the time period that all the landings will occur by getting the landing process started sooner. If you don't do this, you may start crowding up the traffic behind you, just like a car driver would if he drove slowly in the fast lane.If you're more towards the bottom, but have a big floaty canopy: The faster traffic will probably catch up and pass you. Where would you prefer this to happen? If you dive down and try to set up on final approach early, you will probably be passed during your final approach. In this case, assuming the spot is good, it might be better to float in the brakes right from the start. This will force the faster traffic to pass you while you are still quite high. Being passed up high is safer than being passed on final approach.If you're more towards the top: You should try to float in the brakes. You're trying to stretch out the time period that all the landings will occur, by landing later. This is easy if you are on a larger floaty canopy.What if you're more towards the the top, but you have a high wing loading? If you're loaded heavily, you can still probably float in brakes quite well. Try to stay up with the big floaty canopies, until you find the biggest gap in the traffic that is below you. Then you fly down and fill that biggest gap. That gap is usually just in front of the big floaty canopies. C. Learn The Habits Of OthersAnticipating the actions of others will help keep you out of trouble.Here are some examples: 1. The indecisive slow poke. This is someone with a big canopy that likes to do sashays while in the final approach area. If you're flying a much faster canopy, don't follow him on his downwind leg. You may get stuck behind him, needing to pass him on late final. The problem is, you may not be able to predict where he will be when you pass! Better to pass him earlier on, or turn your base leg early, landing more up-wind than him. Perhaps you can land somewhere else. Just don't cut him off, because he might get overloaded by the whole thing and make a mistake, causing an accident. 2. The last-second hook turner. This guy loves to do low toggle-turns, way lower than you're willing to risk. If you're following him back from a bad spot, don't wait for him to turn into the wind before you do! You'll probably be turning lower than you want to be! If he is following close behind you and below you, he might be obstructing your turn into the wind. Remove yourself from this situation while there is still plenty of altitude. 3. Have you ever known someone who likes landing downwind for fun? In today's jumping environment, you have to be ready for anything, so keep lots of options open. D. Diffuse The Hot Landing AreaThis you do by taking the initiative to land somewhere else. Walking is healthy! It's better than being carried back on a stretcher. By choosing to land somewhere else, rather than joining into the already crowded traffic on final to the "cool" landing area, you'll make it safer for yourself, as well as making the "cool" landing area a little less crowded for the others. E. Check The Spot Early During The SkydiveMany marginal spots are made worse by aimlessly wandering around for a few seconds while figuring out where you are. If you can do so quickly, check the spot during climb out if you're a floater waiting for others to climb out. Check it if you have an idle second or two during freefall. Checking the spot early and frequently will give you advance warning of a bad spot. You will know, right away, which direction to fly the canopy. You might even decide to leave a touch early, to start getting safe separation sooner, and therefore permit a little higher opening too. F. Improve Your TrackingYou'll get safe separation sooner, if you improve your tracking. Then you can deploy your canopy higher and avoid problems with bad spots. This will help you avoid the off-airport landing. You can also get more separation, which will reduce chances of a collision during opening. 1. How much separation is necessary? The higher the wing loading on the load, the more separation is required. Most people are way too comfortable with way too little separation! You should be able to have an off-heading opening facing directly towards another jumper and still have enough separation to allow for a rear riser turn to avoid a collision. Blaming off-heading openings for canopy collisions is a major cop-out. 2. To Improve your tracking, first improve your attitude: be dissatisfied! You must be dissatisfied with your present tracking, or you will have no real incentive to improve. Satisfaction with your tracking is a trap and an ego protection device. This ego protection device helps you make your bad excuses for poor tracking more believable. One bad excuse is, "That jerk tracked right over my head when I was ready to pull." Really? Or did you track too steeply and not see where you were going? Be dissatisfied and you'll get constant improvement. 3. With your attitude changed, now experiment with technique. Many people have not really experimented with body positions for tracking, so you often see poor tracking. I suggest that you occasionally devote an entire skydive just to tracking. You'll have plenty of time to experiment. Make sure you track away from the line of flight, to avoid conflicts with other jumpers. 4. Avoid these common errors: Arching. This is OK for a beginner, but it causes a steep track. De-arching makes the track flatter. Try bending a little at the waist. Knees and ankles bent. This slows the track, making it mushy and steep. Straight knees and pointed toes are better, and they should push down onto the relative wind. Arms up, streamlined with relative wind. This causes a steeper track also. The arms should be pressing down onto relative wind to make the track flatter. Legs and arms too close together. This does not help the speed much, and usually causes difficulty avoiding a rolling motion side to side. A slightly spread position, with feet almost shoulder width, and hands 6" 12" from torso is better because it aids in stability and makes it easier to deflect more relative wind.5. When you leave a formation and track up and away, rather than down and away, you're starting to get the hang of it! On most jumps the fall rate is fast while doing RW, and the body is arched. Since the track should be de-arched and flat, a good track may actually have a lower descent rate than the formation! III. ConclusionsI have not covered reducing the risks of normal landings and swoop landings because that will be addressed in a different seminar. As you can see, I believe that most of the canopy survival skills are a combination of improving skills and developing better judgment. Because of my emphasis on improvements, there can be no end to this process, and no real conclusion. I do not wish to fall into the too common trap of thinking that I've completed my learning process and I'm safe from harm. I've seen that this is a deadly trap. That is why I would like to encourage you all to share your ideas on the subject with me. I hope I have presented to you some thought provoking ideas and concepts that you can use to help you reduce the risk of accidents at your DZ.
-
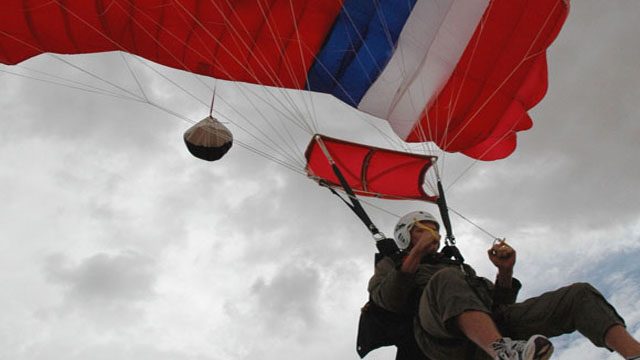 I. Working on Conservative Approach TechniquesA well planned approach makes good landings easier to accomplish, while most bad landings come after a poor approach. It follows then, that working on improving a variety of approach techniques is the first step. A. Control your canopy with smooth toggle movements. Fly your downwind, base, and final approach smoothly, keeping control inputs to an absolute minimum. This makes it easier for others to predict what you are doing. The canopy will fly more efficiently, and it also helps to make the canopy more stable in turbulence. B. Once you're pleased with your landings, experiment with making approaches at various speeds. Getting a good landing with less float after the flare will help you land in small areas. Doing this requires a slower approach. But if you are too slow, you will land hard! It takes considerable skill to land softly after a slower approach, so practicing this in an open area is important. C. Learn how slowly you can approach and still get a reasonable landing. Again, landing well after a slow approach requires practice and considerable work on flaring technique. How slow you can make a safe approach depends on your wing-loading, the design of the parachute, and how good your technique is. It takes a lot of practice to get good landings after a slow approach, but the result is more options for different landings, and greater safety. D. Even if you are conservative, learn how to make a straight-in approach using a small amount of front risers. Make sure your canopy is very stable in this flight mode first. Just 1 to 3 inches of riser will produce quite a change in the approach speed and landing. By becoming familiar with the slightly higher speeds of this approach, you will be better prepared should the unexpected happen and you find yourself screaming along after making an evasive maneuver to avoid traffic near the ground. E. If you are an aggressive canopy pilot and like SWOOP landings, it is very important to practice straight-in approaches at various speeds. You may have to make a slow approach one day, and you need to stay good at it. You may not even realize how slow you can approach and still be safe. Its better to practice in good conditions so that you are prepared for the worst. Most new canopies can be flown straight in, even at very high wing-loadings, with proper technique. If you can't do it, you probably need to work on technique. II. Working on High-Speed ApproachesA. Learn when to say no to a high-speed approach. There are times when high-speed approaches are unsafe, due to heavy traffic in the air or on the ground, when you are angry or tired, when you are disappointed with your performance, or when the weather conditions are marginal. Make sure you err on the cautious side! You can make that swoop landing on a later jump when conditions improve only if you survive this jump! B. Verify that the technique you wish to use works well with the canopy you are using. Some canopies have unusual flight characteristics that can take hundreds of jumps to fully explore. Do this exploration up high away from other traffic. Some canopies can become unstable using certain techniques. C. Stay with straight-in approaches, working on flaring technique for many jumps to obtain the longest swoop possible before attempting any turning approaches. Many people do not work on improving their technique long enough before trying aggressive turning approaches. Many tend to react too late to changing circumstances, and then over control afterwards. The result is reduced canopy efficiency, which reduces the distance of the resulting swoop. It also indicates that the jumper is over his limit of safety. D. If you are doing turning approaches, try to develop several different techniques for controlling the rate of altitude Ioss compared to the rate of turn. 1. Over a period of many jumps, find out how much you can vary the altitude loss in a turn by using different control inputs. 2. In these experiments you will find that some techniques will produce extremely high altitude loss with only a moderate rate of turn (Example: Steep front riser spiral). 3. In these experiments you will also find that some techniques will produce low altitude loss, even with a fairly high rate of turn (Example: Carving toggle turn). E. When setting up for your turning approach, try to set up for a turn that will allow for a great altitude loss with very little turn rate being required. 1. If you're sure you've set up your approach high enough, start the high altitude loss turning technique. As you make the turn, evaluate the altitude loss. Always be ready to change the turn into one that produces less altitude loss. Starting real high and knowing many turning techniques allows you to have plenty of outs. Try to start all your turning approaches with enough altitude to make the high altitude loss turn safe. Choose the turning method you feel is appropriate. If you notice during the turn that you do not have sufficient safety margin, change the turn technique to one that allows for less altitude loss. Now you have your margin for safety back again. 2. If you are sure you are too low to try the high altitude loss turn, and even a medium altitude loss turn does not look like a good possibility, consider landing slightly crosswind, if traffic permits. Avoid the low turn! If it looks like you need to start with a low altitude loss turn method, you are in a dangerous situation! If you turn anyway, and you do survive, slap yourself for being so stupid! Vow to never get caught in that situation again! Don't judge your approach technique as good just because you walked away from the landing! F. Avoid becoming trapped into the habit of using only one turning technique that requires an exact starting altitude for success. Favoring one turning technique, especially a low altitude method such as a sharp snapping toggle turn followed by burying both toggles, is very risky. Because the canopy tends to pull out of the dive almost the same way each time, you require an exact starting altitude and perfect judgement each time. Nobody can be that perfect! One day your judgement will be a little bit off, and you will crash. Or you may have some turbulent air, which will affect your approach, and you will crash. Do not fall into the too common trap of thinking that you've completed the learning process! No one has! G. Learn the concept of the "corner" and stay out of it. The corner represents the change from a vertical diving approach to a horizontal swoop. Make that corner as round as possible. (A large radius pullout started higher is safer than a sharp pullout started lower). 1. If the canopy's natural tendency to pull out gets you to level flight without pulling any toggles at all, then you were not very far into the corner. This is the safer method. 2. If you need to pull the toggles down to get out of the vertical part of the approach before you can start your flare, then you were too vertical too close to the ground! This is better than hitting the ground, but its very dangerous and should be taken as a severe warning. The biggest problem with this is that the average experienced jumper does not see this as being as dangerous as it really is. Slap yourself for being so stupid, and promise not to get caught like that again. Instead, do everything higher, and start the pullout earlier. Again, the idea is to prevent having to be perfect just to survive. 3. As you can see, the measure of safety on your swoop is how little toggle it takes to get to level flight. If you are pulling toggles down hard and late, you need to start the turn much higher, so that you will need less toggle to pull out of the dive. You may also need to learn how to perceive, far sooner, that you are getting too far into the corner. This way you can apply a little toggle up higher, rather than a lot of toggle at the last instant. In other words, you need to work more on better planning of the approach. Probably a less steep approach would help! H. Avoid these hook turn traps. 1. The courtesy trap. You can only pay so much attention to being courteous to others while under canopy. Do not pay so much attention to others that you forget to leave yourself plenty of safe options too. 2 The dropping winds trap. This is one example of failing to adjust for the changing conditions as the day progresses. People who have been flying the same downwind approach to the landing area all day tend to get very used to the sight picture that they have. As the wind drops, this sight picture will change, as the wind will no longer be helping you get back to the landing area so quickly. But you may continue to try and fly the old sight picture. If you are getting caught by this, you will feel you are sinking faster than you expected while on downwind, so you try and float in the brakes a bit more than previously. In an attempt to keep the same landing spot as earlier, you may find yourself trying to float downwind a little farther as well. All this adjusting eats up airspeed and altitude, both of which are needed to turn into the wind. If you are also tired from a day of jumping, you might find yourself ignoring these signs, turning too low to survive. 3. The "I'm really Gonna swoop this time" trap. This is a situation where the jumper is so enthusiastic about his swoop landings, that they forget about everything else! They see their desired approach as the only possibility and will attempt that approach regardless of whether there are problems with traffic, spectators, winds, or turbulence. They forget that other options exist, and are very likely to have an accident. 4. The race horse trap. Jumper making mistake number three (above) has fallen into the race horse trap. Race horses sometimes wear blinders on their eyes to restrict their vision. Sometimes jumpers pay so much attention to their own approach that they don't see anything else, just like the race horse. Collisions near the ground are often caused by this, so its very dangerous. III. Working on Improving LandingsA. Altitude control is the key to no-wind landings. It is not so important to be at an exact specific altitude when starting the flare, but it is very important how high you are when you finish the flare. You should finish the flare so that you have no rate of descent (or at least your minimum rate of descent) when your feet are at ground level. B. For the best landings, transfer the weight from harness to ground gently and gradually. If you are at zero rate of descent with feet at ground level, you can gently press your feet on the ground while you continue to sit in the harness. With the first step, you can remove a little weight from the harness, by stepping only lightly on the ground, and more heavily on the next steps, until all your weight is transferred from the harness to the ground. To do this you must have the zero rate of descent at ground level, not higher. You must also maintain adequate flying speed during this time. No parachute or any other wing is capable of supporting you at no foward airspeed! C. Be careful to avoid using your hands and arms for balancing or protecting yourself during the flare and landing. As you will see in the video, the canopy will respond to every toggle movement (or shifting in the harness), even when you are well into the transition to the ground. D. Watch the landings of other people and get video of your landings. Look for these common errors. 1. Lifting one toggle at touchdown. This is the balance trap. If you feel like you are falling to one side, you may try to stick an arm out for balance, which turns the canopy. You may think it was a side gust. 2. Extending a hand out to protect yourself. This is the protection trap. By extending your hand out to the ground to protect yourself, you unknowingly steer the canopy that direction. 3. Stabbing the ground with your feet. This is done usually in anticipation of a hard landing. It hurts the legs and feet, and is usually accompanied by lifting both toggles backwards and upwards, which compounds the situation by causing the canopy to dive harder at the ground. 4. Fighting the wind. This is letting one toggle come up and pushing the other one down prematurely, in anticipation of difficulties in getting the canopy on the ground in high winds. This can produce some really ugly accidents. Make sure you're really on the ground first, then get the canopy on the ground. 5. Tunnel vision. Though we try our best to avoid it, all of us tend to concentrate more on our flight path as we get closer to landing time. Sometimes swoopers or accuracy jumpers start having this problem much higher up. This is very dangerous! Try to keep looking around and seeing people! 6. Flaring too slowly, too high, or too far, etc... Experiment more while up high. Watch other peoples landings and watch videos of your own landings. Usually this is a perception problem. IV. ConclusionA. Acknowledge your current limitations. B. Constantly play "what if" situations when you're flying. C. If in doubt choose the conservative option. D. Create safe situations for yourself and others. E. VOW TO BECOME A STUDENT OF CANOPY CONTROL AGAIN. F. Have fun!
 -
From an aircraft operations standpoint, as a general rule whichever group will have the slowest climb out should leave first. On a calm day the aircraft on jump run covers about 175 feet per second, or one mile in 30 seconds. Assuming the practical distance that a square canopy open at 2,000 feet can cover is at most about one mile, that means that the first people out would just barely make the landing area from one mile short, while the last would be able to make it back from one mile long. In other words, all jumpers have to be out in a two mile long jump run or some will land out, or a second pass will be required. In time terms, on a calm day no more than 60 seconds can elapse from when the first jumpers leave the airplane to when the last jumper exits. At busy events with several aircraft flying, second passes are not an option. Let's take a sample jump run, where a large group will take up to 20 seconds to climb out, a 4-way 12 to 15, 2-ways six to eight, solos five, and AFF students about 12 to 15. Our load has an 8-way, two 4-ways, two 2-ways, a solo, and one AFF. That adds up to between 70 and 80 seconds from green light to last out. But it is possible to make it all on one jump run if the eight way gets out first, because the pilot figures at least 15 to 20 seconds for the first climb out. That brings us back to 60 seconds from first out to last out, and one pass. Needless to say, we don't want to do an extra pass because 2-ways want to leave before 8-ways. (If the 2-ways get out first, the pilot can only count on a five to ten second climb out. He has to put the light on 1/3 to 1/2 mile closer to the dz than he would for the slow climb out.) That's the timing reason why small groups shouldn't leave first. Now lets talk about separation from other jumpers. First of all, anyone who counts on vertical separation for safety is out of touch with reality. I see people in freefall at 1,500 feet and lower routinely, so just because someone plans to open at 2,500 doesn't mean you should bet your life on it. Everyone needs to open in their own column of air. Horizontal separation is the only guarantee of security. The only real reasons - and they are good ones - why students and tandems get out last are that a student is more likely to balk or ride down, and that canopies opening high can get back from a longer spot. I repeat, horizontal separation is the only guarantee of safety. Vertical separation is a nice idea but cannot be counted on since a minor loss of awareness or a long snivel will eliminate it instantly. Now, a quick digression about fall rates. Follow these categories out or time their videos if you don't believe me. Light freestylists doing routine freestyle do not fall significantly faster than a fast falling four way. Freeflyers fall about 30% faster than normal. Small skyboards fall fairly fast, if the rider is standing, but big ones fall very slow - slower than most RW, usually about the same speed as tandems. Because of their exits, they must leave first, and because of their complex emergency procedures, they must pull high. Leaving first and pulling high defies conventional wisdom, yet not once have we had a problem with slow falling skysurfers getting out first and pulling at 3,500. In fact, as long as the first person pulls higher than the break off altitude of the following group, they are a contribution to safety, not a detriment, provided adequate time was left between groups at the exit. We do have a recurring problem maintaining safe separation when the freeflyers get out first. Typically a freefly pair will have a forty five second freefall and open at 2,500 to 3,000 feet. Let's imagine that they are followed by an RW group that has a 10 second climb out. Now, let's say you are a freeflyer jumping a Stiletto. A Stiletto (assuming a 30 mph forward speed, which I can document is a reliable figure) covers about 45 feet per second on a calm day. If you open 30 seconds (shorter freefall plus exit separation time) before the RW group leaving after you and turn directly towards the dz (which you will, since otherwise you can't make it back from getting out first unless you cheat on the climb out, spot for yourself, and force the pilot to go around, which REALLY pisses us off) in that 30 seconds you will cover over 1,300 horizontal feet. This would put you about 400 feet from the center of a group leaving the plane ten seconds after you. In theory, that would just barely be enough, except that a good tracker can do about 70 feet per second, so if they track towards you for six seconds they are right on top of you. Furthermore, a modern canopy descends about 800 feet in 30 seconds (also documented) so if one of you pulls at 3,000 to get back from a short spot, for camera effect, or whatever - by the time you are at 2,000 you are well into the danger zone of the group that followed you. So far, the big sky theory has taken care of us most of the time but I have heard of a couple close calls and more than once found myself directly over the freeflyers if they leave first. Having seen the consequences of freefaller/canopy collision more than once, I want to minimize the possibilities. And they go way up as soon as we add wind to the exercise. Here's why. In a 30 mile per hour breeze, the plane only covers 130 feet per second, instead of 175. In ten seconds of exit separation, the airplane only covers 1,300 horizontal feet instead of 1,750. Worse still, the RW group is in freefall for a longer time, and consequently gets blown further. Let's say the freeflyer is in freefall for 45 seconds, and the RW for 70. In 45 seconds you get blown nearly 2,000 horizontal feet. The RW blows just over 3,000. That leaves only 300 feet of horizontal separation without taking tracking or canopy movement into account! Make the winds 50 miles per hour, and the RW group drifts over 1,800 horizontal feet further than the freeflyers! Meanwhile, in ten seconds the plane only covers 1,100 feet. A 20 second exit separation will still have the RW group opening 400 feet from the freeflyers, not counting canopy movement or tracking! Having opened right over freeflyers before, and having just heard from several expert skydivers who narrowly missed freeflyers, and having watched RW groups blow over freeflyers on windy days, I think we have a problem. You might say, make sure the groups leave longer between exits. Well, we do tell them, but if they wait 20 seconds instead of ten, that still doesn't solve the problem because Freeflyers still fly under them under canopy. So for fast fallers your only choice if you want to get out first is to always fly perpendicular to the line of flight for 30 seconds before turning towards the dz. While I am confident most of you are aware enough to do this, it brings us back to the original time on jump run problem. Basically, Skydive Arizona isn't willing to do a lot of second passes just so freeflyers can get out first. Getting out last except for students solves virtually every problem. You control the horizontal separation, so you can ensure you won't be overtaking anyone in freefall. The windier it gets, the safer you are because you get extra separation by having slower fallers blow away from you. Students take long climb outs and pull real high, so no problem there: just get open and fly off the wind line for a few seconds to be clear of them in the unlikely event that they are in freefall at 2,500 feet. As for the argument that the canopy separation is necessary in the landing area, I don't buy it. Opening over the top instead of short, you can spiral down to make sure you get on the turn around loads. As for congestion at the landing area, no one else on the loads seem to have any problem, although you may not always get to land right by the fence. Please give this some thought. Unless one of you gives me an extremely convincing reason why you need to leave first, such as a safe spot for the skyball, I will make it standard policy that exit order will always be 1) skysurfers 2) freefall groups, largest to smallest, regardless of fall rate (Note (Skr): I believe this is a typo since the real rule is: ) (2a - relative work groups, largest to smallest and then ) (2b - fast fall groups, largest to smallest and then ) (3 - AFF and tandems ) 3) AFF and tandems, plus any other very high openings. The main reason for high openings leaving last is not separation, it's that they can make it back from a long spot!
-
Before discussing static and dynamic stalls we should first review some terms involving stability. Static stability refers to how something behaves in a steady state. A parachutist suspended under a normally functioning canopy would usually be said to have positive static stability. That is to say that when not changing the position of the toggles or risers, things like airspeed and heading will not change very much from one moment to the next. Dynamic stability refers to what happens after something has been disturbed from its static state. Once a parachutist changes the position of the toggles or risers, dynamic stability comes into play as the body swings under the canopy. A static stall refers to what airplane pilots would call a slow deceleration, approach to landing or simply a normal stall. Basically, at an altitude from which it will be safe to recover from the stall, slowly increase the angle of attack and let airspeed bleed off. Keep increasing the angle of attack, gently, until the stall happens. Under a parachute, this is fairly simple. Slowly pull the toggles down and wait. Do not pull down the toggle so quickly that you swing forward from your normal position under canopy. Hold the toggles all the way down and wait. You should notice the sound of the airspeed decreasing, perhaps a slight rocking in the saddle and then perhaps a noticeable increase in descent rate. This is a basic stall. For all intents and purposes it is the most genteel stall your canopy will demonstrate. Recover from the stall by decreasing the angle of attack -- let the toggles up and resume flight. The dynamic stall is different because of the suspended weight swinging under the canopy. Again at an altitude from which it will be safe to recover, begin the maneuver from full flight -- toggles all the way up. This time instead of slowly pulling the toggles down, pull them down as quickly and as far as you can and hold them there. A few different things are happening this time around. Because your airspeed initially hasn't changed all that much, but you've increased the angle of attack dramatically, the wing is now creating a lot more lift. A function of creating lift however is also the creation of drag. Your canopy as a result will not only go up but also slow down. Your body on the other hand is following Newton's first law of motion and will continue at its current speed and direction. Unfortunately this also asymmetrically loads the front and rear risers, which continues to further increase the wing's angle of attack. It's a vicious little circle there for a moment or two as increasing the angle of attack slows the canopy more and more. As your body swings farther and farther forward, rapidly, the wing exceeds the critical angle of attack and it stalls. Your body may have been thrown quite a bit forward of the leading edge of the wing and even slightly upwards of your normal place under the canopy. As a result, your body may feel a much more definite falling or even backward motion than it did during the static stall. Stalls can happen at any airspeed and at any attitude. All that is required is for the wing to exceed the critical angle of attack. Up to this point in this discussion, we've been looking at stalls in a fairly normal manner. If you didn't know better you may have thought that the stall had something to do with the speed of the wing or its attitude in relationship with the horizon. That's normal. Many people make this mistake. After all, we've demonstrated the stalls from a slow deceleration and with a fairly normal relationship to the horizon, earth and sky. That's about where most discussions on the subject begin and end. So, some people might make the mistake of thinking that a stall can only happen if you're flying too slow or if the leading edge of the wing is pointed toward the sky. Unfortunately, this is just dead wrong. To make matters worse, some maneuvers that you may perform, turns for example, create G force. Basically, your body wants to continue in a straight line but is getting pulled in another direction by lift. As the bank angle increases, so does the G force. In an airplane, maintaining altitude during a turn, the G force increases at a rate equal to one divided by the cosine of the bank angle. So, at a bank angle of 60 degrees the G force will be 2. You might not get exactly 2 Gs under a parachute turning with a 60 degree bank though since generally you're not maintaining the altitude and the equation becomes quite a bit more complicated taking into account your descent rate, but in most cases it will definitely be greater than 1. So what does this have to do with stalls? As the G force increases so does the amount of lift required to offset it. With the same angle of attack, the airspeed at which the stall occurs will be increased by the square root of the G force. Airplane pilots would call this an accelerated stall. Let's say you're pulling a sustained 2 Gs pulling out of a steep swoop, your canopy will have an accelerated stall at 1.414 times its static stall speed. The really insidious part of this is when a person is snapping the toggles down to pull out of a too steep and too low swoop, the dynamic stall comes into play. The body continues in a straight line, increasing the angle of attack and aggravating the stall with really bad results. It's my opinion that this could be the primary factor in some botched hook turn landings. Paul Quade is a Certified Flight Instructor and the camera flyer for the Open Class 4-way team, Perris Lightwave.

.thumb.jpg.4bb795e2eaf21b8b300039a5e1ec7f92.jpg)