Search the Community
Showing results for tags 'general safety'.
Found 110 results
-
 Note: This article refers to skydiving and regulations in the United States. Refer to your country's civil aviation regulations for how to do this safely and legally in your country. Disclaimer: The interpretations of the regulations referenced in this article are that of the authors. Abbreviations and acronyms: FAA: Federal Aviation Administration CFR: Code of Federal Regulations (new designation) FAR: Federal Aviation Regulations (old designation, still often used.) FSDO: Flight Standards District Office Important web pages and documents:FAA web site: www.faa.gov FAR 105, Parachute Operations. Can be found in Section 9 of the USPA Skydiver's Information Manual (SIM) Advisory Circular AC-105-2C, Sport Parachute Jumping. Can be found in Section 9 of the USPA Skydiver's Information Manual (SIM) FAA Aeronautical Information Manual (AIM) Why we need this informationIt seems like every skydiver eventually wants to skydive into an area or event that is not at a regular dropzone or skydiving center at an airport. And no wonder, because it is fun, exciting, and a challenge, plus the scenery is sometimes much better. Imagine jumping at your family reunion into a huge field out on your uncle's farm in the country, and bringing along some of your skydiving buddies. You can't get much better than that. But it does take a bit of preparation to do jumps like this safely and legally. Unfortunately, nearly every time a skydiver asks about how to go about jumping somewhere other than their normal dropzone, they will get a number of answers that are incorrect or incomplete. Why the confusion? Well, one reason is because the regulations associated with parachute jumping, FAR 105, changed in 2001. Many of us who have been skydiving a long time tend to remember the wording of FAR 105 before this change. Jumping into the various type of airspaceFor a detailed explanation of the airspace in the U.S, you can refer to official FAA airspace documents. There are also many tutorials on airspace, as pilots must learn about airspace classifications when learning to fly. Related Section: FAR 105.25, Parachute operations in designated airspace (a) No person may conduct a parachute operation, and no pilot in command of an aircraft may allow a parachute operation to be conducted from that aircraft— (1) Over or within a restricted area or prohibited area unless the controlling agency of the area concerned has authorized that parachute operation; (2) Within or into a Class A, B, C, D airspace area without, or in violation of the requirements of, an air traffic control authorization issued under this section; (3) Except as provided in paragraph (c) and (d) of this section, within or into Class E or G airspace area unless the air traffic control facility having jurisdiction over the airspace at the first intended exit altitude is notified of the parachute operation no earlier than 24 hours before or no later than 1 hour before the parachute operation begins. Paragraph 1 refers to two special types of airspace. It is unlikely that you will ever want or need to jump into that airspace unless you are with the military or with an exhibition skydiving team. It includes airspace around government and military buildings and installations. Paragraph 2 refers to airspace into which you must get authorization to jump. It includes controlled airspace up to, and above altitudes of Flight Level 180 (18,000 feet MSL) and above, airports with operating control towers and/or radar approach control. It is possible that you might want to jump into such areas and airports. Paragraph 3 refers to airspace that is the most likely type of airspace that you will encounter in rural areas or away from larger cities. "Giving notification of the parachute jump to Air Traffic Control" is the key information in this paragraph. Advance "notification" to Air Traffic Control is not required when jumping at a location in Class A, B, C, or D Airspace because an advance “authorization” is required from the respective controlling agency. The requirements for communication with Air Traffic Control during the jump are specified in FAR 105.13, Radio equipment and use requirements. NOTAMsA Notice to Airmen (NOTAM) is defined as "time-critical aeronautical information, which is of either a temporary nature or not sufficiently known in advance to permit publication on aeronautical charts or in other operational publications." NOTAMs are filed (by phone or online) with an FAA "Flight Service Station". A Flight Service Station is an FAA briefing facility that provides information and services to pilots, for example, providing information related to flight planning. If a parachute jump is planned at a location where jumping is not normally done, filing a NOTAM for this activity will increase the safety of flight in the vicinity, because pilots that look up the NOTAMS during their flight planning will know about the planned jumping. NOTAMS for parachute jumping are not normally required, but are a good idea, especially if you will be making a number of jumps on a particular day. Filing a NOTAM (with a Flight Service Station) is not sufficient for "giving notification" as described in FAR 105.25 paragraph 3. Notification needs to be made with the Air Traffic Control facility of jurisdiction, in most cases an Approach Control Facility or an Air Traffic Control Center. Although the phone numbers for these facilities can be found in various locations they can usually be obtained by contacting the Flight Service Station (FSS) at 800-WX-BRIEF (800-992-7433). Here is where the confusion lies The following is from the 1997 version of FAR 105. Sec. 105.23, Jumps in or into other airspace (a) No person may make a parachute jump, and no pilot in command of an aircraft may allow a parachute jump to be made from that aircraft, in or into airspace unless the nearest FAA air traffic control facility or FAA flight service station was notified of that jump at least 1 hour before the jump is to be made, but not more than 24 hours before the jumping is to be completed, and the notice contained the information prescribed in Sec. 105.25(a). Notice that "notification" is required, but that back then this notification could have been given to the nearest Air Traffic Control facility or to a Flight Service Station. Most of the time the notification was given to Flight Service, because pilots were used to contacting Flight Service while planning flights, and because contacting flight service by phone required only remembering a single nationwide phone number. Contacting the "nearest" air traffic control facility or the facility with "jurisdiction" required more research. It is likely that back then, when notification was given to Flight Service about a parachute jump, that Flight Service personnel simply referred to the "notification" as a NOTAM, thereby perpetuating the misconception that a NOTAM was being filed, or even that it was required. Jumping at another airport (where skydiving is not normally done)Related regulation: FAR 105.23, Parachute operations over or onto airports (b) For airports without an operating control tower, prior approval has been obtained from the management of the airport to conduct parachute operations over or on that airport. There are additional requirements for jumping at an airport with a control tower, but paragraph (b) is the important part for when you want to make a jump at a small airport. You must have the approval of airport management. The FAA changed it from “manager” to “management” at some point in the past, presumably, to require permission from the Airport Board, City Authority, etc, to preclude a single “Manager” from giving permission where a larger body actually has control. Certainly, most private airports would only have a “manager” but proceed with caution when receiving approval from an “airport manager” at a public airport. For a number of reasons it would be much better to have written approval from the actual airport management. Advance "notification" to Air Traffic Control is not required when jumping at an airport in Class A, B, C, or D Airspace because an advance “authorization” is required from the respective controlling agency. The requirements for communication with Air Traffic Control during the jump are specified in FAR 105.13, Radio equipment and use requirements. Demo (Exhibition) JumpsRelated regulation: FAR 105.21, Parachute operations over or into a congested area or an open-air assembly of persons (a) No person may conduct a parachute operation, and no pilot in command of an aircraft may allow a parachute operation to be conducted from that aircraft, over or into a congested area of a city, town, or settlement, or an open-air assembly of persons unless a certificate of authorization for that parachute operation has been issued under this section. What constitutes a "congested area" or an "open-air assembly"? Well, now we are getting into the interpretation of the regulations. Parts of Advisory Circular AC-105 were written specifically to cover these questions, but there is still a bit of interpretation to do, and the FAA may interpret a particular landing area differently that you might. If you are jumping into an event like an air show, much of this documentation may already have been taken care of by the organizers, who may have simply added "skydivers" to the show's performers, but you would of course need to check with the organizers to be sure. The FAA will usually require that a "Certificate of Waiver or Authorization" (COA) be obtained for most exhibition jumps of this type, which will require that a FAA Form 7711-2, "Application for Certificate of Waiver or Authorization", be submitted. This application may need to be submitted in advance of the planned parachute jump(s), because the FAA has ten days in which to respond to the request. The Certification of Waiver or Authorization that you receive in response to your request will specify the conditions and limitations of the jump. These conditions may include the requirements that you give notification to Air Traffic Control of the jump and/or file a NOTAM. Either or both may be specified. Note: the completed, original COA is usually required to be on board the aircraft at the time of jump operations. The requirements for communication with Air Traffic Control during the jump will exist as usual, plus, Air Traffic Control radio frequencies and other procedures may be specified in detail in the COA. Note: This section of this article is not intended as a tutorial on organizing exhibition jumps, but is included mainly to compare the regulations associated with exhibition jumps with those of jumping into other areas. The best source of information about exhibition jumps would be a jumper that has organized exhibition jumps in your particular FAA region and has worked with that region's FSDO. The USPA Skydivers Information Manual (SIM) also contains a section "Exhibition Jumping and Rating". Jumping at the family reunionSo the bottom line question becomes, “How do I legally jump into my family reunion on my uncle's farm out in the country?” First of all, make sure that everyone jumping into the area is qualified and skilled enough to safely do so. If you are a USPA member, please realize that you must still follow the BSR’s whether you are jumping at a USPA Group Member DZ, a non-Group Member DZ, or into your uncle’s farm. The BSR’s apply to each individual member regardless of where they make the jump, for example, the landing area requirements. Make sure it is really “out in the country” (Class E or G airspace.) A pilot will help you determine that if you do not know how to read aviation maps. If it is close to a town you will need to determine whether it is really an “uncongested “ area, and this includes both the landing area on the farm, and the place you will be exiting. This means not over a subdivision and not over a school. The FAA will always err on the conservative side when determining if an area is congested, so you will want to be conservative too. Advisory Circular AC-105 includes guidance on this. It is suggested that you not contact your local FSDO. Simply providing the required "notification" should be sufficient, assuming that the airspace is Class E or G. Provide notification as required by FAR 105.25. This notification will usually be to a “Center” or Approach Control facility. As the facility may not be one that routinely receives such notification, it may be helpful to have a copy of FAR 105.25 in hand so that you can read it to the individual if they are not familiar with it. Always be polite but remember that you are giving a notification, not asking for permission. Make sure the pilot knows to communicate as required by FAR 105.13. Look for other air traffic as usual while spotting. Jump and have fun!
 -
This little article is about the art and science of skilfully and quickly pulling out of a dangerously low dive. You can apply this skill to many aspects of parachute flight, but the scope of this article will hone in on keeping you above ground if you turn too low, in more ways than one. When you turn close to the ground, the likelihood of your survival has a great deal to do with suspension line tension. If you are not currently connected to your canopy, you can't pull out of a dive all that quickly. Maintaining positive "g's" requires a smooth reduction of the angle of attack when performing a turn or dive, and graceful coordinated turns throughout your approach. If you feel the parachute pulling away from you in a balanced manner, you are prepared to nose her up whenever you want to. The process of pulling out of a dive clearly has something to do with bank angle, but it has much more to do with pitch. This is the fore-aft pendulum axis, like on a swing-set. If you begin increasing your pitch as soon as you get that funny feeling, and leave the rolling out for after you feel the load increase, you will recover far sooner than if you went straight to fixing the roll problem. Fly the pitch first, then progressively reduce the roll angle when you feel heavier. In doing so, you are literally creating time to fix your problems. In short, nose her up wherever you are, and then deal with the rest of your flight. The pitch responds to a variety of inputs. A tap in the rear risers will nose you up a bit, as will releasing application of the front risers. Such inputs may even level you off to zero descent, provided that you have the altitude. Rears are, however, a terrible way to pull up from a dive executed dangerously low. When you get down and dirty, brakes simply have more bite. Knowing that different inputs have different recovery times, this leads us to the exploration of what kind of brake input moves the pitch fastest. So it turns out, a short, sharp, powerful burst-and-hold of six to twelve inches will move your pitch more, sooner and more effectively than twice the quantity of control input when applied with a slower control motion. Fast works quicker. This is what I refer to as "Power Pitching", and it is an essential skill for all canopy pilots who would like to join the ranks of the old fart club. It is all a matter of airspeed. When the angle of attack is increased swiftly, while the airspeed is still quite high, there is more effect to the direction of flight. When you are in half brakes, for example, you have a slower pitch response, and the resulting level-off is weak at best. Watch scared students land and you will get to see this principle over and over. When a canopy is traveling at high speed, on the other hand, in the first one third of the control range, the bang-for-your-buck is far higher when it comes to maneuvering capability than the lower end of the range will ever hope to offer. This is because the wing is traveling faster, and drag increases as we go faster. That is why a patient pilot who waits for the correct time to flare and then gives one smooth, decisive motion from zero brakes to quarter brakes usually ends up with a glorious level off. The top of the control stroke is the heart of your power to change the direction of flight. Consequently, if you fly smooth coordinated harness-led turns with your toggles mostly up and your tail out, your first pulse of brake application will pop you up out of a steep dive surprisingly quickly. It is true that some parachutes recover more powerfully from a dive than others due to good design, but every parachute recovers far sooner when good technique is used. There are, however, limits to every technique. There is a point when a PLF is just not enough to prevent pain, and there is such a thing as a sloppy turn thrown too low. Don't do this if you want to get old. Fly consistent patterns that work for your landing area and parachute specifics, and relax into having more fun. Most of the time this stuff is not necessary at all. Once in a while, on the other hand, the one with the most Jedi skills wins. In the end it is a calm heart combined with skilful execution that ultimately leads us to glorious recoveries and beautiful landings. As we grow into what it means to us to become a better skydiver, we reach for expansion of the diverse skill-set that will allow us to skydive with our grandchildren. Wonderfully, skill is more fun, and skill is safety. Brian Germain is a parachute designer and test pilot, and runs canopy flight skills and safety courses all over the world. Brian has made over 14,000 jumps in his 25 years in the sport. He is also the host of the “Safety First” segment on SkydiveRadio.com, and the creator of many educational You Tube videos. Brian is the author of the widely popular canopy flight text The Parachute and its Pilot, as well as Transcending Fear, Greenlight Your Life, and Vertical Journey. His websites are www.BIGAIRSportZ.com and www.Transcendingfear.com and his YouTube channel is: www.youtube.com/bsgermain
-
GRADUATION DIVE JUMP SEQUENCE: The JM will check the spot, then tell you to exit. When you are ready to exit, just dive out of the plane like Superman. Do not check in. Get stable as soon as possible after exit. Turn to find your JM. Track towards him when you find him. Follow your JM's hand signals. Remain close to him throughout the dive. When he signals you to turn, do a 360. Check your altitude after each manuever. When he signals you to track towards him, use forward motion to get closer to him. When he gives you the delta-track signal, track for five seconds. If he drops below you, arch harder to increase your fall rate. If he floats above you, arch a little less to decrease your fall rate. At 6000 feet, shake your head to indicate "no more manuevers." Your JM will not remind you if you forget. Turn 180 away from your JM and track for five seconds, then stop. Wave off and pull at 4000 feet. Note the new altitude. Check above you as you wave. Count to five and check your parachute. PERFORMANCE STANDARDS: Remain stable 100% of the time after exit Demonstrate tracking, fall rate control, and tracking skills Demonstrate altitude awareness despite distractions. Perform breakoff procedure at 6000 feet. Stable solo waveoff and pull at a lower altitude (4000 feet, plus or minus 500 feet.) LEVEL SEVEN HINTS: Be altitude aware! Your JM will not help with altitude clues, and may try to distract you. Do not let him! Remember - the pull is lower than previous dives. You have more time between "no more manuevers" and the pull. During the track, be sure to pick a point on the ground to track towards so you don't track in a circle. Expect the unexpected. This is your final dive as a student, and your JM will be testing you to see if you can safely jump on your own. REMEMBER THE MOST IMPORTANT PARTS OF ANY SKYDIVE: PULL! PULL AT THE RIGHT ALTITUDE! PULL STABLE! LAND SAFELY UNDER AN OPEN CANOPY! Before Level 1 Level 2 Level 3 Level 4 Level 5 Level 6 Level 7
-
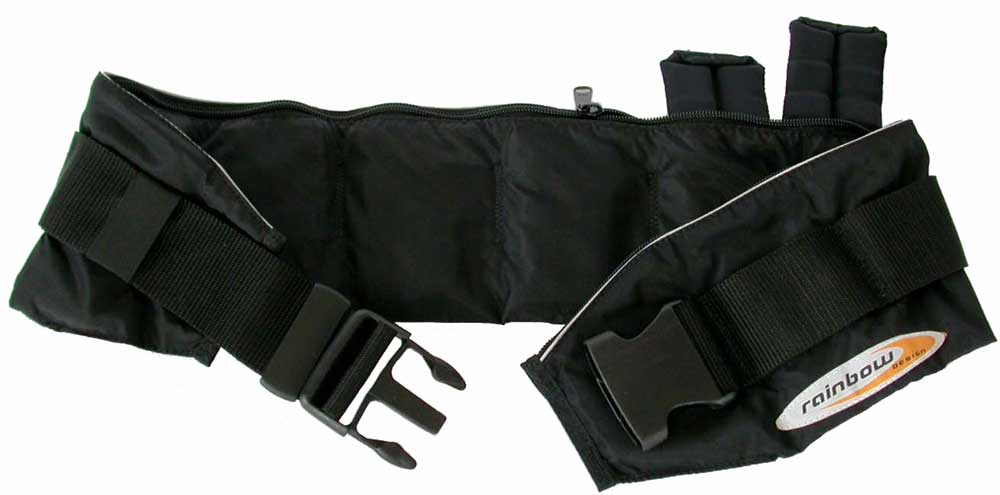 This article applies to FS belly flying, not Freefly or Canopy piloting. Safety firstWingload: Before considering jumping with weights please consider if you are comfortable with the higher wingload of your canopy. You will fly faster with the weights and if you are already pushing your limits then it may be unsafe or unnecessarily stressful. When choosing your canopies it may be a good idea to choose one size larger to allow for wearing weights. Water landings: You cannot swim with weights on! So please consider this if you are jumping near water. A weight belt is a clear advantage in case you have to dump the weights to allow you to swim. A tight jumpsuit and a weight vest are not good when landing in water, you cannot swim with the vest and it is nearly impossible to get off in the water. Health: Please consider if your body can handle the extra stress of jumping with the weights. If you have a bad back, a hard opening while wearing a heavy weight belt could be really bad for you! Comfort: Not exactly a safety aspect but weights can be really uncomfortable. Safety of others: Please make sure your weighs are firmly attached to your body. Losing or deliberately dropping weights can kill people on the ground, destroy houses and sink boats! Then why would anyone choose to jump with weights? Considering the safety and comfort issues why would anyone consider jumping with weights? Because it makes you a much better FS skydiver! Unless of course you naturally fall fast. When you see top performing skydivers, you will see that more than half of them wear weights. They do it because it is a clear performance advantage. Weights is a personal thingJust like your body shape and flying style are unique, so is your need for weights. The big or dense people don't need weights at all, and could do the rest of us a favor by choosing a jumpsuit that will slow them down. Smaller or skinny people often need weights, but the amount varies significantly. DefinitionsJust to make sure everyone is one the same page, two definitions; The Ideal fall rate is your fall rate when you are in freefall alone in a neutral comfortable body position without trying to go either fast or slow. (Mine is 187 km/h - 116 MPH) The Fall rate range is the range of speeds at which you are able to fall when trying to go faster or slower. (Mine is 160 - 220 km/h or 99 - 137 MPH). The purpose of weightsThe purpose of jumping with weights is to increase your Ideal fall rate and shift your Fall rate range upwards. In other words, to make it easier to fall faster and keep up with your team. The fall rate range of most skydivers is +- 30 km/h (+-20 MPH) from the ideal fall rate. The heaviest weights people are comfortable jumping with will give an increase in ideal fall rate of 20 km/h. The body is therefore much stronger at controlling the fall rate than by wearing weights. What a lot of people don't understand is that the weights will not actually make you fall faster! With the weights you will fall at the rate of the team, and without the weights you will fall at the rate of the team, you will just struggle more to do it! This of course assumes that you have a reasonable range, if you don't then you should work on improving it. Avoiding struggling to maintain a higher than ideal fall rate is the real propose of jumping with weights. What happens is that it requires attention to fall faster than the ideal fall rate, attention unnoticed taken away from flying your slot, turning points etc. Less attention on what you are supposed to do will make you perform at less than your potential. Wearing the right amount of weight, so you don't need attention on falling fast, will free your mind to be a better skydiver. With the right amount of weight you will notice that you are stronger, can move and turn faster, be more aware of what is going on around you, and you will make fewer mistakes and brainlocks. How to know if you need more weightIf you need much more weight (5+ kg) then it is easy to feel because you are struggling a lot to fall fast, or you may not be able to keep up with your team. If you don't need that much then it is very likely you will not notice you are struggling. Things to look for indicating you (or others) need more weight; 1. You pop up a little during challenging moves or if unexpected things happen 2. You feel unable to move as fast as you normally can 3. You feel slightly unstable 4. You fly with your hands above your head Video of your jumps can be great for seeing these things since you may not notice during the jump. How much do I need?How much weight you need for a given jump is surprisingly complicated! Obviously, it depends on your ideal fall rate and the fall rate of the team you will be jumping with. For the first jump with a team it is a guess, and then you adjust the amount of weight to match your ideal fall rate to that of the team. It may take several jumps to get it right. As I wrote earlier the body is much stronger than the weights at controlling the fall rate, so don't be afraid of taking more weight, it takes a lot before it makes a real difference. Actually, I doubt anyone will be able to feel any difference if 1 kg (2 pounds) is added. How fast will it make me fall?Assuming everything remains the same, then adding 1 kg will increase your ideal fall rate by 1 km/h (1 pound gives 0.3 MPH). This is true for all but the most extreme body shapes. However, everything does not remain the same! The weight will change but so will the balance and the forces on the body. If your body is very flexible then a weight belt will pull your hip down and effectively make you arch more and thus make you fall even faster. There are several other smaller effects that also change the fall rate, so it is quite complicated and not possible to calculate exactly how much weight you need. A rough guide is; Inflexible body: 1 km/h per kg added (0.3 MPH per pound added) Very flexible body: up to 2 km/h per kg added (0.6 MPH per pound added) Please be conservative when adding weight and keep you increments at maximum 2 kg (4 pounds). Never make big changes in the amount of weight, the result may surprise you! Seeking adviceWhen you are in doubt about how much weight you need (and you will be in doubt), seek advice from an experienced FS skydiver with a body shape, size and weight similar to you. Don't ask the big guys who have never jumped with weights, they may be highly experienced skydivers but they haven't got a clue about your needs. Often they will give useless advice like "You just need to arch more!" or my favorite "Take off your booties!”. Have fun, improve on every skydive and be safe! Jacques Jonsman is an engineer, serial entrepreneur and product & business innovator. He is an FS instructor and has been skydiving for 21 years.
 -
 When we first posted that we were launching a live online canopy course, the beginning of many online adventure safety courses, a number of people asked me if I was joking. In the adventure community, actions have always spoken louder than words, and the internet is for surfing entertaining videos, not training. Although I fully understand the irreplaceable value of on-site instruction, there is a lot of work to do in a short time to get it done. People are dying out there. USPA has wisely issued a mandate to help promote participation in canopy courses in order to expedite the proliferation of the information that saves lives. This is a wonderful step, however the limited number of highly skilled canopy flight teachers causes a bottle-neck of resources. We need the information to get out there faster than we have the ability to spread it. Hence we find ourselves in the place that inspires innovation like no other, need. Live online “e-learning” programs have been fully embraced by the corporate world in recent years, and increasingly by universities and colleges as well. The choice to go with these high tech teaching systems has been partly financial, as it is far cheaper to implement than in-person training in the long run. It is also far greener because instructors no longer need to travel as much to accomplish the same goals. Lastly, corporations and learning institutions all over the world have chosen to use the internet for education because of the vastly increased scope of potential students, as distance can be taken out of the equation. These compelling reasons have caused significant advancement in the technology that makes remote teaching possible, and huge breakthroughs have been made which allow interactions to be surprisingly natural. Further, online testing can be utilized to allow instructors to get a feel for how well they are conveying the information, and what they need to focus on in the next sessions. The implementation of this new model of instruction is still very much in its infancy, however we are already finding that this futuristic method of information proliferation actually has several benefits over in-person training. When you take a canopy flight course, for instance, you cannot control the weather. In most cases, the instructor is flown in from far away and is only on site for one weekend. If the weather does not cooperate, you are in for an all-theory course. With online courses, we are able to teach the group over the course of a month. Chances are, the students will get the opportunity to jump in that time to practice what they have learned, and even get someone to video their landings to upload for the next course. Even if the participants do not get to jump, the longer duration of the course allows for deeper information association and transfer to long-term memory, as well as giving the students the opportunity to formulate better questions to help them get exactly what they want out of the experience. If they don’t remember something from the class, they can even log onto the website and watch the course all over again. This is not possible in the traditional instruction paradigm. Some will say, “But there is no substitute for being able to ask questions of your instructor in the flow of the session. The new live online training systems allow participants to “raise their hand”, so-to-speak, and get the answer they need when they need it. If the students have a webcam as well, the interaction between the student and teacher is nearly as intimate as an in person discussion once the participants grow accustom to the new medium. For some people, this online format actually allows them to come out of their shells a bit more since they are not actually in a room full of strangers. There is no doubt that on-site, hands-on instruction will remain the backbone of all adventure training. There is a great deal that can only happen in a purely organic environment, which is why people like me will continue to pound the pavement and travel to a new dropzone almost every weekend. It is essential. However, the vast majority of skydivers do not have access to such camps but once or twice per year, and by then many of them will have already gotten hurt or even killed. If we are to truly strive to improve the safety of our sport in every way possible, embracing eLearning is an indispensable step toward getting the information out there in a reasonable time frame. The internet transcends time and space like nothing else known to mankind, and if we are serious about safety, than we must cast aside our reservations, and like the first pilots of ram-air canopies, we must give it a whirl. The fear of change is understandable. When we change, we risk things getting worse. However, if we do not try to improve and evolve, in the context of a changing environment, we are essentially moving backwards. The technology passed down to us from wartime allowed our sport to come into existence, and now the corporate world, sometimes equally sinister, has created a technology that will allow great students to connect to great teachers, anywhere in the world. The precious information that was once held by only a few mentors with a limited number of weekends in the year can now be disseminated at an exponential rate, and the possibilities for improvement of our sport and other adventure pursuits are endless. This is a truly incredible time. So when someone asks me if adventure training through eLearning is a joke, I have to ask them to consider the possibility that any initial resistance to change is merely the inertia of habit and a little bit of fear. The future is being born right now in the present, and all we need to do to move forward into the vast potential of this new era of instruction is an open mind and a sense of adventure. Brian Germain is a parachute designer and test pilot, and runs canopy flight skills and safety courses all over the world. Brian has made over 14,000 jumps in his 25 years in the sport. He is also the host of the “Safety First” segment on SkydiveRadio.com, and the creator of many educational videos. Brian is the author of the widely popular canopy flight text The Parachute and its Pilot, as well as Transcending Fear, Greenlight Your Life, and Vertical Journey. His websites are www.BIGAIRSportZ.com , www.Transcendingfear.com and his online training programs can be found at www.AdventureWisdom.com. Brians highly aclaimed YouTube channel is: www.youtube.com/bsgermain
 -
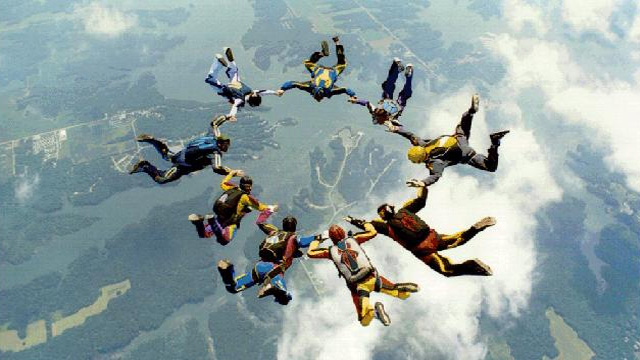
 Imagine holding your arm out of a car window as you drive down the highway. The wind you feel is caused by your speed through the air rather than by weather. Skydivers call this apparent wind the relative wind, and it is the single most important element of the freefall environment. In fact, it is the only thing you have to work with in freefall, and from the moment of exit until your parachute opens you must think of yourself as a body pilot instead of a regular person, just as when you go swimming you have to leave your land habits behind. Your adventure in the relative wind begins at the moment of exit. There is nothing particularly complicated about exits and the techniques you use on your first freefall will be the same as those used by skydivers with thousands of jumps. Your exit makes or breaks the skydive, so we spend a lot of time practicing this part of the jump. A weak exit consumes valuable freefall time and puts you in a mental position of having to catch up, adding unwanted stress to your skydive. With a good exit you can get on with your learning and enjoyment at once, finishing the freefall tasks with plenty of time to spare. The two essentials of an exit are presentation and timing. Presentation refers to how you relate to the relative wind. Timing refers to your relationship with the other skydivers. Let's take a detailed look at these aspects of the exit. The body position we use to maintain a comfortable, neutral position on the wind (the equivalent of floating on water) is an arch. We'll learn more about body position soon, but for now you need to think simply about arching into the relative wind. This means that your hips are pushed forward into the wind, your arms and legs are spread out evenly and pulled back, and your chin is up, creating a smooth curve from head to toe. If you imagine lying face down in a shallow bowl with your arms and legs spread out evenly, you are thinking of an arch. In this position you will naturally face into the wind. To achieve a good exit, all you have to do is present your arch to the relative wind. Remember, we're on an airplane flying nearly one hundred miles per hour, so the relative wind is from the direction of flight. (When you see photos of skydivers they are usually presenting their arch towards the ground, but that's because they have fallen long enough to be going straight down so the relative wind comes straight up from the ground.) Once you are poised outside of the airplane, start your arch before you let go. Then it is a simple matter to open your hands, pivot into the wind, and you're flying! As you will soon learn, a relaxed arch is much more smooth, stable, and comfortable than a tense one so try not to think of yourself as falling off of an airplane. You're not; you're flying free. A mental image that might help would be learning to swim. You would be more relaxed and alert if you lowered yourself slowly down a ladder into warm water and let yourself float comfortably before letting go than if you jumped off a cliff into cold, dark surf. Think of the air as a friendly environment, slip into it smoothly as you climb out of the airplane, arch, take a deep breath, open your hands, and float off on the wind! You will note that I didn't say "push off." Until your parachute opens, your last contact with the world of solid objects is the airplane. If you push off, you will have some momentum that will tend to make you go over on your back, just as if you stood with your back to a pool and pushed off of something solid. Just arch and face the wind. As you leave the aircraft, the relative wind (arrow) is parallel to the ground. In a good arch with your head up, you should see only the airplane and sky rather than the ground during the first second or two of freefall. Losing forward speed and accelerating downward, the relative wind gradually shifts from parallel to the ground to perpendicular. This transition takes several seconds. You will not be facing the ground until about eight seconds after the exit. At no time do you look directly down at the ground. Even after the transition is over and you are falling straight down, in a good arch your head is up and your eyes are on the horizon. The aircraft's speed is about 100 miles an hour. When you leave, you lose some of that horizontal speed and actually slow down for the first few seconds. Then gravity takes over and you gradually accelerate to 110 miles per hour. That's why there is no sensation of sudden acceleration - you only gain ten miles per hour in ten seconds! Relax, arch, and face the wind is all you really need to do to achieve a stable exit. But remember that you are jumping with other people. For everyone to have a good exit, you also need group timing. Just as a band starts playing to a count, we'll start skydiving to a count. That count, used all over the country, is "ready, set, go!" It should be done with a smooth, even cadence. Because it's noisy outside an airplane, the count should be loud. Finally (think of a conductor with his baton giving a visual count to the orchestra) you, the conductor, need to give the other jumpers a visible count. We have you bring up your left knee on "set" and turn into the wind on go. Combining these two elements of presentation and timing will almost always result in a smooth exit. Leave out either one, and the exit may funnel, the term skydivers use to describe an unstable formation. Leave both out and a funnel is almost a certainty. But if that happens, don't panic. An arch will fix the problem. Incidentally, it doesn't affect your stability to dive out of the airplane. As long as you are presenting an arch to the relative wind, you will be stable. Unfortunately it takes most people a while to get used to the idea that the relative wind starts right outside the door. If you walk through an airplane door like you would a house door, you'll present your side or back to the wind and lose stability. In the water, walking doesn't work; you have to swim. Air is the same way - you have to fly through the door, not walk through. Test Yourself1. Skydivers on the outside of an aircraft as they prepare to exit are called floaters. The ones inside the airplane who will dive through the door are called divers. Floaters are further divided into front, rear, and center, depending on their position in the door. On an ASP level one jump, the student is the center floater, the reserve side JM is front floater, and the main side JM is rear. Why is the front floater more likely to have a problem than the rear floater if he cannot hear or see the exit count given by the center floater? 2. Novices diving out of an airplane frequently do a half roll and then recover stability facing the aircraft. What could cause this common problem? Proceed to Chapter 3 (Flying Your Body)
 -
 Every skydive starts before you board the airplane. Before you get on the airplane, you should be totally prepared for the jump ahead. This means that you know exactly what you are going to do on the jump and have had your equipment inspected. Make sure you have your helmet and goggles, remove jewelry and take sharp objects out of your pockets, tie your shoes tightly, and so on. Each jumper is responsible for their gear, and you should always check to be sure you have everything necessary for the skydive. Another part of the ground preparation is being ready to board the aircraft on time. Jump planes are just like airliners: they can't hold up twenty people because one wasn't ready. At the start of your skydiving progression, your jumpmaster will usually take care of reserving your slot on an airplane after you are completely trained and outfitted with the necessary equipment. It is then your responsibility to stay in the area and gear up at the appropriate time with your jumpmasters. Before you Board:1) It's too late to ask questions once you are in the airplane, so before you board know exactly what you will do on the skydive and review your emergency procedures. On the ride to altitude you should review the dive mentally, imagining a perfect performance. Keep in mind, however, that you are not compelled to jump from the airplane just because you happen to be on it! If you realize on the aircraft that you are not ready to jump, you may ride down with the airplane. 2) Check your gear. Your jumpmasters will help you to be sure everything is correctly routed. Be sure your altimeter is set to zero, your goggles are clean, etc. If you will be boarding an airplane when its engines are running, keep a good grip on your goggles and gloves! 3) Stay close to your jumpmaster and away from the propellers, other aircraft, and any other hazardous objects. Remember that the pilot may not be able to see you when he is taxiing the airplane; he always has the right of way. Once you are in the airplane, sit where instructed. Be sure to wear your seat belt until you are high enough for an emergency exit. It is also a good idea to put your helmet on for the take off. Your two responsibilities in the airplane are to minimize movement and to protect your deployment handles. Avoid snagging not only your equipment but that of other jumpers. Until we are on jump run you should stay seated. Then, at the jumpmaster's command you can get to your feet and move carefully to the door. As you move about in the airplane, watch out for door handles, emergency exit releases, seat belt buckles, etc. While inside the airplane your job is to protect your parachute! Most of your jumps will be done from our larger, twin engine airplanes. Exactly which airplane depends on how many people are jumping and the aircraft maintenance schedule. You should have familiarized yourself with the aircraft door, handles, and steps before boarding. Most of the time the more experienced jumpers will exit first for a simple reason: students open their parachutes higher than experienced jumpers. To preclude the possibility of jumpers from different groups colliding, exits are staged several seconds apart and planned with the opening altitudes in mind. That way we get both horizontal and vertical separation between groups. If you are leaving first because of unusual circumstances, have your jumpmaster fill you in on what to expect. The jump run itself is flown into the direction of the wind. This gives the airplane the slowest possible ground speed . In other words, it is over the drop zone (DZ) longer than it would be if it was running down wind. The pilot uses GPS (Global Positioning System satellites) to tell him exactly where he is, and when he is over the spot , or correct exit point, he turns on a green light back by the door, telling the skydivers to exit. Should the exit sequence take so long that the last to leave might not make it back to the airport, the light will go off, indicating that the remaining jumpers should stay in the airplane for a second pass over the drop zone. Incidentally, since you will usually be getting out late in the line up, and since the jump run is into the wind, you have a way of knowing which way the wind is blowing as soon as your parachute opens. Imagine a line from the landing area to a point directly below you. That is the wind line - if the pilot was right about the spot. Test Yourself:1.Why do we take our seatbelts off once we are above 2,000 feet instead of wearing them all the way to altitude? Continue to Chapter 2 (Exits)
 -
 Welcome to skydiving, perhaps the most exciting and unusual sport in the world! You are at the beginning of a path thousands of people have safely followed for over thirty years. In that time, experience has shown that some approaches to skydiving work better than others. This handbook is designed to supplement the practical instruction you will be receiving from our instructors, all of whom are certified by the United States Parachute Association. During the course of your training we will cover the basic principles around which skydiving is built. While actual dive sequences and hands-on training will be given to you by our instructors, this handbook will explain the concepts behind the activities and allow you to study important principles at home. Skydiving terms are clickable the first time they appear, which takes you to the glossary. Be sure to have your jumpmasters explain any concepts that remain unclear. Although underlying principles will not change, they may be easier to understand through a different explanation, drawing, or analogy than the ones offered here. I encourage your questions; some of the principles covered are not immediately obvious. As the author, I also invite your comments and criticism - this first edition is sure to have many oversights and flaws. In the Aircraft Exits Flying Your Body The Skydiving Universe After the Freefall Canopy Performance Landings After the Landing Blue skies and safe skydiving; Bryan Burke
 -
 We've already discussed your body's relation to the relative wind. Now let's look at your relationship to space and time. When you leave an airplane at our customary exit altitude of 12,500 feet above the ground, your accelerate from zero miles per hour vertical speed to approximately one hundred and ten miles an hour in about ten seconds. It doesn't seem too dramatic because the aircraft speed was already about 100 miles an hour, so you reall only gain ten miles per hour. At that point you reach terminal velocity, the speed at which the air pressure against your body balances the pull of gravity. Ignoring minor changes in body position, you will stay at that speed until something stops you - hopefully the deployment of your parachute! At terminal velocity you pass through one thousand feet every six seconds. If your parachute opens at 4,500 feet, that gives you about 52 seconds of freefall. (Ten seconds for the first thousand, six for each of the next thousand.) If your parachute did not open, you would now have a life expectancy of 27 seconds. Opening altitudes are based on allowing skydivers time to be sure that they do land under an open parachute. More experienced jumpers commonly open at about 2,500 feet because of their greater familiarity with equipment and emergency procedures. This gives them about 65 seconds of freefall from a 12,500-foot exit. The main thing about altitude is that if you run out of it while in freefall, you die. However, since your fall rate is constant, your consumption of altitude is constant. This means that if you have plenty of altitude, relax, because only time can take it away from you. Time and altitude are directly related. Loss of altitude awareness is a major contributor to skydiving fatalities. Always bear in mind that no distraction is worth dying for. Until your body's freefall clock has been programmed so that you know how long you've been in freefall, your only reference is your altimeter. Every time you do anything - intentionally or not - check your altitude. That way, you won't lose altitude awareness if a distraction such as a difficult maneuver or loose goggles comes along. Keep in mind that since you are consuming altitude (time) at a constant rate, you can't stop what you are doing, think it over, go back, and try again. In freefall, there are no time outs! That's why we try to do all of our freefall tasks carefully and deliberately, getting them right the first time. If you rush, you will actually lose time because the extra mistakes that result will slow you down. And when you consider the cost of freefall time, you'll appreciate the value of thorough ground preparation! Besides our time reference (altitude), we also make use of space references. There are two types of space references, orientation to the ground and orientation to other skydivers. We'll call the ground reference heading. Heading is an imaginary line drawn from a point on the horizon directly in front of you through your center. You use this reference for tasks such as turns, backloops, or simply hovering in place. Eventually you will substitute the line of flight for a personal heading. The line of flight is the heading the aircraft was on when you left it. The advantage of using line of flight is that now all the skydivers on the airplane have the same heading reference, instead of each picking their own. This makes it much easier to coordinate group activities. Your reference to the other skydivers is called the center point. The center point is that spot closest to all of the skydivers. When you are alone, it is in the middle of your body. With others, imagine a ball falling straight down around which everyone flies. In other words, four skydivers holding hands in a circle would have the center point in the middle of the ring. If they all backed up ten feet, it would still be in the same place because thjey are all still equally close to that point. In many ways, the center point of a formation is like the center of your box man discussed in the previous section. If one corner of a formation is low relative to the center point, the formation will turn in that direction. If two corners are low, it will slide in the direction of the low side. By now you can see that while skydiving, you have to be aware of several different things: altitude, your own body position, your position relative to the ground, and your position relative to others. Initially this will seem like a lot to be aware of, so on your first few jumps you will concentrate almost entirely on altitude and your body position while your jumpmasters take care of the rest. When you are release to fly free, you will add your own heading, and eventually you will be able to monitor these, the formation center point, and the line of flight as easily as you monitor your speed, direction, location, and other traffic as you drive to the drop zone! Test yourself:1. "Temporal distortion" refers to the fact that in an emergency situation (losing control of your car, for example), the rush of chemicals to your brain can cause events to seemingly go into slow motion. Why would temporal distortion be extremely dangerous to a skydiver? 2. Why is ability to hold a heading considered essential to flying with other skydivers? Proceed to Chapter 5 (After the Freefall)
 -
 No matter how many skydives you make, you'll always feel a moment of great satisfaction as your parachute settles to the ground. But the skydive isn't over yet! You need to carefully gather up your gear and bring it safely back to the hangar. You should daisy chain the lines (ask!) and be sure not to snag anything. One easy way to keep track of your stuff is to put things like your goggles, gloves, and ripcord in your helmet and fasten that to your chest strap. Back in the packing area, set the rig down carefully and be sure not to drop or lose any of the paraphernalia such as the altimeter, radios, goggles, and ripcord. Keep in mind that all the equipment is very expensive and you are responsible for keeping it safe; a moment's carelessness with an altimeter, for example, could cost $150. Once all of your gear is safely off, there is one last thing to do. Review your dive thoroughly, noting areas where you would like to get suggestions and advice and thinking about which techniques worked well, and why. Freefall only lasts a minute, the canopy ride about three. That isn't a lot of time to learn, so to be a good skydiver you have to develop your ability to learn on the ground before and after a jump. A few minutes of careful review with your jumpmaster (or yourself, when you are doing solo jumps) will save you many expensive mistakes in the future. Finally, log all of your jumps. Any jumps you plan to use towards a license requirement must be logged and signed by another jumper. Around the Drop ZoneAlthough our sport has a two hundred year heritage of air show jumps and military parachuting, sport parachuting as we know it began in the late '50s when civilians began jumping strictly for fun and combined to form sport parachuting groups. Eventually skydivers began to design their own gear instead of modifying military surplus parachutes, and the combination of civilian organization and improvements in equipment has led to a steady growth that continues today. The national organization that has overseen skydiving in the Unites States is called the United States Parachute Association, or USPA. USPA is a non-profit membership organization in which each member may vote for the board of directors. We will ask you to join USPA by the time you make your Level 4 ASP jump; the first year's dues are $39.50 (more for overseas memberships.) Besides certifying instructors and administering the license system, USPA publishes a monthly magazine that is included with your membership. Membership also provides you with some liability insurance. But perhaps the most important reason for joining USPA is that the organization has been instrumental in keeping the government, at all levels, out of the sport. In fact, skydiving is one of the safest aviation sports and is also the least regulated. To keep it this way, it is important that we police ourselves. The USPA has established safety guidelines that all skydivers at this drop zone are expected to adhere to. The USPA's representative on the drop zone is the Safety and Training Advisor, or S&TA.; He or your instructor can answer questions about license requirements, skydiver ratings, and most other skydiving matters. The USPA categorizes skydivers into six experience levels: students - under direct supervision in a formal training program novices - graduated from a student program but not yet licensed A license - minimum of 20 freefalls B license - minimum of 50 freefalls C license - minimum of 100 freefalls D license - minimum of 200 freefallsIn addition to the freefall experience, each license level requires demonstration of skill appropriate to that level. A license is important to you as a proof of your ability level, especially if you intend to travel to other drop zones. Each level also has currency requirements. Staying current (jumping regularly) is one of the most important things you can do to enhance safety. For this reason if you are away from skydiving for several weeks you will have to do some reviewing and get back into the sport with a simple, safe, skydive. Until you are licensed, if more than 30 days passes without jumping you will be required to make a Level 4 ASP jump with one of the school's jumpmasters before jumping on your own again. USPA also issues instructional ratings to qualified applicants. A person holding a jumpmaster rating has attended a training program and demonstrated the necessary skill and experience to safely guide novices through a student program. Instructors have more experience and have also attended further training courses. Either one will be able to answer most of your questions. You will meet plenty of people willing to offer suggestions to you. Bear in mind that someone with one or two hundred jumps will seem very experienced to you but is actually a relative newcomer to the sport. Rely on rated instructors for guidance until you have your A license! Occasionally you may hear experienced jumpers discussing techniques or procedures that differ from what you have learned; be aware that some things which may be safe for experienced jumpers could be inappropriate for novices. If you have any questions be sure and get an opinion from one of your instructors. Skydive Arizona is a business incorporated for the purpose of providing skydiving facilities. While you are on student status, your jump price pays for all aircraft and site expenses as well as instruction and equipment. The operators of the drop zone, Larry and Liliane Hill, are proud that they have built the finest skydiving center in the world, operate the finest fleet of aircraft available, and have some of the best skydivers anywhere on their staff. To help keep this facility safe and pleasant and to control costs, customers are asked to avoid littering (smokers, please put your butts in the yellow or orange cans) and to be on time for their aircraft. Feel free to bring non-skydiving guests out to share the fun, but be sure that children are under constant supervision: drop zones abound with expensive and dangerous objects! Dogs are not permitted in the grassy central grounds or in the buildings. Drop zone etiquette is casual, but when you are in an area where people are packing, be sure to walk around the parachutes rather than step over them, and never smoke or leave drinks around parachutes. Do not borrow or examine other people's gear without permission. Drinking alcohol on the drop zone is forbidden until the last load of jumpers is up. This rule extends to non-skydiving guests for a simple reason: we try hard to maintain a good image, and an uninformed observer might not be able to distinguish between a skydiver and a non jumper. Where do you go from here?The ASP program has eight levels that cover all the skills discussed in this handbook. At each level you will receive detailed instructions from the school staff. After graduating from our student program you will make several more jumps to hone your basic flying skills. At the same time, you'll be trying more advanced things and looking at buying gear. For this stage of your progression we have written a second handbook, geared for jumpers off student status and working towards their A license. The Skydiver's Handbook will fit right in with this one, and goes into details on license requirements, relative work, the coach program, buying gear, and other neat stuff. Keep the two together for reference and rainy day study. You can also keep notes and sketches, packing manuals, license applications, etc. in this folder. All of these materials are designed to be flexible and are subject to continuous updates. Please let Bryan Burke, the Safety and Training Advisor, know if any of the information was unclear or if you felt more detail was needed. We very much appreciate your comments and suggestions, as well as your questions. Welcome to skydiving!
 -
 There are only two ways to end a freefall. One is to open your parachute, and the other is not to. No one wants it to end the second way. Statistics show that the overwhelming cause of skydiving fatalities are due to the jumper not using a perfectly functional parachute in time. Why does it happen? In order to open your parachute safely, you need to know two things: when and how. The when was discussed in the previous chapter. Altitude awareness is critical and the loss of it is a life threatening situation. The problem can be compounded if the skydiver, running out of altitude, is unfamiliar with his equipment and has trouble deploying his parachute. Add the possibility of a malfunction to low altitude and unfamiliar equipment and you have a perfect recipe for disaster. Therefor you must always watch your altitude and before you ever get on an airplane you should be totally familiar with your equipment. The sport parachute, called a rig in skydiving jargon, is a very simple machine. It must include two canopies, a main and a reserve. The components must be TSO'd, meaning they meet government technical standard orders that require high manufacturing and testing standards. All rigs are worn on the back and consist of similar components. A look at the diagram will show that a rig consists of the deployment system (pilot chute, bridle, and bag), canopy, suspension lines, steering lines, toggles, risers, and harness/container. Deployment is initiated when the container opens and the pilot chute enters the relative wind. The pilot chute may be packed inside the container (all reserves and student mains) or kept in a pouch outside of the container and pulled out by hand, which most experienced jumpers prefer. The pilot chute acts as an anchor in the air, while the jumper continues to fall. As the two separate, the bag in which the canopy is folded is pulled from the container. The parachute's suspension lines, carefully stowed on the outside of the bag, are drawn out until they are fully extended. The bag is then pulled open and the canopy comes out. It immediately begins to inflate as the cells fill with air. Inflation is slowed by the slider which prevents the canopy from expanding too fast. It usually takes three to five seconds from deployment of the pilot chute to full inflation of the canopy. Over the years, parachute design has been refined to a remarkable degree. In fact, square parachutes have no known inherent design malfunctions. Theoretically, given proper packing, a stable deployment, and barring material flaws, a square parachute will never malfunction. However, we don't live in a perfect world, and malfunctions are common enough that no sensible person would intentionally jump without a reserve. The malfunction rate for sport parachutes is about one in every thousand deployments. Nearly all are preventable. The catalogue of possible malfunctions is long, but all you really need to know is that any parachute must have two characteristics. It must be open, and it must be safe to land. Otherwise it is a malfunction. The first characteristic is determined at a glance. The second one, if there is any doubt, is determined by a control check. Should you have a malfunction, the response is simple - pull your reserve. On student parachutes pulling the reserve handle combines two functions. The main parachute is released from the harness, then the reserve container is opened, starting the reserve deployment sequence. For all practical purposes, main and reserve deployments are identical except that the canopies may be of different sizes. Most parachutes used by experienced jumpers have a separate handle for each function of the emergency procedures so you will need some special training when you progress to your own gear. Also, at Skydive Arizona we use only square reserves. If you travel to another drop zone be sure you receive training on their equipment, and find out if the reserve is round or square. Round reserves mean you will need special training. The first factor in preventing malfunctions is a simple one: don't leave the airplane with an existing malfunction. This means that you should always have your equipment checked by a knowledgeable second party to be sure nothing is misrouted or damaged. Prevention extends to packing. When you learn to pack you will learn to inspect the canopy. In the student phase, you have to trust your jumpmasters and packers to be responsible for the condition of your parachute, but you will eventually assume all responsibility. Because of the possibility of a jumper making a mistake, our reserves are inspected and packed by a specialist who holds a Rigger's Certificate issued by the U.S. government, thus ensuring that at least one parachute on every skydiver is technically sound. The second factor in malfunction prevention is one you control: body position. If you think back to the deployment sequence described earlier, the importance of a stable opening becomes apparent. Since the parachute is on your back, if you are facing the relative wind in a good arch it will deploy straight out behind you. If you are unstable, it must find its way past you - between your legs or around an arm, for example. In this situation, the pilot chute could entangle with you, stopping the deployment sequence. Another possibility during an unstable opening is that the lines will feed out unevenly, creating the potential for a line knot that could keep the slider from coming down or deform the canopy to the point that it cannot fly properly. Don't forget, however, that stability is not as important as opening in the first place. Pulling at the correct altitude always takes precedence over pulling stable. An unstable opening does not always result in a malfunction; parachutes are so reliable that the worst that usually happens is a few line twists. Not opening has far worse consequences. Test yourself:1. While you are a student, your decision altitude, sometimes called your hard deck, is 2,500 feet. If you initiate main deployment at 4,500 feet and nothing happens, how many seconds will pass before you reach the decision altitude? How many will you have used counting and checking before you realize you have a problem? 2. If you know you have a malfunction, why should you pull your reserve at once instead of waiting until the decision altitude is reached? 3. In the old days, skydivers wore their reserve mounted on the front of their harness. If you had a chest mounted reserve, what body position would you want to be in for reserve deployment? 4. How often should you practice your emergency procedures? Proceed to Chapter 6 (Canopy Performance)
 -
 There are two goals when landing your parachute: the first is to land safely and the second is to land where you want to. Clearly, the first goal is much more important than the second one, yet a surprising number of skydivers have had the opportunity to consider their values at leisure while recuperating from landing injuries. A parachute is only as safe as the person operating it. As soon as you have determined that your parachute is functioning properly, it is time to start thinking about the landing. Look for potential landing sites - any level area free of obstacles will do but we try to land at an established point, our student landing area, if we can. Usually you can get back over this landing area with at least a thousand feet of altitude left. If this is not the case check the area below you and between you and your target for possible hazards; if you are not positive you can make it safely to the planned landing area, you must select an alternate site. Do not go below the thousand foot mark without making a firm decision about where you will land! Assuming you have made it over the target above one thousand feet, you should turn into the wind and check your ground speed. This is especially important on windy days. Remember the higher the wind speed is, the less ground speed you have when holding, and while running with the wind your ground speed will be higher. Keep this in mind and avoid getting too far down wind of your target area. (Helpful hint: if you can find your canopy's shadow on the ground it will show you exactly how fast you are going!) As you hold into the wind you can make a rough guess as to how far you could fly in, say, 250 feet of vertical descent. Take that estimated distance and lay out an imaginary line of that length from the target to a point downwind. Now just work your way to that point and stay near it until you are about three hundred feet up. Turn towards the target. If your original guess was good, you would slightly overshoot the target. A small "S" turn - ninety degrees one way, then 180 back to the approach, and ninety degrees back into the wind - will line you up on a good final approach. As long as you start your final approach a little high, you can continue these "S" turns to adjust until you are on approach at the right altitude. Remember that your first priority is to land safely, not necessarily in the target. You may have to share the landing area with another canopy, in which case you need to avoid flying in front of or near them. For example, if you are on one side of the target and another student is near the other side, stick to your side rather than aiming at the middle. Be careful to always look before you make a turn and assume the other canopy pilots may not see you. Whoever is lowest has the right of way. Also look for dust devils. They can turn or even collapse your canopy and should be avoided. Most skydivers like to set up their final approach by using a pattern similar to the kind airplanes use approaching an airport. After your ground speed check at one thousand feet, work your way down wind until five hundred feet. Then turn cross wind (90 degrees to the wind direction) until you are over that imaginary point where your final approach begins. This type of pattern lets you observe wind indicators as you refine your estimate of where to turn onto final. Another useful tip: the more turns you do, the harder it is to tell where you are going, because your descent rate and forward speed change in a turn. A few smooth, slow turns will set you up better than lots of radical ones. At an altitude of about one hundred feet you are committed; just let the parachute fly straight ahead and limit any corrections to turns of ten degrees or less. The last part of the approach is the flare. This procedure is simple: pull down both toggles simultaneously to slow down your parachute to a comfortable landing speed. To get the most out of flaring, you must be flying full speed on your final approach, so keep your toggles all the way up until it is time to flare. (An exception is if you have poor depth perception, when the lighting is bad, or when the surface is uncertain such as water or corn. Then you may be better off approaching in partial brakes to slow your approach, giving you a little more time to assess the situation.) The flare should be done when your feet are about two to three body heights above the ground. A smooth flare over about three to four seconds will work better than a fast, hard flare, but the main thing is to have both hands all the way down when your feet are three or four feet off the ground. If you realize you started the flare low, speed up; if you started high, slow down. Do not, however, let your toggles back up once you have started to flare. This will cause your canopy to dive forward and result in a hard landing. The illustration showing a canopy's flight during a flare will show the consequences of a badly timed flare. Too low, and you have a lot of forward speed even though your descent is slow. Too high, and you will have a lot of downward speed even though your forward speed is low. That is why you should flare a little high and slow on a calm day, a little low and fast on a windy one. Let's quickly review the three most important points for a safe landing. First, always pick a safe place. Be sure of your landing site before you reach 1,000 feet! People who hit hazardous things such as cars, buildings, or power lines almost always do so because they did not choose a safe landing site high enough and were forced to land in a bad location when they realized, too late, that they could not make the target. Second, never land in a turn. We know that a parachute's descent rate increases dramatically in a turn, and that speed remains for a few seconds after the turn is stopped. Landing in turns is by far the biggest cause of skydiving injuries. These low turns are usually made by people who did not pick a safe area and turned at the last moment to avoid an obstacle, or by people who thought landing on the target was a higher priority than landing safely.No low turns! Third, land into the wind. This one is too obvious to need elaboration; the slower you are going, the softer you land. However, landing down wind or cross wind is less likely to cause injury than landing in a turn or on obstacles! On a breezy day, turn towards your parachute after you touch down and pull in one line to collapse the canopy. You may need to run around down wind of the canopy. Test yourself:1. The United States Parachute Association limits student and novice jumpers to wind conditions of fourteen miles per hour or less. Why are winds over fifteen miles per hour considered dangerous? 2.Turbulence that can make steering difficult or even collapse your canopy can be caused by three things. Hot, rising air such as dust devils is one and high winds passing over obstacles are another. What else could cause dangerous turbulence on landing? Where would you expect to find turbulence on a windy day? Proceed to Chapter 8 (After the Landing)
 -
 Your square parachute is the result of two decades of design refinement. Like a glider, it can fly straight and level or turn, slow down, spin, and even stall. As the pilot, where you land and how you land is totally up to you. Practice, combined with a clear understanding of how your parachute works, will allow you to land softly, exactly where you want to, every time. When your parachute is inflated, the pressurized air filling the tailored cells causes it to take on a wing shape. A parachute has a fixed angle of incidence, built into it by the length of the lines. The "A" lines in front are shorter than the "D" lines in back, causing the wing to point slightly down. It essentially flies forward and down on the slope of the angle built into it. This angle causes it to fly about three feet forward for every one foot down, giving it a 3 to 1 glide ratio. In other words, on a calm day a parachute opened at 4,000 feet could fly a straight line distance of 12,000 feet before landing! The speed at which it flies is about 20 miles per hour forward and 6 to 8 miles per hour down when the canopy is in full glide with the control handles, called steering toggles all the way up. The toggles are also referred to as brakes, since pulling both down slows you down. Pulling down on the right toggle pulls down the back right corner of the canopy, slowing it down and creating a turn to the right. At the same time, the slow side looses lift and the canopy points downward in the direction of the turn, increasing the vertical descent rate. One of the most important handling characteristics of parachutes is that their descent rate always increases in a turn! This phenomenon is by far the greatest cause of parachuting injuries. With this in mind, you must take care to always plan your landing so that you will not be forced to do any major turns below 100 feet. How slow or fast you turn is in direct proportion to how far you pull down the toggle, as is the change in your descent rate - fast in a sharp turn, slower in a mild turn. If you pull down on both toggles simultaneously, the canopy's forward speed decreases. The slowest you can go is about five miles per hour forward. Generally you should fly your canopy as fast as possible - toggles all the way up. This is because the more air the wing has passing over it, the better it flies. In fact, in sustained deep brakes so little air passes over the wing that the descent rate increases significantly. You can even cause the canopy to stall, which means it gives up flying altogether. Normally student canopies have the control lines calibrated to make a stall condition difficult or impossible to get into. Whenever you jump an unfamiliar canopy, you should always do a series of turns and practice flaring (pulling both toggles down simultaneously) above 1,500 feet in order to acquaint yourself with its handling characteristics. Why 1,500 feet? Your CYPRES automatic activation device that deploys your reserve in an emergency is calibrated to fire at about 1,000 feet. It may mistake radical maneuvers under a good canopy for a malfunction and could deploy your reserve if you are aggressively turning or stalling the canopy below 1,500 feet! This is not only dangerous, but expensive. Recharging the CYPRES and repacking the reserve costs $170. If the CYPRES fired because of your mistake, you are the one who pays! Besides the canopy's handling characteristics, the parachute pilot must consider the surrounding conditions. Two variables are present to some degree on every jump; the spot and the winds. Let's take a look at spotting and how it affects you. Imagine the simplest jump possible. Let's say you are going to exit the airplane at 3,000 feet and your parachute, instead of gliding, descends straight down. There is no wind. In such conditions if you opened directly over the target, you would land on it. If we add a ten mile per hour wind, the spotter would have to determine how far the unsteerable parachute would drift and plan for the jumper to open that much further up wind of the target. Now let's say he has three parachutists leaving at ten second intervals. He must plan the initial exit so that all three will land as close as possible to the target: the first would be short of the target, the second right on, and the third would be long. In our case, the spotter is looking down from 12,500 feet, has to guess about the wind, and has only a rough idea of how long each group will take to exit. Fortunately square parachutes are maneuverable enough to compensate for the variables. As a novice you will usually leave late in the exit order which means that for you the spot will usually be long. This can be useful, because it means all you have to do is locate the landing area and fly towards it. As you do you can think about the wind line (remember chapter one) and check for other wind indicators such as wind socks, the shadows of clouds moving over the ground, smoke or dust, and the direction other parachutes are landing. You need to do this, because the wind is the second variable you need to think about. On a calm day, your ground speed will be the same as your canopy's forward speed - about 20 miles per hour. But when there is any wind, it will affect your ground speed. If the wind is blowing five miles an hour, you are now in a river of moving air. You don't feel like your speed changes, because your air speed is the same. But your ground speed is not. Facing into the wind, or holding, your ground speed is reduced by five miles per hour. When you turn and fly with the wind, called running, you add the wind speed to your canopy speed, resulting in a ground speed of 25 miles per hour. Test yourself:1. When you are crabbing (flying at 90 degrees to the wind) in a 10 mile per hour wind, what will your path over the ground look like? 2. The slowest your parachute can go is about five miles per hour in full brakes. Flying into a ten mile per hour wind, what would your ground speed be? Proceed to Chapter 7 (Landings)
 -
 ByNadene Beyerbach Want to improve your skydiving skills, but don’t have thousands of dollars to blow in the wind tunnel? Try yoga! Yoga has been around for thousands of years. What is commonly considered yoga in Western society is actually Hatha Yoga, focusing mainly on physical yoga postures. However, yoga is not just a series of postures or poses. Yoga is meant to integrate the mind, body and spirit, and to achieve a state of enlightenment. For skydiving, this means developing your insight, awareness and focus, as well as balance, flexibility and stability. Not just an effective exercise for improving skydiving skills, yoga is also extremely convenient to practice at the dropzone. The simplicity of yoga means that you can do it virtually anywhere and need very little to get started. The most important thing you can do is wear comfortable, loose fitting clothing that you’re able to move easily in. A yoga mat is ideal, since it will allow you to grip with your feet and go deeper into the poses. However, poses can be done on grass, a towel or a blanket, if necessary. You can experiment with different yoga postures, breathing, meditation and relaxation exercises to see how they affect your skydiving. Try the following to get started: Complete Breath: A complete, “three part” breath consists of deep, continuous breathing through the nose. It is referred to as “three part” breath because you breathe first into the throat, expanding through the ribs, then deep into the belly. Slowly exhale, drawing the belly back in. Slow, deep breathing both energizes the body and calms the mind. Try using complete breathing when you’re concentrating on flying a body position that requires a lot of effort. For a relaxed and stable exit, you can also try exhaling completely as you leave the aircraft. Meditation/Relaxation: Simply close your eyes and focus on your breathing. Let your mind go blank. As thoughts enter your mind, just return your attention to your breath and let the thoughts float away. Meditation reduces stress and tension and improves concentration. Try meditating for a few moments on the ride to altitude before you begin any mental rehearsal. This will allow you to visualize your intention for the jump from a calm and centered place. Physical Postures: There are many different types of yoga postures to explore. Standing poses, seated poses, forward bends, back bends, twists, inversions (upside down poses), balance poses and relaxation poses are just some of the different types of postures. Let’s take a more in-depth look at sun salutations, twists, inversions and balance poses. Sun Salutations are an ideal warm-up for skydiving. Sun salutations are made up of a series of poses, flowing continuously from one move to the next. As you move through the poses be sure to hold each one for a few deep breathes. Begin by standing with your shoulders back and body properly aligned (Mountain Pose). Taking a deep breath, stretch your arms overhead, then fold forward at the hips and let your head hang toward the ground (Forward Fold). Step back with your left foot into a lunge. Follow with your right foot, pushing into your hands and feet to create an inverted V shape (Downward Dog). Lower your body toward the ground (Plank), then straighten your arms, looking up and lifting your chest toward the sky (Upward Dog). Now return to your starting position: Push back into Downward Dog, lunge on the right leg, fold forward, and finish by inhaling deeply in Mountain Pose. Try this sun salutation before gearing up for your next jump. You’ll instantly increase circulation, mobility, and flexibility. Twists offer back relief for skydivers who do a lot of bellyflying. If you spend a great deal of time arching, try a Half Spinal Twist to release tension in your back. Sitting down, bend your right leg to bring your foot toward you. Lift your left foot and place it on the outside of your right knee. Looking over your left shoulder, place your left arm behind you and your right arm around your knee. Breathe deeply and twist through your spine. Along with relieving tension, spinal twists will increase flexibility in your back and neck to help you further improve your RW skills. Inversions are poses performed upside down (with your feet above your head). They improve circulation and increase the flow of oxygen throughout the body. Inversions allow you to become comfortable in an upside down position and to work on balance with your center of gravity above your head. To try the Half Shoulder Stand, lie on your back and pull your knees to your chest. Support your back with your hands and straighten your legs above your body. Your weight should be on your shoulders, not your neck. Breathe deeply and remain strong through your core to help you balance. The Half Shoulder Stand is an excellent inversion to work on if you’re learning to fly head down. Balance Poses deserve special attention when it comes to skydiving. There is no better way to develop balance, strengthen stabilizer muscles, and increase mind-body awareness. Warrior 3 (also known as Airplane) is a good pose to begin working on your balance. Start by standing tall and lifting your arms to shoulder-height. Place your weight on one leg, lifting the opposite leg and leaning forward until you form a straight line. Hold for a few deep breathes, then repeat on the opposite side. Holding a balance pose will quickly make you aware of your alignment and body position. If you do any freeflying, adding balance work to your routine could give you the edge you’re looking for. Enjoy your adventures in yoga! Test out the suggestions in this article and continue to experiment with different postures to find what works best for you. Always work at your own pace and stop if you experience any pain or discomfort. Remember, it’s about the journey, not the destination, so don’t worry if you’re not an expert right away. To learn more, consider attending a yoga class or inviting an instructor to teach at your dropzone. With practice you’ll start to notice improvement in your skydiving skills through increased mind-body awareness, balance, focus and control. Keeping your body strong and flexible will also help to protect you from hard openings and not-so-perfect landings. Blue skies, or as we say in yoga, Namaste. Nadene Beyerbach is a skydiver and yoga instructor. She is certified by Body Training Systems as a Group Centergy instructor and is a member of the Canadian Yoga Association. Learn more about skydiving specific yoga at Flex Fly.
 -
Wikipedia describes the phenomenon as follows: 'Risk homeostasis is a psychological theory developed by Gerald J.S. Wilde, a professor emeritus of psychology at Queen's University, Kingston, Ontario, Canada...the theory of risk homeostasis states that an individual has an inbuilt target level of acceptable risk which does not change. This level varies between individuals. When the level of acceptable risk in one part of the individual's life changes; there will be a corresponding rise/drop in acceptable risk elsewhere. The same, argues Wilde, is true of larger human systems (e.g. a population of drivers).' Through the comparison of relevant Sky Diving statistics, recent studies in the field of risk homeostasis show that the introduction of a safety feature does not necessarily improve the generalredistribution This phenomenon, due to a type of 'risk redistribution', was researched by Sky-Diving academics who spotted strange fatality rate fluctuations migrating back and fourth between open canopy fatalities, 'no pull' and 'low pull' cases and others, depending on the adoption of certain safety feature at that time. The study employed the Cypres (Cybernetic Parachute Release System) Automatic Activation Device (AAD) as an example, which is specifically designed to deploy the reserve parachute at the required altitude, in the event of timing neglect by the jumper. Risk homeostasis shows that varying individual trends toward risk adjustment become displaced by the introduction of a safety feature. The concept results an inadvertent psychological neglect of natural automated adjustments to these barriers. This leads to a generalised lowered level of risk, instead of unique to the area in which the safety feature is applicable. The risk then becomes distributed across parameters and is referred to as 'accident migration'. When this in turn was applied in relation to levels of perceived risk, it was noted that; 'Skydivers adjust their behaviors to maintain arousal at optimal levels'- a behavioral modification linked to inadvertent risk displacement. Levels of risk vary from one person to another and are adjusted in accordance so as to maintain a level of comfort most acceptable to the individual. On the other end of the spectrum, however, more risk can be introduced if the threshold is too low in comparison to what the individual is used to. In other words, the tendency to take less precaution in presence of a safety measure does not necessarily result in a balanced distribution of risk and as a direct result, risk is inadvertently lowered in other areas. Where there may have been a decrease in 'low pull' or 'no pull' fatalities due to this mechanism, the open canopy fatalities increased, and the introduction of open canopy safety features appeared to coincide with an increase in landing fatalities. A correlation can be seen concerning traffic accidents, where most of the evidence for risk homeostasis originates. Studies have shown that 'pedestrians are twice as likely to be killed in a painted crosswalk as in an unmarked one' and that driver side airbags in actual fact contributed to driver behaviors that increased accidents and fatalities. Needless to say, the field of skydiving is a popular target for academic study on the topic of researching risk whether perceived or real. Sensation seeking provides the blueprint for studying risk-taking in social, legal, physical and financial for the sake of such experience. It has been found that personality types within this sphere can be genetically characterized by an elongated version of the DRD4 gene which regulates the production of dopamine and effects pleasure and emotion. It should therefore come as no surprise that when comparing skydivers to non-skydivers it was found that the former have lower levels of death anxiety, which in turn lends itself to higher levels of target risk. It was also found that Skydivers accept significantly higher levels of risk and that 'More experienced skydivers monitor the risk perceptions of the beginning skydivers in their subcultures.' Further research will be conducted into how to enforce precautionary measures within the parameters of these findings. To read the original case study visit www.vicnapier.com Original Authors:Napier, Vic Pima Community College Findley, Carolyn Sara (Casey) Auburn University Montgomery Self, Donald Raymond Auburn University Montgomery
-
 Most skydivers exercise some form of mental preparation on the way to altitude. What most do not realize is how incredibly important this is. The mental state that we are in prior to exiting the airplane determines how we respond to any given situation, and this response is the most important contributing factor in how the situation ultimately evolves. In other words, mental preparation is every bit as important as a pin check. What is Meditation?It must first be clarified that the specific method of meditation is not important for the purposes of this discussion. There are many ways to attain a calm internal dynamic, and there are no wrong ways to meditate. The goal of meditation is simple. We are striving to calm the mind, and develop a state that is devoid of thinking so we may calm back down to our state of basic sanity and health. This can be achieved through sitting practice, or through deliberate focus of attention toward a simple task such as walking or yoga. All of these pursuits result in the same kind of brain activity, which happens to be the direct opposite of the fear state. In the emotional experience of fear, the brain becomes unbalanced. Certain parts of the cortex become deactivated, while others, most notably the older structures such as the Amygdala, become awakened. These ancient brain areas cause an unconscious escalation toward a preparatory "sympathetic" response, rather than the healing, balancing forces of our "parasympathetic" systems. Interestingly, the first part of the brain to show significant diminished functionality during a fear response is the pre-frontal cortex. This is the newest part of the brain, responsible for higher cognitive functioning and is the source of willed action. This means that when we are afraid, we are no longer in control of our actions. Our choices gradually become dominated by our old brain that only knows three things: Fight, Flight and Freeze. In walks the "parietal lobe" of the brain. Located on the crown of the head, this is the spatial orientation area. When the parietal lobe is working to help us orient ourselves in the world, we are not in a state of rest. When this part of the brain is under-stimulated or deprived of input, however, the quiescent (calming) systems of the mind and body take over to cool us down. When the visual information coming into the visual cortex is interpreted by the parietal lobe, there are aspects of our visual experience that have not changed in the recent past. These aspects of our reality become "base frame", which is to say that we stop paying attention to them. When this occurs to a majority of the visual data, the parietal lobe is said to be in a state of "Deafferentation". (Newberg, 2001) Deafferentation may be the cause of the altered states reported by mystics and spiritual seekers of all cultures. The common denominator across all the spiritual practices is the lack of changes in the data set coming into the visual cortex. This is accomplished simply by gazing in one particular direction for a long period of time. When the parietal lobe is deprived of neural input, our parasympathetic processes begin to transform our state of consciousness, as demonstrated in brain scans such as SPECT and functional MRI. The resulting brain activity is most notably different from our normal waking consciousness, called "beta" activity. In fact, experienced meditators exhibit extremely balanced activity throughout the brain, referred to as "gamma synchrony" (Davidson, 2004). Further studies have shown that the balance of activity in the parietal lobe is significantly different from that experienced in "normal" consciousness (Newberg, 2002). The interesting thing about the results of the many studies on meditation is the fact that repeated exposure to the meditative state seems to increase the effect. Buddhist monks with considerable meditation practice showed a much higher level of gamma synchrony than subjects with no previous experience (Davidson, 2005). It seems that practice really does make perfect. What does this mean for you and me? These studies show that we are actually able to alter our brain's activity, and prevent stress from diminishing our cortical activity to the capacity of a caveman. All we need to do is take the time to practice a new way of operating our minds. Although there are many different methods of meditation, there are common aspects across the techniques that seem to create the most powerful effect. Following are some of the common elements. Minimal change to the visual field, eyes open Focusing on the breathing, particularly the out-breath Balancing the posture to prevent physical discomfort Letting go of thoughts as they come Returning to the present momentWhen you exit an aircraft in flight, you are going into battle. You must prepare in every way that you can to defend yourself against planetary impact. The most important tool of all is your awareness. When your mental speed increases due to fear or anything else, you are a danger to yourself and everyone near you. How you find your way to the meditative state is your business. Your rituals are your personal avenue to the calm state, and it will look different for everyone. All that matters is that you take the time before each jump to cool out and let go of your thinking. That way, when some unconsidered possibility comes your way, you are relaxed and in balance, ready for anything. BSG Portions of this article are excerpts from Brian Germain's new book, Transcending Fear, 2nd edition. For more information regarding meditation as a tool for fear abatement and performance optimization, go to: www.TranscendingFEAR.com
 -
How do you perform a canopy controllability check? What happens if you flare too high? How do you prevent that? What is your decision altitude? What does that term mean? How do you recognize a good canopy? How do you get the slider down if it's stuck partway up? How do you deal with closed end cells? How do you fix line twist? How do you use your reserve if you need it? How do you handle a horseshoe malfunction? How can you avoid losing sight of your reserve handle during a cutaway? What do you do if you’re in the plane and your jumpmaster tells you "BAIL OUT ON YOUR MAIN?" What do you do if your parachute deploys prematurely in the plane? How can you prevent this from happening? If you find yourself still in freefall and the altimeter needle is in the red, what do you do? If you're in freefall, and you're unstable but you're still above 5000 feet, how do you get stable again? If you find yourself in freefall at 5000 feet and you're unstable, what do you do? What do you do if two canopies are out? How do you control them? When would you cut one away? What would you do if the pilot chute goes over the front edge of the canopy? How do you handle a hard-to-pull main ripcord? If you start having some kind of serious problem during the freefall, how do you stop the skydive? If you see your jumpmaster pull, what does that indicate? What do you do if you can't find the main ripcord? How do you steer your canopy? How do you flare it? How is your reserve canopy different from your main? How do you collapse your canopy after landing to avoid being dragged? How do you prepare for a landing in trees? Rough terrain? Water? How do you determine wind direction? What direction should you land in with relation to the wind? How do you find the landing area? What do you do if you realize you will not be able to make it back to the landing area? What is the hand signal for pull? Check-altitude? Legs-out? Hips-down? Relax? What is your pull altitude on this dive? What are the manuevers you'll be expected to perform on this dive? IF YOU DON'T KNOW THE ANSWERS TO THESE QUESTIONS, ASK A JUMPMASTER BEFORE YOU JUMP! REMEMBER, YOUR SAFETY IS IN YOUR HANDS.
-
INTRODUCTION TO SKYDIVING JUMP SEQUENCE: When jumpmaster says "GET INTO POSITION", take your position in the door. You should be facing forward, with your left foot on the edge of the door. Keep your back low to avoid snagging your rig on the top of the door. When you are ready to exit, turn to your right and shout "CHECK IN!" to your main side JM. The JM will respond "OK!" and nod his head when you are ready to go. Do the exit count - "Ready! Set! Arch!" On "Arch!" step to the left, out of the plane. Try to remain facing forward, and try to hit the wing with your pelvis as you leave the plane. Remember to ARCH! Count to four, maintaining a hard arch - "One thousand! Two thousand! Three thousand! Four thousand!" Do three practice ripcord touches - "Arch! Reach! Feel! Back to arch!" Check your altitude by turning your head to look at the altimeter on your left hand. Look at your main side jump master and shout your altitude at him - "Ten thousand feet!" Respond to any hand signals your main side JM gives you. Check your altimeter once every five to ten seconds, and shout your altitude to the main side JM each time. At 5000 feet, wave off once, then arch-reach-feel-pull. Hang on to the ripcord after the pull! Start counting - "One thousand! Two thousand! . . . . . . Five thousand!" to give your parachute time to open. Check your canopy to make sure you have a good parachute, unstow your brakes, and head back to the landing area. PERFORMANCE STANDARDS: Freefall awareness - Open your eyes and look around! Pay attention to hand signals. Altitude awareness - Check your altimeter once every 5-10 seconds, and tell your JM your altitude. Stability - Maintain the arch during the entire dive, especially on exit. Canopy control - Check your canopy upon opening, and listen to the radio during the descent. LEVEL ONE HINTS: To fix stability problems - ARCH! Check your altimeter at least once every five seconds. Time goes fast up there. Remember to keep your legs out. Don't let them collapse on your butt. REMEMBER THE MOST IMPORTANT PARTS OF ANY SKYDIVE: PULL! PULL AT THE RIGHT ALTITUDE! PULL STABLE! LAND SAFELY UNDER AN OPEN CANOPY! Before Level 1 Level 2 Level 3 Level 4 Level 5 Level 6 Level 7
-
FORWARD MOTION JUMP SEQUENCE: When jumpmaster says "GET INTO POSITION", take your position in the door. You should be facing forward, with your left foot on the edge of the door. Keep your back low to avoid snagging your rig on the top of the door. When you are ready to exit, turn to your right and shout "CHECK IN!" to your main side JM. The JM will respond "OK!" and nod his head when you are ready to go. Do the exit count - "Ready! Set! Arch!" On "Arch!" step to the left, out of the plane. Try to remain facing forward, and try to hit the wing with your pelvis as you leave the plane. Remember to ARCH! Count to four, maintaining a hard arch - "One thousand! Two thousand! Three thousand! Four thousand!" Do three practice ripcord touches - "Arch! Reach! Feel! Back to arch!" heck your altitude by turning your head to look at the altimeter on your left hand. Look at your main side jump master and shout your altitude at him - "Ten thousand feet!" Respond to any hand signals your MS JM gives you. When you see the "forward motion" signal (legs-out signal, moving away from you) do forward motion for six seconds - hands back by your waist, legs straight, toes pointed. After six seconds, return to a neutral arch. Don't bring your feet up too much! Check your altimeter. If below 6000 feet, shake your head - no more manuevers. At 5000 feet, wave off once, then arch-reach-feel-pull. Hang on to the ripcord after the pull! Start counting - "One thousand! Two thousand!" to give your parachute time to open. PERFORMANCE STANDARDS: Move forward through the sky by straightening your legs and bringing your arms back. Do three good PRCP’s to help you find the ripcord later. Pull at the right altitude. Maintain stability by keeping the arch. LEVEL TWO HINTS: To fix stability problems - ARCH! Make sure your legs are still out a little after each forward motion. Check your altimeter at least once every five seconds. Time goes fast up there. Your legs are 80% of your drive during forward motion. Make sure you get them out there. REMEMBER THE MOST IMPORTANT PARTS OF ANY SKYDIVE: PULL! PULL AT THE RIGHT ALTITUDE! PULL STABLE! LAND SAFELY UNDER AN OPEN CANOPY! Before Level 1 Level 2 Level 3 Level 4 Level 5 Level 6 Level 7
-
 Napoleon Skydiving Center: Level 1 - Free ArmThis dive is intended to be an introduction to skydiving. As such we will leave plenty of time to just arch and enjoy the experience. Concentrate on a good, relaxed arch, but don't forget to have fun. Remember to hang on to that ripcord at pull time. TLOs Perform a controlled exit. Exposure to continuous freefall. Heading awareness. Focused awareness and attention. Coordinated body movements with 3 practice pulls from free arm. Altitude awareness. Actual ripcord pull by 4000 feet. Dive Flow Running DescriptionHotel Check: Check In, look to left and wait for a nod. Check Out, look to the right and wait for a nod. Exit Count : On the C-128, the count is Prop, Up, Down, Arch. On the Twin Otter, it is Center, Out, In, Arch. In both cases the count should include both the verbal commands and the physical motions. Exit: Step off of the aircraft and push hips forward, chest forward, head back, and arms and legs to "boxman" position. HARM Check: Also called a Circle of Awareness or Circle of Observation. Heading, look forward and down at a 45 degree angle to ascertain heading. Altimeter, read the altitude on the chest-mounted altimeter. Reserve, look at reserve side jumpmaster and wait for a nod. Main, look at main side jumpmaster and wait for a nod. PRCT: A practice ripcord touch. Arch, insure a good arch at hips and chest. Look, tilt head to the right and look down the side of the body at ripcord. Reach, in with the right hand to place it over the ripcord handle while extending the left hand one foot over your head. Touch, recover to an arched position. Check, over right shoulder. Short Circles: Heading, Altitude, Reserve, Main. Performed throughout the dive to maintain awareness (indicated by the dotted lines on the dive flow). No nods from JMs. 5-5 Signal: An altitude awareness signal performed by the student at 5500'. The signal is given by closing the hands twice in quick succession. Pull: Arch, Look at ripcord, Reach for ripcord with right hand while extending left hand over head, Pull ripcord, Arch, Check over right shoulder for pilot chute launch. Primary Canopy Check: Performed five seconds after the Pull. The main canopy is checked overhead for Shape (rectangular), Spin (not spinning), Speed (floating, not falling), and Twists (spread risers and kick out). Release Toggles: by grasping them and pulling them quickly to the waist. Secondary Canopy Check: Slider Down, Endcells Open, Rips/Tears, Broken Lines. Controllability Check: Execute a turn in each direction and then a flare. Canopy Control: Locate the Airport and then the landing area. Fly back using the halfway down, halfway back rule. Watch your jumpmasters canopies. Setup For Landing: The landing setup consists of three legs: Downwind: Starting at 1000' fly to the downwind side of the target. Base: By 500', begin crabbing across the wind downwind of the target. Final: By 200', turn into the wind and fly towards the target. Once on final, no turns in excess of 45 degrees should be attempted. Prepare to Land: At 50', feet and knees together, toggles at ``full flight''. Flare:: At approximately 10', bring both toggles smoothly to your crotch, keeping your feet and knees together. If the flare occurs prematurely, slowly raise the toggles to your stomach, then re-flare at 10'. PLF: Parachute Landing Fall. Keeping feet together and hands in, roll with the landing taking the force on the fleshy parts of the body (feet, calves, thigh, butt, back/shoulder). Collapse the Canopy: by reeling in a toggle and running to the downwind side. Field Pack: the canopy, turn off the radio and AAD, return to the student packing area with the jumpmasters. Return: the helmet, goggles, altimeter, jumpsuit and radio. Congratulations You've just made your first skydive! Hand Signals Level 1 Level 2 Level 3 Level 4 Level 5 Level 6 Level 7 Level 8
 -
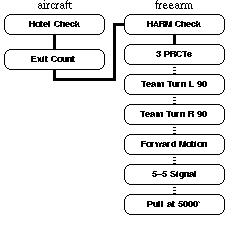 Napoleon Skydiving Center: Level 2 - Body AwarenessNow that you have your feet wet, we will start working on trim maneuvers. There are a lot of things to accomplish on this level, so don't waste time geeking the camera. Once you are under canopy, try a few spiral turns (above 1500' please). TLOs Maximum free arm time. 3 PRCTs. Heading awareness during freefall. Trim control or body awareness exercises. Relaxed, arched body position through entire freefall. Pull by 3500 feet, look over right shoulder to observe pilot chute launch. Dive Flow Running DescriptionHotel Check: Check In, Check Out. Exit Count: C-182 Prop, Up, Down, Arch; Otter Center, Out, In, Arch. HARM Check: Heading, Altimeter, Reserve JM, Main JM. PRCT: Arch, Look, Reach, Touch, Check 3 times. Short Circles: to maintain altitude awareness between maneuvers. Team Turn: initiated by looking over the arm in the direction of the desired turn to pick a heading refrence. Then bend his/her upper body 20 degrees at the waist in the direction of the turn. At the same time, drop the shoulder the turn is moving toward by 2-3 inches. Keep hands and arms still -- all motions are preformed from the waist. As the desired heading is aquired, return to a neutral boxman position. Forward Motion: initiated by extending legs (straightening them at the knees) while simaltanously bending arms at the shoulders to form a 'lazy W'. Hold for 3 seconds and return to a neutral boxman position. 5-5 Signal: at 5500 feet. Pull: Arch, Look, Reach, Pull, Check at 5000 feet. Primary Canopy Check: Shape, Spin, Speed, Twist. Release Toggles Secondary Canopy Check: Slider, Endcells, Tears, Lines. Controllability Check: turns and flares OK. Canopy Control: halfway down, halfway back. Setup For Landing: Downwind at 1000', Base at 500', Final at 200'. Prepare to Land: at 50'. Flare: at 10', feet and knees together, PLF if necessary. Collapse the Canopy, Field Pack, and Return. Level 1 Level 2 Level 3 Level 4 Level 5 Level 6 Level 7 Level 8
 -
TURNS JUMP SEQUENCE: When jumpmaster says "GET INTO POSITION", take your position in the door When you are ready to exit, turn to your right and shout "CHECK IN!" to your main side JM. The JM will respond "OK!" Do the exit count - "Ready! Set! Arch!" On "Arch!" step to the left, out of the plane. Count to four, maintaining a hard arch. Do one practice ripcord touch - "Arch! Reach! Feel! Back to arch!" Check your altitude. Look at your main side jump master and shout your altitude at him - "Ten thousand feet!" Your main-side jumpmaster will give you the left turn signal. When he does, look left, then turn left and face the reserve side jumpmaster. Check your altimeter. Your reserve side jumpmaster will give you a turn signal, either left or right. Look in the direction you want to turn , pick a landmark, and then turn 90 degrees towards it. Check your altimeter again. If below 6000 feet, shake your head - no more manuevers! At 5000 feet, wave off once, then arch-reach-feel-pull. Hang on to the ripcord after the pull! Count to five then check your canopy. PERFORMANCE STANDARDS: Do slow, controlled turns in each direction. Make sure you stop where you want to stop. Maintain good stability throughout the dive. Maintain altitude awareness by looking at your altimeter after every manuever. Respond correctly to all signals. Solo stable ripcord pull at the right altitude. Fly your canopy back to the LZ and land with minimal radio assistance. LEVEL THREE HINTS: To fix stability problems - ARCH! Remember - your body follows your eyes. Look, then turn. Keep your legs out and steady! Unwanted leg movement can keep you from turning. REMEMBER THE MOST IMPORTANT PARTS OF ANY SKYDIVE: PULL! PULL AT THE RIGHT ALTITUDE! PULL STABLE! LAND SAFELY UNDER AN OPEN CANOPY! Before Level 1 Level 2 Level 3 Level 4 Level 5 Level 6 Level 7
-
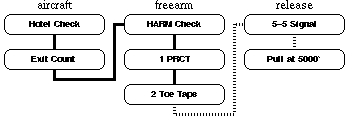 Napoleon Skydiving Center: Level 3 - Release DiveThis is the last of the two jumpmaster levels. If things go well, your jumpmasters will let go of you and you'll be skydiving unassisted for the 5-5 and pull. Stay relaxed and maintain a good arch. Pay careful attention during the pre-jump gear checks since you will soon have to know how to do one on your own. Likewise begin observing the packing procedure. Under canopy you should try a stall above 2000'. After you successfully complete this level, you should become a USPA member by filling out the application provided at manifest. TLOs Leg awareness and control modes. Heading maintenance. Hover control. Unassisted solo pull at or above 3000 feet. Dive Flow Running DescriptionHotel Check: Check In, Check Out. Exit Count: C-182 Prop, Up, Down, Arch; Otter Center, Out, In, Arch. HARM Check: Heading, Altimeter, Reserve JM, Main JM. PRCT: Arch, Look, Reach, Touch, Check. Toe Taps: Tap toes together twice to insure leg awareness. Short Circles: to maintain altitude awareness. Hover Control and Heading Maintaince: using principles of turning and forward motion. 5-5 Signal: at 5500 feet. Pull: Arch, Look, Reach, Pull, Check at 5000 feet. Primary Canopy Check: Shape, Spin, Speed, Twist. Release Toggles Secondary Canopy Check: Slider, Endcells, Tears, Lines. Controllability Check: turns and flares OK. Canopy Control: halfway down, halfway back. Setup For Landing: Downwind at 1000', Base at 500', Final at 200'. Flare: at 10', feet and knees together, PLF if necessary. Collapse the Canopy, Field Pack, and Return. Level 1 Level 2 Level 3 Level 4 Level 5 Level 6 Level 7 Level 8
 -
RELEASE DIVE JUMP SEQUENCE: When your jumpmaster says "GET INTO POSITION", take your position in the door. There will be no reserve side JM on this dive. When you are ready to exit, turn to your right and shout "CHECK IN!" to your main side JM. The JM will respond "OK!" and nod his head when you are ready to go. Do the exit count - "Ready! Set! Arch!" On "Arch!" step to the left, out of the plane. Count to four, maintaining a hard arch. Do one practice ripcord touch. Check your altitude. Your JM may give you hand signals, and will then move in front of you. If everything is going well, and you seem stable, your JM will release you and fly 5-10 feet in front of you. Maintain hover control. If you slide backwards away from the JM, use forward motion to correct. Maintain heading. If you seem to be turning away from the JM, turn back towards him At 6000 feet, shake your head. Your JM will move back beside you when he sees this. Do not follow! Wave off and pull at 5000 feet. Count to five and check your parachute. PERFORMANCE STANDARDS: Maintain heading control by using your turning skills Maintain forward/back control by using your forward motion skills Stay stable by holding the arch throughout the dive Pull on your own at the right altitude. Hold the arch through the pull. Fly your canopy back to the LZ and land with no radio assistance. LEVEL FOUR HINTS: To fix stability problems - ARCH! Remember - pull at 5000 feet NO MATTER WHAT! Do not attempt to get stable if you find yourself on your back at 5000 feet. PULL IMMEDIATELY! REMEMBER THE MOST IMPORTANT PARTS OF ANY SKYDIVE: PULL! PULL AT THE RIGHT ALTITUDE! PULL STABLE! LAND SAFELY UNDER AN OPEN CANOPY! Before Level 1 Level 2 Level 3 Level 4 Level 5 Level 6 Level 7
-
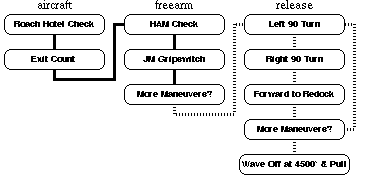 Napoleon Skydiving Center: Level 4 - Turns to RedockCongrats, you are halfway through the AFF program. In the aircraft you should be paying careful attention to the spotting procedures. On the ground, you should be well along learning how to do a JMPI and packing. Under canopy try using risers (front and rear) for control up high. Though you are still a student, you should start preparing for the time when you will be off student status and jumping on your own. Safe skydiving requires good equipment. Begin talking with your instructors and other jumpers about what type of equipment you should purchase. It is recommended that you start by ordering an appropriately sized jumpsuit, helmet, goggles and altimeter. In fact, you can begin using these items before you complete the AFF program. TLOs Start and stop controlled turns. Forward motion to redock. Wave off, then pull at or above 3000 feet. Dive Flow Running DescriptionRoach Hotel Check: Check In, but no check out. Exit Count: C-182 Prop, Up, Down, Arch; Otter Center, Out, In, Arch. HAM Check: Heading, Altimeter, Main JM. JM Gripswitch: Jumpmaster switches from side to front. More Maneuvers? Check Altimeter, if above 6000 feet signal with a nod yes. If below 6000 feet signal with a head shake no. In either case, JM has the final authority. 90 degree Turns: performed using a combination of bending and tilting the upper body. Initiate by looking over the arm in the direction of the turn. Bend upper body toward the turn at the waist and tilt shoulders by raising the shoulder opposite the direction of the turn by 3--4 inches. Keep arms in the same position at the shoulders and elbows, all motion should originate at the waist. Recover to box man as new heading is attained. Forward to Redock: At the completion of the 2nd turn, the JM will back up from 5--10 feet. Move forward by extending legs at the knees and bending arms at the shoulders. Keep elbows locked at 90 degrees. Hold position until redocked on JM, then recover to boxman. More Maneuvers? Yes if above 6000, else no. Wave Off: at 4500 feet by crossing hands above head twice with a large sweeping motion of the arms. Pull: at 4000 feet. Primary Canopy Check: Shape, Spin, Speed, Twist. Release Toggles, Secondary Canopy Check, Controlability Check. Canopy Control: halfway down, halfway back. Flare at 10 feet, knees together, PLF if necessary. Collapse the Canopy, Field Pack, and Return. Level 1 Level 2 Level 3 Level 4 Level 5 Level 6 Level 7 Level 8

