
Tuiske
-
Content
32 -
Joined
-
Last visited
-
Feedback
0%
Posts posted by Tuiske
-
-
I haven't done any changes to trim yet but last weekend I was able to put seven more jumps with this canopy. I also bought Flysight to analyse flying. There was almost no wind that day and I got quite nice data from Flysight.
Here is one of the jumps with flysight data analysis:
https://skyderby.ru/tracks/11453/video
And bonus footage.. flare power!
https://www.instagram.com/p/BWXo3roFNju/?taken-by=skydive_tuke
You can follow me on Instagram if u want ;)IG @skydive_tuke -
QuagmirianFrom the looks of the images in your very first post, it looks as though you might have rotated your rib about the horizon rather than a line parallel to the bottom skin or angle of attack. This is what I or Lee would call a negative 'twist' where the panels are narrower at the front, and it's a bad idea.
It was like that on my very early design, even before than 10,4sqft prototype.Quagmirian
The end cells of any canopy naturally have a lower angle of attack anyway, so if you twist the canopy, it makes sense to make it zero (like I have done) or positive...
Hmm I don't get this. If I understand what you are meaning it is something about "rotating line"? Airfoil shape is rotated around line, which is parallel to bottom surface seams. Maybe that line should be more like to be parallel with flight path line?
...I don't know, I'm still thinking this front corner problem is in brake lines or in stabilizers.IG @skydive_tuke -
RiggerLee.....So I'm not sure this is a trim issue. You might be able to address it that way but I don't think that is where the problem lies. Ultimately I think it might be in the plane form and how you generated your panels.
At first, thank you Lee for such a good analysis for my problem. Today I watched really carefully all the photos and videos I have, and I think you could be right on that thing. Maybe this problem is not a trim issue. I guess it could be brake like and/or stabilizer problem. Outer line of the cascaded brake lines could be couple of inches too short? It pulls the trailing corner quite a lot even on shallow brakes. And when that happend, stabilizer starts to make weird wobbling.
When making harness turns, canopy flies really well without any issues.
Harness turns: https://youtu.be/8XFHtFNQFbc
Opening the brakes: https://youtu.be/_Jieg4EvjBk
Also photo: outer-brakelines.jpgRiggerLee
It might help to think about the line that you rotated the airfoil around when you generated your panel shapes. Rather then it being horizontal maybe you should angle it along the glide angle for instance.
This line is align with bottom surface of the airfoil. These pictures are from final design of the canopy and these shows a lot of how I designed it.
side.jpg <---this is maybe most important
top.jpg
front.jpg
center-rib.jpg
ribs_1-2,5.jpg
top_surface_1-2.jpgRiggerLee
.....I think the problem is in the panel set. I'm not sure it's a big deal but it may make your end cells more vulnerable to rolling under in turbulence like when you are on approach preticually if you make small break inputs like on final.
...could be true...RiggerLee
The trim change you are suggesting would basically make the nose a bit steeper. You don't really shift the location of the cascade point. It finds that balance on it's own.
That is true, but I think when moving cascade point more forward, could give more tension to line which goes to nose. Because there is only 3 lines on outer edge, cascaded line from front riser to outer edge cascades more "widely" than lines to other cells. But I also find out that the cascade point on outer lines is already little bit more forward from "middle point". I didn't remember that I designed it like that already :) ..so is is good on bad to be like that? Hmmm..
photo: outer-lines-cascade-point.JPG
And here is some testing on brakes and random pulling from all lines. I wanted to feel how much there's a tension in every line.
https://www.youtube.com/watch?v=zo_9iuVjfsU
Thanks to Teemu Hietakari for taking awesome photos!
outside_cam_canopy.jpg
-TuukkaIG @skydive_tuke -
This "wobbling" is showing quite clearly on this video:
https://www.youtube.com/watch?v=_Xo-1aZOAnA
(opening on this jump was best one so far)IG @skydive_tuke -
I have now jumped 10 jumps with this canopy. Openings have been ok, but maybe a bit too fast for being perfect. I'm going to make bigger slider when I have time for that. Current slider is from Odyssey 100.
There's lot of power on brakes and it is possible to pull brakes all the way down before stalling point. Front risers feels nice! Recovery arc seems to be a bit longer than on my 107 Stiletto, hoho.
But I also find out some weird behaving. Front corners of the nose make small "wobbling" when giving small brake input (maybe on half brakes) but when adding more brake it will be gone. Also on full flight canopy flies well.
I'm thinking maybe I should move "dividing point" of the A-lines little forward. On the attached picture there is current line setup on black, and my proposal for fixing this problem on blue.
What do you think?IG @skydive_tuke -
d.dumanskiy***Fuck yeah! Finally did the first jump.
Very cool! What are your plans? What are you going to do next?
I'm going to jump more with the canopy. It's now in my rig. I also started to design new canopy as well. We will see some day is that new design going to be something real..IG @skydive_tuke -
I used SolidWorks 2015 for making 3d model. It was great tool to make surface model and it also has tool to make 2D patterns from 3d curved surfaces. It could be a pain to learn to use it if you don't have 3d modeling experience already. Canopy shape is not the easiest model to start that learning process. But good thing is that you can find heaps of tutorial videos from youtube to SolidWorks. I've been working as a 3d modeling engineer last 8 years so it was piece of cake for me to model this kind of thing ;)IG @skydive_tuke -
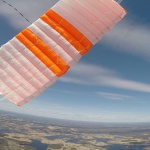
Same jump, different angle. I think from this video it's easier to see how it is flying.
Outside camera:
https://www.youtube.com/watch?v=oIzOlKLyfKUIG @skydive_tuke -
JerryBaumchen..Feels good doesn't it?
Jerry Baumchen
One of the best feeling what I have experienced. Definitely.IG @skydive_tuke -
Jump:
https://youtu.be/s5dbb_dEmbk?t=34s
(sorry about crappy raw footage)
Landing:
https://www.youtube.com/watch?v=4p-JUqff4Ms
I Can't tell how good was the feeling after that jump!IG @skydive_tuke -
Fuck yeah! Finally did the first jump.
https://s16.postimg.org/h4l60zdut/Sieppaa.jpg
..video is coming.IG @skydive_tuke -
pchapmanUsing the backpad mounted closing loop as a replacement for the top flap is simplistic but workable and clever. Saves building a flap.
But that lack of pin protection is a bit sketchy as RiggerLee said. It might be ok in a half full Twin Otter but scarier in a C-182. One would also need to be on good terms with the DZO to not get into trouble! (The more one has the trust of the DZO the sketchier the stuff they'll let you take on their expensive airplanes...)
The sharp turn of the cutaway cable when attaching the handle to the chest strap:
Easy to improve if you want - If the cutaway housings are tacked at their end, untack them there from the webbing, slide them out of the webbing loop they are in, and tack them higher up. Then one has a few inches one can bend gradually instead of making the cutaway cable do a sudden 90 degree turn.
Attached: extract from a selfie some years back, showing that feature along with the big cutaway handle I built.
Thanks a lot for the comments pchapman! I'm normally jump from C206 and if I'm sitting next to the door (first jumper) I think it's ok to not have pin protection flap. But I will think about that later.. could it be possible to built one to that kind of three flap desing?
For the DZO problem: my home DZ is not commercial and we don't have DZO. ..but I understand your point.
Cutaway housings are not tacked at the moment but they will be tacked. That loop handle looks nice on your photo but it looks also a bit scary to me. I feel it could be easy to make unintentional cutaway with that loop but it is sure easy to pull when you need it.IG @skydive_tuke -
Ok, I made belly container from old reserve container and it looks good to me. Whole setup feels quite messy when it's on my back with main rig, but I think that's the way it should be?
I made attachment straps for belly container from old reserve risers. Webbings are sewn into container and there is velcro for attaching "risers" to hip rings. I also made boc pouch for pilot chute.
How does that looks for you folks? Is there something I definitely should change?
And one more thing, I borrowed slider from Skylark Odyssey 100 and it fits fine. It is just narrow enough comparing to center cell width. I think I'm going to test jump with that slider.
I haven't done any plan yet for first jump. It's still quite cold outside and skydive season is not started yet.
Some pics...IG @skydive_tuke -
Two more pictures for you.IG @skydive_tuke -
Not so much has happend here after last post but today I had time for short ground testing. Some photos attached. I'm pretty happy how it looks and works.
pchapman and RiggerLee, thanks guys. I have to think once again how I'm going to attach third canopy to myself (safely). I still have reserve container with flaps from that harness and maybe it is possible to use it at the front with main canopy d-bag? I knot that shape of the reserve container is not perfect for main dbag but it should work if I add pocket for pilot chute?IG @skydive_tuke -
RiggerLeeWhat he means is that is the stitching of the bar tack gets above the upper seam where the bottom skin pannels spread it will start to form a stress point pinching the fabric. This is true but being level or just a bit above is not the end of the world. You will see this where one winds up just a bit high. If it's not pinching too much, odds are nothing will happen. If it's really high you might form a stress point and get a small tear at the corner. Basically it will releave it self and then stop. I've seen this on production canopies. It wasn't worth fixing. Hundreds of jumps on the canopy since then, no further tearing. Basically patching it would have been harder on the canopy the leaving it. By the way that was like half an inch high above the seam, old canopy done with a zig zag vertically, not a bar tack. Precision actually recommended centering a second bar tack on the upper seam, stitches above the seam line, in one of their service bullitons. I and others opposed this just be cause it's bad practice, and what if you're a little high? It also did not address the real problem. Bottom line, I recomend trying to stay between the seams, but I don't see any thing scarry there. It's a proto type, go jump it. If you start pulling out your "bar tacks", that's a lot of stitching and needle holes. It's hard on the fabric. Banging one of those in on top of another is not the greatest idea. Some times the "fix" is worse then the problem.
Oh, and the canopy looks awsome. Have you thought about how you're going to jump it? I don't supose you have a ring around with tirsh rings? It's not that hard of a mod. You could send an old rig in and have them installed. Or you could build or have built an independent harness to go under your rig. I like to wear the test canopy on the front and release it with a pare of cutaway risers. So three rings on the front of your harness, or sepperate harness, cutaway two point risers and then all the rest is the same. It's not perfect but trying to put all three on the back is a pain. You can also D bag the canopy out of the plane but the openings are funky. I don't like doing that. You can build the rings for the cutaway risers into the main risers and avoid tirsh rings but I've never liked that. Try to keep it as simple and clean as you can. By haveing an independent front mount for the test, every thing is seperat and independent. Less complexity in order of handle pull and perceadures.
Lee
I have to chech that is some of those bartacks above upper stitching line, and if so, how much above. I tried to sew them between stitching... but I'll check.
I'm not sure how I will jump it. Maybe I can use separate harness under my rig? I already have that kind of harness. It's made from old Wings rig, I just removed container and moved cutaway handle to chest strap because it's nice to have that handle in different location than "real" cutaway handle. But how should I pack the canopy? D-bag with pilot chute pocket at the front attached to some kind of velcro strap between hiprings? ..and deployment when back-flying?IG @skydive_tuke -
accumackIn your picture of line attach points at the canopy, the line attachment point looks like the zig zag is slightly above the stitch line of the seam. This will be a failure point.
Thanks for the comment.
Do you mean about the lower non loaded stitch line or loaded stitch line? And it could be failure point for stitching or what? There is also reinforcement tapes (about 6" long) inside those seams on line attachment points.IG @skydive_tuke -
Yesterday I finalized the lineset. Line attachment points are also done. I made all those "bartacks" with that same sewing machine and I'm not 100% happy with all of those, but I hope those are good enough. Here's some pics of the final phase. ..slider is still on the design table.
https://s29.postimg.org/5xpk3cspj/IMG_20170130_212842.jpg
https://s29.postimg.org/9ilfmkx93/IMG_20170130_212939.jpg
https://s29.postimg.org/utizqufdj/IMG_20170130_213112.jpg
https://s29.postimg.org/tsncfgnrr/IMG_20170130_213133.jpg
https://s29.postimg.org/3lm5ji5hz/IMG_20170130_213303.jpgIG @skydive_tuke -
Here is some new photos from yesterday. Next thing to do is line attachment points. The project has progressed a bit slowly but I'm already happy what I have already done.
https://s24.postimg.org/v3szewlbp/IMG_20170109_183118.jpg
https://s24.postimg.org/g94e0qbqt/IMG_20170109_183137.jpg
https://s24.postimg.org/i27ap1wxh/IMG_20170109_182822.jpg
https://s24.postimg.org/qlva0junp/IMG_20170109_183110.jpg
https://s24.postimg.org/s26sioxkl/IMG_20170109_182718.jpgIG @skydive_tuke -
JerryBaumchenThe top left seam does not need all three pieces of fabric to make the 180* turn, only the piece of fabric coming over from the right side needs to make this 180* turn to hide the raw edges. The other two pieces of fabric only need to make a 90* turn.
That makes sense to me. I just designed same size seam allowances to all pieces of fabric. Of course smaller to front edges on the nose. I have already leaned a lot of small things I could do better or wiser to next design. This thing about seam allowances is one of those things.JerryBaumchenThe bottom left seam does not need the three raw edges exposed. Trim them so that they are hidden within the seam.
Maybe I can do trimming after sewing but I still have to leave some exposed edges because I have already done half of those seams. I left too much seam allowance to those parts, but I think it's also fine like that. It only looks ugly with exposed raw edges?IG @skydive_tuke -
Sorry, I attached wrong picture of the seam. This is correct one. (I deleted that wrong picture from my last post.)IG @skydive_tuke -
RiggerLeeBy top seams do you mean the unloaded rib of the I-beam like you show there?
No.. I mean seams in loaded ribs. I have already done those as I showed.RiggerLeeYou know there has been a movement towards not doing that little under fold. Basically if you just leave the equivalent amount of fabric beyond the seam you can just scab it on.
I have seen those kind of seams in Skylarks canopies. But I also wanted to learn how to do "old style" seams. I didn't want to choose easiest way :D
Really? I didn't know that. But, if I'm going to make more canopies, I'm considering to do more simpler seams I guess?RiggerLee...I've seen canopies out of newzeland with just a single stitch line on the non load bearing ribs.
IG @skydive_tuke -
Some more pics.. I copied the basic stucture of the seams from my good old stiletto. It was little hard to sew those top seams
All of the top seams are now done and maybe 4 of the lower seams still under construction.IG @skydive_tuke -
QuagmirianNice. I look forward to seeing pictures of it put together. How are you transferring information like V tape locations and non loaded seams onto the fabric?
I marked locations from paper patterns to fabric with small waterproof pen. You may see those marking from some photos I uploaded.
All the tapes are now sewn and cross ports are also done. I cutted cross ports with regular small soldering iron. I sharpen it with file and it worked fine.
Here's few more photos...IG @skydive_tuke
Skylark new "EVO" canopies
in Gear and Rigging
Looks interesting indeed.. It would be nice to test jump those things.