

stevenblincoe
-
Content
25 -
Joined
-
Last visited
Never -
Feedback
0%
-
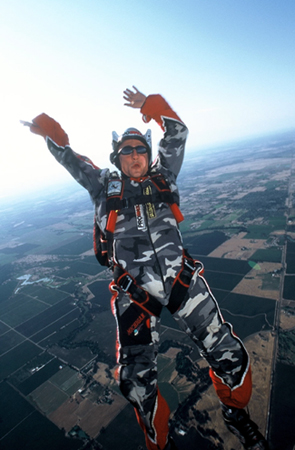 So, you can sit fly with your friends in a group or fly in a two way. The first step to being a free flier, Congratulations! Once you have reached this level you might ask yourself “what’s next?” Today is your lucky day because this article is for you! After you have learned the basic position which we will cover in a second, the skill set you want to learn is 6 points of motion and then docking. This will allow you to interact with your friend in the sky and not just be a base. Sit Fly: The PositionServing as an introduction to free fly, this position is pretty difficult to get without some instruction. The idea is to sit in the sky just like you are sitting in a chair with a few minor exceptions. First you want to have your legs about shoulder width apart. Second, you want to have your heels aligned with your knees as not to catch any air on your shins. The foot should be flat just like if you had it sitting on the ground. It is imperative to have even consistent heel pressure when you sit fly, or you will be on your toes which makes it difficult to improve your mobility. Keep your feet pointing straight forward at all times! In sit fly your body follows your heels and your hips so you need to have a strong platform to work from. Third, you must consistently have a 90 degree angle at your hips to fly strait down. Sit up not back. Pretend you have a string pulling your head strait up while keeping that 90 degree angle. Sitting up will then add a quaint arch to your torso which will help you keep from falling back. Lastly, relax your arms so they keep right at head level. Do not press down on your arms in the neutral position. Pressing down the arms is a common fault of most new sit flyers. It causes you to press your torso forward catching air on it and then consequently backsliding. If you have problems with the position get some coaching in the wind tunnel, SkyVenture has made learning the sit fly position a snap for the student and the instructor. Let’s move on to movement, shall we! Sit Fly: 6 points of MotionSpeeding up will be the first point of motion we learn. Simply press your heels down while keeping flat feet and having your hips, torso and heels in alignment. It is not necessary to straighten you legs. A small adjustment of your surface area will increase your speed greatly. Practice sitting up against a wall in the sit fly I described above, then by pressing through your heels stand up to a half squat, not all the way up and then settle back down into the sit. Do it slowly, erratic movements usually create horizontal space, so stand up and down smoothly. The reason we try not to straighten are legs at first, is because straight limbs usually create stiffness. In order to keep control of the position you must be supple. Slowing down is the next thing we learn. This can be done a few ways. I use them all, so it would be best to learn as many ways as you can. The first way to slow down is to press your arms down. Remember to keep sitting up while you do this or you will back slide from leaning forward. The second way to slow down is to bring your knees in a bit and then flare out your heels. This is my preferred way to slow down. This position increases your surface area a lot because your legs are a larger wing then your arms. This is also ideal because this leaves your arms free to dock or to use sign language to your friend. This position became popular in the wind tunnel because larger people needed to use there legs to keep them off the grate. Lastly if you really need to slow down learn to back fly in the wind tunnel. The back fly position will help you close huge vertical gaps quickly, for example if your friend corks up. A word of caution, learn to back fly with a coach in the wind tunnel before you use it with your friends. Using the back fly position without proper control can cause a vertical speed variation between you and your partner which can cause a high speed collision if you are not careful. Moving forward is our next task. Forward motion is the hardest yet most used motion in sit fly. It is technically difficult to learn so it might take some time. It is the most used point of motion because most people are back sliding in sit fly or back slide when they try something new. To move forward, get back in the half squat position or the downward motion. Then press your hips forward as far as you can while keeping your heels shoulder width apart and your feet facing forward. The best way to practice this is on the ground by leaning as far back as you can while free standing. Forward is a balance move that is why it is so hard. It also takes a little momentum in the sky to move forward so you might have to hold the position a few seconds before you actually realize you are moving. Keep those heels down! Moving backward is the easiest of the 6 points of motion. Most people are back sliding at first when they learn the sit fly position. To move backwards simply keep in the sit fly position and lean forward a bit. It doesn’t take much to rocket backwards, so immediately go back to the neutral position. The last two positions are side sliding left and right. They are tough. We won’t go into them in depth here because that would be a little advanced for this article. Besides carving is much more fun and seems to be a little more useful in every day flying. To carve go forward with a slight turn in your hips. Sit fly: Docking Docking your friend for the first time is probably the most fun you can have sit flying. This move is tough for some so listen up! First you must get your arms level with what you are going to dock. Move up or down. Then move forward slowly and stop at the target you want to dock so it is just out of your reach. Stabilize your heels by pressing down slightly. This is the key to docking; if you turn while you dock it is probably because your feet slide one way or the other. After you have stabilized reach with your hand up at the target not out. If you reach out your torso will follow and you will back slide, maybe pulling your friend with you. Make sure your arm is 90 degrees from your torso. Try not to shift with your torso. Have your arm and hand move independently of your torso. Fly your hand into the target and then dock the hand or foot lightly. If you grab on too hard you might contort your position so you fly away. Dock lightly. If you feel tension in the dock let go and go back to neutral, breathe deeply and try again. Keep in mind that this stuff is not easy for everybody. Don’t be afraid to ask for help or to get coaching. The SkyVenture wind tunnel is also a great tool when it comes to learning these basics of sit fly. Steven Blincoe is the Founder of The New School Flight University. He has 4,000 free fly jumps and over 300 hours in the SkyVenture Orlando wind tunnel. You can contact him at 530-412-2078 or [email protected] for advice.
 -
What's up. I flew in the Perris Valley tunnel. Skyventure Orlando tops out at 87% or 143 mph right now. Starting in April they will run 90% or 150 mph. Skyventure Perris due to electricity zoning and the high cost of power in southern california runs there tunnel at 83% or 136 mph. It is a huge difference! It was very hard to get vertical for freefly even with it being cold. Keep in mind, the warmer it gets with the coming summer the slower it will become. The same is true for the Skyventure tunnel, but with them increasing the speeds to 90% in April it should far make up for the difference. Steven Blincoe
-
I am a coach at the tunnel, and I recommend that you do thirty mintues first before you know what hit you. The in the following days do 15-20 minutes. People start getting tired at an hour and a half for the week. Remember to jump also. There are camps for both.
-
Where you able to learn head down with Max. If you did a lot of time, you should have been able to get to head down. How much time did you do? It should have only taken 3.5 hours to get to head down.
-
Do any of you out there have something to say about tunnel coaching? Have you recieved it? From who? How did they compare? How did they differ? How did it help you? Did it transfer directly to the sky? Did you find it different with your rig on? Did you like it and have fun? Steven Blincoe
-
Mirage are superior rigs as far as protection. The only rig that I would disuede people from getting is a Javelin. Every brand new Javelin I have seen on a student has opened up on EVERY FLAP at one point or another. That is a scary thought. I have had four students have to buy a new rig after their Javelin was modified multiple times to no avail. They are in my opinion, a waste of money, as far as protection goes. They fit nice though. Steve
-
I know of two people who got killed this year by going with just a friend, not an experienced coach. The newbie hit the friend in both situations. I also know of one person who got turned into a parapalegic trying to help a person with head daown, he too was not a professional coach. With dramatic changes in vertical, and horizontal speed, it is very dangerous to learn the beginning stages of head down. Save your money and don't waste it on second rate coaches. Solos on the other hand are quite good. Go last becasue of the seperation you will close when you are screaming across the sky. Be safe. Be conservative. Steve
-
You should check out my website blincoe.org for progressions in freefly. I hope you find it helpful. Please email me on the site to tell me what you think of it. Steve
-
Hello my name is Steven Blincoe. I have 4000 jumps and 200 hours of windtunnel. I have been jumping for 11 years since I was 17. I am the head coach for the world's premier coaching facility, the New School Flight University. My website is blincoe.org! Check it out! Has any of you newbies considered coaching? Steven Blincoe
-
Hi I work at Florida Skydive Center. We do coaching there. Gear is important, but skills are more so. Check out my website blincoe.org with full progression charts. Email me a [email protected]. We can make you a great skydiver as fast as possible. Steven Blincoe
-
How many people out there have gotten good freefly coaching? Sky or tunnel? Did they video your landings and give your proper canopy coaching also? Did they pre, and debrief you? How was their camera framing? Did they coach you on the pattern? How about seperation? Would you get coaching in the future?
-
Hello, My name is Steven BLincoe head instructor of the New School Flight University in Orlando FL. You should try tunnel coaching to get more comfortable in the air. I did when I got hurt. Check out our website at blincoe.org whch explains what we do and give a progression chart. Feel free to contact me at [email protected]. Steven Blincoe
-
New to forums...Old/New Skydiver
stevenblincoe replied to IanHarrop's topic in Introductions and Greets
Hello Ian, My name is Steven Blincoe head instructor for the New School Flight University in Orlando, FL. Have you ever thought about coaching. Come visit our website at blincoe.org, cantact me at [email protected]. We have a full progression table at the website. Steven Blincoe -
Hey what's up Neily. My name is Steven Blincoe head instructor for the New School Flight University in Orlando, Florida. Have you ever though about coaching? We do coach jumps, tunnel coaching, and canopy coaching. Check out our website at blincoe.org. Contact me at [email protected]. We also have a complete progression table at the website. Steven Blincoe
-
If you want you can come with us to the tunnel this weekend. We are going FRI 19th, SAT 20th. If you want to go contact me at [email protected]. We have a full progression list on blincoe.org, for the tunnel. Steven Blincoe