0

General

    Highway To The Dangerzone

    Image by Lukasz SzymanskiHeadin' into twilight

    Spreadin' out her wings tonight

    She got you jumpin' off the deck

    And shovin' into overdrive...
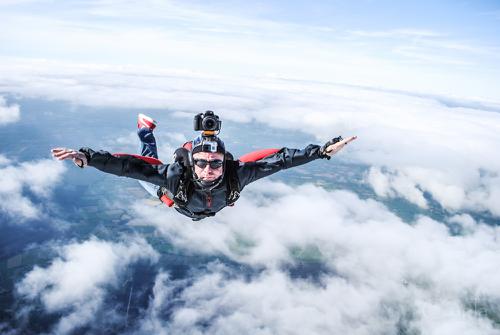
    When I was learning to wingsuit, I sang it in my helmet. Every time.
    True story.
    Anyway.
    We can all agree that -- in addition to fun, of course -- skydiving is about pushing personal limits and building personal skillsets. We might also agree that skydiving is not necessarily about putting yourself directly in the path of actual mortal danger. There are inherent risks (and, if we’re being honest, we kinda love them), but we don’t love the idea of spending a couple of seasons healing up from a broken pelvis. Right? Right.
    There are multiple danger zones in skydiving, and it’s actually something of an autobahn -- in that there are no posted speed limits to reach them. To put it another way: most of them exist as much for brand-new skydivers as well as battle-worn multiple national champions. As a skydiver, it’s important to take these just as seriously, no matter how much of a n00b or dropzone hero you might be.
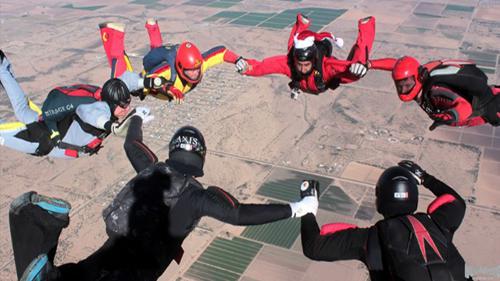
    Danger Zone 1: Meat-Based Collisions
    If you’re not flying on proper level with a group, you’re officially in Danger Zone 1. Flying on level keeps you out of the broken-bone zone if a member of the group suddenly corks or prematurely deploys. It keeps you out of pesky burbles, and it helps you keep meaningful awareness of where everybody else is flying around you. Invest in the coaching that will help you get (and stay) on level in formations of any kind.
    Also important: don’t just fly on level. Fly on-heading. Off-heading collisions hurt more than same-heading collisions. And never risk a 180-degree collision, even if you’re totally sure there’s nobody on your six -- it’s just not worth it.
    Danger Zone 2: Nylon-Based Collisions
    Once you’re dangling from your fabric, you have another danger zone to contend with: potentially crowded skies. According to the USPA, the most likely moments you’ll veer into oopsie territory here are:
    a) right after deployment and

    b) after entering the pattern.
    Instead of putting yourself in a place where you’re nimbly avoiding (or tragically not-avoiding) other jumpers at close quarters, be smart about it. Break off from other jumpers with room to spare. Create horizontal and vertical distance from everybody else in the sky (including the guy who’s almost certainly lurking behind you). Finally, keep your head on a swivel -- especially during that troublesome base-to-final bit, where everybody will be trying their best to kill you.
    Danger Zone 3: The Basement
    The basement is the biggest, baddest danger zone there is. It is, after all, where the ground lives. The ground is a monster that’s just waiting for you to stop paying attention because it wants to eat you.
    You’re going to enter this danger zone every time -- there’s no avoiding it. When you do enter it, you’re going to want to be under a canopy you’re controlling, over a landable bit of dirt, with a plan that accommodates as few obstacles as possible. This means that you must get that first canopy out at an altitude at which a second canopy is an option. It means that you must make sure that your equipment is maintained to prevent preemie brake releases. It means that you must either avoid or manage the hell out of low turns. And it means you’re going to need to know how to land that thing in water.
    The ground is waiting for you to make a mistake -- and it’s hungry.
    So, if you happen to be on the highway to the danger zone, try taking the next exit. Most people will indeed say hello to you, even if you never get it on the red line overload.
    I promise.

    By nettenette, in General,

    The Skydiving Handbook - Chapter 7 (Landings)

    There are two goals when landing your parachute: the first is to land safely and the second is to land where you want to. Clearly, the first goal is much more important than the second one, yet a surprising number of skydivers have had the opportunity to consider their values at leisure while recuperating from landing injuries. A parachute is only as safe as the person operating it.
    As soon as you have determined that your parachute is functioning properly, it is time to start thinking about the landing. Look for potential landing sites - any level area free of obstacles will do but we try to land at an established point, our student landing area, if we can. Usually you can get back over this landing area with at least a thousand feet of altitude left. If this is not the case check the area below you and between you and your target for possible hazards; if you are not positive you can make it safely to the planned landing area, you must select an alternate site. Do not go below the thousand foot mark without making a firm decision about where you will land!
    Assuming you have made it over the target above one thousand feet, you should turn into the wind and check your ground speed. This is especially important on windy days. Remember the higher the wind speed is, the less ground speed you have when holding, and while running with the wind your ground speed will be higher. Keep this in mind and avoid getting too far down wind of your target area. (Helpful hint: if you can find your canopy's shadow on the ground it will show you exactly how fast you are going!)
    As you hold into the wind you can make a rough guess as to how far you could fly in, say, 250 feet of vertical descent. Take that estimated distance and lay out an imaginary line of that length from the target to a point downwind. Now just work your way to that point and stay near it until you are about three hundred feet up. Turn towards the target. If your original guess was good, you would slightly overshoot the target. A small "S" turn - ninety degrees one way, then 180 back to the approach, and ninety degrees back into the wind - will line you up on a good final approach. As long as you start your final approach a little high, you can continue these "S" turns to adjust until you are on approach at the right altitude.
    Remember that your first priority is to land safely, not necessarily in the target. You may have to share the landing area with another canopy, in which case you need to avoid flying in front of or near them. For example, if you are on one side of the target and another student is near the other side, stick to your side rather than aiming at the middle. Be careful to always look before you make a turn and assume the other canopy pilots may not see you. Whoever is lowest has the right of way. Also look for dust devils. They can turn or even collapse your canopy and should be avoided.
    Most skydivers like to set up their final approach by using a pattern similar to the kind airplanes use approaching an airport. After your ground speed check at one thousand feet, work your way down wind until five hundred feet. Then turn cross wind (90 degrees to the wind direction) until you are over that imaginary point where your final approach begins. This type of pattern lets you observe wind indicators as you refine your estimate of where to turn onto final. Another useful tip: the more turns you do, the harder it is to tell where you are going, because your descent rate and forward speed change in a turn. A few smooth, slow turns will set you up better than lots of radical ones. At an altitude of about one hundred feet you are committed; just let the parachute fly straight ahead and limit any corrections to turns of ten degrees or less.
    The last part of the approach is the flare. This procedure is simple: pull down both toggles simultaneously to slow down your parachute to a comfortable landing speed. To get the most out of flaring, you must be flying full speed on your final approach, so keep your toggles all the way up until it is time to flare. (An exception is if you have poor depth perception, when the lighting is bad, or when the surface is uncertain such as water or corn. Then you may be better off approaching in partial brakes to slow your approach, giving you a little more time to assess the situation.) The flare should be done when your feet are about two to three body heights above the ground. A smooth flare over about three to four seconds will work better than a fast, hard flare, but the main thing is to have both hands all the way down when your feet are three or four feet off the ground. If you realize you started the flare low, speed up; if you started high, slow down. Do not, however, let your toggles back up once you have started to flare. This will cause your canopy to dive forward and result in a hard landing. The illustration showing a canopy's flight during a flare will show the consequences of a badly timed flare. Too low, and you have a lot of forward speed even though your descent is slow. Too high, and you will have a lot of downward speed even though your forward speed is low. That is why you should flare a little high and slow on a calm day, a little low and fast on a windy one.
    Let's quickly review the three most important points for a safe landing. First, always pick a safe place. Be sure of your landing site before you reach 1,000 feet! People who hit hazardous things such as cars, buildings, or power lines almost always do so because they did not choose a safe landing site high enough and were forced to land in a bad location when they realized, too late, that they could not make the target.
    Second, never land in a turn. We know that a parachute's descent rate increases dramatically in a turn, and that speed remains for a few seconds after the turn is stopped. Landing in turns is by far the biggest cause of skydiving injuries. These low turns are usually made by people who did not pick a safe area and turned at the last moment to avoid an obstacle, or by people who thought landing on the target was a higher priority than landing safely.No low turns!
    Third, land into the wind. This one is too obvious to need elaboration; the slower you are going, the softer you land. However, landing down wind or cross wind is less likely to cause injury than landing in a turn or on obstacles! On a breezy day, turn towards your parachute after you touch down and pull in one line to collapse the canopy. You may need to run around down wind of the canopy.


    Test yourself:
    1. The United States Parachute Association limits student and novice jumpers to wind conditions of fourteen miles per hour or less. Why are winds over fifteen miles per hour considered dangerous?
    2.Turbulence that can make steering difficult or even collapse your canopy can be caused by three things. Hot, rising air such as dust devils is one and high winds passing over obstacles are another. What else could cause dangerous turbulence on landing? Where would you expect to find turbulence on a windy day?
    Proceed to Chapter 8 (After the Landing)

    By admin, in General,

    The Skydiving Handbook - Chapter 5 (After the Freefall)

    There are only two ways to end a freefall. One is to open your parachute, and the other is not to. No one wants it to end the second way. Statistics show that the overwhelming cause of skydiving fatalities are due to the jumper not using a perfectly functional parachute in time. Why does it happen?
    In order to open your parachute safely, you need to know two things: when and how. The when was discussed in the previous chapter. Altitude awareness is critical and the loss of it is a life threatening situation. The problem can be compounded if the skydiver, running out of altitude, is unfamiliar with his equipment and has trouble deploying his parachute. Add the possibility of a malfunction to low altitude and unfamiliar equipment and you have a perfect recipe for disaster. Therefor you must always watch your altitude and before you ever get on an airplane you should be totally familiar with your equipment.
    The sport parachute, called a rig in skydiving jargon, is a very simple machine. It must include two canopies, a main and a reserve. The components must be TSO'd, meaning they meet government technical standard orders that require high manufacturing and testing standards. All rigs are worn on the back and consist of similar components. A look at the diagram will show that a rig consists of the deployment system (pilot chute, bridle, and bag), canopy, suspension lines, steering lines, toggles, risers, and harness/container. Deployment is initiated when the container opens and the pilot chute enters the relative wind. The pilot chute may be packed inside the container (all reserves and student mains) or kept in a pouch outside of the container and pulled out by hand, which most experienced jumpers prefer. The pilot chute acts as an anchor in the air, while the jumper continues to fall. As the two separate, the bag in which the canopy is folded is pulled from the container. The parachute's suspension lines, carefully stowed on the outside of the bag, are drawn out until they are fully extended. The bag is then pulled open and the canopy comes out. It immediately begins to inflate as the cells fill with air. Inflation is slowed by the slider which prevents the canopy from expanding too fast. It usually takes three to five seconds from deployment of the pilot chute to full inflation of the canopy.
    Over the years, parachute design has been refined to a remarkable degree. In fact, square parachutes have no known inherent design malfunctions. Theoretically, given proper packing, a stable deployment, and barring material flaws, a square parachute will never malfunction. However, we don't live in a perfect world, and malfunctions are common enough that no sensible person would intentionally jump without a reserve. The malfunction rate for sport parachutes is about one in every thousand deployments. Nearly all are preventable.
    The catalogue of possible malfunctions is long, but all you really need to know is that any parachute must have two characteristics. It must be open, and it must be safe to land. Otherwise it is a malfunction. The first characteristic is determined at a glance. The second one, if there is any doubt, is determined by a control check. Should you have a malfunction, the response is simple - pull your reserve. On student parachutes pulling the reserve handle combines two functions. The main parachute is released from the harness, then the reserve container is opened, starting the reserve deployment sequence. For all practical purposes, main and reserve deployments are identical except that the canopies may be of different sizes.
    Most parachutes used by experienced jumpers have a separate handle for each function of the emergency procedures so you will need some special training when you progress to your own gear. Also, at Skydive Arizona we use only square reserves. If you travel to another drop zone be sure you receive training on their equipment, and find out if the reserve is round or square. Round reserves mean you will need special training.
    The first factor in preventing malfunctions is a simple one: don't leave the airplane with an existing malfunction. This means that you should always have your equipment checked by a knowledgeable second party to be sure nothing is misrouted or damaged. Prevention extends to packing. When you learn to pack you will learn to inspect the canopy. In the student phase, you have to trust your jumpmasters and packers to be responsible for the condition of your parachute, but you will eventually assume all responsibility. Because of the possibility of a jumper making a mistake, our reserves are inspected and packed by a specialist who holds a Rigger's Certificate issued by the U.S. government, thus ensuring that at least one parachute on every skydiver is technically sound.
    The second factor in malfunction prevention is one you control: body position. If you think back to the deployment sequence described earlier, the importance of a stable opening becomes apparent. Since the parachute is on your back, if you are facing the relative wind in a good arch it will deploy straight out behind you. If you are unstable, it must find its way past you - between your legs or around an arm, for example. In this situation, the pilot chute could entangle with you, stopping the deployment sequence. Another possibility during an unstable opening is that the lines will feed out unevenly, creating the potential for a line knot that could keep the slider from coming down or deform the canopy to the point that it cannot fly properly. Don't forget, however, that stability is not as important as opening in the first place. Pulling at the correct altitude always takes precedence over pulling stable. An unstable opening does not always result in a malfunction; parachutes are so reliable that the worst that usually happens is a few line twists. Not opening has far worse consequences.


    Test yourself:
    1. While you are a student, your decision altitude, sometimes called your hard deck, is 2,500 feet. If you initiate main deployment at 4,500 feet and nothing happens, how many seconds will pass before you reach the decision altitude? How many will you have used counting and checking before you realize you have a problem?
    2. If you know you have a malfunction, why should you pull your reserve at once instead of waiting until the decision altitude is reached?
    3. In the old days, skydivers wore their reserve mounted on the front of their harness. If you had a chest mounted reserve, what body position would you want to be in for reserve deployment?
    4. How often should you practice your emergency procedures?
    Proceed to Chapter 6 (Canopy Performance)

    By admin, in General,

    Is Your Rig Freefly-Friendly or Preemie-Prone

    How to Set Yourself Up For Success

    Image by Joel StricklandIt’s time. You’re ready.
    You’re going to point your belly button away from the ground when you fall out of a plane. YES.
    You’re gonna point it at the horizon. You’re going to point it at other people. You’re going to sit around and look at it while you slide backward. You’re going to take your belly button on an amazing adventure.
    But wait: is your container ready to join you on this journey?
    The discipline you’re about to enter -- freeflying -- makes more demands of your skydiving rig than belly flying does. Now that you’re going to start moving around at a full range of angles in the relative wind, you need freefly-friendly equipment.
    But what is a freefly-friendly skydiving rig?
    The simple answer is that it’s a skydiving container, with all of its flapping bits under control, that fits close to your body. To get a little more specific, we’ll look at a few examples of non-freefly-friendly rigs -- and we’ll see how to get them fixed.
    The “Reclining Chair”
    What’s the difference between making a great skydive and hanging out in a poolside sun lounger?
    Uh...everything.
    If your leg straps are slippy, your sitfly might end up looking like a lounge-fly -- and the resultant harness ride-up might put your chest strap into your throat. SO importantly, this look is also humorously unflattering in photos and videos.
    This might be the easiest issue to fix -- it could be a simple issue of improper strap adjustment. Before you send your kit in for surgery, see your S&TA;, rigger or instructor to check your current gear-up method and adjust accordingly. If it’s truly an issue of fit, your rigger can amend your harness, leg pads and leg straps accordingly -- and add one of those fetching little butt-bungees to keep your leg straps managed.
    The “Incredible Floating Container”
    If the laterals on your rig are too long or the leg straps are too loose, you’re going to have one of these -- a container that floats away from your freefallin’ body while air rushes in to separate the two of you.
    The fixes for the Incredible Floating Container are similar to the Reclining Chair -- first, check with an expert to make sure you’re kitting up correctly; then, if the problem persists, send it to the loft.
    The “Flippy Floppy Flapper”
    Guess what? Your pin flaps -- and riser-cover flaps -- love to flap. They just love it. They’ll use any excuse to get out there and do their name proud.
    To keep the flaps under wraps, you’ll need to look closely at the condition of each component. Make sure the stiffeners aren’t broken, warped or loose. Check for weak Velcro and/or magnetic closures. If you find something, don’t despair: Your rigger can revitalize wiggly tuck tabs, replace ragged-out Velcro, install (or replace) magnets and/or repack your reserve to adjust where its bulk places pressure on the system.
    The “Premature Popper”
    If your BOC doesn’t hug your pilot chute snugly enough, the multi-orientational pressures of freeflying make it much more likely that said pilot chute is going to make an early escape. Even if you’ve gone ahead and bought yourself one of those fancy low-profile freefly puds, that’s not going to save you if your BOC is loose, holey or inelastic. Note: if you’ve recently downsized in addition to switching up your discipline, be extra careful -- the BOC system relies on a snug, correctly-fitting main in the tray.
    Another pop-preventer: maintaining a frayless closing loop of the proper length.
    The “Put Me In, Coach”
    The Put Me In, Coach is another variation on the Premature Popper. It’s an even less-fun one: an instantaneous reserve ride without the screamy good time of a malfunctioning main. It happens when the Velcro on your handles is weak, or when you bumble into a limb or foot that grabs your D-ring.
    Make sure that the Velcro on your handles is strong and mated completely on both sides. It should take a moderate tug to separate the handle from its cozy home. Also: it’s not necessary to replace your D-ring with a pillow when you transition to freefly, but there’s a reason it’s so commonly done: that capital D is a big, shiny, shoe-sized liability.
    The “Velveteen Rabbit”
    If your rigger tells you that your rig is impossible to freeflyify, you may be the soon-to-be-ex owner of a Velveteen Rabbit rig. Don’t be too sad: it has probably been very loved for very many years, and it’s ready for retirement. Give it a viking funeral if you want, but don’t insist on flying it -- let it go. Making the hard choice to get rid of it might just save you -- and your wandering belly button -- a lot of unnecessary misery.

    By nettenette, in General,

    Thermals 101: A Paraglider’s Perspective

    I am much more experienced in paragliding than skydiving and in paragliding we really respect the thermals as they are what we need to fly – but at the same time can cause all sorts of havoc close to the ground.
    Thermals are bubbles of rising air. They might extend all the way from the ground to a cloud or they might be just a bubble. I have been told to study a 1970 hippie lava light, as the rising lava in the light is nothing more than a thermal.
    If a thermal bubble leaves the ground and rushes up in a column of air, there is a void that must be filled - with the same amount of air going down or sideways outside the thermal as is going up in the thermal. Again, think of the lava light – as the lava rises, the oil fills the void where the lava was. In other words, if you land near a thermal that is bursting, you can be in the middle of a gust of wind that is going down or sideways filling the area under the thermal. I have been in a thermal that went up at 1,400 feet per minute – which is faster than a lot of jump planes. Somewhere there must have been air going down 1,400 feet per minute to fill the void.
    If you see a wind indicator (wind sock) quickly change directions, you might have just witnessed a thermal near by. On a quiet day in a field of tall grass you can hear them leave too, just a quick rustle of the grass is all you hear.
    A lot of times thermals are the most aggressive close to the ground as they are narrow and get wider as they go up. They can be explosive off of a super heated asphalt driveway or black roof. There are some “surface tension” forces that keep the thermals close to the ground until they break off. If the wind changes a bit, it might be all it takes to make a thermal release.
    In paragliding, you know you are about to enter a thermal when you start to feel turbulence or even go down a bit. You actually judge your angle of attack into the thermal by looking at how the wing turns as you enter it. If your wing flies straight but surges back evenly, you entered it straight on. If your wing turns, part of your wing hit the thermal first causing the turn. If your wing surges forward, you probably just left the thermal.
    It is very easy on a large paragliding wing for half of your wing to be in a thermal and the other half not – causing all sorts of fun things – like asymmetric collapses. You could “hear” them in your wing all the time, they sounded like fabric getting loose then springing tight. Big asymmetrics could collapse more than half a canopy.
    On very active thermal days, only the advanced would dare to fly paragliding canopies/wings because you could experience all sort of "asymmetric collapses” or other dynamic unexpected events.
    Paragliders are rated by DHV ratings, 1 thru 4 where 1 is the safest to fly, which rate their handling in stalls and collapses. My DHV 1 GIN Bolero glider turns 90-180 degrees in an asymmetric collapse and must spontaneously recover to get the DHV 1 rating. Gliders rated higher might need pilot intervention to recover from a collapse. Turning = loss of altitude = hit the ground hard any way you look at it. Have you ever studied what might happen to your canopy under an asymmetric? How do you fix it?
    To avoid thermals close to the ground, I avoided ground treatments that absorb heat, like rock (pea gravel) or cement. In paragliding – we liked the green soccer fields, but I don’t think DZ have those.
    Thermals are caused by heated air on the ground being abnormally hotter than the air above. They “break” off of any pointed object, as small as a shrub. We were taught – turn the ground upside down after a rainstorm and anywhere water would drip off is where thermals rise. It is a mistake to think thermals only happen on hot days, because temperature difference, not just warm air, causes thermals. If the atmosphere is cold and the tarmac is hot – expect a greater thermal than normal even if the outside air temperature is freezing.
    There are all sorts of mathematical equations used to predict thermals and the strength of thermals, some available on the 1-800-WXBRIEF FAA Flight Service Center pre-flight briefing system, such as the “wave soaring forecast” and the “K index”. The K index measures stability in the atmosphere. You can also speak to a pre-flight briefer who can help interpret the data – but since I don’t speak pilot, I was always intimidated to talk to the humans and only played the recorded messages.
    If you are interested, you can study the “lapse rate” which is the phenomenon that as air gets thinner higher you go up in the atmosphere, the air pressure goes down and so does temperature. Physics says pressure and temperature are related due to fact higher pressure causes molecules to be closer to each other. Pure science says that the “dry adiabatic lapse rate” is 5.5 degrees per 1000 feet. This means, if you jump out of a plane 12K above the ground, expect it to be 66 degrees colder at 12K than at the DZ because the air is under less pressure.
    But our flying areas do not exist in scientific test tubes – there is instability in the atmosphere. If the actual temperature, lets say 2K up, is more than 11 degrees colder than the ground temperature – you are bound to experience even more aggressive thermals than normal as the atmosphere tries to find balance.
    Oh, thermals cause clouds – the reason why paragliders fly “cloud streets” of thermals across country. It is possible to experience “cloud suck” also, where the thermals are so strong you get trapped in a cloud and must use advanced techniques to lose altitude.
    Note – I am not an expert at this. Someone with more experience is invited to correct me. But my point is: aggressive thermals can cause turbulence close to the ground, which can very easily cause landings to be rough.

    By tdog, in General,

    The Skydiving Handbook - Chapter 8 (After the Landing)

    No matter how many skydives you make, you'll always feel a moment of great satisfaction as your parachute settles to the ground. But the skydive isn't over yet! You need to carefully gather up your gear and bring it safely back to the hangar. You should daisy chain the lines (ask!) and be sure not to snag anything. One easy way to keep track of your stuff is to put things like your goggles, gloves, and ripcord in your helmet and fasten that to your chest strap. Back in the packing area, set the rig down carefully and be sure not to drop or lose any of the paraphernalia such as the altimeter, radios, goggles, and ripcord. Keep in mind that all the equipment is very expensive and you are responsible for keeping it safe; a moment's carelessness with an altimeter, for example, could cost $150.
    Once all of your gear is safely off, there is one last thing to do. Review your dive thoroughly, noting areas where you would like to get suggestions and advice and thinking about which techniques worked well, and why. Freefall only lasts a minute, the canopy ride about three. That isn't a lot of time to learn, so to be a good skydiver you have to develop your ability to learn on the ground before and after a jump. A few minutes of careful review with your jumpmaster (or yourself, when you are doing solo jumps) will save you many expensive mistakes in the future. Finally, log all of your jumps. Any jumps you plan to use towards a license requirement must be logged and signed by another jumper.
    Around the Drop Zone
    Although our sport has a two hundred year heritage of air show jumps and military parachuting, sport parachuting as we know it began in the late '50s when civilians began jumping strictly for fun and combined to form sport parachuting groups. Eventually skydivers began to design their own gear instead of modifying military surplus parachutes, and the combination of civilian organization and improvements in equipment has led to a steady growth that continues today.
    The national organization that has overseen skydiving in the Unites States is called the United States Parachute Association, or USPA. USPA is a non-profit membership organization in which each member may vote for the board of directors. We will ask you to join USPA by the time you make your Level 4 ASP jump; the first year's dues are $39.50 (more for overseas memberships.)
    Besides certifying instructors and administering the license system, USPA publishes a monthly magazine that is included with your membership. Membership also provides you with some liability insurance. But perhaps the most important reason for joining USPA is that the organization has been instrumental in keeping the government, at all levels, out of the sport. In fact, skydiving is one of the safest aviation sports and is also the least regulated. To keep it this way, it is important that we police ourselves. The USPA has established safety guidelines that all skydivers at this drop zone are expected to adhere to. The USPA's representative on the drop zone is the Safety and Training Advisor, or S&TA.; He or your instructor can answer questions about license requirements, skydiver ratings, and most other skydiving matters.
    The USPA categorizes skydivers into six experience levels:

    students - under direct supervision in a formal training program
    novices - graduated from a student program but not yet licensed
    A license - minimum of 20 freefalls
    B license - minimum of 50 freefalls
    C license - minimum of 100 freefalls
    D license - minimum of 200 freefalls In addition to the freefall experience, each license level requires demonstration of skill appropriate to that level. A license is important to you as a proof of your ability level, especially if you intend to travel to other drop zones. Each level also has currency requirements. Staying current (jumping regularly) is one of the most important things you can do to enhance safety. For this reason if you are away from skydiving for several weeks you will have to do some reviewing and get back into the sport with a simple, safe, skydive. Until you are licensed, if more than 30 days passes without jumping you will be required to make a Level 4 ASP jump with one of the school's jumpmasters before jumping on your own again.
    USPA also issues instructional ratings to qualified applicants. A person holding a jumpmaster rating has attended a training program and demonstrated the necessary skill and experience to safely guide novices through a student program. Instructors have more experience and have also attended further training courses. Either one will be able to answer most of your questions. You will meet plenty of people willing to offer suggestions to you. Bear in mind that someone with one or two hundred jumps will seem very experienced to you but is actually a relative newcomer to the sport. Rely on rated instructors for guidance until you have your A license! Occasionally you may hear experienced jumpers discussing techniques or procedures that differ from what you have learned; be aware that some things which may be safe for experienced jumpers could be inappropriate for novices. If you have any questions be sure and get an opinion from one of your instructors.
    Skydive Arizona is a business incorporated for the purpose of providing skydiving facilities. While you are on student status, your jump price pays for all aircraft and site expenses as well as instruction and equipment. The operators of the drop zone, Larry and Liliane Hill, are proud that they have built the finest skydiving center in the world, operate the finest fleet of aircraft available, and have some of the best skydivers anywhere on their staff. To help keep this facility safe and pleasant and to control costs, customers are asked to avoid littering (smokers, please put your butts in the yellow or orange cans) and to be on time for their aircraft. Feel free to bring non-skydiving guests out to share the fun, but be sure that children are under constant supervision: drop zones abound with expensive and dangerous objects! Dogs are not permitted in the grassy central grounds or in the buildings.
    Drop zone etiquette is casual, but when you are in an area where people are packing, be sure to walk around the parachutes rather than step over them, and never smoke or leave drinks around parachutes. Do not borrow or examine other people's gear without permission. Drinking alcohol on the drop zone is forbidden until the last load of jumpers is up. This rule extends to non-skydiving guests for a simple reason: we try hard to maintain a good image, and an uninformed observer might not be able to distinguish between a skydiver and a non jumper.
    Where do you go from here?
    The ASP program has eight levels that cover all the skills discussed in this handbook. At each level you will receive detailed instructions from the school staff. After graduating from our student program you will make several more jumps to hone your basic flying skills. At the same time, you'll be trying more advanced things and looking at buying gear. For this stage of your progression we have written a second handbook, geared for jumpers off student status and working towards their A license. The Skydiver's Handbook will fit right in with this one, and goes into details on license requirements, relative work, the coach program, buying gear, and other neat stuff. Keep the two together for reference and rainy day study. You can also keep notes and sketches, packing manuals, license applications, etc. in this folder.
    All of these materials are designed to be flexible and are subject to continuous updates. Please let Bryan Burke, the Safety and Training Advisor, know if any of the information was unclear or if you felt more detail was needed. We very much appreciate your comments and suggestions, as well as your questions. Welcome to skydiving!

    By admin, in General,

    The Skydiving Handbook

    Welcome to skydiving, perhaps the most exciting and unusual sport in the world! You are at the beginning of a path thousands of people have safely followed for over thirty years. In that time, experience has shown that some approaches to skydiving work better than others.
    This handbook is designed to supplement the practical instruction you will be receiving from our instructors, all of whom are certified by the United States Parachute Association. During the course of your training we will cover the basic principles around which skydiving is built. While actual dive sequences and hands-on training will be given to you by our instructors, this handbook will explain the concepts behind the activities and allow you to study important principles at home. Skydiving terms are clickable the first time they appear, which takes you to the glossary.
    Be sure to have your jumpmasters explain any concepts that remain unclear. Although underlying principles will not change, they may be easier to understand through a different explanation, drawing, or analogy than the ones offered here. I encourage your questions; some of the principles covered are not immediately obvious. As the author, I also invite your comments and criticism - this first edition is sure to have many oversights and flaws.
    In the Aircraft
    Exits
    Flying Your Body
    The Skydiving Universe
    After the Freefall
    Canopy Performance
    Landings
    After the Landing


    Blue skies and safe skydiving;

    Bryan Burke


    By admin, in General,

    The Skydiving Handbook - Chapter 4 (The Skydiving Universe)

    We've already discussed your body's relation to the relative wind. Now let's look at your relationship to space and time. When you leave an airplane at our customary exit altitude of 12,500 feet above the ground, your accelerate from zero miles per hour vertical speed to approximately one hundred and ten miles an hour in about ten seconds. It doesn't seem too dramatic because the aircraft speed was already about 100 miles an hour, so you reall only gain ten miles per hour. At that point you reach terminal velocity, the speed at which the air pressure against your body balances the pull of gravity. Ignoring minor changes in body position, you will stay at that speed until something stops you - hopefully the deployment of your parachute! At terminal velocity you pass through one thousand feet every six seconds. If your parachute opens at 4,500 feet, that gives you about 52 seconds of freefall. (Ten seconds for the first thousand, six for each of the next thousand.) If your parachute did not open, you would now have a life expectancy of 27 seconds. Opening altitudes are based on allowing skydivers time to be sure that they do land under an open parachute. More experienced jumpers commonly open at about 2,500 feet because of their greater familiarity with equipment and emergency procedures. This gives them about 65 seconds of freefall from a 12,500-foot exit.
    The main thing about altitude is that if you run out of it while in freefall, you die. However, since your fall rate is constant, your consumption of altitude is constant. This means that if you have plenty of altitude, relax, because only time can take it away from you. Time and altitude are directly related.
    Loss of altitude awareness is a major contributor to skydiving fatalities. Always bear in mind that no distraction is worth dying for. Until your body's freefall clock has been programmed so that you know how long you've been in freefall, your only reference is your altimeter. Every time you do anything - intentionally or not - check your altitude. That way, you won't lose altitude awareness if a distraction such as a difficult maneuver or loose goggles comes along. Keep in mind that since you are consuming altitude (time) at a constant rate, you can't stop what you are doing, think it over, go back, and try again. In freefall, there are no time outs! That's why we try to do all of our freefall tasks carefully and deliberately, getting them right the first time. If you rush, you will actually lose time because the extra mistakes that result will slow you down. And when you consider the cost of freefall time, you'll appreciate the value of thorough ground preparation!
    Besides our time reference (altitude), we also make use of space references. There are two types of space references, orientation to the ground and orientation to other skydivers. We'll call the ground reference heading. Heading is an imaginary line drawn from a point on the horizon directly in front of you through your center. You use this reference for tasks such as turns, backloops, or simply hovering in place. Eventually you will substitute the line of flight for a personal heading. The line of flight is the heading the aircraft was on when you left it. The advantage of using line of flight is that now all the skydivers on the airplane have the same heading reference, instead of each picking their own. This makes it much easier to coordinate group activities.
    Your reference to the other skydivers is called the center point. The center point is that spot closest to all of the skydivers. When you are alone, it is in the middle of your body. With others, imagine a ball falling straight down around which everyone flies. In other words, four skydivers holding hands in a circle would have the center point in the middle of the ring. If they all backed up ten feet, it would still be in the same place because thjey are all still equally close to that point. In many ways, the center point of a formation is like the center of your box man discussed in the previous section. If one corner of a formation is low relative to the center point, the formation will turn in that direction. If two corners are low, it will slide in the direction of the low side.
    By now you can see that while skydiving, you have to be aware of several different things: altitude, your own body position, your position relative to the ground, and your position relative to others. Initially this will seem like a lot to be aware of, so on your first few jumps you will concentrate almost entirely on altitude and your body position while your jumpmasters take care of the rest. When you are release to fly free, you will add your own heading, and eventually you will be able to monitor these, the formation center point, and the line of flight as easily as you monitor your speed, direction, location, and other traffic as you drive to the drop zone!


    Test yourself:
    1. "Temporal distortion" refers to the fact that in an emergency situation (losing control of your car, for example), the rush of chemicals to your brain can cause events to seemingly go into slow motion. Why would temporal distortion be extremely dangerous to a skydiver?
    2. Why is ability to hold a heading considered essential to flying with other skydivers?
    Proceed to Chapter 5 (After the Freefall)

    By admin, in General,

    How To Organize Your Sky

    7 Expert Tips For New Skydivers to Get the Most Out of Load Organizers

    Remi Aguila organizing a festive Christmas-boogie jump at Skydive Arizona

    Photo by Alex SwindleThe portrait wall next to manifest is confusing for a brand-new skydiver.
    Who are all those people, anyway, with the smiling faces and the discipline names printed in all-caps underneath them? What’s an “Organizer,” really? If you don’t know the etiquette, it can be a little daunting to get on those loads without fear of a forehead-slapping faux pas.
    New skydivers, make no mistake: you are invited.
    Remi Aguila has been organizing belly jumps at one of the biggest, busiest dropzones in the US – Skydive Arizona – since around 2008. Since then, he has organized thousands of skydives for jumpers of all levels, nationalities, aptitudes and proclivities. You can be certain he’s seen your kind before. Here’s what he says you need to know to have a successful experience in the organized sky.
    1. Don’t be shy.
    “Newbies have this tendency to find me in the bar after the day is over and say that they wanted to get on a jump but that they didn’t want to intrude; didn’t want to ‘ruin the skydive.’ That’s missing the point entirely, guys. If there are organizers on your drop zone, go talk to them. Maybe the jumps they’ve currently got going aren’t a great match for your skill level, but a good organizer will find a way to get you in. Most organizers will be happy to split groups into smaller factions that fit more of the jumpers’ goals. They’ll be happy to design a jump for people with less experience – but you have to ask.”
    2. Know who you’re talking to.
    “An organizer is not the same thing as a coach. An organizer’s job is really to get people jumping, and to make sure that people who want to jump with other people can find somebody to jump with. Organizers exist because, even though there’s a lot of casual organizing that goes on between jumpers, most people like – to a certain degree – to be told what to do. An official organizer can facilitate that without being too authoritarian, but still the presence of an organizer on a jump puts a nice bit of structure into the mix.
    A dropzone representative usually hires the organizers at any given DZ. Basically, that hiring manager looks for people that hold a coach rating, that demonstrate skill in their chosen discipline, that have a friendly attitude and that show a solid record of experience in smaller formations. (Most organizers end up doing between two- and eight-way jumps.)
    Don’t get tripped up by the specter of compensation, either. I have never been on a drop zone where somebody who was called an organizer was expected to be paid by the jumpers. There may be some out there; I don’t know. However, I have been jumping for 25 years, and I have never come across a dropzone where somebody who was called a load organizer was expected to be paid directly by the jumpers. At boogies, you generally pay an extra fee to cover the load organizers in general, but you won’t be paying for slots or paying organizers as you would a coach.”
    3. Communicate clearly.
    “You need to start the conversation; the organizer probably won’t approach you first. When you do, introduce yourself confidently. Tell the organizer your skill level and your experience. Tell them what you want to learn.
    I don’t personally know a single organizer that’s going to turn a newbie away out-of-hand. They may, however, tell them that – at the moment, at least – there are too many people on a given jump, or that the jump sits outside of their current abilities, and it wouldn’t be appropriate for them. That said: if you’ve made it clear that you’re new and you’re looking for a jump you can join, then you’ll be on their radar.”
    4. Get the timing right.
    “Where I jump – at Skydive Arizona, in Eloy – showing up on a weekday is your best bet if you’re fresh off student status. It’s a lot less busy, and organizers will more often have the time to do one-on-ones or two-on-ones with new jumpers. You may even get lucky and score some free one-on-one, non-structured coaching from them, whether that’s belly or freefly. Personally, I think that’s a great way to get some foundational experience.
    For instance: If it is a very quiet day and somebody approaches me, I’ll certainly ask what their experience level is, but it’s not going to be a deciding factor as to whether or not I’ll jump with them. If we’re doing one-, two- or three-ways, it doesn’t really matter what the experience level of the person is. They’re going to get on the jump, and they can expect much more feedback than they’d receive on a busier day.”
    5. Be honest.
    “As an organizer, it’s important for me to get a realistic idea of a jumper’s skill level and general awareness level. When you tell me how many jumps you have, I need you be honest about it. If you have 20 jumps, say you have 20 jumps. There’s no point in misrepresenting yourself. If you have 20 jumps and 3 hours in the tunnel, be clear about that. Jump numbers are no longer the absolute measure they used to be, with the introduction of tunnels. However, somebody with 20 skydives is going to have a different skill and awareness level than someone with 200.”
    6. Be open.
    “If you’re a brand-new skydiver, there’s a good chance that you don’t know what you want to do on the jump. A good organizer will have a few basic jumps that are two-ways and three-ways that are ready-made for people that don’t have a lot of experience. These tend to be kind of coachish and workshop basic skills. That’s what really you should be doing at this point.
    For these jumps, we tend to focus on basic turns, slides and levels. The aim is to keep it fun, but also to add factors that build on the basic freefall skills: like procedures for exiting the plane and for separation.
    Some people expect a full-on coach experience, and other people just expect a smile and a high-five. I advise shooting for the middle of that scale.”
    7. Ask for feedback.
    “Immediately after the jump, approach your organizer for a quick debrief. This is key to your development as a skydiver. Make it specific: ‘What do you think I should improve? What do you think went well? What do you think didn’t go well?’ This debrief may not involve video; it may just involve some basic feedback on how the exit went, what aspects you can work to improve and general notes on the jump flow.
    On busier days and on bigger jumps, it’s going to be a little more challenging for your organizer, because he or she might have 20 people that want notes. When that’s the case, it’s incredibly hard to give individual feedback because of the number of people we’re looking out for.
    Always ask. The worst an organizer could say (and I would be very surprised if they did) is that they’re sorry; that they have to run to another load. In that rare case, just brush it off and try again next time. We’re here to facilitate your experience, after all – and to help you have the most fun you can have in the sky.”

    By nettenette, in General,

    The Skydiving Handbook - Chapter 1 (In the Aircraft)

    Every skydive starts before you board the airplane. Before you get on the airplane, you should be totally prepared for the jump ahead. This means that you know exactly what you are going to do on the jump and have had your equipment inspected. Make sure you have your helmet and goggles, remove jewelry and take sharp objects out of your pockets, tie your shoes tightly, and so on. Each jumper is responsible for their gear, and you should always check to be sure you have everything necessary for the skydive.
    Another part of the ground preparation is being ready to board the aircraft on time. Jump planes are just like airliners: they can't hold up twenty people because one wasn't ready. At the start of your skydiving progression, your jumpmaster will usually take care of reserving your slot on an airplane after you are completely trained and outfitted with the necessary equipment. It is then your responsibility to stay in the area and gear up at the appropriate time with your jumpmasters.
    Before you Board:
    1) It's too late to ask questions once you are in the airplane, so before you board know exactly what you will do on the skydive and review your emergency procedures. On the ride to altitude you should review the dive mentally, imagining a perfect performance. Keep in mind, however, that you are not compelled to jump from the airplane just because you happen to be on it! If you realize on the aircraft that you are not ready to jump, you may ride down with the airplane.
    2) Check your gear. Your jumpmasters will help you to be sure everything is correctly routed. Be sure your altimeter is set to zero, your goggles are clean, etc. If you will be boarding an airplane when its engines are running, keep a good grip on your goggles and gloves!
    3) Stay close to your jumpmaster and away from the propellers, other aircraft, and any other hazardous objects. Remember that the pilot may not be able to see you when he is taxiing the airplane; he always has the right of way.
    Once you are in the airplane, sit where instructed. Be sure to wear your seat belt until you are high enough for an emergency exit. It is also a good idea to put your helmet on for the take off. Your two responsibilities in the airplane are to minimize movement and to protect your deployment handles. Avoid snagging not only your equipment but that of other jumpers. Until we are on jump run you should stay seated. Then, at the jumpmaster's command you can get to your feet and move carefully to the door. As you move about in the airplane, watch out for door handles, emergency exit releases, seat belt buckles, etc. While inside the airplane your job is to protect your parachute!
    Most of your jumps will be done from our larger, twin engine airplanes. Exactly which airplane depends on how many people are jumping and the aircraft maintenance schedule. You should have familiarized yourself with the aircraft door, handles, and steps before boarding. Most of the time the more experienced jumpers will exit first for a simple reason: students open their parachutes higher than experienced jumpers. To preclude the possibility of jumpers from different groups colliding, exits are staged several seconds apart and planned with the opening altitudes in mind. That way we get both horizontal and vertical separation between groups. If you are leaving first because of unusual circumstances, have your jumpmaster fill you in on what to expect.
    The jump run itself is flown into the direction of the wind. This gives the airplane the slowest possible ground speed . In other words, it is over the drop zone (DZ) longer than it would be if it was running down wind. The pilot uses GPS (Global Positioning System satellites) to tell him exactly where he is, and when he is over the spot , or correct exit point, he turns on a green light back by the door, telling the skydivers to exit. Should the exit sequence take so long that the last to leave might not make it back to the airport, the light will go off, indicating that the remaining jumpers should stay in the airplane for a second pass over the drop zone. Incidentally, since you will usually be getting out late in the line up, and since the jump run is into the wind, you have a way of knowing which way the wind is blowing as soon as your parachute opens. Imagine a line from the landing area to a point directly below you. That is the wind line - if the pilot was right about the spot.


    Test Yourself:
    1.Why do we take our seatbelts off once we are above 2,000 feet instead of wearing them all the way to altitude?
    Continue to Chapter 2 (Exits)

    By admin, in General,

0