Napoleon Skydiving Center: Level 1 - Free Arm
This dive is intended to be an introduction to skydiving. As such we will leave plenty of time to just arch and enjoy the experience. Concentrate on a good, relaxed arch, but don't forget to have fun. Remember to hang on to that ripcord at pull time.
TLOs
- Perform a controlled exit.
- Exposure to continuous freefall.
- Heading awareness.
- Focused awareness and attention.
- Coordinated body movements with 3 practice pulls from free arm.
- Altitude awareness.
- Actual ripcord pull by 4000 feet.
Dive Flow
Running Description
Hotel Check: Check In, look to left and wait for a nod. Check Out, look to the right and wait for a nod.
Exit Count : On the C-128, the count is Prop, Up, Down, Arch. On the Twin Otter, it is Center, Out, In, Arch. In both cases the count should include both the verbal commands and the physical motions.
Exit: Step off of the aircraft and push hips forward, chest forward, head back, and arms and legs to "boxman" position.
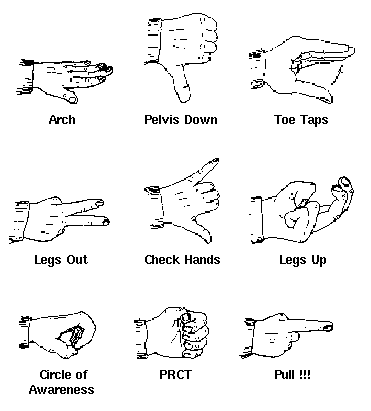
HARM Check: Also called a Circle of Awareness or Circle of Observation. Heading, look forward and down at a 45 degree angle to ascertain heading. Altimeter, read the altitude on the chest-mounted altimeter. Reserve, look at reserve side jumpmaster and wait for a nod. Main, look at main side jumpmaster and wait for a nod.
PRCT: A practice ripcord touch. Arch, insure a good arch at hips and chest. Look, tilt head to the right and look down the side of the body at ripcord. Reach, in with the right hand to place it over the ripcord handle while extending the left hand one foot over your head. Touch, recover to an arched position. Check, over right shoulder.
Short Circles: Heading, Altitude, Reserve, Main. Performed throughout the dive to maintain awareness (indicated by the dotted lines on the dive flow). No nods from JMs.
5-5 Signal: An altitude awareness signal performed by the student at 5500'. The signal is given by closing the hands twice in quick succession.
Pull: Arch, Look at ripcord, Reach for ripcord with right hand while extending left hand over head, Pull ripcord, Arch, Check over right shoulder for pilot chute launch.
Primary Canopy Check: Performed five seconds after the Pull. The main canopy is checked overhead for Shape (rectangular), Spin (not spinning), Speed (floating, not falling), and Twists (spread risers and kick out).
Release Toggles: by grasping them and pulling them quickly to the waist.
Secondary Canopy Check: Slider Down, Endcells Open, Rips/Tears, Broken Lines.
Controllability Check: Execute a turn in each direction and then a flare.
Canopy Control: Locate the Airport and then the landing area. Fly back using the halfway
down, halfway back rule. Watch your jumpmasters canopies.
Setup For Landing: The landing setup consists of three legs:
Downwind: Starting at 1000' fly to the downwind side of the target.
Base: By 500', begin crabbing across the wind downwind of the target.
Final: By 200', turn into the wind and fly towards the target. Once on final, no
turns in excess of 45 degrees should be attempted.
Prepare to Land: At 50', feet and knees together, toggles at ``full flight''.
Flare:: At approximately 10', bring both toggles smoothly to your crotch, keeping
your feet and knees together. If the flare occurs prematurely, slowly raise the toggles to your stomach, then re-flare at 10'.
PLF: Parachute Landing Fall. Keeping feet together and hands in, roll with the
landing taking the force on the fleshy parts of the body (feet, calves, thigh, butt, back/shoulder).
Collapse the Canopy: by reeling in a toggle and running to the downwind side.
Field Pack: the canopy, turn off the radio and AAD, return to the student packing area
with the jumpmasters.
Return: the helmet, goggles, altimeter, jumpsuit and radio.
Congratulations
You've just made your first skydive!
Hand Signals


There are no comments to display.
Join the conversation
You can post now and register later. If you have an account, sign in now to post with your account.
Note: Your post will require moderator approval before it will be visible.