0

Gear

    Know Your Gear: Harness and Container Systems Part 1

    Know your gear series: Harness, fitting to your body and effects to consider.
    by Damian Alvarez
    The harness is a fundamental piece of your skydiving gear. As such, you know it like the back of your hand, right? Maybe the answer is "well, not really". Many experience jumpers will answer that. Most novice jumpers looking for their first rig also often neglect the importance of a harness that fits them. Coming from "one size fits nobody" student gear, they don't even know how a harness should fit them. This might change once they order their first custom harness/container system, if they ever do. If you want to know your gear a bit better, or if you want to inform yourself a bit better about what you should look for when buying a harness/container, either new or second hand, then this article is for you.
    What is a Skydiving Harness?
    The harness is the part of your harness/container system that is designed to keep your body attached to your canopies. In today's sport skydiving gear, the harness and container are 2 different but inseparable pieces. It wasn't always like that. In the 60s and early 70s harnesses and containers were interchangeable. That allowed to quickly swap components as needed. While this might seem like a good idea at first, these systems had their own set of problems. They were heavy due to the additional hardware needed, and error prone, as they had more room for assembling errors. In the 70s manufacturers started to integrate both into a single harness/container system, hiding part of the harness in the backpad of the container. This concept stays with us almost 50 years later.
    Even though the harness and container are today a single unit, it is important to know that the container is built around canopy sizes, and the harness is built around body dimensions. A byproduct of these two pieces of gear being inseparable, is that rookies typically focus on a single thing: the range of canopies they can fit in the container. That is not an issue when they are buying a custom harness/container (as long as the body measurements provided to the manufacturer are accurate), but novice jumpers start their skydiving career typically by buying used gear. Take a look at your DZ next time you are there, and pay close attention to how different harnesses fit their owners. I bet you'll find a few ill-fitting harnesses among new jumpers. Later on we'll see why this is important. But first, we have to know a bit more about the harness itself.
    Basic Harness Components and Construction
    Before getting into the details of harness construction, it makes sense to take a look at the webbing and tape types used for it. Distinguishing webbing and tape is not obvious. Generally it is considered webbing anything wider than 1" and with a tensile strength higher than 1000 lbs, and tape anything less than any of these 2 parameters. The table summarizes the most common webbing and tape types in harness construction. The pictures below show how they look like and how to distinguish them.
    Common webbings and tapes used in harnesses. Kind    Type Tensile strength Width Common use Webbing    Type 7  6000 lbs (2721 kg) 1 23/32" (4.3 cm)  MLW, laterals and risers    Type 8  4000 lbs (1814 kg) 1 23/32" (4.3 cm)  Risers and straps    Type 12  1200 lbs (544 kg) 1 23/32" (4.3 cm)  Reinforcement around rings    Type 13   7000 lbs (3175 kg) 1 23/32" (4.3 cm)  MLW and straps    Type 17  2500 lbs (1134 kg) 1" (2.5 cm)  Chest straps, main risers    3" Type 4  1800 lbs (816 kg) 3" (7.6 cm)    Confluence wraps Tape    Type 4-B  1000 lbs (453 kg) 1" (2.5 cm)   Reinforcement around rings and confluence wraps

    Type 7 webbing. Has yellow lines at the edge. Photo: Bally Ribbon Mills

    Type 8 webbing. Has a black centerline. Photo: Bally Ribbon Mills

    Type 12 webbing. Has red lines at the edge. Photo: Bally Ribbon Mills

    Type 13 webbing. Has black lines at the edge. Photo: Bally Ribbon Mills

    Type 17 webbing. Photo: Bally Ribbon Mills

    3" Type 4 webbing (Spec. PIA-W-4088). Do not confuse with Type 4 tape. Some authors consider this as tape, not webbing, due to the low tensile strength it has (relative to its width). Photo: Bally Ribbon Mills

    Type 4-B tape (Spec. PIA-T-5038). Do not confuse with 3" Type 4 webbing. Photo: Bally Ribbon Mills
    Now, you can try and take a look at your harness. Can you identify the different types of webbing and tapes used on it? If you do take a look, you'll also notice that in most parts of the harness you have actually two layers of webbing instead of one. There are two reasons for it: to make a stronger harness, and to prevent slippage.

    Harness diagram with its main components.
    Now that we know what are the materials used, we can get into the different parts on a harness. Any sport skydiving harness has the following components:
    Detachable main risers:
    These are the risers that you are most familiar with. They are attached to the rest of the harness via the 3-rings system, and they depart with the canopy when you cut away. They are also some of the parts of the harness that see the most wear. The most common type are the "mini-risers" with "mini-rings". These are made of Type 17 webbing. During the transition period where this style of risers became popular, there were occurrences of riser breakage close to the grommet used for the 3-ring system. This was particularly dangerous with RSL equipped rigs, as if the riser broke below the RSL attachment ring (while the opposite riser stayed attached), your reserve could fire into a trailing main, and you'd be set for a bad day. The Collins lanyard, the double-sided RSL system, or the LOR system try to prevent that from happening, by either releasing the other riser, or by keeping the reserve pilot chute in the container until both risers leave. Regardless of these solutions, to diminish the chances of mini-riser breakage, most manufacturer reinforced their mini-risers with a piece of Type 4 tape sewed between the front and back risers at the grommet area. Parachutes de France opted for an alternative solution, reversed risers, that avoid the grommet piercing the webbing altogether. With these changes, the number of risers breaking was reduced drastically, and is today almost unheard of.
    If you are a student, you are probably more familiar with the "normal" risers, ie: the ones with Type 8 webbing and full size rings. These risers are stronger than mini-risers, and the leverage provided by their bigger rings allow to cutaway with less force. They are however bulkier and have more drag in flight, and have fallen out of fashion among most sport skydivers.
    Non-detachable reserve risers:
    These are the risers that you will get to know one day during a cutaway, if you haven't done so already. They are an integral part of the harness. In many harnesses they are part of the same webbing of your MLW, instead of a separated piece of webbing sewed to it. They are normally Type 7, even though other materials are possible.
    Main lift web (MLW):
    The main lift web, typically shortened to MLW, is the piece of webbing that holds the whole harness together. It takes all the load from opening and during flight, all the way from the risers (either main or reserve) to the leg straps, where you are hanging/seating. Due to that, it is typically the strongest part of the harness, made of Type 7, 8 or 13. Even though this is the strongest part of the harness, it doesn't necessarily mean that other parts are significantly weaker. It can be further divided in upper MLW and lower MLW. Conceptually, you can think about the lower MLW as the part that goes from the chest rings (or chest strap junction) to the hip rings, where your handle pockets are sewed. The upper MLW is the part that goes from the chest rings (or chest strap junction) to the upper part of the junction between MLW, reserve risers, and diagonal back straps. The length of the MLW is normally fixed, except in some student or tandem gear. In these cases the length can be adjusted to accommodate the sizes of different users.
    Chest strap:
    The chest strap is one of the 3 straps you have to fasten to adjust your harness. It secures your torso in place, and keeps it in the space formed by the chest strap, the MLW, and the back straps. It is not designed to take a huge load, since most of it is transferred from the risers to the leg straps by the MLW. The webbing used has typically a lower tensile strength. It is normally either Type 8 or Type 17. The hardware to fasten the chest strap has been also certified with lower loads than leg straps hardware (500 lbs. vs 2500 lbs.).
    There are jumpers today "abusing" their chest straps, by putting a load on them that they weren't designed for. Think of hybrids or Mr. Bills. Harnesses are typically "overbuilt", so they are unlikely to fail due to these practices, particularly with hybrids, due to the limited stress induced in the seams, webbing and hardware (for a 2 belly flier + 1 freeflyer hybrid, just 100—150 lbs. hang from each chest strap). However, on Mr. Bills, the load can be significantly higher. A careful jumper should try to hang on the upper MLW on a Mr. Bill, instead of the chest strap.
    Leg straps:
    The leg straps are the remaining 2 adjusting points of your harness, besides the chest strap. They are attached to the hip rings or sewed directly to the MLW. In some older designs without rings, they could also be part of the same piece of webbing of the MLW. They need to be strong, but sometimes they aren't as sturdy as the MLW. They can be Type 7, 8 or 13.
    Freefly bungee:
    The elastic cord that attaches both leg straps isn't necessarily a part of the harness. However, it has a small but very important function. It prevents the leg straps from slipping up your leg towards your knee. The largest "hole" in your harness is right there, between your laterals and your leg straps, waiting to mess up your day when you have a premature opening while sit flying. Tandem harnesses have a "Y" strap that has essentially the same function. If you don't want to find yourself in a difficult situation like the granny on the video, use this simple addition to your harness. If you still think that this can't happen in a sport harness, well, take a look at the remaining 2 videos and think again.
     
     
    Laterals:
    The laterals are some of the most commonly overlooked parts of the harness. They are relatively small and out of sight, so people tend to forget about them. They are the parts that join the MLW (or the hip rings, depending on the harness design) with the bottom end of the diagonal back straps. This last junction is hidden inside the backpad of the container. They also form an horizontal back strap, which I am considering here as part of the laterals itself, even though strictly speaking, it is not. They are normally made of Type 8 webbing, but Type 7 or 13 are also possible. Their only function is keeping your rig close to your back. It is a simple but important function, and we'll come back to it in part 3 of this series of articles.
    Diagonal back straps:
    If laterals are overlooked, it is safe to say that the diagonal back straps are completely ignored. They sit below your reserve risers and typically wrapped in fabric, and they are completely out of sight from that point on and all of the way to where they meet the horizontal back strap AKA (in this article at least) laterals. Even with the reserve tray completely open, they are out of sight, trapped between the backpad and the bottom fabric of the reserve tray. Like laterals, they can be made of Type 8, 7 or 13. Their function is holding your torso in place and keeping the whole harness together. Without them, the container would support a higher stress, which would wear it and break rather sooner than later. There are multiple configurations possible for them. They can have an "X" arrangement, where the left shoulder straps crosses the back and joins the lateral at the right side, and vice versa. They can also have a "V" arrangement, where the webbing goes down from one shoulder, wraps the horizontal back strap, and goes up again until it reaches the opposite shoulder. Other arrangements are also possible —like "U" for instance, but manufacturers don't discuss these details openly and knowing what is really used would require tearing open the containers.
    Hardware:
    The hardware binds together 2 or more pieces of webbing, either permanently or temporarily. Taking a look at the hardware used in harnesses, you can see 3 different types from the functional point of view:
    Fastening hardware:
    These are the quick fit adapters found in chest straps and leg straps. For the leg strap adapters there are 3 common types: thread-thru, thread-thru with locking bar, and flip-flop, shown in the pictures. All of them are rated for 2500 lbs. The chest strap has a lightweight thread-thru quick fit adapter, rated for 500 lbs, independently of the width of the chest strap.

    Thread-thru leg strap adapter.


    Thread-thru leg strap adapters with locking bars.


    Flip-flop leg strap adapter.
    3-Rings:
    These are the 3 rings we are all familiar with. There are two variants: The original, rated for either 2500 lbs or 5000 lbs, depending on the particular model, and the mini version (RW-8), rated for 2500 lbs. The tandem variants are slightly different in the large ring to allow to connect the student harness, and are always rated for 5000 lbs.
    Hip and chest rings:
    These rings are optional and normally use the same type of ring found in the large ring used in the 3 rings system. In some cases the ring is completely flat, as opposed to the large ring in the 3 rings system, which are bent at the point where they are connected with the MLW. Some rigs have a completely round hip ring, instead of using the large ring from the 3 rings system.
    Junctions:
    Obviously all the different pieces of webbing have to join somehow. These junctions can be of 4 types:
    Rings:
    In a ring junction, the webbing goes around the ring folded on itself —typically with a reinforcement tape in between the ring and the webbing—, and is locked in place with a stitching that follows a given pattern. It is important to note that the pattern is not arbitrary. Its shape, thread and number of stitches per inch determine the strength of the junction.

    Hip ring with Type 8 and Type 4 as reinforcement at the leg straps. Note how the ring is completely flat.
    Stitching points:
    Normal stitched joints are simply that, points were 2 or more pieces of webbing are sewed together with a particular pattern.

    Chest strap junction with Type 8 and Type 7 webbings.

    Hip webbing sandwich with Type 7, Type 8 and Type 12 webbings.


    3 rings junction where you can see most of the webbing types used in modern harnesses. Note how the large ring is bent at the webbing loop, instead of being flat.


    Layers in a confluence wrap below the 3 rings system.
    Confluence wraps:
    Confluence wraps are similar to the previous type, but there a piece of reinforcement tape wraps the junction to make it stronger. These reinforcement tapes are particularly important in high stress areas, like where the 3 rings, the reserve risers, and the MLW meet. One thing to consider when two pieces of webbing are sewed together, is that the strength required to break that junction is way lower when "peeling" than when "shearing". A manufacturer can in most cases design its joints to prevent situations where peeling forces are applied. However, depending on the harness design, these situations might occur. Confluence wraps are added to strengthen joints that are at risk. A couple of years ago, some BASE rig manufacturers had to modify the construction of their harnesses because of this. If you want to know more I suggest you take a look at this excellent article.
    The confluence wrap that stitches together the MLW, reserve risers, main risers and diagonal back straps is normally hidden in the mud flap. But some manufacturers —not all— have another confluence wrap that you have seen a thousand times but probably didn't pay attention to it: the wrap that traps the 3 rings locking loop in the main risers.
    Adjustable hardware:
    Here 2 pieces of webbing are locked in place together with a fastener. As we saw before, they are normally located in the chest strap and leg straps, but there are other possible points, like in student harnesses or belly bands.
    End of Part 1
    Hopefully by now you feel a bit more confident about the construction of your harness. This is important knowledge to better understand part 2, where we will take a look at the different articulations and other options possible in modern harnesses. Part 3 will focus on the proper fitting of the harness, and how a bad fitting can affect our performance or safety in the air. Stay tuned for more!

    By admin, in Gear,

    How To Select The Right Canopy For You

    In this article we will explore some of the questions you might ask when you go shopping for a parachute. While this advice is intended primarily for the novice jumper--just off instruction to one hundred jumps or so -- instructors may also wish to take note. As instructors we are often asked by our students, for advice on what kind of equipment to purchase. I always try to advise as if I were counseling a family member. “If you were my little brother or my little sister I would recommend the following.” Especially when I am in a student/instructor situation, I feel responsible for this fledgling until he is well on his way.
    Picking the right parachute is more complex than you might imagine. With well over 200 main canopies to choose from, this decision can be harder than buying a house. Today, there is a huge spectrum of canopies, from extremely high-performance parachutes to downright sluggish ones. There are some excellent selections for the novice and intermediate jumper in the mid to lower performance range. Let’s begin by defining some key terms for the uninitiated.
    High Aspect Ratio: The span (width) of the canopy is more than twice the chord length (straight line measurement from front to back) or greater than 2:1 aspect ratio.

    Low Aspect Ratio: The span of the canopy is less than twice the chord length or less than 2:1 aspect ratio.
     
    Elliptical High Aspect: As its name suggests, the elliptical canopy has tapered wing tips that significantly reduce wing tip vortices, thus reducing induced drag. When heavily loaded, this type of parachute goes very fast. The landing and stall characteristics are not as forgiving as a straight wing. It is only for the highly experienced skydiver with appropriate accuracy skills.
    Dynamic Flare vs. Steady State Flare
    There are two ways to land a parachute. More commonly in the past, the two methods were referred to as the “steady state flare” and the “dynamic flare”. The dynamic flare is one in which the brakes are applied, close to the ground or at the last moment at a toggle application rate of 1 foot per second. This is not a rapid movement -- it is really quite slow if you think about it. This maneuver converts downward and forward speed to vertical lift and diminishing horizontal glide. It should eventually result in a “tippy toe” landing. This maneuver, under a small canopy (meaning more than one pound per square foot of loading), almost anyone can do -- when the winds are up. In zero wind conditions the same maneuver requires years of experience, hundreds, perhaps thousands of jumps and a fabulous understanding of a particular canopy’s flight characteristics.
    The steady state flare is what is commonly used by practitioners of precision accuracy. You do not have to be a highly experienced accuracy jumper to use it, as it is a very forgiving technique. You must have a canopy of adequate square footage, however, and it generally works better on the thicker airfoils (accuracy canopies, demo canopies, some student canopies). In a steady-state flare the application of brakes is done more gradually, can be initiated at a higher altitude, and generates a minimum of lift. This is in opposition to the dynamic flare which generates a great deal of lift. The goal is the same with either technique. The last six inches above the ground should look the same: forward speed is virtually eliminated, and the parachute is brought straight down.
    The Pros And Cons Of Zero-P
    Zero Porosity fabric is impregnated with a silicone-based product that makes the fabric more resistant to wear and aging. This coating is what makes the fabric feel so slippery.
    The “Pros”
    The “Pros” of Zero-Porosity fabric include a better resale value, because the canopy will retain its original flight characteristics longer. But resale value, I try to stress to all canopy shoppers should be the last parameter. Buy what is right for you now. Choose the colors that you like. Go for the size and model that best suits your present needs. Zero porosity does not improve canopy performance as such. It only improves the longevity of the canopy. That is a big plus. However...
    The “Cons”
    It is harder to pack. You can sugar coat it a lot of ways but the fact is, the slippery, slimy feeling fabric is more difficult to keep under control, especially for the novice just learning to pack. Zero-P packs “bigger” because you can’t get as much air squeezed out of the pack job as you can with F-111. You will take longer to pack. At this stage of the game you want to keep up with the loads -- make more jumps in a day and not be fatigued. Your energy is better spent learning to skydive, rather than wrestling with your pack job.
    Canopies made from F-111 cost less. Considerably less. You can get many happy years of use out of your F-111 canopy, provided there is enough square footage over your head to start. Accuracy parachutes are made of F-111 because it allows the parachute to “bleed air” and sink better. This is something to bear in mind if you plan on doing a lot of demo jumps into tight areas!
    Line Drag vs. Pack Volume
    When should I choose Dacron? When should I choose Micro or Spectra line? Dacron lines provide greater parasitic drag, helping the canopy to shut down easier. Note that I speak in a positive light about this parasitic drag. In many cases it can be a good thing. Students would likely benefit from Dacron lines, as they often have trouble slowing down enough or at the right moment. Micro line or Spectra line reduces pack volume -- as a container manufacturer I love that aspect. I will grudgingly accept Dacron on my accuracy canopy to help control forward speed, however, and would recommend it to some young jumpers (under 200 jumps), for the same reason.
    Micro lines do not cause hard openings. Loose, short line bites, oversized rubber bands or Tube Stows, or otherwise improperly stowed lines cause hard openings. Consistently soft openings are commonplace on many micro-lined canopies. Likewise, hard openings are easily achievable with big, fat Dacron lines, if improperly stowed.
    Thick Dacron lines do not necessarily mean stronger lines. Jump Shack uses 1500 lb. Spectra on its’ Tandem canopies. There is nothing with greater tensile strength in use, in the parachute industry today.
    I almost always recommend Micro or Spectra on reserves. It is stronger. It reduces bulk in an area where space is at a premium. You may want to fit an AAD in the reserve container later on. Because your reserve is most likely a relatively low aspect 7 cell, excessive forward speed is not a problem. The reduced line drag will enhance the performance of your otherwise low-performance canopy.
    Winds And Field Elevation Change Everything
    Ask yourself this question: “Is it predominantly windy where I jump? Is it rarely windy where I jump?” If you are lucky enough to jump in Hawaii where it is absolutely beautiful, but windy most of the time, you can get away with a smaller canopy. You may in fact need a higher aspect canopy to survive if you are a lightweight. You don’t want to risk blowing off the DZ, after all. If it is only sometimes windy at your Drop Zone, and mostly calm, anticipate having to judge the distance of your glide on those low wind landings.
    Also consider Drop Zone elevation, and density altitude in the Summertime. Your parachute is going to display decreased performance capability at airports above 2000 feet, and on high temperature, high humidity days (the air actually gets thinner). You will have more difficulty stopping your canopy. The higher the elevation of your drop zone, the more square footage you should have. Otherwise anticipate a longer distance to bleed off forward speed. Above 2000 feet is where this factor becomes very evident, but I can feel the difference when I go away from DeLand, elevation 80 feet, and jump in New England at about 500 feet.
    Surprised is the student who makes his first 8 jumps in a 7 - 10 mph breeze, on a 288 sq. foot canopy, then suddenly finds himself off instruction, with no radio, on a windless day, with a 190 sq. foot demo canopy. Don’t let it happen to you -- unless you have endless desert stretched before you, free of barbed wire fences. This brings us to another important point -- drop zone location. In conservative New England (God love it), where the drop zones are small and the obstacles many, novices are generally guided toward canopies that are adequately large and docile. Whether it is done consciously or not, I have witnessed that the square foot per pound ratio (important! not the pound per square foot ratio) amongst young jumpers in that region is about 1.5, which I think is perfect. If you jump in a congested area, or one with many obstacles on or near the Drop Zone, you are generally better off with a relatively low-performance canopy. Don’t buy the argument about not being able to “get back” to the Drop Zone on a long spot day. Keep in mind that even todays “low performance” canopies could fly circles around the parachutes that we used 15 or 20 years ago, and we used those parachutes for demos, for accuracy, for students...
    Take The Conservative Approach
    Fifteen to twenty years ago, instructors were jumping parachutes that were not significantly different from those of the student. Giving advice was easy. You could go round or you could go square. If you were a big fella, you jumped a T-10. If you were a lightweight you could have a 28 ft. flat circular. If you had some money to spend you could get a ParaCommander. If you really wanted to go out on a limb you could have a Cloud or Paraplane (the latter not all that low in performance)! The point is, most of the canopies were relatively low in performance, or sufficiently high in square footage (or area).
    If I am speaking on the phone to a potential buyer, I always inquire about his age, physical condition, weight, and experience. I also ask where he jumps to get an indication of field elevation and prevailing conditions.
    Because many of us have fantasies of being a Sky god or a World Champion of some sort, we have a propensity to project this onto our students, giving advice with this in mind for one and all. We forget how many years it took to achieve our present status. We forget that many are in this sport just for fun! We should remind ourselves and our students, that there is plenty of time to learn, and there should be no rush. The instructional community seems to have no problem with telling the new jumper to sit down on a windy day so that he can jump tomorrow, rather than risk a bad landing that will put him out for three months. Likewise we should be telling them to take the conservative approach to canopy selection. We must assume that the novice jumper is going to make a mistake at some point, so why not let him do it on a big, forgiving canopy?
    Before you shop, talk to a few people, including your instructor, and some of the older, more experienced skydivers on your Drop Zone. Be careful not to let a salesperson dictate what you should buy. Because, while most retailers out there are reputable and knowledgeable -- they have a tendency to want to sell you what is in stock.
    A Formula To Go By
    Most manufacturers of parachutes speak in terms of pounds per square foot. For example, if John weighs 200 pounds and jumps a 97 sq. ft. canopy, he is loading it at 2.06:1 or 2.06 pounds per square foot of canopy.
    When you go shopping for a canopy, you should think in terms of square feet per pound of your body weight (i.e. you weigh 200 pounds and you have 0 - 20 jumps). Using the following chart, multiply your 200 pounds by the 1.75 sq. ft./pound recommendation for your number of jumps, and find that you should be jumping a 350 sq. ft. canopy.
    The following numbers are general guidelines from a conservative point of view. They are based largely on my own personal experience as an instructor, and active competitor, with 20 years of experience, flying canopies in every size range. For tandem jumping, I prefer the 400 square foot range. For accuracy, I jump a 252 to 259 square foot canopy, and for style, RW and everything else, I use a 107 square foot elliptical. So you see also, that different jobs require different canopies! Also remember -- there is an exception to almost every rule. For example, not all 7 cells are low aspect. The new Triathlon is a recent exception to that old rule. Not all reserves are 7 cells. There are 9 cell reserves, even 11 cell reserves. There is such a thing as thick Spectra line, and rather thin Dacron suspension line. There are a lot more exceptions where those came from.
    Number Of Jumps Appropriate Square Footage Aspect Ratio : 1
    1 - 20 1.75 sq. ft. / lb. <2.0 : 1
    21 - 50 1.65 sq. ft. / lb. <2.0 : 1
    51 - 200 1.50 - 1.35 sq. ft. / lb. 2.0 to 2.5 : 1
    201 - 1000 1.30 - 1.10 sq. ft. / lb. 2.0 to 2.8 : 1
    1001 - ? 1.10 - 1.00 sq. ft. / lb. >2.8 : 1
    Some interpolation will be required here. Round the figure up or down as much as 15% to find an existing canopy size.
    We know that highly experienced jumpers can and do exceed the one pound per square foot maximum as prescribed by most canopy manufacturers. This is one of the benefits as well as one of the hazards of living in a free society. We just have to be sensible about such freedoms.
    A jumpers’ age and physical condition must also be weighed into the equation. Ask yourself honestly,
    Am I athletic and limber? Can I run off excessive forward speed from a small, high aspect ratio canopy on a high-density altitude, no wind day? Am I simply in good physical condition? (Perhaps you can’t run as well or as fast as you used to.) Am I in fair physical condition? (I don’t want to have to run at all.) Or am I in poor physical condition (Lacking in strength and muscle tone, not very flexible)? If you are a “1," eventually when you have gained experience, you will be able to jump the sportiest of canopies. If you are a “2,” you may want a high aspect canopy, but with square footage in the 1.35 to 1.15 range. If you are a “3” or a “4,” consider a low aspect canopy, as well as abundant square footage.
    The Step-Down Method
    Spend your first two years or first 500 jumps on a canopy that is 1.5 square feet per pound in relation to your body weight. You should be completely comfortable in any situation or meteorological condition with that canopy before you graduate to the next size down. Then spend a year-- or 300 jumps-- whichever comes first, on the next size down the canopy, and so on.
    Riding The Clutch
    Fly with a little bit of brakes. It is OK to fly leaning on the toggles a bit. We do not have to be in full flight all the time until landing -- especially when there is a lot of other canopy traffic in the air. I routinely fly my Stiletto 107 in 1/4 brakes when on a large RW load or when picking my departure point to land in the pea gravel area. In a congested situation, one has to get in the landing queue (ahead of the big floater, behind the hot little 99 square foot canopy). The main reason for flying with a little bit of brake applied is to provide for more forward speed in the event you misjudge and find yourself short of your targeted landing area. You now have a little “extra gas”. Additionally, if you’re “steep” (high and close to your target), it is OK to apply some brake and sink till you reach the desired angle of attack.
    Timing the flare is infinitely critical. Learning this skill simply takes a number of jumps to perfect. I think it is probably harder to master than the basic freefall skills. Some jumpers have a natural “feel” for this. Others may take hundreds of jumps to learn it! Most skydiving schools do not spend enough time on canopy control. More emphasis should be placed on canopy control in the post-instructional period. Teaching drop zones might consider a five or ten-jump “stand-up accuracy” course before graduating that student. Abundant square footage will provide for a greater margin of error until you develop the necessary canopy control skills. There are canopies out there for you.
    If you have under 200 jumps you should allow yourself ample square footage, seriously consider low aspect, and resign yourself to a medium or large sized container. There is plenty of time to work your way down in size of canopy. No one ever screwed themselves into the ground because they were jumping a canopy that was too large.
    Nancy J. LaRiviere
    USPA/ I, Tandem Examiner
    Pilot, COM, MEL
    Senior Rigger
    May, 1995
    © The Jump Shack
    Reprinted with permission

    By admin, in Gear,

    Derek's Gear Tips


    Image by BoonhuckDerek Vanboeschoten is a Senior Rigger, Tandem Master and AFF instructor with more than 3300 jumps. Derek also moderates the Gear & Rigging forum on Dropzone.com where he first posted this list of Gear Tips. It is republished here for your convenience.
    Use Performance Design's Slinks for the main and reserve canopies instead of Rapide links. Slinks are stronger, lower bulk, easier to install and remove, and won't damage the slider grommets.

    Clean cutaway cables every 30 days with Ace Pure Silicone Lubricant, sold at Ace Hardware stores, to keep cutaway pull forces low.

    Inspect cutaway cables every 30 days and replace nicked or kinked cutaway cables with a new cutaway handle/cables.

    Flex 3-rings every 30 days to prevent them from taking on a "set" and hanging up during a cutaway.

    Inspect Rapide links and bumpers or PD Slinks every 30 days. Always use slider bumpers with Rapide links to prevent damage to the slider grommets, "Lock-Tite" to keep the link from loosening, and nail polish to torque-stripe Rapide links.

    Use metal, capped, and tacked riser inserts for the excess cutaway cables, regardless of main size or type. They prevent difficult or impossible cutaway resulting from the channel "gripping" the cables or from line twists that include the excess cutaway cables.

    Replace the main closing loop early and often. Adjust main closing loop so that the closing pin is snug. Use a stainless steel washer thick enough that it won't bend when closing the container.

    Have Velcro replaced every 100-200 uses.

    Use a kill line pilot chute, regardless of the size/type of main canopy you have. Check the length of your main pilot chute kill line every 30 days. The kill line should have a little slack in it when the pilot chute is "cocked" and the bridle is under tension. If it doesn't, have it fixed.

    Replace a damaged or old kill line pilot chute with a new one.

    "Cock" a kill line PC after laying the cocooned canopy on the ground and just before putting the canopy in the deployment bag.
    Take the twists out of steering lines every jump or, at a minimum, after the last jump of the day.

    When setting the brakes, set them so that the steering line is to the inside (between the risers) and the excess is to the outside. This will put the excess to the bottom of the riser channels, helping to protect the excess steering line.

    Keep gear out of the sun as much as possible.

    Use Velcro-less toggles/risers. Velcro requires replacement every 100-200 uses, and Velcro damages the steering lines, risers and anything else it comes into contact with.

    Replace mini-risers every 500 jumps or less. Inspect them every 30 days for wear.

    While packing, check your line trim every 30 days or less. When new, all the "A" lines are the same length (on 'most' canopies, check with the manufacturer). Spectra shrinks from the heat from friction with the slider grommets, pulling the canopy out of trim. Pay special attention to steering/control lines. Replace line sets that are significantly worn or out of trim.

    Use the proper size rubber bands, 'Sky Bands', or 'Tube Stows' and do not double wrap them.

    Have your rig washed every 500 jumps or so, more if jumping in a sandy or salt-water environment.
    What to do After Landing Your Reserve:
    First, place the toggles back on the Velcro. This will prevent the hook half of the Velcro from damaging the lines. Second, daisy chain the lines. Use the slider to keep the daisy chain from unraveling. This will keep the lines neat and untangled. If you have an RSL, remove it from your main canopy and re-mate the Velcro to keep the hook Velcro from damaging your gear.
    Be very careful with the canopy. Get it out of the sunlight and into a large plastic garbage bag and then into your gear bag. Be careful when zipping the gear bag shut to not get any fabric caught in the zipper. As long as it is clean, put the reserve pilot chute and free-bag in the center of your rolled up reserve. This will protect the spring inside the reserve pilot chute from damage.
    Do not take the main canopy off of the risers to untangle it. It got tangled on the risers, it will come untangled on the risers. Taking the canopy off the risers, or worse, the lines off the links, will only make the job of re-assembling the main more difficult.
    Put the cut away cables and reserve ripcord back into their housings and the handles back in their pockets. This will prevent any dirt on the cables from getting on the reserve or the Velcro from damaging lines, the container, or the reserve. If you lost one, or both handles, order them and have them shipped to your rigger. Also, if the free-bag and reserve pilot chute was lost, order a new one and have it shipped to the rigger. Make sure when ordering handles or free-bag to order the correct size for your harness/container.
    In the gear bag, put a card with your name, address, phone number(s), and any special instructions, such as "install/replace soft links", "wash the container", "remove/install RSL", "I need the rig by this weekend", etc.
    If you have a Cypres, check your reserve packing data card to see when the scheduled maintenance and 2 year battery replacements are due. If the maintenance is due (4 and 8 years +/- 3 months (+/- 6 months for Cypres "2") from DOM), make arrangements with your rigger to ship the unit or have your rigger remove it and ship it yourself (your rigger will need the original Cypres box to ship it). If your batteries are due (two years since installation for the Cypres1), check with your rigger to see if they have new batteries or if they will need to be ordered. The batteries will have to be replaced if there is less than four months remaining in the two-year cycle, for a Cypres "1". Cypres2 batteries are replaced at the 4 and 8 year maintenance by the factory.

    By admin, in Gear,

    Toggles Matter

    It is often the little things in our skydiving day that change the way things go. Paying attention to the details can make all the difference when it comes to preventing malfunctions, and when we get lazy, tired or complacent, our attention gets fuzzy and unfocused. That is when we make mistakes that we regret. One area that often results in malfunctions is errors in stowing our toggles, and there are quite a few ways in which we can perform this seemingly simple act incorrectly, only some of which will be discussed in this article.
    The most obvious aspect of this necessary part of packing that we can mess up is the depth of the toggle in the keeper. If we do not push the toggle sufficiently into its fabric keeper, the toggle will eventually unstow during deployment.

    Premature brakes releases result in countless cutaways each year. Each time we chop, we risk losing our main canopy and our freebag; a very expensive mistake.
    Another facet of stowing our toggles that can result in a premature “brake-fire” is insufficient tension on the portion of the brake line that leads to the canopy.
    This slack can allow a sharp tug of the brake line near the toggle, causing it to pop out of the keeper, and even snap the line itself. A healthy practice when setting your brakes is to pull upward on the brake line above the toggle, ensuring that everything is loaded against the toggle properly.
    Yet another common error when stowing the steering toggles is to pass the toggle through the brake line above the guide ring.
    This will almost always result in a premature brake release. It will also usually result in damage to the fabric toggle keeper, as the load on the brake line will go directly to the keeper rather than to the guide ring. I see this one quite a lot, and the jumper is always blown away when I point it out while they are packing. Better a moment of embarrassment on the ground than a premature brake fire in the sky.
    On that note, if you experience a premature brake release, or snap a brake line during deployment, your canopy will turn. On many parachutes, this turn can be quite fast, and it is likely to increase in both airspeed and rate of rotation. This means that time is of the essence when dealing with this kind of malfunction. This, however, does not mean that the correct response is to claw for the stowed toggle like a crazed monkey. Yes, you do need to unstow the remaining toggle, but having this singular goal in mind has resulted in many cutaways, AAD fires and even some fatalities. When you open up in a spin, your first job is to try to stop the spin, while remaining aware of your altitude. If you apply opposite harness input or simply pull the rear riser on the side of the canopy that has experienced the toggle release or broken line, you will slow the situation down. By holding a heading, you will be losing much less altitude, and will afford yourself the time and brain power to properly execute whatever procedure is next.
    Also key to your safety is the condition of your equipment. For instance, if the toggle keeper has become loose due to wearing over time, even sufficiently stowed toggles will unstow prematurely. Since we stow the toggle in the same way every time, the toggle eventually becomes deformed, narrower at the load point, which can cause the toggle to jam when you try to release it.
    Also contributing to this possibility is the inevitable shrinkage of the “cat’s-eye” hole in the brake line on spectra lined canopies. This is caused by heating of the line due to friction as you unstow your toggles. The melting point of spectra is 297 F and the material’s response to heat is shrinkage, unlike George Castanza. Most cat’s eyes begin at about 25 millimeters on new canopies, and by 3 or 400 jumps, it reduces to a 19 or 18 millimeter passage. When combined with a narrow point in the toggle, a brake-lock malfunction is quite likely. This problem can easily be avoided through regular replacement of the mid and lower brake lines, and pinching of the toggle with plyers to create a uniform width.
    When the tip of the toggle fails to extract from the cat’s-eye, it is possible that the jumper unstowed the toggles in a gentle, slow motion, allowing the friction to hold the toggle in place inside the brake line. This phenomenon can often be avoided by making it a habit to always unstow the toggles with a sharp, snapping motion. This method has served me well for many years, and has totally eliminated the “stuck toggle” malfunction for me.
    On the topic of toggles that do not want to release, we have another malfunction that shows up from time to time. There are many things you can do with your excess brake line, depending on your particular riser design and your personal preferences. Some skydivers choose to pass the excess line through keepers on the opposite side of the riser. This is perfectly acceptable. If, however, the free end of the brake line is passed down through the keepers and then around the bottom of the toggle, a complete failure to release is possible.
    This occurs when the upward relative wind blows the brake line up over the toggle during opening.
    The jumper then can grab the toggles below this loop of line and unstow, causing an irreparable knot around the keeper loop on the opposite side of the riser.
    Another way that jumpers sometimes cause a toggle-lock is by passing the excess brake line through the soft links, and then securing the end of the loop through the tip of the toggle. Although this method has proven to be perfectly safe, and may make it easier to pull the slider down after opening, a serious danger exists. If the soft links are not sewn in place with tack-cord, the loop of brake line can get caught on the tab or ring on the soft link, causing a locked toggle malfunction.
    It is true that a toggle-lock does not need to result in a cutaway. If the jumper cuts the brake line with a hook knife, the parachute will fly straight. Nevertheless, this fix requires the canopy pilot to land with a rear riser flare, something that many are not prepared to do. If you have never performed this maneuver in premeditated circumstances, you are not likely to perform the task well in an emergency. As I often say, there is no such thing as an emergency if you have practiced the solutions; it is just a change of plans.
    The last toggle-related problem that I will discuss is failure to stow the excess brake line at all. It is true that many jumpers have been leaving “free range” brake line for many years without incident. In most cases, these are jumpers with small canopies who have very little excess brake line to deal with due to the size of their parachutes. Regardless, it is my experience that it is just a matter of time before this free line snags on something. It might be your GoPro. It might be someone else’s GoPro. It might be the door of the airplane or something even worse that I can’t even think of. The bottom line is, the procedure of stowing your excess line costs you only a few seconds, but it can save your life. Deal with it, please.
    It is the smallest of details that usually result in the worst and best experiences on the dropzone. Skydiving is a sport of tiny issues that add up to big consequences, and if we continue to enjoy the process of paying attention to these little particulars, we can continue to enjoy the sport for a very long time. If we flippantly skip off the tops of the waves so-to-speak, and pretend that the danger does not exist, this sport will prove us wrong in the most painful and terrifying ways. We are always at risk when we skydive, but fear is not what keeps us safe. It is attention to the details, and the positive emotions that come as a result of knowing that we are doing everything we can think of to stay alive. If we are happy, we are more skillful, and skill definitely increases the chances of a happy landing.
    About the Author: Brian Germain is a parachute designer, author, teacher, radio personality, keynote speaker with over 15,000 jumps, and has been an active skydiver for 30 years. He is the creator of the famed instructional video "No Sweat: Parachute Packing Made Easy", as well as the critically acclaimed book The Parachute and its Pilot. You can get more of Brian’s teaching at Adventure Wisdom, Big Air Sportz, Transcending Fear, and on his vast YouTube Channel

    By admin, in Gear,

    Personal Parachutes: The Ethics of Safety

    Many of us since the attack on the World Trade Center have been asking how this could have been prevented. And if it could not have been prevented, how then could we have had more survivors? As daunting as it is to think of, a parachute appears to be a logical and effective means of escape. After all, Leonardo DaVinci conceived in 1485 the first parachute specifically for the purpose of escaping safely from fires in tall buildings, and there have been countless other inventors and engineers who have worked on similar ideas since his time.
    Why then have we never seen this technology in use? Simply put, it is not necessarily a good idea. The recent events have led the public in a state of helpless anxiety to seek protection, reassurance, and a means to escape. Thousands of gallons of water have been sold, as well as a multitude of flashlights, antibiotics, gas masks, and now, personal parachutes. Several companies have taken advantage of this new demand by marketing parachute systems to office workers, hotel guests, emergency workers, and high rise tenants. One example, “The Executive Chute” is being advertised as a “last resort” when fleeing a structure over 20 stories. While the idea of marketing an emergency escape system itself is an admirable idea, it is highly irresponsible to sell these parachutes to people without adequate training. Their web site makes it seem like anyone could just pop it out of their desk drawer at work and saunter out to the nearest ledge and leap to safety.
    Another company, Precision Aerodynamics, is marketing the “Emergency Building Escape Parachute System”. They compare the need for an EscapeChute for people in high rises as similar to the need of a life preserver when traveling beyond swimming range from shore. People need to understand that this is not as simple as putting on a life vest. While their web site does say “training required”, they also promote the EscapeChute as an easy and obvious choice: “By following simple instructions, the parachute is automatically deployed for you. All you have to do to initiate deployment is to jump out the window and away from the building. Simple steering and landing techniques can deliver you to the surface with confidence”. A video is provided with purchase of the canopy, which may falsely lead people to believe that this is all the training they need.
    B.A.S.E. jumping, for the most part illegal in this country, is the extreme sport of jumping off of stationary objects (Building, Antennae, Span (bridges), and Earth). Buildings are the most difficult, even for a highly experienced jumper. Morpheus Technologies, which provides one of the only legal US training courses for B.A.S.E. jumpers, will not even let anyone sign up for their courses unless they are already a licensed and experienced skydiver with a minimum of 200 jumps. Even then, their training is intensive and rigorous. Kathy Gillespie-Jones at Morpheus says “As a manufacturer of B.A.S.E. specific equipment, we feel a responsibility to the general public. There is no quick fix in this situation. A background in skydiving and a very thorough training course are needed to even begin to pursue what we look at as a SPORT. Even then, we can die!”
    B.A.S.E rigs contain only one parachute and there is no back up, as typically altitudes are so low that it would not be possible to deploy a reserve in time. Packing must be perfect as well as your body position when jumping off the building to provide for the best chance that the parachute will open properly, on-heading, away from the building and with adequate horizontal separation. There are so many other variables that need to be taken into consideration when executing a base jump just under good conditions, such as exit height, wind patterns, piloting the parachute, just to name a few. An experienced and trained B.A.S.E jumper under good conditions is going to be a highly different model than a panicked inexperienced office worker, who would in all likelihood be severely injured or killed using a parachute to escape from a building. For a novice even with training, the lack of conditioning would cause a sensory overload which could prevent them from being able to react and properly use the equipment.
    Fire within a building would take this to an entirely different level of risk. Greg Yarbenet, the inventor of the slider which made modern parachuting possible, did studies about fifteen years ago, researching the effectiveness of escaping from a burning structure with a parachute. ”Parachuting from a burning building has to take into account the very unusual wind patterns that develop from a very hot rising air mass that is being replaced by the cooler, lower air that is now funneling upwards to replace the hot air.” He clocked the thermal updrafts at over two thousand feet per minute at the top of a test burning building. Air near the ground began to swirl upwards in a small vortex that changed the velocity and direction according to doors, windows, and other building shapes that allow the air to find the easiest path to the flames. Rising thermals off of the top created sudden downdrafts on the leeward side. Yarbenet found that any normal size parachute would not function well in such turbulent conditions, and could be pulled back up in the strong updrafts or collapse in the multiple vortexes along the sides of the building.
    Daniel Preston, of the New York based parachute company, Atair Aerodynamics, has mixed feelings on the subject. When asked if he would work in a high rise without his B.A.S.E. rig Preston answered “definitely not”. He believes that people should be given all the facts, allowing them to then seek training and make an educated purchase. However, he is against the selling of escape parachutes to the general public. As a New York company, Atair finds the ads for these products to be in horrendous taste, dangerously misleading and opportunistic. One company, B.E.S. even showed a banner of one of the towers being hit and people falling to their death. “It is specifically the way these products are being marketed that is irresponsible”, says Preston, “B.A.S.E. jumping requires training, period. It is not something you can just learn in a few hours from reading a book or seeing a video. The first step is to learn how to skydive. With a couple hundred jumps under your belt, you could consider learning B.A.S.E.”
    Preston estimated the survivability rate of some of these personal escape parachute systems to be less than 50%. That means that half of the people jumping would probably die. Other industry leaders estimated the survivability rate to be less. By comparison in skydiving where everyone is trained and licensed, fatality rates are less than one in one hundred thousand jumps. The majority of those fatalities are caused by pilot error under a fully functioning parachute. While it would be arguable that one should take any chance in the case of extreme emergency, the difficulty with that is determining what exactly is a last ditch situation. “I could envision many situations where people would be likely to jump when they don't have to”, says Preston. It is estimated that 70% of the people in the World Trade Towers escaped the through the stairwells.
    According to Cliff Schmucker, president of the Parachute Industry Association, “there’s obviously people out here trying to make a quick buck in a bad situation….At least one person was looking into congressional relief for the liability issue.”. This would be disastrous, as it would remove accountability for improperly designed, tested and marketed products.
    Dan Poynter, a well known publisher and writer of educational and technical texts on sport parachuting, says “sure, if you are a base jumper and on the 28th floor, keep your rig at the office, but for other people it doesn’t make a whole lot of sense”. Poynter believes “a parachute could work for some people in some cases, but there are many, many questions to be answered with regard to practicality, cost, training and design.”
    Atair manufactures a B.A.S.E. parachute called the Troll and states that the parachutes accumulated one thousand live real world jumps before it was offered for sale. What is being marketed by many companies as escape systems, is untested technology. The way that it is being marketed is misleading and sensationalist. “While I am not against the possibility of escaping from a building with a parachute”, says Preston, “there are so many things that need to be taken into consideration, and which seem to be overlooked in these current products.” “you can not just take an off the shelf para-glider reserve parachute, put it in a container and market it for a wholly different, far more complex and demanding application…its not safe.”
    The systems being marketed at this time have appeared on a variety of television shows and are gaining a lot of publicity. “From what we have seen”, says Gillespie-Jones, “The harness seems to be extremely awkward and the point in which the static line connector is located is very prone to cause an entanglement with the body. We witnessed complete failure by a company representative to put this system on properly. This was done on the Today Show in a controlled environment. There is no way that a person in a panicked state could begin to equip themselves properly in a timely fashion.”
    It is very frustrating to see the direction that this whole thing is going in. Companies seem to be jumping on the bandwagon, offering parachuting equipment that in any other application would take months if not years of research and development, drop testing and live testing in a variety of environments before there would even be a consideration to sell to the public. What transpired in New York, Washington and Pennsylvania is absolutely tragic and it was horrifying to see those people jump from the World Trade Center. Unfortunately, jumping with many of these escape systems that are being marketed in the aftermath under those same circumstances may not have saved lives, but only extended them by a second or two.

    By admin, in Gear,

    Spot Cleaning of Nylon Parachute Fabric

    The following is presented as a public service. It is copied directly out of a handbook from Performance Textiles, Inc. which I obtained at the 1999 PIA Symposium in San Diego.
    This information is intended as helpful suggestions. Performance Textiles makes no guarantees of results and assumes no obligation or liability whatsoever in connection with this information. For that matter, neither do I, but with all of the questions asked about cleaning parachutes, I wanted to get the best information available out to the public.
    Most stains can be avoided by immediately wiping the stained area with an absorbent cloth or paper towel. Always handle the fabric carefully and treat the smallest area possible. The following cleaning procedures have been used successfully to remove stains from coated and non-coated parachute fabrics:
    Stain Type: Food, soda, catsup (kethup for most of us), mud, dirt, sweat.
    Procedure: Use clean water and a sponge gently. Rinse area thoroughly with clean water. NEVER USE FULL STRENGTH DETERGENT.
    Stain Type: Mustard, red clay, blood.
    Procedure: Use a MILD detergetn. Let it sit on the stain 3-5 minutes, then sponge gently and then firmer if needed. DON'T use bleach as it can (my comment as a chemist...WILL) affect the fabric strength, finish, and color. (My comment....Can you say turn it into tissue paper quality?!!!)
    Stain Type: Motor oil, hydraulic fluid, grease, exhaust and demo smoke.
    Procedure: Allow to sit on stained area for 1 minute and work into the stain with a sponge. Then gently and carefully clean and rinse as above. Be aware that staining chemicals and cleaning agents can affect fabric strength, finish, and color. (In this paragraph, they left out the comment about what to use. Presume they mean mild detergent again.)
    DO NOT USE FLAMMABLE SOLVENTS SUCH AS GASOLINE, ACETONE, MINERAL SPIRITS, PAINT THINNER, ETC., as they may damage the fabric or fabric coating and other components.
    WARNING: If the fabric shows any sign of (excessive) wear, fraying, or a cut, scratch, or tear, do not use the parachute. (My comments: I added the word excessive. Gee whiz...if we followed this protocol, we'd have very few jumps on our parachutes because they all have some minor stuff as they age. That's one reason why a rigger should check the systems out routinely!)

    Never use bleach or products containing bleach. Contact the original parachute manufacturer for any problems associated with the parachute.
    One final sentence from the pamphlet: Cleaning may be more harmful than the spot!
    Stay safe out there.
    Blue Skies & Safe Dives from Mike Turoff,
    Co-author (with Dan Poynter) of Parachuting, The Skydivers Handbook, 7th ed.
    Instructor and Tandem Examiner, Jump Pilot
    Source:
    Rec.Skydiving
    Subject: Spot Cleaning of Nylon Parachute Fabric
    Date: 1999/10/30

    By admin, in Gear,

    How To Buy Used Skydiving Gear (The Smart Way)

    Image by Trigger
    Hey, new skydiver! Congratulations. That A-license stamp looks great in the middle of your forehead. Very flattering.
    Now that you’re in the fold, do yourself a favor: don't dally at the rental counter. It’s an investment (and somewhat counterintuitive) but trust me: you will find it much more cost-effective to buy your first set of gear than to keep renting, but If this is your first set of skydiving gear, you should buy used -- and spend the money you save on jumping. Here’s how to do it right.
    How to Buy a Used Reserve Parachute

    Get comfortable with the idea. Picking up a used reserve -- if it’s in spotless shape -- is a smart place to save a lot of cash. Riggers tend to agree that the cost of a brand-new reserve isn’t justified.
    Choose a damage-free reserve -- no patches, please -- with less than ten rides. Less than five is better.
    If your reserve is old enough to vote, it’s too old to jump.
    How to Choose a Used Main Canopy

    Look for a main with as few jumps on it as you can afford. Newer canopies fly better -- and, importantly, flare better -- than older canopies, because the passing seasons make the fabric more porous. As a rule, you can expect a harder landing from an older canopy.
    It can be tricky, but your best move is to choose a used main with its original line set. Even honest resellers don’t often know for certain the canopy’s actual jump numbers, and the condition of the line set is an inspecting rigger’s best clue.
    Find out where your canopy used to live. If it was jumped seasonally at grassy drop zones, it’ll be in much better condition than a year-round desert dropzone. That silicate desert dust chews up the fabric’s protective coating. Beware of beach DZs, too: seawater landings can result in very serious, sneaky damage.
    Be picky. Do your best to find an undamaged main canopy -- even one that’s been meticulously repaired. These are hard enough to resell that it’s rarely worth the up-front savings.
    Image by Halldor92572

    How to Buy a Used Harness/Container System

    Do not look for a container first. There are so many reasons why this is the case. You must know the exact sizes of both of your canopies before you can choose a harness/container to fit them.
    Have a rigger measure your body. Don’t go it alone. Harnesses are sized and carefully proportioned to both height and weight, and you’ll save yourself time by eliminating the guesswork.
    Ask the seller for the serial number. Then contact the manufacturer with your sizes. Ask the rep whether it’s a good fit for your body and canopies.
    Impossible to fit? Don’t worry. As you’ve undoubtedly noticed by now, non-standard body types are not uncommon in skydiving. However, new A licenses with unique body types sometimes face an uphill battle. Resizing a harness is almost always an option, but it’s can be so expensive that buying simple, new gear may make more sense. If this is you, research the basic, no-bells-and-whistles container systems available: for instance, the Dolphin, the Genera and the Shadow Racer.
    How to Buy a Used AAD

    Be sure that the used AAD meets your basic requirements. Determine that the AAD on offer is within its service life, has met the proper maintenance schedule and is approved for your container system. (Note that both the Cypres II and the Vigil II are waterproof, but the earlier (I) versions are not. Beach/lake dropzone? You know your answer.)
    Determine your timeline. When you buy an AAD – whether used or new – you’re paying a fixed cost per year. The quality of the AAD doesn’t change over time within its approved lifespan, so don’t worry about snagging a unit within a couple years of expiration. (Just save your pennies while the time runs out.)
    Buy new, if you can afford it. AADs are very easy to resell. Purchasing a new one is not a bad choice if you have the cash.
    General Advice for Buying Used Parachuting
    Equipment

    Keep an open mind. It’s unlikely that you’ll find a container that matches all the other criteria and comes in your colors. Accept that fact early.
    Pay a trusted rigger to conduct a pre-purchase inspection on any used gear you buy. The inspection will run you about $25 (or a matching amount of beer). Ask him or her to write down a list of issues – including potential ones – and the cost to remedy them, as if you’re buying a used car.
    Trust your instincts. If you don't like any potential component of your new skydiving kit — even one that has been suggested to you by a skydiving friend or a rigger or a boogie rep – do not buy it. You'll never be happy with it, and starting out with gear you dislike will adversely affect your entire skydiving career. Love the gear you’re in, and you’ll be a better skydiver for it.


    By admin, in Gear,

    Inspecting your Gear

    Most jumpers realize the importance of having their reserve parachutes repacked every 120 days in accordance with F.A.A. regulations. We know that this is not just a reserve repack but is also an inspection of our reserve canopy and also our harness and container assembly. Most parachute riggers will gladly accept your complete rig and inspect the main canopy and its components as well as inspect and repack the reserve (and will rightfully charge extra for this service). However, some of us do not give our main canopy to our rigger and more importantly some of us make so many jumps between reserve repacks that even a thorough inspection every 120 days might not be often enough to find potential problems with our gear. It is for these reasons that we should know the procedures for checking the parts of our gear that get the most wear.
    The following is a list of items on your main canopy assembly that you should inspect occasionally. This inspection should never be a substitute for a periodic inspection by a rigger but should supplement your rigger's inspection in between reserve repacks. If you find a problem with your gear, your rigger will be glad to advise you on what to do.
    A special note for those of you who usually have someone else pack your main parachute: Unless you have made some arrangement with your packer to do this inspection while they pack and unless they know what to look for, you are giving up this opportunity to check your gear each time they pack for you!
    Pilot Chute-
    Your pilot chute is one of the most critical items on our list of things to check on our gear, after all, the pilot chute is the thing that starts the deployment sequence at pull time. The pilot chute is also one of the most likely things for us to abuse. How many of us have left it dragging when walking in from the landing area?
    First check the handle attachment at the top of the pilot chute. After a number of jumps the stitching can loosen and come out. If this happens and the handle comes off it will probably happen at the worst possible time. For those of you that have had your handle converted to a custom handle like a Hacky Sack, pay particular attention to the modification. Some of this stitching will be inside the pilot chute.
    Check the seams of the pilot chute and the condition of the fabric. This is very important for those of you that have a large grommet in your deployment bag to allow it to slide over the pilot chute to collapse it. A very small tear or burn in the fabric may result in a large rip at 120 miles-per-hour. If your pilot chute blows up and you have a very tight container, there may not be enough drag to pull the pin.
    Bridle-
    Your pilot chute bridle has several important areas to check. The top of your bridle may be permanently sewn to your pilot chute or may have a loop sewn at the end. In either case you should check the stitching for security.
    Further down the bridle is usually a section of Velcro to secure your bridle to your container and it should be in good condition. Your bridle needs to be firmly attached to your container so that there is less chance of snagging it on anything that could pull your pin and cause your container to be opened prematurely.
    Next on the bridle is the pin that holds your container closed. The most important thing to check is the attachment of the pin to the bridle. This is the area that has the most stress, especially if your container is tight. Most manufacturers attach the pin with 3 bar-tack stitches which is very secure, but even bar-tack stitching can loosen. If your pin is attached by any other type of stitching it would be a good idea to have a rigger look at it as well.
    Continue by looking at the closing pin itself. Some pins were manufactured with a plating that tends to chip off making it harder to pull through the closing loop and also causing excess wear to the loop. Stainless steel replacement pins are available and work much better.
    On the other end of the bridle check the stitching on the loop where it attaches to the main canopy and check for wear at the point where it rubs against the grommet in the deployment bag.
    For those of you that have collapsible pilot chutes there is one more area to look at. Check for wear on the line that runs inside the bridle and pulls down on the top of the pilot chute. Fortunately most of these designs are fail-safe, and will still deploy your canopy correctly although not collapse the pilot chute later.
    If you have any problem at all with your bridle and it is a standard non-collapsible type, keep in mind that you can get a new and complete assembly from the manufacturer at a reasonable price. If you have the type of bridle that loops through the pilot chute attachment point it will also be very easy to replace.
    Bag-
    Your deployment bag is a straightforward item on the list and seldom requires much work, but it does take some abuse from dragging and forcing a canopy in it when you pack. You need to check the seams and stitching for this stress including the loops that the rubber bands attach to.
    Check that the grommets are securely in place and that they have no rough edges inside, particularly the one that the bridle passes through.
    If your bag has Velcro, make sure it is in good condition.
    Canopy-
    Although your main canopy is made up of many parts, this is a short list of the items that need the most attention. A more complete inspection should be done by a rigger periodically.
    First check the bridle attachment point at the top center of the canopy. This area gets a good deal of stress during deployment. Check the stitching and for stress around the attachment point.
    Check the general condition of the fabric. There may be some tiny snags or pin holes but there should be no rips or seams that have pulled out.
    Check the general condition of the suspension lines. A little roughness in the lines is not unusual but if any of the fibers in the line are broken have a rigger take a look.
    Check the slider fabric and seams like you did for the canopy and then check the condition of the grommets. The grommets should be securely seated in the edges of the slider and they should have no rough edges inside.
    Check the connector links to make sure the barrels have not turned and loosened. Slider stops are a good idea here because they not only protect the slider grommets, but they also prevent the barrels of the links from turning.
    Risers-
    The risers are the final area of your main canopy assembly to be inspected.
    Check the security of the large harness type stitching at both the top loop and at the rings. Make sure the grommets near the rings are securely seated and have no rough edges inside.
    Make sure the Velcro on the toggles and on the risers is in good enough condition to secure the toggles onto the risers.
    The risers should occasionally be released from the harness to check the operation of the release system. The webbing should be flexed enough to take the stiffness out of riser and the release cable should be checked for cleanliness and ease of operation. The manufacturers of harness and container systems devote whole sections of the owner's manual to describing the operation and maintenance of the 3-ring release. Read the manual and understand how it works.
    Rig-
    Your rigger will inspect your harness and container assembly when repacking the reserve, but several items should be inspected more often.
    The Velcro that the bridle is attached to should be in good condition as well as the pilot chute pouch. Be sure that the pouch contains the pilot chute well enough that it cannot come out accidentally but still allow it to be comfortably extracted.
    Lastly and very important is the closing loop. It should be the right length for the size canopy packed into the container and should not be worn so much that it could break from the pressure and cause a premature opening.
    In Conclusion-
    This inspection list has included the items that are most likely to show wear and need further attention from a rigger. Although it seems like there are a lot of things to look for, just remember that almost everything on this list is something that you look at every time you pack. Simply taking the time to look closely and knowing what to look for will go a long way toward keeping your gear safe and in good condition.

    By admin, in Gear,

    Inside Squirrel Wingsuits

    There are constant advancements in the development of human flight and over the past decade in particular we’ve seen some pretty ground breaking achievements, thanks both to the pilots who push the envelopes and the gear manufacturers that are constantly coming up with new products, and researching the way forward with regards to these items.
    We had a chat with Matt from Squirrel Wingsuits, one of the new wingsuit manufacturer on the block.
    On your facebook group you mention that this venture is one of a collaborative nature and that there are some 'elite wingsuiters' involved in the project. Are you able to provide names of those who are involved?
    Squirrel was originally founded by Matt Gerdes, Luc Armant, and Dave Barlia. After a year of intensive work, Dave was not able to reconcile the inherent workload with his family life and returned to fun jumping. Currently the day-to-day operation is Matt Gerdes and Mike Steen, with testing and development the responsibility of us plus a list of team pilots that will be released on the website soon.
    You mention on the Squirrel website that "If you want something done right, you have to do it yourself". That philosophy seems to be the primary reasoning behind the development of Squirrel. It is clear that you guys felt as though something was not being done correctly by other modern wingsuit manufacturers; is there something in specific that you felt was lacking in the current market and that there was a dire need for that had to be developed?
    In 2009 there weren’t a lot of people jumping “big” wingsuits in the BASE environment. Jade Tatom was the only person I had met who had ever BASE jumped a Tony suit. At that time (summer 2009) I felt that I had outgrown the suit I was flying and I was looking for something new but I didn’t want a Vampire because everyone else had a Vampire. I decided to get a “big” suit and immediately realized that it was awesome in the BASE environment. For 2009 and most of 2010, lots of people sneered at me and the other guys who were jumping these new big suits… there was an incredible amount of poop-talking that went on here at the Dropzone forum, in hindsight it’s really sad but it’s funny seeing so many of the people who were adamantly against big suits flying them now. I have to give Andy West and Dean Potter credit for being smarter than I was and basically enjoying their suits in private. I was a loud proponent of big suits and convinced as many people as I could (which turned out to be a lot) that wingsuit BASE was more fun with bigger wings… and by the end of 2011, a lot of people had figured out that more surface area is potentially advantageous in many ways. Anyone familiar with the evolution of wingsuit design in the past 3 years knows the rest of the story.
    I have liked every suit I’ve owned, for the most part. Tony makes great wingsuits and his and Jeff’s designs have (in my opinion) revolutionized the sport. But in 2011 I almost died twice and decided that I either had to quit jumping, or figure out a solution to the issue. In the end, Squirrel was the solution. If I die BASE jumping, now at least it will be in my own suit ;-)

    What is different about Squirrel wingsuits that sets them apart from the competition? Why would one be making a better choice by going for Squirrel as opposed to one of the other guys?
    If you look at the suit and fly it and can see and feel the difference, then you will know if the suit is for you or not for you. Deciding which suit to fly is (and should be) a very personal choice. I’ve tried my best to describe some of the details that are unique to our suits on our website, but I would never claim that our suit is better than another. It’s something that each jumper needs to experience and decide for themselves.
    The company is quite new, as are the products that have been released. How has reception been thus far?
    The feedback has been even better than we hoped. Our main concern is delivery times at this point.

    How many products do you currently have for sale, and how many are in development, with any possible release periods for upcoming products?
    The Colugo will be on general sale in late February. The Aura, a slightly larger suit, will follow. The Swift, our entry-level suit, will come this summer.
    How much time or effort has been spent into the research, specifically aerodynamic research for these suits. Are they going to be offering anything special with the way they fly? Anything you can tell us about the procedure that has lead up to the production.
    We are very lucky to have Luc Armant on board. He and Fred Pieri were instrumental in establishing the planform and profiles. Luc and Fred work for Ozone Paragliders, which for the past few years has been widely recognized as the world leader in high performance paraglider designs (currently about 80% of the top competition pilots are flying Ozone, which is insane in a sport with almost 50 brands).
    Luc and Fred are both complete and total geniuses, and their understanding of flexible airfoils is unparalleled. They have had some wild and awesome ideas, but there are major restrictions for wingsuits because we need them to be comfortable and safe (in my opinion safety and comfort come before performance) before we need them to be fast and efficient. Some of our early prototypes had massively stiff arms with reinforced tri-laminate surfaces and mostly-rigid profiles. The performance was amazing but you couldn’t even sit comfortably in the airplane. We remedied some of that with complex arm-release systems using magnets and Lycra and other things, but in the end it was all just too much going on when you’re standing on the exit point.


    Simplicity is so incredibly important in our sport. The first phase of development really made clear that comfort and confidence are the main priorities. A natural flying position, very clean and easy access to the BOC and brakes, and fast start-arc* in the BASE environment are our first priorities. When you start pushing speed and glide performance too much, inevitably there are sacrifices. We’re very happy with the performance but for me the most important thing is having the maximum amount of confidence that I’m going to get a fast, balanced, and predictable start, and then be able to reach my BOC clean and clear on every jump. I think that this is what pilots will appreciate on every jump.
    It’s human nature to be obsessed with performance, and I am not against that obsession, but I think that choosing suits based on their theoretical glide and losing sight of things like a fast start-arc and a really clean pull is a mistake. Nothing else matters when you can’t get your PC. In the past year we’ve seen more and more jumpers ordering the biggest suit possible – and while I agree that big is fun, I also think that we have to stay focused on ease of use and agility, especially for BASE jumping. And a lot of jumpers are not getting this point. The phenomena is like the opposite of skydive canopies, where jumpers feel cooler when they are flying something smaller; it seems like a lot of BASE jumpers want to be wearing the biggest suit they can, even though they would be able to fly much better lines in a more moderate design.
    *We define the “start-arc” as the vertical distance consumed at the point at which the jumper crosses an imaginary line extended at a 45 degree angle from the cliff edge.
    Your primary focus at the moment seems to be on attracting BASE jumpers, do you ever plan on expanding focus to skydivers as well?
    Every BASE jumper is a skydiver, too. Or at least they should be. In my opinion, skydiving is the single most important thing that you can do to improve your wingsuit BASE jumping. One of the most important features on our suits is the Innie-Outie zip system, which allows you to zip your BASE harness inside the suit and profit from the increased wing area and reduced drag which results, or you can zip your skydive harness onto the outside of the suit which allows you to access your handles safely and easily with no funny-business. Our focus will always be on wingsuit BASE jumping, that’s just who we are, but we all love to skydive and all of our suits are designed to be skydived safely and easily.
    Are there any professionals, whose names one may know busy flying Squirrel suits at the moment, and if so, who are they?
    Stay tuned for the list.

    By admin, in Gear,

    Know Your Gear: Harness and Container Systems Part 2

    Harnesses: Fitting to your body and effects to consider...

    During part 1 (take a look here) we described the different parts of a skydiving harness and the materials used on it. On the second part we are a bit more practical. Here we will go through most (all?) harness options and designs, independently of the manufacturer. We will see what they are and which purpose they have, so you can decide if they are for you or not. Most manufacturers are open to offer non standard options if the buyer asks about it. However, there is a significant number of options that are specific for a subgroup of manufacturers, and therefore you can't freely mix and match every single option explained here.

    To keep things ordered we will go from top to bottom of the harness. Let's go!
    Risers

    Going from top to bottom, the first thing you find are the main risers. As simple as they seem to be, they have a significant number of options.
    Webbing

    The first thing to decide is which type of webbing you want on your risers. In this time and age there is little debate: If you are not an outlier you'll want type 17 risers. There are multiple reasons. The main technical reason is that it makes it easier to pull down the slider to stow it behind your head. Type 17 is also preferred to type 8 because of its lower bulk and cooler appearance (which is, of course, not a technical reason). It typically comes paired with minirings, which are also less bulky than traditional rings and "cool" looking.

    Regarding webbing, a second option is to have risers sewed in half, reducing its cross section and drag. This option is only available in type 17 risers and has a very specific audience: hardcore swoopers. They need to reduce drag as much as possible, to squeeze out all the performance in their canopies. If you are not a hardcore swooper you can ignore this option. Moreover, some manufacturers advise against these low profile risers if you are going to deploy at terminal speed.

    The last bit regarding webbing on risers is its length. 21" (53 cm) is the standard length of many manufacturers. As usual, check first with them to ensure that is true. You can also order them shorter (if you have short arms) or longer. It is normally recommended to have them as long as possible, but allowing to reach the slider. That's because with longer risers the canopy can "open up" a bit more, and you'll have more range in all your controls, particularly in toggles. That also means that you can stall your canopy easier, so the whole system has to be in balance.
    Diving loops

    Diving loops are nowadays kind of standard, and even rigs targeted at newly licensed skydivers have them. There are, however almost as many kinds as manufacturers.

    The simplest type is a loop of type 17 webbing sewed close to the top of the front risers. These loops are easy to manufacture, cheap, and play no role on hooking your main canopy. On the flip side, they lay flat against the risers, making them more difficult to grab and causing distractions, and are harder on the fingers.

    Another common type of loop uses tubular webbing. The advantage of this type of loop over the simple type 17 is two-fold: It is easier on the fingers, allowing to hold the front risers longer, and the loop tends to stay open, making it easier to grab. Sometimes these loops have extra material inside (stiffeners or bungee cords) to ensure they stay open when you need them. It is also possible that the tubular webbing is sewed in the inside part of a regular type 17 loop.

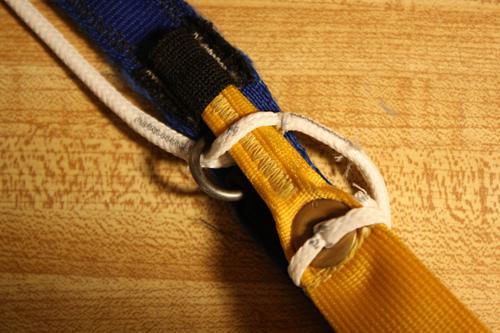
    In recent years the so called "louie" loops have become more popular. These loops have a double layer of webbing, and stay easily open. But their most distinctive feature is that they wrap the loop used to connect the canopy to the risers. That implies 2 things: First and foremost, they require more attention when connecting a canopy. The soft links (these loops do not accept hard links) have to go through the diving loops and the connecting loops. Routing the soft links just through the diving loops can have serious consequences. The stitching could break and the whole line group could be released. The advantage of these loops is that it allows the canopy pilot to pull from the highest point of the risers, giving more range and a more comfortable pull.


    Diving loop with tubular webbing on the inside for added comfort and to keep it open.


    Louie loop. Note how the soft link has to go through the link loop and the dive loop.  

    The last thing to comment here is that CRW dogs typically have dive blocks instead of dive loops. Dive blocks are easier to grab and release, which makes them more useful than loops in that environment.
    Toggles

    Manufacturing techniques vary wildly between different rigs. So much, that we won't cover them in too much detail here. What is important is that the toggles stay secured until you grab them. To the best of my knowledge, that is true for every modern reputable manufacturer. Nevertheless, we can analyze the different components/options, even though each manufacturer uses its own technique and rarely offers changes to it.

    Brake line retainer: That's the part of the toggle that goes through the cat's eye in the brake lines. Normally it is a "hardened" piece made using multiple layers of webbing. Some manufacturers use a straight pin instead. While this seems like a good idea, it opens the door to misrigging, since the pin fits through the guide ring. That could result in the brake line pulling on the pin and its pocket, which could be easily damaged.

    Toggle retainers: The toggles need to be secured in place. This is achieved with either stiffer parts inserted in pockets in the risers (just like the brake line retainer), straight pins inserted in tighter pockets, or snaps. The number of stiff parts and pins varies between 2 and 3. The orientation also varies. That is why some cases require an upwards motion before pulling the toggles down to release them. Should snaps be used, it is important to remark that the snaps should perforate an extra piece of webbing sewed in the risers, not the webbing of the risers itself.

    Slack retainers: These are loops sewed on the back side of the back risers. They can be a simple piece of tape (which tend to let the slack a bit more loose), or a elastic (which secures the slack better, but makes the slack stowing more tedious).


    Toggle with stiffener on top and pin on bottom, tape slack retainers and closed top pocket. Other options are stiffeners on top on bottom, pin on top, extra stiffener pointing downwards on top, elastic retainers and open (at the top) top pocket.  
    Additional guide rings
     

    Some riser manufactures have the option of placing an extra set of guide rings at the top of the risers. This way, during full flight, the brake lines go through this set of rings, but not through the normal guide rings. To stow the brakes the cat's eye has to go through the normal rings, the toggle has to lock the brake in place, and the excess can be normally stowed. The benefit of this option is to have a smoother transition to rears, and reduce the length that the brake line is traveling, since it doesn't have to go down to the guide ring and up again towards wherever the pilot has his/her hands. If you are into canopy piloting, or if you need to have very short brake lines, this might be an interesting option for you.
    3 rings

    The last set of options in the risers is the 3 rings system. The first thing to decide here is if you are happy with today's standard: Minirings. The vast majority of sport rigs have them today, mostly for aesthetic reasons. They work just fine, and you rarely see rigs with large rings nowadays. But the pulley minirings form is slightly less effective than in large rings. That means that the force needed during cutaway might be higher. Modern risers have extra housings for the cutaway cable -sometimes with teflon inserts-, to avoid them from being pinched in twists, and make cutaways more difficult. The usage of these housings in modern risers offsets the extra force required to cutaway with minirings in most cases. Another thing to consider is that typically minirings come with type 17 risers, and large rings with type 8 risers, even though other combinations are possible. So the type of webbing you want on your risers might tip the balance for you, if you are undecided.

    Aerodyne, to keep the aesthetics of minirings but without compromising on pull forces, designed a modified 3-ring release system. The "miniforce" rings system is essentially the same as other minirings systems, but with an enlarged middle ring. That improves the pulley efficiency and reduces the load in the white loop. If you want to use these risers in a container not manufactured by Aerodyne, check first with your manufacturer about component compatibility. We will talk a bit more about this at the end of the section.


    Aerodyne's "miniforce" 3-rings system.

    Lastly, you can decide the hardware finish. There are 3 main options in the market:

    Cadmium plated steel: This is possibly the oldest type of hardware used in skydiving that is still sold today. It works well will all kinds of webbing, the plating offers corrosion protection and it is generally cheaper, despite the extra costs associated to dealing with cadmium's toxicity. However, the plating can flake off over years, and then corrosion might happen, depending on the environmental conditions and how you treat your gear. Moreover, it is not shiny, which goes against one of the (sadly) first principles of skydiving: You have to look cool.


    Cadmium plated steel 3-rings system after more than 1000 jumps.

    Stainless steel: This kind of hardware is the most commonly used today. It offers better corrosion protection than plated steel, since there is not plating that can flake off. It is and stays shiny. And it slips more. 3-rings release system can lose about 5% efficiency (more force transmitted to the small ring) because of the reduced friction. Arguably, in well manufactured miniring systems, it doesn't play a role.


    Stainless steel 3-rings system after 100 jumps.

    Black hardware: This is the latest addition in hardware finish. It is steel hardware with an oxide layer, that gives it its matte black color. It is relatively recent, so field experience is more limited than stainless steel and cadmium plated steel. Some people claim that after hundreds of jumps it doesn't have significant usage marks. However, at least in some cases, marks are pretty visible (see also the pictures of chest rings).


    Black 3-rings system after 100 jumps.

    The chosen finish will affect the 3-rings system, buckles, chest and hip rings, and RSL shackles. However, whatever you choose, it won't affect the grommets or housings of your rig. Maybe something to consider.

    Some people mix risers with different hardware materials and from different manufacturers. This works fine in most cases. However, you are stacking the odds against you if you are not careful. On one hand dimensions and placement of all the parts should match. RSL ring side, cutaway cable inserts and length of cable, large ring dimensions -that can be different even among minirings systems-, large ring placement -higher or lower in the MLW-. All these are things to consider. There have been already fatalities rooted in a poor mix of components (reverse risers on a Javelin container). On the other hand, NAS-804, the specification required by TSO-C23b, states "The use of dissimilar metals, especially brass, copper, or steel in intimate metal-to-metal contact with aluminum or aluminum alloy, shall be avoided, whenever possible.". So, in principle, unless you know better, you should avoid mixing types for extended periods of time, as you might cause premature degradation of your hardware. Also, "miniforce" risers work fine with Aerodyne rigs. But the enlarged middle ring might not release cleanly in other rigs. Check compatibility with the manufacturer of your rig before using that mix.
    Chest rings

    Exploring down our harness we get to the chest strap junction. Most manufacturers -but not all- add chest rings to articulate their harness, either by default, or as an option. A fully articulated harness (with chest and hip rings) is supposed to be more comfortable, as the webbing doesn't need to bend and fold as much as a non-articulated harness. However, the chest is an area where these deformations are not really pronounced. As much as your body moves and twists in freefall, your upper torso stays pretty rigid. Nevertheless, chest rings help to avoid awkward and uncomfortable webbing twisting when the harness has been made for a larger person than the wearer. In these cases, the tendency is to overtighten the chest strap to compensate and secure better the jumper. That brings both chest junction together more than they should, and without rings the webbing would be unnaturally bent at that point. Of course, in an ideal world, every skydiver would have a harness that fits them properly, so this would never happen.

    Besides the arguable increase in comfort, chest rings are an excellent investment if, for whatever reason, the harness needs to be resized or repaired in the lower MLW. With chest rings the area affected is reduced to the webbing between the chest and hip rings. Without chest rings, the amount of work (and price) for this would be significantly higher, since the MLW is sewed to more components that would need resewing or replacement.

    Like the 3-rings release system, the chest rings can have different finish. More unique to chest rings is their orientation, and its influence on fitting and chest strap width. The chest rings used in every modern harness/container system are always very similar to the large ring in the 3-rings release system. The only possible difference is the bend in the slot where the MLW is threaded, which might or might not be present. In the chest, manufacturers orient the ring in 2 different ways: With the threading slot towards the upper MLW, or towards the chest strap. There are a few subtle implications:

    Rings with a vertical orientation (threading slot towards upper MLW) accept more naturally type 17 chest straps. In roughly half the circumference of the ring, the manufacturer has to accomodate the lower MLW and the chest strap, so commonly type 17 is used for the chest strap. That doesn't mean that type 8 is not possible. It is, but being it more bulky, it is less convenient.

    Rings with a horizontal orientation (threading slot towards chest strap) accept more naturally type 8 chest straps. I have yet to see this configuration with type 17, but it is, in theory, possible. Looks would be compromised for no reason though, so it is unlikely you'll see it either. Another thing to consider with this configuration is the range of motion of the upper MLW. Here, it can slide to the sides easier (the ring stays in place and the upper MLW can slide on it) than in vertical configuration (where the whole ring has to move and overcome the friction with the chest strap and the lower MLW). What that means is that when flying steep head down angles, the harness can slip down (up?) your shoulders easier than in other cases.


    Black chest ring after 1000 jumps. Note the shiny side on the right.

    Chest ring with the threading slot towards the upper MLW and a type 17 chest strap.

    The last option to consider regarding chest rings is the use of padding under the rings. Not many manufacturers offer it, but it is nevertheless possible.


    Chest ring with the threading slot towards the type 8 chest strap. The additional tape keeps the padding secured under the ring. Chest strap

    As we mentioned already, there are two chest strap widths to choose from. Regarding strength, there is no real difference, since the weakest point is the friction adapter, which is rated at 500 lbs independently of the width. Type 17 is less bulky and has less drag, which some swoopers would care about. It is also true that these same swoopers, the ones that can notice the difference, would completely remove their chest strap after opening and stow it away (while using a belly band to secure themselves). So this is also a moot point. At the end, this is one of these options that are completely a matter a personal taste.

    Another option regarding chest straps is their length. Most manufacturers have a standard length, which is typically around 19" (48cm). Normally this can be extended at no cost. Long chest straps allow the jumper to open up their harness and therefore their canopy, for increased efficiency. With a long chest strap it is also possible to lean forward during landing for a more active canopy piloting position. Regardless the length of your chest strap, if you are going to loosen it as much as you can, you should pay attention to its termination. Type 8 chest straps have a folded end that acts as a stopper and prevents the chest strap from being accidentally unthreaded. Type 17 terminations are sometimes not that effective, depending on how it was done.


    Termination of a type 8 chest strap. The tip has 4 layers to make it stiffer and the tab prevents the strap from being accidentally removed.


    Terminations of type 17 chest straps. The top picture has an extra tape, that creates a tab. The bottom picture has a stiffener at the tip. Note how fuzzy they are, specially the one on top. That's the effect of rubber instead of the normal elastic bands. Lastly, some manufacturers offer wide webbing loops in the chest strap to stow it. That replaces the default elastic bands, that tend to stretch over time loosing effectiveness, and can also get lost. This option is more common on type 17 chest straps than on type 8. Whatever you choose (elastic band or webbing loop) avoid rubber bands anywhere in contact with webbing. Rubber bands are fairly abrasive. As a result they will weaken your webbing and make it look fuzzier.
    Handles

    The next decision point coming down the harness affects the cutaway and reserve handles. The most common combination is a pillow for the right side (cutaway), and a metal ring for the reserve ripcord. But there are variations.

    Pillow handles are popular among freeflyers, because they are less snag prone than other options. Many of them use pillows for both the cutaway and reserve handles. The obvious downside, is that they make grabbing and pulling them more complicated. A pillow requires your whole hand to grab it. On top of that, it has a similar texture to your jumpsuit fabric, so if you are not looking and you have a loose suit you can grab part of your jumpsuit by mistake. To make them easier to grab, some manufacturers make sure they have a harder core. Others make them extra fat. And others sew an extra layer of a less slippery material. You can also embroider pillows for extra "flashiness", which is not possible with other types of handles.


    Reserve pillow handle, with embroidery, a pocket between both pieces of webbing on the MLW, and a spectra ripcord.
    Metal rings have been around a longer time than pillow handles. They are easier to grab (you can simply hook your thumb through them) and have a very distinctive feeling, so you can't possibly grab your jumpsuit fabric by mistake. On the other hand they are easier to snag when your buddy is grabbing your harness or with a small camera during exit. To mitigate that, some manufacturers offer low profile D rings, that stick out less than traditional D rings.


    Reserve D ring with a pocket between both pieces of webbing, and a steel cable ripcord.

    The last option is having a webbing loop with a stiffener inside to retain its open shape. These handles are very common in tandem rigs. However, in sport rigs they are rarely used. They are compromise between pillow and D ring handles.

    The reserve ripcord has been made of a steel cable for a long time. It works well in most cases, and most manufacturers stick to it. Others give the option of using a spectra ripcord with a bungee inside. In some cases this is the default for new rigs. The claimed advantages are many. Since spectra is more slippery than steel cables, it reduces the pull force required. In case of a dislodged handle, the bungee will keep it close to the housing and minimize the area in which it will be bouncing around. It is also cheaper to manufacture and inspect in some cases (steel cables have a hidden swage inside the pillow to keep them connected to the handle). However, it is slightly easier to misrig (the reserve pin can be threaded through just some fibers of the ripcord, instead of through the loop) and can be damaged by a sharp edge in the housing easier than a steel cable.

    The next option here is the material of the cutaway cable. Almost every manufacturer offers "lolon" coated cables. These are the standard yellow cables that most people are familiar with. They are reliable if the user/rigger ensures proper length and maintenance. The maintenance requires regular cleaning and lubrication of the cables. This is often neglected, which can result in increased pull forces during a cutaway. An alternative material is teflon coated cables. These are orange or red, and are currently in use just by Parachute Labs and their Racer harness/container. The advantage is that they don't require periodic cleaning and lubrication. However, getting them right is more complicated, as teflon doesn't stick easily to the cable. That resulted in the past in the core of the cable detaching from the coating, leaving the sheath locking the 3-rings release system. Regardless of the material you chose, it would be smart to check regularly your cables for cracks or other issues to avoid similar situations, as in theory it could also happen with "lolon" cables.

    Finally, there are a few ways to construct the pockets for the handles. The most common ways are either sandwiched between the 2 pieces of webbing of the MLW, or with a specifically manufactured pocket made of fabric wrapping the MLW webbing. As long as the velcro is in good condition, both are equally secure. On rigs with chest and hip rings the pocket wrapping the MLW is more common, as there is extra stitching necessary to secure the MLW in place, right where the handles are. Another advantage of the fabric pocket is that velcro is placed further away from webbing, avoiding possible contact and damage. On some older rigs, the cutaway handle might be attached just with a simple velcro strip, without extra pockets or in between the MLW. This is easier to disengage accidentally.


    Reserve pillow handle, with pocket wrapping the MLW and a steel cable ripcord.

    Cutaway pillow handle, with a simple velcro strip on the back side of the MLW.
    Hip rings

    More important than chest rings, are hip rings. However, they are more difficult to evaluate for a variety of reasons. The most important one, is that each manufacturer puts together in that junction a different set of harness components. Let's see this in more detail:

    MLW, laterals and front and back leg straps: Some manufacturers might connect together in a single round ring 4 different components. This has a couple of disadvantages, and that's why it is not a common configuration. First and foremost: it connects the leg straps too far up. The angles then could be a bit more awkward and less comfortable, particularly if you are a tall person and want to sit on your harness during canopy flight. Secondly, with 4 connected components there is little room for a belly band.


    Round hip ring connecting 4 different components (lower MLW, laterals and front and back leg straps).

    MLW, laterals and a single leg strap junction point: This setup is far more common than the previous one. Having the front and back leg strap junction working independently from the ring, and therefore placing this junction further down in the harness, allows to have a more comfortable fit. The angles of the leg strap become more natural. Nevertheless, the consequence of this is that the leg strap becomes slightly more stiff. There is a non-articulated junction between front and back leg straps, and they move as a single component. Most manufacturers design the geometry of this junction in a way where the back leg strap connects to the ring, and the front leg strap connects to the back leg strap. Rigging Innovations does it the opposite way in their Curv. There these roles are reserved and the front leg strap is connected directly to the ring. As a result, when the leg strap moves forward, it pulls in a bit more on the hip ring, and consequentially on the whole container.


    Round hip ring connecting 4 different components (lower MLW, lateral, belly band and leg strap)

    MLW and front and back leg straps: This arrangement is also very common. The ring is placed further down than in the previous case, which allows to connect independently the front and back leg straps, while preserving comfortable angles. Laterals are connected to the MLW above the ring in this setup. That junctions is very stiff, and right above it is the handle pocket. The small area in between absorbs whatever angle change you induce by leaning forward, so it ends up bending sharply. Another effect of this arrangement is that having the rings below that junction makes belly bands sit further low than in harnesses with rings connecting laterals. But the positive side is that both parts of the leg strap can move independently. Some people like them to move "at once", and so opt for a setup that adds an extra piece of fabric that softly links front and back leg straps and slightly covers the ring.


    Hip ring connecting 3 different components (lower MLW and front and back leg straps linked with an extra piece of fabric). Note how further up is the lateral junction.

    Each arrangement is a tradeoff. Depending on your body type and chosen discipline, you might prefer one setup or another. Part 3 will focus on body types and will explain how theses tradeoffs might affect you.

    As with chest rings, repairs are easier on harnesses with hip rings than without them. Another thing in common with chest rings is that hip rings are also affected by your choice of hardware finish.

    An option related to hip rings is the belly band. This component can have 2 different functions. Most people that use them do it in their swoop setup. They undo completely their chest strap, and stow it away. To stay secured in the harness they use belly bands. The second group of people interested in belly bands are people whose harness has laterals that are too long. With a belly band they can pull their hip rings a bit forward, making their container stay closer to their lower back and move less in freefall. That is particularly important while freeflying. Of course moving the hip rings too much forward can distort the harness geometry and affect comfort. If you are in this situation chances are that you should get your harness resized.


    Hip ring connecting 4 different components (lower MLW, front and back leg strap, and belly band). Note how this setup places the belly band lower than in a setup with a ring connecting to the lateral.
     
    Laterals

    As we saw in part 1, the laterals are the part of the harness that connect the back of the harness with the lower MLW. They are critical for comfort during freefall and under canopy. Too long and you will have a huge gap between your back and your container. Too short and they'll make your harness feel too tight and uncomfortable. The default construction, with the laterals coming straight out of the edge of the backpad, works fine if your back is significantly wider than your container. But in many cases that's not true, the container and back are about the same width, and there is a measurable gap between the back side of the laterals and your back.

    Many manufacturers try to find a way to contour to the side curvature of your back (back to front, at the belly level). That makes the container more comfortable and it stays in position without moving around much. There are essentially 2 schools for that. The most common is to find "cut-in" laterals, where they are inserted in the backpad not at the edge, but somewhere more centrally. This style of laterals are in contact with the jumpers back, and typically they are padded for extra comfort. Another type is to have the webbing coming straight from the edge, get to the hip junction, and come back a bit more towards the center of the backpad, wrapped in padding.

    There are alternatives to the two main approaches. Infinity and Sife provide floating laterals as an option, where the lateral webbing goes through the webbing slot of the hip ring, which moves freely. Sife adds padded stabilizers to that configuration. Mirage has the laterals coming straight out of the edge of the container, but has two elastic bands coming from the center of the backpad, acting as a sort of elastic stabilizers. Lastly, as in some student rigs, SunPath added adjustable laterals to their Aurora wingsuit rig.


    Straight laterals coming out of the edge of the container.

    Padded stabilizers. The outermost component is simply an stiffener wrapped in fabric, without major structural purpose.

    Floating laterals. Note how the ring can move freely through the webbing of the lateral.


    Elastic stabilizers.
    Leg straps

    Leg straps are the remaining piece of the harness. And of course, there are multiple options here as well. In part 1, we already saw multiple adapters. Each manufacturer has its default set of adapters. Nevertheless, some of them, can install an alternative style if you ask them. These adapters are also affected by the chosen hardware finish. As it has been mentioned before, stainless steel is more slippery than cadmium plated steel. The teeth of the adapter could also be harder and sharper if they were the same design as plated adapters, which could damage the webbing and make the whole system work differently. That's why both types of hardware have slightly different designs. These effects are also part of the reason to have double layer straps, to make them thicker and slip less. Besides this, adapters are normally thread-thru. But it is also possible, even though not common, to order B-12 snaps. They allow to clip-in the leg straps, instead of having to put your legs through them.

    We have seen lots of options targeted for swoopers in the upper side of the harness. The bottom side also has options for this discipline. It is possible with some manufacturers to order wider leg straps, so sitting in your harness for long periods is a bit more comfortable. The tradeoff is that they are more uncomfortable during freefall and on the ground. Since swoopers tend to slide during their landings, the leg straps suffer a great deal of wear. That's why it is also possible to use leg strap covers, that can be easily replazable once they are worn out. That way, your harness stays intact.

    The last optional bit is the freefly bungee. It's functionality has been already discussed in part 1. There are basically 2 designs: Connecting the inner part with 2 webbing loops and a bungee; or connecting the outer part, with the bungee routed through a channel that hides the knots and distributes the tension.


    Freefly bungee connecting the inner part of the leg straps and knots exposed.


    Freefly bungee connecting the outer part of the leg straps and knots hidden in the channels.
     
    More harness options

    There are even more options than what we have covered so far. But they are difficult to classify going from top of the harness to bottom. For instance, embroideries. Laterals, leg straps, mud flaps (right below the 3-rings) are all areas were you can include any embroidery. Mind you, the embroidery is done in fabric, not in webbing. So for instance, to add an embroidery to your laterals, they have to have a piece of fabric covering the webbing.

    Other example are hook knifes. There are 2 common pockets for hook knifes: In the mud flap, or in the leg strap. Some manufacturers also add a hook knife pocket integrated in the fabric that makes their handles pocket. There are multiple models of hook knifes: Cheap plastic handle with a single blade, harder plastic with single or double blade, metal handle and single or double blade, or full metal knifes. Even though it is unlikely that you'll need it, it is recommended to avoid the very cheap knifes made of brittle plastic.

    Some manufacturers make contoured yokes, that adapt better to your shoulder area. It is also possible that they offer an "inverted yoke", where the container seams are inwards, looking a bit neater and slightly more comfortable on that area, since the sharper binding tape won't be rubbing against you. Every manufacturer also offers padding. Some include full padding (yoke, backpad, stabilizers and leg straps) as a single option. Others separate it in 2 or 3 areas, allowing you to choose with more granularity. Besides the standard padding, made normally out of some spacer foam, some manufacturers also offer "deluxe" padding in their backpad, made of a more comfortable material.

    Rigging innovations has gone an extra mile in the harness design of their Curv container, and offer 3 unique things. The first is what they call the bio yoke. There, they essentially separated the part of the yoke in contact with your shoulders, and the part of the yoke that connects with everything else inside the container (risers, reserve risers and housings). This way the part in contact with your body is more flexible and comfortable. The second is what they call the bio curve. This is a half container half harness feature. It simply contours the container so it follows the curvature of your back, avoiding gaps there. The third thing is a new leg strap geometry, which has been already discussed in the hip rings section.
    End of Part 2

    This concludes part 2. As you can see, there are tens of options, which create hundreds of combinations. Each manufacturer has their defaults and their common options. If you are buying a new container and want an option not listed in their order form, ask them. You might be surprised. If you are buying an used container, hopefully this will help you to decide on which harness designs and options are important for you, to narrow down your search in the wild second hand market.

    Part 3 will be the last part of the series. There the focus will be on how different harness designs might fit different body types, and how the wrong dimensions in parts of the harness will affect your flying, comfort, and potentially even safety. So if you enjoyed part 1 and 2, keep an eye out for part 3!

    By admin, in Gear,

0