Argus AAD - Mandatory cutter replacement
Product Service Bulletin
Issue date: 2 December 2006
Bulletin number: SB AMM021206/1
Subject: Mandatory cutter replacement in Mirage rigs
Argus Cutter PN# ARG001CUT manufactured for Aviacom SA by Nobel Energetics.
Background:
As part of our evaluation program, the Argus was installed in an RTS M7 Mirage and made 46 jumps.
When opening the reserve container the loop was frayed around the area it was going through the cutter.
The plastic insert was damaged at some point during closing.
Further investigation showed that the damage was due to the typical set-up of the cutter on top of the
concave pilot chute cap modification that the Mirage has since May 2005.
This damage only occurred with the Mirage
After consulting Mirage Systems we decided to replace the cutters in all Mirage rigs with a modified insertless
cutter that has meanwhile been intensively tested and does not cause any damage whatsoever.
Service bulletin:
The "old" cutter with the plastic insert must be returned to Aviacom SA for replacement. The new cutter will
be shipped as soon as we have received the old one.
The new cutter is easily identified by the safety seal on the body. The date of manufacturing is November
2006 or later.
Any senior or master rigger or foreign equivalent can unscrew the cutter and replace the old cutter with the
modified one. The connector must be locked hand tight in order to ensure the water resistance.
Compliance date:
Before the next jump, but no later than June 30th 2007.
Comments
In order not to create confusion, all Argus cutters manufactured before November 2006 and not sporting a
safety seal on the body must be mandatory replaced before June 30th, 2007. The cutters will be replaced
free of charge.
You can download the full service bulletin: http://dbc.landingpage.be/475/SBAMM021206_1.pdf
For a video clip of the new cutter check: http://www.argus-aad.com/media/Downloads/MVI_0552.avi
Dropzone.com Editors Note:
Please note that while the official subject of this service bulleting is "Mandatory cutter replacement in Mirage rigs" that in fact "all Argus cutters manufactured before November 2006 and not sporting a safety seal on the body must be mandatory replaced" as mentioned in the comments in the full bulletin. The subject as at very least confusing.
Please download the entire Service Bulleting from the link above and read this forum post for a response from Mirage Syatems.
Introducing the PD Horizon - The easy ‘off button’ to end your wingsuit flight
The wait is over! No one is more excited than we are here at Performance Designs. After years of development, hard work, and dedication we are delighted to announce our first wingsuit specific canopy, Horizon, is ready to order.
In 2013 Performance Designs began development on a wing with emphasis on eliminating deployment problems caused by the large burble of wingsuits without sacrificing a great flare or responsive handling. When you have been making canopies as long as we have here at Performance Designs, this process is always evolving. The one thing that never changes is our high standard for quality, performance, and our focus on providing excellent products to everyone in our skydiving community.
The result, we think the Horizon has the best openings and the best landing power of any canopy in its class! Best of all the Horizon gives you the ability to upsize as many as two full sizes compared to a non-crossbraced ZP main. This means you can fit a larger canopy in your existing rig for wingsuit jumps. No need for a new container!
The Horizon features
7 cell construction
Hybrid ZP and low-bulk 30 denier fabric
consistent and reliable openings
efficient glide when it counts
responsive handling and a powerful flare
slider presentation snaps
HMA or Vectran Lines
packs 1-2 sizes smaller than a similar ZP main
Introductory Retail Price- $2100
Available in sizes 120-135-150-170-190
Horizon’s openings are stress free and comfortable, but they don't eat up a lot of altitude. Although this canopy was not designed to win any swoop meets, the response in flight is quite a pleasant surprise. With its agile response to control inputs, the Horizon is a joy to fly. It has a fairly long control range with excellent slow flight characteristics. Its dynamic response to braked flight turning inputs makes it an excellent canopy to conserve altitude as you fly back home from a long spot. The Horizon continues to uphold the landing performance that Performance Designs customers have come to expect. With a quick response to proper flare input it is easy to predict the “sweet spot” for a nice easy shutdown no matter what the wind is doing.
Pack volume has been reduced significantly by combining our proprietary low-bulk fabric technology with our well known Zero-P fabric. In fact, the Horizon typically packs two(2) sizes smaller than a similar non-cross braced ZP main. The incredibly small pack volume easily facilitates easy upsizing for safety.
In short, the Horizon is an easy off button to transition from wingsuit flight to canopy flight stress free.
Pablo Hernandez landing at Skydive Dubai.
Photo by: Ivan Semenyaka
Do you have any questions? We might have some answers below!
When can I get one?
A: We will be accepting orders from PD’s Authorized Dealers as of today! (May 10th 2017). Standard production time will apply to the Horizon. These lead times are posted on the PD website at www.performancedesigns.com
How do I buy one?
The Horizon will be sold through PD’s Authorized dealer network. Interested customers should contact their local dealer to discuss if this canopy is right for them.
Can I jump this without my wingsuit?
We can’t tell you what to do with your canopy. Most people like the way the Horizon opens in freefall at terminal speeds when properly configured and packed. However, in order to get the most bang from your buck we recommend saving the Horizon for its intended wingsuiting purpose.
How long will this canopy last?
Putting a specific number on the lifespan of any canopy is quite difficult as it is impossible to consider all of the ever-changing variables that affect that canopy. A person who does 1000 jumps a year will go through equipment a lot faster than a person who does 100 jumps a year…and that is just one small piece of the puzzle. Our proprietary low-permeability, low-bulk fabric has proven to be more forgiving when subjected to the wake turbulence of a wingsuit deployment. We have added ZP to the center top skin and across the leading edge to enhance the performance and longevity of the Horizon. However, it does not possess the same durability that a canopy constructed of all ZP material would have. Following our recommendations for wing loading and taking the proper care of your equipment will go a long way toward getting the most out of your wing. With proper care the Horizon should bring you joy and happiness for several hundred jumps.
What size should I buy?
The fabrics utilized in the Horizon’s construction are part of what make this canopy so well suited for wingsuit skydiving. Because the characteristics of this fabric combination are different from traditional ZP, jumping a Horizon that is too small or loaded too high could demand a little more from the canopy pilot to ensure comfortable landings (when compared to an all ZP canopy in a similar size and design). Size your Horizon one (1) or 2 (two) sizes BIGGER than the smallest ZP canopy you are comfortable with.
Roberta Mancino flying over Perris Valley Skydiving.
Photo by: Sebastian Alvarez
Your Wing Loading is also a critical factor in the performance of your Horizon canopy.
Check out our Wing Loading chart on the Horizon page of our website.
When considering what size wing is best for you, the size of the reserve in the container that you intend to use should also be strongly considered.
It is always advisable to consult a certified wingsuit coach/ instructor when selecting a canopy to optimize your wingsuiting experience. For more information visit the Horizon page on our website www.performancedesigns.com
Additional Information:
Horizon Packing Manual
Horizon Flight Characteristics
Horizon FAQs
RSL Removal on the Javelin/Javelin Odyssey
This letter dated February 27, 2007 from Sun Path Products, Inc. addresses the issue of Reserve Static Line Removal on the Javelin/Javelin Odyssey. Download the Letter from SunPath.
Reserve Static Line (RSL) and the Javelin/Javelin Odyssey
Reference: This letter supersedes SPP letter regarding removal of the reserve
static line (RSL) dated 16 May 2005.
1. Is the RSL a part of the TSO’ed components of the system?
YES
2. Can any or all of the RSL components (RSL lanyard, hook Velcro on
reserve riser, guide rings on pin flap and main riser RSL ring) be
removed from a Javelin/Javelin Odyssey without voiding the TSO?
YES, however the FAA determines this to be an "alteration". This means
that only a master parachute rigger can perform this action. (Ref. AC105-2c)
Once the master rigger removes the requested RSL components, the
alteration must be noted on both the packing data card and the master
parachute riggers log book.
3. Does removal of the RSL void the TSO?
YES, this only applies if someone OTHER than an FAA master parachute
rigger or foreign equivalent removes any RSL components, or the removal of
the components is not logged on the packing data card.
4. Who can pack a reserve in a Javelin/Javelin Odyssey without a RSL?
As long as a master parachute rigger has indicated the removal of the
components, (i.e. lanyard, rings, Velcro) on the packing data card, any senior
or master rigger or foreign equivalent can repack the reserve.
5. Who can pack a main in a Javelin/Javelin Odyssey without a RSL?
As long as a master parachute rigger has indicated the removal of the
components, (i.e. lanyard, rings, Velcro) on the packing data card, any senior
or master rigger or foreign equivalent, anyone under the direct supervision of
the afore mentioned or the person making the next jump can repack the
main.
5. If I am a senior rigger and I get a Javelin/Javelin Odyssey to repack
that has any or all RSL components removed, what do I do?
The senior rigger will need to check the packing data card to see if the
appropriate entries have been made. If yes, then the rig is "legal" to be
packed by a senior rigger. If not, the rig will need to be taken to a master
rigger who can approve the alteration and note the removal of the
components. The master riggers data card/log book notation is only
certifying the alteration.
6. Who is authorized to remove the RSL and when?
Only a Master parachute rigger or foreign equivalent can permanently remove
the RSL components thus altering the TSO’ed system.
The user can "disengage" the RSL lanyard by disconnecting the snap
shackle, if in an emergency situation or to avoid a possible emergency
situation ONLY. The owner/jumper (unless a master
rigger) is not authorized to permanently remove the RSL lanyard.
Sun Path Products, Inc. position on the removal of the RSL components remains
unchanged. "Permanent removal of this part is highly discouraged and NOT
recommended". However we do acknowledge situations that the user may wish
to have the RSL components removed from the system or not have the system
installed with the components at all. Therefore this guidance should serve as
reference for fielded systems as well as new assemblies.
Systems manufactured after Feb 2007, come with the RSL/Collins lanyard as
standard items. This incorporates the Marine eye reserve ripcord, Curved
Reserve Pin with lanyard and the RSL/Collins lanyard.
The Skyhook can be added by the manufacturer as an option by adding the Red
Skyhook lanyard to the RSL/Collins lanyard and corresponding skyhook on the
reserve bridle.
An alteration to the RSL/Collins lanyard on the post Feb. 2007 rigs will require a
terminal pin reserve ripcord which must be replaced with factory TSO’ed
components only. *** (reference Pg 6. of the Javelin/Javelin Odyssey Owners
Manual Rev. 2 Issue 01 March 2007)
Download the Letter from SunPath
Dave Singer
Engineer
Sun Path Products, Inc.
Derek Thomas
President
Sun Path Products, Inc.
Sun Path Products, Inc. * 4439 Skydive Lane * Zephyrhills, FL33542
Phone 813-782-9242 * FAX 813-788-3057 * www.sunpath.com
Service Bulletin - Quasar II
SERVICE BULLETIN #26 - ISSUE DATE: April 18, 2007
SUBJECT: Quasar II, P/N115100, Quasar II Trainer P/N115102,
Military Quasar II P/N 115103.
Quasar II Reserve pilot chute launch under conditions with main canopy still in
main container.
IDENTIFICATION: All Quasar II harness/container systems. Including both
Quasar IIs with ‘Flinger/PRO’ (Positive Reserve Opening) assembly installed as
original installation or modification, and those without.
STATUS: Mandatory removal of ‘Flinger’/PRO assembly and replacement of
inner sub-flap with pilot chute Base Plate and pilot chute before next jump.
BACKGROUND: Recent on-the-ground activations of several Quasar II reserve
containers with the main canopy still in the container, showed slow or impeded
pilot chute activation. There have been no reports of in-air incidents. Repeated
tests with the main tray open and riser covers off (simulating an open main to
reserve cutaway), resulted in clean reserve pilot chute deployments clearing the
reserve container. Further testing revealed the steel ‘Flinger’/PRO assembly may
take a set beyond the designed acceptable range, restricting movement of the side
flaps and reserve pilot chute.
SERVICE BULLETIN: As a precautionary measure, Strong Enterprises requests
that all Quasar II systems be returned to Strong Enterprises for modification, that
includes:
Removal of the steel ‘Flinger’/PRO assembly.
Top sub-flap replacement (improved with a Base Plate.)
Pilot chute replacement.
STRONG ENTERPRISES
11236 SATELLITE BLVD
ORLANDO, FL 32837
Tel 407 859 9317
Fax 407 850 6978
[email protected]
www.strongparachutes.com
Download the Service Bulletin (PDF)
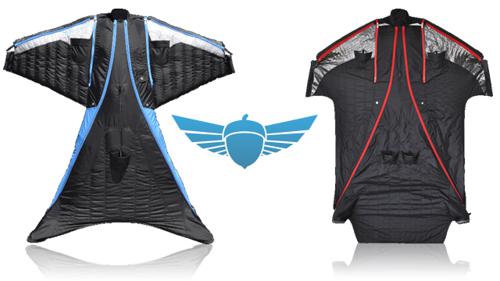
Two New Suits from Squirrel
Squirrel have recently released two new products to their wingsuit inventory, with an entry level wingsuit called the Hatch and an advanced wingsuit called the Colugo 2. The Colugo 2 was announced for release in June, but was delayed until the Redbull Aces event, which saw the testing of technology included in the suit. Andy Farrington who was flying a Squirrel prototype which included this new new technology found in the Colugo 2 came first in the event.
Colugo 2
The original Colugo suit was met with positive reviews from owners of the suit, with many noting how quick it was to start in a BASE environment. The Colugo 2 has taken the strengths of its predecessor and included new technology and enhancements in order to make it an even stronger wingsuit. The Colugo 2 has a smaller surface area than the original with a slight change in the arm wing design. These changes were made to increase the efficiency of the profile and leading edge. Squirrel advise that while the Colugo 2 is an ideal choice for experienced wingsuit BASE jumpers, the Aura remains the best suit for more technical exit points. The Colugo looks to be great for both BASE jumpers and skydivers, with the suit catering well to glider-performance focused based jumps and skydive flocking. A better trim speed and glide range makes the Colugo 2 fly both further and faster than the original Colugo wingsuit.
The handling of the C2 is said to be far superior to that of the original Colugo, with a thinner profile and more efficient leading edge. The C2 is all about speed as well, with the reduced surface area and less drag - you can expect to experience higher speed than those produced by the Colugo.
The Colugo 2 from Squirrel is an agile mid to large sized wingsuit that aims to provide high performance flying in a competitive slalom environment, focusing on carving and speed. Though the suit is also able to provide pilots with quality floating.
One of new features on the Colugo 2 is the AFLE (Andy Farrington Leading Edge), as they've called it. The AFLE is a new design of the leading edge, where the arm zipper on the wing chord has been moved to increase the amount of 'effective edge', in turn improviding the shape and smoothness - which then increases performance.
Pre-orders are now open with the suit expecting to ship by the end of August.
Read more about the Colugo 2 Wingsuit
Hatch
The new Hatch suit focuses primarily on being the easiest suit to fly, aimed at beginner wingsuiters who are looking for something easy, comfortable but also reliable. The Hatch has many of the features found on the other Squirrels suits, including the RAD system, tri-layer leading edge construction, reinforced inlets and innie-outie zips. The Hatch doesn't require cutaway cables, and in turn allows for direct access to the risers and brakes during and after deployment. A safety feature that Squirrel feel is vital to every wingsuit. The leading edge of the suit is said to be based on the tried and tested method Squirrel have used in their other suits of combining both comfort and performance.
The Hatch is certainly aimed at those looking to purchase their first wingsuit and for skydivers that are new to wingsuiting. Though Squirrel seek to stress that the Hatch is not only for beginners and is a competent flyer in situations where agility and versatility are required. It is also recommended as a good suit for more advanced wingsuit pilots who may be new to backflying or acrobatics and are looking for a comfortable, low surface area suit to practice with.
Prior to the release of the Hatch, the Swift seemed to be Squirrel's go to suit for less experienced pilots looking for something easy to fly. It will be interesting to see how the two suits hold up against each other.
Read more about the Hatch Wingsuit

How the Pros Keep Their Canopies In Perfect Form
Canopy wear-and-tear can sneak up on you--and, if you’re new(ish) to the swooping trade, you might not know exactly what parts of your equipment need extra attention. Since a dedicated canopy pilot plies his trade on the basis of impeccable nylon, only a seasoned pro’s advice on the matter will do. To that end, I caught up with multi-disciplinary virtuoso Pete Allum to ask him for his best tips and tricks for keeping that kit in fighting shape.
Pete started skydiving in 1979, and it didn’t take long for him to clamber up on his first podium. Since 1985, Pete has stood on national- and world-level podiums almost every year (sometimes, more than once). In the pursuit of all that gold--and in the course of his extensive coaching work--Pete has made more than 32,000 skydives. It’s safe to say, then, that he’s seen a few canopies through their life cycles. Here’s what he has to say on the subject.
1. Pack your own parachute as much as possible.
When you’re hopping and popping like a broken record, the last thing you probably want to do is wiggle around on a packing mat. Pete suggests that you should suck it up and make the effort, because your personal attention is the most important factor in your gear’s fitness. After all, your packer’s job is to get it in the container. Your gear’s overall well-being is your job.
“If I’m jumping 20 times a day,” Pete explains, “I certainly won’t be packing it every time, but I want to make sure I have my own eyes on it regularly. Even if I have a very heavy schedule, I’ll make sure to pack it myself at least a couple of times a week. That gives me the opportunity I need to see the things I wouldn’t if I only jumped it. When it’s in my hands, I can check for problems like closing pin damage, dinged grommets and center cell discoloration from sweat.”
2. Don’t be shy. Keep your standards high.
Non-ideal openings accelerate wear-and-tear on your gear (as well as your body), so it falls to you to make sure that some standards are being upheld when a third party is compressing your fabric. Pete advocates a professional, proactive position, especially when it comes to stows.
“Packing stows vary widely, and not everyone is aware of how important it is to be consistent,” Pete admonishes. “So it’s a good idea to make sure your packer is using the same large stows throughout and double-wrapping every stow on the bag.”
Finally, make sure the packer is dressing the container’s flaps correctly. If they don’t, Pete notes that creases will form, building memory in the fabric over time. These ever-deepening furrows can cause degradation as the container ages.
3. Watch the wear points on the lines.
With high performance comes high mechanical stress. A small, aggressive canopy has a tendency to shake the system like an energetic rottweiler thrashes a favorite chew toy, so you’ll need to keep an even more vigilant eye on your canopy’s wear points: especially the lower control lines and the places at the top and bottom of your lines where your grommets like to grind. If there’s even a hint of fraying on your lines, bringing your gear to a rigger should rise to the top of the to-do list.
“When I’m in Florida, it’s the easiest thing in the world to bring it over to Performance Designs, so I’ll pop over at the earliest sign of wear,” Pete says. “When I’m farther afield, my standards have to relax a little, but it’s still a top priority to get it done.”
4. Give your pilot chute an extra look.
Pete recommends that you check for wear at the bridle attachment point at every opportunity. Beyond that, he notes that you should occasionally tug out the kill line and check it for fraying, twisting and shortening.
“The system has a couple of inches of margin,” Pete explains, “But if the kill line measures outside that allowance, you need to take it to a rigger.”
5. Keep an eye on how many jumps you’ve already put on the canopy.
Especially if you aren’t a logbook-lovin’ kinda jumper, it’s easy to lose track of a canopy’s jump numbers. According to Pete, that will need to change. When it comes to jump numbers, swoopers don’t enjoy the luxury of unintentional ignorance.
“Especially if you’ve been jumping someplace hot and/or dusty, it pays to know exactly how far along you are,” Pete advises. “As soon as the ticker goes over 200 jumps, I start to pay way more attention, even though the line set is expected to last much longer than that.”
6. Be an active participant in a high-caliber team.
When your zoomy descent becomes the focus of your skydiving days, your need for a professional team of advisers increases exponentially. Take time to build relationships with the very best, most enthusiastically recommended riggers, packers and coaches you can find, and don’t hesitate to reach out to them for guidance. It takes a village to raise a safe (and super) swooper, after all.
To pursue the perfect swoop under the matchless tutelage of Pete Allum, reach out to him through Flight-1.

GoPro Hero 4 - Release Date and Specs Revealed
GoPro have announced the specs and release date for the highly anticipated Hero 4 action camera, which will come in three models. The new series of GoPros are scheduled for release around the middle of October this year, and will feature the standard GoPro Hero 4, a GoPro Hero 4 Silver and then the top of the range GoPro Hero 4 Black.
New Key Features
Some of the highlights with regards to the specifications of the new GoPro range is the addition of 30fps recording at 4k resolution that is found with the Black Edition, which sees a big step up from the previous models 4k video recording, which only allowed for 15fps recording at 4k. The increase in frames from the Hero 3 will mean that users will find more versatility with their high resolution video recording.
Another exciting new addition is that of a touch screen on the Silver edition. While GoPro has always been a reliable camera with regards to build and video quality, one aspect that many have found lacking has been the usability of the camera menus, which are handled with the on camera buttons and a small display. Now GoPro have gone and added what is likely to be a very welcomed addition in that it has introduced for the first time in the GoPro series, a touch screen which will no doubt allow for easier navigation of the menus, as well enabling the ability to preview your images (worth noting that the Hero 4 claims to have a new interface for quicker menu navigation too). It is however unusual that the touch screen feature is only available on the Silver edition and not on that of the more expensive Black edition, nor the entry level version of the Hero 4. The most likely reason for the inclusion in the Silver edition is that GoPro is marketing the new series towards three general groups of people, and the mid-range target market is more likely to desire the touch screen, without having to purchase the LCD "BacPac" accessory, which sells for another $80. Though of course it is still possible for one to use their smartphone as a remote for the camera.
As customary with a new GoPro release, the company has focused on increasing the general image quality achieved and further enhancements have been made on ensuring better quality in low-light.
GoPro Hero 4 Black
The GoPro Hero 4 Black, is as mentioned above, the top of the range for the Hero 4 series and thus the most powerful of the lineup. A new processor is claimed to be twice as fast as that found in it's predecessor. The Hero 4 Black will not only have video performance enhancements, but also step up the game with far superior audio recording. There are three modes of shooting with regards to field-of-view: Narrow, Medium or Ultra Wide.
There will be the ability to manually adjust settings like ISO limit, exposure and colour for both video and photos. The camera will include built-in Wi-Fi and Bluetooth.
Waterproofing down to 40 meters will be standard.
GoPro are seemingly targeting the Hero 4 Black to those looking for the absolute best quality and features available in an action camera, specifically professional use and dedicated adventure sports enthusiasts who are looking to create high quality video footage using the camera.
The Hero 4 Black will cost $500 on release.
GoPro Hero 4 Silver
The GoPro Hero 4 Silver seems to be targeted to your average action cam user, from the weekend surfer to the seasoned hiker, or even tourist. The touch screen that is included on this model will make it easier to navigate and preview what you've taken. This is especially useful for those who want to use the photographic functions and treat it as both a still camera and video camera. The image sensor on the Silver, like the Black - allows for 12 megapixel images at 30fps.
This model is still more than adequate to provide quality video footage and also offers 4k resolution video recording, but only at a maximum of 15fps.
With functionality such as Wi-Fi, Bluetooth and Waterproofing being the same as that of the Black, one can see why there is only a $100 price difference between the two. The Silver will sell at around the $400 dollar mark.
GoPro Hero 4
The Hero 4, is the entry model for the series and comes in at an extremely affordable $130. It records in full 1080p resolution at 30fps or 720p at 60fps. The sensor of the camera allows for 5 megapixel images, offering 5fps bursts.
The market for this entry level camera would be those looking to enjoy the benefits of an HD recording camera, while not having to fork out more than they need to. The use of action cameras in every day life has become exceedingly common and this camera will offer more than enough for a large portion of GoPro users.
This camera could also work for those who are perhaps wanting to try something brave with their camera to get a certain shot, but do not want to risk the potential damages to a higher priced model.
We haven't seen much video footage yet, so it is difficult to put these models side by side to see exactly what one can expect from each one, and the difference in quality between models - but it will no doubt only be a matter of time before we see what this latest range is capable of.
Reviewing Vertical's Viper Elite
The amount of suit designs there are to choose from continues to grow, and selecting the right one to meet your needs can be a confounding process. Why are there so dang many and what are they all for?
The simple truth is there are a lot of ways to fly your body. Our sport is divided by both line-in-the-sand disciplinary boundaries, such as wether-or-not you require booties and grippers to ply your trade - but also on macro levels inside sub-disciplines that have evolved together with the modern freefly scene. The ultimate grail quest of any company that designs suits is surely to come up with something so exquisitely crafted and manufactured that it should eclipse all else, transcending choice altogether by being totally awesome at all the things. The reality is that there is no single combination of pattern and material that serves all areas of a flying career as well as something focused on and aimed at a particular niche. The result of this is it can be difficult to choose one from a toolbox of designs when you are pushing at the edges of you skillset in all directions at the same time - hungry to get good everywhere right now. What you are left with is having to make a wise and honest choice about the kind of suit you really need.
Up to the point where you might be seriously considering investing multiple jumpsuits to apply where and when you need them, you should be approaching an expensive purchase with practicality in mind. A slinky squeezy suit might be all the rage right now, but if you are continually sinking out on all your mates then you have not chosen wisely. The opposite of this is also true - if you are prioritising the time, money and effort on some quality tunnel time then a fitted design that will help build good technique and feels like a second skin might be just the job. When assessing which suit is best for you, the right kind of eyes are the same ones you should be using to choose a parachute: a smaller, more advanced canopy will not make you a better pilot - the path to success is getting the right thing for where your skills are currently.
The Viper Elite is a further refinement of Vertical’s flagship Viper template - already previously tweaked into the Viper Pro. While it is possible to simplify these iterations as each being more advanced than the last, to do so would be disservice to the thoughtful work and overall consideration that Vertical have put into their range. If you do find yourself tumbling down the freefly rabbit hole - ultimately reaching the level where you are coaching, competing, or simply flying enough that the only real way forward is to own more than a single suit, then Vertical has all your needs covered, from the specifics of bendy freestyle to powerful lines, static shapes and everything in-between.
At this point in my flying career I have utilised all the styles and types of suit - from back-in-the-day Talsan bagginess, through the first generations of tunnel-is-a-sport-now rethinks and all the way up to the damn-I-should-eat-less looks of right here and right now. The Viper Elite is my favourite out of all the suits I have owned. This is not because Vertical have created a better suit or some kind of revolutionary design, but because it represents the best intersection of materials and design characteristics with my personal abilities and the specific requirements I have for it. The place that this suit occupies on the spectrum of performance characteristics has, for me, the widest band of usability - it feels equally as good both indoors and under a parachute harness, and I love putting it on either at the dropzone or the tunnel. When flying in either environment, any concessions made to the other are as small as I have encountered - leaving the suit feeling tailored to both the tube and the big blue.
Pros and Cons
As stated above - there is no single suit design that covers every aspect of flying. Here is a look at some of the advantages and disadvantages of the Viper Elite.
Spandex: This super stretchy material is at the central compromise between power and mobility, and its use and placement is often the most important consideration when creating a new design. The Viper Elite has spandex in the areas you would expect to see on a pure-bred tunnel suit, with additional panels for underneath where your parachute harness goes. Even the best quality spandex will shift and flap when put under pressure from the wind and in the tunnel you might feel this in a few places at certain angles, but it does allow for full, unrestricted mobility in both environments.
Squeezy Fit: The closer a suit fits your body, the more you are relying on your true shape to fly. The better you understand how your true shape flies the more graceful you look and feel. The Viper Elite is very much a squeezy suit so all the extra stuff has been removed, such as the mesh lining and any pockets. This is good for the fit of the suit around your body and subsequently your technique, but it does mean you will need to wear some kind of base layer for comfort and find another solution for the things you like to take with you while skydiving - such as your phone, lip balm, bungees, pull ups etc. etc.
Reinforcements: In line with it’s two Viper siblings, the Elite has Cordura covering the elbows and knees. In an ideal world none of us would ever crash or wear out our suits by dragging our limbs about on various surfaces - like the net or the glass at the tube, the floor/wall/roof of the plane, or whatever your landing area is made of, but we do any they do. The plus here is that the Viper Elite will last longer in those hard-wearing areas than if it was made without Cordura, the minus is that every extra of fabric used in the construction of a suit moves it a little bit away from the actual shape of your body.
If you, like many, are buried up to the eyeballs in the possibilities of flying your body, and are committed to the rewards of getting it right across both environments - Vertical may well have created the best single tool produced thus far.
By joelstrickland, in Gear,
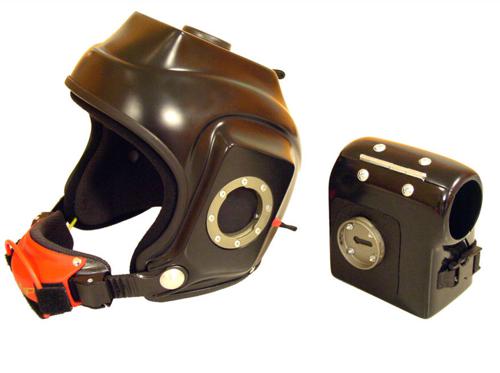
The Tonfly Camera Converter
Action sports camera helmets are more than just protective gear that hold a camera, they're tools of the sports trade and action videographer. Just any old helmet can be used to hold a camera, and many videographers do exactly that. For those that are a bit more serious about their action photography, a helmet designed specifically as a camera mount system is needed. Tonfly is the newest player in the camera helmet manufacturing world.
Hailing from Slovakia, this small manufacturer may be new, but they've researched the needs of the typical action sports videographer very well and offer a wide lineup of products. The staff at Tonfly are predominantly from Italy, and the design of the helmet is Italian.
In this review, we'll look at a Tonfly Converter (CC1), which I purchased specifically for the purpose of wingsuiting.
The Tonfly Converter is brilliant in its design, given how the camera mounts to the helmet, and we'll examine those features in a bit. First we'll dig into the very important features like the fit, design, and safety functions.
The helmet fits well. It's quite thin, and one of the lightest helmets in its class. It's also very sturdy in spite of the thinness of the helmet. The helmet slips on easily, and is snug all the way around for an average head-type. I have a ponytail, and this helmet doesn't lend itself well to my hair being tied up inside the helmet without the helmet being too tight. People with shorter hair won't have this problem, of course, and Tonfly do offer various sizes.
The Tonfly Camera Converter helmet is one of the most innovative designs available to action-POV camera operators today.
Light-weight, strong, form-fitting, and comfortable, this helmet offers the most peripheral eye-space of any helmet in its class.
Another favored aspect of this helmet that is easily overlooked, is how far back the side of the helmet is cut. The sides of the helmet allow for much greater side-to-side vision than most camera helmets do, and this is particularly an important feature when flying camera for tandems when others may be joining in. Freeflyers will enjoy the wide peripheral view as well. Ski goggles will fit well in this wide-view cut, as the sides of the helmet won't interfere with the larger goggle sizes.
Built in pockets can hold audible altimeters for the skydiving videographer. The audible pockets come pre-cut for the typical sized audibles. A small bit of gaffers tape will hold the audible altimeter in place until the foam lining is replaced with the audible device in the pocket.
The Tonfly Converter comes with the audible pocket already cut to fit most popular audibles. (Photo)
A cutaway system is critical for many action sports, particularly for skydivers. This allows the helmet to be immediately removed/cut free from the body in the event of an accident that involves some sort of entanglement. The Tonfly cutaway system is a bit different than most as it has the cutaway handle facing upwards, which feels very natural and ergonomically placed. Unlike other cutaway systems that use looped nylon to release the latch, the Tonfly system uses a metal button that is drilled out. On initial inspection, this was a concern, but the truth is that the cutaway system works and feels no different from any other cutaway system. The metal containment system may even last longer.
The Tonfly cutaway system is unique in placement and method, but works identically to any other cutaway system. (Photo 1, Photo 2)
What makes this helmet truly unique is the way in which the camera mounts are inserted. Entirely flush with the helmet, the receiver side of the mount is installed so that if there is no camera mounted, the helmet can be completely flat (Tonfly provides small inserts that stick out approximately .25, but are smooth and pose no snag hazard). With the camera box mounted to the side of the helmet, the camera box is flush to the helmet and poses no snag hazard. I ran a bit of Spectra line over the edge of the helmet and there was no sticking/locking point of the line due to this very tight connection.
The mate point for a still camera is identical, however the top of the helmet isn't as wide as a Canon Rebel XTi, so it is possible, although not likely, that a line could snag in the area where the top plate isn't as wide as the camera body.
Another aspect of the Converter Camera mount is the ability to rotate the camera box in small degrees to compensate for head position when freeflying, doing tandem camera, or RW work. Each of the base ring (male ring) has a series of small holes drilled to fit a pin in the insert link (female receiver side), that is spring-loaded. The spring is very tight, there should be no worry that the pin will release on its own.
Note the spring-loaded pin in the female/helmet side of the connection, and note the three drilled holes in the male insert. These holes allow for user-positioning of the camcorder or still camera mount. (Photo 1 , Photo 2)
The pin isn't entirely responsible for holding the base ring. there is a rotational cuff that holds tight when the male ring is inserted in the female receiver plate, and it requires a full 90 degree turn of the male ring to remove the camera box or stills mount from the system, assuring that even in the event of a pin/spring failure, the box or still mount would not separate from the helmet. The pin is released by pulling back on a small nylon loop found at the back of each of the camera mount plates.
Tonfly has responded to another potential snag point problem with remarkable simplicity. Many camera helmets have a possible snag point in the ladder/clip attachment at the chincup. This leads some videographers to cut the ladder strap short, which is no big deal, other than it sometimes affects the ease of attachment on some helmets. Tonfly have addressed this challenge by opening up the chincup, allowing for any excess from the ladder strap to be concealed inside the chincup.
Any excess from the ladder strap fits neatly inside the chincup. (Photo)
The Flaws:
The helmet isn't entirely perfect and some changes could be made on the part of Tonfly, or perhaps by users themselves. For example, some of the options Tonfly offers could be more readily identified as "important." For instance, most buyers should want the Carbon Look finish or at the very least, ask for a lacquer coat. From the model I received, it became immediately apparent that the finish will scratch quite easily, and all I was doing was mounting a Schumacher removable ringsight bracket. Drilling a hole for the HypEye Mini cable further demonstrated this.
Mounting the Schumacher articulating arm, I realized just how easy it is to scratch the flat finish. (Photo)
Another aspect of the helmet that users will want to be mindful of; until the helmet is worn in, a small amount of silicon lubricant will help with the mating of the insert ring to the receiver plate. On my helmet, I found that the pin release loop is a touch small for my large fingers. Using a pencil or pen inserted to the loop helped me get a better grip on it. I'm sure once the spring is more worn in, it won't be quite so difficult.
Small challenges aside, the Tonfly helmet is very well designed for skydiving and other action sports, offering a width of view and light weight that is very impressive. With prices ranging from around $500.00 USD to as high as $750.00 with all options, these helmets are investments rather than frivolous purchases. Until the dollar rises again, it'll be a while before they're competitive with helmets manufactured in the USA in terms of cost.
Congratulations to Tonfly for a very well designed, well-built helmet. This is one camera helmet model that any POV sports photographer should consider when choosing a helmet mounted camera system.
Check out the YouTube stream that shows how the Tonfly Camera Converter works.
Built for:
Skydivers
Ski photographers
Kayaking
Rock Climbing
Chase bicycles
Mountain cyclists
BASE Jumping
Paragliding
Ground launching
Other hands-free sport photographer
Rock on!
-douglas spotted eagle
For more reviews, video, audio, streaming and surround training visit VASST
Tonfy CC1 website
Write your own review of a TonFly helmet
Reviewing Larsen and Brusgaard's New Ares2 and Alfa
I will always leap on an opportunity to do some work for Larsen and Brusgaard, yet when squaring up to a review of their newest releases - the Ares2 and the Alfa - I found myself wondering exactly what I could contribute that people don’t either already know or could easily find out for themselves with a quick trip to the LB website. Sure - I could publicly express my admiration for both the quality of the units and the constant enthusiasm with which Larsen and Brusgaard support the skydiving community at large, and I could dutifully list the features and functions of the gadgets in question - but without finding something with which I can contextualise it’s usefulness I would likely feel guilty of journalistic hackery.
The Ares2 is the civilian version of the Alfa - an upscaled and ruggedised visual altimeter designed for military use that includes some extra functionality specific to jump operations. With a little luck I will never be faced with parachuting into combat - but what relevance can I apply when approaching these devices from the other direction? Year upon year of freefly competitions - where beeps alone reign supreme - have programmed me to view at my altimeter much less frequently than I really should - and possibly therefore am not in the best position to elaborate the many qualities of the new visual thingumys. However - serendipitously, I was actually right on the doorstep of an ideal testing environment where I would need to reverse my instincts and operate a visual altimeter with a level intensity such as never before - an accelerated freefall instructor course. Perfect.
1. Along with all the functions available in the Viso2, Larsen and Brusgaard’s new units are bigger and tougher - constructed form aircraft grade aluminium and hardened glass. The buttons cycle the menus and options as normal, and at the front end act directly to speedily set an altitude offset and operate the backlight. Also, it feels really nice to hold.
As well as a bunch of other stuff on the ground and in the plane, to earn an AFF instructor rating you need to pass three out of four evaluation jumps. The most crucial part of each of these descents is the procedure from the altitude at which the evaluator-as-student finishes their freefall practice and moves through the deployment process. During this ‘bottom end sequence’ the instructor candidate must act precisely and accurately within very specific altitude windows - stacked one upon another - that last less than three seconds each. Get things in the wrong order? Fail. Too low? Fail. Too high? Fail. Maintaining altitude awareness throughout the whole jump is important, but for the bottom end sequence it is absolutely crucial.
2. The Altiset is the required gizmo for military jumpmasters to batch adjust the altitude offset of Alfa units between take-off and landing. Fancy. Also probably important.
Much of the writing I produce for the airsports industry involves the recurring theme of utilising anything and everything at your disposal to squeeze the most you can from each and every jump. Skydiving is expensive and happens fast - so every area in which you can find even the smallest physical or mental advantage has real value. Aside from the odd freefly competition nail-biter, these AFF evaluation jumps were the most pressure I have ever felt on a skydive - and as such, saddling up for the test with a bigger, more visible altimeter made me feel a little more confident both on the way in and throughout the course.
3. Also available is the Echo. This is an audible altimeter that follows the same design principals that is also controllable via the Altiset. While it has been created for military concerns - the interesting part is devices that communicate with each other are looking increasingly like the very near future across all of skydiving.
I didn’t need that fourth jump. Maybe because of experience, possibly due to practice and perhaps simply down to good tuition. Most likely a combination of all these things. But also just maybe because I could see my altimeter a bit better, from a little further away and at a slightly wider angle. It takes no stretching of one’s imagination to feel if that day had played out differently, a small advantage like this could well have meant the distance between passing the course or not.
4. It might not seem that much bigger, but I found myself surprised at how much easier it is to see - both directly and peripherally - when I needed to know.
A quick scan of any modern group freefall picture underlines the majority vote and market share Larsen and Brusgaard enjoy, with the familiar stretchy arm band wielded upon the forearm of a great many jumpers. While the new Ares2 is likely not going to replace their most popular digital altimeter - the Viso2 - after using it a in high pressure situation I can fully embrace its value and relevance as a thing that exists as an option for those who desire or require such utility. It also looks a little bit like it was designed by Batman. I am quite tough on things too, an effect created from equal parts bigness and clumsy. I am trying to be better about it this but have trashed more that a few gizmos and gadgets over the years by being a lummox, and something that is more likely to resist getting smashed from me being stoopid is quite appealing.
5. Success! Jay Stokes (right) is a man who has done 640 skydives in 24 hours.
Thanks to Larsen and Brusgaard, Jay Stokes and the staff of Skydive San Diego.
You can view and download the complete list of functions for all LB’s technology at www.lbwebstore.com
By joelstrickland, in Gear,