Control Systems Malfunctions Information Sheet
Performance Designs has released safety information regarding control systems and related issues that may result in malfunctions. The text below is the conclusion from that paper. For a more detailed discussion go to the education section on the PD web site and click on the article "Control Systems Malfunctions Information Sheet".
Research Conclusion
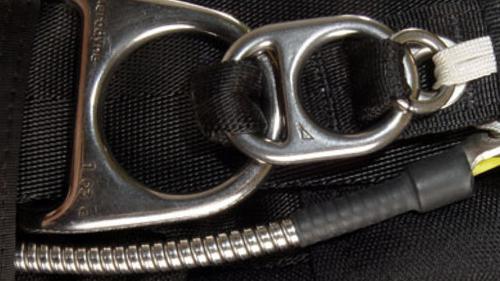
Setting a canopy’s deployment brakes correctly, which includes the proper stowing of the excess steering line, is an important part of the packing process. Failing to do this correctly may cause a control system malfunction or other type of equipment malfunction.
Every time you deploy a canopy you must make sure it is fully controllable, with no unusual friction, binding, or drag on the control system. You must perform this check at a high enough altitude to allow the use of proper emergency procedures if necessary. Many jumpers do not perform control checks on every jump, and some even wait to release their brakes until they reach a fairly low altitude. If you do not perform a full controllability check after opening, or if you wait to reach lower altitudes before releasing your brakes, you may not discover a control problem in time to respond correctly.
If you need to let go of your toggles in flight after releasing the brakes, you should place them on the risers against the guide rings before releasing them from your hands. Letting go of the toggles suddenly while they are pulled away from the guide rings may allow the toggles or steering lines to entangle with part of the riser assembly or some other object.
A misrouted steering line, entangled steering line, or any other type of problem involving the control system may severely limit your ability to control the canopy and should be considered a serious, life-threatening malfunction. As with any malfunction, you must follow proper emergency procedures if you experience this situation. Jumpers have been severely injured and killed while attempting to land canopies with malfunctioning control systems. Even if you are using a canopy size or wing loading that is considered “conservative,” you may be severely injured or killed if
you attempt to land a canopy that you cannot fully control.
You should understand how to properly use every component of your parachute system, and understand any instructions, manuals, or other information supplied by the manufacturer. If you have any questions about a particular component of your parachute system, seek the advice of a qualified rigger or contact the manufacturer. If you have any questions concerning canopy deployment, canopy control, or emergency procedures, ask a qualified instructor for assistance.
Download the Information Sheet
Performance Designs Education Section
Relative Workshop - 40,000th rig Essay Contest Winner
Relative Workshop would like to thank everyone that entered the essay contest. We would like to congratulate the runner-ups for their entries; SSG Brian Heft, Maggie Downs, and Al King. A big congratulations goes out to Ben Liston for his winning essay and the recipient of the free Vector. Ben's essay is posted below.
Why I Want to Jump a Vector
I still own the first rig I ever bought: a Vector II. My friends and I refer to it as "Old Blue" and it has taken me through each license, to my first gold medal (Collegiate Nationals 1996), through countless video and coach jumps, and traveled with me around the world. When I was jumping in other countries, the language barrier was sometimes tough to get through, but gear checks were never a problem. I remember a moment in Italy when I sensed that the locals were a bit skeptical of me, but after I pulled out "Old Blue," the owner of the DZ nodded at my rig, went into the hanger, and emerged with his own Vector. In broken English, he turned me and said, "Okay, we jump." It turned out to be an incredible day of 8-way, pasta, and wine. This is just one of many times I’ve been glad to have a Vector. Whether I was jumping over the Great Barrier Reef in Australia, or filming my best friend’s first AFF jump, the rig has never let me down.
As a rigger, I’ve always appreciated the craftsmanship, functionality, and clean lines of Vector rigs. I like that every feature of the rig is well designed and constructed with precision. For instance, the main pilot chute’s support tape is sewn at a 45-degree angle to mesh. Sure, it would be easier to sew it in line with the mesh, but the Relative Workshop sews it to minimize the stretch and increase the pilot chute’s efficiency. There is also simplicity and ingenuity in the reserve system. I don’t know why every manufacturer doesn’t use reserve pilot chutes that create drag regardless of the angle from which they are launched and springs strong enough to clear burbles and find clean air, but I’m glad The Relative Workshop does. Packing reserves into some containers is more like a wrestling match. With Vectors, the free-bag and pilot chute close into the container cleanly, exactly as they are going to leave it if they need to be used. Every time I pack up a Micron or M-Series for one of my customers, it’s hard to give it back. I want one of my own.
Most importantly, Vector Microns are safe. I appreciate that Vector rigs are designed to be as snag free as possible, that the riser covers will stay closed in freefall, and that both the main and reserve containers stay closed until the handles are pulled. It’s also comforting to know that the cut-away system is made to the standards of the original inventor and that no creative liberties have been taken with this crucial aspect of the rig. From hard housing riser inserts to pin protection, the Vector Micron and M-Series are clearly the harness/container systems that all others are measured against. Yes, there are other manufactures out there, but in a sport that has a zero tolerance for error, I want the best. On top of all of this, I want to jump a rig made by a company that stands behind its products and provides great customer service. Every interaction I’ve had with The Relative Workshop has been outstanding. Whether during a visit to the factory or getting technical assistance over the phone, everyone at the company is professional, friendly, and knowledgeable.
I’m at a point where I’m ready to take my skydiving to the next level and I know a Vector Micron can help get me there. The ergonomic harness will give me the mobility to perform my best in freefall and keep me comfortable under canopy, and the design innovations will keep me safe. I work in education and whether I’m training hard, or supplementing my "four-way fund" by doing video or coach jumps, I want a Vector on my back every time I get on the plane. Skydiving is changing, and while "Old Blue" needs a replacement, I won’t let it be anything but a Micron. The Relative Workshop makes the most dependable container in the world, so the question isn’t really "Why do I want to jump a Vector?" but rather "Why would I jump anything else?"
Make My Camera an "Extra Small" Please!
There's only so much real estate on or around your head for camera gear. The average Joe/Jane tandem camera person will fly a helmet with a 35 mm SLR and a miniDV video camera. Each camera can be mounted any number of ways, but the sum total of their weights is still enough to make your neck tired. The more advanced camera flyers involved in record jumps, night jumps, etc. are attaching more equipment in addition to the usual video and still cameras, such as lights and battery packs. Suddenly, the weight of the helmet goes from 5 or 6 pounds to 15 or 20 pounds. Aside from all the weight issues, there are the dozens of stories of snag incidents. The more junk you bolt to your melon, the more your chances increase for a line snag.
It's pretty cool to see an expert camera flyer with a finely configured helmet, but it's still scary to see the number of potential snag hazards and the amount weight balanced on that camera flyer's neck. Enter the "lipstick" or "bullet" camera. The bullet camera is simply the imaging sensor of a standard video camera mounted inside a groovy little metal tube. It has a lens at one end and a cable at the other. Most of the models available are only 50 to 70 mm in length and roughly the diameter of a nickel. Nowadays, the picture quality is basically equivalent to any miniDV consumer camcorder on the market. Some models include the ability to change lenses, filters, and mounting hardware.
First, a word on resolution and media (as in, recording media: tapes, DVD's, memory cards, etc.). We won't go into the bits and bytes or the exact specifics, just the general terms and numbers. (If you're a video expert, forgive the simplicity or lack of depth.) The standard format for video storage on today's small camcorders is "miniDV." The newer video recording technologies in camcorders are DVD disks and "microMV" tapes. DVD is great quality, but the jury is still out on whether a DVD camcorder will hold up well in freefall. The microMV tapes are tiny, to say the least, but microMV uses video compression to allow it to store an hour of video on a dinky little tape. The compression in microMV compromises the quality of the picture. The quality of microMV lies somewhere between miniDV and VHS. The miniDV standard stores frames of video at a resolution of 720 pixels by 480 lines. It, too, uses compression to store video, but doesn't sacrifice as much quality as microMV. miniDV is still a great choice overall for skydiving video. It's small and it provides great video quality.
Television in the US and some other countries is based on a standard called, "NTSC." NTSC defines a television screen's resolution to have 525 lines from top to bottom (the number of pixels across isn't really an issue here). The closer your camera gets to saving 525 lines of resolution, the more your video will look like a professional or "broadcast" quality picture on an NTSC television. For more details on the standards that define different video formats, do some searching on Google.com.
In order to replace your miniDV camcorder, you're going to want a bullet camera that at least matches the resolution and picture quality of your miniDV camera. There are several different resolutions available in bullet cameras. As of the writing of this article, 380 lines and 480 lines are typical. 380-line cameras contain 20% fewer lines of resolution than 480-line cameras. If the picture quality isn't that important to you, you might be interested in a 380-line model. This would be equivalent to a VHS, microMV, or maybe even a Hi8 recording. The ideal camera for the best quality is a camera capable of 480 lines of resolution (matching miniDV). The size of the little image sensor chip in the bullet camera also makes a difference in the clarity of the picture. Many lower resolution cameras use a quarter-inch chip. The better quality 480-line cameras use Sony's new third-inch chip, which is also happens to be capable of very low light and infrared (or "night vision") imaging. The bigger the image sensor, the more accurately it can differentiate between pixels in the picture that's coming through the lens. This equates to better contrast and color in the video. This is precisely why you see bigger lenses and imaging sections on professional cameras. A bigger imaging CCD is just like having more megapixels in the digital still camera world.
There are a couple of tiny cameras available specifically for skydiving Ranging in price from $360 to $900 and up, each with their own selection of accessories.
The "monkeyKamera," by monkeyKam, is based on Sony's ExView CCD chip and has an imaging resolution of 480 lines. It's the same chip technology found in late model Sony single-chip CCD camcorders. The monkeyKamera starts at $359, according to the web site. The other camera is the "SportsCam" from Mike Swain. The SportsCam is a "board" type mini camera that has a resolution of 380 lines of full color ("board camera" means that the circuitry and lens of the camera head are all mounted on a little circuit board in a little black box). The advertised price for the SportsCam is $899 and up. These tiny cameras weigh no more than 6 or 7 ounces and takes up very little space on your helmet. They add no noticeable weight in freefall.
The camera "head" (the bullet or the little black box with the lens) provides a video signal to an RCA-type connector, which is connected to your camcorder's A/V input jack. An extension cable runs up from the camcorder to your helmet. The connector at the collar or base of the helmet allows the cable to break away in case your helmet is lost in action.
Your camcorder is usually carried in a belly pouch and run in "VTR" or "VCR" mode. Camera kits typically include the hardware required to rig the camera head to most any helmet. Also included are a battery pack (batteries not included), connectors and cables, and even a pouch for your camcorder (check the manufacturer's web site for what is included in the base camera kit). Any "fanny" pack can be used for your camcorder, but check with the camera manufacturer for any custom built pouches they may offer. For instance, the "monkeyPak" from monkeyKam is a belly pouch that holds your camcorder, batteries, and switches for controlling the camcorder and bullet camera. The monkeyPak is specifically designed to make using your camcorder in a belly mount configuration easier. It gives easy access to the CamEye button and monkeyKamera power button, as well as a clear vinyl window that makes it easy to watch your camcorder's screen without having to remove it from the monkeyPak.
The bullet camera requires its own power. Power is usually supplied by a battery pack. Most bullet camera battery packs use 8 AA batteries to provide 12 volts of power to the camera head. In tests, Duracell NiMH rechargeable batteries purchased at a local retail store were used to power the monkeyKamera and were found to last over 10 hours of continuous use! In an average skydive, the camera will probably only be turned on for a few minutes, so a fully charged pack of batteries should last for weeks and weeks, if not months.
When flying a bullet camera, there's nothing new to learn, except for your procedures in the airplane. The CamEye is a great tool for controlling the camcorder without having to remove the camcorder from the belly pouch. An LED indicates the status of the camcorder (on, off, or recording). When you're waiting for the door to open, connect your helmet to the belly pouch cable, don the helmet, wake up your camcorder with the CamEye, turn on the bullet camera, wait for the door to open, then click the CamEye button to start recording and zip up your suit.
If you wish, you can even rig the CamEye to the outside of your jumpsuit through a button hole (or grommet) OR you can even wear your belly pouch on the outside of your suit. In this author's humble opinion, it's wiser to wear the pouch on the inside of the suit. Less is more on the outside of your suit and around your rig's handles, when it comes to safety.
Save your neck! Try a bullet camera and see how comfy freefall video can be. :)
monkeyKam Web Site
Derek's Gear Tips
Derek Vanboeschoten is a Senior Rigger, Tandem Master and AFF instructor with more than 3300 jumps. Derek also moderates the Gear & Rigging forum on Dropzone.com where he first posted this list of Gear Tips. It is republished here for your convenience.
Use Performance Design's Slinks for the main and reserve canopies instead of Rapide links. Slinks are stronger, lower bulk, easier to install and remove, and won't damage the slider grommets.
Clean cutaway cables every 30 days with Ace Pure Silicone Lubricant, sold at Ace Hardware stores, to keep cutaway pull forces low.
Inspect cutaway cables every 30 days and replace nicked or kinked cutaway cables with a new cutaway handle/cables.
Flex 3-rings every 30 days to prevent them from taking on a "set" and hanging up during a cutaway.
Inspect Rapide links and bumpers or PD Slinks every 30 days. Always use slider bumpers with Rapide links to prevent damage to the slider grommets, "Lock-Tite" to keep the link from loosening, and nail polish to torque-stripe Rapide links.
Use metal, capped, and tacked riser inserts for the excess cutaway cables, regardless of main size or type. They prevent difficult or impossible cutaway resulting from the channel "gripping" the cables or from line twists that include the excess cutaway cables.
Replace the main closing loop early and often. Adjust main closing loop so that the closing pin is snug. Use a stainless steel washer thick enough that it won't bend when closing the container.
Have Velcro replaced every 100-200 uses.
Use a kill line pilot chute, regardless of the size/type of main canopy you have. Check the length of your main pilot chute kill line every 30 days. The kill line should have a little slack in it when the pilot chute is "cocked" and the bridle is under tension. If it doesn't, have it fixed.
Replace a damaged or old kill line pilot chute with a new one.
"Cock" a kill line PC after laying the cocooned canopy on the ground and just before putting the canopy in the deployment bag.
Take the twists out of steering lines every jump or, at a minimum, after the last jump of the day.
When setting the brakes, set them so that the steering line is to the inside (between the risers) and the excess is to the outside. This will put the excess to the bottom of the riser channels, helping to protect the excess steering line.
Keep gear out of the sun as much as possible.
Use Velcro-less toggles/risers. Velcro requires replacement every 100-200 uses, and Velcro damages the steering lines, risers and anything else it comes into contact with.
Replace mini-risers every 500 jumps or less. Inspect them every 30 days for wear.
While packing, check your line trim every 30 days or less. When new, all the "A" lines are the same length (on 'most' canopies, check with the manufacturer). Spectra shrinks from the heat from friction with the slider grommets, pulling the canopy out of trim. Pay special attention to steering/control lines. Replace line sets that are significantly worn or out of trim.
Use the proper size rubber bands, 'Sky Bands', or 'Tube Stows' and do not double wrap them.
Have your rig washed every 500 jumps or so, more if jumping in a sandy or salt-water environment.
What to do After Landing Your Reserve:
First, place the toggles back on the Velcro. This will prevent the hook half of the Velcro from damaging the lines. Second, daisy chain the lines. Use the slider to keep the daisy chain from unraveling. This will keep the lines neat and untangled. If you have an RSL, remove it from your main canopy and re-mate the Velcro to keep the hook Velcro from damaging your gear.
Be very careful with the canopy. Get it out of the sunlight and into a large plastic garbage bag and then into your gear bag. Be careful when zipping the gear bag shut to not get any fabric caught in the zipper. As long as it is clean, put the reserve pilot chute and free-bag in the center of your rolled up reserve. This will protect the spring inside the reserve pilot chute from damage.
Do not take the main canopy off of the risers to untangle it. It got tangled on the risers, it will come untangled on the risers. Taking the canopy off the risers, or worse, the lines off the links, will only make the job of re-assembling the main more difficult.
Put the cut away cables and reserve ripcord back into their housings and the handles back in their pockets. This will prevent any dirt on the cables from getting on the reserve or the Velcro from damaging lines, the container, or the reserve. If you lost one, or both handles, order them and have them shipped to your rigger. Also, if the free-bag and reserve pilot chute was lost, order a new one and have it shipped to the rigger. Make sure when ordering handles or free-bag to order the correct size for your harness/container.
In the gear bag, put a card with your name, address, phone number(s), and any special instructions, such as "install/replace soft links", "wash the container", "remove/install RSL", "I need the rig by this weekend", etc.
If you have a Cypres, check your reserve packing data card to see when the scheduled maintenance and 2 year battery replacements are due. If the maintenance is due (4 and 8 years +/- 3 months (+/- 6 months for Cypres "2") from DOM), make arrangements with your rigger to ship the unit or have your rigger remove it and ship it yourself (your rigger will need the original Cypres box to ship it). If your batteries are due (two years since installation for the Cypres1), check with your rigger to see if they have new batteries or if they will need to be ordered. The batteries will have to be replaced if there is less than four months remaining in the two-year cycle, for a Cypres "1". Cypres2 batteries are replaced at the 4 and 8 year maintenance by the factory.
Gear & Rigging Forum
Preyor Pins Dropzone.com Closing Pin Necklace
Russell Jackson from Preyor Pins recently launched a new closing pin necklace design especially for the Dropzone.com community. This small new company makes a beautiful line of quality skydiving jewelry. You can now order your Dropzone.com closing pin necklace straight off their web site.
When you order the Dropzone.com piece, reference the coupon code "DZCOM" and it will give 4 dollars off the set price of $28.00
Russell says: When starting out on the first design and team lines, I wanted to be absolutely assured that they were the best quality and most unique beads from around the world, finest Greek leather, first quality components, .925 silver, best quality fresh water pearls, and of course authentic parachute parts. That each of the pieces has great wearability, were jump safe and durable. As my Mom says: "We are proud of our quality and innovation in the design and production of our jewelry." I wanted first and foremost that each of the pieces "represented", and that they conveyed the expressiveness that all skydivers do in the air and on the ground. that the individuality and commonality that we all share can be easily seen by all.
My day job is an Executive Chef in San Francisco, so I live by the creed of "Service, first and foremost", that ultimately we are here for you. I believe in my Mom, I believe in my skydiving family and will always look out for your best interest and be there to serve your fasionata needs. "Represent" with Preyor Pins.
Preyor Pins web site
Dropzone.com piece
Top 5 RSL myths
I keep seeing the same arguments made against RSL's, over and over. Many of them are just myths, word-of-mouth anecdotal stories passed down for so long that their original meaning has gotten lost. I figured I would list them here:
1. You should get stable before you open your reserve, and so you should disconnect your RSL.
First off, you should _not_ be stable face-to-earth when you open your reserve. The Racer manual spells this out explicitly - you should be head-high if possible to ensure a cleaner reserve deployment. Fortunately, you are head high the instant you cut away from your main, and that is the point at which an RSL will open your reserve.
Secondly, there are two universal truths in skydiving - you won't do it if you don't practice it, and you _will_ do what you trained to do. If you practice "cutting away and getting stable" you _will_ do that in the air, even if you someday cut away at 500 feet. If you do that, the only thing that will save your life will be your RSL.
Finally, before you decide that it's a good idea to cut away and then get stable, I'd recommend you do an intentional cutaway from a rapidly spinning canopy and see how long it takes. (Hint - it does not take just a second or two.)
2. You only need an RSL if you're going to forget to pull your reserve.
Rick Horn, one of the three people in the US who trains all AFF-JM's, once needed his RSL due to rig distortion. He could not find his reserve handle. If you are more current at cutaways than a man who teaches them every month, and have more jumps than him (6000?) that might be a valid point, but I think few people are.
3. If you cut away on the ground on a windy day and you have an RSL, your reserve will inflate.
Simply not true. Try it next time you need a repack - go outside in the wind and pull your reserve handle. The PC will come out, the freebag may fall on the ground - and that's it. Unless you have decided to jump in a hurricane, even 25kts of wind (way more than most people will jump in) won't inflate a reserve.
Of course, you can disconnect your RSL once under canopy to prevent the reserve from opening at all if you have to cut away on the ground. That's a convenience issue, not a safety one.
4. You can practice cutting away on the ground, so how hard can it be?
RSL's are not for normal cutaways. They are for madly spinning mals where you can barely see one of your handles. They are for mals while wearing a wingsuit, where you have fabric flying in your face and you can barely see. They are for cutaways at 600 feet when someone sets up a hook right into your canopy and destroys it. These are the situations where RSL's save lives.
If you will never be in such a situation, great. But I have discovered that those situations find you, rather than the other way around.
5. You have to "fall away" from your main to guarantee you won't entangle with it.
Simply untrue. I've watched an awful lot of rig testing, and the physics just doesn't let that happen. Even in a malfunctioning canopy, the forces work to separate the main and the jumper/reserve.
And if you postulate a bizarre scenario where the reserve PC can somehow entangle with the main? The reserve will simply open faster.
All that being said, there are still reasons not to use an RSL. We disconnected all our tandem RSL's a while back because there had been some problems with broken risers, and that's a risk when you use a one-sided RSL. If you're doing something bizarre (like jumping a 46 sq ft canopy and opening at 5000 feet) an RSL will probably not help you much, and if you're doing intentional cutaways or CRW, it makes sense to simplify your gear and be able to fall away from something before you open your reserve. But for a lot of people it makes sense.
Personally, I recommend everyone use one until they get to 200 jumps and/or have their first cutaway from a spinner. At that point they will have the experience to make a good judgement on their own.
-bill von

Do Skydivers Care About Safety
Image by Russell M. WebbIf I've learned one thing in my 35 years in the sport, it's that it is very difficult to get most skydivers interested in safety. Years ago, when it became obvious that my hand deploy pilot chute and 3-ring release made it possible to deploy a malfunction, and then breakaway from it, 500 feet faster than the existing internal pilot chutes and Capewell canopy releases allowed, a lot of jumpers simply started deploying their mains 500 feet lower. Utterly negating the increase in safety these systems offered.
Even today, most jumpers think that because all gear has a TSO tag on it, one piece of gear is as safe as another. Unfortunately, that is not true, and most jumpers will choose "fashion" over safety every time. Here are just a few examples of what I mean, starting in the '60's, right up to the present day.
The army found out that if you put 2 foot band of fine netting around the skirt of a round parachute, you eliminate the most common deployment malfunction, the partial inversion. The trick worked so well that airborne troop static line malfunctions went from 1 in 250 to 1 in 250,000. WOW! So, a company that made round sport reserves (there were no square reserves yet) came out with an "anti-inversion netted" reserve. NO ONE bought it. You know why, of course...It packed up 10% bigger. Jumpers past up a proven 1,000 times increase in safety for smaller pack volume.
Believe it or not, there is a similar, thought not nearly as drastic, choice jumpers are making when they buy a square reserve today. Let me explain. The first square canopies came without sliders, so they had to be built tough. This meant, among other things, that there was tape running spanwise (from right to left) between the line attachment points. With the advent of the slider and softer opening canopies, some companies began leaving the spanwise reinforcing tapes out of their square reserves. Why? Because they cost less to build, and (you guessed it) they packed smaller. This proved to be a wise choice, (at least in the marketing department) because although jumpers very often choose their mains for performance and durability, the almost always always choose their reserves base only on price and pack volume. While reserves without spandwise tapes are fine in most situations, as we have seen recently, they tend to fall apart when skydivers push the envelope. (ie. big people on tiny canopies, going head down at high altitudes.) Safety doesn't seem to be any larger a consideration than it was when they passed up anti-inversion netted round reserves in the '60's.
Standard size (large) 3-ring release systems have never given a solo jumper any problem. They ALWAYS release easily and NEVER break. However, mini 3-rings look neater, so that's all people will buy. No matter all the reports of hard or impossible breakaways or broken risers. Don't get me wrong, Properly made, and maintained, mini 3-ring release systems will handle anything even the newest ZP canopy with microlines can dish out. Unfortunately, because they are now being pushed right to their design limit, they must be made EXACTLY right. And a lot of manufacturers either can't or won't. On the other hand, a large 3-ring system has so much mechanical advantage, that even a poorly made system will still work just fine. But then fashion is much more important than safety, isn't it?
Spectra (or micro-line) is strong and tiny, so it reduces both pack volume and drag , which means you get a smaller rig and a faster canopy. Unfortunately, It has a couple of "design characteristics" (this is manufacturer talk for "problems") It is very slippery (less friction to slow the slider), and stretches less than stainless steel. This is why it hurt people and broke so many mini risers when it was first introduced. Now, I must say that the canopy manufacturers did a wonderful job handling these "characteristics" by designing new canopies that opened much slower than their predecessors. However, the fact still remains, that if you do have a rare fast opening on a microlined canopy, Spectra (or Vectran) will transmit that force to you (and your rig) much, much faster, resulting in an opening shock up to 300% higher than if you have Dacron lines. (It's sort of like doing a bungee jump with a stainless steel cable. At the bottom of your fall, your body applies the same force to the steel cable as it would to a rubber bungee cord, but because steel doesn't stretch, your legs tears off.)
So why would I have a fast opening? Well for one thing, you, or your packer might forget to "uncollapse" your collapsible slider. BAM! Or perhaps you're zipping along head down at 160 mph with a rig that wasn't designed for it, and you experience an accidental container opening. BAM again. The point is this: If you want to push the envelope, and get all the enjoyment this sport has to offer, and do it "safely", you need to make careful choices in the gear you jump. If you weigh 200 lbs. and do a lot of head down, perhaps you really shouldn't be using a reserve without spanwise reinforcement, mini 3-rings, or a canopy with micro lines.
No matter how much you weigh, you should educate yourself about gear, and then only jump gear that is designed for how you jump. So many fatalities occur because of decisions jumpers make BEFORE even getting in the airplane. Don't join that group. Be smarter than that. Fashion, at least in skydiving, can get you killed.
~ Bill Booth
Inspecting your Gear
Most jumpers realize the importance of having their reserve parachutes repacked every 120 days in accordance with F.A.A. regulations. We know that this is not just a reserve repack but is also an inspection of our reserve canopy and also our harness and container assembly. Most parachute riggers will gladly accept your complete rig and inspect the main canopy and its components as well as inspect and repack the reserve (and will rightfully charge extra for this service). However, some of us do not give our main canopy to our rigger and more importantly some of us make so many jumps between reserve repacks that even a thorough inspection every 120 days might not be often enough to find potential problems with our gear. It is for these reasons that we should know the procedures for checking the parts of our gear that get the most wear.
The following is a list of items on your main canopy assembly that you should inspect occasionally. This inspection should never be a substitute for a periodic inspection by a rigger but should supplement your rigger's inspection in between reserve repacks. If you find a problem with your gear, your rigger will be glad to advise you on what to do.
A special note for those of you who usually have someone else pack your main parachute: Unless you have made some arrangement with your packer to do this inspection while they pack and unless they know what to look for, you are giving up this opportunity to check your gear each time they pack for you!
Pilot Chute-
Your pilot chute is one of the most critical items on our list of things to check on our gear, after all, the pilot chute is the thing that starts the deployment sequence at pull time. The pilot chute is also one of the most likely things for us to abuse. How many of us have left it dragging when walking in from the landing area?
First check the handle attachment at the top of the pilot chute. After a number of jumps the stitching can loosen and come out. If this happens and the handle comes off it will probably happen at the worst possible time. For those of you that have had your handle converted to a custom handle like a Hacky Sack, pay particular attention to the modification. Some of this stitching will be inside the pilot chute.
Check the seams of the pilot chute and the condition of the fabric. This is very important for those of you that have a large grommet in your deployment bag to allow it to slide over the pilot chute to collapse it. A very small tear or burn in the fabric may result in a large rip at 120 miles-per-hour. If your pilot chute blows up and you have a very tight container, there may not be enough drag to pull the pin.
Bridle-
Your pilot chute bridle has several important areas to check. The top of your bridle may be permanently sewn to your pilot chute or may have a loop sewn at the end. In either case you should check the stitching for security.
Further down the bridle is usually a section of Velcro to secure your bridle to your container and it should be in good condition. Your bridle needs to be firmly attached to your container so that there is less chance of snagging it on anything that could pull your pin and cause your container to be opened prematurely.
Next on the bridle is the pin that holds your container closed. The most important thing to check is the attachment of the pin to the bridle. This is the area that has the most stress, especially if your container is tight. Most manufacturers attach the pin with 3 bar-tack stitches which is very secure, but even bar-tack stitching can loosen. If your pin is attached by any other type of stitching it would be a good idea to have a rigger look at it as well.
Continue by looking at the closing pin itself. Some pins were manufactured with a plating that tends to chip off making it harder to pull through the closing loop and also causing excess wear to the loop. Stainless steel replacement pins are available and work much better.
On the other end of the bridle check the stitching on the loop where it attaches to the main canopy and check for wear at the point where it rubs against the grommet in the deployment bag.
For those of you that have collapsible pilot chutes there is one more area to look at. Check for wear on the line that runs inside the bridle and pulls down on the top of the pilot chute. Fortunately most of these designs are fail-safe, and will still deploy your canopy correctly although not collapse the pilot chute later.
If you have any problem at all with your bridle and it is a standard non-collapsible type, keep in mind that you can get a new and complete assembly from the manufacturer at a reasonable price. If you have the type of bridle that loops through the pilot chute attachment point it will also be very easy to replace.
Bag-
Your deployment bag is a straightforward item on the list and seldom requires much work, but it does take some abuse from dragging and forcing a canopy in it when you pack. You need to check the seams and stitching for this stress including the loops that the rubber bands attach to.
Check that the grommets are securely in place and that they have no rough edges inside, particularly the one that the bridle passes through.
If your bag has Velcro, make sure it is in good condition.
Canopy-
Although your main canopy is made up of many parts, this is a short list of the items that need the most attention. A more complete inspection should be done by a rigger periodically.
First check the bridle attachment point at the top center of the canopy. This area gets a good deal of stress during deployment. Check the stitching and for stress around the attachment point.
Check the general condition of the fabric. There may be some tiny snags or pin holes but there should be no rips or seams that have pulled out.
Check the general condition of the suspension lines. A little roughness in the lines is not unusual but if any of the fibers in the line are broken have a rigger take a look.
Check the slider fabric and seams like you did for the canopy and then check the condition of the grommets. The grommets should be securely seated in the edges of the slider and they should have no rough edges inside.
Check the connector links to make sure the barrels have not turned and loosened. Slider stops are a good idea here because they not only protect the slider grommets, but they also prevent the barrels of the links from turning.
Risers-
The risers are the final area of your main canopy assembly to be inspected.
Check the security of the large harness type stitching at both the top loop and at the rings. Make sure the grommets near the rings are securely seated and have no rough edges inside.
Make sure the Velcro on the toggles and on the risers is in good enough condition to secure the toggles onto the risers.
The risers should occasionally be released from the harness to check the operation of the release system. The webbing should be flexed enough to take the stiffness out of riser and the release cable should be checked for cleanliness and ease of operation. The manufacturers of harness and container systems devote whole sections of the owner's manual to describing the operation and maintenance of the 3-ring release. Read the manual and understand how it works.
Rig-
Your rigger will inspect your harness and container assembly when repacking the reserve, but several items should be inspected more often.
The Velcro that the bridle is attached to should be in good condition as well as the pilot chute pouch. Be sure that the pouch contains the pilot chute well enough that it cannot come out accidentally but still allow it to be comfortably extracted.
Lastly and very important is the closing loop. It should be the right length for the size canopy packed into the container and should not be worn so much that it could break from the pressure and cause a premature opening.
In Conclusion-
This inspection list has included the items that are most likely to show wear and need further attention from a rigger. Although it seems like there are a lot of things to look for, just remember that almost everything on this list is something that you look at every time you pack. Simply taking the time to look closely and knowing what to look for will go a long way toward keeping your gear safe and in good condition.
MANDATORY Ripcord / Pin Test
Capewell Components LLC has received (3) reports from (3) customers of (4) ripcord pins that broke. All (4) pins were reported to have broken under very low force. All (4) pins are reported to have broken on the blade section of the pin, approximately 1/8” (3 mm) from the shoulder of the pin. Two of these ripcord pins that broke were supplied by Capewell as a completed ripcord assembly. Two of the ripcord pins that broke were supplied as pins to Capewell customers who then assembled the full ripcord. The (4) ripcord pins that broke were delivered to Capewell customers in the first half of 2002.
Capewell has an on-going investigation to determine root cause. No root cause(s) has been determined to date. Affected Ripcord Pins are: MS70107 (angled), PS70107 (angled), 61C4304 (angled); 55A6480 (terminal)
A defective pin could cause your parachute system to malfunction. Please download the complete service bulletin below which describes two MANDATORY tests. Either TEST 1 or TEST 2 must be performed prior to the next uyse of your system.
Download Service Bulletin (pdf)
Gear and Rigging Forum
Gear Regulations for Parachutists Visiting the US
Federal Aviation Regulations covering skydiving operations within the United States were updated two years ago. One of the key changes allows the use of otherwise unapproved equipment by foreign parachutists. The new rule has received very little official explanation, and has created confusion among foreign jumpers and United States drop zones. Some drop zones treat the equipment of foreign visitors with open arms and an "anything goes" policy, while other drop zones strictly apply the relevant federal regulation (105.49). United States drop zones and visiting jumpers should understand what Federal Aviation Regulations actually require with regard to foreign equipment, and should be prepared to comply with those requirements. USPA has published a paper that outlines the specific regulation covering equipment use by visiting jumpers, and the complete regulation is readily available in the USPA SIM, and in Federal Aviation Administration publications.
Based on the USPA report, and original research, it appears that in order for a foreign jumper to use unapproved equipment in the United States the following FAA standards apply:
The equipment must be owned by the foreign jumper.
The jumper can NOT be a citizen of the United States, or a resident alien. A dual citizen (example: Canadian/US) must comply with the United States standards.
Either the reserve or container must be UNAPPROVED. If both components are TSO'd and can be used in the United States by a United States citizen, then United States standards apply. So, a French citizen jumping a Javelin and a PD reserve in the United States must comply with all United States regulations, including a 120 day repack by an FAA rigger, with a seal applied to the reserve.
If the reserve OR the harness/container is NOT approved for use in the United States AND the equipment is approved for use in the jumpers home country, it can be used by the foreign jumper/owner in the United States under his home country rules.
Understanding The Regulation:
FAR 105.43 requires that a reserve parachute and the harness/container must be approved by the FAA (TSO'd), and that the reserve must have been packed within 120 days by an FAA certificated rigger. This part governs parachute systems that are approved (reserve and harness/container).
FAR 105.49 allows a foreign parachutist to use his own unapproved foreign parachute system if it is packed "in accordance with the foreign parachutist's civil aviation authority…" and if the foreign parachutist is the owner of that equipment. This part applies only to foreign parachutists, and only to unapproved equipment.
FAR 105.3 defines a foreign parachutist as "a parachutist who is neither a U.S. citizen or a resident alien and is participating in parachute operations within the United States using parachute equipment not manufactured in the United States."
FAR 105.3 defines an approved parachute as "a parachute manufactured under a type certificate or a Technical Standard Order (C-23 series), or a personnel-carrying US military parachute…"
The key term to understand is "unapproved foreign parachute system"
The regulation that allows a foreign parachutist to use unapproved foreign equipment (105.49) is based on exemptions that had been granted under a previous version of part 105. The change to allow this use without an exemption was proposed and published in the Federal Register on April 13, 1999. In the preamble to the proposal the FAA stated the following: "The FAA proposes to permit foreign parachutists to conduct jumps in the U.S. using their own equipment provided that they use single-harness, dual-parachute systems which contain a non-Technical Standard Order (TSO) reserve parachute or a non-TSO'd harness and container…" The FAA repeated this position in the section-by-section discussion of the proposed changes under 105.49, saying" This proposed section addresses equipment and packing requirements for foreign parachutists. Only single-harness, dual-parachute systems which contain a non Technical Standard Order (TSO) reserve parachute or non-TSO'd harness and container would be allowed to be used in the United States…"
The FAA received several comments about the proposed rule, but incorporated the original proposal into law with only limited changes to the specific labeling of the regulation. The final rule was published in The Federal Register on May 9, 2001, and became effective on July 9, 2001. Thus, the stated intent of the FAA is to exempt systems from 105.43 that are owned by a foreign jumper and are at least partially unapproved, but to require the 120 day inspection and repack by an FAA certificated rigger if the equipment is entirely approved for use in the United States. There is some confusion in the language between the country of manufacture, and approval (TSO), but it appears that the intent of the FAA is to require the standard 120 repack by a rigger if BOTH the harness/container and reserve are approved under the TSO process, regardless of where they were actually manufactured.
Making Sense of The Regulation:
The FAA appears to be saying that if BOTH the reserve parachute and the harness/container are approved in the United States, then the FAA has knowledge of the equipment and believes packing should comply with 105.43. If either the reserve or harness/container is NOT approved, then the FAA does not know enough about the equipment to form an opinion about maintenance or packing, and thus the FAA defers to the jumpers home county civil aviation authority, as listed in 105.49.
What it Means:
Foreign jumpers visiting the United States with a reserve and harness/container approved for use in The United States (TSO'd) should be prepared to comply with United States packing requirements, including the 120 day repack by an FAA certificated rigger.
Drop zones should adhere to the foreign jumpers home country rules only if either the reserve OR harness/container is unapproved by the FAA, and the drop zone has a solid understanding of the rules issued by the foreign jumpers civil aviation authority.
Many drop zones are not familiar with FAR 105.49, and very few drop zones have direct knowledge of the civil aviation authority requirements of other countries. Visiting jumpers can assist drop zone owners by having copies of their home country requirements written in, or translated to English. The drop zone is responsible for making sure unapproved equipment is in compliance with the civil aviation authority of the jumpers home country under 105.49(a)(3), so foreign jumpers should be prepared to explain their local regulations and show at least this level of compliance.
All skydivers and drop zones should understand that a violation of Federal Aviation Regulations can be levied against the jumper, the pilot, the drop zone, or just about any other entity involved in the parachute operation.
Information Resources:
FAR Part 105 http://www.access.gpo.gov/nara/cfr/cfrhtml_00/Title_14/14cfr105_00.html
USPA Skydivers Information Manual with all relevant Federal Aviation Regulations and USPA policies: http://www.uspa.org/publications/manuals.pdf/SIM.2003.pdf
Notice of Proposed Rulemaking (Federal register): http://frwebgate.access.gpo.gov/cgi-bin/getdoc.cgi?dbname=1999_register&docid;=99-8753-filed
Final Rule with Comments (Federal Register): http://frwebgate.access.gpo.gov/cgi-bin/getdoc.cgi?dbname=2001_register&docid;=01-11726-filed
USPA White Paper on Foreign Parachutes
Tom Buchanan is a Sr Rigger, S&TA at The Ranch Parachute Club and author of the book JUMP! Skydiving Made Fun and Easy.