0

Gear

    Safire 3 - Jill Grantham's First Impressions

    Jill Grantham is a travelling gypsy from Australia with 1900 jumps and 12 years in the sport. She has hair like Rapunzel, a penchant for lords and ladies and is as sweet as her favorite candy.
    What is your canopy flying experience?
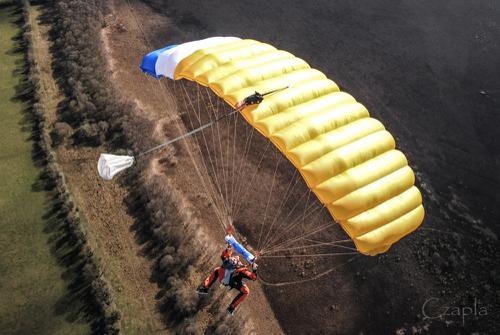
    I have historically been a consistently terrible canopy pilot due to low confidence (slid in on my butt for 11years). Before I got Lady Safina (my new Safire 3 129 from NZ Aerosports) I was flying a Safire2 139, for 800 jumps. I have now done about 150 jumps on Lady Safina at a bunch of different dz’s with weather etc. But I am loving flying this canopy.
    Lady Safina, how I love thee, let me count the ways:
    Amazing flare! No matter what sort of things I do with regards to my landings (I’m currently learning to do a front riser approach) there is always a good enough flare to stand me up. This is giving me the confidence to try and progress to higher speed landings rather than straight ins and not worry about getting dumped if I come out too high.
    Slightly easier to get on the front risers
    Slightly faster opening than the Safire 2, which is not too fast and helpful to not be hanging up a slow opening canopy in amongst traffic.
    More responsive to harness turns.
    Feels more solid in bumpy wind conditions
    Heaps and heaps of range to get back with the rears from a long spot.
    Plus she is really pretty. Is there anything you don’t like about the Safire 3, sorry, Lady Safina?
    She is a Beta test canopy that was built for me before the Safire 3 was released to the public. I was having inconsistent openings to begin with. After filming some openings and sending some feedback a mod was made to mine and all subsequent Safire 3 models - and now she opens great!
    What do you notice different in the Safire 3 to your previous Safire 2?
    I feel like the Safire 3 is just overall more responsive. I definitely feel like I am more in control and can actively fly her. We work together a bit more. With the Safire 2 I felt more like a passenger. Could have been the difference in size a little too of course!
    The rears are better for getting back from a long spot and the fronts are a bit easier to get on than the Safire 2. She still pulls out of a dive pretty quickly - you can’t hold the fronts down too long before they’re pulled out of your hands.
    Who is the Safire 3 suitable for in your opinion?
    I think she is suitable for beginner and intermediate canopy pilots. Especially good if you are a bit nervous or don’t want to push it, you can have a lovely safe easy flight to the ground.
    You have heaps of range to set yourself up in the pattern, which helps you not become cornered by having too small or too big a canopy...and if you don’t want to do much other than float down softly it will allow you to do that.
    If you do want to start flying it more, and seeing what you can do with it, then it is a really responsive wing and awesome to try out some new things on. But because the flare is so good it doesn't matter soooo much if you don’t nail the landings while you’re learning, because the canopy sort of fixes your little mistakes up :)
    What's the main benefit or advantage to you personally of having a Safire 3 rather than another canopy?
    Aside from her being the prettiest Lady I have seen?
    When I’m flying her I feel comfortable enough that I can choose what is appropriate for the situation and group and fly her how I need to to be safe and keep everyone else safe too.
    The increased responsiveness and flare have made me confident to try more when flying her.
    She has really changed my attitude towards skydiving. I feel more in control of how I am flying her rather than feeling a little bit exposed to the elements. She is basically all those empowering girl songs in canopy form!.
    ** Jill Grantham received early access to the pre-released version of the Safire 3 gratis from New Zealand Aerosports. The article above was Jill's unpaid opinion on her experience with the canopy.

    By admin, in Gear,

    The Slickest Rigs From PIA 2017

    Each year some of the manufacturers show off some unique and exciting rig designs at PIA, sometimes these rigs are actually able to be put into use, while others are simply demo rigs to show off some really cool design concepts.
    This year saw a couple of really awesome looking rigs, with a transparent rig from Sun Path and an amazing "steam punk" rig from the guys at United Parachute Technologies.
    United Parachute Technologies


    Sun Path


    Which of these rigs would you most like to be flying?

    By admin, in Gear,

    The ProTrack II - A Detailed Look

    With the release of the new ProTrack 2 we have a look at exactly how many more things it offers.

    ProTrack II Design When falling through the sky it is not only a jolly good idea to have a little gizmo the beeps in your ear to remind you to do stuff - in many situations it is mandatory. For some people the simplest set of warnings are sufficient - one distinct electronic chirrup for each of break-off and deployment, then an angry screechy one for being lower than is safely acceptable/possibly getting told off about what you just did. However, even the most rudimentary electronic devices now come packaged with a tiny computers buried inside that have enough computational power to perform orbital mechanics and help serve the purpose of pacifying your life’s need to do anything much other than binge watch old episodes of Deep Space Nine on Netflix.
    Original ProTrack Design I bought an original ProTrack as my first set of beeps back in 2007 as I am a big nerd and it was the most fanciest audible altimeter available. I remember being tremendously excited about how it allowed me to download the accumulated digital data from my skydives and then produce graphs from the correlated information to share on my MySpace page - thus proving beyond all doubt I was both cooler and smarter than the people who laughed at me in school for my ongoing interest in toy soldiers.
    Technology moves fast and our insatiable appetite for mobile phones that do more and more has led to some mind-boggling miniaturisation in our daily lives. We are now very used to tiny electronic doodads with little screens that do many things. So - we some beeps to remind us of a few important things in freefall, but how much more is it possible or necessary to do with an audible altimeter if we apply the technology we have available now?
    With this update of the ProTrack, what Larsen and Brusgaard have done is smoosh together the features of the original device with those of their flagship audible altimeter - the Quattro - then sprinkle it with some modern goodness that we recognise from things we see every day in phones and such.
    If we break it down the ProTrack 2 can be divided into categories as follows:
    Things ProTrack Did Already:
    Mass Storage: It records the details of your jumps. Including accumulated freefall time, which is nice - especially if you find adding up units of time a pain in the ass.
    Connectivity: There is much to be said for a digital record of you achievements. A meticulously crafted pen and ink logbook is beautiful artefact of your skydiving career (and still a requirement for advancement in many places), but equally splendid in a different way is a lovingly curated online adventure zone that enjoys all the fruits of modern computing.
    Exit/Deployment Altitude: With time one learns that the altitude advertised by a Dropzone is not always what you get. Many variables determine your precise altitude when you are when you are in the right place to get out of the plane and mostly it is not a big deal. It is nice to have proof if you find you are getting fleeced though.

    Things The Quattro Does That The ProTrack 2 Does Too:
    Low Speed Warnings: These are the swoop alarms we know and love. They are programmed to register low freefall speeds too, which can be right useful if you are into complex wingsuit flocking where they can be set to signal points along a flight path or breaking into groups or stuff like that.
    Beeps Going Up: Having settings to signal certain altitudes in the plane is a convenience that can be beneficial. Efficiency with your jump preparations leads to safer and better skydive and good awareness is crucial.
    Always On: You don’t have to remember to switch it on and off. Unless you want to.
    New Things The ProTrack 2 Does Now:
    Micro USB: Which seems so normal but is new and exciting as the old model came with a cradle thingy that had required you to have a serial port (a serial port?) or, for Mac users - some kind of laborious solution. The JumpTrack software offered by Larsen and Brusgaard has been around a good while and although due for an overhaul it is still used around the world.
    Live Jump Playback: With 2MB of internal flash memory the unit is able to replay the speed profile of your jump in real time. (Approximately 200 jumps with 2 minute profiles or 26 jumps with 15 minute profiles). If you are prepared to put in some effort (like watching side-by-side with video) there are things you can learn from this.
    Economy Mode: These devices don’t use very much energy and if you get the batteries from somewhere sensible instead of a dropzone shop then they don’t cost very much. However, If your jumping is random or infrequent then the ability to actually switch it off properly means your battery will last a while longer. A modest boon, but nice if you gain satisfaction from managing the small things.

    Useful but very 90s looking software. Note the attached videos and images While there are undoubtably people out there who just desire some beeps that beep at the right time and nothing much else, devices like the ProTrack 2 offer extra information that can be very valuable for those that are inclined to manage and study it. Skydiving represents a huge investment in your own skill and experience, and the ability to analyse accurate, reliable data relating to trends in your performance is another way of squeezing a little a little more from your jumps.

    By admin, in Gear,

    What's New - The Latest Gear at PIA 2017

    We're at the PIA symposium this year, scouting out what the manufacturers have lined up for release this year, and we've managed to grab some images to show you what has just arrived on the market and what is coming soon. Check out the following items and let us know in the comments section which ones you're most likely going to be picking up once they hit the shelves.
    Alti-2 - Chronos


    Cookie Composites - M3


    Larsen & Brusgaard - Pro-Track II


    Sun Path - Aurora


    Airtec GmbH - Wingsuit Cypres


    By admin, in Gear,

    Preventing Camera Snags

    Image by Ralph Turner
    Remember when getting a camera onto your helmet required power tools, soldering irons, hot knives and makeshift camera mounts? Um--probably not.
    It wasn’t so long ago, really, that you had to have access to a workshop to get a camera on your head. Back then they were, like, really big, too. And it was obvious that cameras were problems waiting to happen. Those behemoths could--and regularly did--snap the stuffin’ out of the jumpers’ necks, making jumpers literally painfully aware that the camera posed additional safety considerations.
    With the advent of the GoPro, jumping with a camera started to seem, well, obvious. Just peel off the little sticker on the mount, slap it somewhere on your helmet, clip in the little plastic doohickey and away you go. Set it and forget it! You won’t even know it’s there!
    ...until it decides to get all uppity and grab a handful of your lines at an inopportune moment, that is.
    Here are the key questions you oughta be asking yourself before you end up in a spiderweb of your own making.
    1. Should I even be jumping this thing?
    The USPA actually recommends that you be the proud bearer of a C license before you jump a camera, and that you’ve jumped everything else on your person at least 50 times before. If that causes you to make a big, exasperated noise, consider this: your overall bodyflight and canopy skills need to be beyond reproach before you add the risks and distractions of a camera.
    2. What am I actually going to do if it all goes pear-shaped?
    You’ll need to make a decision about what the exact steps you’ll take if part of your system ends up snagged on your camera. Go through the individual components: bridle, pilot chute, lines, etc. Talk to your S&TA; about these details to check your intuition.
    Perhaps, if your helmet allows, you’ll fit it with a cutaway system so your helmet doesn’t impede your life-saving efforts. That said: Talk to someone who has actually had to use a quick-release chinstrap setup under duress. Yes, it’s great that they exist. No, they are not failsafe.
    If you don’t install a cutaway system, you’re going to have to be able to get that helmet off your head yourself. This is, suffice it to say, not the easiest thing to do while spinning and plummeting and stuff.
    If you’re convinced your flimsy-seeming little mount will pop right off when it counts, think again. It seems that, at least when you don’t want them to come off, those GoPro mounts are tougher than they look. (A lot tougher.)
    3. What’s it worth to me to buy a safer mount?
    The free mounts that come with your camera have that one thing going for ‘em: They are, y’know, free. You don’t have to buy anything else. They are gratis. No more exchange of funds involved.
    Free, however, sometimes isn’t the way to go.
    As ubiquitous as they have become, the venerable GoPro was not invented for skydiving. Check out the array of sky-specific aftermarket mounts that aim to eliminate that looming snag hazard. Ask the camera flyers you admire what mounts they prefer (and why).
    4. Can I anti-snag myself in the absence of after-market parts?
    If you just don’t see yourself buying an alternative mount, you shouldn’t just throw up your hands and leave it to the fates. You should still make the effort to reduce your snag hazards. The SIM has some advice for industrious DIYers:
    All edges and potential snag areas should be covered, taped or otherwise protected.
    Necessary snag points on helmet-mounted cameras should at least face away from the deploying parachute.
    A pyramid shape of the entire camera mounting system may deflect lines better than an egg shape.
    Deflectors can help protect areas that can’t be otherwise modified to reduce problems.
    All gaps between the helmet and equipment, including mounting plates, should be taped or filled (hot glue, etc.).
    Protrusions, such as camera sights, should be engineered to present the least potential for snags.
    Ground testing should include dragging a suspension line over the camera assembly to reveal snag points. That last one is key, so I’ve gone ahead and put that sucker in bold.
    5. What’s my decision altitude?
    There is very little in this life that’s more distracting than getting a dangly brake line looped around your helmet camera and whipping into a brutal spin. The wha huh OH CRAP OH NO moment turns into GET IT OFF GET IT OFF GET IT OFF and, before you know it, your dytter is giving you the business.
    So: it’s a smart idea to bump your deployment altitude up a little big to give you more time to extricate yourself. More variables require more buffer and, make no mistake, that light little fluff of a sports camera is an additional variable to be reckoned with.
    6. Is this thing going to put me on the facepalm-inducing-incidents list?
    ...Because that, at the end of the day, is a more important question than “is it on?”

    By nettenette, in Gear,

    Performing a Great Wingsuit Gear Check (The Easy Way)

    Let me ask you this: When was the last time that you saw the pilot running down a safety checklist on the jump plane?

    Photographer: BatCam
    If you’re paying attention, you certainly have--or at least seen the clipboard stuffed somewhere in the cockpit, lookin’ official.
    Metal-tube pilots have an actual checklist to run down to confirm the safety of the gear that heaves us all up into the sky. That’s a great idea -- it’s a reasonably complicated system, and a checklist ensures that nothing’s being forgotten.
    Now: when have you ever seen a nylon pilot with a clipboard and a pen, spinning briskly around in front of a mirror and checking things off? Yeah--never. Even though a wingsuit has lots of little safety details that need to be confirmed before every flight, our before-takeoff checklist exists only in our heads--and it’s significantly more complicated than a standard skydiving gear check.
    Let’s make that checklist a little easier to remember, hey? A gear check should be a mantra. Here’s the abbreviated checklist to add to your “standard” skydiving gear check:
    The Four-Three Wingsuit Check

    3 Checks
    3 Straps
    3 Handles
    3 Zeroes
    Here’s what it means.
    Three Checks
    This will be familiar to any skydiver, since it’s been a recommendation since the dawn of the sport: you should perform a pre-flight gear check three times. Perform one in the hangar, one before hoppin’ on the plane and one before you exit. Also: Never underestimate the value of another pair of eyeballs during this process.
    Three Straps
    Two leg straps and one chest strap are the only things that keep us skydivers from being skyfallers. All wingsuits cover up two-thirds of those vital bits of webbing; some wingsuits (in BASE mode) obscure the chest strap as well*. As you might imagine, fatalities--and many close calls--have resulted.
    Check them with your eyeballs before you’re zipped in. Some suits fit snugly enough that the straps seem tightened when they’re not (gulp!), and once those straps are out of sight, they can easily slip out of mind. After you’re zipped in, you can check your legs by lifting your shoulders and feeling for the pull of the leg straps.
    Three Handles
    Make sure you know exactly where all three of your handles are, and that they’ll be available to you while you’re flying. Your cutaway and reserve handles must be readily accessible and visible to you in flight -- so make sure your suit is fitted and attached in a way that puts those handles on proud display.
    Switching from BOC to leg pouch? Switching from leg pouch to BOC? Best be damn sure you know which one you’re wearing.
    Three Zeros
    Zero Holes
    When you’re fully zipped in, every zipper on the suit should be zipped and every cable should be properly routed. If a zipper is down, you’re in for a rodeo.
    Your wingsuit closure zippers aren’t the casual affair at the front of your pants, either, my friends. Check: Are the female and male ends mated properly so that each tooth of the zipper alternates? This is checked at the fitting end of the zipper. If that’s not done properly, you risk losing that wing in flight (or potentially shifting the zipper during deployment, which can cause jamming and possible damage).
    Eminent wingsuit athlete and coach Matt Blank has additional advice. “I have my students zip their arms all the way closed,” he explains, “Then touch their handles and then open both arm zippers. This insures that the clothing they have on under their suit does not inhibit the student from reaching his or her handles--or is a risk for being caught in zippers if they need to rapidly unzip after deployment.”
    Look at your pressure zippers, too. Are the pressure relief zippers in the appropriate place for the flight, and symmetrical from arm to arm? For beginner flight, we quite often unzip the pressure zippers, which naturally comes at a cost to performance. As we advance in the sport, we may zip them partially closed or closed all the way. In either case, check for symmetry. If one arm is zipped differently than the opposite, the suit will have an asymmetric inflation--causing an unbalanced flight.

    Image submitted by bruno.ferrazza
    Zero Dangles
    Check for dangly anything: cables, webbing, half-stowed pilot chutes, camera bits, etc. As a rule, dangly bits are bad.
    Oh. and another thing: Never disconnect your RSL for wingsuit jumps. Take it from Richard Webb, one of the discipline’s most experienced and respected athletes (as well as the founder of the science-forward, no-nonsense human flight information source Top Gun BASE).
    “I've been saved by an RSL when my reserve pillow got sucked into my wingsuit on a spinning malfunction,” Webb explains. “It literally saved my life. I didn't have an AAD at the time. Now, I will never wingsuit without an RSL. Ever. I strongly endorse RSL use for all wingsuit ops. The data is conclusive. Even on spinning malfunctions on tiny cross-braced canopies, RSLs and Skyhooks work remarkably well at getting you under an inflated reserve safely with minimal line twists.”
    Zero on Your Altitude Indicators
    Make sure your AAD is on (and reads zero), as well as your other altitude indicators -- and that you can see your visual alti while you’re in flight mode.
    If you wingsuit with an AAD, you need to know this: most AADs will not fire at even modest wingsuit speeds. That said, they have saved wingsuit pilots who got little-bunny-foo-food on the way down, so don’t let that dissuade you from turning yours on.
    The Rest of the Recipe
    A good gear check requires that you know your gear. As a wingsuit pilot, it falls on you to become intimately familiar with the design, operation and function of the suit you’re whizzing around in. If you’re checking your flocking buddy and you’re not familiar with his/her particular equipment, ask. (If your buddy doesn’t seem to know what the hell he/she is wearing, take that as a warning.)
    Allow your intuition some room to breathe, here. Check for a comfortable range of motion, that the configuration makes sense to you and that you feel good in the suit. You can rest assured that if you don’t feel good in the suit, you’re not going to have a good time.
    *Sound confusing? Yeah. Well. It is. Wingsuit design varies widely by brand and model--sometimes, with some manufacturers, even within the model. Wingsuits are often built to be configured differently, depending on the jump specs, the container design, pilot preference and--I dunno--current mood. You are likely going to have questions. Ask them of your mentors and the manufacturer of your suit.

    By nettenette, in Gear,

    How To Avoid Line Burn (Because Raw Canopies Work Better)

    Image by Keith CreedyC’mon...just how much damage can one little line really do?
    Actually--lots.
    When a suspension line gets out-of-place and slides across neighboring nylon, another line, or another skydiver (in a collision scenario), the damage can be catastrophic. The lines connecting your mortal coil to your nylon conveyance are, after all, thin strands of extremely strong material – and, in deployment and flight, they move very, very fast.
    Line burn is, as you have no doubt extrapolated by now, caused by the generation of heat by friction. The amount of heat a fast-moving line generates is enough to literally melt the canopy – and, under certain circumstances, the line itself. Here are the questions you’ve gotta answer in order to avoid cooking your precious canopy.
    1. How melt-resistant are your lines?
    Both F-111 and ZP nylon melt at 417 degrees Fahrenheit. That’s a lower melting point than almost all the common suspension line materials (Dacron®, Vectran® and HMA), which melt when exposed to heat levels of 482-932 degrees. There is, however, one exception: Spectra®. Spectra®, that tender little princess, melts at just 297 degrees.
    Even if they literally melt a hole in the canopy, all lines but Spectra® will likely survive the incident unscathed. If you have Spectra® lines, however, check them carefully if you discover line burn on your canopy – they are likely sufficiently damaged to require replacement.
    2. Is that crease really a crease?
    Most modern sport canopies used to be made of F-111 nylon. These days, for lots of reasons--from performance to fading mitigation--they’re generally constructed of ZP (zero-porosity) fabric.
    The behavior of these two materials under stress varies widely. When an F-111 canopy suffers line burn, the damage tends to be localized – often, sufficiently contained to be landable. ZP fabric is not so forgiving: high-speed line burns tend to cause major structural disintegrity. In addition to that, burn damage to ZP fabric can be difficult to identify, often appearing as a simple crease in the fabric – though testing to that crease finds it to have been massively reduced in tensile strength. (For this reason, Performance Designs doesn’t use zero-P fabric in their reserve canopies.)
    3. Are you packing for a smacking?
    According to the United States Parachute Association, incorrect packing is the most common source of line burn. The other cause, of course, is canopy collision – but that is a subject for another article entirely. To reduce your risk:
    Don’t throw your canopy in the bag. Take a moment to mindfully arrange the lines towards the center of the pack job, making sure that rogue lines aren’t nestled deep in the fabric where they could cause burn.
    Mind your slider. Keep the slider flush against the slider stops and tucked between the line groups. Not only will this help to mitigate opening shock, it will help to manage the lines as the canopy deploys and keep them from unnecessary intimacy from the neighboring fabric.
    Clear your stabilizers. The stabilizers (the “ears” of fabric that come down slightly on each lateral side of the canopy) have a tendency to tuck themselves in towards the lines when you’re pro-packing. Make sure they’re clear.
    4. Have you already been burned?

    Look for melting and discoloration. Line-burn damage looks very different than puncture damage (or any other clean cut or rip).
    Check your lines. If you notice burn damage on your canopy, it means that the nylon most certainly came into contact with your lines. To check lines for burn damage, use your hands more than your eyes. While seared lines often show signs of melting at the burn point, the easiest way to determine damage is by feel: an undamaged line will feel smooth if you pinch it and slide your fingers down, while burned (or otherwise damaged) lines will feel bumpy and rough.
    Get help. If you notice evidence of line burn – or what you suspect to be line burn – on your canopy or lines, take the damage to your rigger for inspection as soon as possible. Don’t freak out! In many cases, the damage can be repaired simply and economically, with replacement suspension lines and patching.
    Don’t be a dick. If you notice any damage on a rental (or student) rig, don’t hesitate to point it out to your coach or the rental office, whether or not you believe the damage happened “on your watch.” You’d want the same treatment--and you don’t want to be burning your fellow skydivers. Right?

    By nettenette, in Gear,

    A Great Suit Fit By The Numbers

    No-Punches-Pulled Advice From A Long-Time Suit Dealer
    Image by Joel Strickland You might think twice--or three times, or never--about dropping many hundreds of dollars on a dapper tuxedo. A skydiving suit, however? Shut up and take my money, dear manufacturer. Just make sure it’s in my colors and that the sponsor logos are right.
    When you’re slinging that kind of cash around, the last thing you want is for the object of your ardent longing to show up too loose, too tight, too short, or too long--and, due to a bafflingly high instance of improper measuring on the part of the buyer, that happens all the time. Take it from Joel Strickland, double British gold medalist (in both freestyle and freefly) and dealer for the venerable Vertical Suits. He’s been wrapping innocent skydivers in measuring tape for some years now, and he has excellent advice for the un- (or under-) initiated.
    1. Relax.
    “Measuring is not as difficult as people think it is,” Strickland soothes, “So, if you follow a few simple rules, it is pretty straightforward.” In other words: don’t get too nervous about this.
    2. Get someone to help.
    “While it’s technically possible to measure yourself,” Strickland explains, “It is not recommended. There will be some touching. Try not to make it weird.”
    3. Make it a dress rehearsal.
    Strickland advises everyone who comes to him for a fitting to wear what he/she would normally wear under a suit: base layers, thermals, underpants, jeans, whatever’s usually under there. You’ll want that suit to fit comfortably over your usual undergirdings, not strain over a pair of baggy, beloved chinos you didn’t wear to the fitting.
    4. Follow the video.
    “It is difficult to get it wrong if you use the talking pictures,” Strickland says. “We live in the future. Few people are ever more than ten feet from a device that will let you do this. No excuses.”
    He’s referring specifically to the Vertical Suits fitting video, of course, but similar helping hands are available from other suit manufacturers.
    5. Measure twice, cut once.
    “Always measure twice,” Strickland insists. “Maybe switch hands or stand on the other side and do it the other way around. Perhaps switch the limb being measured. See that the numbers match up.”
    6. Don’t tweak.
    “Suit design has grown into a very precise process using science and maths and brains,” Strickland says. “The manufacturers ask for a lot of measurements for a reason, and the best results come from sticking to the plan. If you mess with them, it can throw out the form of the suit and compromise its awesomeness.”
    7. Let the company know about your special needs.
    If you do require a specific area to be looser--for example, if you wear a brace--reach out to the manufacturer for advice instead of altering your measurements to suit what you think the suit requires. They’ve almost certainly seen your issue before and can give you the best advice.
    8. Don’t fudge the numbers.
    Your measurements now are what counts. “If you want your suit to fit,” Strickland sighs, “Do not adjust anything based the diet you just started or the gym membership you just bought.”
    9. Be gentle.
    “When wielding the tape measure,” he continues, “You should be aiming for tickle, not strangle.”
    10. Come as you are.
    When being measured, stand naturally. “Don’t puff out your chest or suck in your stomach or clench your buttocks or whatever,” Strickland explains. Your suit will feel better, fly better and look better if it fits you as you really are, right now.
    11. Look to the experts, if you really want to nail it.
    The best way to get all of this stuff done is to seek out one of your chosen suit’s stable of official dealers. “In and around all the places where skydiving is popular,” Strickland advises, “There are people who work closely with the company as boots on the ground to help.”
    These dealers have the benefit of many years of combined experience, as well as a direct line to the manufacturer for questions. They’ve generally tried and tested many different jumpsuits through the years, and can offer horse’s-mouth feedback on any issues or questions you might have. Sniff around at boogies or events--not just under the loudly-logo’d tents, but in the crowds, as well.
    “They will go on and on,” Strickland assures. “You will wish they would shut up about it after a while.”

    By nettenette, in Gear,

    How To Show Your Three-Ring System You Care

    Three-ring systems look pretty tough. They’re made of thick, heavy metal, after all – what could possibly go wrong? Bad news: lots.
    The rings are husky little guys, that’s true. However, they depend on the webbing behind them–and the cutaway cables that fasten them in the ready position–in order for them to work. It behooves you to know when and how to maintain the system.
    How Sloppily Maintained 3-Ring Systems Can Cause a Bad Day
    Nylon webbing, the material used to make skydiving (and BASE, for that matter) risers, stiffens over time to conform to the position in which it’s usually stored.
    Sometimes, they “set” so firmly in that position that the risers can’t flex the backing nylon–and can’t detach from the harness when the jumper engages the cutaway system, especially during a low-drag malfunction (such as a streamer).
    This, of course, is a very bad thing.
    The B-Sides
    You’ve probably gotten used to looking at the little snowmen of your three-rings during your preflight gear checks. Great! How often do you look behind them? The loop that connects the cutaway cable to the three-ring system can get dangerously abraded over time. You should peek at it every time you pack.
    The Deep Tracks
    To keep your three-rings in proper working order, the three-rings need to be manually disassembled, the cables checked and the webbing treated to a little massage.
    For skydivers, this is the stuff of riggers. According to Federal Aviation Regulation Part 65-111, skydivers “must be under the supervision of a rigger when performing any maintenance on a parachute system.”
    Don’t let your rigger have all the fun, though. Having a hand in the process has the significant benefit of familiarizing you with the operation of the system and increasing your confidence that it’ll be there when you need it. The best advice is to go through these steps every three months, whether or not you’ve been jumping the rig.
    Check your user’s manual for specific instructions. You can always find this on the manufacturer’s website.
    Pull the cutaway handle. Set the cutaway and connected cables on a clean surface. (Do not pull the reserve handle – unless you need a repack, of course.)

    Inspect the Velcro on the cutaway handle and the seating on the harness. You may need to use a stuff brush to “fluff” the Velcro and clean off any adherence-preventing dirt, especially if you jump at a dusty drop zone.
    Check the ends of each cutaway cable to be sure they haven’t developed any kinks or rough edges.
    Run a microfiber cloth over each cable. While you do, check for smoothness.
    Disassemble the risers.
    Carefully check each riser for signs of wear. Look especially carefully at the white loop that “locks” the cutaway cable to the three-ring system. (You should be checking this loop each time you pack the rig, but this process gives you a better, closer look.)
    Twist and flex the webbing of each riser near the ring system. You can safely be vigorous. You’ll likely feel the problem-causing stiffness as you do this.
    Reassemble the system. Refer to your user’s manual to ensure you’ve done it correctly.
    Before your next jump, have an experienced jumper or a rigger confirm that the system is correctly reassembled.
    Enjoy a little more gear confidence, dear reader. You’ve earned it.

    By nettenette, in Gear,

    6 Ways to Be Less Dumb When You Buy Used Skydiving Gear

    Image by Lukasz SzymanskiPaul Iglin has been brokering used skydiving gear for more than a decade. He’s seen it all.
    He has definitely seen your kind before, and wants you to know a few things about the buying process, so you don’t make the same mistakes he’s seen over – and over – and over. I asked him what people need to know about buying used skydiving gear when they begin the process, and he had plenty of sage advice to share. Here’s what he has to say about it.
    1. Curb your enthusiasm.
    “Your job as a buyer is to get the right gear at the right time and at the right point in your skydiving career. It’s not as easy as it sounds.
    Every once in a while I have had people contact me who have not actually started skydiving yet. It is very rare, but it happens. They are clueless – and they are dangerous to themselves from a financial standpoint, because they have no idea what they’re buying. I tell them to go to somebody else; I won’t sell them gear. Before you start shopping for gear, you need to know what you are shopping for. So, if you don’t: Stop right there.
    Good shape, good brand, good used gear at the right price: Make no mistake; that’s hard to find. In skydiving gear, the supply-and-demand curve is really messed up. There’s very little supply and very high demand.
    It’s also seasonal. Come March and April, everybody rushes to find gear, and then demand stays strong all the way through end of the season around September. Try to shop outside that time frame if you can.”
    2. Don’t trust your friends.
    “Man, people get their advice from some terrible sources. A lot of the time, they’ll just go to their friends. But when you’re a new jumper, most likely your friends are also newer jumpers who basically don’t know jack****. Their understanding is very, very narrow; they have blinders on. Like: they bought themselves a brand-new Infinity rig with a brand-new Optimum with a brand-new Sabre 2, and it works for them, so that’s what they tell their friends to get.
    Now, it doesn’t necessarily mean that the gear they’re recommending is the worst. It just means that these people don’t have a statistically relevant sample, so their opinion doesn’t really count for anything. And they always tell whoever’s asking that ‘this is the best,’ as opposed to making the correct statement: ‘This is the one I have, and it works well for me.’”
    3. Do your homework.
    “All of this ties into the fact that people often just don’t do proper research. How do you do proper research? Well, whenever people ask me this question, I tell them this: Look at the gear as tier A, B and C as far as manufacturers, quality and pricing. I’m going to go ahead and throw some manufacturers’ names out there. You have your tier-A manufacturers: your Vectors; your Javelins; your Mirages; your Infinities. All those guys have been around for a long time. There are no questions about quality. They are very reputable. All the options are available.
    Then you have your tier-Bs: Icons, Wings, Perigees, whatever Dolphin became and a whole lot of other brands that are either obscure or very localized to another continent or a particular country. Avoid the latter if you’re a new jumper, because you don’t know what the **** you’re doing.
    You may have somebody try to sell you another brand that’s technically TSO’d, but you’re really going to suffer when you try to resell. You’ll have a hard time finding replacement parts if you are outside of the country of manufacture – and you’re going to get killed on shipping, and support is going to be pretty crappy. Be aware.
    Your can ask any rigger what the tier-C manufacturer is. They’ll tell you.”
    4. Make peace with your pants size.
    “One of the biggest mistakes I see people make is being a over-optimistic about their weight. It happens a lot, because it’s usually people who are just slightly overweight that make the biggest mistakes. For example: a 5’10”, 180-pound person says, ‘I am going to be exiting at 210 pounds, so I should get a 210, But I’m going to work out and lose weight, so I’m going to go with a 190.’
    I immediately tell them not to shop for the future. You shop for right now. If you need a 210 based on your current body weight, for chrissakes get a 210. Because in my experience -- and this is 15 years of skydiving speaking -- it is very unlikely that you will actually get to that goal weight. Sorry. It is possible, sure, but nobody has ever gotten hurt because their canopy was bigger rather than smaller. Don’t be stupid about it.”
    5. Then add to that number. More than you think.
    “The other problem that I see a lot of people early on in their careers -- and a lot of times even as they become experienced skydivers with a couple of hundred jumps -- is that people don’t account for exit weight. People add a couple of pounds and call it a day, and that’s completely wrong.
    You step out of the shower, and that’s your body weight. Then you put on your clothes. You put on your boots. You put on your rig. You put on your helmet and whatever suit you wear and your cameras and whatever else you’re jumping with. Then you step on the scale, and that’s your exit weight. You know all that already.
    Even knowing that, a lot of people don’t bother with the scale and egregiously underestimate what their rig weighs. A lot of people estimate 15 pounds for gear. Seriously?! What the **** are you talking about? You are going to put on 10 pounds just of clothing and boots alone. Then a canopy weighs about eight pounds. Your container weighs 8-12 pounds, depending on the amount of hardware. Your reserve? About six pounds. Your AAD, even, weighs six ounces. Your jumpsuit is going to add another couple of pounds. None of that stuff is magically
    weightless.
    Add 30 pounds for your gear. Maybe more. Don’t underestimate! You’re only hurting yourself.”
    6. Consult the chart.
    “The loading chart that I share with my customers – Brian Germain’s chart -- is the easiest one that I think is out there. I’m not necessarily saying it is the best one; I just think it’s the easiest to grasp. What he says is this: If you have 100 jumps or less, you should load one-to-one or less. For every 100 jumps, increase your wing loading by .1. That means that if you have 300 jumps, there is no reason you shouldn’t be jumping the 1.3 wing loading.
    Of course, you have caveats. People who jump at high-altitude dropzones and people who jump in very windy areas will need to choose different gear than people who jump at sea level, and so on and so forth. If you live in Colorado, you should probably jump a bigger canopy, because the air is thinner. If you jump where it’s really, really windy, you may get away with a slightly smaller canopy because you really do need the speed.
    Also, keep your head.
    “If you get a 170, you weigh 210 pounds and you’re 50 jumps into the sport, you are not doing anybody any favors. You may survive. You may not. But I certainly won’t be the person selling you a 170-square-foot canopy.”
    In general, please: Don’t go into it blind. Ask very experienced people for advice. And if you come to me as a buyer, expect me to tell it like it is. Because I will.”

    By nettenette, in Gear,

0