0

Disciplines

    The History of Atmonauti Fly

    Atmonauti is a human flight technique, body free, invented by Marco Tiezzi in 1998. Developed and perfected with the help of Gigliola Borgnis, it was presented for the first time in 2000 at the World Freestyle Competitions, the European Espace Boogie, and the Eloy Freefly Festival.
    The technique consists of flying diagonal with a determinate relation between angle and trajectory speed of the body, to obtain an air stream that permits lift and a precise control of flight. The aim is to fly in formation at the same level and angle, and to be able to perform different aerial games, such as freestyle, three-dimensional flight formation with grip, or acrobatic freefly maneuver (see the 'guinnes' page in www.atmonauti.com).
    All this is not executed in the normal vertical trajectory of the gravity force. The atmonaut creates his own diagonal trajectory, and thanks to this technique, he regulates with extreme precision all the parameters, such as the angle (trim), speed, and direction, becoming a real 'flight pilot' of his own body.
    The term 'Atmonauti' ('atmonauts' in English), coined by Marco Tiezzi, is defined as: Atmosphere Navigators (like 'astronauts', that mean astro=space nauts=navigators), the ideal 'definition' of this new way of fly.
    Revolutionizing the concept of skydiving, where all the different disciplines are performed in the vertical fall (the trajectory of the gravity force), Atmonauti fly is a very complex kind of 'relative' work that occurs during a real 'flight'. There is a considerable horizontal displacement, and above all longer flight time. In fact, the Atmonauti fly permits the jumper to remain in the air for a 50% longer time in respect to the vertical free flight, confirming a real 'human fly performance'.
    In continuous development and evolution, the Atmonauti fly marked another important step in 2001. Gigliola Borgnis discovered the possibility of flying in the angle trajectory with the feet first instead of head first, realizing something that was considered impossible since then... another revolution that confirms and opens the potential of the Atmonauti fly!
    In 2002, Marco Tiezzi invented the "Atmonauti tandem", experimenting with the technique to maintain the same angle and speed of a normal Atmonauti fly, but with double the weight (without drogue of course). The tandem Atmonauti offers the passenger the exceptional possibility of trying a real sensation of flying, instead of falling.
    In 2002 Atmonauti became a reality, known and practiced all over the world. The Atmonauti fly also entered into the compulsory of FAI competitions of free style and freefly.
    At the end of 2003, the short-film "Atmosphere Navigators", composed of only images in Atmonauti angle fly, won first place in the Flyboyz Film Festival for its unique images and technical contents of the highest level. (The movie is available at www.atmonauti.com.)
    And again, in October, 2004, Marco discovered the possibility to fly Atmonauti in the wind tunnel: "Tunnelnauts" = "wind tunnel navigators". That consisted of flying around all the perimeter of the tunnel in a side Atmonauti position.
    Gigliola Borgnis and Marco Tiezzi, of Team Atmonauti, will feature another article on the Technique of Atmonauti Fly in the near future. Until then, more information on beginning your "Atmosphere Navigation" can be found on their website at www.atmonauti.com.

    By weegegirl, in Disciplines,

    Getting Wet: Wingsuits In The Water

    An unplanned water landing is a frightening scenario for many skydivers; it’s
    one of the reasons that live water training is required for a USPA B License (If
    you didn’t truly get wet when working on your USPA B license, your instructors
    weren’t doing you or anyone else any favors). Add a wingsuit to the mix and it’s
    enough to give pause to even the most experienced skydiver. In 2010 alone, we’ve
    had three known unintentional wingsuit water entries in the USA. Wingsuits can
    fly further than skydivers can, and water is an attractive hazard to fly-over.
    Toss in a low deployment, restricted movement, and some adrenaline and a normal
    skydive can get really exciting really fast.
    OK, so it’s not quite the same as Houdini and his locks, and skydiving in a
    “prom dress” or freefall in a straight jacket isn’t nearly as difficult as some
    make it out to be. However, emergency situations do require a different
    approach. Wingsuit skydivers should pre-plan for an unintentional water landing
    even if flight over water isn’t an issue at their home DZ. A boogie or other
    special event may put wingsuit pilots into unfamiliar situations where water is
    present. Flotation devices should be a part of that pre-planning process if
    over-water flights are a common occurrence. TSA allows for up to four Co2 cartridges to be carried as part of a "life-vest unit."
    USPA Training And Recommendarions
    Section 6.2 of the USPA Skydiver Instruction Manual (SIM) guidance for
    unintentional water landings tells us to:

    a. Continue to steer to avoid
    the water hazard.
    b. Activate the flotation device, if available.
    c. Disconnect the chest strap to facilitate getting out of the harness after
    landing in the water.
    d. Disconnect the reserve static line (if applicable)
    to reduce complications in case the main needs to be cut away after splashing
    down.
    e. Steer into the wind.
    f. Loosen the leg straps slightly to facilitate getting out of the harness after splashing down.
    (1) If you
    loosen the leg straps too much, you may not be able to reach the toggles.

    (2) Do not unfasten the leg straps until your feet are in the water.
    g.
    Prepare for a PLF, in case the water is shallow (it will be nearly impossible to
    determine the depth from above).
    h. Flare to half brakes at ten feet above
    the water (this may be difficult to judge, due to poor depth perception over the
    water).
    i. Enter the water with your lungs filled with air.
    j. After entering the water, throw your arms back and slide forward out of the harness.

    (1) Remain in the harness and attached to the canopy until actually in the
    water.
    (2) If cutting away (known deep water only), do so only after both
    feet contact the water.
    (3) If flotation gear is not used, separation from
    the equipment is essential.
    k. Dive deep and swim out from under the
    collapsed canopy.


    All of these same procedures apply when wearing a wingsuit, yet
    preparations for an unintentional water landing don’t stop there. We still got
    work to do. Prior To Entering The Water
    It goes without saying that the best way to avoid a water landing is to avoid
    being over the water. However, sometimes it cannot be avoided. In addition to
    the previously mentioned, USPA-recommended actions, the wingsuit should be
    unzipped as much as possible prior to landing. This includes armwings, legwings,
    and body zippers if possible. Do not pull the cutaway/release cables on the
    wingsuit (assuming the wingsuit has cutaway cables, not all do) if the arms can
    be unzipped. An armwing that has been cut away will be much more difficult to
    move and unzip once it has filled with water and your arms are still in the
    sleeves (For example, the newest Phoenix-fly wingsuit arms might be cut away, as
    they detach the full wing from the arm, but the arm will still be inside a foam
    sleeve making it difficult to swim). The tailwing may act as a drag point and
    force the upper body forward, putting the skydiver on his belly. Enter the water
    with feet and knees together. Flying at half brakes should allow the canopy to
    continue forward. Do not flare. Take a deep breath prior to entering the water.
    After Entering The Water
    The canopy is a potential point of entanglement. It is recommended that a
    main canopy be cut away once you are fully in the water. If there is a current,
    this will prevent the main from dragging you along with it. A reserve cannot be
    cut away without a hook knife (if you are going to carry a hook knife, carry a
    metal, not plastic hook knife. A $5.00 hook knife will not do the job). Roll
    backward or sideways onto your back. If you have not deployed the reserve, the
    reserve will keep you floating for approximately 30 minutes in fresh water,
    longer in saltwater. With the tail (and perhaps the armwings) potentially being
    still inflated, being on your back will prevent the tail and rig from forcing
    your face into the water. Try to remain calm, breathe deeply and begin the
    process of removing goggles, helmet, and legstraps (chest strap if it was not
    undone in the air). The arm and legwings of a three-wing style wingsuit are
    similar to a ram-air parachute; there is an inlet and air fills the cells. These
    same inlets and cells can fill with water as easily as they fill with air.
    Although water in the cells alone will not cause the wingsuit to sink, movement
    of the wing will cause the suit to be dragged downward. This means that
    attempting to tread water will drag you under. Do not attempt to tread water,
    but rather keep your legs motionless. If there is any current, it is imperative
    that you stay on your back and try to keep your head upstream. Keeping the legs
    apart will help achieve this goal. Even a slow current will move your body very
    fast. Remaining calm is perhaps the most important aspect of clearing the suit
    and surviving.
       
    Jeans, boots, and gloves can make the task of escape a little more
    difficult than expected.
     
    Once you are fully unzipped and your legstraps loose, slide your rig and
    armwings off. After the upper body has been freed, “sit down” in the rig and
    suit to put you head-high. This allows the torso to roll forward so that it’s
    possible to dive deep and away from the rig, allowing the legs to escape from
    the legstraps and tailwing. Although the USPA SIM instructs skydivers to swim
    away from their rig, I have made the personal choice that I
    will not swim away from my rig if the reserve has not been deployed. It
    may be used as a flotation device and might be the difference between life and
    death. I will cut away the main canopy and swim away from the main.
    This is my personal decision and is in opposition to
    USPA recommendations. Follow at your own risk.
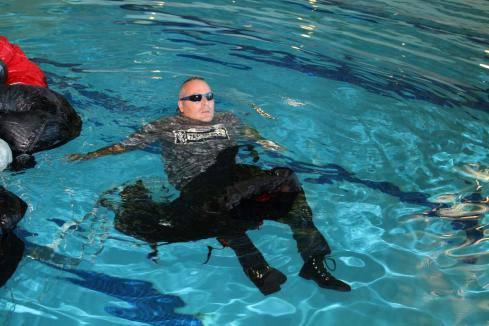
    During the various water experiments, there were a total of 49 water entries
    in various conditions and wingsuits, all with a rig or dummy rig in place, many
    with a main canopy attached. Performance Designs Sabre II, Silhouette, and Storm
    canopies were used. We jumped into still water 18’ deep, 6’ deep, current pools
    34” and 24” deep with speeds up to 7 knots. We also jumped into wave pools with
    swells of up to 3’, which are small to moderate compared to coastline
    swells.
     
    Tossing the main canopy into the 7 knot current
    pool.  


    Summary


    During these entries, three things became clear;
    Go into the water with as many zippers undone as possible. Your chest strap
    should also be undone for best possible speed once in the water. while this may
    seem logical, in at least two of the three unintentional water landings, the
    wingsuiter forgot to unzip arms while dealing with other issues.
    Get onto your back as quickly as you can. Stay on your back as legstraps,
    zippers, helmet releases, and goggles are removed. You may want to consider
    leaving the helmet on if in moving water and head protection is needed.
    Take a deep, calming breath. Even though my experiments were intentional
    water landings, they were still nerve-wracking when the suits were fully zipped
    up. Being jittery is entirely likely. Staying calm and keeping heart and
    breathing rates down may easily be the difference in survival, particularly in
    cold water.


        Be sure to stay clear of the canopy and lines. Currents may drag the canopy
    around a bit. Rescuers might have an easier time finding you if they can spot
    the canopy in the water so staying somewhat near but well clear of canopy and
    lines is a good idea. A hook knife should be part of your kit.
    When landing in water that has a current, try to keep your head upstream
    while getting out of the suit. Leave the helmet on to protect your head from
    rocks and other objects. Stay as far away from the canopy as possible. This is
    easier said than done. Note that in the video, the current combined with the
    canopy drag was more than two men could manage even in shallow water. This is
    where a hook knife would be beneficial.
    If the rig has a reserve still packed in it, it will float. It also is very
    easy to escape once the legstraps are undone, as it will remain on top of the
    water as you dive forward away from the container.  
     
    "Exiting" from the 3 meter board, fully zipped  
    In conclusion, if over-water wingsuit flights are planned, seriously consider
    a floatation device. They will not have a significant impact on the comfort of
    the suit, and are not relatively expensive. ParaGear, ChutingStar, and other
    skydiving supply shops sell these devices. Remember that CO2 cartridges may not
    be carried aboard a commercial flight, so you’ll need to source or ship
    cartridges to your final destination.


    If a flotation device is not part of your gear/kit, have an advance plan in
    the event of a water landing. There have been at least three known unintentional
    water landings in the US this year; only through luck and calm procedures did
    the wingsuiters survive. Read the Incident Report below to see how one survivor
    described his experiences and how multiple errors led him into the water.
     
    Big puffies and blue skies (and calm waters, I suppose)! -d
    Douglas Spotted Eagle is a USPA AFFI, Coach Examiner, PRO, and PFC Senior
    Examiner (North America) on staff at Skydive Elsinore.
    Student’s Incident report:
    #####


    Name [Deleted]
    My
    age: 31
    Years in the sport: 4.5 yrs.
    # of skydives: 287
    # of
    Wingsuit SD’s: 7
    # of BASE: 70+
    I recently purchased a new Phantom2 Pheonix fly wingsuit and was super eager
    to get in the air. I got to the DZ and got on the first available load which was
    a 10 minute call. On any typical skydive, an immediete 10 minute call upon
    arrival isn’t so bad, but setting up a wingsuit system quickly is not a great
    idea, but I did.
    Mistake #1: I forced myself to have to rush to get on a load to do a
    technical jump for no apparent reason. In the end, I don’t think my rushed
    preparation lead to the actual situation, but I guess my mind wasn’t where it
    should have been.
    I was the last to exit from 12,500?. I had a really great (mostly stable)
    flight, flying around some clouds. At pull time, like most jumps, I was out over
    the ocean. I took one last look at my wrist alti at 5K’. Based on my audibles
    4000? warning, I’m guessing I was open between 3500?-3000?.
    Mistake #2: I shouldn’t have pulled that low with a WS on with my low
    experience level.
    Mistake #3: I have made 6 previous WS jumps. All more than 2.5 years
    ago. I did not physically or mentally dirt dive this jump before getting on the
    plane.
    After a stable pull (I felt), I immediatley opended with line twists. I’ve
    had line twist before with this canopy/harness (Sabre 1, 150; 9 cell/Infinity
    dom;1997) and was able to kick out of them in the past. This line twist began to
    accelerate instantly. I made 3-4 attempts to kick out of it, but with the
    restricted movement of my legs in the WS, and spinning horizontally around the
    canopy, it didn’t do much at all.
    Mistake #4: I was under too small of a canopy for a WS jump. My exit
    weight= 240lbs. Wind loading= 1.6. I should have been under a more docile (7
    cell), or larger canopy.
    So, having no luck with my kick attemps, I chopped it. It took me a few
    seconds to locate my handles (one hand on each). In my haste, I did a “T-Rex”
    style cut-away. As soon as I saw my right riser clear, I let go of the handle
    and pulled the reserve (also “T-rex”). Obviously leading to my main still
    dragging off my left shoulder.
    Mistake #5: I was jumping a borrowed rig. Although I’ve had about 20
    uneventful (other than line twist) jumps with this rig. I wasn’t really familiar
    with it.
    Mistake #6: Probably the biggest one. I DID NOT CLEAR MY CUT AWAY
    CABLE/HANDLE COMPLETELY!
    Mistake #7: This goes right along with the above…Pulling my reserve
    WAY TOO SOON!
    I think because of my slightly slower descent rate (caused by my main still
    being attached), and my reserve already fired, I felt the second set of risers
    bouncing around on my head and saw all the lines whipping in-front of my face. As
    the reserve was slowly coming to line stretch, the lines were beginning to
    entangle with my helmet (actually the camera on my helmet)
    Mistake #8: Wearing a camera on a “student” WS jump.
    With the lines still “somewhat” relaxed, I thought of dumping my helmet but
    instead I picked/brushed the lines off the camera, clearing them. A split second
    later, I felt the canopy pressurize and go to complete line stretch. Instantly,
    the reserve risers had forced my head completely forward, making my chin squeeze
    into my neck. I knew I had MAJOR line twists on my reserve now too.
    So now, I’m under one collapsed main still dragging off my left riser, and
    one tightly twisted up reserve to my right side, still fully zipped into my WS,
    and I’m getting choked from behind by the reserve risers and can’t lift my head
    to see any of it. I knew I wasn’t “falling” anymore and that the canopies were
    not entangled. I don’t know, but the reserve must have been “un-spinning” because
    the pressure was slowly coming off the back of my neck and the twist opened up
    enough to squeeze my head back through, behind the risers.
    Mistake #9: Not sure if I could have prevented this one. If my arms
    had been unzipped and out of the wings (which they weren’t) I may have been able
    to reach back during the reserve deployment, and guided the risers in-front of
    my head before pressurization.
    At this point, my first objective was to finally cut the main off so I could
    get completely out of my reserve line twists. The main was still being held on
    by 1cm of ripcord cable still in the three ring release closing loop. In any
    case…I was focused on getting that last tinny bit of rip cord out of the closing
    loop. I had “tunnel” vision on trying to pick at the centimeter of cord. There
    was too much tension on the riser so I couldn’t get it out. I was definitely not
    thinking clearly at that moment. ALL I had to do was find my cut-away handle
    floating behind me and pull it another 1/4 inch. In retrospect, the dragging
    main (acting like an anchor) may have kept my reserve from continuing to twist
    and spin me into the ground/water. I’m not sure if completely cutting away at
    that point would have been any better.
    Mistake #10: Had I been thinking clearly, I would have found my handle
    and finished the job of cutting away.
    At this point I stopped all attempts to correct anything. I saw that I was
    about 300 yards(?) of the beach, over the water at about 500-300?(?) up. I knew
    I was going for a swim. The swell was small (2-3?), but definitely was not flat
    and calm. In preparation for my mid day swim, I started unzipping
    everything…chest, arms, legs, chest strap. I then reached above the reserve line
    twist, grabbed the rear/right line set and did a “rear riser” turn towards the
    visibly shallower water over the reef. I don't know if that helped at all because
    I pretty much felt like I was under a round canopy with no directional control.
    I just knew I was drifting towards the reef now. Not knowing the shallowness
    above the reef gave me a second of pucker factor, but at this point I had not
    much control or time anyway. I then did a “backwards” PLF (obviously with no
    flare, toggles still stowed and twisted). I slammed the water pretty hard.
    Mistake #11: Although this is what saved me from serious impact, I
    landed in the water with a WS on….not good!
    While I was underwater, my wingsuit quickly turned into a tunasuit, but
    before I even had time to deal with the next hurdle……..I stood up.
    I was now standing 300 yards out in the surf, in 3 feet of water with both
    canopies attached and the WS on, all filled with water. I was getting dragged
    in-land with the swell a little bit, but had plenty of time to finally cut-away
    the main and completely step out of the WS. I saw all the scrambling of people
    on the shore. I was soon reached by a couple of skydivers and a rescue kayak. We
    loaded up the rig on to the kayak and swam back to shore.
    Mistake #12: I probably should have made my first priority to un-zip
    my wings. Although, at no point did I feel like they were restraining my movement
    (until I wanted to steer towards the reef). I guess I unzipped them right when I
    had a moment and thought it was totally needed.
    #######
    Massive thanks to:

    Lake Elsinore Casino
    Tooele City Pool

    Raging Waters/SLC
    Skydive Elsinore
    Skydive Utah
    Performance
    Designs
    Rigging Innovations
    Teledyne Instruments
    Joey Allred, Aaron Hutmacher, Jose Calderon, Mannie Frances, Karl Dollmeyer,
    Scotty Burns, Chuck Blue, Jarno Cordia, Bence Pascu, Joe Turner, Frank Hinshaw,
    T.K. Hinshaw, Tom Deacon, Jim Crouch, Jack Guthrie, Scott Callantine, Jeanie
    Curtis, Mike Harlon, Chris Squires, Robert Pecnik, Jeff Donohue, and Andreea
    Olea.

    By admin, in Disciplines,

    Sit Fly: How to Move and Dock!

    So, you can sit fly with your friends in a group or fly in a two way. The first step to being a free flier, Congratulations! Once you have reached this level you might ask yourself “what’s next?” Today is your lucky day because this article is for you!
    After you have learned the basic position which we will cover in a second, the skill set you want to learn is 6 points of motion and then docking. This will allow you to interact with your friend in the sky and not just be a base.
    Sit Fly: The Position
    Serving as an introduction to free fly, this position is pretty difficult to get without some instruction. The idea is to sit in the sky just like you are sitting in a chair with a few minor exceptions. First you want to have your legs about shoulder width apart.
    Second, you want to have your heels aligned with your knees as not to catch any air on your shins. The foot should be flat just like if you had it sitting on the ground. It is imperative to have even consistent heel pressure when you sit fly, or you will be on your toes which makes it difficult to improve your mobility. Keep your feet pointing straight forward at all times! In sit fly your body follows your heels and your hips so you need to have a strong platform to work from.
    Third, you must consistently have a 90 degree angle at your hips to fly strait down. Sit up not back. Pretend you have a string pulling your head strait up while keeping that 90 degree angle. Sitting up will then add a quaint arch to your torso which will help you keep from falling back. Lastly, relax your arms so they keep right at head level. Do not press down on your arms in the neutral position. Pressing down the arms is a common fault of most new sit flyers. It causes you to press your torso forward catching air on it and then consequently backsliding.
    If you have problems with the position get some coaching in the wind tunnel, SkyVenture has made learning the sit fly position a snap for the student and the instructor. Let’s move on to movement, shall we!
    Sit Fly: 6 points of Motion
    Speeding up will be the first point of motion we learn. Simply press your heels down while keeping flat feet and having your hips, torso and heels in alignment. It is not necessary to straighten you legs. A small adjustment of your surface area will increase your speed greatly. Practice sitting up against a wall in the sit fly I described above, then by pressing through your heels stand up to a half squat, not all the way up and then settle back down into the sit. Do it slowly, erratic movements usually create horizontal space, so stand up and down smoothly. The reason we try not to straighten are legs at first, is because straight limbs usually create stiffness. In order to keep control of the position you must be supple.
    Slowing down is the next thing we learn. This can be done a few ways. I use them all, so it would be best to learn as many ways as you can. The first way to slow down is to press your arms down. Remember to keep sitting up while you do this or you will back slide from leaning forward. The second way to slow down is to bring your knees in a bit and then flare out your heels. This is my preferred way to slow down. This position increases your surface area a lot because your legs are a larger wing then your arms. This is also ideal because this leaves your arms free to dock or to use sign language to your friend. This position became popular in the wind tunnel because larger people needed to use there legs to keep them off the grate. Lastly if you really need to slow down learn to back fly in the wind tunnel. The back fly position will help you close huge vertical gaps quickly, for example if your friend corks up. A word of caution, learn to back fly with a coach in the wind tunnel before you use it with your friends. Using the back fly position without proper control can cause a vertical speed variation between you and your partner which can cause a high speed collision if you are not careful.
    Moving forward is our next task. Forward motion is the hardest yet most used motion in sit fly. It is technically difficult to learn so it might take some time. It is the most used point of motion because most people are back sliding in sit fly or back slide when they try something new. To move forward, get back in the half squat position or the downward motion. Then press your hips forward as far as you can while keeping your heels shoulder width apart and your feet facing forward. The best way to practice this is on the ground by leaning as far back as you can while free standing. Forward is a balance move that is why it is so hard. It also takes a little momentum in the sky to move forward so you might have to hold the position a few seconds before you actually realize you are moving. Keep those heels down!
    Moving backward is the easiest of the 6 points of motion. Most people are back sliding at first when they learn the sit fly position. To move backwards simply keep in the sit fly position and lean forward a bit. It doesn’t take much to rocket backwards, so immediately go back to the neutral position.
    The last two positions are side sliding left and right. They are tough. We won’t go into them in depth here because that would be a little advanced for this article. Besides carving is much more fun and seems to be a little more useful in every day flying. To carve go forward with a slight turn in your hips.
    Sit fly: Docking
    Docking your friend for the first time is probably the most fun you can have sit flying. This move is tough for some so listen up! First you must get your arms level with what you are going to dock. Move up or down. Then move forward slowly and stop at the target you want to dock so it is just out of your reach. Stabilize your heels by pressing down slightly. This is the key to docking; if you turn while you dock it is probably because your feet slide one way or the other. After you have stabilized reach with your hand up at the target not out. If you reach out your torso will follow and you will back slide, maybe pulling your friend with you. Make sure your arm is 90 degrees from your torso. Try not to shift with your torso. Have your arm and hand move independently of your torso. Fly your hand into the target and then dock the hand or foot lightly. If you grab on too hard you might contort your position so you fly away. Dock lightly. If you feel tension in the dock let go and go back to neutral, breathe deeply and try again.
    Keep in mind that this stuff is not easy for everybody. Don’t be afraid to ask for help or to get coaching. The SkyVenture wind tunnel is also a great tool when it comes to learning these basics of sit fly.
    Steven Blincoe is the Founder of The New School Flight University. He has 4,000 free fly jumps and over 300 hours in the SkyVenture Orlando wind tunnel. You can contact him at 530-412-2078 or [email protected]
    for advice.

    By stevenblincoe, in Disciplines,

    Headdown - Everybody wants to learn!

    The winter is coming and you’re thinking about where you're going to jump to clear your winter doldrums. When you get to where you want to jump, everybody needs to freshen up their skills, maybe learn some new ones. One of the most popular skills to learn is Headdown. As a coach I have seen a lot of ways to learn the position. Some people, if you manually stick them in the position and hold them there, will learn it in a few jumps. Other fliers don't have it so easy. Well this article is for you!
    We will learn what to concentrate on in the Headdown position, but more importantly how to work around the problem with other skills, which I think contribute and can sculpt the Headdown position. These skills being back flying, flat back tracking and flat belly tracking.


    Headdown
    Headdown is probably the most technical of the freefly positions. It requires balance, skill, strength, and a refined technique. I teach the straddle position first, because it is easier to balance and conceptualize early on. You should have your head, shoulders, hips, and ankles completely in line. Your head should be pointing straight towards the Earth with your field of view consisting of the horizon with a half sky/half ground ratio.
    People who fly on their bellies a lot usually have a huge arch in their torso, which causes them to go to a back track, or belly track (we will get to how that is important later). Others usually have a kink in their hip so their shoulders and head are in one plane and their hips and ankles in another plane. This causes a steep track on their belly.
    Most of the concentration, once you have acquired the skill of keeping your body all in one plane, should be concentrated on the hips, legs and feet. First, You should have tension in your butt so you are straight, this can fix the hinged at the hip problem addressed above. Second, you should squeeze your quads taught so they push outwards, but remain in the same plane as everything else and keep the full extent of your leg straight. Third, you should have your toes flexed up towards your head. Picture yourself hanging from a bar upside down by your feet. You should feel air on your toes when you get it right. Pressure should be felt on your toes much like someone standing on your feet.
    Once you have the straddle position, the progression calls for 360 turns both ways, forward and backward motion, and then docks.
    We won't get into the technique of daffy Headdown, but it is extremely useful to slow down, fly in the tunnel with the lower speeds, and for heavier people to fly with others.

    Back Fly
    People often ask why they need to learn to fly on their back. The answer is simple. Headdown is a balance between flying on your back and on your belly. When the Headdown position is correct, no wind should be felt on your back or belly. This position requires the awareness of air being on your back or belly, so you can achieve no air on the torso. Since most people can fly on there belly relatively well, then it is imperative for you to learn how to fly on your back to acquire the Headdown position.
    The back fly position can be attained in the tunnel first, because it is much safer. Start on the grate. Relax your torso so it is convex. Put your hands above your head, and relax them. Do not push down towards the grate unless you want to slow down, or go up! Let your head relax and sit in line with your torso, while looking straight above. Keep your hips 90 degrees just like sitting in a chair. Keep your legs wide for stability.
    Back fly also has many everyday uses. Flying with tandems on your back is not only fun, but honestly the best video angle. When you are flying with an inexperienced sit flier and they cork you can match their speed on your back, until they can get vertical again. Lastly, you can use back fly to fly with relative workers, or once again get an interesting camera angle from below.
    Two words of caution! First, tighten up your rig when you fly on your back because the rig tends to shift from the wind below and can turn you. Second, I do not recommend flying on your back with other people unless you can competently fly in the wind tunnel on your back with a coach, as not to cause a huge difference in speed and thus a high speed collision.

    Tracking
    When first learning the Headdown position people either track towards the coach or away. I think it is very useful to learn to flat track on your belly and back. If you learn to fly both positions well with a coach, then control of the Headdown position is easier.
    Belly flat tracking is a little different than the steep track taught in the majority of AFF programs. A flat track has the ankles, hips and shoulders all in one plane.
    The progression suggests to learn to turn left and right, adjust your fall rate with your torso, and finally increase your speed with your legs. Turn left and right with your arms first as to make the adjustment slow. Then start to adjust the trim of your body for more powerful turns. Adjust your fall rate in tracking by arching to go down, and cupping with your torso to go up. Lastly, squeeze your quads tight for speed.
    Back tracking is fun and challenging. It can be used in Headdown, to track up to formations and to close huge distances. Make sure to slow down well before you reach your target.
    The first problem most people have when they back track is they have a kink at the hip. This creates more of a back fly rather than a track. Squeeze your butt, or push your hips forward to get flat. To gain more speed, put your legs together and press your ankles down slightly.
    With all these positions and abilities under your belt, Headdown will be easier to learn. The awareness and skills you learn from these alternate positions can in the end help you conquer Headdown.
    Remember, try to freshen up with a coach and in the tunnel before you start flying with other people. Headdown, along with these other positions is never easy, but persistence mixed with awareness and the right guidance always pays off.
    Swoop high, don't lag on jump run, and pack your instructor's parachute. Later!
    The New School Fligh University Web Site
    Steven Blincoe is the founder of The New School Flight University in Lake Wales, Florida. He has 4,000 jumps total and 300 hours of Skyventure Orlando wind tunnel time. If you would like to contact him you can at blincoe.org, or 530-412-2078.

    By admin, in Disciplines,

    Flying Techniques for New 4-Way Teams

    (This article was first published in Parachutist magazine under the title "The ABCs of 4-Way", and has been published with consent of the author)
    4-way is a group activity, so jumpers should learn it as a team. This article offers advice for doing just that. As such, it is geared toward jumpers new to 4-way, but you don’t have to be a student to be “new to 4-way.” Jumpers with experience in other disciplines like freeflying, canopy RW, or skysurfing can be new to 4-way. Even jumpers with experience on big-ways can be new to 4-way flying.
    Before you read another word, remember this: Learning 4-way is a gradual process. You have to start with simple drills and work your way up, adding to your skill set as you go. The skills you learn in the beginning will be useful down the road, even in the most complicated block moves. So, learn 4-way correctly from the get-go.
    Here, then, are suggestions for learning 4-way flying techniques from the ground up, so to speak.
    Train with video.
    No team should jump without video. Jumpers might have to swallow a little pride the first time they see their screw-ups on video, but it’s well worth it. Video helps jumpers identify and correct problems before they become bad habits, and it saves money. What might have taken a couple hundred jumps to learn in the pre-video days, jumpers today can learn in 20 or 30 jumps. Camera flyers deserve every penny put toward their slots.
    Match fall rates and fly no-contact.
    A team’s first few practice jumps should be devoted to finding a compatible fall rate and basic body control. Both can be accomplished on the same jump. Here is a good drill: Launch a 2-way with the other two jumpers exiting as close as possible.Build a Star then drop grips and try to stay level with the formation and in your slots. Adjust your fall rates to match that of the fastest falling jumper.
    Jumpers who float after adjusting their body position should wear weights on the next jump. If three of the jumpers are arching the whole time to stay down with the fastest-falling jumper, that jumper should probably wear a looser jumpsuit on the next jump. The rest of the jumpers should wear slick suits. It might take several jumps to get fall rates and body control worked out, but it is important. You can’t do 4-way if you can’t stay level and in your slot.
    Practice turning in place.
    After jumpers learn to fly no-contact and fall at the same rate, they can move on to turning in place. Here is a drill: From a no-contact Star, two jumpers across from each other turn 90 degrees (either direction) while the other two jumpers stay put (facing in). Fly these positions while staying in your slots. Try to stay close enough so you could take grips if you wanted to. After a designated jumper gives the “key,” go back to the no-contact Star. (A “key” is a signal to break for the next point.) Make two or three jumps doing this drill, then two or three more, this time substituting 360-degree turns for the 90-degree ones.
    Practice single formations.
    After teams can fly no contact and turn in place, they can start on randoms(single formations) selected from the 4-way dive pool *.
    * The 4-way dive pool is published in USPA’s Competition Manual. The dive pool is used for parachuting competitions around th world and is agreed upon by the IPC (International Parachuting Commission) at the beginning of each year. In the 4-way dive pool, single formations are called “randoms.” As of this writing, there are 16 randoms in the dive pool.
    Teams should start with simple randoms, where jumpers are facing in and nobody moves more than 90 degrees to go to the next formation.
    The following illustration shows a sequence of three simple randoms.
    Jumpers perform the sequence in the order shown (Star-Satellite-Zipper) then repeat the sequence. (For more challenging flying, a team can build the Zipper before the Satellite.)
    (Note: The Zipper is not a formation in the current 4-way dive pool but it is a good tool for learning how to stay level.)
    Techniques to practice while performing this sequence include:

    Flying with little tension on grips.
    Paying attention to the keys. If you can’t see the person giving the key, look into the eyes of a jumper who can see the key – it will tell you a lot!
    Moving smoothly and in control to the next point.
    Stopping the move and flying level before taking grips.
    Once teams can do drills like the one above, you can move on to more difficult randoms.But they shouldn’t do so without proper coaching. With all the formations in the dive pool, new teams can easily get lost in a fog deciding how to transition (move from one point to the next). What might look like a good move for one jumper might hinder the moves of other jumpers. Dive engineering is not rocket science, but it requires experience to see the most efficient moves for each jumper.
    Let a coach map out the moves so the team can focus on performance.
    Practice exits.
    The success of any 4-way jump depends on a solid exit. New teams should dedicate several jumps to exit practice. They should start with simple exits where all jumpers can look into the center. And they should check with a coach before they go up to make sure they are doing it correctly. A good way to focus only on exits is to jump at a lower altitude, say 6,000 feet so there is little time for anything but the exit.

    With 16 randoms and 22 block sequences in the 4-way dive pool, there are 38 possible exits. But the same principle applies to each. Jumpers exit as one stable unit by presenting themselves and the formation to the relative wind*. The formation should ride smoothly on the relative wind without buffeting or creating undue tension on grips.

    * Relative Wind is the air coming at you from the direction you are falling. On exit, the prop blast is the first type of relative wind you encounter, although this lasts only a second or two. As you fall away from the plane, the relative wind comes more and more from straight up from the ground.
    Learn your slots.
    On a 4-way team, there are four slots: Point, Outside Center, Inside Center and Tail. The camera flyer, the fifth (and invaluable) member of the team, does not turn points with the team, so the camera position is not discussed here. (But be good to your camera flyer – you can’t do without video!) The Point typically flies in the “front floater” position on the high end of the formation as it leaves the plane. He or she is responsible for launching out and up on exit.
    The Point usually makes bigger moves, especially in the block sequences. Typically, this slot is given to the jumper who is better at the longer moves.
    The Outside Center flies in the “middle floater” position and works with the Inside Center to build the center of most formations. The Outside Center also catches the Point in some block moves.
    The Inside Center exits from inside the door across from the Outside Center. It might appear that this is an easy position since the jumper is often facing out, but timing and body position are important. The Inside Center exits “with” the group and normally presents his or her chest to the relative wind. If the relative wind catches them in the back, they can fold underneath the formation.
    On some teams, the Outside Center gives the count and keys transitions. On other teams, the Inside Center gives the count and keys the next point. For this reason, both the centers should be able to lead the skydive and fly their slots at the same time.
    The Tail usually flies in the “rear floater” position and is responsible for anchoring the formation down as it flies off the plane. Sometimes it appears that the Tail exits early. Whether this is true is up for debate. The important things are timing and placement. As long as the Tail stays low on exit, the formation has a better chance of flying smoothly on the relative wind.

    Learn to fly on the hill.
    Experienced 4-way teams transition to the second point right off the plane while the formation is semi-upright relative to the ground. This is called flying “on the hill.” New teams should not try to transition on the hill until they can consistently pull off good exits. Even then, they should transition to simple formations where not much movement is involved. Also, teams should not try block sequences on the hill until they can consistently transition to single formations.
    Here is a simplified look at hill flying. The exit is the first part of hill flying. Moving to the next point is the next part. As long as the exit formation flies stable on the relative wind, you can make the same moves on the hill that you make when the formation is falling at terminal velocity. You just have to put more punch into some moves because the air is a little “mushy” (meaning the formation hasn’t yet reached terminal velocity). Probably the hardest part about hill flying is learning to ignore the fact that it seems like you’re sometimes standing on your head (or vice versa) when making your move.
    In Summary:
    If you can perform the techniques discussed in this article, you’re a darn good skydiver. But you have so much more to look forward to, like block sequences where you fly with piece partners. But don’t jump ahead just yet. Piece flying injects a completely new set of dynamics into 4-way flying and builds upon the fundamentals discussed in this article.
    So learn the basics first. Learn them as a team. Find a compatible fall rate before you practice randoms. Learn how to make smooth, controlled moves. Set aside jumps for practicing nothing but exits. Learn all the randoms in the dive pool. Then keep practicing. Spend an entire season doing randoms if necessary. Then you will be ready move on to the block sequences.
    Don’t expect miracles overnight, but do expect rewards for hard work. It might be weeks before your team has a breakthrough, but when you do, it will be exhilarating! The light will come on for the team all at once - you’ll see it in each other’s eyes in freefall. You’ll feel it in the rhythm of the skydive. And, most important, you’ll see it in your score!

    By elightle, in Disciplines,

    BASE jumping injuries and treatment in the field

    You just landed after throwing a double gainer from a cliff in Moab. Adrenaline surges through your system as you think of the amazing visuals you just saw. As you gather up your canopy, you pause to watch the next jumper exit. After a short delay, he tosses his pilot chute and the canopy deploys offheading. He takes evasive measures but the strikes the wall repeatedly. After finally getting the canopy turned away from the cliff, he lands hard on the talus and tumbles to a stop thirty feet below and doesn't move… Now the real adrenaline kicks in. What do you do?
    Introduction
    The scenario above is a severe one, but all too possible. In the hazardous environment we know as BASE jumping, we often place ourselves in situations which may result in our injury or death. Due to the inherent risk involved with this activity, every time we jump there is a possibility that something will go wrong. Fortunately, the most common BASE injuries are relatively minor and having a basic knowledge of first aid can help dramatically. With immediate care you can reduce the lasting effects of many injuries, and the time it takes to recover. Another goal is to improve the comfort level of the injured. The scene of an accident is not the place to be thinking about learning lifesaving skills. Preparing yourself ahead of time will make you a more confident jumper and knowing your partners have the same skills will go a long way if you yourself happen to be the one needing help. For the purposes of this paper, I have tried to explain thing in layman's terms wherever possible and assume that you have taken a basic CPR course. (Call the American Red Cross or go to www.redcross.org.)
    Assessment
    This is where you size up the situation and the extent of the jumpers injuries. This is a process you will use for serious injuries. Your basic assessment should take about one minute. Not slow enough to waste valuable time, but not so fast that you miss important signs. Your minute will be divided into two phases: the Primary survey or ABC' s (15 seconds), and the Secondary survey (45 seconds).
    Primary: Establishing the severity of the situation.
    Make the scene as safe as possible. Move anything that may be a risk to you or the injured and get hysterical people out of the area. Send someone for help. Airway. Make the jumper has an airway. If they can talk to you, they have an airway. If not, check yourself. Use the head tilt/chin lift or a jaw thrust. (These techniques can be learned in a basic CPR course.) Breathing. Are they breathing? Put your ear to their mouth/nose area and look for the chest to rise and fall. If no breathing, revert to your CPR training. Circulation. Do they have a pulse? If not, start CPR. Is there profuse bleeding? Deformity. Are there obvious injuries? Expose. Weather conditions permitting, remove the clothes of the jumper (cut preferably) and cover with blankets as needed. Hypothermia is a possibility now and you need to be aware that the jumper may go into shock. Secondary:
    Eyes, ears, nose, and mouth:
    Eyes; in sunlight, cover the eyes then uncover them and see if the pupils react. At night use a light to check. Ears; is there any fluid coming out? Don't try to stop drainage. Nose; any bleeding? Mouth; look for blood or broken teeth. Teeth can be a choking hazard so remove loose, broken pieces. Neck: Can you see any obvious deformities? Chest: Can you see any section of the chest that moves opposite the rest when the patient breathes? (Broken ribs) Is there any tenderness? Abdomen: Is there any tenderness or does the abdomen seem more rigid than normal? (Internal bleeding) Are they trying to keep you from touching them? Pelvis: Any tenderness? Can you feel bones rubbing or grinding? Someone with a broken pelvis will sometimes feel like they're, "falling apart." Arms: Do you see any obvious fractures? Can you feel any bones grinding? Can you feel a pulse in the wrist? Check circulation by pressing on the fingernails and seeing how fast they get red underneath. Try this on yourself for a comparison. Can they feel you touching their hands? Can they move their arms? Have them squeeze both of your hands at the same time and feel if one side is weak. Legs: Do you see any obvious fractures? Can you feel bones grinding? Can you feel a pulse behind the ankle? (Check behind the big ball on the inside of the ankle.) Check the nail beds. Can they feel your touch? Can they wiggle their toes? By now, you should have an overall impression of how severe the jumpers' injuries might be. Now you can plan the best course of action for the rescue efforts. Redo this assessment every 3-5 minutes until EMS personnel take over. Be sure to report these findings to EMS personnel as it will provide useful information to them.
    For a quick set of field vital signs:
    Check the pulse and count beats per minute. Approximate blood pressure can be obtained without a stethoscope or BP cuff.
    A cool trick: If you can feel a wrist pulse, the systolic pressure is about 80. If
    you can feel a pulse on the inside of the arm where the bicep and tricep meet,
    it's about 70. If you can only feel it in the neck, it's about 60. Check breaths per minute. This may not mean much to you but if you can provide EMS workers with a sheet of vital signs detailing every five minutes in the past half hour, it can increase your friends' odds of surviving. This is because it shows the "trend" of vital signs and can give valuable clues about the condition of the jumper.
    Shock
    Shock can have several different causes but the likely causes in our situations would be trauma to the nervous system, or loss of blood. Shock occurs when tissues and vital organs are not getting enough oxygen from the bloodstream.
    Symptoms of shock include:
    Pale, cool, clammy skin Restlessness Nausea/vomiting Rapid breathing Drop in blood pressure The first step in treating shock is to stop blood loss. Then, cover the jumper with a blanket. As long as injuries don't prevent you from doing so, elevate the feet about 8-10 inches over the heart. They may get thirsty but try not to give anything to eat or drink. If there may be a long delay until help arrives, you can give small amounts of water at room temperature. Even if a jumper doesn't display symptoms of shock, treat for shock anyway. They might not be in shock yet.
    Bleeding
    There are three types of bleeding: capillary, veinous, and arterial. Capillary bleeding is the oozing blood you see when you skin your knee. It is minor and not life threatening. Veinous bleeding is blood from a vein. It is dark red and flows out of the wound. Arterial bleeding is pretty obvious since there will usually be an arc of bright red blood spurting out of the body. Arteries carry lots of blood and arterial blood loss can be immediately life threatening.
    Stop the bleeding:
    Apply pressure directly over the wound. If you have a clean dressing,
    use it. If you don't have something sterile, use what you have. A shirt or towel will work. If the wound gets dirty, we can treat it with antibiotics later. If direct pressure fails to stop the bleeding, combine direct pressure
    with elevating the wound over the heart. If the bleeding still hasn't stopped, apply direct pressure to a pressure
    point. There are eleven pressure points on each side of the body If all else has failed, use a tourniquet. The decision to use a tourniquet
    is a serious one. This will completely stop the blood supply to the extremity involved and may result in that limb being amputated. Use it in a life or death situation. To apply a tourniquet: Wrap a band around the limb. Preferably, use something flat and at least one finger wide. A strap from a stashbag will work. Tie it in a knot around the limb. Lay a stick or similar object directly on the knot and tie another knot over it. Twist the stick to tighten the band. Twist it until the bleeding stops. Tie the stick in position Record what time you applied the tourniquet and once it's on, DO NOT remove it. Femur Fractures
    The femur is the long bone between your hip and knee. Alongside your femur, lies the femoral artery. The femoral is one of the largest arteries in your body and cutting it can result in bleeding to death very rapidly. For this reason, proper attention to femur fractures is extremely important. Fortunately, the femur is a serious chunk of bone so it takes a lot of force to fracture it.
    If you suspect that the jumper has a femur fracture, you must not let them attempt to walk on it!
    After the thigh is injured, the muscles will spasm. If the femur isn't there to support the muscle, the sharp bone ends can cut muscle tissue, nerves, and the femoral artery. The way to prevent this is to apply traction in the long axis of the bone. The easiest method of applying traction is to use a traction splint. (The Kendrick traction splint™ is a very BASE friendly item to have. It costs about $100 and folds into a pouch that will fit inside a hip pouch or cargo pocket. If you were sitting there with a femur fracture I could offer you one for a couple thousand dollars and you'd accept.)
    To apply traction, pull straight on the ankle. Imagine trying to stretch the leg and make it longer. You will need to keep constant traction until an actual traction splint is available. It is very important that you never let up the tension or else serious damage may result. If the shoe comes off, the resulting rebound will be excruciating and bad things will happen. For this reason, remove the shoe on the broken leg. The jumper won't be walking anyway.
    Splinting
    Splinting is not really a science. When a bone breaks, the ends are usually very sharp. When these sharp edges move around, you can damage muscle tissue, nerves, and blood vessels. In order to prevent this, you splint the affected bone to immobilize it. Sometimes, you use whatever is available.
    There are two classifications of fractures, closed fractures and open fractures. Closed fractures include any fracture where the bone does not break the skin. In such instances, proper treatment includes immobilizing the fracture and seeking medical attention. Open fractures occur when a bone breaks through the skin.
    Signs of a fracture include:
    A bone end sticking out of the body, A grinding feeling at the site of the suspected fracture, Deformity of the limb, Loss of ability to move the limb, Loss of pulse or sensation, Muscle spasms. Your first step in treating a possible fracture is to stop and take a deep breath.
    Few fractures are life threatening unless they are mishandled. If there's no apparent life threatening injury, the best approach is a slow methodical one.
    Cut away clothing from the area and control any bleeding. If you find an open fracture, treat it like any other wound.
    Generally, you don't want to attempt to straighten out a broken limb. Don't try to realign the bones yourself. There are exceptions to this. If the limb has no pulse or is losing color, you may need to reduce the angle of the fracture to restore circulation. If you need to transport the jumper over rough terrain, a limb sticking out to the side will make things difficult. In these situations, not splinting would be more dangerous. IF YOU DECIDE TO ADJUST A FRACTURE, keep in mind that the sharp end can do major damage to the surrounding tissues so limit movement as much as possible. Also, have someone hold the jumpers arms so you don't catch a right hook.
    The goal in splinting is to immobilize the bone that is broken. You should try to immobilize the joint above and below the fracture.
    Find something to use as a splint. Most sites where we jump are in wooded areas so there is usually a variety of sticks and branches to choose from. If possible, pad the splinting materials with a towel or shirt to take up the space between the limb and the splint. This will also improve the comfort of the jumper. Use your imagination and you can usually come up with a splint for most fractures.
    Forearms can be fractured when you try to catch yourself during a less-than-graceful landing. Fractured forearms should be splinted with a natural curl of the fingers. Place a roll of gauze, or something similar in the palm of the hand. This will go a long way to improve comfort.
    If you suspect fractured ribs, you can pad the chest and gently wrap it. Placing the arm on the affected side into a sling helps. Try so calm the jumper and have them sit down until help arrives. Limit movement since a fractured rib can puncture a lung.
    If you suspect a skull fracture, DO NOT place pressure on the head. Monitor level of consciousness and do not give morphine!
    Joint injuries
    Damaging joints is a constant threat to BASE jumpers. Ankles are the most frequently injured joints skydiving, BASE jumping, and most sports. There's a saying that goes, "An ounce of prevention is worth a pound of cure." This applies to us because it is pretty easy to reduce the number of ankle injuries. Wearing an ankle brace is an easy and effective measure to prevent hurting your ankles in a sketchy landing. They're available at any sporting goods store. A simple low-grade sprain can keep you grounded for a weekend. A serious sprain can keep you from jumping for a year or longer.
    If you break a bone, it will usually heal stronger than it was before you fractured it. Ligaments, tendons, and other soft tissues may never completely recover from injuries. Ask anyone who's been jumping for a few years.
    If a jumper injures a joint in the field to the point that it will not bear bodyweight, you should treat it as a fracture until an x-ray can prove otherwise. Splint it and proceed to the nearest hospital for evaluation.
    All Sprains can be treated with the acronym, R.I.C.E.
    Rest: stay off the affected joint and give it time to heal. Ice: apply ice, cold packs or frozen vegetables to the joint. Peas work well because they will conform to the shape of the joint. Just don't eat them after several freeze/thaw cycles. Compress: wrap the joint firmly but not too tight. An ACE wrap can is ideal. If your fingers or toes turn purple, it's too tight. If you squeeze your nail-beds, the color should return immediately. If not, re-wrap more loosely. Elevate: Kick back and have a cold one. Try to keep the injured joint at about heart level. This regimen can be supplemented by taking Motrin (ibuprofen) or Aleve (naprosyn). Follow dosing directions on the package. Both are anti-inflammatories and will help with the pain. If this treatment isn't working, it might be a good time to see a doctor.
    Summary
    This paper is by no means, a complete set of first aid information for the BASE jumper. In addition to reading this paper, I highly recommend enrolling in a CPR class, a basic first aid course, and an EMT Basic course. Most junior colleges offer an EMT course and CPR is usually included. These classes will show you how to approach an injury and decide on the most appropriate course of action.
    First aid is a skill-set we hope to never need. The harsh reality of our sport is that there will be more injuries, and there will be more fatalities. Hopefully someday BASE jumpers will stop being injured and killed. Until that day comes, we all need to know what to do when accidents happen.
    ---Dexterbase
     

    By admin, in Disciplines,

    Style and Accuracy

    More commonly called Style and Accuracy, these disciplines are also referred to as the "Classics." The first skydiving competitions in the first half of the 20th Century involved landing on a target using a parachute, then the Style series was created:
    Freefall style is a sequence of six maneuvers performed in the following order: 360-degree turn, 360-degree turn, backloop, 360-degree turn, 360-degree turn, backloop. All four turns and two backloops performed in proper sequence and in the correct direction is called a "series." Each of the four series prescribes different directions for the 360 degree turns.
    For Accuracy Landing, a jumper guides his/her canopy to a precision landing on a disc, or electronic pad, with a three-centimeter diameter dead-center target. The object is to get as close to the center as possible. Accuracy landing is also part of the USPA-sanctioned championship event Para-Ski. Para-Ski combines accuracy landing with a giant slalom skiing race.

    By admin, in Disciplines,

    The Future of Wingsuiting:

    In November 2008, 71 wingsuit pilots flew in a stealth-bomber-shaped formation over Skydive Elsinore.
    It was the largest slot-specific formation in the short history of this emerging
    discipline. But how did the event, which was billed as a “Wingsuit World
    Record,” change the future of wingsuit flying (if at all)? In a discipline still
    unrecognized by the FAI and the Guinness Book of World Records, what does it
    mean to try setting new standards?
    71: Achievement and Frustration
    The idea of a big-way wingsuit record was not new. The most notable previous
    event was in Cochstedt, Germany in July 2006. Organizers there sought Guinness
    recognition for the largest number of wingsuits exiting on a single jump run,
    out of an Antonov 72.
    In contrast, the 2008 71-way at Skydive Elsinore was a purely invitational event
    focused on slot-specific flying in a four-plane formation. A diverse
    international team reflected a worldwide growth in the discipline and a global
    desire to achieve something recognizable within our sport. Hailing from as far
    as South Africa and Russia, participants from 14 countries qualified for a
    chance to fly in the big-way by demonstrating their skills at official camps and
    through a referral system. Five were women (the few, the proud, the only gender
    not to have a single member axed from her slot!).
    The skydiving press (the French

    ParaMag, British

    Skydive The Mag and American

    Parachutist, among others) extensively documented the event.
    The 71-way marked significant achievements as well as frustration. In the
    achievements column, the team flew a new, wider spacing that reduced oscillation
    and movement within the unlinked formation. This led to multiple smooth and
    on-level jumps that looked beautiful from the ground.
    The previous slot-specific record recognized within the wingsuit community was a
    16-way diamond. Like that formation, most small groups had employed a
    “head-to-foot” spacing technique that encouraged proximity but usually resulted
    in trailing flyers at the back and reactive vertical motion within the flock.
    The scope and level of organizing, while it left much room for improvement, was
    also a check in the achievements column. While there was some initial grumbling
    about the level of seriousness and the pushing of safety standards in
    communications to team members prior to the event, most participants expressed
    relief that the 71-way jumps would be a focused record attempt and not “just
    another boogie”.
    Frustration arose when it came time to judge whether the group had succeeded in
    setting a “world record”. The initial goal was to have each wingsuit pilot
    flying within three-square-meter boxes arranged in a grid that would be
    superimposed over still photographs of the formation. The organizers’
    proclamation of success was based on a photograph where all flyers were either
    fully within or touching at least one edge of their three-square-meter grid
    square. However, without an outside judging structure, heated discussions
    escalated the meaning of “success” and the best way of judging unlinked
    formations into a full-throttle debate.
    Beyond R&D;: 100 over Elsinore
    The debate about how to judge large wingsuit formations will continue unabated
    until an outside governing body agrees to recognize one set of objective
    criteria. The 71-way was destined to be a “work in progress” since it had never
    been done before. With the lessons learned from the experience, an expanded
    organizing team is preparing for a 100-way wingsuit event at Skydive Elsinore
    from November 7th to November 13th, 2009.
    While some ask whether trying to set records before there are established
    categories is futile, skydiving is not a sport that waits for mainstream
    approval in order to change and grow. Wingsuiting is an especially
    entrepreneurial and fast-growing subculture. The hope is to continue safely
    demonstrating what is possible. In doing so, organizers strive to create events
    that excite new skydivers and unite those already committed to wingsuit flight.
    Armed with evidence from last year’s judging attempts, big-way organizers are
    prepared to continue lobbying both the FAI and Guinness.
    The 100-way five aircraft formation is invitational. Skills camps are planned
    between now and July, when official qualifying events begin. A specific Skills
    Checklist sets out minimum jump requirements and what exit, flying, and canopy
    skills potential participants need to practice and perfect in order to gain a
    spot on the team. For more specific information about the 2009 Wingsuit 100-way,
    go to www.wingsuitworldrecord.com.
    Numbers and Recognition
    Official recognition of wingsuit flight as a skydiving discipline will bring a
    clear judging regime – and therefore, is ultimately necessary for long-term
    growth. Competition drives our sport, and desire to achieve recognizable goals
    is at the heart of every team. Whether with the versatility and creativity of
    vertical relative work or the sheer size of the formation World Team, standards
    and rules (some made to be broken) compel excellence and progress.
    In the current vacuum, setting new standards and claiming achievements without
    official rules is difficult but necessary. The 71-way, for all its
    imperfections, spurred the wingsuiting community to more seriously consider how
    it wants to be judged. It also demonstrated that such events have the potential
    to recruit serious sponsorship and interest from both new skydivers and
    experienced jumpers in other disciplines. That’s the future.

    By Deleted, in Disciplines,

    Improving Your Sequential Skills

    I've seen a lot of skydivers who want to improve their sequential skills but don't quite know how to go about it. They jump their butts off but never seem to get any better. They learn just enough to dive down and latch onto somebody, but that's about it. Somehow, they fell through the cracks when it came to learning the basics.
    I blame some of this on experienced skydivers who don't take the time to work with up-and-coming skydivers. I blame some of it on the speed with which we whisk jumpers through our training courses. I blame some of it on the instructors for not making sure students can perform basic freefall maneuvers. And I blame some of the students, themselves, for not asking for help.
    So, for those of you who may have fallen through the cracks or want to improve your flying, here are a few simple ways to tune up your freefall skills.
    Learn to Calm Down
    You can't enjoy or concentrate on a skydive unless you are calm. There is no magic formula for achieving calmness -- it is just something you have to do on your own.
    Exercise, proper rest and diet can help, but inner calmness is something you have to find within yourself. Just try to leave your troubles behind when you come to the drop zone. Focus on enjoying your day of freedom.
    Breathe -- take slow deep breaths both in the airplane and in freefall. Stay mentally focused but relaxed, not tense.
    Learn to filter out distractions right before and during the skydive. There are a lot of distractions on a skydive (people talking in the aircraft, the sound of the engines, the wind, your fear of forgetting a point, and yes, even your fear of falling). With practice, you can learn to filter out distractions. Think about your skydive and how good it will feel once you're in the air.
    Establish a Good Fall Rate
    Before you can do anything related to sequential, you must fall at just about the same speed as the other jumpers. Before you find yourself floating on a big-way sequential dive, check your fall rate on a smaller one. Do a simple 4-way maneuver (star to open accordion and back to a star, for example). Monitor who is falling faster or slower.
    Try to find a common fall rate for your group. Heavier people, or faster fallers, should wear a jumpsuit with a little extra fabric to slow down their fall rate, and slow fallers should wear tight suits and weights.
    Finding this common ground is sometimes easier said than done, especially if you are jumping with different groups. But try to work out the fall rate first before moving on to more advanced moves.
    Start Small and Get Coached
    Practice 2-, 3- and 4-ways instead of trying to get on the big-ways right off the bat. If you're a student or just getting into formation skydiving, this is what you should be doing anyway. If you have been jumping for some time but are still having problems, you might have to swallow a little pride and go back to the basics.
    In either case, get an experienced skydiver to coach you and your group. Don't waste time floundering around by yourselves. Get your jumps on video if at all possible. Make each jump count.
    Practice! Practice! Practice!
    Try to make several jumps with the same group, and make as many jumps as you can back-to-back. Even if you can't afford to jump every weekend, lump several jumps together when you can jump. Skydiving is no different than any other sport -- you have to practice to be good.
    Give Yourself Time to Learn
    Don't expect to fly like a pro in one or two weekends. If that were possible, you wouldn't see 4- and 8-way teams making 10 jumps a day every weekend all summer long.
    Tell your friends you're taking some time away from big-ways to work on smaller formations. Don't worry, they won't make fun of you. They'll probably respect you for trying to improve your flying skills. They might even be a little envious that you're doing something they might need but are too proud to try. Better yet, some of them might join you.
    Skydive in Your Head
    When you can't practice for real, go through skydives in your head. I do this a lot, and for good reason. I live in Ohio where it's tough to jump during the winter.
    So I do a lot of mental skydiving. I go over 4-way block sequences. I design skydives, then go through them in my mind.
    After a day of real jumping, I always review the day's jumps during the drive home. It's the same thing football and basketball teams do after a game -- they review the game film. Speaking of videos, they are wonderful training tools, but they cannot substitute for instant replay in your head.
    Which brings up another point -- always get a debrief after the jump. A good coach or organizer always does this. It helps you remember the skydive better, especially the parts that need work.
    Enjoy the Skydive!
    Last but not least, enjoy the skydive from exit to landing. Feel the formation leave the plane as one coordinated unit. Ride the exit and smile as you look for the first key. Then feel yourself glide, relaxed and controlled, to the next point.
    Keep that smile and relaxed control as you go from point to point. At breakoff, contain your enthusiasm until you clear and pull. Then hoot and holler if you want. It's your skydive!

    By elightle, in Disciplines,

    Wingsuit Gear Check

    Whether you jump at a large dropzone or a small one, you’ve
    probably shared a ride to altitude with a wingsuiter. Like all skydivers,
    wingsuiters should receive a thorough gear check, but a wingsuit also creates
    unique concerns that a watchful eye can catch.  Regardless of experience level,
    it’s possible to make a mistake while gearing up with a wingsuit – in the same
    way that its possible for any of us to make a mistake while gearing up for a
    traditional skydive. This is a situation where your vigilance can save a fellow
    skydiver’s life. Here are a few recommendations that Flock U has for gear
    checks:
    A wingsuit skydiver is a skydiver first and a wingsuiter
    second – you will need to check his or her rig, chest strap, altimeter,
    goggles, etc. in the same way that you would with any other skydiver.
    Make sure that the jumper’s AAD is on (if he or she is jumping with one). Pay
    particular attention to the jumper’s cutaway and reserve handles. While a
    wingsuiter’s emergency procedures aren’t any different than a traditional
    skydiver’s, in some suits, handles can become pulled into or obstructed by the
    fabric of the suit. That can result in a dangerous surprise if a cutaway or
    reserve pull becomes necessary.
    After inspecting the rig, examine the wingsuiter’s arm
    wings – and in particular, examine the connection between the wing and the
    jumper’s torso. There’s unfortunately no “one size fits all” rule for arm wing
    inspection, as different wingsuit designs have different wing configurations. 
    That being the case, there are several general categories of wing/torso
    connections that each raise their own concerns:
    Cable Thread Systems. Cable Thread Systems consist of a cutaway-style
    cable that runs through alternating torso and wing tabs, which keep the wing
    attached to the torso.  By pulling on the cutaway cables, the wingsuiter can
    release the arms of the suit in an emergency. This design can generally be found
    in BirdMan brand suits, among others. For a Cable Thread Systesm, look to see if
    the cables are threaded correctly through the tabs, all the way up. In some
    cases, they will alternate evenly between wing and torso, but often the cable
    will intentionally be threaded to skip one or more tabs. Don’t hesitate to ask
    the wingsuiter if you’re not sure – even experienced wingsuiters may not know
    the proper configuration for suits that they haven’t flown before, and some
    wingsuiters have preferences for arranging these tabs that differ from the
    standard. Make sure the wing cutaway handles are properly secured in a Velcro
    or tuck-tab housing. Note that there’s often both a front and a rear cable on
    these systems - so check both, on both wings.
    Zipper Attachment Systems. Zipper Attachment Systems are found
    primarily on Tonysuit, Phoenix Fly and S-fly brand suits, though there are many
    different suit designs on the market that use one form or another of the Zipper
    Attachment System. These systems generally come in two types: “over the
    shoulder zippers” and “bottom of wing” zipper attachments.
    “Over the shoulder zippers” are what their name implies – a zipper that runs
    over the wingsuiter’s shoulder, which connects the wing to the torso.
    Generally, in this design, the wing isn’t detached from the torso even in an
    emergency, and the “over the shoulder” zipper is usually only unzipped if the
    wingsuiter is removing the suit from his or her rig while on the ground. In
    these models, there’s generally a Velcro breakaway or other cutaway system or a
    safety sleeve (described below). Look to see if the zipper is attached properly
    and zipped all the way down. Some wingsuiters will intentionally leave several
    inches of the zipper unzipped in the back, so ask before correcting a slightly
    unzipped wing! If the over the shoulder zipper design includes a Velcro
    breakaway system, check to make sure the Velcro “sandwich” is holding the top
    and bottom of the wing together and that the Velcro isn’t bunched or pinched –
    these gaps can widen when the wing encounters the relative wind.
    Newer Tonysuits brand model have a “safety sleeve” – a ZP liner – that allows
    the armwing to silde up the jumper’s arm, permitting the wingsuiter to reach
    canopy controls in an emergency. As a result, there’s no arm wing cutaway
    system to inspect. When looking at these suits, make sure that the arm zipper –
    the zipper that runs from the jumper’s shoulder to his or her wrist – is fully
    zipped. There will generally be a snap or tuck tab on the bottom of the wing;
    check to see if they are properly stowed.
    While inspecting the arm wing, check the wingsuiter’s
    wrist-mount altimeter (if he or she is jumping with one). Make sure that the
    jumper can release his or her wings without undoing the wrist-mount (which
    can happen, for example, if the wrist-mount is put on after the arm wing is
    zipped up in wingsuit designs with a thumb loop). This is a dangerous and
    easily avoidable method of losing a wrist-mount altimeter!
    Check to make sure the wingsuiter’s legstraps are on. Leg
    straps can be missed by wingsuiters while gearing up, as the suits tends to
    restrict motion and prevent the jumper from seeing his or her legstraps. Even
    highly experienced wingsuiters have admitted to momentarily forgetting leg
    straps while gearing up. When using a wingsuit, visual inspection is
    insufficient to make sure that the leg straps are on – the wingsuit can
    deceptively pull the strap against the leg, making it appear that the strap is
    on. Ask the wingsuiter to shrug – the jumper should feel the resistance in the
    harness created by tightly worn leg straps. Alternately, you can lift the
    bottom of the wingsuiter’s rig (in other words, under the pilot chute). If the
    rig moves more than a couple of inches, it’s not secure enough.
    Each leg of a Tonysuits brand wingsuits also has a leg
    zipper pull up system, which is basically a bridle that connects to the leg wing
    zipper. The bridle is stowed against the leg by Velcro or tuck tabs. Also
    incorporated in this design is a pair of magnets that keep the bottom of the
    wing together. These magnets must go over the zip pull ups. If they are under
    the zip pull up, they may jam under canopy.
    Are the wingsuiter’s booties on? Particularly when the wingsuiter is using a
    borrowed or rental suit, booties may be ill-fitting. Badly fitted and poorly
    positioned booties can result in a lost bootie, which can make for an incredibly
    difficult flight and dangerous canopy deployment. Check to make sure the bootie
    is on, and straight.
    Help to make this year a safer year for skydiving by
    looking out for your fellow jumpers. Making it a habit to look at others’ gear
    can only result in positive results. Save someone’s life this year - it could
    be yours!
    A free, downloadable
    wingsuit pincheck file can be found on our site at
    www.flockuniversity.org. This
    pincheck guide is perfect for printing for Safety Day or for putting on the wall
    near manifest.
    Thanks to Jeff Donahue and Andreea Olea for their help in this article. All photos courtesy DSE.

    By Deleted, in Disciplines,

0