0

Disciplines

    Advice for Starting Wingsuit BASE jumping

    Visit BASEjumper.com for more BASE jumping information, articles, photos, videos and discussions

    Section 1: Introduction
    Section 2: Before even considering doing a wingsuit BASE jump
    Section 3: So you still want to wingsuit BASE
    Section 4: You now have some wingsuit BASE experience, what’s next?
    Section 5: Conclusion
    Appendix A: Specific wingsuit drills to practice from the plane
    Appendix B: Relevant entries from “the list”
    Appendix C: Some considerations for wingsuit site selection


    Download Full Article in PDF


    1. Introduction:
    We have all seen the amazing videos of people like Robert, Yuri and Loic flying their wingsuits. It is natural to want to follow in their slipstreams but let us make sure we do so safely and with adequate preparation.
    This document is intended as an initial information source for BASE jumpers interested in starting wingsuit BASE.
    This document is not an instruction manual. It does not contain rules, only advice.
    Wingsuit BASE is more dangerous than normal BASE jumping if the jumper does not conduct adequate preparation.
    If you choose to pursue wingsuit BASE you are strongly recommended to seek instruction from an experienced wingsuit BASE jumper. There is no substitute for one to one coaching.
    A wingsuit allows for incredible freefall delays and horizontal distances to be achieved, almost eliminating the chance of striking the object you jumped off, the number one cause of BASE jumping fatalities.
    But jumping a wingsuit also has some serious drawbacks:
    The wingsuit restricts your physical movement making exits harder to perform i.e. difficult to climb down to the exit point, easier to go unstable and then harder to recover.

    The wingsuit complicates deployment and prevents you from controlling your canopy immediately after opening.

    The wingsuit jumper must carefully assess the terrain he intends to fly over as the eventual opening point and landing area will be different than for a normal BASE jump and will also depend on flight performance.

    Experienced BASE jumpers who use ground rush as an altitude indicator must exercise caution during their initial jumps. The low fall rate and high horizontal speeds can fool the jumper that they are higher than they actually are. The wingsuit ground rush for a minimal canopy ride is a lot less intense than for normal freefall.

    The wingsuit jumper must also pay attention to his altitude when flying down a talus or over sloping terrain. The jumper often focuses on the airspace they are flying towards, giving the illusion they have lots of altitude available (e.g. looking at the valley floor in front of them).

    In this situation the jumper must remember that the critical altitude is the immediate vertical elevation they have over the talus or slope. The wingsuit jumper must always ensure sufficient altitude for a safe deployment - bear in mind that as soon as the PC is released the wingsuit jumper will stop flying and drop vertically approx. 200’+ as the canopy deploys.

    Experienced wingsuit BASE jumpers may attempt to make jumps that would be otherwise impossible without a wingsuit. The jumper must be absolutely sure of his own capabilities and those of his equipment when undertaking jumps that allow little margin for error.


    2. Before even considering doing a wingsuit BASE jump you should be:
    An intermediate BASE jumper:
    With minimum 50 BASE jumps (but more jumps are strongly recommended!)
    Cool under pressure, very comfortable in the BASE environment
    Always performing solid exits, also when exiting with arms by your side
    Have good sub & terminal tracking skills
    Have excellent canopy flying skills and landing accuracy
    Have consistent record of stable deployments and on-heading openings An intermediate wingsuit skydiver:
    With minimum 50 wingsuit skydives (but more jumps are strongly recommended!)
    Who wears a wingsuit as if it were pyjamas, not feeling physically restricted by the fabric
    Always able to find the PC quickly and cleanly, with good on heading openings
    Well practiced at recovering from instability
    Able to unzip arm wings instantly after deployment - like 2nd nature
    Familiar using arm and leg cutaways in freefall and under canopy immediately after opening
    Able to fly the suit comfortably without “potato chipping” achieving reasonable fall rate and forward speed
    Ideally have performed some wingsuit balloon jumps to simulate the exit & sub terminal flight
    See Appendix B for specific flight drills to practice whilst jumping the wingsuit from the plane. A person who has read all the incident reports, analysed the contributing factors and accepted that wingsuit / BASE jumping is worth the risk of serious injury & death.


    3. So you still want to wingsuit BASE? Let’s talk about specific preparation:

    Equipment:
    First thing, it is strongly recommended to start wingsuit BASE using a low performance wingsuit i.e. Birdman Classic, GTi or similar. Once you have 10+ good wingsuit BASE jumps you could consider jumping with a higher performance suit.
    The following items are strongly recommended:
    A 1 or 2 pin BASE container for wingsuit BASE. The high speed airflow over the container and high deployment angle excludes the use of a Velcro rig.
    A normal terminal pack job i.e. symmetrical, mesh slider packed “up” (large or fine mesh depending on personal preference).
    ZP pilot chutes, the size depends on your canopy, between 34” – 38”. The PC should NOT have a hackey handle (or heavy handle). With a hackey PC handle there is the possibility of the bridle wrapping around the base of the handle. A heavy PC handle could contribute to PC hesitation. The following items are recommended:
    A container with “dynamic corners” or open corners.
    A suitable helmet, goggles and low profile protective pads.
    Back to the dropzone:

    Perform 20 hop-n-pops using your low performance wingsuit and a sensibly sized 7 cell main, or even better your BASE canopy in a skydiving rig. (The 20 jumps can count towards the 50)

    Work your deployment altitude gradually down to USPA minimum of 2200’, open by 2000’
    (Discuss this with your CCI / DZO first, some dropzones may enforce a higher pull altitude)

    If you have any instability, deployment or opening problems go back to full altitude jumps until they are rectified, use a BMI if necessary. During these 20 hop-n-pops think about your emergency drills for the following situations, bearing in mind the reduced altitude and time under canopy:
    Unstable exit
    Handle inside of pouch /BOC
    Hard pull
    Floating handle
    PC in tow
    Premature deployment
    Horseshoe malfunction
    Line twists
    Line over
    Water landing
    Jammed zip
    Now to a far away land:
    It is strongly recommended to go to one of the following well known “high” locations for your first wingsuit BASE jumps. Become familiar with the object performing normal BASE jumps, getting to know landing areas and outs, obstacles, rock drop, winds, talus / ledges etc.


    Site
    Pro
    Con


    Carl’s Huge wall in Northern Norway:
    Good vertical rock drop

    Huge LZ

    Good access

    Not many sheep and it rains a lot


    Norwegian Fjord in Southern Norway:
    Good vertical rock drop

    Medium sized LZ

    Good access

    Very expensive beer


    Italian Terminal wall:
    OK vertical rock drop

    Small LZ (assume Heli LZ)

    Good access

    Wind / turbulence can be a problem


    Swiss Fungus:
    Good vertical rock drop

    Large landing area

    Access is difficult, requiring high fitness level and basic climbing skills


    Once you are comfortable with the site, pick a day when you are feeling 100% and the weather conditions are perfect to make your first wingsuit BASE jump.
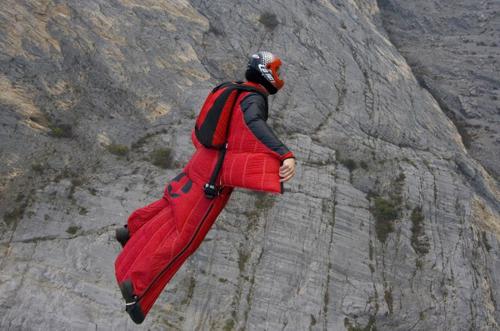
    Advice for your first wingsuit BASE jump. What to focus on?

    Being current! Make sure you get current at wingsuit skydiving and BASE jumping in the weeks running up to your first jump.

    Pack yourself a nice terminal opening, attach the wingsuit correctly with the PC packed in the BOC with the correct tension (not too loose or too tight). Perform a full gear check before the hike, avoid “exit gear fear” syndrome, as you will already be under pressure.

    Exit in a nice head high position, student style, with you arm wings open and your leg wing closed, your arm wings will help you balance and remain head high. 1-2 sec after exit slowly extend your leg wing and start to trim the suit as you feel the air speed picking up. Premature exposure of the leg wing can cause you to go head low – be warned! Better to be head high.

    If you should go head low, stay calm! Bring your head up and if the object allows it, try to stay parallel with the surface and build up some speed to allow you to pull up out of the dive more easily. You may wish to consider this possibility when selecting the site of your first few wingsuit jumps.

    After you have extended the leg wing focus on flying the suit efficiently away from the object pulling nice and high – don’t rush, take time to reach, grip and throw the PC. The PC throw should be vigorous to clear the burble the suit makes behind you. Remember to keep your body symmetrical at all times during deployment to help maintain on heading performance.

    It is recommended to learn to deploy from full flight as the BASE environment rarely allows enough altitude to collapse your wings and fall vertically prior to deploying. This also has the advantage of keeping the airflow over your body fast & clean reducing the chance of pilot chute hesitation. Deploying from full flight implies keeping your leg wing inflated and only collapsing your arm wings for the moment required to locate the PC. As your canopy reaches line stretch it is better to close your leg wing as it can catch air causing your body to twist. Your first 5 - 10 jumps should focus on a stable exit, flight and deployment, once you have these survival skills you can start to think about flight time and distance.


    4. You now have some wingsuit BASE experience, what’s next?
    Once you have become a competent wingsuit BASE jumper you could consider:
    Jumping a higher performance suit
    Jumping from lower objects, for example the higher exit points in the legal Swiss valley.
    Jumping camera
    Performing 2 ways +
    Opening up new objects
    Aerials
    Your imagination is the limit! Make sure there is video! Note:
    Trying to land any of the current wingsuit designs is only recommended for the terminally ill.
    You want to jump a higher performance wingsuit:
    So you have done approx. 10+ good wingsuit BASE jumps with a low performance suit and you now intend to jump a higher performance suit.
    Assuming you have trouble free experience flying the higher performance suit from the plane you can go ahead and use it for BASE.
    Treat your first wingsuit BASE jump using the higher performance wingsuit the same as your first wingsuit BASE jump.
    You want to jump a wingsuit that has a leg pouch PC:
    If you intend to use the leg pouch PC (e.g. S3 or Phoenix Fly wingsuit) - it is strongly recommended to perform the following ground and skydiving preparation.
    Prior to jumping the leg pouch PC perform a couple of thousand practice pulls on the ground. Be able to find the handle, regardless of body position with your eyes closed. Do 300 practice pulls a night for a week or so, simulating full flight then deployment.
    When packing the PC into the leg pouch assure that the Birdman or Phoenix Fly guide lines are followed. The PC should not be too loose or too tight. It is strongly recommended to bar tack the Velcro sleeve to the bridle - check that you leave enough free bridle between the bar tack and pin to ensure the Velcro is completely peeled before any tension is applied to the pin. Failure to do so can cause PC hesitation.
    Don’t mate the male-female Velcro over each other 100% when the suit is brand new, let the them overlap 50% to the side for the first few dozen jumps until the Velcro is slightly worn. For more details on assembling and packing the leg pouch PC system please refer to http://www.interone.net/learn/basepc.html.
    Perform at least 10 skydives with the system, using a wingsuit or BASE bridle, start with normal altitude jumps, performing dummy pulls in flight and then pulling high to give yourself extra time. Assuming you have no opening problems or issues finding the PC handle quickly & easily you can work down to lower altitude deployments.
    Treat your first wingsuit BASE jump using the leg pouch the same as your first wingsuit BASE jump.


    5. Conclusion
    Following these guidelines does not make wingsuit BASE jumping a safe activity.
    Wingsuit BASE is still a relatively new discipline. It requires jumpers to develop new skills, new muscle memory, new judgement and new understanding. Respect it.
    This document is by no means the final word on wingsuit BASE jumping, always seek advice and guidance from other experienced wingsuit jumpers and share what you discover.
    By taking part in this activity you are in effect a “test jumper”, we all still have a lot to learn….
    Let’s be careful out there
    Long Flights
    Contributors:
    James Boole

    Craig Poxon

    Robert Pecnik

    Simon Brentford

    Gray Fowler

    Yuri Kuznetsov

    Steve Schieberl

    Per Eriksson
    Disclaimer:
    The authors of this document accept no responsibility, financially or otherwise for any loss, serious injury or death that occurs as a result of any persons following the advice contained within this document.
    BASE jumping and wingsuit BASE jumping are extremely dangerous activities carrying risk of serious injury or death. Performing the activities described in this document with out becoming an expert skydiver and completing dedicated BASE / wingsuit training will likely result in a demonstration of natural selection.


    Appendix A
    Specific wingsuit drills to perform whilst jumping from the plane:
    Barrel rolls
    Front flips
    Back flying
    Flying and pulling with left arm wing closed (i.e. to simulate blown wing)
    Pulling out of steep dives quickly (i.e. bad exit)
    Dropping knees
    Turning with minimal altitude loss
    Carving turns
    Arching, de-arching
    Deploying from full flight
    Flying with one bootie off
    Turning only with legs
    Turning only with arms


    Appendix B – Wingsuit fatalities

    #67 Kirill Kiselev, September, 2002 
    Age: 27, from Ekaterininburg, Russia.

    Cliff Jump (Wing Suit)

    Vikesaxa (Eiksdalen Valley) Norway
    Impact
    I received this report from a close friend of Kirill who witnessed or heard most of the jump. Kirill has 500 skydives with 20 being with a wing suit, and 30 BASE jumps, with 2 being with a wing suit. This fatality began with an inadvertent low pull from a man who didn't do low pulls. His friend believes Kirill encountered a stability problem late in the flight. The friend, along with authorities, inspected Kirill's body and gear at the hospital. Kirill had opened his canopy, the slider is at the links. Both toggles are still stowed. The wing zippers are closed and the swoop cords are still over his fingers. The wing fabric between his legs is torn. His broken neck and one broken leg suggest opening and impact occurred at about the same time. The report intimates failure of the wingsuit material between Kirill's legs caused a stability problem at pull time. By the time Kirill stopped trying to overcome the situation and deploy, it is too late. Kirill is the first BASE jumper to die flying a wingsuit on a BASE jump.
    #68 Rob Tompkins, September 12, 2002 
    Lysbotn, Norway

    Cliff Jump (Wing Suit)

    Kjerag
    Impact
    This is the second wing suit BASE fatality. Rob has 247 BASE jumps with 92 being with a wing suit on the day he died. A report states: "For the last month, Rob had his eye on a particular jump between launch points 4 and 5. We looked at it, doing rock jumps and basically studying the jump. There are two launch points next to this particular jump, one with a 7-second drop and the other with an 8-second drop. Rob jumped the 7-second launch point 10 times always doing a reverse gainer. The place he's looking at now, he dubbed the, "RT Hjørner," and has a rock drop time of 5-seconds. We analyzed this site on video and with other wing suit  pilots. In my opinion, the jump is not achievable - and I repeated this to Rob. Other wing suit pilots said the same thing. Rob is convinced he can do it including a reverse gainer. After 7 seconds of freefall Rob impacted the talus ledge. He never tried to deploy his pilot chute, knowing that this would not save him. Rob believed he could out fly the ledge right up until he died. Rob is remembered as a good man, full of respect, and kind to everyone."
    #69 Lukas Knutsson, October 11, 2002

      Cliff Jump (Wing Suit)

    Engelberg, Switzerland (Cold Steel)
    Impact
    Lukas has a good launch and good flight with his wingsuit and pulled high over the landing area. This is the third BASE wing suit fatality. Despite a powerful pull the pilot chute ended up in the turbulence behind him. In the burble the pilot chute spun around very fast. Lukas notices the deployment is hesitating and collapsed his wings and rolled to one side to clear the pilot chute. At this point the pilot chute achieved bridle stretch but the bridle had entangled with the pilot chute so badly the pilot chute is almost totally collapsed. Lukas did rollover to the other side and struggled hard to get the canopy out of the container. However, the container remained closed to impact. Lukas is a very experienced long time BASE jumper (this site is now called "Cold Steel" in his honour) and he will be missed by the entire BASE community.
    #75 Gabi Dematte, August 13, 2003 
    Cliff Jump (Wing Suit)

    Gasterntal, Switzerland
    Cliff Strike & Impact
    The following report is from one of Gabi's many friends. "Gabi went to jump alone, like she did very often. Getting away from the crowds in Lauterbrunnen she went to another valley known by only a very few jumpers. She couldn't out fly a ledge with her wings. Which is awkward, because she kicked ass with those wings. She did not attempt to pull. Gabi was a very good jumper, and a super nice person. I was lucky to get to know her and I will treasure her contribution to my existence. For me, it was nice to jump with another woman. It was special and it did not last long enough. Lauterbrunnen valley is empty and quiet now." Gabi is the fourth BASE wing suit fatality."
    #80 Jeff Barker, July 5, 2004
    Age: 32

    Cliff Jump

    Mount Baker-Snoqualmie National Forest
    Impact
    Jeff is jumping with a wingsuit and he failed to clear a outcropping in freefall.
    #81 Duane Thomas, August 21, 2004 
    Age: 35

    Cliff Jump

    Lauterbrunnen, Switzerland
    Impact
    Duane, a Kiwi with a quick smile, is a well known and experienced BASE jumper. The following is from an eye witness. "The jump is witnessed by two British jumpers and two Swiss jumpers. One Brit watching, and videoing, from the exit point, the other three watching from the LZ. This is Duane's first wingsuit BASE jump, and his first jump ever with a leg mounted pilot chute pouch. Prior to this jump Duane prepared by making 50 aircraft and 2 hot air balloon wingsuit skydives. Duane had a good exit and a good flight. Everybody saw him reach for and locate the pilot chute at what the witnesses said is a reasonable altitude. He then kept his hand there and continued in freefall. The speculation is the lack of normal ground rush (like the type he is used to when not wearing a wingsuit) might have fooled him. The Swiss are yelling at him to pull and he finally did so, at what they said is about 30-feet above the ground. The canopy lifted out of the pack tray but is no where near line stretch when he impacted in a full flight position. According to the Swiss there is no fumbling around, or looking for the pilot chute handle - all the witnesses agree on this. He reached and located the pilot chute, but just took to long to deploy it. A hard pull cannot be fully discounted at this time, but all the witnesses believe he just waited too long." This is the sixth BASE wingsuit fatality since the first one occurred in September of 2002.
    Reproduced with the kind permission of Nick Di Giovanni #194. The complete list can be viewed at:
    http://www.basefatalities.info or http://hometown.aol.com/base194/myhomepage/base_fatality_list
    Other wingsuit incidents:
    Patrick de Gayardon

    Geoff Peggs or

    Dwain Weston


    Appendix C – Wingsuit site selection
    You want to open up a new object jumping a wingsuit:
    So you have become a very competent wingsuit BASE jumper and you intend to open up an object that has never been jumped with wingsuit. Here are some factors to bear in mind.
    Make sure the vertical rock drop gives you enough altitude to launch the suit and get flying with a little extra in case you have a poor exit.

    The altitude profile of the object will also affect your decision. Use tools like rock drop, laser range finder and GPS to accurately measure the object.

    When estimating the horizontal distance that can be achieved from an object remember to factor in the altitude loss from exit and deployment.

    You may also wish to consider the conditions at the exit point and whether it is practical to put on the wingsuit there.

    Booties offer little traction when wet or muddy, be careful that you have good ground to stand on for your exit

    A wingsuit takes several seconds to start generating significant lift and forward speed. Therefore jumping a wingsuit from below 1500’ offers very little benefit in terms of freefall time and object separation (but it adds some colour to the jump).

    By admin, in Disciplines,

    Getting Into BASE

    For BASE jumping information, BASE jumping articles, photos, videos and discussions visit BASEjumper.com This article was written entirely by Tom Aiello, BASE 579. Tom has made over 500 BASE jumps in the past 30 months, from more than 100 objects. He is not an authority or expert of any kind on BASE jumping or any other type of parachuting, so all his advice should be taken with a grain of salt. Copyright 2002. Permission to reproduce and distribute in this exact form only is hereby granted.
    Virtually every time I tell someone that I'm a BASE jumper, their first question is "how could I get into that?" After answering that question dozens of times, I decided to write it all down, so that I can avoid repetition induced laryngitis.
    There are as many different ways of getting started BASE jumping as there are jumpers. But, after some soul-searching, some discussion with friends, and some internet research, I've decided that the course I wish I had followed, and the one I've tried to set people on, goes something like this.
    Check the Fit
    BASE jumping is not for everyone. Give yourself a long hard, look, and decide if BASE really fits you. It's virtually impossible to objectively evaluate yourself, so it might be helpful to have a (close and tactful) friend help you with this step.
    Does BASE jumping fit your physical abilities? BASE is not really about personal fitness (although it helps) or athleticism (which only comes into play in advanced sub-disciplines). In BASE, the important physical abilities are reaction time, coordination and balance. Evaluate yours. It may be helpful to ask some of the following questions: If you are sitting at a desk, and knock a pencil off, do you pick it up off the ground, or did you catch it in mid-air? When you spill a bottle of beer, do you have to get up and get a new one, or do you right it before you've lost most of it? How often do you trip or stumble?
    Does BASE jumping fit your mindset? The best BASE jumpers are organized to the point of anal retentive. They also have an intellectual curiosity about almost everything. Have you ever wondered how the reserve system on a skydiving rig works? How many times did you trust your life to it before you starting wondering? Are you always trying to find a pull-up cord to close, or do other people ask you for them?
    Do you make correct decisions in pressure situations? BASE jumpers need to react quickly, and correctly, in life threatening situations. Have you ever been confronted with an oncoming car in your lane? How did you react? Did you have to think about it, or did it just happen for you?
    BASE will best fit a person who is intellectually curious, has good reactions, responds quickly and correctly (without having to think during the emergency), has excellent coordination and is highly organized and detail oriented. You can definitely still be a BASE jumper who has trouble with one or two of these things, but if you are weak in most of these areas, BASE is not a good sport to take up.
    Make the Decision
    Make absolutely certain BASE is really what you want. This sport is dangerous, sometimes illegal and very addictive. It will take over your life. I would never advise someone to get into it (and I have found it to be the most rewarding experience of my life). In my short time in this sport I've seen two life flight helicopters from the outside, two more from the inside, the back of a police car, several broken bones and a funeral. I've also spent three weeks in Intensive Care and 18 hours in neurosurgery. Are you sure you really want to do this?
    There are lots of different reasons to get into BASE, and I have given up trying to decide which are the "right" ones. The important thing is that your reasons are important enough to you to outweigh the potentially enormous costs of BASE jumping. Unless you are a NASCAR driver, BASE is by far the most dangerous thing you will ever do. Statistically, you have something like a 5% chance of dying by the end of your BASE career. Worse, your chance of serious injury (think hospital time) is more like 95%. I know three BASE jumpers with more than 500 jumps who have not spent serious time (more than a day or two) in the hospital due to BASE accidents. Even they agree that it is just a matter of time until they are seriously injured. If you are not ready to die BASE jumping, you are not ready to BASE jump.
    Go to this web site: http://juliabell.home.att.net . Read the entire thing. Seriously.
    Still want to be a BASE jumper? Then read on...
    Do Your Homework
    Next you need to find out everything that you can about BASE jumping. Talk to every BASE jumper you can. Read every article you can find about BASE, rigging or weather. Get on the internet and find everything you can about BASE (there is a whole lot more than you'd think). I have included several of my favorite references at the end of this article, but there are many, many more.
    Get Your Head Straight
    Now that you've made the decision to jump, make sure that you have the right mentality. There are two important pieces of that mentality that will keep you alive in this sport.
    Never do anything that doesn't feel right to you. If you're not ready for something, don't do it. We all determine our own learning speeds, and there is no way to know in advance what you'll be comfortable with. Don't be pushed into doing things you're not ready for by overeager partners or teachers.
    Never be afraid to back down. It takes far more courage to back off the exit point than to jump. There are definitely times when it is right to back off, and knowing when to heed that little voice in your head is critical to your survival. This sport is very, very serious, and taking it lightly will hurt, maim, or kill you in short order.
    The rest of your mentality you'll develop as you go, learning from other jumpers, from experience (both positive and negative) and from the rest of your life.
    Tell Your Family
    It is the responsibility of every BASE jumper to tell their family that they are involved in BASE, that they understand the risks, and that they have chosen to take those risks.
    Sit down with your family and talk to them about BASE. This is obviously an extremely difficult proposition. Facing your family with your decision to engage in a life-threatening activity cannot be easy. However this discussion is important both for you and for the sport of BASE jumping.
    An honest, open discussion with your loved ones will make them feel more included in your decisions. They will generally be more impressed with the maturity and thought that has gone into your decision to jump. This can help avoid the arguments, tantrums, and guilt trips that might otherwise be thrown at you by family and friends who don't understand your activities.
    An explanation, by you, that you understand and accept the risks involved, will help prevent your family from attacking other members of the BASE community in the event of your injury or death. There have been far too many cases of the families of dead jumpers accusing, confronting, suing and even prosecuting other jumpers as a result of fatalities. Don't let this happen to your friends.
    Write a letter to your friends and family, to be opened in the event that you die BASE jumping. In the letter, explain why you have chosen to take up BASE, what you hope to get from BASE jumping, and why you are willing to risk death for it. Give sealed copies to (at the very least) your family and your BASE mentor. Do this to defuse any conflicts that might arise from your death.
    Make the Skydives
    First, make at least 200 skydives. You need to make these skydives in order to practice accuracy, tracking and canopy control skills. You also need to establish a general comfort level with parachutes, free fall, and split second decisions. The skydivers who are best prepared for BASE generally jump large, 7 cell, F-111 canopies, have had a number of malfunctions and responded correctly, and are comfortable with multiple skydiving disciplines. If your only focus is BASE jumping, don't succumb to the temptation to become canopy swooping freeflyer. Instead, focus on CRW and Accuracy as your skydiving disciplines.
    To practice tracking make entire skydives in max track. Don't count on the limited tracking on break off, or on the balanced tracking of a tracking jump. Make the whole dive tracking as hard as you can, with camera and coaching if possible, and work on getting the most lift, and the most drive out of your track.
    For accuracy practice, it's best to use the canopy that you intend to BASE jump with. Try to set up low (under 500 feet), to simulate the BASE environment. Don't forget to make approaches cross- and down-wind as well, since you will often have to do this while BASE jumping.
    For canopy practice, you should make some CRW jumps (on a CRW canopy) and then do some canopy drills on your intended BASE canopy. CRW is a great way to learn canopy flight characteristics in tight spaces before you get into the BASE environment (and CRW with your BASE canopy is an excellent drill-after you've learned some CRW skills).
    Be sure you've made several night jumps during your skydiving career. In many places, BASE jumps are made almost exclusively at night (to avoid arrest, incarceration, and gear confiscation), and comfort with flying and landing your canopy at night is essential to survive these jumps.
    Make some jumps on your BASE canopy to learn its performance envelope. Pay particular attention to riser input, practicing riser turns and riser flares. Make sure you practice your riser turns before popping your toggles-that's the way you'll have to do it to avoid smacking the side of a cliff one day. Obviously, you'll want to practice them after grabbing the toggles, as well.
    Find a Mentor
    While you are learning to skydive, you will doubtless meet skydivers at the drop zone. Try to find and meet the local BASE jumpers as well. Your goal should be to find someone with 200 or more BASE jumps, who you think will be a good teacher, and whom you get along with. You also have to trust them with your life (that is what you will be doing, after all).
    Get a BASE Rig
    Now, with proper canopy skills and an instructor, you need to find a BASE rig. Your best bet is to buy a new, Velcro closed, BASE specific rig from a major manufacturer, and put a real BASE canopy in it. You can also find good used gear (check the classified ads on the BASE board: www.blincmagazine.com). The key is to get actual BASE specific gear. Lots of people will try to sell you converted skydiving gear (Ravens, Cruiselites, Pegasus's, etc). Avoid this and get real BASE gear. Everyone has different preferences in gear, but the key is to find actual, purpose built, BASE gear.
    Take a First Jump Course
    So, now you have the pre-requisite skydiving skills, an appropriate rig, and you've found an instructor. Time to go jumping, right?
    Wrong. Now it's time to get to work. Before you can make your first jump, you still have to learn basic rigging and packing, dead air exits skills, and simple ethics. There are two ways to do this.
    The simplest is to cough up US$1000 or so, and take a first jump course from one of the major gear manufacturers. Since most of us don't have an extra grand to throw around, we tend to try to skip this step. I don't recommend this. It really is worth the money to get qualified, professional instruction. You wouldn't try to make your first skydive without paying for instruction, would you? Even if you had a friend who swore he "knew all about it", and could easily "take you for a jump."
    First jump courses are also available from various BASE organizations around the world, such as the Australian BASE Association (which maintains a database of qualified instructors in Australia) and the Norwegian BASE Association (which has classes available at Lysefjord in an attempt to minimize accidents at that popular site). If you have the money, though, my preference would be to take your course from an American manufacturer, as their "teaching object" (a 486' bridge over water, with a huge grassy landing area) is generally the safest for a first time jumper. There is a similar object in Southern Europe, and Robert Pecnik offers a First Jump Course there.
    Lots of people try to save some money by getting their friends to "teach" them. This is a bad idea for several reasons. First, you don't know that your friend really has the qualifications to teach. Second, you don't know that he's really motivated to do a thorough job teaching. Sure, he can get you off for that first jump, but what did he teach you about dealing with your unstable launch on jump number 12? Third, you will learn more if your First Jump Course is not taught by the same mentor who guides you through your next 20-50 jumps. Finally, these "informal" first jump courses can drag on for weeks, months, even years. If you contract with a real business, you know the exact dates of your course, and you can plan for it.
    Watch Some Video
    Now that you have an idea of what a BASE jump ought to look like, get your hands on some BASE video. The best video for this is the "Lemmings Exits" series from Bridge Day (http://www.lemmingsvideo.com/). Try to get several years of "Lemmings Exits", and whatever other BASE video you can find. Watch the video, preferably with your BASE mentor. Evaluate each jump. The more errors you can see before jumping, the more likely you are to avoid them yourself.
    Get Started
    Now you're ready to start jumping. After your First Jump Course, you should have a solid knowledge of gear, rigging and packing, some theoretical knowledge of malfunctions and solutions, and a practical set of launches to work from.
    The next step is to get home and make as many jumps (in as short a time) as possible with your BASE mentor. Ask as many questions constantly. Try to learn as much as you can. Once you feel comfortable (and so does your mentor), start branching out and jumping with other people. Ask them the same questions (they may have different answers). Watch different people pack. Watch different people jump. Always ask why things are done a certain way.
    Keep Learning
    Now that you have 20-30 jumps, and can hang with the local crew, you can consider yourself a solid beginner. There is still a lot more to learn, see and do. Never stop learning. In addition to being a good way to stay alive, it's one of the most rewarding things about the sport.
    Some Resources
    First Jump Courses:
    Consolidated Rigging

    4035 Grass Valley Highway

    Auburn, California 95602

    530 823-7969

    530 823-7971 fax

    [email protected]

    http://www.crmojo.com
     
    Basic Research

    236 East 3rd Street, Unit C

    Perris, California 92570

    909 940-1324

    909 940-1326 fax

    [email protected]

    http://www.basicresearch.com
     
    Morpheus Technologies

    5107 Lantana Street

    Zephyrhills, Florida 33541

    813 780-8961

    813 788-7072 fax

    [email protected]

    http://www.BASErig.com
     
    Robert Pecnik

    [email protected]
    Australian BASE Association

    Tom Begic

    Director of Safety and Operations

    [email protected]
    Must See Web Sites:
    http://www.basejump.org Click on the "Articles" link, and read ALL the "Must Read" articles.

    http://www.blincmagazine.com Pay special attention to the "Knowledge BASE" and "BASE Board" sections.

    http://www.crmojo.com Especially look through the "Articles" section of the "Library".
     
    Books:
    Understanding the Sky. Dennis Pagen. Sport Aviation Publications; ISBN: 0936310103; (February 1992): Buy this book. Read it, then keep it. You'll want to read it again when you have around 100 BASE jumps, and then again around 500 jumps. Each time, it will become more useful.

    Groundrush. Simon Jakeman. Jonathan Cape; ISBN: 0099232618; (July 1993): The first (and so far only) book ever published about BASE jumping.

    Album of Fluid Motion. Milton Van Dyke. Parabolic Press, Inc.; ISBN: 0915760037; (May 1982): The most valuable picture book I've read. You may not understand why it matters at first, but once you start jumping cliffs and buildings in wind, the basic concepts in this book become invaluable. Don't worry about the technical jargon-just look at the pictures.
     
    BASE Gear Manufacturer Web Sites

    http://www.crmojo.com

    http://www.basicresearch.com

    http://www.BASErig.com

    http://www.vertigobase.com
    Used BASE Gear Classifieds On Line

    http://www.basejumper.com/
    Other Informational BASE web sites of interest

    http://www.basejumper.com

    http://www.vertical-visions.com

    http://juliabell.home.att.net

    http://www.bridgeday.info

    http://www.thebasepoint.com
    And one inspirational web site:

    http://www.yosemite.org/vryos/
    © Copyright 2002 Tom Aiello. Permission to reproduce and distribute in this exact form only is hereby granted. Please address any questions, comments or corrections to the author at [email protected].

    By admin, in Disciplines,

    Formation Skydiving

    Free Flyers would call Formation Skydiving "belly-flying", with the earth always below, and the skies above. Formation Skydiving is much more than this, and entails quite a long history. Already in the 70's, freefall veterans experimented for a long time to hook up two people while falling straight down. Currently, the span of Formation Skydiving begins with a two-way and ends with a 246-way as the official world record. It's a social affair in the air: skydivers are holding hands and legs and both at the same time to build all kind of different formations of all sizes. Organizers and coaches are engineering the puzzle. Formation Skydiving has two different areas: recreational skydiving, also known as fun jumping, and the competitive arena.
    Recreational Formation Skydiving
    Bellyflyers meet on all kind of different occasions to build their formations in the sky. They are filling their local jump planes on the weekends, as well as weekday sunset loads, to the maximum capacity. As the number of bigger events with larger aircraft continues to grow, they meet with skydivers from all over the country, sometimes all over the world, to build their formations up to the present potential. The current world record is a 300-way formation.
    Formation Skydiving Competition
    More ambitious bellyflyers are sharpening their flying skills at training camps and go out to compete. Formation Skydiving has become a very well organized competition arena. Regional leagues and meets are offering competitions for all performance levels over the whole season. Nationwide championships bring the best teams of the country together (such as the National Skydiving League Championships and the U.S. National Championships). The national champions of all countries in the world compete each year at the World Cup or at the World Championships. The best teams of the world are invited to compete at the World Air Games. Formation Skydiving is slowly forging its way to becoming a part of the Olympic Games.
    The Formation Skydiving competitions are recognized by the IOC (International Olympic Committee) and sanctioned by the FAI (Federation Aeronautique Internationale), the IPC (International Parachuting Committee) and by the USPA (United States Parachute Association) in the United States. The sanctioned competition disciplines are: 4-Way 8-Way 16-way.
    Competition teams perform up to six rounds per day at the competition. After exiting the jump plane, all teams have a certain amount of time available (4-way 35 seconds, 8-way and 16-way 50 seconds) to perform the same pre-determined sequence of formations and maneuvers. The team with the most accumulated points wins the round. At a competition, all teams must perform between six and ten rounds. Each competition round has a different sequence of formations and maneuvers. Freefall videographers are filming the performance and deliver the footage to the judges for evaluation. The major events have live broadcast of the freefall and live judging.
    U.S.A. and France have been the dominating the nations in Formation Skydiving. The 8-way discipline has never seen a different winner than the U.S. 8-way team in the history of 8-way competition. In 4-way, U.S.A. and France have been taking turns in bringing home the gold medal. Only the Swiss 4-way team "Blue Magic" has interrupted this series once in 1983. The French national team is holding the world record in 4-way with 36 points in 35 seconds. The U.S.A. is holding the world record in 8-way with 31 points in 50 seconds.
    Twenty years ago, the world record holders in 4 way were scoring 8 points in time, and no one would ever have believed that our sport would have advanced to currently scoring 36 points in time. This rapid progression is testimony that formation skydiving is truly a professional, athletic sport with highly trained athletes, and is a skill that can be developed and cultivated like many other professional sports in our culture. We all look forward to where our sport will take us in the future. Until then, the belly flyers continue to train hard, compete well and enjoy the journey.

    By admin, in Disciplines,

    Freeflying

    Freeflying is the ability to fly your body in any position, in any direction, at any speed at any given time. This includes, but is not limited to, headdown, sit, stand, back, belly and any kind of flying you can imagine. There are no limits to freefly except those created in your own mind.
    Freeflying Safety
    Freeflying is exciting, new and so much fun. Safety must always be an issue. By maintaining a safe flying atmosphere you allow yourself to have more fun. Flying safely relates to the level of experience of those with whom you fly. The basics of freeflight can practiced in a safe atmosphere as long as the size of the flying group does not exceed the skill level of those individuals flying together. 2-ways are the best way to train your freeflying skills.
    Freeflying involves many different flying positions which relates to many different speeds ranging from 90-300 miles an hour. There is a logical progression to safe learning of freefly. It is best to first have an understanding of how to fly your body in slower flying positions before moving on to faster ones. Learning to control speed, direction and proximity at slow speeds increases awareness and reactions. These are the methods which keep everyone safe in the sky.
    As stated earlier, smaller groups are the safest way to fly. One-on-one flying is the safest way to experience flight with someone else. It allows flyers to maintain visual contact with each other at all times. As experience increases and awareness grows, flying with more people can be fun and safe. This is dependent on the skill of the fliers and how well everyone has planned their dive. There are certain safety rules for breakoff. Once again speed is an important factor. Breakoff altitudes are slightly higher for freefly jumps, 4000ft because of higher speeds. It is also important to gently transition into a track to avoid radical changes in speed. Track for clean air and check. A slow barrel roll before deployment is highly recommended to insure clean air. Following the simple rules of small groups, planning, awareness and breakoffs, insures safety and fun for everyone.
    Freefly Safety Equipment

    Container: A tight fitting container which does not allow for exposure of risers and pins is essential to every freeflyer. Increased airspeeds and varying body positions make closure necessary.
    Altimeter: Two altimeters, visual and audible, are necessary for freeflying. Altitude awareness takes on a new importance when dealing with the faster speeds of freefly.
    Clothing: It is important to wear clothing that does not restrict movement and will not cover any handles.
    Helmet: A hard shell helmet is recommended.
    Cypres: Cypres is recommended to all those who can afford it. The potential for collisions exists. Therefore, it is best to be prepared.


    By admin, in Disciplines,

    My First BASE Rig

    For BASE jumping information, BASE jumping articles, photos, videos and discussions visit BASEjumper.com
    This article was written entirely by Tom Aiello, BASE 579. Tom has made more than 500 BASE jumps in the past 3 years, from over 100 objects. He is not an authority or expert of any kind on BASE jumping or any other type of parachuting, so all his advice should be taken with a grain of salt. All opinions are those of the author only. By making any fixed object parachute jump, you are taking your life in your own hands, and accepting responsibility for any possible outcome. Copyright 2002. Permission to reproduce and distribute in this exact form only is hereby granted.
    So, the time has come to buy your first BASE rig. You've made the skydives, practiced your canopy control, and have an experienced mentor to keep you out of trouble. But what rig should you buy? If you have less than 30 jumps, here are my recommendations (more jumps than that, and you're on your own).
    The really critical thing is to buy purpose-built BASE gear. Lots of people have been BASE jumping with converted skydiving gear for a long time. It is time for this to stop. Skydiving gear is very dangerous for BASE jumping, and has caused, and continues to cause, fatalities, especially among beginners, in the BASE world. Please don't become a statistic.
    The guiding principle for selecting a first BASE rig is "Keep it Simple." If you are faced with a choice between a simpler and a more complex option, always choose the simpler one.
    In this article, I will focus on stock (non-custom) gear from major manufacturers, which is what the majority of first BASE gear purchasers must choose from. Note that I will pick and choose from various manufacturers. If you want to take advantage of the "package" prices offered by most manufacturers, you will not have this option. If you are doing this, I strongly recommend selecting your canopy first, and letting that choice determine your package. In the end, it is the canopy that will make or break your system. The container is, in the words of one BASE jumper, "just the garage you park your Ferrari in."
    Canopy
    Not Optional: Tailgate
    It is absolutely mandatory that any BASE canopy deployed with the slider removed or tied down use a tailgate. The tailgate is reefing device developed by Basic Research to promote nose first inflation, and reduce the incidence of line over malfunctions. Under no circumstances should a beginner jump a canopy without a tailgate.
    Option: Secondary Inlets
    Several BASE canopies (FOX Vtec, Flick Vtec, Blackjack, Troll) are now available with secondary (bottom skin) inlets. These additional inlets provide faster inflation, give rear riser response earlier in the inflation sequence, and can help keep the canopy inflated in some emergency situations (such as an object strike pinching off the nose). They slightly increase pack volume, especially on the canopies (Troll, Blackjack) where they are covered with one way valves to retain the canopies original flight characteristics. They may also create some poorly understood, but relatively undesirable phenomenon, such as opening backsurge in deep brakes. There is no real consensus in the BASE world on the suitability of secondary inlets for beginners.
    I believe that beginners should avoid canopies with bottom skin inlets. There are several reasons for this. First, no beginner should jump a system that has poorly understood effects of any kind. Second, a beginner should not be jumping objects in which the advantages of secondary inlets are critical (for example, opening very near to an object). Third, secondary inlets add expense to the canopy (especially the one-way valve systems, which are generally superior to the open vents). My recommendation is to avoid bottom skin inlets until you know enough to want them for your particular (advanced) jumping style.
    Option: Multi Bridle Attachment
    The multiple bridle attachment is available on FOX canopies from Basic Research. Essentially, the multi replaces the standard, single bridle attachment point with a line cascading to four separate attachment points (one in the standard location, one near the rear of the center cell, and one each on cells three and five). The objective is to reduce center cell stripping (the center cell pulling out of the free packed canopy on deployment), and thereby improve opening heading and consistency. While the theory is sound, I am not convinced of the practical benefits, especially at subterminal airspeeds. Given that, I would not recommend the system for a beginner, as it adds both complexity and price (US$150) to the parachute system.
    Option: ZP/Composite Topskin
    Most BASE manufacturers offer topskins made either wholly or partly of zero porosity material. There are several advantages to this configuration, including better flight performance, stronger flare, and faster openings. Unfortunately, there is one big disadvantage-packing. When you are learning to pack for BASE, there are enough difficulties and distractions without throwing in another one. I'd recommend that a beginner get an all F-111 canopy, for simplicity and ease of packing, which translates into better opening heading.
    Recommendation: Ace, all F-111, Consolidated Rigging
    My favorite all around BASE canopy is the Ace, from Consolidated Rigging. The Ace airfoil (which is identical to the Blackjack) has tremendous control range, giving both very high and very low speeds. It flares quite well, although you may have to adjust toggle settings for your personal arm length and preference. It also opens (the real issue in BASE canopies) faster, cleaner, and more consistently than any other unvented canopy on the market. In my opinion, the best canopy for a beginning BASE jumper is a standard, all F-111 Ace.

    Avoid: Any Skydiving Canopy, Unvented Troll
    Do not jump any skydiving canopy (PD 7 Cell, Raven, PD Reserve, etc) in the BASE environment. This is an archaic practice that should be stopped. With real, purpose built BASE canopies available, there is virtually no reason to ever leave a fixed object with a skydiving canopy on your back (and the few reasons that do exist-salt water landings, gear confiscation-are pretty much inapplicable to a beginner). Don't kill yourself trying to save a few dollars. Buy real BASE gear.
    I personally have had very bad openings on my Troll (Atair Aerodynamics). My openings have been wildly inconsistent, and included unacceptable snivels, end cell closures, and asymmetric inflation (leading to off-heading openings). As a relatively experienced jumper, using every technique I can think of, including those recommended by the manufacturer, I have been unable to achieve consistently good openings in my jumps (just under 100) on this canopy. Although the Troll's flight characteristics are fantastic, the openings make this canopy unacceptable for a beginner.
    Container
    Velcro or Pin?
    The first thing you have to decide is if you want a Velcro or pin closed container. For a first container, get Velcro. Velcro rigs are simpler, cleaner, and easier to pack and use. Pin rigs are advanced gear, because you must have your pack job dialed in to achieve the correct pin tension, because many acquire adjustment for various altitudes, and because it's harder to close a pin rig without disrupting your pack job. The only case in which you should consider a pin rig for your first rig is if you are an experienced wingsuit pilot determined to jump right into wingsuit BASE. Velcro rigs are unsuitable (and very dangerous) for wingsuit flights. However, Velcro rigs are well proven for delays from 0-15 seconds, so any non-wingsuit jumper should definitely start with a Velcro closed BASE rig, regardless of their intended objects and delays.
    Option: Alpine
    Basic Research offers a built in climbing harness as an option on their BASE rigs. I have owned a rig with this option for some time, and have found that I rarely use it. For the extra cost and complexity (the extra buckles have some small potential to confuse the uninitiated), I'd definitely skip this option.
    Option: Saddle Bags
    Saddle bags are built in "pockets" sewn onto the leg straps of the rig's harness. These can be handy for stashing bits of rescue, first aid, or climbing gear, or just as a place to put your camera after shooting exit shots of your friends. I also have this option on one of my rigs, and while I do use it, I haven't found it indispensable enough to recommend it. For a first rig, avoid the saddle bags.
    Option: B-12's
    B-12's are the snap closures on old-style skydiving leg straps. They can be extremely useful on some relatively advanced jumps (those where room to gear up is limited). However, the use of B-12's with a hand held pilot chute (which is the proper beginner deployment technique) has caused at least one BASE fatality. If you do use B-12's on your BASE rig, be sure that you always snap your leg straps before removing your pilot chute from the bottom of container (BOC) pouch. In the interests of simplicity, this is another option I'd leave off a first BASE rig.
    Option: Stainless Steel Hardware
    Following the popularity of stainless hardware in the skydiving world, most BASE gear manufacturers now offer rigs with stainless hardware, both in the harness geometry and the three ring system. Unless you know that you will be making a large number of water landings, there is very little reason to add the expense of stainless hardware to your rig.
    Option: Sorcerer
    The Sorcerer is a two parachute BASE container manufactured by Vertigo BASE outfitters of Moab, Utah. Although some skydivers will like the extra confidence of a second canopy, the truth is that the Sorcerer is really an advanced trick rig. Advancing technology has made BASE gear so reliable (statistically more reliable than skydiving reserves), that adding a second canopy really gives very little additional insurance. In addition, the two canopy system is a poor choice for beginners because (a) it makes them less likely to pay the proper level of attention (meticulous) to their pack job, (b) it may make them overconfident, even in situations where the Sorcerer's second canopy (which deploys admirably quickly, in less than 150' under ideal conditions) will have insufficient altitude to inflate, (c) the system is more complex, and a beginner should use the simplest system possible, (d) it is cumbersome to carry around a second canopy you never use, and (e) The extra bulk of large canopies tends to make most Sorcerer jumpers use canopies that are significantly undersized for BASE landing areas, which could be a very costly and injurious problem for a beginner. Note that some skydivers may feel that having a "reserve" is worth the cost. However, the second canopy on a Sorcerer is no more a "reserve" than the first. Any BASE system, properly assembled, maintained, and packed, will open more reliably and consistently than any skydiving reserve system. Jumping a Sorcerer isn't like having a reserve-it's like having two reserves. Save the Sorcerer for advanced trick jumps (like BASE fun-aways), when you are more experienced. For now, stick with a standard BASE system.
    Option: Para-pack
    The Para-pack is specialized BASE rig that allows you to stow gear (camping gear for long approaches, for example) between the back pad and the pack tray. The rig is remarkably clean, and maintains tension over the pack tray quite well. However, unless you have a specific need for this type of expedition jumping, there is no need to spend the extra money (it's something like US$500) and deal with the extra complexity of the system.
    Option: Hook Knife
    Originally, a hook knife was considered mandatory equipment for BASE. However, as gear technology advanced, and it became clear that the incidence of slider up line over malfunctions was extremely low, hook knives started to be left off of BASE rigs. However, there have been at least three documented cases of slider up line overs in the past two years, and one of them required the use of a hook knife to clear. Even if this happens on only one in 1000 jumps, it is worth carrying a hook knife for the other 999. Since the cost of a hook knife is quite low, and there is no inconvenience in carrying one, you should purchase a hook knife with your first BASE rig.
    Recommendation: Vision, Gravity Sports Limited
    My personal favorite Velcro rig is the Vision, from Gravity Sports Limited. The Vision was designed, built, re-designed, and re-built by Dennis McGlynn while he was jumping very aggressively. Everything about this rig screams "ease of use." It is incredibly simple, it is very comfortable, and it absolutely minimizes distortion of your pack job, both on the way into, and on the way out of, the pack tray.
    Secondary Recommendation (Pin): Gargoyle, Morpheus Technologies
    If, and only if, you are an experienced wingsuit pilot intending to take your wingsuit to the cliffs as soon as possible, you should skip a Velcro rig (very dangerous for wingsuit jumps due to the potential for a premature deployment) and go straight to a pin rig. It would be far better to buy a Velcro rig and become an expert BASE jumper before launching your wingsuit. However, if you are dead set on moving straight to wingsuit flights (which I do not recommend), you will need a pin rig. My favorite pin rig is the Gargoyle, by Morpheus Technologies. If you are jumping a wingsuit, you will definitely want the dynamic (open) corners option. The Gargoyle has superb pin protection (better than any other two pin rig), does an excellent job of maintaining pack symmetry both into and out of the pack tray (it is probably the best of the pin rigs in this critical area), and can be closed exactly the same at any altitude (reducing complexities that could be troublesome early in your BASE career).
    Avoid: "Home Made"Rigs
    Many jumpers (including myself) begin their BASE careers using "home-" or "rigger-made" BASE gear. Unfortunately, many of the minor manufacturers who produce these rigs are so far out of the main stream that they make rigs with design flaws (minor or major) that have long since been worked through and eliminated from the rigs built by major manufacturers. Avoid purchasing a rig from a friend, or your DZ rigger, and instead purchase your gear from a major manufacturer. In general, if you cannot buy a real, purpose built, BASE canopy (Ace, Blackjack, Mojo, FOX, Flick, Dagger or Troll) with your rig, from the same shop, you should look to purchase the container elsewhere.
    Avoid: Unstiffened Side Velcro
    Some older Velcro rigs have unstiffened side flap Velcro. Examples include early Odysseys and Reactor 3's. Unstiffened side flap Velcro can shrivel with the shrivel flap during a head down deployment, and should be retrofitted with a stiffener to prevent a pilot chute in tow malfunction. All major manufacturers have rectified this design flaw, and will retrofit older rigs to eliminate the problem.
    Pilot Chutes
    Eventually, every BASE jumper accumulates a large collection of pilot chutes for various delays. As a beginner, you will need to acquire at least three. To paraphrase my BASE mentor, you will need one PC each for terminal jumps, really low jumps, and everything else. In general, that means one 32-36" PC (terminal), one 46-50" ZP PC (low) and one 42" ZP PC (everything else). Unless you live in Norway or Australia, you will quickly find that the 42" ZP is your workhorse PC, and that you leave it on your rig for everything from 2-6 second delays. Later on, you will want to fine tune your PC's for your delays. For example, one manufacturer recommends a set of four PC's (32", 38", 42", and 46") to cover all possible delays. When you are starting, though, you can save money (and simplify your systems) by going with just three-little for terminal, big for go and throws, and 42" for everything else. Just about everyone uses ZP material exclusively for BASE PC's. In some cases, F-111 can have advantages over ZP, but all your subterminal PC's ought to be ZP in the beginning.
    Option: Bridle Attachment Point
    There are several different configurations possible for bridle attachment on a pilot chute. The standard configuration used by virtually every BASE gear manufacturer (CR, BR, Morpheus) allows the jumper to asymmetrically attach the PC to the bridle. The older style of attachment (Paratech Rigging) is far superior, as it makes an asymmetric attachment (which greatly contributes to orbiting, and hence degrades heading performance on opening) virtually impossible. If at all possible, order your PC's with the older "loop" style attachment point.
    Option: Apex Vents
    Some manufacturers are now offering pilot chutes with mesh vents at the apex. The purpose of these vents is to dampen the oscillation inherent in a pulled down apex round (like a pilot chute), as well as reducing the orbiting that often results from a vigorous PC toss. This is one of the few options that I would strongly recommend for any jumper, even a beginner. The vents really don't create any added complexity packing, and really do help improve opening heading (which suffers dramatically from oscillating and orbiting pilot chutes). Vented pilot chutes are not recommended for low freefalls with very short (less than one second) delays, as they do inflate slightly slower than unvented PC's.
    Recommendation: Apex Vented 42", Consolidated Rigging
    My favorite 42" PC is the A-V pilot chute from Consolidated Rigging. The CR A-V series, in addition to the apex vent, has a slightly oversized topskin, which contributes to stability.
    Recommendation: 36" F-111, Basic Research
    For terminal delays (without a wingsuit-wingsuit PC's should be slightly larger), the standard BASE PC is either a 32" ZP, or a 36" F-111 PC. For a beginner, I would recommend a 36" F-111 PC, as F-111 PC's appear to be more stable than ZP (even vented) PC's, and the advantages of ZP (faster inflation) should not matter to a beginner at terminal (no beginner should pull low enough that the PC inflation time difference becomes important).
    Recommendation: 48" ZP, Basic Research
    For low, hand held deployments, I prefer the Basic Research 48" ZP PC. BR does not put a handle of any kind on their 48", which is mandatory for hand held deployment. Further, they do not put any kind of cap or vent on the PC, either of which could slow inflation, and cost critical feet at low altitudes.
    Avoid: The Hook, Gravity Sports Limited
    Gravity Sports pilot chutes have the load tapes applied on the block, rather than the bias of the ZP material. This allows the pilot chute to stretch and deform, both over time with wear, and instantaneously during each deployment. This can result in asymmetries and oscillation, both of which can degrade opening heading.
    Risers
    Although almost all BASE specific risers meet certain criteria (type VIII, LRT style toggles, etc), and you should be fine sticking with whatever riser and toggle system comes standard with your first rig, it is slightly better to purchase toggles and risers separately, to allow a wider choice in available options. If cost is a primary consideration, just go with the standard setup. But if you have a bit more money to spend, consider ordering exactly the riser setup you want.
    Not an Option: Mini-Risers (Type 17)
    Occasionally, skydivers (and one German BASE manufacturer) will attempt to use mini-risers on a BASE rig. This is totally unacceptable. Mini risers have failed in actual use, and if that were to happen on a BASE jump (more likely than on a skydive, as BASE openings are harder), you would be lucky to survive. Under no circumstances should a beginner (or any other BASE jumper) use equipment with mini-risers.
    Option: Pin v. Cloth Toggle Stubs
    BASE toggles are available with either standard (stiffened cloth) or metal pin toggle stubs. The standard stubs are generally preferred. Although the metal pins have virtually no chance of toggle hang-up, the incidence of hang-ups on the cloth stubs (with the thick Dacron lines used for BASE canopies) is near zero. Also, the metal pins tend to wear the brake settings more quickly, and are slightly more likely to prematurely release ("blow" a toggle) during the opening sequence.
    Option: Mini Rings (RW8)
    Most BASE gear manufacturers offer mini three rings, either as an option, or standard equipment. Since the manufacturing tolerances for these rings are tighter, and there is no disadvantage in using standard large (RW1) rings, avoid mini-rings on your first BASE rig. If possible, you might wish to use large tandem strength (RW10) rings, which are available from some manufacturers.
    Option: Big Grab Toggles
    Several manufacturers now offer stiffened toggles. These go by a variety of names, including "Big Grab" and "EZ Grab". Although the best way to avoid object strike is to correct heading on risers, there are some situations in which a BASE jumper wishes to release the toggles immediately, with no hesitation and no fumbling. Stiffened toggles are designed to make this much easier, and generally work in that regard. They do make packing marginally more difficult, and for that reason, should be avoided by a beginner. However, like line release toggles, this is a piece of equipment you should consider adding quite early in your BASE career. If cost is a major issue (you don't want to spend the extra money on a second set of toggles), it is possible, but not recommended to start with big grab toggles.
    Option: Integrity Three Rings
    BASE risers are now available in both standard three ring and reversed (integrity) configurations. Most BASE jumpers consider the reversed (integrity) three ring to be standard equipment for BASE. Integrity risers are marginally stronger than standard risers, but are also a bit more difficult to manufacture properly. Since a standard type VIII riser has never failed in actual use, either riser set up should be fine for a beginner. The standard set-up (with a grommet through the riser) is probably more familiar to a beginner, and is definitely more field tested (there have been two reported incidences of unintentional riser release on BASE jumps-although the cause is undetermined in both instances, both releases occurred on integrity style risers). On balance, the standard three rings are probably a slightly better option for a beginner.
    Option: Line Release Toggles
    Several BASE manufacturers now offer toggles that can release the control line, allowing a jumper to clear a line over malfunction without resorting to a hook knife. These line release toggles are the best currently available line over clearance technology. However, the extremely low occurrence of line over malfunctions in the BASE environment, combined with the added complexity of the line release toggles, indicate that beginners should avoid their use. Although they may become standard equipment for BASE, they are not yet sufficiently proven to recommend their use to a beginner. As an aside, in the event that you do choose to purchase line release toggles with your system, I would strongly recommend a toggle with a one handed operation (such as Vertigo BASE Outfitters' WLO [What Line Over?]), rather than a toggle with a two handed operation (such as the Gravity Sports Supertoggle. All things considered, though, a beginner should avoid adding this extra complexity to their system until they are comfortable with their basic equipment.
    Recommendation: Standard Three Rings, Standard Toggle, Morpheus Technologies
    My favorite standard riser is the one manufactured by Morpheus Technologies. Essentially the same as the risers made by BR or CR, Morpheus' standard riser is a non-integrity three ring, with the LRT toggle system, and RW10 (tandem) three rings.
    Stash Bag
    Option: Waist Band
    Some manufacturers (Vertigo BASE Outfitters, Gravity Sports Ltd) offer stash bags with waist bands, either permanent or removable. For technically difficult approaches, or just for longish hikes, these waist bands are an absolute life saver. Since they are generally removable, and add negligible bulk, they are highly recommended for all jumpers.
    Option: Waterproof Material
    Some manufacturers offer stash bags made of waterproof material. Whether you decide to use one will depend on your jumping environment. If you live somewhere that it rains often, you will find the water protection well worth the investment. However, if you live in a dry area, or frequently need to wad up and pocket your bag quickly, you may find that the extra bulk of the waterproof fabric makes it more trouble (and cost) than it is worth. I know that my waterproof stash bag (Gravity Sports, Ltd) more than paid for itself the first time I had to swim across a creek to reach the trail and hike back to the car (my rig stayed completely dry on my back).
    Option: Cliff Pack
    You may want to consider adding a heavier cliff pack to your gear collection. A cliff pack is a backpack, sized to fit your rig, protective gear and a bit more, with a decent suspension for hiking, and which can be collapsed into a waist pack for jumping. Although most modern jumps do not require this gear, there are certain areas with long hikes (Norway comes immediately to mind) where a cliff pack will significantly improve your hiking experience. Although you probably won't need one initially, if you are planning a trip to a site with long hiking approaches, definitely consider purchasing a cliff pack.
    Recommendation: Heavy Duty Stash bag, Gravity Sports Limited
    My favorite stash bag is Gravity Sports' heavy duty stash bag. This bag is burly, will take tons of abuse, has no plastic buckles (which can break at inopportune moments), and compresses moderately well. If you have a chance to pick one of these bags up, grab it.
    Avoid: Stash bag, Paratech Rigging
    I had very bad luck with my Paratech stash bag. The fabric was too light, and the bag survived very few jumps. In addition, the cord lock that closed the bag kept sliding open, so I had to stop every few hundred yards to verify that my gear was still in the bag.
    NOTE:
    My recommendations have evolved considerably during the course of this writing. Although the basic equipment I recommend for a beginner (Ace in a Vision) is the same, my views have changed as to several options (Big Grab Toggles, WLO toggles, Integrity Risers) for this writing.
    Resources

    BASE Gear Manufacturers
    Consolidated Rigging

    4035 Grass Valley Highway

    Auburn, California 95602

    530 823-7969

    530 823-7971 fax

    [email protected]

    http://www.crmojo.com
    Basic Research

    236 East 3rd Street, Unit C

    Perris, California 92570

    909 940-1324

    909 940-1326 fax

    [email protected]

    http://www.basicresearch.com
    Morpheus Technologies

    5107 Lantana Street

    Zephyrhills, Florida 33541

    813 780-8961

    813 788-7072 fax

    [email protected]

    http://www.BASErigs.com
    Vertigo BASE Outfitters

    P.O. Box 1304

    Moab, Utah 84532

    435 259-1085

    [email protected]

    http://www.vertigobase.com
    Gravity Sports Limited

    10472 Iris Road

    Truckee, CA 96161

    530 582-4747

    530 582-4345 fax

    [email protected]

    http://www.gravitysportsltd.com/dennis/
    Leading Edge BASE

    1425 Century, Suite 100

    Carollton, Texas 75006

    972 245-5300

    972 245-0598 fax

    [email protected]

    http://www.leadingedgebase.com
    Paratech Rigging

    6416 Cardinal Road

    Vernon, British Columbia

    Canada V1H 1W3

    250 260-8053

    [email protected]
    Used BASE Gear Classifieds On Line

    http://www.blincmagazine.com/cgi-bin/forum/dcboard.cgi?az=list&forum;=classified&conf;=blinc

    http://www.dropzone.com/cgi-bin/classifieds/page.cgi?g=BASE_Gear%2Findex.html&d;=1
    BASE Gear Reviews

    http://www.blincmagazine.com/reviews/Gear/
    © Copyright 2002 Tom Aiello. Permission to reproduce and distribute in this exact form only is hereby granted. Please address any questions, comments or corrections to the author at [email protected].

    By admin, in Disciplines,

    Canopy Relative Work

    Canopy Relative Work (CRW) may be described as the intentional maneuvering of two or more open parachute canopies in close proximity to, or contact with one another during descent. The most basic maneuver in CRW is the hooking up of two canopies, one below the other. This formation, known as a "stack" or "plane"(the difference between a stack and a plane is the grip on the parachute), is the most common maneuver in CRW.
    There are two major categories of CRW formations:
    Vertical formations : Canopies are either stacked or planed one beneath the other. All grips should be on the center cell. Off-set formations : one or more docks and grips are on end-cells. These formations include diamonds, boxes and stair-steps. USPA BSRs recommends a beginner should have the following qualifications before engaging in CRW:
    At least 20 jumps on a ram-air canopy. Thorough knowledge of canopy flight characteristics, to include riser maneuvers and an understanding of relative compatibility of various canopies. Demonstrate accuracy capability of consistently landing within five meters of a target. Initial training would be conducted with two jumpers - the beginner and an Instructor experienced in CRW. The instructions should include lessons in basic docking and break-off procedures as well as emergency procedures.
    USPA BSRs has the following recommendations on equipment:The following items are essential for safely doing CRW:
    hook knife -- necessary for resolving entanglements ankle protection -- adequate socks prevent abrasion from canopy lines. If boots are used, cover any exposed metal hooks short bridle cords -- short, single attachment point bridlecords are essential to reduce the danger of entanglement. Retracting bridle pilot chute systems are desirable cross connectors -- are essential for building planes. These should be connected between front and rear risers only. The following items are strongly recommended for safely doing CRW:
    altimeter -- provides altitude information for dock, abort and entanglement decisions protective headgear -- must allow adequate hearing capability for voice commands, in addition to collision protection soft toggles -- provide less possibility of entanglement than hard toggles and better flight control trim tabs (go toggles) -- helpful for equalizing decent ratesand increasing control envelope cell crossporting (two rows) -- is recommended (when doneper manufacturer's specs) to minimize the likelihood of canopy collapse cascades -- recommended to be removed from the two centerA lines.

    By admin, in Disciplines,

    Freestyle

    Freestyle is defined as a solo free fall discipline that involves choreographed multi-orientation static and dynamic maneuvers.
    Generally speaking, it combines the dynamics of gymnastics and ice skating with the elegance of dance. The free stylist executes precise acrobatic maneuvers including loops, spins, twists and poses while falling at speeds of up to 200+ miles per hour.
    Team Composition:
    A freestyle team consists of a performer and a videographer. Teams may consist of members of one or both genders, but the gender of the team is determined by the performer. If the videographer and performer are of the same gender, either may serve as the videographer on any particular round.
    Freestyle Competition:
    In freestyle skydiving there are seven rounds, two of which are compulsory. The remaining five are free rounds. The content of the compulsory rounds contains four compulsory sequences drawn by the Chief Judge, which must be performed in order of the draw. The compulsory rounds are performed in rounds 2 and 5. All sequences must have a static start and stop.
    The content of the free rounds is chosen entirely by the team, and there may be any number of different free routines within the set number of free rounds. Each jump is from 13,000 feet with working time beginning when the first team member leaves the aircraft and ends 45 seconds later.
    Scoring:
    The compulsory routine is scored for the quality and correctness of execution of the sequences, with 10 being a perfect score.
    The free routine is scored in four different categories: difficulty, execution, artistic impression, and camera work.
    Judging rules:
    The calculation of the official score for each round is as follows: (USPA rules 2004)
    Compulsory rounds:

    All five judges evaluate the routines. For each compulsory sequence, the highest and lowest judges' scores are discarded. The average score is calculated by adding the three judges' scores and dividing by three with no rounding applied.
    The average scores of all four compulsory sequences are added, and the result is divided by four and rounded to the first decimal place.
    Free rounds:

    Two judges evaluate the difficulty and execution criteria, with three judges evaluating the artistic and camera criteria.
    The scores for difficulty and execution are added and the result divided by four with no rounding applied. The scores for artistic and camera are added and the result divided by six with no rounding applied. The two results are then added, then divided by two and rounded to the first decimal place. The first International freestyle skydiving competition was held in 1990. In 1996 the International Aeronautical Federation (FAI) gave freestyle skydiving official recognition, and free stylists competed alongside other established skydiving events at the World Cup of Skydiving in 1996, at the World Championships in 1997. Freestyle remains one of the most appealing skydiving events to media audiences.

    By admin, in Disciplines,

    Skysurfing

    Skysurfing is a team parachuting discipline, with each team consisting of two athletes: a Skysurfer and a Cameraflyer. The Skysurfer rides a specially designed skyboard during freefall, sliding, spinning, twisting and yes, surfing through the sky. The Cameraflyer records the performance with a helmet-mounted camcorder but also contributes to the performance interactively --and the team's overall score--through his or her own creative and athletic skills.
    All Skysurfing performances take place in the four dimensional stadium in the sky called freefall. This is the only place where you can fly your body in all three regular dimensions, up/down, left/right, forward/backward, plus the fourth dimension of relative speed. Not even NASA astronauts get to play in four dimensions. In free fall, you can cheat the boundaries of time and space, but only a minute at a time.
    Comparing Skysurfing to other board sports such as snow boarding and skate boarding is a common mistake. About the only shared trait is that all involve some kind of board. The Skysurfer's skills are much more closely related to freestyle skydiving, whose devotees perform gymnastic- and/or ballet-style maneuvers utilizing the aerodynamics created by the "relative wind" the athlete moves through during freefall. Adding a board to the equation, though, is not just a whole other ball game--it's a whole other sport.

    By admin, in Disciplines,

    Beginning Freeflying

    Whether you are interested in freeflying as a main discipline, or you only want to make the occasional "fun jump", you will still want to follow the best and safest learning progression. Though freeflying can be a very fun discipline to take part in, it can also be very dangerous if you get it wrong. It is not something to rush into. You should take your time and enjoy the experience of flying in this new dimension. This article will introduce you to the steps you need to take to have a safe and fun experience and carry on doing so throughout your freeflying career.
    Not Just Vertical
    Freeflying isn’t just about learning to fly headup and headdown, it’s everything (yes belly flying too). As your skills improve you will realize that you can use all angles and positions between headup and headdown. Once you are proficient on your back, belly, feet and head, you will see that everything flows together and you end up moving in between these positions with ease.
    To get to this stage you need to have a solid base in all these positions and an understanding of what the air is doing to your body. Too many people, especially now that freeflying is becoming so popular, go straight to headup flying after AFF and quickly move to headdown. The majority of these people are limiting themselves in the future and will find that they have to go back and learn basic belly flying and back flying to progress any further.
    I will now go through the steps I believe necessary to become proficient at this discipline. Future articles in this series will go through some of these steps in more detail, explaining how to do them, how to practice them, and drill dives to improve these skills. You should try to learn these skills in the order listed to increase the learning curve.
    Belly Flying
    The most important thing is to become proficient on your belly. This doesn’t mean you need to become a 4-way master, but learning how to move around the sky with control certainly helps (especially now that hybrids are becoming more common).
    You should learn the following:
    Fall rate control
    Horizontal movement (forwards, backwards and sidewards)
    Center point turns
    Diving to a formation
    Docking on a formation
    Superpositional moves (e.g. sidesliding while moving forwards – known as carving)
    Break off procedures (flat tracking) It also helps if you experiment with barrel rolls, forward loops and back loops to get used to not just being on your belly. All these skills will become very beneficial in the future. The other advantage to learning to fly on your belly is that you will be getting used to flying close to other people and will be learning the necessary skills to do this, even though it is in a different position.
    Tracking
    By now, you should have already learned how to flat track. It’s time to take tracking one step further. Find a coach or someone who has experience leading tracking dives and learn the following:
    Tracking on exit
    Heading control
    Fall rate control
    Speed control (speeding up/slowing down)
    Moving Sideways
    Break off procedures (different on tracking dives) Tracking is a big part of freeflying. Learning these skills will help on breakoff, especially with larger groups, and will also help you when it comes to tracking dives.
    Back Flying
    Back flying is the first big step towards learning headup flight. You won’t be able to see the ground and you will start to get used to feeling the air on your back and the other side of your legs. This skill can be used a lot in freeflying when you get low on a jump or become unstable. This position is used to get back where you want to be, while preventing corking (suddenly lose speed) and hurting someone.
    You should learn:
    Heading control
    Fall rate control
    Horizontal movement (forwards, backwards and sidewards)
    Turns
    Barrel rolls from belly flying to back flying and back again
    Front/Back loops from belly flying to back flying and back again The advantage of back flying is that its speed range is huge. You can stay with a belly formation quite easily, but you can also speed up so that headdown flyers can stay with you without a problem. This diversity is what makes it such a useful technique in freeflying.
    Headup Flying
    This is where things start to get a bit different. Because you are in a vertical orientation, you have to learn how to move your body differently, move your arms and legs differently, whilst remembering that arching doesn’t make you stable at all. In later articles we will cover all of this in a lot of detail, explaining how and why, but you must always remember that an article is in no way a substitute for a coach. Whenever you have the chance, get coaching!
    Things you need to learn:
    Heading control
    Fall rate control
    Horizontal movement (forwards, backwards and sidewards)
    Turns
    Transitions (cartwheels, front loops, back loops)
    Independent arm movement (altimeter checks, taking docks, etc)
    Correct exit technique
    Breakoff procedures (you can’t simply go to your belly and track) Headup flying is much faster than any of the other positions. Because of this, every movement has a much larger effect than it would if you were going slower. The air is moving over you much faster and therefore has much more power behind it. Therefore, you have to be very careful with your movements to ensure the safety of yourself and others.
    Back Tracking
    Back tracking is a very important skill in freeflying, especially when starting to learn headdown. During breakoffs it adds a whole new perspective and gives you more awareness. Once you have learned headdown this position will open up more angles and add fluidity to your jumps. Backtracking is what I call a power position, this means that when your learning it you have to put in a lot of energy to keep an efficient position and to speed up, etc..
    Things you should learn:
    Back tracking exit
    Heading control
    Fall rate control
    Speed control (forwards/backwards)
    Moving Sideways
    Break off procedures (different on tracking dives)
    Transitions (back to belly/belly to back) Once you have learned these skills, try going on a tracking dive, getting next to the base and transitioning to your back track position, while staying relative. Talk to an experienced freefly coach and ask about leading a tracking dive; you’ll learn a lot.
    Headdown
    Learning headdown brings a whole new level to your freeflying. Everything flows together much better and you can move around the sky with more ease. While moving around becomes so much easier, collisions become much more of a danger and you must be even more cautious. This position is not a power position. By this I mean that once you are used to keeping your legs wide you will be able to move around smoothly and fast without having to push into your movement.
    Again you should aim to learn the basics before you start work on complex manoeuvres. Use this list:
    Correct exit technique for jumping with others
    Heading control
    Fall rate control
    Turns
    Horizontal movement (forwards, backwards and sidewards)
    Transitions (front loop, back loop and cartwheel) both to/from headup and from headdown to headdown
    Independent arm movement (altimeter checks, presenting for docks, etc)
    Correct breakoff procedures Once you’ve done this you can start to work on using your skills to take docks, carve, etc.
    Jumping with Others
    When you start to jump with other freeflyers, you have a lot more to think about, including where the other jumpers in your group are at all times. As a minimum you should specify the following for a freefly jump with others:
    Exit
    Content of jump (don’t just say ‘we’ll see what happens’, have a plan and stick to it)
    Base (specify someone as a person, everyone should then work towards them for a level)
    Breakoff (what is the breakoff height, make sure everyone knows where the others are and do not go straight to their belly and track, slowly decrease your speed as you track away) When you are just learning freeflying you should only be jumping solo or with an experienced freeflyer. Use the following as a rough guide to how many people, maximum, you should be jumping with:
    0-100 freefly jumps: Solo’s or 2 Ways
    100-300 freefly jumps: Up to 3 ways maximum
    300-500 freefly jumps: Up to 5 people maximum
    After this I try to use good judgement and common sense If you have only ever done 2-ways then at the most you should only allow yourself to go on 3-ways.
    Safety
    Freeflying can involve a huge range of speeds, trajectories and positions, which presents us with many possibly dangerous situations. Because of this you need to ensure you have the correct training and also the right equipment.
    Your container should fit well. You should not use a leg throwaway system, only BOC throw out or pull out is acceptable. The leg straps should fit right and not easily slip down your legs. You should also have some kind of bungee between the two leg straps to make sure they do not move around in freefall. It should have good riser and bridle protection with an absolute maximum of 1” exposed bridle near the BOC. Your pins and flaps should be tight. A good test is to gently lift your rig by each pin cover separately - if the covers stays closed then you’re good to go, but if the cover opens when lifting then get the opinion of an experienced rigger.
    You should have a minimum of 2 altimeters: one visual and one audible. This is important as when you are learning to freefly it can be difficult to see your visual altimeter and it is easy to forget that you will be falling much faster than you would be if belly flying. The audible altimeter will remind you of this.
    Wear a hard helmet. Don’t think you can get away without a helmet or just a frapp hat. Hard helmets might not save you from everything, but can mean the difference between life and death. If you’re just starting freeflying, don’t even think about wearing a camera helmet. This just adds to the list of new things you will have to think about and will take your awareness away from other more important matters. Some people get away with a full face helmet but if you are learning to freefly then I would suggest an open face. This allows you to keep better eye contact with your coach or other jumpers.
    Any clothing you wear should be durable and secure. It shouldn’t be able to cover any of your handles and shouldn’t be excessively baggy. A good all round freefly suit will do the job. When learning headup, a lot of people like to wear trousers and a baggier top to help them. If you’re doing this, then make sure the top is tucked in well and is secure.
    You should always use an AAD of some form when freeflying. You can easily have collisions when freeflying and closing speeds can be upwards of 100mph. It is also very easy to lose altitude awareness. An AAD could save your life, fatal collisions have happened to very experienced freeflyers, why couldn’t it happen to you?
    The next article in this series will concentrate on how to do the things mentioned in this progression list. There will be ground exercises and tips on performing these in the sky.
    Louis Harwood is a freeflyer from the UK and jumps at Target
    Skysports, in Hibaldstow. He has competed for the last two years in the Artistic nationals, he has two silver and one gold medal in B catagory freefly, freestyle and skysurf. www.avalore.co.uk

    By fuga, in Disciplines,

    Para-ski

    Para-ski is one of the competitive disciplines in parachuting and the only one to originate outside parachuting. The sport originated in Switzerland in the early 1960’s, when Swiss skiers conceived of para-ski as a form of mountain rescue. The concept was to jump from an aircraft, parachute to an open area near the victim, strap on skis, and evacuate the casualty down the mountain. Original European meets were a timed event which included parachuting onto the mountain, donning skies, and racing a course. Today, the two events are conducted separately. Para-ski international meets and cups have been held since 1964 and World Championships since 1987. Meanwhile, the modern, turbine-powered helicopter has replaced the parachute as the aerial vehicle for transporting mountain rescuers and casualties as well as today’s para-ski competitor.
    Today’s competition consists of giant slalom (GS) skiing and precision parachuting using gliding parachutes. The GS courses are approximately 1,000 meters long with a run time of one minute and average 30-35 gates. Two GS races are conducted under FIS rules.
    Each competitor makes six jumps under FAI rules. Jumps are from 3,000 feet. The target is located in a challenging and sloping mountainside venue; competitors aim for a touch-sensative pad with a five centimeter target center.
    A system of scoring combines parachuting and skiing performance to determine combined individual and team winners.

    By admin, in Disciplines,

0